
Excel для Microsoft 365 Word для Microsoft 365 PowerPoint для Microsoft 365 Excel для Microsoft 365 для Mac Word для Microsoft 365 для Mac PowerPoint для Microsoft 365 для Mac Excel для Интернета Word для Интернета PowerPoint для Интернета Excel 2021 Word 2021 PowerPoint 2021 Excel 2021 для Mac Word 2021 для Mac PowerPoint 2021 для Mac Excel 2019 Word 2019 PowerPoint 2019 Excel 2019 для Mac Word 2019 для Mac PowerPoint 2019 для Mac PowerPoint 2016 Excel 2016 для Mac Word 2016 для Mac PowerPoint 2016 для Mac Excel 2013 Word 2013 Outlook 2013 PowerPoint 2013 Еще…Меньше
Примечание: Эта статья выполнила свою задачу, и в скором времени ее использование будет прекращено. Чтобы избежать появления ошибок «Страница не найдена», мы удаляем известные нам ссылки. Если вы создали ссылки на эту страницу, удалите их, и вместе мы обеспечим согласованность данных в Интернете.
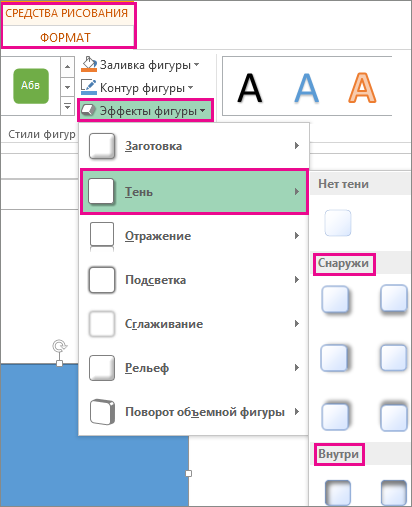
Чтобы применить тень к фигуре или тексту в wordArt, необходимо перейти в нужное место на вкладке Средства рисования — Формат. Для фигуры вы можете перейти к области Эффекты фигуры, а для текста перейти к текстовым эффектам.
-
Щелкните фигуру.
Совет: Чтобы добавить тень к нескольким фигурам, щелкните первую фигуру, а затем, удерживая нажатой кнопку CTRL, щелкните остальные.
-
На вкладке Средства рисования — Формат нажмите кнопку Эффекты фигуры > Теньи выберите нужный вид тени.

Если наказать один из эффектов тени, он будет отобразится в виде предварительного просмотра на фигуре.
Совет: Чтобы настроить тень, щелкните Параметры тени в нижней части параметров тени.
-
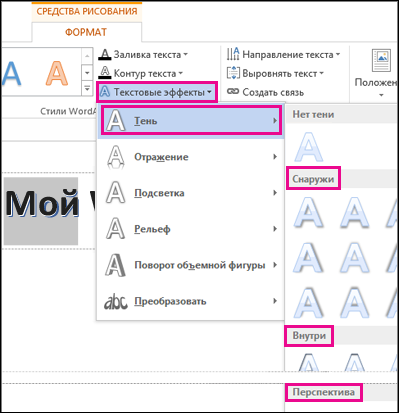
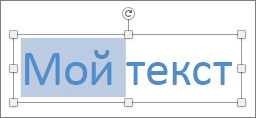
Вы выберите текст WordArt, к который вы хотите добавить тень.
Совет: В PowerPoint также можно выбрать текст, который не является wordArt, и применить к этому тексту тень.
-
На вкладке Средства рисования — Формат нажмите кнопку Текстовые эффекты > Тень и выберите нужный эффект тени.
Если наказать на один из эффектов тени, он отображается в тексте в режиме предварительного просмотра.
Совет: Чтобы настроить тень, щелкните Параметры тенив нижней части параметров тени.

Подробнее о тени и эффекты
Добавление эффекта для рисунка.
Вы можете применять различные тени к объектам, таким как фигуры, рисунки или текст, в Word, Excel и PowerPoint в Office 2016 для Mac. Вы можете использовать внутренние или внешние тени, а также создать с помощью тени эффект перспективы. Главное — найти меню «Формат» и «Эффекты» для объекта, с которым вы работаете.
-
Щелкните фигуру.
Совет: Чтобы одновременно применить эффект тени к нескольким фигурам, выберите первую фигуру, а затем, удерживая клавишу SHIFT, щелкните остальные объекты.
-
На вкладке Формат фигуры щелкните
(значок Эффекты фигур), найдите пункт Тень ивыберите нужный вид тени.
Совет: Для настройки таких параметров тени, как прозрачность, размер и цвет, выберите команду Параметры тени в нижней части меню «Тень».
 (значок Эффекты фигур), найдите пункт Тень ивыберите нужный вид тени.
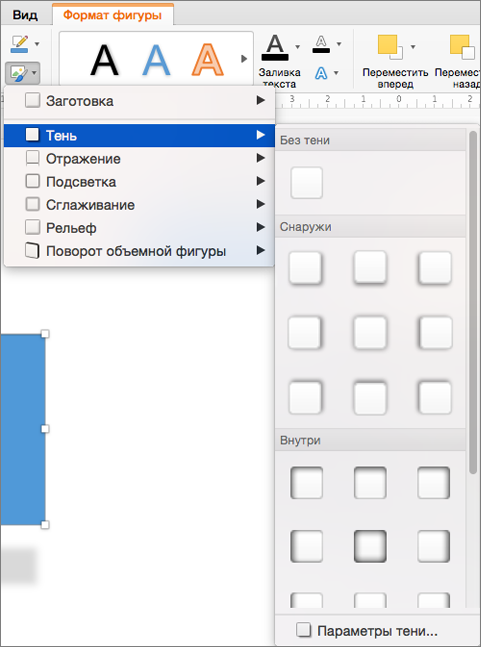
-
Щелкните рисунок.
Совет: Чтобы одновременно применить эффект тени к нескольким рисункам, выберите первый рисунок, а затем, удерживая клавишу SHIFT, щелкните остальные объекты.
-
В PowerPoint 2016 для Mac и Excel 2016 для Mac: на вкладке Формат рисунка нажмите кнопку Эффекты для рисунка ,найдите пункт Тень ивыберите нужный эффект тени.
In Word 2016 для Mac: On the Picture Format tab, click
(Picture Effects icon), point to Shadow, and then click the shadow you want.
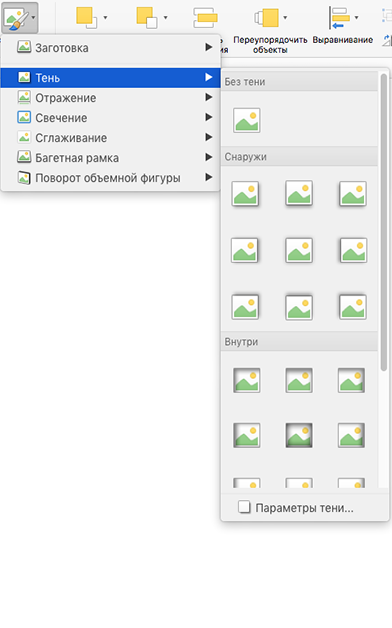
Совет: Для настройки таких параметров тени, как прозрачность, размер и цвет, выберите команду Параметры тени в нижней части меню «Тень».
-
Вы выберите текст WordArt, к который вы хотите добавить тень.
-
На вкладке Формат фигуры щелкните
(значок Текстовые эффекты), на вкладке Тень ивыберите нужный вид тени.
Советы:
-
Для настройки таких параметров тени, как прозрачность, размер и цвет, выберите команду Параметры тени в нижней части меню «Тень».
-
Внутреннее и внешнее тени могут быть не видны для черного текста. В этом случае попробуйте изменить цвет текста или применить эффект перспективы.
-
 (значок Текстовые эффекты), на вкладке Тень ивыберите нужный вид тени.
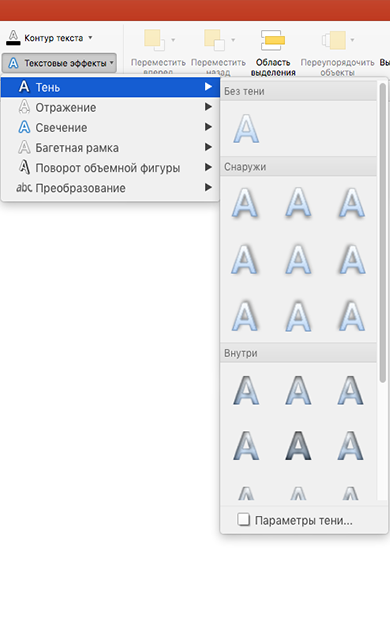
Примечания:
Только Word 2016 для Mac: если документ был создан в более ранней версии Word, можно использовать режим совместимости. Вот как добавить тень, если документ находится в режиме совместимости
-
Выделите текст или объект WordArt, к которому требуется применить форматирование.
-
В области Текстовыеэффекты выберите вкладку Текстовые эффекты и нажмите кнопку Тень.
В Word, Excel и PowerPoint Office для Mac 2011 к объектам, таким как фигуры, рисунки или текст, можно применять различные тени. Вы можете использовать внутренние или внешние тени, а также создать с помощью тени эффект перспективы. Главное — найти меню «Формат» и «Эффекты» для объекта, с которым вы работаете.
-
Щелкните фигуру, которую требуется изменить, и откройте вкладку Формат.
-
В области Стилифигур щелкните Эффекты, найдите пункт Теньи выберите нужный стиль тени.

-
Щелкните фигуру, которую требуется изменить, и откройте вкладку Формат.
-
В области Стилифигур щелкните Эффекты, найдите пункт Теньи выберите нужный стиль тени.
-
Щелкните фигуру, которую требуется изменить, и откройте вкладку Формат.
-
На вкладке Главная в области Форматнажмите кнопку Стилина вкладке Тень ивыберите нужный стиль тени.
-
Выделите текст или объект WordArt, к которому требуется применить форматирование.
-
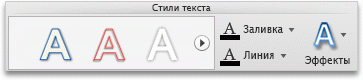
На вкладке Формат в области Стили текстанажмите кнопку Эффекты , найдите пункт Тень ивыберите нужный стиль тени.
Если документ был создан в более ранней версии Word, можно использовать режим совместимости. Вот как добавить тень, если документ находится в режиме совместимости
-
Выделите текст или объект WordArt, к которому требуется применить форматирование.
-
В разделе Эффекты тени выберите пункт Тень.

Примечание: Текстовые эффекты нельзя применить к тексту в ячейках.
-
Выберите нужный wordArt.
-
На вкладке Формат в области Стили текстанажмите кнопку Эффекты , найдите пункт Тень ивыберите нужный стиль тени.
-
Выделите текст или объект WordArt, к которому требуется применить форматирование.
-
На вкладке Формат в области Стили текстанажмите кнопкуЭффекты , найдите пункт Тень ивыберите нужный стиль тени.
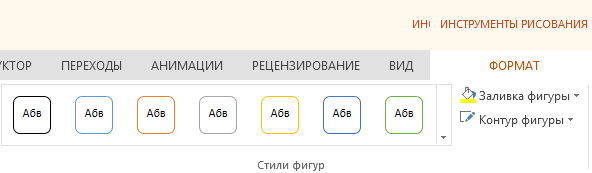
Эффекты тени для текста и фигур не поддерживаются в Microsoft 365 для Интернета.
Тем не менее вы можете применить стили фигур, включив эффект стемы.
-
Нарисуйте фигуру, а затем выберем ее.
-
На вкладке Средства рисования : Формат откройте коллекции Стили фигур, щелкнув стрелку справа и выбрав эффект в нижней строке коллекции.
(Фигуры и wordArt доступны в Веб-приложение PowerPoint и Excel в Интернете.)
Нужна дополнительная помощь?
How do I shade part of a picture in Word?
Apply shading to words or paragraphs
- Select the word or paragraph that you want to apply shading to.
- On the Home tab, in the Paragraph group, click the arrow next to Shading.
- Under Theme Colors, click the color that you want to use to shade your selection.
How do I get more highlight colors in Word 2020?
Expanding Colors Available for Highlighting
- Select the text you want to highlight.
- Choose Borders and Shading from the Format menu. Word displays the Borders and Shading dialog box.
- Make sure the Shading tab is displayed. (See Figure 1.)
- From the colors displayed, select the one you want to use. …
- Click OK.
How do you color half a shape in Word?
You may be able to get the effect you want by using a 2 color Gradient Fill. Right-click the shape & select Format AutoShape. Open the Color list for Fill & choose Fill Effects then click the Gradient button. Experiment with the options there.
How do you arrange words in a shape?
Align shapes
- Press and hold CTRL and select each of the shapes you want to arrange.
- On the Shapes tab select the Arrange. button.
- From the Arrange menu select Align, and then what you’d like to do with the shapes.
How do I change the spacing between lines in Word?
Change the line spacing in a portion of the document
- Select one or more paragraphs to update. …
- Go to Home > Line and Paragraph Spacing.
- Select Line Spacing Options and choose an option in the Line spacing box.
- Adjust the Before and After settings to change spacing between paragraphs.
- Select OK.
How do you color a whole line in Word?
Word
- Click the line that you want to change, and then click the Format tab.
- Under Shape Styles, click the arrow next to Line. , and then click the color that you want.
How do you make a GREY line in Word?
On the Home tab, click the arrow on the Borders button and select “Horizontal Line.” By default, a horizontal line created in this manner is a thin gray rectangle, although it can be customized in terms of height, width, color and alignment by right-clicking on the line and selecting “Format Horizontal Line.” You can …
How do I make bold lines in Word?
Step 1: Go to the Word document where you want to add a bold line. Step 2: Press the “Enter key” to make a space between text and line. Step 3: Press and hold the Shift and dash (“-“) keys. Once the line is drawn on the page, press “Enter Key.” You can see the Word automatically generate a bold line on the page.
How do I change the spacing between lines in Word 2010?
To format line spacing:
- Select the text you want to format.
- Click the Line and Paragraph Spacing command in the Paragraph group on the Home tab.
- Select the desired spacing option from the drop-down menu. …
- From the drop-down menu, you can also select Line Spacing Options to open the Paragraph dialog box.
What are the 4 alignment options?
There are four main alignments: left, right, center, and justified.
Is 1.15 single spacing?
The value of “single” line spacing is 1.15 or 115%.
How do I make curved text?
Create curved or circular WordArt
- Go to Insert > WordArt.
- Pick the WordArt style you want.
- Type your text.
- Select the WordArt.
- Go to Shape Format > Text Effects > Transform and pick the effect you want.
How do I align only certain text in Word?
Align the text left or right
- Select the text that you want to align.
- On the Home tab, in the Paragraph group, click Align Left or Align Right .
How do you rotate 45 degrees in Word?
Rotate to an exact angle by degrees
- Select the object to rotate.
- Go to Shape Format, Drawing Tools or Picture Tools > Format.
- Select Rotate, and then select More Rotation Options.
- In the pane or dialog box that opens, enter the amount to rotate the object in the Rotation box.
How do I align text horizontally?
To align text horizontally on a page, highlight the text you want to center. Next, click the “Center Alignment” icon in the “Paragraph” group of the “Home” tab. Alternatively, you can use the Ctrl+E keyboard shortcut. Your text will now be horizontally aligned.
What is the shortcut key of right alignment?
Right-aligned text is text that is aligned with a right edge. You can also right-align your text with the shortcut Ctrl+R (Cmnd+R).
What is left alignment in MS Word?
Left-Aligned Text
A paragraph or a text is left-aligned when that paragraph or text is aligned evenly along the left margin of the page in MS-Word.
Why is there extra space between lines in Word?
According to the Microsoft’s “Word Blog,” spacing changed because “Back in 2007, the product designers changed the default line spacing to improve document readability.” The noticeable differences in the new settings are a larger space between lines and a whole skipped line between paragraphs.
How do I change the spacing between lines in Word 2013?
To format line spacing:
- Select the text you want to format. Selecting text to format.
- On the Home tab, click the Line and Paragraph Spacing command. A drop-down menu will appear.
- Move the mouse over the various options. …
- The line spacing will change in the document.
How do I make lines in Word?
Draw a line
- On the Insert tab, select Shapes.
- Under Lines, select any line style you like.
- Select a location in the document, hold and drag your pointer to a different location, and then release the mouse button.
How do I change the color of a horizontal line in Word?
Change the color of a line
- Select the line that you want to change. …
- Under Drawing Tools, on the Format tab, in the Shape Styles group, click the arrow next to Shape Outline, and then click the color that you want.
2022-07-07
Download PC Repair Tool to quickly find & fix Windows errors automatically
What if you want to put a picture into a shape to create a collage or any other creation? Microsoft Word has tools that allow this to happen. Shapes in Microsoft Office are ready-made shapes offered by Office for users to use in their documents, such as circles, squares, and arrows. In this tutorial, we will explain how to:
- Inserting Pictures into shape.
- Crop the Picture inside the shape.
- Crop Picture into shape.
Open Microsoft Word
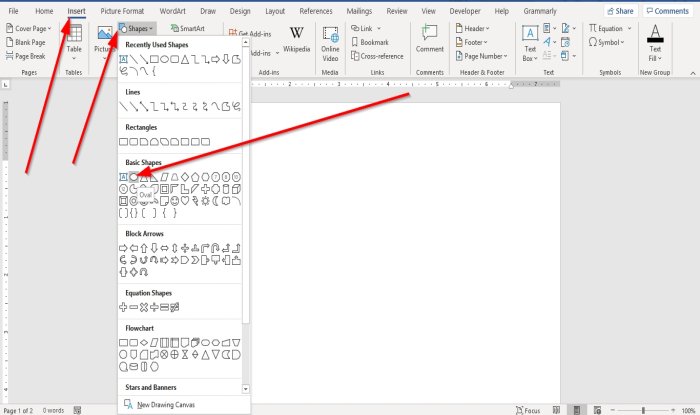
Go to the Insert tab in the Illustration group, select Shapes.
In the Shapes drop-down list, choose an oval or any other shape you desire.
Now draw the shape into the document.
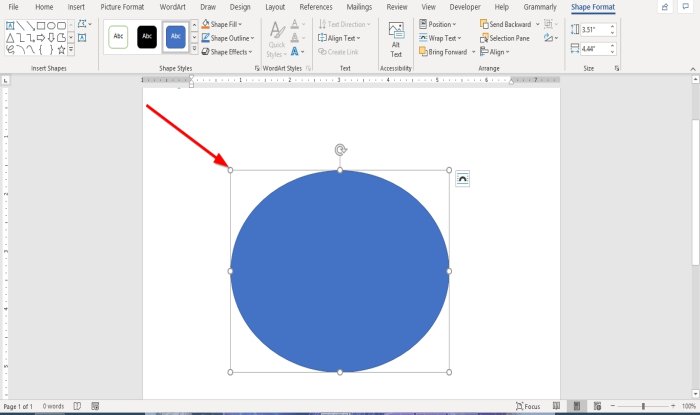
To make the shape bigger, drag the points on the end of the shape.

When a shape is drawn into the document, a Shape Format tab will appear.
Click the Shape Format tab.
On the Shape Format tab in the Shape Styles group, select the Shape Fill Tool.
In the Shape Fill, drop-down list, select Picture.
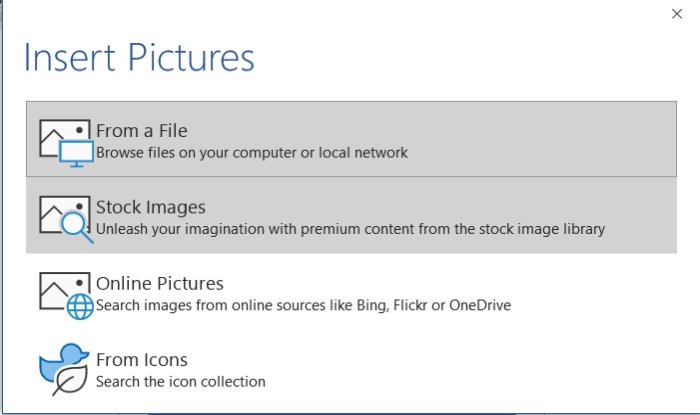
An Insert Picture dialog box will pop up.
Choose From a File.
When you select From a File, an Insert Picture window will appear, select your desired picture file and click Insert.
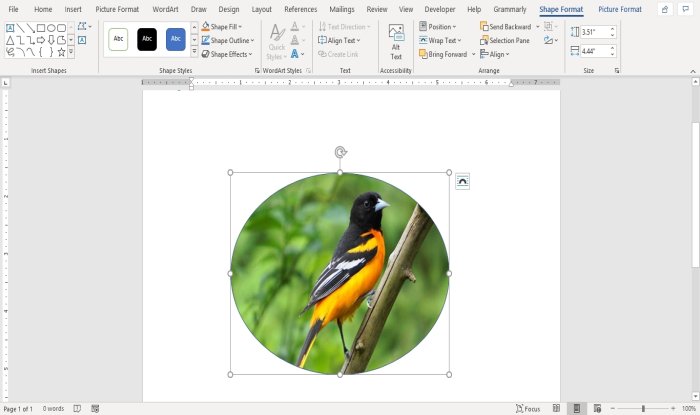
The picture is inserted into the shape.
Crop the Picture inside the shape
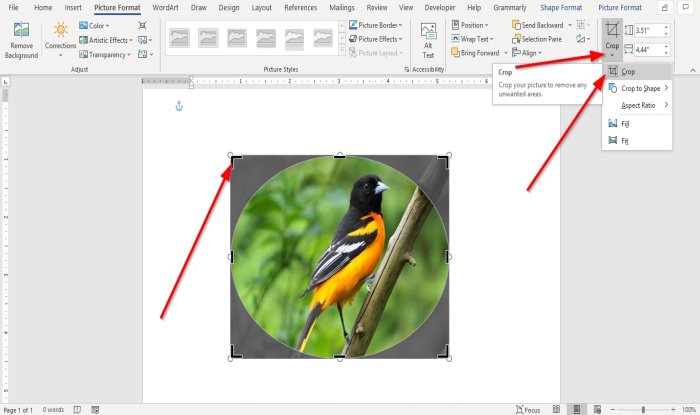
Click on the shape containing the picture.
Go to the Picture Format tab in the Size group and Click Crop.
In the Crop drop-down list, select Crop.
You will see pointers at the end of the image to crop the image.
Crop Picture into shape
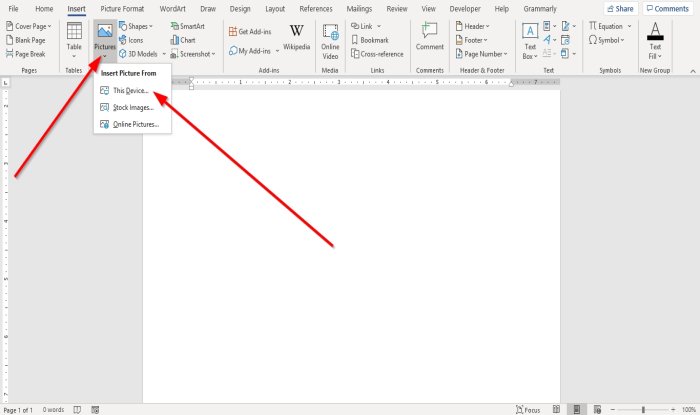
Go to the Insert tab and click Pictures in the Illustration group.
In the Picture drop-down list, click This Device.
An Insert Picture window will open, choose your picture file and click Insert.
The picture is in the Document.
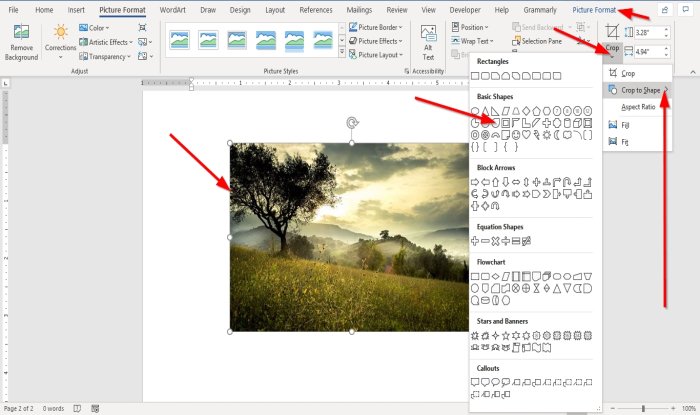
Click on the picture and go to The Picture Format tab.
On the Picture Format tab in the Size group, click Crop.
In the Crop drop-down list, click Crop to Shape.
In the Crop to Shape list, in the Basic Shapes group, select a teardrop.

You will see a teardrop shape with a picture inside it.
Now read: How to add Text Effects to WordArt in Office apps.

Shantel has studied Data Operations, Records Management, and Computer Information Systems. She is quite proficient in using Office software. Her goal is to become a Database Administrator or a System Administrator.
You might want hide a few images (pictures) in MS Word for a class testing or a better reading experience. If you receive a document with strange blank, try the following steps and restore all hidden images (pictures).
1. Select the image (picture) which you want to hide.
 in Microsoft Word")
2. Go to Format tab that is under Picture Tools.
 in Microsoft Word")
3. Find Arrange group and click Selection Pane. The Selection dialog box will display in the right pane. Find the specific image (picture) then click the eye icon to make it a horizontal line.
 in Microsoft Word")
 in Microsoft Word")
4. The image (picture) will be hidden as below, and it will display when you repeat the previous steps and click the horizontal line again.
 in Microsoft Word")
Copyright Statement: Regarding all of the posts by this website, any copy or use shall get the written permission or authorization from Myofficetricks.

Word allows you to do much more than simply insert or place graphics. For our fourth lesson in this series, we will focus on the graphic design functions in Word such as pictures, SmartArt, screenshots, and other items that can be found on the “Insert” tab.
These functions really breathe life into your drab black and white text documents. With a simple picture or chart, you can turn your term paper from meh to yeah! Luckily, there’s a whole range of ways you can add images to better illustrate (no pun intended) your point.
We’ll wrap the lesson by changing gears a bit and discussing how to use more than one language in Word 2013.
Images and Multimedia
You don’t have to think of Word as simply a word processing program. It has requisite tools for doing some pretty nifty page layout. While it’s not a feature-complete or robust as a professional page layout program such as Adobe InDesign. You can still get very professional looking results if you know what’s in your toolbox and how to use it.

Pictures and Online Pictures
Both “Pictures” and “Online Pictures” accomplish the same goal. The only difference is that “Pictures” means you can insert pictures locally, while “Online Pictures” allows you to insert images from an internet-based source such as clip art from Office.com, Bing, or OneDrive (formerly SkyDrive).
You can also insert pictures from your Facebook profile or Flickr although you could always just save the pictures you want to insert to your computer and then insert them from there if you don’t want to connect Office to these profiles.
Picture Tools
As always, when you want to edit a picture or any element place in a Word document, you can click on it and the appropriate tab will appear on the Ribbon.
With pictures, that tab is “Picture Tools.” Here we see you can make all kinds of corrections to the picture on-the-fly. For example, you can correct brightness and contrast, the color, add a border.
Where you position and how you wrap text will also play a large role in formatting your documents.
Here we see those controls. In our documents, we don’t worry so much about word wrapping or positioning because Word isn’t the final step toward publishing online. However, if you’re going to produce something WYSIWYG (What You See is What You Get), such as for a PDF or print publication, then these things will definitely matter.
Also, there are a couple ways you make changes to your pictures inline, such as resizing, rotating, and moving them. In the following image, you see these controls, many of which you will likely be familiar with.
When you click on an image in your document, you get a box on each corner, which will let you resize a picture. At the top, in the middle, is a circular arrow, grab this to freely rotate your picture. To move the image, hover the mouse over the image until the pointer is the four arrows, you can then click and drag the image anywhere you like.
Finally, if you click on the little “Layout Options” button, you can change your text wrapping without going to the Ribbon.
Clicking on “See more…” at the bottom of the “Layout Options” opens the full-blown “Layout” dialog.
Note, the size tab both on the Ribbon the “Layout” dialog allows you to specifically resize, rotate, and scale your pictures, rather than relying wholly on winging it:
We’d like to spend the whole day talking about formatting images in Word, but as you can see, there’s a ton of options at your disposal. Let’s move on now to other objects you can insert into your documents, starting with “Shapes.”
Shapes
Microsoft Word 2013 comes with an array of built-in shapes, which you can use to create callouts, boxes, stars, and other shapes.
When you choose a shape, you simply draw it on a blank space on the page. It doesn’t matter if you get it perfect or just the way you want it because you can adjust it to your heart’s content once it is placed in your document.
Note in the screenshot, the previously mentioned little “handles” you can use to resize and rotate your shapes.
At the bottom of the “Shapes” menu, there’s an option to create a “new drawing canvas.” This will open, what is essentially a text box for shapes. With this drawing canvas, you can create drawings using these shapes allowing you to create things like diagrams and flowcharts.
SmartArt and WordArt
SmartArt and WordArt tend to have some overlap, particularly if you create something using WordArt and then customize any of the text within it. Of course, you can use one or the other and never the twain shall meet, but we’re going to talk about them in the same section because one often leads to the other.
Think of SmartArt as premade drawing canvases that you can insert into your document and then customize as you like. Simply pick an arrangement, such as a list, process, or cycle.
As you can see, we created a graphic based on a “Continuous Block Process.” When we click on the text boxes, we can edit what is inside. There are also the usual grab handles needed to resize the image, and the “Layout Options” allowing you to wrap text to your preference.
If you use SmartArt, note that the Ribbon changes to reflect this. The “SmartArt Tools” features two tabs: “Design” and “Format.” Let’s cover each one and its features.
The right half of the “Format” tab allows you to pick from a number of “SmartArt Styles” and you can also “Change Colors.”
If you look at our previous example, you can see we applied an embossed, shiny effect and changed the colors of our text boxes and arrow.
On the left half of the “Design” tab, you can “Create Graphic” so you can add shapes, bullets, text, and move things around.
The “Layouts” section lets you change how your graphic looks on the fly. Simply hover over any of the built-in options to see how it would look utilizing a different layout. Changes to the layout are not applied unless you first click on a style.
The right side of the “Format” tab is used for affecting changes to text. These include “WordArt Styles” and other effects suchs as fill and outline. Beyond that, you can arrange multiple layers by sending them forward and backward.
The “Layout” dialog pops out if you select the little arrow in the bottom-right corner of the “size” section or you can choose more options from any of the drop-down menus including “Position”, “Align”, and “Rotate.”
On the left side of the “Format” tab you can select any of your shapes and change them to another, and also make them larger or smaller.
If you click on “Shape Styles” you will be able to choose from a selection of pre-defined shapes and colors.
Shift right just slightly and you will find controls to alter the fill. Choose from various “Theme Colors” or select your own. You an also use pictures, gradients, and textures for even more fill options.
If you want to refine the outline around your shape(s), you can choose any color, weight, or dashes.
Finally, “Shape Effects” has quite a few options for enhancing your shapes, many of which will give them a cool 3D effect that you can adjust by clicking 3D Options at the bottom of the of the menu.
Format Text Effects
Let’s take a closer look at this because it contains a pretty sizable amount of features. We’ll cover the basics so that you’re more aware of them. The pane titled, “Format Text Effects,” slides out from the right edge.
As with any other panes in Word 2013, it can be detached, which you can then stick out of the way to save screen area, or keep it nearby so it is handy. Regardless, this dialog box will allow you to quickly work with text, so you don’t have to repeatedly keep going to the ribbon to change things. Note also that the dialog is split into functions, “Text Fill and Outline” and “Text Effects.” “Text Fill and Outline” is simple enough to figure out, and is used to enhance how text appears.
Say, for instance, we want to write How-To Geek School and enhance it so that it is size 48 pt., blue with a black 1 pt. outline. We simply select the text we want, increase to the size to 48, then in the “Format Text Effects” dialog, we can change the color (we can also do this in the “Font” section of the “Home” tab. Then under “Text Outline” we choose “Solid line” and choose block and 1 pt. for the outline width.
That looks pretty good, but we really want it to pop, let’s add some more text effects, such as a shadow, a reflection, and we’ll add a bit of a 3d bezel to round the lettering out.
The result is a bit more striking and while it’s not likely to make it into any final designs, it does give you an idea of what you can do with WordArt.
Chart
Who doesn’t like charts? Charts are a great way to visually display data sets and Word 2013 comes jam packed with a large assortment of Charts to choose from, including columns, pie, bar charts and much, much more. Check out the screenshot for an idea of just how many options there are:
When you choose a style, you’ll get a spreadsheet, which will allow you to enter the data points on your x and y axes. As you enter data, the chart will change.
Manipulating and formatting charts is easy. Whenever you click on a chart in your document, you’ll get the “Chart Tools,” which, as you might have guessed, is the Ribbon tab devoted solely to charts.
Using the “Design” tab, if you don’t like the colors or style of your chart, you can instantly apply changes to it without having to generate a new one.
If you decide you don’t think the layout works for this particular type of data, change it using “Quick Layout” or add another element such as another axis, chart title, gridlines, and more.
On the right side of the “Design” tab you will find essential tools for altering your data and you can also go back and completely change the type of chart you’re using.
So, if you think a pie chart would work better, you can change to that. Note however, some data points, such as “breakfast,” “lunch,” and “dinner” aren’t represented on this chart.
The “Chart Tools” also give you a “Format” tab so you can dress things up a bit by adding shapes and then being able to change the style, fill, and outline.
Turning to the right side of the “Format” tab, you are given options for adding and changing WordArt, arranging elements, and adjusting the size of your chart (which you can also do with the grab handles).
It’s easy also to affect changes inline too. When you click on a chart in your document, formatting controls appear along the upper-right corner. From top-to-bottom, you get “Layout options” so you can set your text wrapping. You can change chart elements with the plus (+) symbol, so if you want to change chart titles, add gridlines, and stuff like that.
The paintbrush icon is for setting a style and color them, and finally, the sieve icon is for “Chart Filters,” so you can edit data points and names on your chart.
Screenshot
The “Screenshot” feature will allow you to take a screen clip, which is automatically pasted in you document.
When you use the screenshot function, it will let you choose between any currently open windows, or you can select “Screen Clipping,” which will minimize Word allowing you to take a selection or full shot of your desktop. So for example, if you want to simply insert a shot of your desktop and its icons, you would first need to minimize everything you have open.
There’s a myriad of ways you can take and add screenshots, so we’re not going to dwell on it. Just note this feature, if you’re unfamiliar with adding screenshots, and you want an easy way to do it in Word.
Online Video
You can insert “Online Video” such as Bing, YouTube, or video embed code into your document.
When you embed a video, it will appear as if it is a regular picture, complete with grab handles and text wrap controls.
Further, you can adjust how the emedded video thumbnail appears (as a picture) using the “Picture Tools” so you can make adjustments to the color, add a border, correct the contrast and brightness, and more.
So you see, we simply applied a “picture style” and add a purple border. This is only a fraction of the stuff you can do, so if you to add some really nice looking effects and create a nice looking document that really pops, you should take your time to familiarize yourself with everything.
On the other hand, if you don’t like your changes and you want to go back to the default, simply click “Reset Picture” and it will revert to normal.
Other Text Features
Here are few more text features that you might want to be aware of though you will probably rarely use them.
Text Box
Text boxes are like their own little islands in Word. What we mean is, when you add a “Text Box” to your documents, it is immune to changes you make to the rest of the document. It is like a document within a document.
This is useful if you want to present something “as is” in your work, be able to make overarching changes to the document’s formatting, but have something you’ve pasted remain unchanged.
For the most part, text boxes are something of a bane to an editor’s existence because they don’t play nice with styles (Lesson 5). You may find them extremely convenient and that’s perfectly fine, but if you want something that conforms to your document’s style and formatting, but still place it in a box or have a border around it, then we recommend simply adding a border, which we covered in Lesson 2 – Shading and Borders.
Drop Cap
Drop caps are simply that one letter at the beginning of a chapter or book that is larger than the rest:
You can either make your drop cap “Dropped” (the text below it shifts underneath it) or “In Margin.” Check out the “Drop Cap” options for more power over how your drop caps behave.
Using More than One Language
If you want to produce content in a language other than the one that comes with Word by default, you will likely need to purchase it. Open the Word “Options” and click on “Language.”
Pick the language you want to add from the dropdown list and then click the “Add” button. When you add a language, you will need to enable it, which means that you will have to turn it on in the “Control Panel.”
From here, you can write in the language, but Word won’t display in it, in other words, menus and help systems will still appear in the default language. To get the full multilingual experience, you may need to purchase a language pack from Microsoft.
To see what languages are available for purchase, and how much, click on “Not installed” and you will be whisked to the Microsoft Office website.
If you want to add proofing tools, such as spellcheck, grammar check, and/or screen tooltips, then you may be able to simply download them for free.
While it’s doubtful you’ll be using Word in full multilingual mode, it’s nice to know how you can affect those changes. Moreover, most languages are freely available to use system-wide so actually creating a document in another language is well within your reach, for free.
Coming up Next…
So that concludes this section. We know it’s been a lot to absorb but you’ll see that after a while, this stuff is a cinch!
Once you get the hang of one skill, the rest is pretty similar and comes easier. By now you should have more than enough knowledge to create awesome documents with lists, tables, pictures, video, and anything you need to create a true multimedia publication!
Don’t forget though, if you’ve missed anything in this series you can always go back and read our introduction in Lesson 1, all that stuff on paragraphs and lists in Lesson 2, and all-important tables and other formatting options in Lesson 3.
In our final lesson, Lesson 5, we will cover styles, templates, and themes. It doesn’t sound like much, but they can be a fantastic way to not only save tons of time and create consistently formatted documents, but quickly apply themes that will instantly affect the entire appearance of your documents, as well as create templates that you can later use over and over again!
READ NEXT
- › This New Google TV Streaming Device Costs Just $20
- › HoloLens Now Has Windows 11 and Incredible 3D Ink Features
- › BLUETTI Slashed Hundreds off Its Best Power Stations for Easter Sale
- › How to Adjust and Change Discord Fonts
- › Google Chrome Is Getting Faster
- › The New NVIDIA GeForce RTX 4070 Is Like an RTX 3080 for $599