
Word for Microsoft 365 Outlook for Microsoft 365 Word 2021 Outlook 2021 Word 2019 Outlook 2019 Word 2016 Outlook 2016 Word 2013 Outlook 2013 Word 2010 Word 2007 More…Less
You can use styles to quickly apply a set of formatting choices consistently throughout your document. If you want formatting choices that are not available from the built-in styles and themes available in Word, you can modify an existing style and customize it to suit your needs. You can change the formatting (such as font size, color, and text indentation) in styles applied to titles, headings, paragraphs, lists, and so on. You can also select formatted text in your document to create a new style in the Styles gallery.
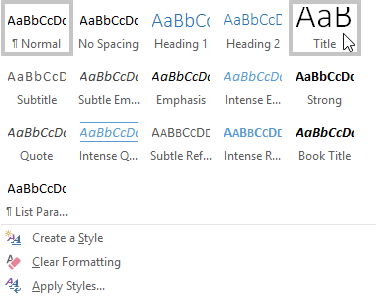
The styles covered in this article are located in the Styles gallery, a visual menu located on the Home tab. To apply a style, simply select the text you want to format, and then click the style you want in the Styles gallery. To learn more, see Apply a style to text in Word.

Modify an existing style
You can modify an existing style in the Styles gallery in two ways:
-
Modify a style by updating it to match formatting in your document
-
Modify a style manually in the Modify Style dialog box
Modify a style by updating it to match formatting in your document
If you have text in your document that already has a style applied, you can change the formatting of that text and apply it to the style in the Styles gallery.
-
Select text in your document that has the style applied, such as Heading 1.
When you select text that has a style applied, that style is highlighted in the Styles gallery.

-
Format the selected text with the new attributes that you want.
For example, you might want to change the point size for the Heading 1 style from 16 points to 14 points.
-
On the Home tab, in the Styles group, right-click the style that you want to change, and then click Update [Style Name] to Match Selection.
Note: All text with the style that you changed will automatically change to match the new style that you defined.
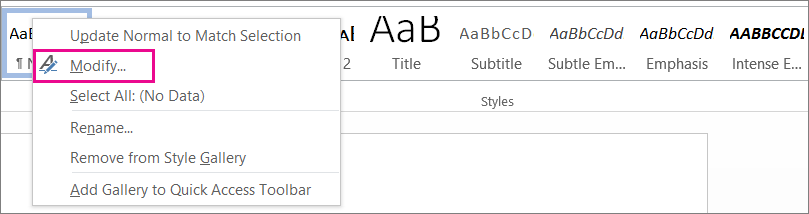
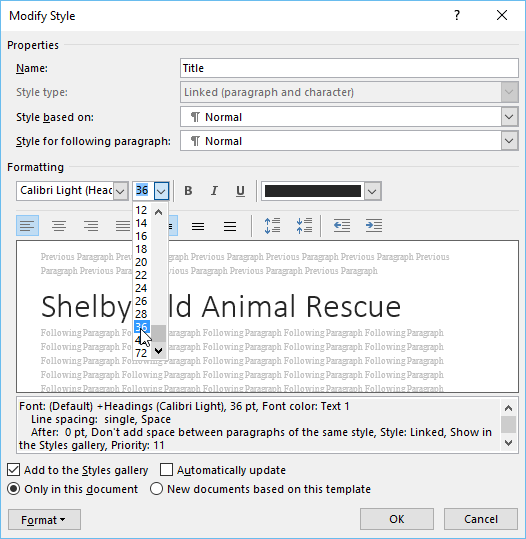
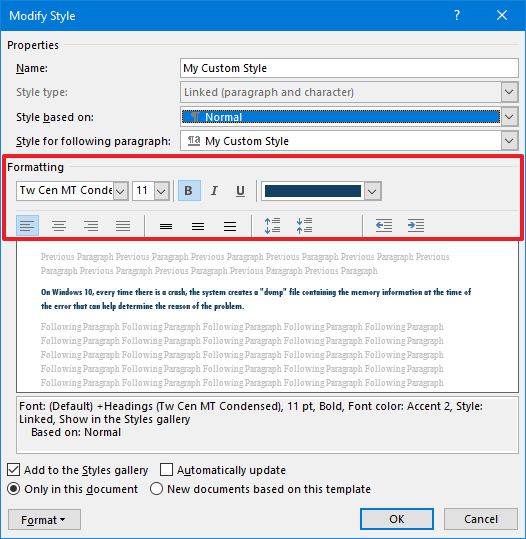
Modify a style manually in the Modify Style dialog box
You can modify a style directly in the Styles gallery, without using the text in your document.
-
On the Home tab, right-click any style in the Styles gallery and click Modify.
-
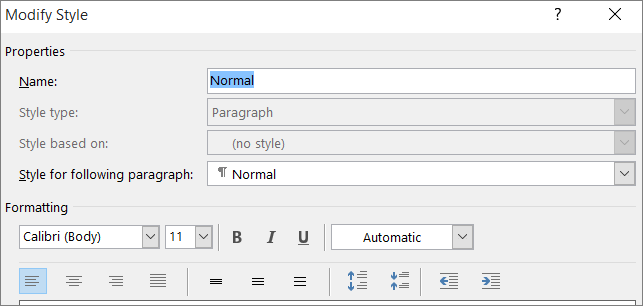
In the Formatting section, make any formatting changes you want, such as font style, size, or color, alignment, line spacing, or indentation.
-
Choose whether the style change applies to the current document or to all future documents.

Create a new style based on document formatting
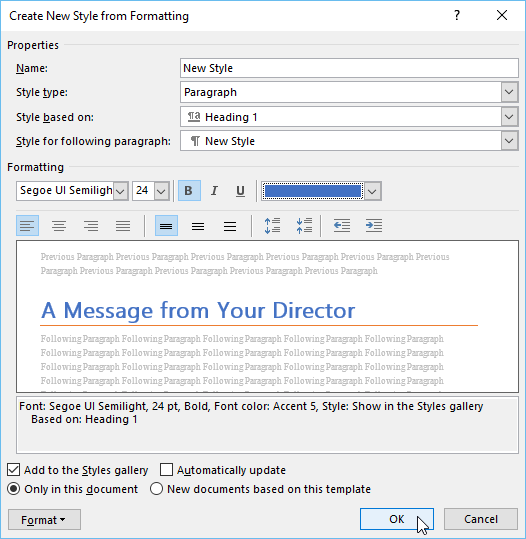
You can select formatted text in your document to create a new style that you add to the Styles gallery.
-
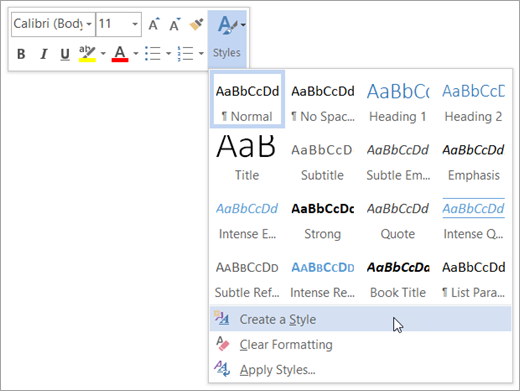
Right-click the text on which you want to base a new style.
-
In the mini toolbar that appears, click Styles, and then click Create a Style.
-
In the Create New Style from Formatting dialog box, give your style a name and click OK.
Your new style will now appear in the Styles gallery.
Note: If you want your new style to appear in all new Word documents, right-click it in the Styles gallery, click Modify, and then select New documents based on this template at the bottom of the dialog box.
-
Right-click the text on which you want to base a new style, point to Styles, and then click Save Selection as a New Quick Style.
-
In the Create New Style from Formatting dialog box, give your style a name and click OK.
Your new style will now appear in the Styles gallery.
Note: If you want your new style to appear in all new Word documents, right-click it in the Styles gallery, click Modify, and then select New documents based on this template at the bottom of the dialog box.
See also
Apply a style to text in Word
Need more help?
Want more options?
Explore subscription benefits, browse training courses, learn how to secure your device, and more.
Communities help you ask and answer questions, give feedback, and hear from experts with rich knowledge.
Apply styles

Try it!
Styles give your document a consistent, professional look.
-
Select the text you want to format.
Tip: If you place your cursor in a paragraph, the style is applied to the whole paragraph. If you select specific text, only the selected text is formatted.
-
On the Home tab, point to a style to preview it.
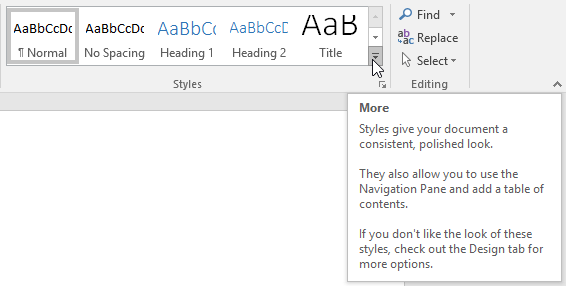
If you don’t see a style you want, click the More button
to expand the gallery. -
Select a style.
 to expand the gallery.
Using Headings allows you to move parts of the document around by using View > Navigation Pane and then moving the listed headings up or down in the doc. Headings also can be used in creation of a table of contents.
Note: If you need a different look, go to Design > Themes and select a new one. Each Theme has its own set of Styles.
Want more?
Use the Navigation pane in Word
Apply themes
Customize or create new styles in Word
Insert a table of contents
Need more help?
Lesson 29: Applying and Modifying Styles
/en/word2016/smartart-graphics/content/
Introduction
A style is a predefined combination of font style, color, and size that can be applied to any text in your document. Styles can help your documents achieve a more professional look and feel. You can also use styles to quickly change several things in your document at the same time.
Optional: Download our practice document.
Watch the video below to learn more about using styles in Word.
To apply a style:
- Select the text you want to format, or place your cursor at the beginning of the line.
- In the Styles group on the Home tab, click the More drop-down arrow.
- Select the desired style from the drop-down menu.
- The text will appear in the selected style.


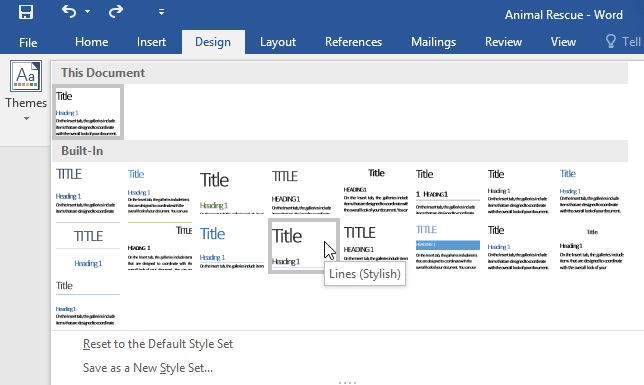
To apply a style set:
Style sets include a combination of title, heading, and paragraph styles. Style sets allow you to format all elements in your document at once instead of modifying each element separately.
- From the Design tab, click the More drop-down arrow in the Document Formatting group.
- Choose the desired style set from the drop-down menu.
- The selected style set will be applied to your entire document.


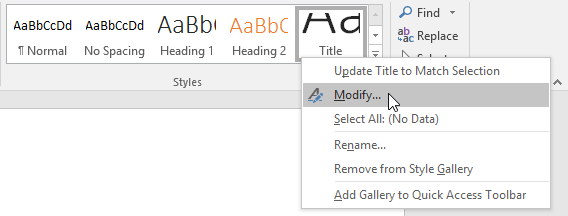
To modify a style:
- In the Styles group on the Home tab, right-click the style you want to change and select Modify from the drop-down menu.
- A dialog box will appear. Make the desired formatting changes, such as font style, size, and color. If you want, you can also change the name of the style. Click OK to save your changes.
- The style will be modified.

When you modify a style, you’re changing every instance of that style in the document. In the example below, we’ve modified the Normal style to use a larger font size. Because both paragraphs use the Normal style, they’ve been updated automatically to use the new size.
To create a new style:
- Click the arrow in the bottom-right corner of the Styles group.
- The Styles task pane will appear. Select the New Style button at the bottom of the task pane.
- A dialog box will appear. Enter a name for the style, choose the desired text formatting, then click OK.
- The new style will be applied to the currently selected text. It will also appear in the Styles group.

You can also use styles to create a table of contents for your document. To learn how, review our article on How to Create a Table of Contents in Microsoft Word.
Challenge!
- Open our practice document. If you already downloaded our practice document, be sure to download a fresh copy by clicking the link again.
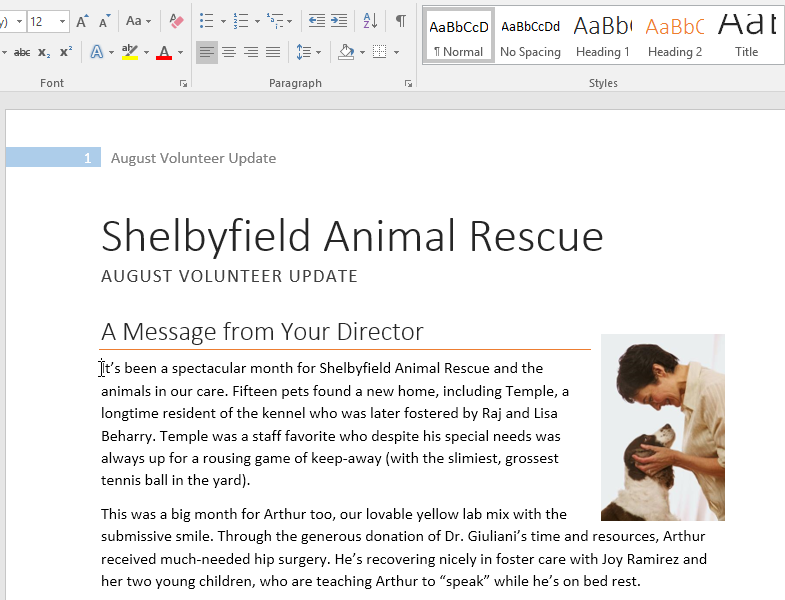
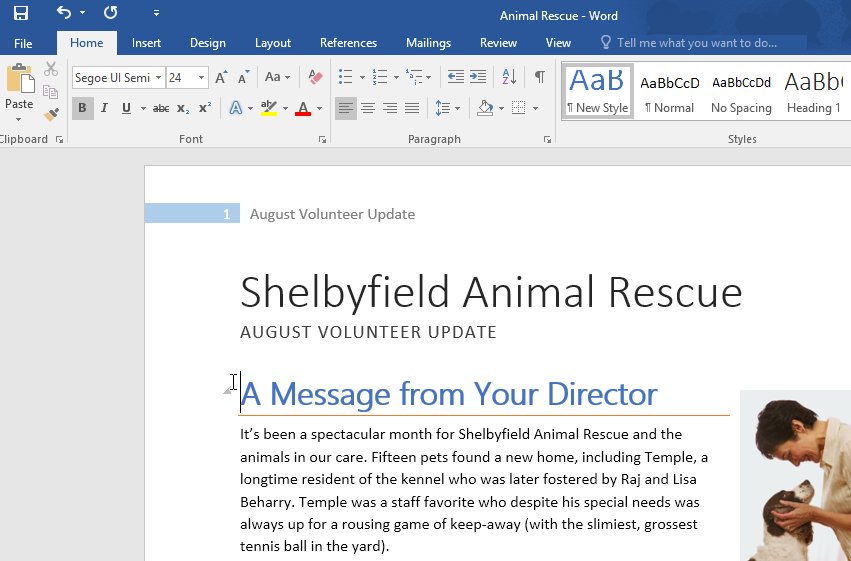
- On page 1, select the first line of text Shelbyfield Animal Rescue and change the style to Title.
- Select the second line that says August Volunteer Update and change the style to Heading 1.
- Select the third line that says A Message From Your Director and change the style to Heading 2.
- In the Design tab, change the style set to Casual.
- Modify the Normal style so the font is Cambria and the font size is 14 pt.
- When you’re finished, the first page of your document should look like this:

- Optional: Modify the Heading 3 style any way you want. You can change the font, font size, color, and more. This heading appears throughout the document, so try to choose formatting that complements the body text.

/en/word2016/mail-merge/content/
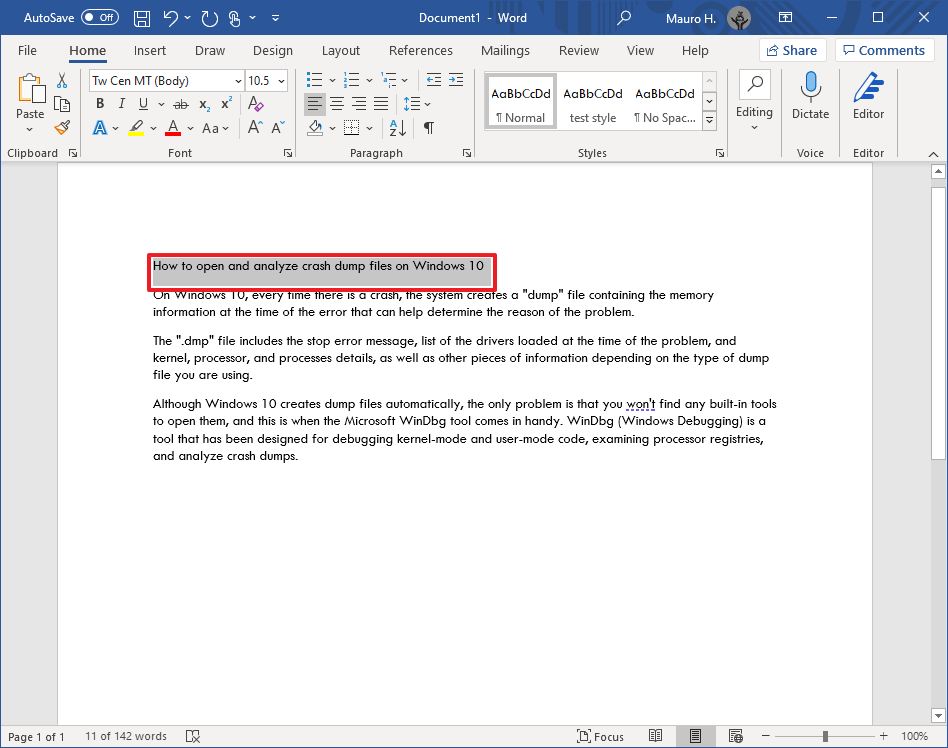
(Image credit: Windows Central )
Although you can style every part of a Microsoft Word document individually with unique fonts and colors, it is not a convenient approach since you have to repeat the steps many times, consuming more time and increasing the chances of mistakes, and this is when styles and themes can come in handy.
In the Office apps, styles are collections of fonts, text sizes, and colors that you can apply to different parts of the document (titles, subheadings, quotation, etc.). On the other hand, themes are collections of styles that you can use to format the entire document quickly.
When you use styles and themes, you will still be using a few steps, but it is a more organized way to format a document on Windows 10, and you will really see the benefit when you need to make changes since updating the format can be as easy as selecting a new theme or style.
In this Windows 10 guide, we will walk you through the steps to change the look and feel of Word documents using the style and themes settings whether you use Office from Microsoft 365 or Office 2019.
- How to use styles in Word
- How to use themes in Word
How to use styles in Word
To change the overall look of a Word document, use these steps:
- Open the Word app.
- Under the «New» section, click the Blank document option (or open an existing document).
- Create the document’s content.
- Select with the mouse the text you want to apply a different format – for example, the title.
- In the «Home» tab, under the «Styles» section, select the content type to style.Quick note: When selecting a style, make sure to apply it to the correct formating. For example, if you choose the title, then the style should be «Title.» For the subtitle, select the «Subtitle» style and the rest of the headings using «Heading» 1 through 9 accordingly. And don’t worry about the colors. You will customize these when applying a theme. Also, to view all the available elements, click the More button in Styles’s bottom-right corner.

- Continue applying the styling for subtitles, headings, quotes, and anything else you want to format.Quick tip: You can always click and hold the Ctrl key and use the mouse pointer to select the same parts of the document, including the same stying, for instance, all the subtitles (headings).
Once you complete the steps, the document will be formatted with the styling you selected, and when you make changes to the style, the formatting will change automatically for all the same parts of the document.
In addition to selecting from the predefined settings, you can also create new or modify existing elements to style documents with custom settings.
Create new style element
To create a custom style element in Microsoft Word, use these steps:
- Open the Word app.
- Click the Open option.
- In the «Home» tab, under the «Styles» section, click the More (down-arrow button) menu.
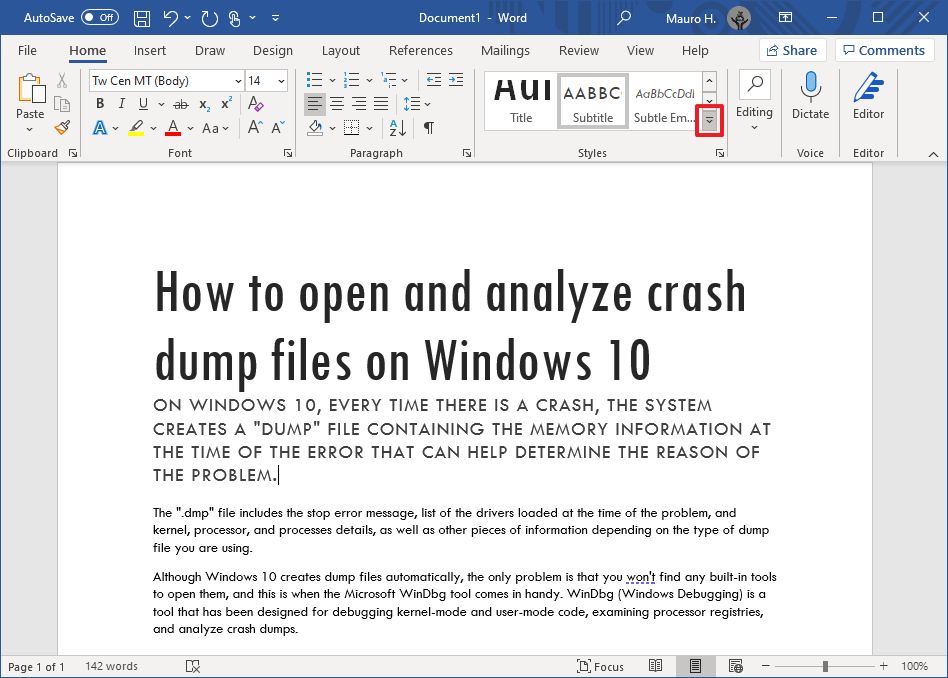
- Click the Create a style option.
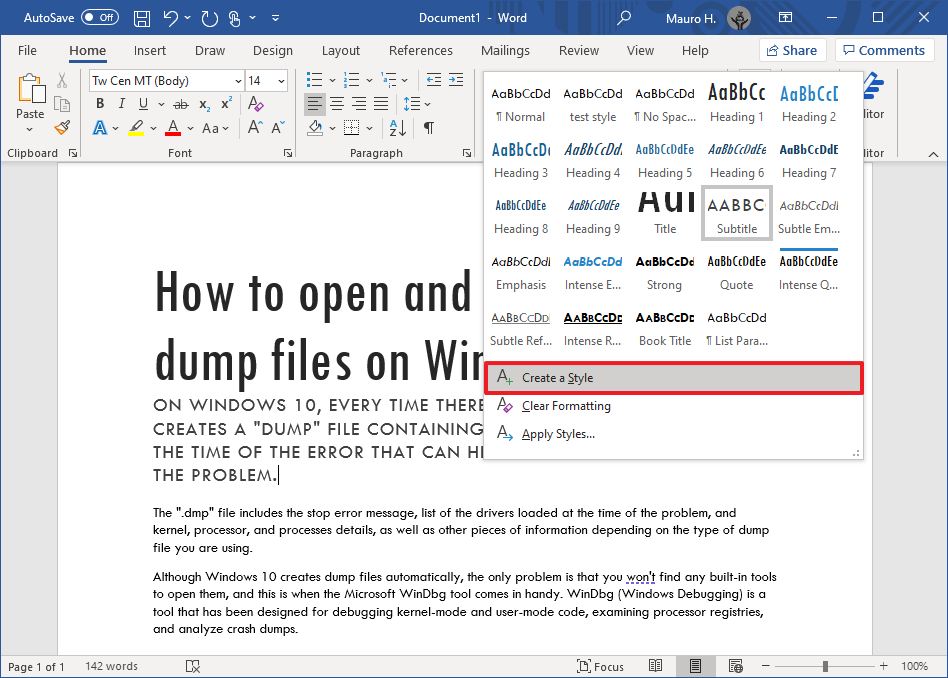
- Specify a name for the style.
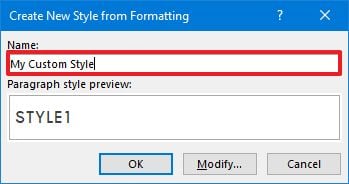
- Click OK button.
After you complete the steps, the new element will appear in the Styles menu.
Modify style elements
To modify a new or existing style element, use these steps:
- Open the Word app.
- Click the Open option.
- In the «Home» tab, under the «Styles» section, right-click the style and select the Modify Option.
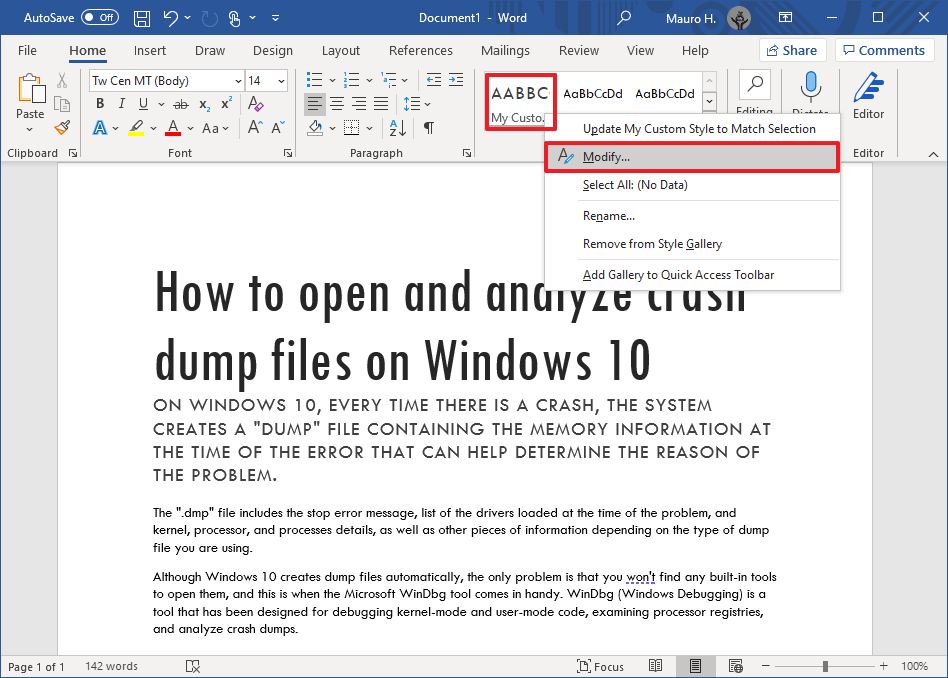
- Customize the style name and formatting settings (for example, font, size, color, aligment, etc.) as necessary.
- Click the OK button.
Once you complete the steps, the new styling changes will apply to the element.
 Get subscribed
Microsoft 365 gives you full access to all the Office apps and perks, such as 1TB OneDrive storage and Skype minutes. You can also install Word, Excel, PowerPoint, Outlook, and other apps on up to five devices, and depending on the subscription, you can share the account with up to five people.
How to use themes in Word
After applying the style, you can use themes to give the document a different look and feel with colors and a combination of fonts.
To apply a theme to a Microsoft Word document, use these steps:
- Open the Word app.
- Click the Open option.
- Select the document you already styled to open it.
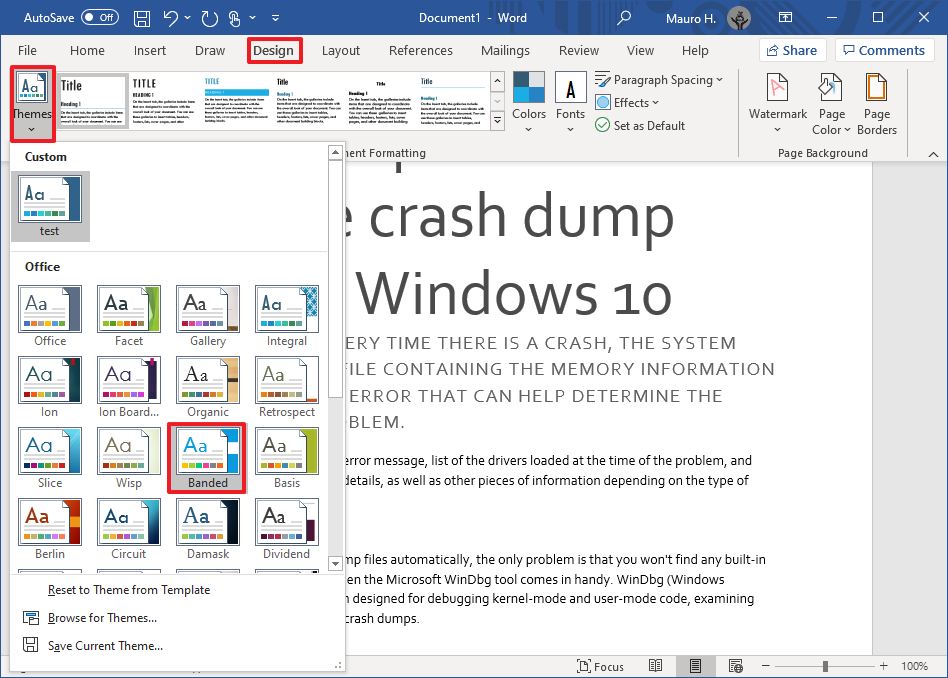
- Click the Design tab.
- Click the Themes button.
- Roll the mouse pointer over the themes to see a live preview of each available theme.
- Click the theme you want for the document.
- (Optional) Use the «Document Formatting» section to select another version of the theme with different combinations of fonts and colors.
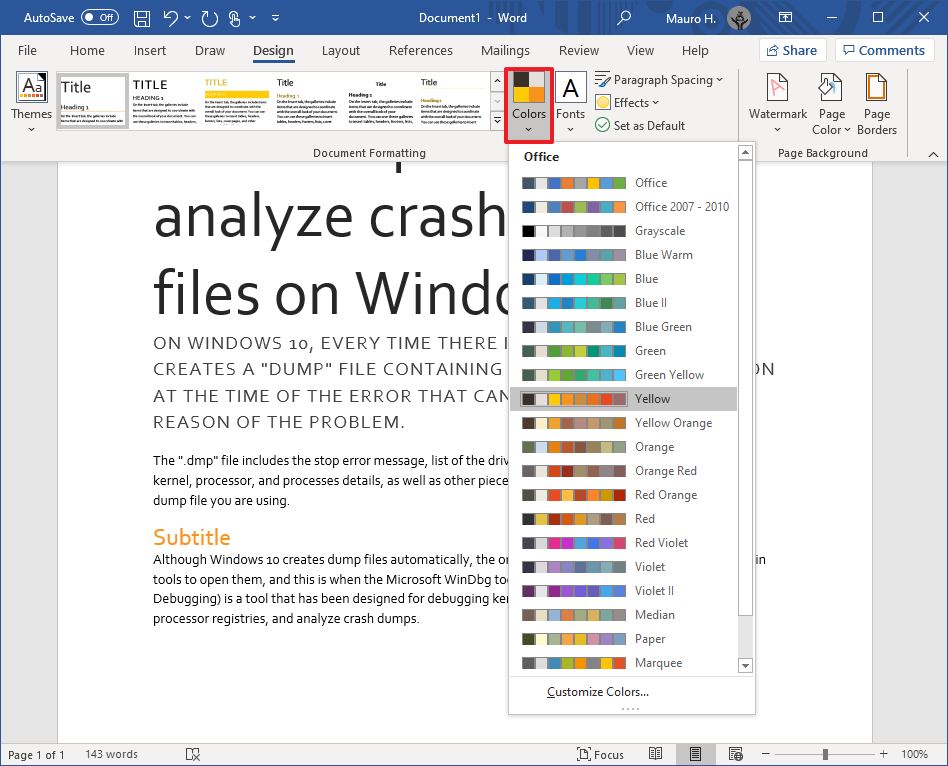
- (Optional) Click the «Colors» menu to select a different color scheme.
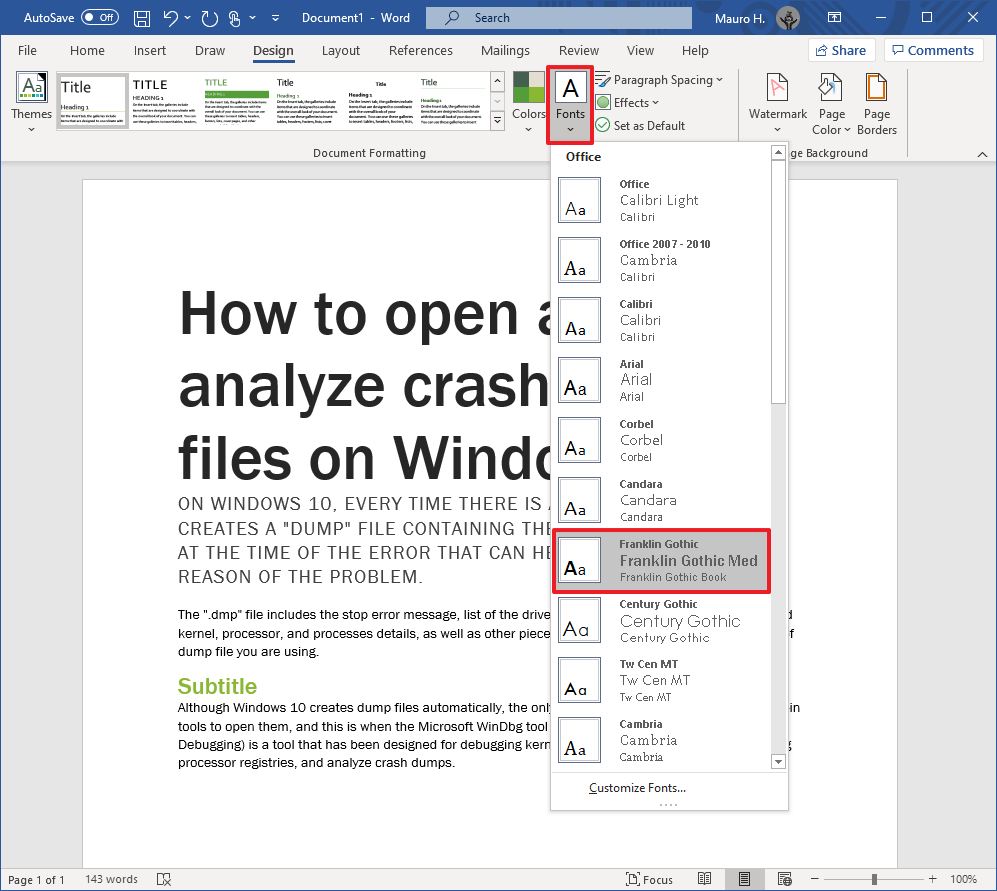
- (Optional) Click the «Fonts» menu to select a different combination of fonts.Quick note: As you open the menu, the top font is one for the title, the one in the middle is for the subheadings, and the one at the bottom is for the content.
After you complete the steps, the content will incorporate the new colors and fonts available through the theme you selected.
Set theme as the default
To set a theme as the default for Word, use these steps:
- Open the Word app.
- Click the Open option.
- Select the document you already styled to open it.
- Click the Design tab.
- Customize the formatting of the document with colors, fonts, spacing, and effects.
- Click the Set as Default button.
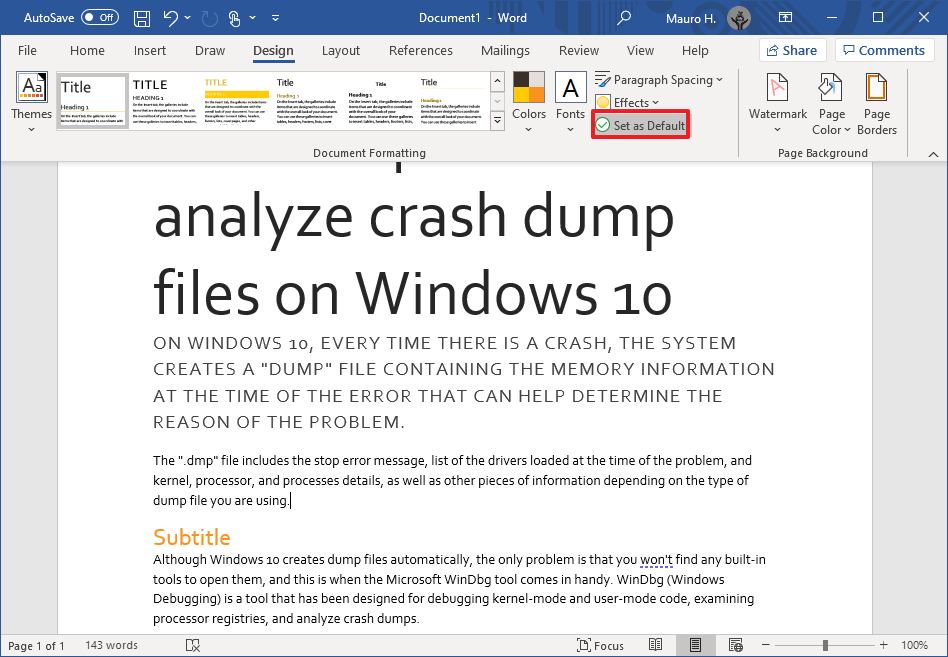
- Click the OK button.
Once you complete the steps, the theme will be available as the default for every new document. However, it won’t apply to the document automatically. Instead, it will be the default theme in the «Style» section, in the «Home» tab.
Create a new theme template
To create a new theme for Microsoft Word documents, use these steps:
- Open the Word app.
- Click the Open option.
- Select the document you already styled to open it.
- Click the Design tab.
- Use the «Document Formatting» section to select a format.
- Click the «Colors» menu to select a color scheme.
- Click the «Fonts» menu to select a combination of fonts.
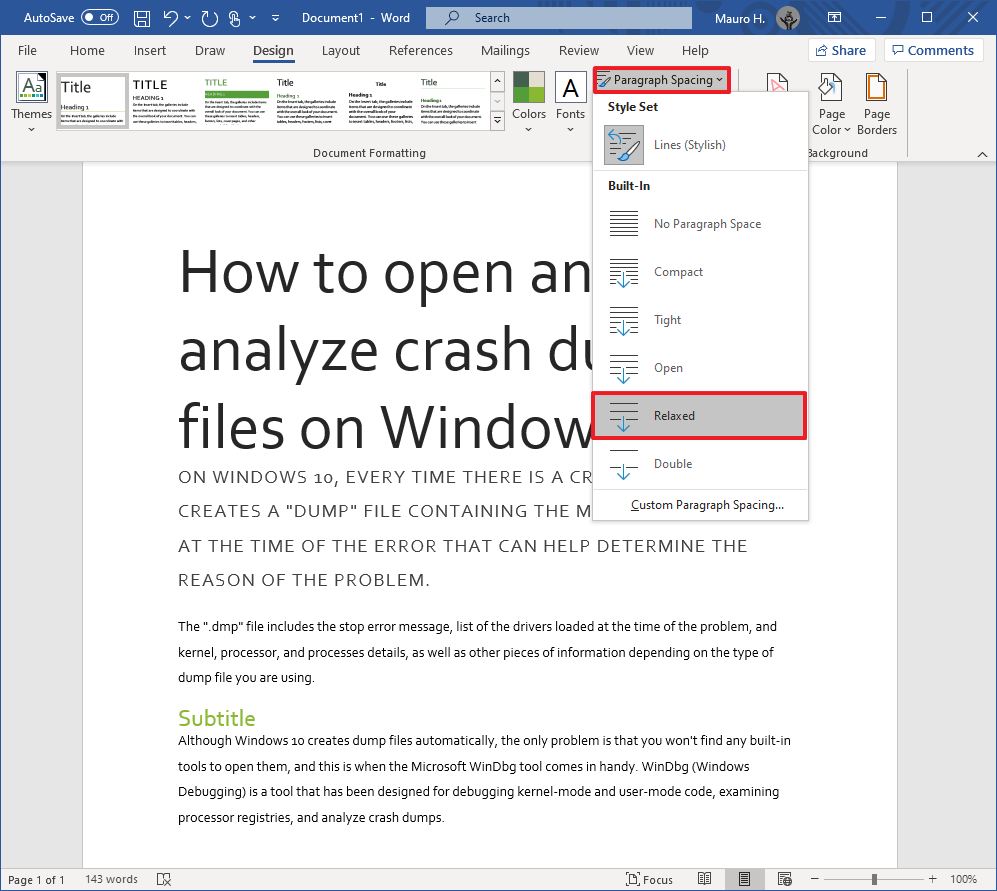
- Click the «Paragraph Spacing» menu and select one of the predefined options.Quick tip: You can also click the Custom Paragraph Spacing option to create a new style.
- (Optional) Click the «Effects» menu and select the effect you want to use when inserting objects.
- Click the «Themes» menu and choose the Save Current Theme option.
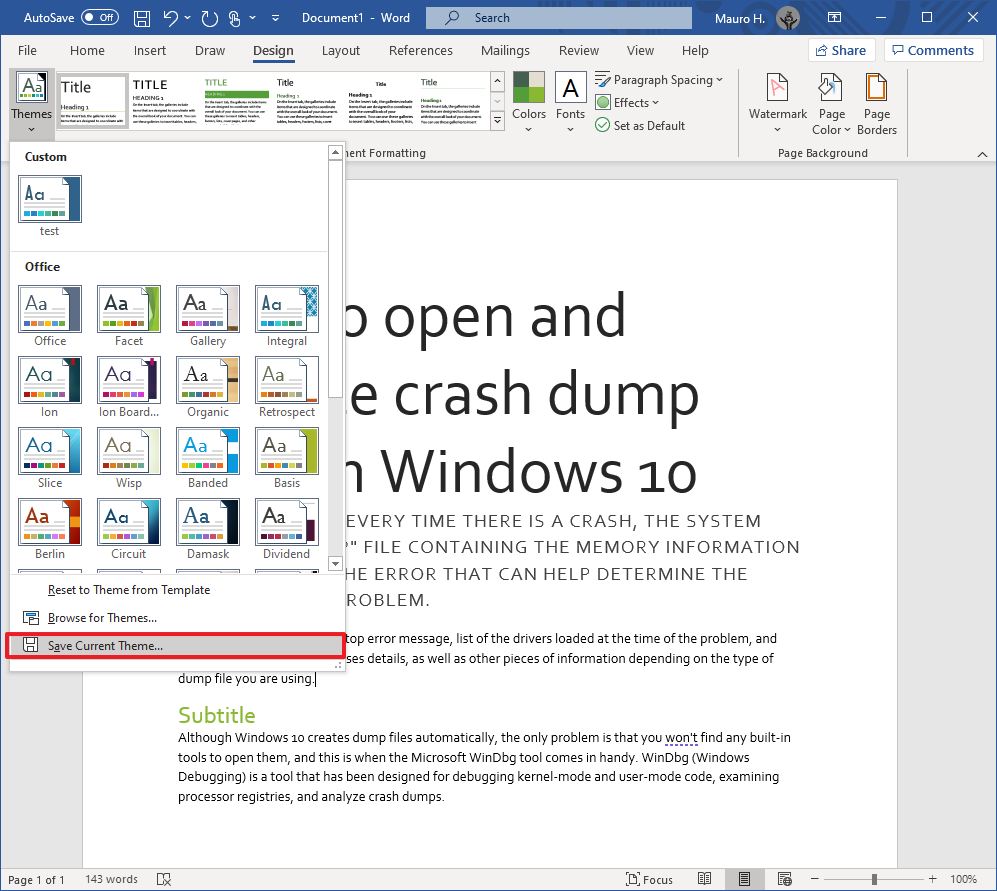
- Confirm a name for the theme.
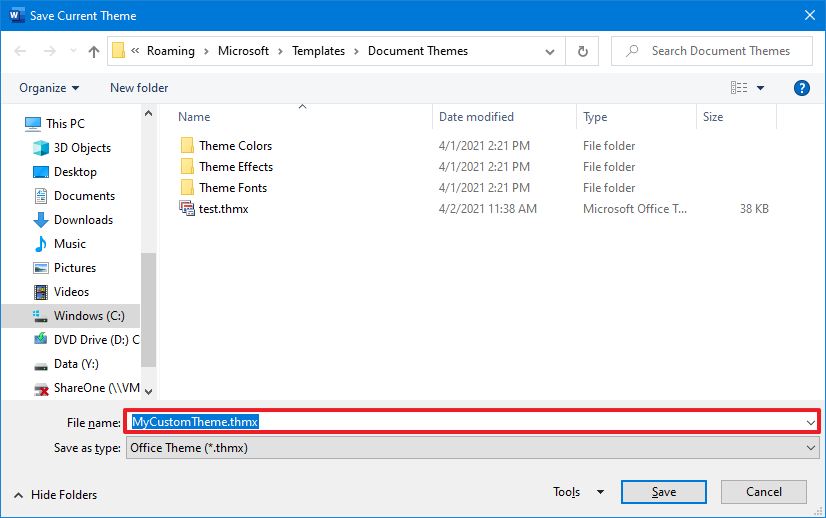
- Click the Save button.
After you complete the steps, the new theme will be available from the «Themes» menu in the «Custom» section.
More Windows 10 resources
For more helpful articles, coverage, and answers to common questions about Windows 10, visit the following resources:
- Windows 10 on Windows Central – All you need to know
- Windows 10 help, tips, and tricks
- Windows 10 forums on Windows Central
All the latest news, reviews, and guides for Windows and Xbox diehards.
Mauro Huculak is technical writer for WindowsCentral.com. His primary focus is to write comprehensive how-tos to help users get the most out of Windows 10 and its many related technologies. He has an IT background with professional certifications from Microsoft, Cisco, and CompTIA, and he’s a recognized member of the Microsoft MVP community.
A style is a group of formatting settings stored under a single name. Using styles and style sets rather than formatting ad hoc has several advantages:
- The document looks professional and is easy to read.
- Styles provide consistency and can apply several formatting properties at one time.
- Heading styles can be used to create tables of contents and outlines.
- If you change the formatting properties of a style, all instances of the style are updated with the formatting changes.
Apply a Style
Word includes several built-in styles that cover most basic formatting needs in a document.
- Click in the paragraph or select the text you want to apply a style to.
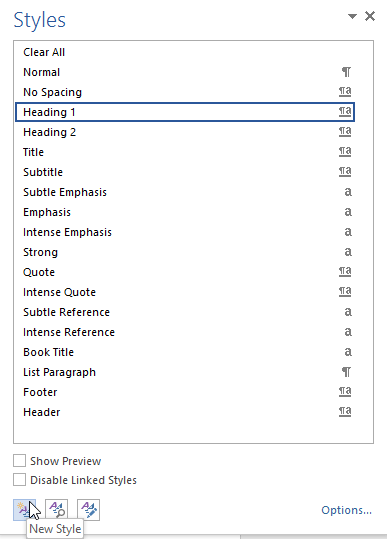
- Click the Styles group dialog box launcher on the Home tab.
- Select a style from the Styles pane.

Alternatively, you can browse within the Styles gallery on the ribbon, which will also preview the formatting used in the style, but it’s often easier to choose from all the available styles at once by clicking the dialog box launcher.
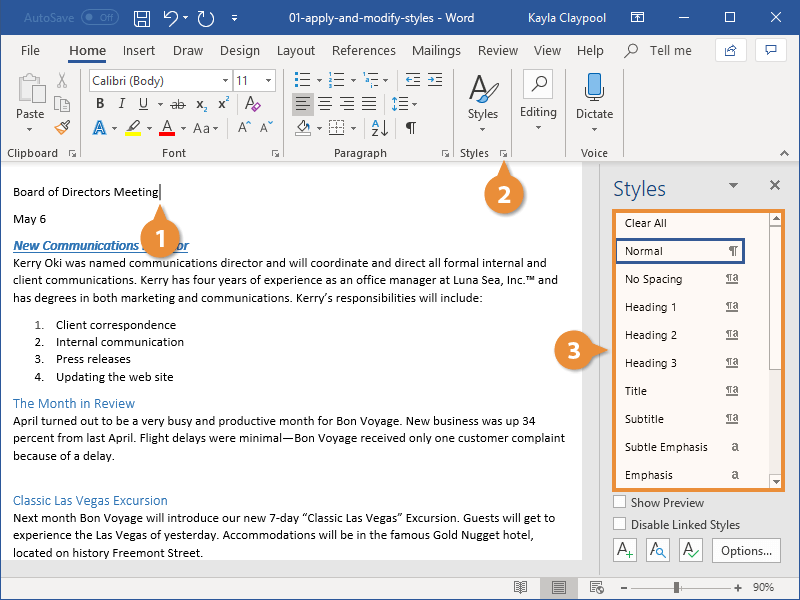
The style is applied to the text or paragraph.
Change Style Sets
Another advantage to using styles throughout your document is the ability to quickly change how those styles appear using Style Sets.
Style Sets will update the appearance of the built-in default styles. This way, you can format these elements at once instead of one by one.
- Click the Design tab.
- Open the Style Set gallery by clicking the gallery’s More button.
- Select a Style Set.
Thumbnails previewing the available Style Sets appear.
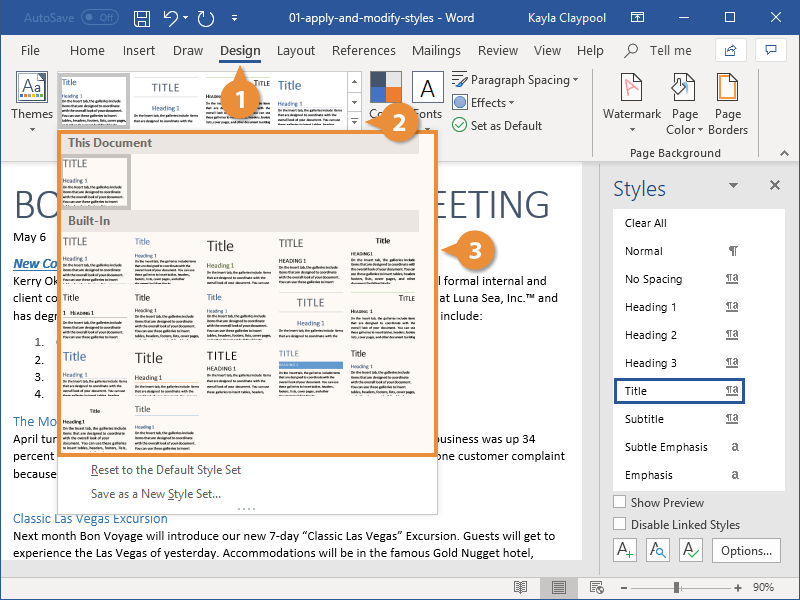
The new Style Set is applied, affecting all the default styles used in the document.
| Default Styles | |
|---|---|
| Normal | The document’s main body text. Any text not using another style is set in Normal. |
| No Spacing | Normal text, with no additional spacing between paragraphs. |
| Heading 1, 2, 3 | Three levels of headings to use in your document, with outline levels automatically applied. |
| Title | A larger heading, useful for the main title of a document. |
| Subtitle, Subtitle Emphasis | Subtitle text, styled to complement the Title style, along with an additional style for emphasis. |
| Emphasis, Intense Emphasis, Strong | These styles are meant to emphasize text in a document. Emphasis usually italicizes, Strong usually bolds, and Intense Emphasis will usually do both. |
| Quote, Intense Quote | These styles will separate blocks of text to display a quote. |
| Subtle Reference, Intense Reference, Book Title | These styles are meant for text used to cite references and book titles. |
| List Paragraph | This style is automatically applied when text is used in a numbered or bulleted list. |
Create a Style
You can also create your own styles, saving a set of formatting to use easily in other places. If the need arises, creating a style is quick and easy. There are five different types of styles:
- Character: Includes any type of character formatting, such as font size, type, color, and effects. These styles can be applied to any selected text.
- Paragraph: Includes any type of paragraph formatting, such as paragraph, tab, border, and bullets and numbering formats. These styles will be applied to entire paragraphs.
- Linked: Uses a combination of character and paragraph formatting properties. These styles will be applied to entire paragraphs as well.
- Table: Provides a consistent style for all borders, shading, alignment and fonts in tables.
- List: Applies similar alignment, numbering or bullet characters and fonts to lists.
You can also base a style on another style. The new style will inherit the formatting of the original style, as well as any changes made to the original style later.
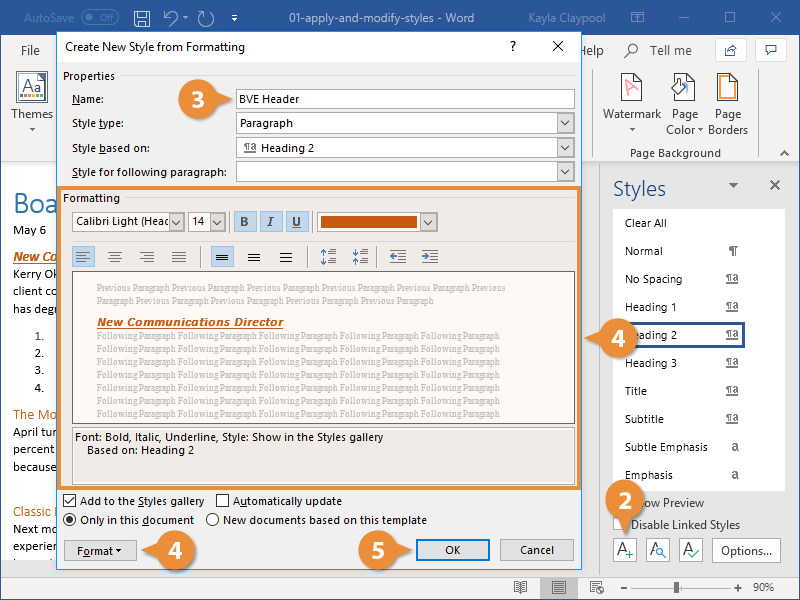
- Format the selected text the way you’d like it to appear in your style.
- Click the New Style button, in the Styles pane.
- Give the new style a name.
- Make any additional adjustments to the style formatting.
- Click OK.
The differences between the selected text that was formatted and the style that it’s based on will be captured. The style that it’s based on will also be listed here.
Basic formatting commands are found right in this dialog box. To customize more advanced formatting, click the Format button and select a category from the menu.
The new style is created and can be applied to other text in the document.
Modify a Style
One of the benefits of using styles is that when you make a change to one, everything that’s using the style is automatically updated.
- Change the formatting of some text using a style.
- Click that Style’s list arrow in the Styles pane.
- Select Update [style name] to Match Selection.
To delete a style, select Delete or Revert to [style name]. If there is no option to delete the style, reverting it back to the style it was based on effectively deletes the style.
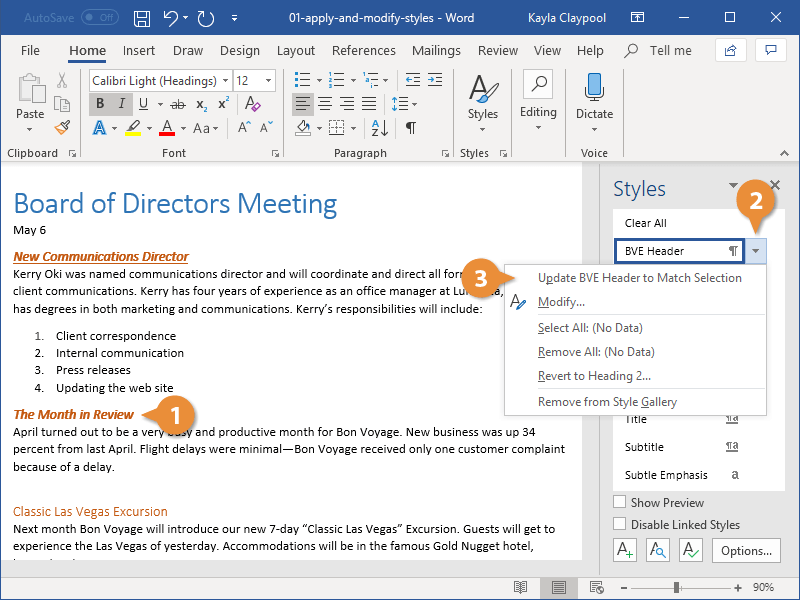
The style is updated, and the changes you made are applied to all text that uses the style.
Only Show Styles in Use
There are a lot of built-in styles that don’t get used and get in the way of the styles you’re working with. You can change the Styles pane settings to show only the styles used in a document.
- Click Options in the Styles pane.
- Click the Select styles to show list arrow.
- Select In use.
- Click OK.
The Style Pane Options dialog box opens.
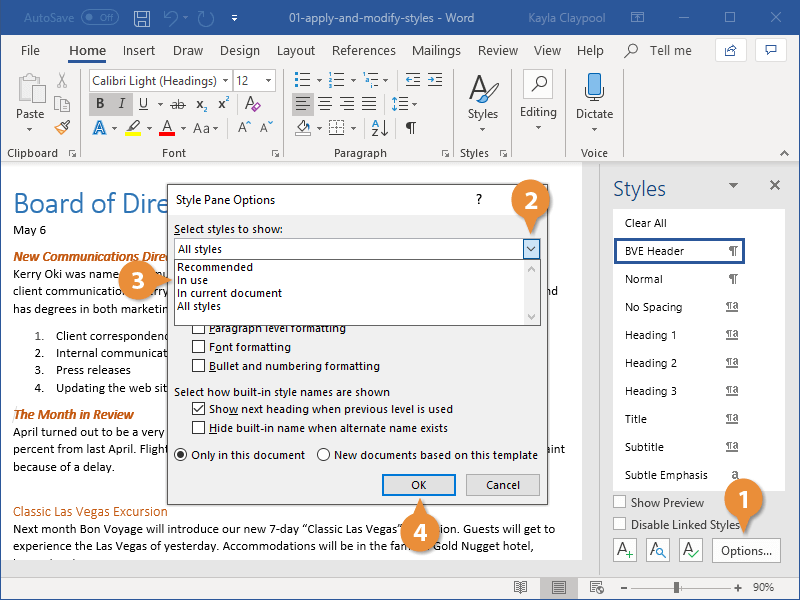
Now only the styles used in the document are shown in the Styles pane.

FREE Quick Reference
Click to Download
Free to distribute with our compliments; we hope you will consider our paid training.