
In Word for Mac, you can choose a predefined paper size from a list and change the paper size for all pages in your document, for a specific page, or for a specific section. You can also change the default paper size used for new documents.
When you create a new document, Word applies the default paper size and margins that are stored in a template (normal.dotm). If you frequently use a paper size that differs from the default size (for example, US Legal), you can set new defaults that Word uses when you create a new document. If your current document is set up with the margins that you want, you can use this document to set your new default margins.
In Word 2016 for Mac, you can also create a custom paper size and you can choose different paper sources for pages in your document. Choosing different paper trays allows you to use different paper for your first page, which could be a different color or heavier weight than the other pages.
-
On the File menu, click Page Setup.
-
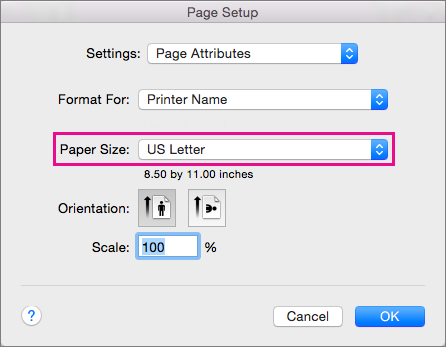
In Page Setup, select a size from the Paper Size list.

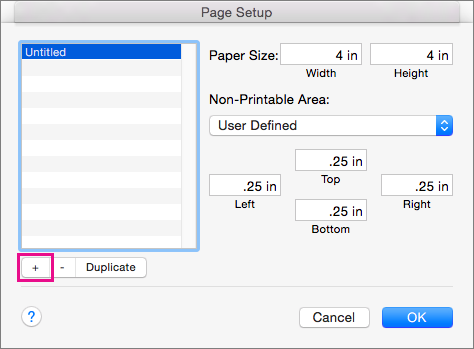
If you select Manage Custom Sizes from the list, you can define a custom paper size; click the plus sign to create a new paper definition, and then enter sizes for width, height, and non-printable area.
-
When you have finished selecting your paper size, click OK.
-
Select the text on the pages that you want to change.
-
On the Format menu, click Document > Page Setup.
-
Select a paper size from the Paper Size list, and then click OK.
-
On the Document page, on the Apply to list, click Selected text, and then click OK.
Word inserts section breaks as needed before and after the text that you selected and changes the paper size for that section.
-
On the View menu, click Print Layout.
-
To display nonprinting characters, such as paragraph markers (¶), click Show all nonprinting characters
on the Home tab. -
Select the section break for the section that you want to change.
-
On the Format menu, point to Document, and then click Page Setup.
-
On the Paper Size list, select a paper size and then click OK.
-
On the Apply to list, click Selected sections.
 on the Home tab.
-
On the Format menu, click Document.
-
Click Default, and then click Yes.
Note: If you change the preferred paper size or margins for the template that Word bases new documents on (normal.dotm), all future documents that use the normal.dotm template use the new settings. If you change the preferred paper size or margins for a document that is based on another template, only new documents that are based on that template use the new settings.
Choose a paper source for your document’s first page, and then for all subsequent pages. The list of available sources is provided by the printer driver on your computer and may be different from those shown here.
If a page source is set to Auto Select, Word will automatically choose a paper source based on the size of the page and the information about paper sizes provided by your printer driver.
-
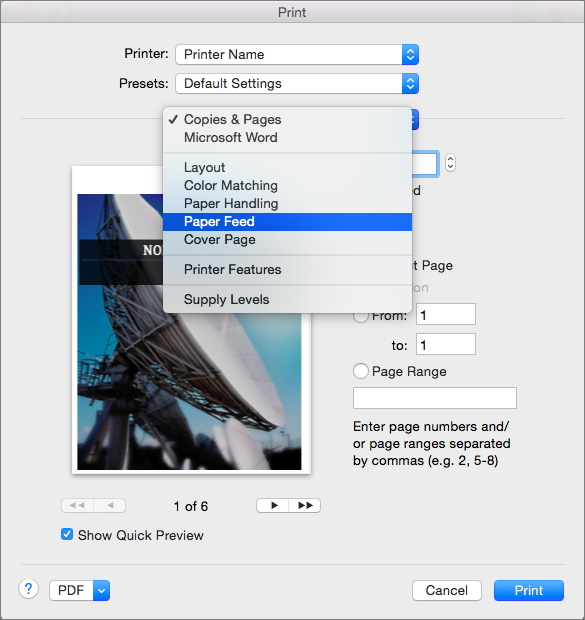
On the File menu, click Print.
-
In Print, select Paper Feed.
Word displays Paper Feed settings.
-
To specify a paper source for the first page in your document, select First Page From, and then select a source from the First Page From list.
-
To change the paper source for all pages in your document after the first page, select a source in the Remaining From list.
-
If you are ready to print, click Print.
Otherwise, change Paper Feed to another category of settings to make additional changes.

-
On the Format menu, click Document.
-
Click Page Setup.
-
On the Paper Size pop-up menu, select a paper size.
-
Click OK.
-
On the Apply to pop-up menu, click Whole document, and then click OK.
-
Select the text on the pages that you want to change.
-
On the Format menu, click Document.
-
Click Page Setup.
-
On the Paper Size pop-up menu, select a paper size.
-
Click OK.
-
On the Apply to pop-up menu, click Selected text, and then click OK.
Word inserts section break as needed before and after the text that you selected and changes the paper size for that section.
-
On the View menu, click Print Layout.
-
To display nonprinting characters, such as paragraph markers (¶), click Show all nonprinting characters
on the Standard toolbar. -
Select the section break for the sections that you want to change.
-
On the Format menu, point to Document, and then click Page Setup.
-
On the Paper Size pop-up menu, select a paper size.
-
Click OK.
-
On the Apply to pop-up menu, click Selected sections.
-
On the Format menu, click Document.
-
Click Default, and then click Yes.
Note: If you change the preferred paper size or margins for the template that Word bases new documents on (normal.dotm), all future documents that use the normal.dotm template use the new settings. If you change the preferred paper size or margins for a document that is based on another template, only new documents that are based on that template use the new settings.
See also
Print a document
Insert, delete, or change a section break
Use headers and footers
Need more help?
Changing the Paper Size in Word
You aren’t tied to letter-size paper and documents in Word
Updated on January 4, 2021
What to Know
- Mac: Go to File > Page Setup, choose Page Attributes from the drop-down menu, then set the Paper Size.
- Word 365: Go to File > Print > Page Setup, select the Paper tab, then set the Paper Size.
- If you don’t see the size you want, select Custom or Manage Custom Sizes to set your own margins and define a nonprintable area.
This article explains how to change paper size in Word. Instructions apply to Word for Mac and Microsoft 365.
How to Change a Document Paper Size for Printing
You can change a document paper size for a new file or for an existing one.
-
Open a new or existing file in Microsoft Word.
-
On a Mac, choose the File menu and select Page Setup.
-
In Word 365, choose File.
-
Select Print in the left pane, then click the Page Setup link at the bottom of Settings.
-
On a Mac, when the Page Setup dialog box appears, it should be set on Page Attributes. If not, click the drop-down selector at the top of the box and select Page Attributes.
-
For Word 365, you may need to click the Paper tab at the top of the dialog.
-
Using the drop-down menu next to (or under) Paper Size, select the size paper you want from the available options. When you make a selection, the Word document on-screen changes to that size. For example, if you pick US Legal on the menu, the document size changes to 8.5 by 14.
Paper Size Limitations in Word
For U.S. versions of Microsoft Word, the default paper size is 8.5 inches by 11 inches. While you probably print most of your letters, reports, and other documents on this size paper, changing the page size in Word to use a different-size paper is a straighforward task.
Word does not place many limitations on page size or orientation. There is a good chance that your printer sets greater limitations on the paper you use than Word does, so before you make any changes to the page size, you should consult your printer documentation. It may save you a lot of frustration in the long run.
How to Set Up a Customized Paper Size
If you don’t see the size you want in the drop-down menu, set up any specific size you want.
-
On Mac and non-Microsoft 365 versions of Word, click Manage Custom Sizes at the bottom of the list of paper size options.
-
Click the plus sign to add a new customized size. The fields populate with the default measurements, which you will change.
-
Highlight untitled in the customized size list and change the name to something you’ll remember or recognize by typing over it.
-
Click in the field next to Width and enter a new width. Do the same in the field next to Height.
-
Set a Non-Printable Area by choosing User Defined and filling in the margin amounts in the Top, Bottom, Left, and Right fields. You can also select your printer to use its default non-printing areas.
-
Click OK to return to the Page Setup screen.
-
Select Other or the name you gave the customized size in the drop-down paper size menu. Your document changes to that size on the screen.
Word 365 is a bit different. Set the Paper size to custom, and then set the various parameters in the Paper, Margins, and Layout tabs. Then Click OK.
If you enter a paper size that the chosen printer cannot run, the name of the customized paper size is grayed out in the paper size drop-down menu.
Thanks for letting us know!
Get the Latest Tech News Delivered Every Day
Subscribe

To change the paper size in Microsoft Word, open the «Layout» tab, click «Size,» and then select your desired paper size from the list. To change the page size of part of a document, click «More Paper Sizes» and change the «Apply to» drop-down box to «This Point Forward.»
Documents come in different shapes and sizes, like legal or brochure. In Word, you can change the paper size to fit the type of document you’re working on, or change the default paper size for all new documents. We’ll walk you through it!
Change the Paper Size of a Document
When you’re ready to change the paper size of a Word file, open the document and navigate to the “Page Setup” group in the “Layout” tab. Here, click “Size.”

A drop-down menu appears in which you see a generous list of paper sizes. Just select an option from this list to change the paper size of the entire document.
Change the Paper Size from a Specific Point Onward
There might be times when you need to use two different paper sizes in the same Word document. You can easily accomplish this in just a few steps.
First, make sure your cursor is where you want the new paper size to start. If that happens to be in the middle of a page, it will simply move to a new page after you select the new size.
Next, head back to the “Page Setup” group of the “Layout” tab and click “Size” again. This time, though, instead of selecting an option from the list, click “More Paper Sizes” at the bottom of the menu.
Here, in the “Paper” tab of the “Page Setup” dialog box, select the size you want under “Paper Size.”
At the bottom of the dialog box, click the drop-down arrow next to “Apply to,” click “This Point Forward,” and then click “OK.”
The location in which you had your cursor now appears on a new page with the new paper size.
Word’s default paper size is “Letter,” which is 8.5 x 11 inches. If you use a different size more frequently than the default, you can change the default size of all new documents. This way, you won’t have to change the paper size of each new document you create.
To do this, go to Layout > Size > More Paper Sizes. In the “Page Setup” dialog box, click “Paper,” and then click the drop-down arrow next to “Paper Size.”
Select the paper size you want to make the default for all future documents.
At the bottom of the dialog box, click “Set As Default.”
A message appears asking you to confirm the change; click “Yes.”
Click “OK” to close the Page Setup dialog box. Next time you open Word, the paper size will be the one you just selected.
READ NEXT
- › BLUETTI Slashed Hundreds off Its Best Power Stations for Easter Sale
- › HoloLens Now Has Windows 11 and Incredible 3D Ink Features
- › This New Google TV Streaming Device Costs Just $20
- › Google Chrome Is Getting Faster
- › How to Adjust and Change Discord Fonts
- › The New NVIDIA GeForce RTX 4070 Is Like an RTX 3080 for $599
How-To Geek is where you turn when you want experts to explain technology. Since we launched in 2006, our articles have been read billions of times. Want to know more?
Изменение формата страниц в Ворде на желаемый
Документы бывают разных форм и размеров, как принято говорить более профессиональным языком – форматов. Одни подходят для юридических задач, другие предназначены под брошюры, третьи листы можно использовать для открыток и так далее… Сегодня всю номенклатуру макулатуры создают в Word – это удобно! Но не каждый знает, что все многообразие форматов, подходящих под каждый из типов документов, можно создать в этом мощном виртуальном инструменте.
Смотрите также
Как сохранить документ Word в формате JPEG и PDF в JPEG: инструкция
Но как изменить формат бумаги (рабочего поля, в котором мы печатаем текст) в соответствии с типом документа, над которым вы работаете? Или, скажем, изменить формат бумаги по умолчанию для всех новых документов? Не знаете? А это полезно знать любому пользователю! Мы поможем в этом разобраться, это просто.
Изменение формата страниц документа в Word
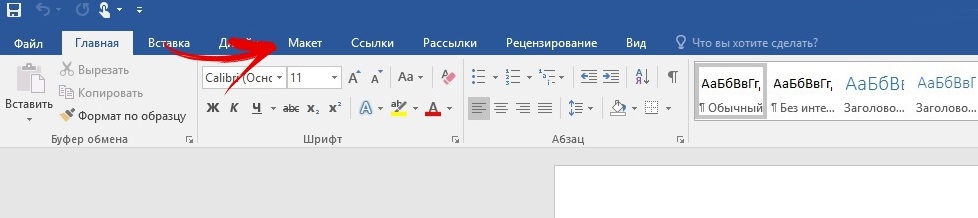
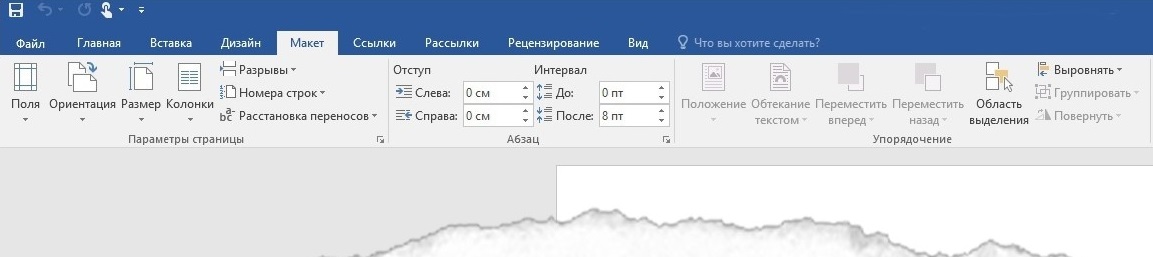
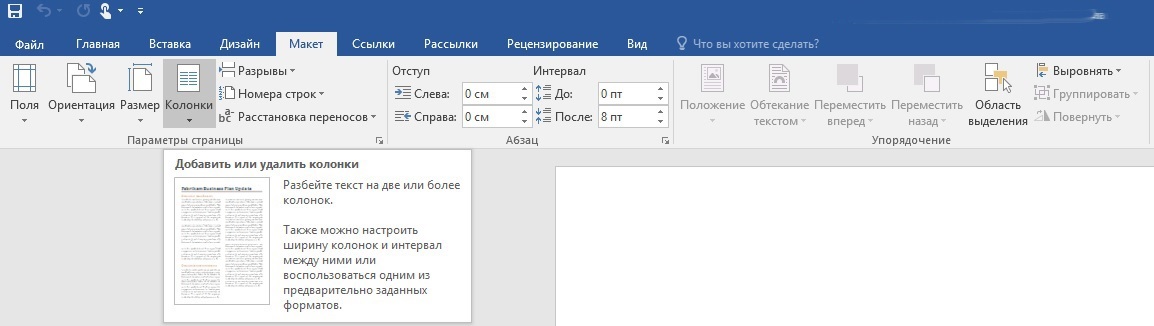
Итак, перед вами стоит задача изменить формат страницы в файле Word. Вот что для этого необходимо сделать: откройте документ и в «Панели быстрого доступа» (расположена на синем фоне сверху) перейдите на вкладку «Макет» («Page Setup» в англоязычной версии). Здесь, в «Параметрах страницы» («Layout»), нажмите кнопку «Размер» («Size»).
Появится раскрывающееся меню, в котором вы увидите список форматов страниц. Далее просто выберите искомый формат из списка для изменения размера документа.* Готово!
*Способ рассчитан на использование в современных версиях «Ворд». Ранее вкладка, отвечавшая за изменение формата, называлась «Разметка страницы».
Изменение размера страницы в Ворде под другой формат
Тем не менее иногда может потребоваться использовать в одном документе несколько разных форматов листов. Вы их также можете легко создать всего за несколько шагов.
Для этого:
Убедитесь, что курсор мыши находится на том месте, где вы желаете начать новый формат страниц. Если курсор будет стоять в середине страницы, изменения вступят в силу на новой странице после выбора нового размера.
Затем вернитесь в группу «Макет» («Page Setup»), «Макет» («Layout») и снова нажмите кнопку «Размер» («Size»). На этот раз, однако, вместо выбора варианта из списка нажмите кнопку «Другие размеры бумаги» («More Paper Sizes») в нижней части меню.
Здесь, на вкладке «Размер бумаги» («Paper») диалогового окна «Параметры страницы» («Page Setup»), выберите нужный формат.
В нижней части диалогового окна щелкните стрелку выпадающего списка рядом с надписью «Применить к» («Apply to»), нажмите кнопку «до конца документа» (This Point Forward), а затем нажмите кнопку «ОК».
Место, в котором был установлен курсор, теперь отображается на новой странице с новым размером бумаги.
Пользовательский размер страницы
Для изменения по своему вкусу воспользуйтесь параметрами в диалоговом окне «Пользовательский размер страницы». Далее:
На вкладке «Макет страницы» в группе «Параметры страницы» нажмите кнопку «Размер».
Выберите команду «Создать новый размер страницы».
После создания пользовательский размер страницы отобразится в поле «Настраиваемый» в меню «Размер».
Например, щелкните Letter (книжная ориентация) 21,59×27,94 см. Если не отображается нужный размер, щелкните «Дополнительные готовые размеры страниц» или выберите «Создать новый размер страницы», чтобы создать свой.

Изменение ориентации страницы в Word по умолчанию
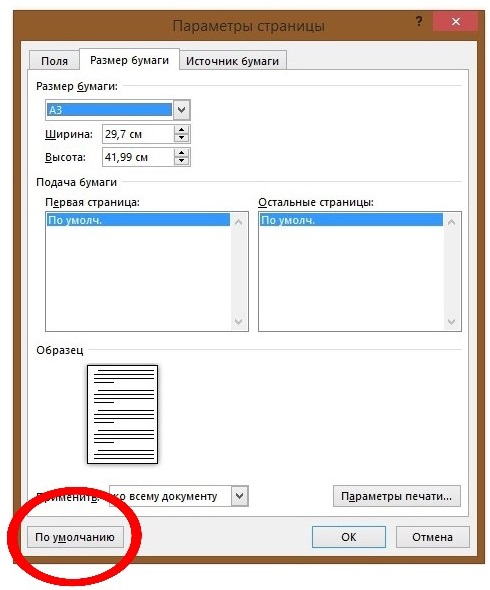
Формат бумаги Word по умолчанию – «Letter», то есть 215 мм x 279 мм. Если вы используете другой размер чаще, вы можете изменить размер для всех новых документов, и в будущем вам не придется изменять размер бумаги для каждого нового документа, который вы создадите.
Для этого перейдите в раздел «Макет» («Page Setup») > «Размер» («Size») > «Другие форматы бумаги» («More Paper Sizes»). В диалоговом окне «Параметры страницы» нажмите кнопку «Бумага», а затем щелкните стрелку списка рядом с пунктом «Размер бумаги» («Paper»).
Выберите формат бумаги, который будет использоваться по умолчанию для всех будущих документов.
В нижней части диалогового окна нажмите кнопку «По умолчанию» («Set As Default»).
Появится сообщение с просьбой подтвердить изменение; нажмите кнопку «Да».
Нажмите кнопку «ОК», чтобы закрыть диалоговое окно настройки страницы. В следующий раз, когда вы откроете Word, размер страницы будет тем, который вы выбрали.
You can use Microsoft Word to create documents in different formats and sizes. You can choose from the standard sizes built into Word. The other possibility is to customize the dimensions according to your requirements.
By default, a new Word document uses an A4 size sheet, measuring 8.27 inches by 11.69 inches. Schools and offices use the A4 size most for printing presentations. But documents can be larger or smaller in comparison to A4. Also, the user might want to change the page size of the document for printing.
It is always possible to print on a larger paper using a special printer setting. But if your printer does not allow that, the only option is to change the size of the document in Word.
The process is very simple and you only have to follow the steps in our instructions. You can change the size of all the pages while working on a Microsoft Word document. Sometimes, you may want to change the size of a specific page inside a document.
Thus, you may set up a custom page size for:
- All pages in a document
- Specific pages in a document
We will show you both the methods.
Let us begin.
Method #1: Custom page size for all pages in a document.
Step #1: Open the document
Open the Word document for which you want to change the page size. The document could be new or an existing one. The process is the same for both.
Click on the Layout tab on the top menu bar to change the ribbon.

Step #2: Select a standard page size
In the Page Setup section, click on the Size icon. This will open various selections for page size.

You can select from standard sizes like:
- Letter (8.5” x 11”)
- Tabloid (11” x 17”)
- Legal (8.5” x 14”)
- Statement (5.5” x 8.5”)
- Executive (7.25” x 10.5”)
- A3 (11.69” x 16.54”)
- A4 (8.27” x 11.69”)
- A5 (5.83” x 8.27”)
- B4(JIS) (10.12” x 14.33”)
- B5(JIS) (7.17” x 10.12”)
Step #3: Select a non-standard page
Click on More Paper Sizes. This will open the Page Setup dialog.

Click on the Paper tab.
Under Paper size, click on the downward arrow. Scroll down and click on Custom Size.
Enter your desired Width and Height of the page in inches.
Click on the downward arrow next to Apply to:. Word offers two options:
- Whole document—The page size applies to all the pages in the document.
- This point forward—The page size applies to all pages following the cursor.
Click on Whole document.
Click on Ok to exit the dialog.
Word changes all the pages in your document to your custom size.

Method #2: Custom page size for specific pages in a document
Step #1: Open the document
Click on the View tab on the top menu bar to change the ribbon.
Step #2: Increase the number of pages on display
In the Zoom section, click on Multiple Pages.

Drag the Zoom slider in the bottom right-hand corner of your screen to the left side.

This will increase the number of pages Word is displaying on the screen.

Place the cursor at the beginning of the page you want to change.
Step #3: Change the page size
Click on the Layout tab in the top menu bar to change the ribbon.
In the Page Setup section, click on Size.

This will open various selections for page size.

Click on More Paper Sizes. This will open the Page Setup dialog.

Click on the Paper tab.
Under Paper size, click on the downward arrow. Scroll down and click on Custom Size.
Enter your desired Width and Height of the page in inches.
Click on the downward arrow next to Apply to:. Word offers two options:
- Whole document—The page size applies to all the pages in the document.
- This point forward—The page size applies to all pages following the cursor.
Click on This point forward.
Click on Ok to exit the dialog.
Word changes the size according to your choice for all pages following the cursor.

Step #4: Revert to original page size for the rest of the document
Place the cursor at the beginning of the page from where you want to revert to the original size.
Repeat Step #3, only this time enter the original Width and Height of the pages.
Word changes the rest of the pages in the document to their original size.

Conclusion
We have shown you how to change to a custom page size for all pages or for a few pages of your document. Follow our instructions step by step for easily implementing the change in page size.
If you want to learn how to setup custom page size in Google Doc, check out this tutorial.