
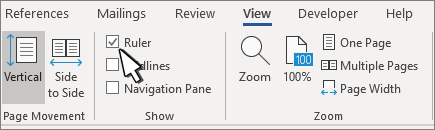
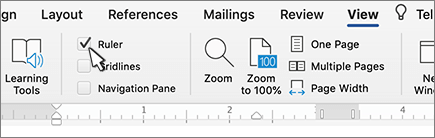
Turn on the ruler
If you don’t see the ruler at the top of your document, go to View > Ruler to display it.
Set a tab stop using the ruler
-
Select Left Tab
 at the left end of the horizontal ruler to change it to the type of tab you want.
-
Choose one of the following types:
-
A Left tab stop sets the left end of the text line. As you type, the text fills toward the right.
-
A Center tab stop sets the position at the middle of the text line. As you type, the text centers on this position.
-
A Right tab stop sets the right end of the text line. As you type, the text fills toward the left.
-
A Decimal tab stop aligns numbers around a decimal point. Without regard to the number of digits, the decimal point remains in the same position. See Use decimal tabs to line up numbers with decimal points.
-
A Bar tab stop doesn’t position text. It inserts a vertical bar at the tab position. Unlike other tabs, the bar tab is added to the text as soon as you click the ruler. If you don’t clear the bar tab stop before you print your document, the vertical line is printed.
-
-
Click or tap the bottom of the horizontal ruler where you want to set the tab stop.
 at the left end of the horizontal ruler to change it to the type of tab you want.
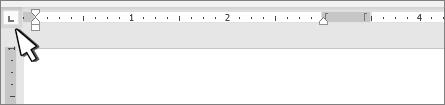
 A Center tab stop sets the position at the middle of the text line. As you type, the text centers on this position.
 A Right tab stop sets the right end of the text line. As you type, the text fills toward the left.
 A Decimal tab stop aligns numbers around a decimal point. Without regard to the number of digits, the decimal point remains in the same position. See Use decimal tabs to line up numbers with decimal points.
 A Bar tab stop doesn’t position text. It inserts a vertical bar at the tab position. Unlike other tabs, the bar tab is added to the text as soon as you click the ruler. If you don’t clear the bar tab stop before you print your document, the vertical line is printed.
Drag the tab stop down off the ruler to remove it.
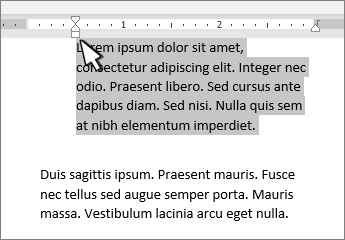
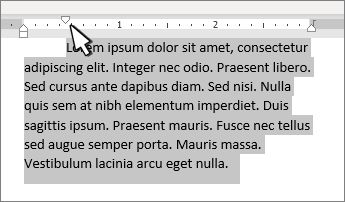
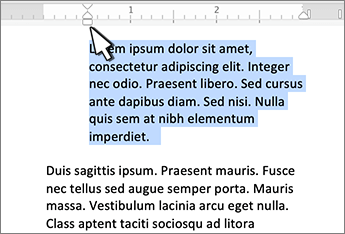
The left indent sets the position of the left side of a paragraph. When you move the left indent, your first line indent or hanging indent are moved in sync.
-
Select the text where you want set the left indent.
-
On the ruler, drag the square marker on the lower left side of the ruler to the place you want the left edge of the paragraph.
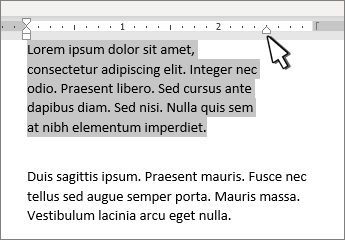
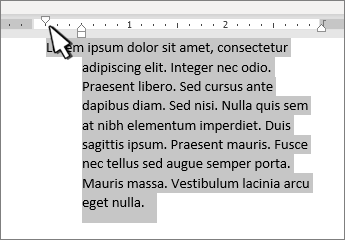
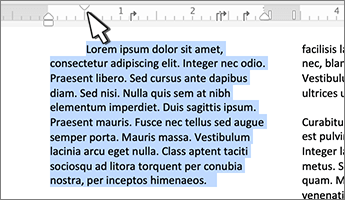
The right indent marker controls the position of the right side of a paragraph.
-
Select the text where you want set the right indent.
-
On the ruler, drag the triangular marker on the lower right side of the ruler to the place you want the right edge of the paragraph.
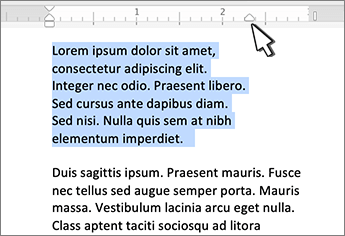
With a first line indent, the first line of a paragraph is indented and the following lines of a paragraph are not.
-
Select the text where you want to add a first line indent.
-
On the ruler, drag the triangular marker on the top left of the ruler to the place you want the indentation to start, for example to the 1″ mark.
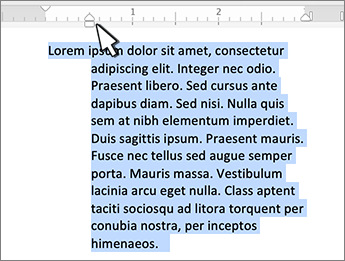
With a hanging indent, the second and all the following lines of a paragraph are indented more than the first.
-
Select the text where you want to add a hanging indent.
-
On the ruler, drag the upper triangular part of the lower marker to the place you want the indentation to start, for example to the 1″ mark.
Turn on the ruler
If you don’t see the ruler at the top of your document, go to View > Ruler to display it.
Set a tab stop using the ruler
-
Select Left Tab
at the left end of the horizontal ruler to change it to the type of tab you want.
-
Choose one of the following types:
-
A Left tab stop sets the left end of the text line. As you type, the text fills toward the right.
-
A Center tab stop sets the position at the middle of the text line. As you type, the text centers on this position.
-
A Right tab stop sets the right end of the text line. As you type, the text fills toward the left.
-
A Decimal tab stop aligns numbers around a decimal point. Without regard to the number of digits, the decimal point remains in the same position. See Use decimal tabs to line up numbers with decimal points.
-
A Bar tab stop doesn’t position text, it inserts a vertical bar at the tab position. Unlike other tabs, the bar tab is added to the text as soon as you click the ruler. If you don’t clear the bar tab stop before you print your document, the vertical line is printed.
-
-
Click or tap the bottom of the horizontal ruler where you want to set the tab stop.
 at the left end of the horizontal ruler to change it to the type of tab you want.
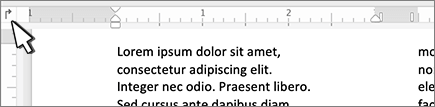
 A Center tab stop sets the position at the middle of the text line. As you type, the text centers on this position.
 A Right tab stop sets the right end of the text line. As you type, the text fills toward the left.
 A Decimal tab stop aligns numbers around a decimal point. Without regard to the number of digits, the decimal point remains in the same position. See Use decimal tabs to line up numbers with decimal points.
 A Bar tab stop doesn’t position text, it inserts a vertical bar at the tab position. Unlike other tabs, the bar tab is added to the text as soon as you click the ruler. If you don’t clear the bar tab stop before you print your document, the vertical line is printed.
Drag the tab stop down off the ruler to remove it.
The left indent sets the position of the left side of a paragraph. When you move the left indent, your first line indent or hanging indent are moved in sync.
-
Select the text where you want set the left indent.
-
On the ruler, drag the square marker on the lower left side of the ruler to the place you want the left edge of the paragraph.
The right indent marker controls the position of the right side of a paragraph.
-
Select the text where you want set the right indent.
-
On the ruler, drag the triangular marker on the lower right side of the ruler to the place you want the right edge of the paragraph.
With a first line indent, the first line of a paragraph is indented and the following lines of a paragraph are not.
-
Select the text where you want to add a first line indent.
-
On the ruler, drag the triangular marker on the top left of the ruler to the place you want the indentation to start, for example to the 1″ mark.
With a hanging indent, the second and all the following lines of a paragraph are indented more than the first.
-
Select the text where you want to add a hanging indent.
-
On the ruler, drag the upper triangular part of the lower marker to the place you want the indentation to start, for example to the 1″ mark.

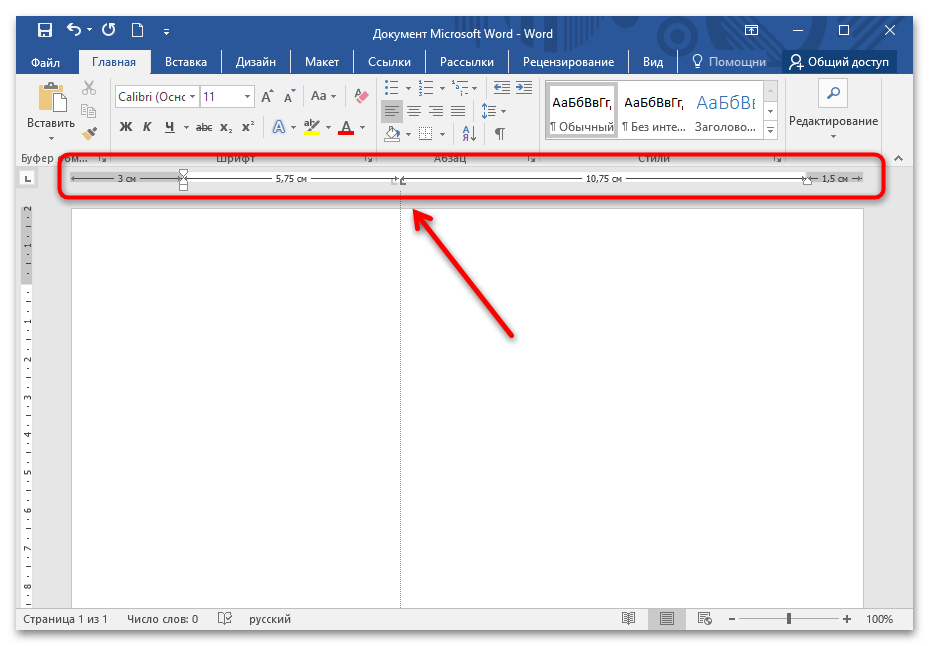
Word’s rulers let you control the margins of your page and the indentation of paragraphs. They’re great for precisely lining up images, text, and other elements. If you’re printing a document, the rulers can help ensure that what you see on your screen translates into what you’ll get on the printed page.
The trouble is, rulers aren’t even visible by default in Word anymore. Here’s how to turn them on, and how to make the most out of them.
Note: We’re working with Office 2016 in this article. The rulers have been around pretty much forever, though, and work similarly in previous versions of Word.
Activate the Rulers
First, make sure you’re in Print Layout view. On the Ribbon, switch to the “View” tab (all the way on the right). If “Print Layout” isn’t already highlighted, click it now.

Now look towards the center of the Ribbon. In the “Show” section, enable the “Rulers” option. You should immediately see the horizontal ruler above your document and the vertical ruler to its left.
Note: The horizontal ruler is also visible in Web Layout and Draft view. The vertical ruler is not.
Access the Page Setup Window
Double-click any empty space on the ruler to open the Page Setup window. This is the same window you can open from the Layout tab on the Ribbon.
The “Page Setup” window shows you most of the physical layout properties of the document. The “Margins” tab lets you set the margins for the top, bottom, left, and right, which you can verify with the markers on the ruler (see below). The Gutter is extra space on the page, usually used as an extra blank space for things like comb binding (those little plastic corkscrews that make a cheap notebook). It’s set as blank by default. You can also use this tab to control page orientation.
If you’re printing your document, the “Paper” tab lets you can change the physical size of the paper to match different paper sizes in your printer. The default is 8.5 inches by 11 inches, the standard “Letter” size for US paper printing (215.9 x 279.4mm). You can see the result of this setting in the digital rulers on the page, with the default 1-inch margins resulting in a 7.5-inch horizontal ruler and a 10-inch vertical ruler. If you’re planning on printing via a standard home printer or you’re using the primary tray in your office printer, leave this as is.
Change Margins On the Fly
Margins are indicated on the ruler by the gray and white areas. The gray areas at either end of the ruler represent your margin; the white areas the active page. The scaling of the rulers seems a little strange at first. It actually starts on the far left (or top for the vertical ruler) with a number indicating the size of your margin and then counts down. When it reaches the white, active area, it starts counting up again. You can see this in the image below, where I’ve set the margin to two inches.
In Word’s default 8.5 by 11-inch page setup, the horizontal ruler starts at 1 (indicating a one-inch margin), then resets at zero where the margin ends, then counts up to 7.5 for the remaining horizontal space. Ditto for the vertical ruler: starts at one for a one-inch margin, restarts at zero at the white space, and only goes up to ten.
Note: Word’s rulers show whatever measurement you have set in File > Options > Advanced > Show Measurements In Units Of. You can change measurements to centimeters, millimeters, points, or picas. Be aware, though, that this settings controls the units of measurement used throughout Word—not just the ruler.
You can also quickly adjust margins right from the ruler. Hold your mouse over the line separating the white and gray area. You’ll see the pointer turn to a double arrow and will likely see a tooltip letting you know you’re point at the margin. Now, just click and drag that line left or right to adjust that margin.
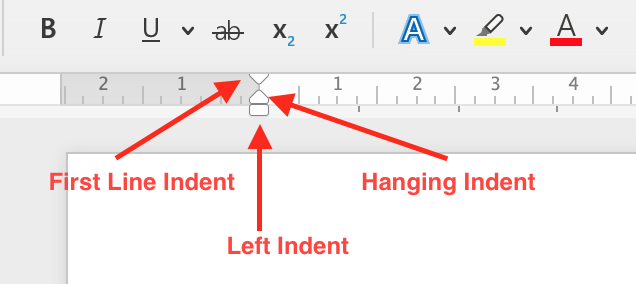
Change Indents on the Fly
Those little triangle- and box-shaped markers on the ruler are quite handy. They control the indenting of individual paragraphs. Just position your cursor in the paragraph you want to adjust and slide them around. If you want to change multiple paragraphs, select the paragraphs you want to change. And if you want to change indents throughout the whole document, just hit Ctrl+A (to select everything), and then adjust the sliders.
Here’s how each indent works.
Dragging the Left Indent marker changes the indentation for all lines of a paragraph. As you slide it, the other two indent markers move as well. Here, I’m moving the Left Indent half an inch in from the left margin.
Dragging the First Line Indent marker changes indentation for only the first line of a paragraph.
Dragging the Hanging Indent marker changes the indentation of all lines except the first line.
On the right end of the ruler, you’ll find only one marker: the Right Indent marker. Drag it to constrain the paragraph on the right side.
Add Tab Stops
A tab stop is the location your cursor moves to when you hit the Tab key. A default Word document has no tab stops, so each time you hit the Tab key, the cursor jumps ahead about eight characters. Setting tab stops lets you better control and line up text.
Of course, Word offers enough options that things get a little more complicated than that. If you look all the way to the left edge of your document, just above the vertical ruler, you’ll see the Tab Stop button.
Clicking this button lets you cycle through the different types of tab stops Word makes available. Here they are:
- Left: Left tabs are Word’s default tap stop. They’re what most people think of when they think of tab stops, and what you’ll likely use most of the time. Text is aligned against the left edge of the tab stop.
- Center: Center tabs align the text around the center of the tab stop.
- Right: Right tabs align text against the tab stop’s right edge and are a great way to align the rightmost digits of lengthy lists of numbers as you enter them.
- Decimal: Decimal tabs align numbers (or text) based on decimal points. They are great for aligning currency figures. Be careful, though. Text is also aligned on decimals, so if you type a sentence with a period, the period will align on the tab stop.
- Bar Tab: Bar tabs do not create an actual tab stop. Instead, they create a vertical line wherever you insert them. You could use these for putting vertical lines between tabbed columns in instances where you’d rather not use a table.
- Indents: Select first line and hanging indent options and then click anywhere in the active ruler space (the white area) to place the indent there. This works the same as dragging the indent markers the way we discussed in the previous section.
A little tip for you. If you’re cycling through tab stops and don’t remember what each symbol means, move your mouse away from the button and then back to activate a tool tip describing that tab stop.
To insert a tab stop, just use the button to select the type of stop you want. Now, point your mouse anywhere on the white portion of the horizontal ruler (toward the bottom of the ruler line), and then click. A symbol appears indicating the type of tab stop you’ve placed. This is a tab marker, showing where the text will jump to if you press the Tab button on your keyboard.
Here’s an example. In this paragraph, the Left Indent is half an inch from the left margin, the First Line indent is another half inch further in, and I’ve set a tab stop at two inches. I pressed the Tab button with my cursor in front of “Lorem,” so the text jumped to my manually-set tab point.
You can insert multiple tab markers if you want, and you can click and drag them around to reposition them on the fly.
To get rid of a tab marker, just drag it down (away from the ruler) and release the mouse button.
And, if you prefer to set up your tab stops manually (and a little more precisely), double-click any tab marker to open the “Tabs” window.
The ruler is just one of the little features in Word that packs a whole lot more functionality than most people realize. It provides a quick way to control margins, set various indents for a paragraph, and keep things in line using tab stops. Why Word leaves it turned off by default is beyond us, but at least now you know how to turn it back on and put it to use.
READ NEXT
- › How to Number Paragraphs in Microsoft Word
- › How to Change the Ruler Measurement Unit in Microsoft Word
- › How-To Geek is Looking for Microsoft Office Writers
- › How to Insert a Vertical Line in Microsoft Word: 5 Methods
- › How to Indent Paragraphs in Google Docs
- › How to Add, Edit, and Remove Tab Stops in Microsoft Word
- › How to Add Sideheads and Pull Quotes to Microsoft Word Documents
- › How to Adjust and Change Discord Fonts
Содержание
- Основные настройки линейки
- Изменение единицы измерения
- Измерение расстояния с помощью линейки
- Другие возможности линейки Word
- Вопросы и ответы

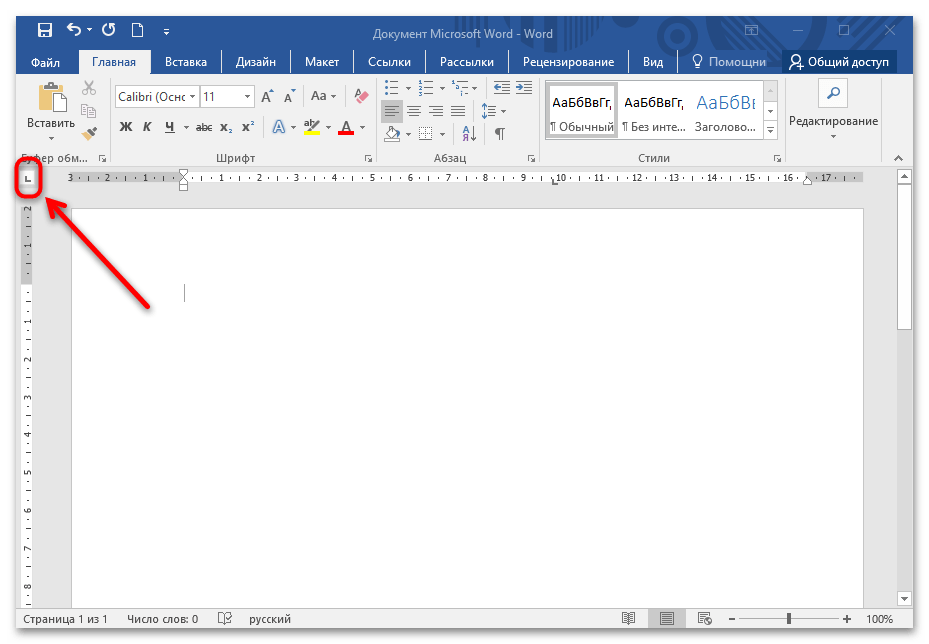
Если линейка сверху и слева окна в Word не отображается, то ее можно включить вручную через настройки вида страницы.
Подробнее: Как включить линейку в Word
Основные настройки линейки
Инструмент «Линейка» предусматривает ползунки, которые позволяют изменять положение текста и отступов, величину полей в документе, а также определять позицию табуляции. Скользящие индикаторы предназначены для следующего:
- верхний треугольник слева определяет отступ первой строчки выбранного абзаца в тексте;
- нижний индикатор задает отступ всего абзаца слева;
- ползунок справа позволяет выставить отступ для абзаца с правой стороны.

Если нужно между символами или словами оставить большее пространство, чем одиночный пробел, рекомендуется использовать табуляцию. Это позволит избежать проблем с форматированием и смещением текста. При одинарном нажатии на нижнюю часть линейки сверху отобразятся черные уголки – табуляторы, которые можно перетащить левой кнопкой мыши по линейке. С помощью них выравнивается надпись.

Подробнее: Использование табуляции в Word
Тип выравнивания табуляции можно задать специальной кнопкой в верхней части окна MS Word. В зависимости от вида иконки задается выравнивание текста по левой или правой стороне, по центру, а также табуляция с числовым выравниванием, которое соответствует десятичной точке.
Кроме того, значок в виде черной вертикальной полоски предполагает панель табуляции для вставки вертикальной черты в соответствии с позицией, но при этом она не позволяет разместить текст.
Изменение единицы измерения
Помимо сантиметров, линейка в Ворде позволяет использовать и другие единицы измерения: миллиметры, дюймы, пики, пункты. Чтобы изменить настройки, действуйте следующим образом:
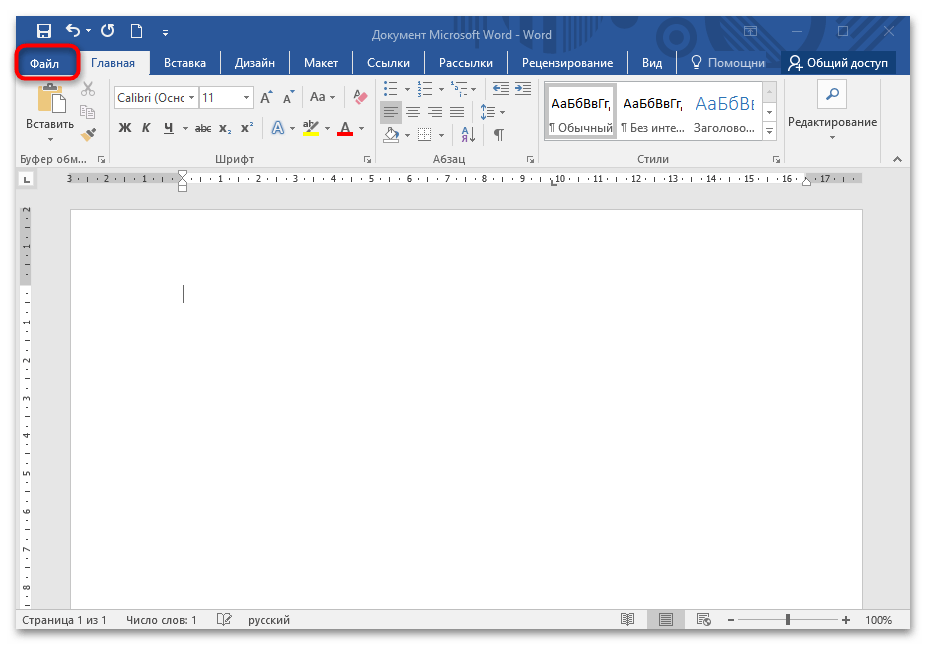
- Кликните по вкладке «Файл» в открытом документе.
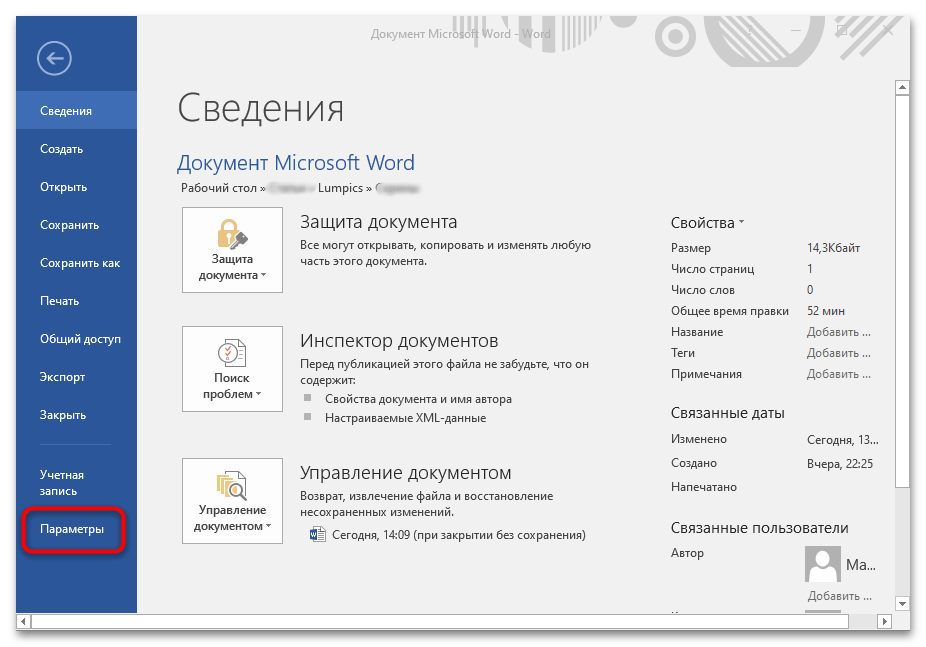
- В меню слева выберите пункт «Параметры».
- Откроется новое окно, где нужно нажать на раздел «Дополнительно». В обширном списке опций найдите блок «Экран». Рядом с функцией «Единицы измерения» кликните по раскрывающемуся меню и выберите нужное значение.
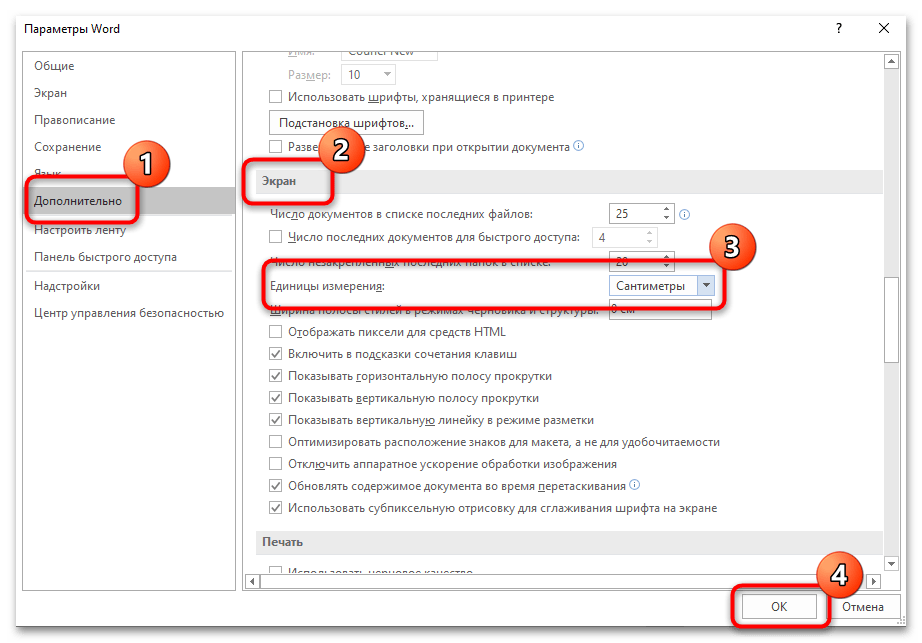
После процедуры вид линейки в Ворде изменится в соответствии с выбранной мерой измерения в параметрах редактора.
Измерение расстояния с помощью линейки
Линейкой в MS Word возможно измерить расстояние на странице документа в доступных единицах измерения. Для этого выберите значение меры через параметры способом, описанном выше, затем проделайте следующее:
- Кнопкой выбора типа табуляции в верхнем правом углу выберите любое выравнивание. Один раз щелкните левой кнопкой мыши по нижней границе линейки, чтобы установить позицию табулятора.
- Протяните уголок в нужное место на линейке, удерживая его левой кнопкой мыши, затем щелкните по правой кнопке, при этом не отпуская левую. Отобразится шкала измерения, зависящая от выбранной единицы.


Следует учитывать, что шкала берет свое начало от отступа первой строки, а также показывает расстояние между красной строки и отступом. По бокам указывается длина полей, которая подсвечивается темно-серым цветом.
Другие возможности линейки Word
Линейка скрывает множество возможностей, которые знают немногие пользователи. Помимо выравнивания и измерения, у инструмента есть следующие особенности:
- при разметке табуляторов, величины отступов или границ таблицы при помощи перетаскивания уголков можно нажимать на клавишу «Alt», чтобы установить величину в два раза точнее;
- двойное нажатие левой кнопки мыши по верхней границе горизонтальной линейки открывает дополнительное окно с параметрами страницы;
- отключение линейки позволяет сэкономить место для рабочего пространства, поэтому целесообразно деактивировать разметку, если функция не используется продолжительное время.
Еще статьи по данной теме:
Помогла ли Вам статья?
19
19 people found this article helpful
How to Show the Ruler in Word
Use it to adjust margins, tabs, and more
What to Know
- In Print Layout: On the View tab, select Print Layout. Choose the Ruler check box to display the rulers.
- In Draft Layout: On the View tab, select Draft. Choose the Ruler check box to display the rulers.
- With the rulers enabled in the print or draft layout, you can change the margins and tabs.
This article explains how to display the ruler in Microsoft Word—and how to use the ruler to change margins and create tabs.
How to Show the Ruler in Word
Word has a ruler feature that enables you to do reasonably accurate layout work right within a Word document. If you want to set a tab, or see how big your text box or headline will be when you print a document, you can use the ruler to measure where on the page you want those elements to fall and see how big they will be when printed.
If you don’t see the ruler while working on a document, it’s probably turned off. Here’s how to show the ruler in Word.
-
If you want a ruler that appears horizontally and vertically, first make sure you’re working in the Print Layout view. With your document open, select Print Layout on the View tab.
-
Select the Ruler check box. In the Ribbon, it’s located at the top of the column that also contains Gridlines and Navigation Pain.
-
The ruler will appear above your document, as well as vertically on the left side in the Print Layout.
-
With the rule enabled, you can use tabs and margins, measure the size and placement of text boxes, and more in the Print Layout view.
-
To turn the ruler off, uncheck the Ruler check box.
How to Display the Microsoft Ruler in the Draft Layout in Word
If you prefer to work in the Draft layout, rather than the Print layout, the ruler works similarly in that view. While the ruler will not appear along the vertical margin of your document in the Draft layout, it will display along the top. It works much the same way as it does in the Print layout.
-
First make sure your document is open and you’re looking at it in the Draft view. To do this, Select Draft on the View tab.
-
Select the Ruler check box on the Ribbon. It’s in the same column on the ribbon as Gridlines and Navigation Pane.
How to Use the Microsoft Word Ruler
With the Ruler is enabled in either the Print Layout or in the Draft Layout, you can use it to change the margins and tabs, or to see the size and placement of graphic or type elements.
Using the Ruler to Change the Margins
-
Hover the mouse over the double tab at the left margin. Your mouse will turn to a double arrow and “Left Margin” will display as hover text. The part of the document outside the margin — the the left — is shaded grey.
-
Select and drag the left margin icon to increase your left margin.
-
On the right end of the ruler is the right margin. Hover your mouse over it until your mouse turns into a two-way arrow with «Right Margin» appearing over it.
-
Select and drag the right margin icon to see how it changes your right margin.
How to Create a Tab Using the Ruler
-
Place your cursor on the line where you want to place the tab.
-
Select the ruler in the spot where you want the tab. This will create a small corner-shaped icon representing your tab.
-
Press the Tab key to place a tab in your document, then drag along to ruler to change the tab’s placement.
Thanks for letting us know!
Get the Latest Tech News Delivered Every Day
Subscribe
The ruler tool in Microsoft Word provides a simple way of making sure different parts of your document are aligned. It also lets you quickly adjust margins and indents in your work. So, how does it work? Let us explain.
How to Display the Ruler in Microsoft Word
To show the horizontal and vertical rulers in Microsoft Word, simply:
- Go to the View tab on the main ribbon.
- Click the Ruler checkbox.
This should then display the rulers on the top and left margins in the Print Layout view. You can then change the unit of measurement to suit your requirements.

How to Adjust Margins Using the Ruler
On the ruler, the gray areas represent the margins of your document. The white space between these represents the part of the page writing will appear within.
To adjust a margin in a document using the ruler tool:
- Hover the cursor at the edge of the margin you want to adjust.
- When the double-headed arrow cursor appears, click and drag to increase or decrease the margin size.
However, this way of adjusting margins can be inexact. As such, if you need to ensure precision, we suggest using the standard margin options in Word.
How to Use Indentation Tabs
You should also be able to see some white shapes on the edge of the ruler. You can use these to quickly adjust indentations in a document. All you need to do is place the cursor in text you want to indent, then drag the relevant shape on the ruler.
The trick, then, is making sure you select the correct tab! On that note:
Find this useful?
Subscribe to our newsletter and get writing tips from our editors straight to your inbox.
- To adjust the left indent (i.e., the indentation of text from the left margin), drag the rectangle shape on the ruler to move all the tabs at once. This will then adjust all the text in the paragraph where you placed the cursor.
- To add or adjust a first line indent, drag the arrow at the top of the ruler. This will indent just the first line in the paragraph where you placed the cursor.
- For a hanging indent, select and move the triangle just above the rectangle shape (this will also move the left indent tab). Doing this will indent each line in the selected paragraph after the first line.
- To adjust the right indent, simply click and drag the arrow on the righthand side of the rule. This will indent text from the right margin.
If you’re not sure which tab is which, moreover, simply hover the cursor over any of the shapes on the ruler. Its name will then pop up, helping you to pick the right one.
As with margins, though, adjusting indents via the ruler can be imprecise. To ensure consistency, you may want to check the size of indents via the paragraph menus.
Toggling the Vertical Ruler
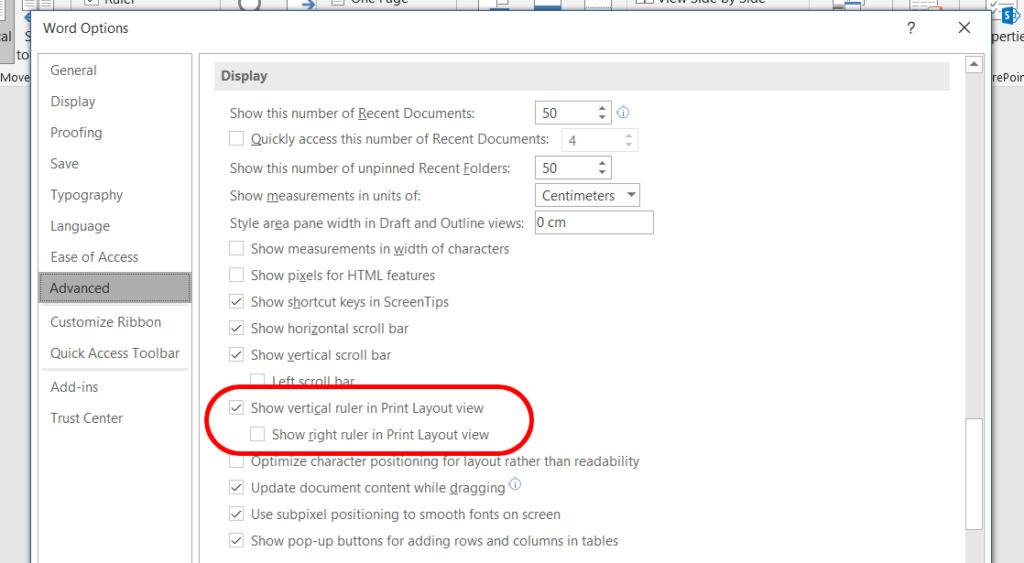
If the vertical ruler doesn’t display with the horizontal one, you may need to turn it on via the options menu. To do this in Word for Windows:
- Go to File > Options > Advanced and scroll down to Display.
- Click the Show vertical ruler in Print Layout view checkbox (you can also select to display this ruler on the right margin here).
- Click OK to accept the change.
In Word for Mac, meanwhile, the process is:
- Go to Word > Preferences via the toolbar.
- Select View under Authoring and Proofing Tools.
- Check Vertical ruler under Show Window Elements.
- Close the preferences pane to save your changes.
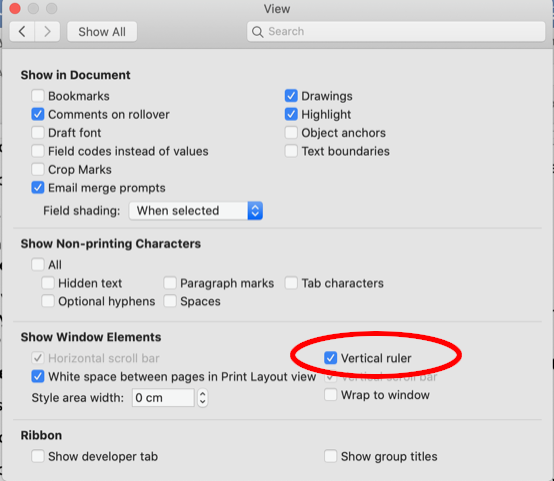
You should now see the vertical ruler running down the left side of your document.
Expert Formatting Services
If you want to be sure your documents look perfect, our formatting services could be exactly what you need. All you need to do is add the “Formatting” option when you upload a document for proofreading, then let us know what formatting to apply!