
If you find yourself needing to expand or reduce Excel’s row widths and column heights, there are several ways to adjust them. The table below shows the minimum, maximum and default sizes for each based on a point scale.
|
Type |
Min |
Max |
Default |
|---|---|---|---|
|
Column |
0 (hidden) |
255 |
8.43 |
|
Row |
0 (hidden) |
409 |
15.00 |
Notes:
-
If you are working in Page Layout view (View tab, Workbook Views group, Page Layout button), you can specify a column width or row height in inches, centimeters and millimeters. The measurement unit is in inches by default. Go to File > Options > Advanced > Display > select an option from the Ruler Units list. If you switch to Normal view, then column widths and row heights will be displayed in points.
-
Individual rows and columns can only have one setting. For example, a single column can have a 25 point width, but it can’t be 25 points wide for one row, and 10 points for another.

Set a column to a specific width
-
Select the column or columns that you want to change.
-
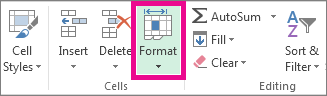
On the Home tab, in the Cells group, click Format.

-
Under Cell Size, click Column Width.
-
In the Column width box, type the value that you want.
-
Click OK.
Tip: To quickly set the width of a single column, right-click the selected column, click Column Width, type the value that you want, and then click OK.
-
Select the column or columns that you want to change.
-
On the Home tab, in the Cells group, click Format.
-
Under Cell Size, click AutoFit Column Width.
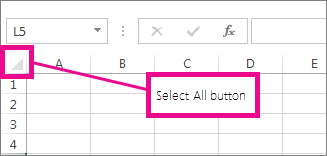
Note: To quickly autofit all columns on the worksheet, click the Select All button, and then double-click any boundary between two column headings.
-
Select a cell in the column that has the width that you want to use.
-
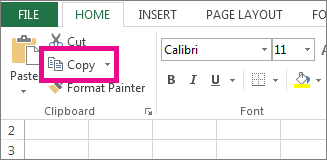
Press Ctrl+C, or on the Home tab, in the Clipboard group, click Copy.
-
Right-click a cell in the target column, point to Paste Special, and then click the Keep Source Columns Widths
button.
 button.
The value for the default column width indicates the average number of characters of the standard font that fit in a cell. You can specify a different number for the default column width for a worksheet or workbook.
-
Do one of the following:
-
To change the default column width for a worksheet, click its sheet tab.
-
To change the default column width for the entire workbook, right-click a sheet tab, and then click Select All Sheets on the shortcut menu.
-
-
On the Home tab, in the Cells group, click Format.
-
Under Cell Size, click Default Width.
-
In the Standard column width box, type a new measurement, and then click OK.

Do one of the following:
-
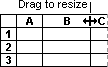
To change the width of one column, drag the boundary on the right side of the column heading until the column is the width that you want.
-
To change the width of multiple columns, select the columns that you want to change, and then drag a boundary to the right of a selected column heading.
-
To change the width of columns to fit the contents, select the column or columns that you want to change, and then double-click the boundary to the right of a selected column heading.
-
To change the width of all columns on the worksheet, click the Select All button, and then drag the boundary of any column heading.
-
Select the row or rows that you want to change.
-
On the Home tab, in the Cells group, click Format.
-
Under Cell Size, click Row Height.
-
In the Row height box, type the value that you want, and then click OK.
-
Select the row or rows that you want to change.
-
On the Home tab, in the Cells group, click Format.
-
Under Cell Size, click AutoFit Row Height.
Tip: To quickly autofit all rows on the worksheet, click the Select All button, and then double-click the boundary below one of the row headings.
Do one of the following:
-
To change the row height of one row, drag the boundary below the row heading until the row is the height that you want.
-
To change the row height of multiple rows, select the rows that you want to change, and then drag the boundary below one of the selected row headings.
-
To change the row height for all rows on the worksheet, click the Select All button, and then drag the boundary below any row heading.
-
To change the row height to fit the contents, double-click the boundary below the row heading.
Top of Page
If you prefer to work with column widths and row heights in inches, you should work in Page Layout view (View tab, Workbook Views group, Page Layout button). In Page Layout view, you can specify a column width or row height in inches. In this view, inches are the measurement unit by default, but you can change the measurement unit to centimeters or millimeters.
-
In Excel 2007, click the Microsoft Office Button
> Excel Options> Advanced. -
In Excel 2010, go to File > Options > Advanced.
 > Excel Options> Advanced.
Set a column to a specific width
-
Select the column or columns that you want to change.
-
On the Home tab, in the Cells group, click Format.
-
Under Cell Size, click Column Width.
-
In the Column width box, type the value that you want.

-
Select the column or columns that you want to change.
-
On the Home tab, in the Cells group, click Format.
-
Under Cell Size, click AutoFit Column Width.
Tip To quickly autofit all columns on the worksheet, click the Select All button and then double-click any boundary between two column headings.

-
Select a cell in the column that has the width that you want to use.
-
On the Home tab, in the Clipboard group, click Copy, and then select the target column.
-
On the Home tab, in the Clipboard group, click the arrow below Paste, and then click Paste Special.
-
Under Paste, select Column widths.

The value for the default column width indicates the average number of characters of the standard font that fit in a cell. You can specify a different number for the default column width for a worksheet or workbook.
-
Do one of the following:
-
To change the default column width for a worksheet, click its sheet tab.
-
To change the default column width for the entire workbook, right-click a sheet tab, and then click Select All Sheets on the shortcut menu.
-
-
On the Home tab, in the Cells group, click Format.
-
Under Cell Size, click Default Width.
-
In the Default column width box, type a new measurement.

Tip If you want to define the default column width for all new workbooks and worksheets, you can create a workbook template or a worksheet template, and then base new workbooks or worksheets on those templates. For more information, see Save a workbook or worksheet as a template.
Do one of the following:
-
To change the width of one column, drag the boundary on the right side of the column heading until the column is the width that you want.
-
To change the width of multiple columns, select the columns that you want to change, and then drag a boundary to the right of a selected column heading.
-
To change the width of columns to fit the contents, select the column or columns that you want to change, and then double-click the boundary to the right of a selected column heading.
-
To change the width of all columns on the worksheet, click the Select All button, and then drag the boundary of any column heading.
-
Select the row or rows that you want to change.
-
On the Home tab, in the Cells group, click Format.
-
Under Cell Size, click Row Height.
-
In the Row height box, type the value that you want.
-
Select the row or rows that you want to change.
-
On the Home tab, in the Cells group, click Format.
-
Under Cell Size, click AutoFit Row Height.
Tip To quickly autofit all rows on the worksheet, click the Select All button and then double-click the boundary below one of the row headings.
Do one of the following:
-
To change the row height of one row, drag the boundary below the row heading until the row is the height that you want.
-
To change the row height of multiple rows, select the rows that you want to change, and then drag the boundary below one of the selected row headings.
-
To change the row height for all rows on the worksheet, click the Select All button, and then drag the boundary below any row heading.
-
To change the row height to fit the contents, double-click the boundary below the row heading.
Top of Page
See Also
Change the column width or row height (PC)
Change the column width or row height (Mac)
Change the column width or row height (web)
How to avoid broken formulas
Excel has cells that are neatly divided into rows and columns in a worksheet.
And when you start working with data in Excel, one of the common tasks you have to do is to adjust the row height in Excel based on your data (or adjust the column width).
It’s a really simple thing to do, and in this short Excel tutorial I will show you five ways to change row height in Excel
Change the Row Height with Click and Drag (Using the Mouse)
The easiest and the most popular method to change row height in Excel is to use the mouse.
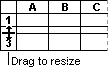
Suppose you have a data set as shown below, and you want to change the row height of the third row (so that the entire text is visible in the row).

Below are the steps to use the mouse to change the row height in Excel:
- Place the cursor at the bottom edge of the row header for which you want to change the height. You will notice that the cursor would change into a plus icon

- With the cursor on the bottom edge of the row header, press the left mouse key.
- Keep the mouse key pressed and drag it down to increase the row height (or drag it up to decrease the row height)

- Leave the mouse key when done


This is an easy way to change the row height in Excel and is a good method if you only have to do it for one row or a couple of rows.
You can also do this for multiple rows. Just select all the rows for which you want to increase/decrease the height and use the cursor and drag (for any of the selected rows).
One drawback of this method is that it doesn’t give consistent results every time you change the row height. For example, if you change the row height for one row and then again for another row it may not be the same (it may be close but may not exactly be the same)
Let’s look at more methods that are more precise and can be used when you have to change the row height of multiple rows in one go.
Also read: How to Copy Column Widths in Excel (Shortcut)
Using the Mouse Double Click Method
If you want Excel to automatically adjust the row height in such a way that the text nicely fits within the cell, this is the fastest and the easiest method.
Suppose you have a data set as shown below, and you want to change the row height of the third row (so that the entire text is visible in the row).
Below are the steps to automatically adjust the row height using mouse double-click:
- Place the cursor at the bottom edge of the row header for which you want to change the height. You will notice that the cursor would change into a plus icon
- With the cursor on the bottom edge of the row alphabet, double click (press the left mouse key in quick succession)
- Leave the mouse key when done
When you double-click the mouse key, it automatically expands or contracts the row height to make sure that it is enough to display all the text within the cell.

You can also do this for a range of cells.
For example, if you have multiple cells and you need to at just the row height for all the cells, select the row header for these cells and double click on the edge of any of the rows.
Manually Setting the Row Height
You can specify the exact row height you want for a row (or multiple rows).
Let’s say you have a data set as shown below and you want to increase the row height of all the rows in the data set.

Below are the steps to do this:
- Select all the rows by clicking and dragging on the row headers (or select the cells in a column for all the rows for which you want to change the height)

- Click the Home tab

- in the Cells group, click on the Format option

- In the dropdown, click on the Row Height option.

- In the Row Height dialog box, enter the height that you want for each of these selected rows. For this example, I would go with 50.

- Click on OK


The above steps would change the row height of all the selected rows to 50 (the default row height on my system was 14.4)

While you can use the previously covered mouse double click method as well, the difference with this method is that all your rows are of the same height (which some people find better)
Keyboard Shortcut To Specify the Row Height
If you prefer using a keyboard shortcut instead, this method is for you.
Below is the keyboard shortcut that will open the row height dialog box where you can manually insert the row height value that you want
ALT + H + O + H (press one after the other)
Let’s say you have a data set as shown below and you want to increase the row height of all the rows in the data set.
Below are the steps to use this keyboard shortcut to change the row height:
- Select the cells in a column for all the rows for which you want to change the height
- Use the keyboard shortcut – ALT + H + O + H
- In the Row Height dialog box that opens, enter the height that you want for each of these selected rows. For this example, I would go with 50.
- Click on OK
A lot of people prefer this method as you don’t have to leave your keyboard to change the row height (if you have a certain height value in mind that you want to apply for all the selected cells).
While this may look like a long keyboard shortcut, if you get used to it, it’s faster than the other methods covered above.
Autofit Rows
Most of the methods covered so far are dependent on the user specifying the row height (either by clicking and dragging or by entering the value of the row height in the dialog box).
But in many cases, you don’t want to manually do this.
Sometimes you just need to make sure that the row height adjusts to make sure that the text is visible.
This is where you can use the autofit feature.
Suppose you have a data set as shown below where there is more text in each cell and the additional text is being cut off because the height of the cell is not enough.
Below are the steps to use autofit to increase the row height to fit the text in it:
- Select the rows that you want to autofit
- Click the Home tab
- In the Cells group, click on the Format option. Doing this will show an additional dropdown of options
- Click on the Autofit Row Height option


The above steps would change the row height and auto fit the text in such a way that all the text in these rows would now be visible.
In case you change the column height, the row height would automatically adjust to make sure that there are no extra spaces within the row.
There are more ways to use autofit in Excel, and you can read more about it here.
Can We Change the Default Row Height in Excel?
While it would be great to have an option to set the default row height, unfortunately as of writing this article, there is no way to set the default row height.
The Excel version that I’m using currently (Microsoft 365) has the default row height value of 14.4.
One of the articles I found online suggested that I can change the default font size and that would automatically change the row height.
While this does seem to work, it’s too messy (given that it only takes a few seconds to change the row height by any of the methods I’ve covered above in this tutorial)
Bottom line – there is no way to set the default row height in Excel of now.
And since it’s quite easy to change the row height and the column width, I don’t expect Excel to have this feature anytime soon (or ever).
In this tutorial, I’ve shown you 5 easy ways to quickly change the row height (by using the mouse, a keyboard shortcut, or by using the autofit feature).
All the methods covered here can also be used to change the column width as well.
I hope you found this tutorial useful.
Other Excel Tutorials you may like:
- How to Delete All Hidden Rows and Columns in Excel
- How to Indent in Excel
- How to Wrap Text in Excel (with a shortcut, One Click, and a Formula)
- Insert a Blank Row after Every Row in Excel (or Every Nth Row)
- Delete Rows Based on a Cell Value (or Condition) in Excel
- How to Lock Row Height & Column Width in Excel
In this tutorial, you will learn how to make all rows the same height and all columns the same width in Excel and Google Sheets.
When working in Excel, we often have data exported from some other system and the general layout can be pretty messy. Therefore we may need to sort out the worksheet to be able to work with data. One thing that often needs to be done is to set all rows to the same height and all columns to the same width.
Make All Rows the Same Height
To make all rows the same height, follow these steps:
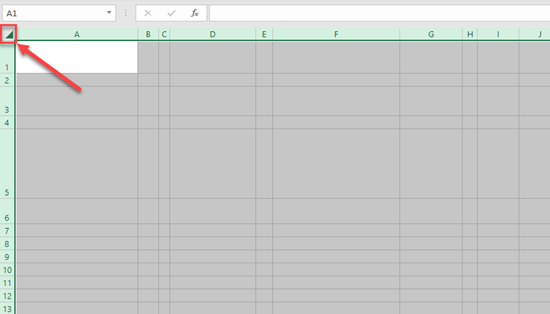
1. Select all cells in the worksheet. To do this, click on the arrow in the upper left corner of the gridlines.
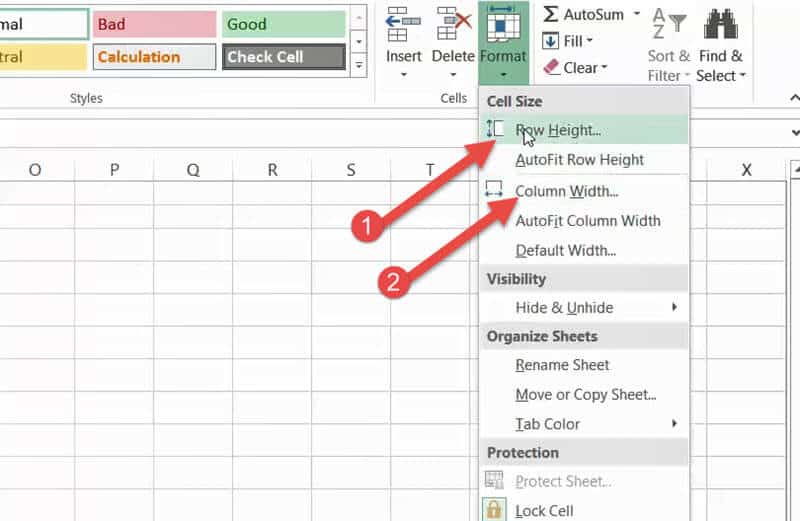
2. In the Ribbon, go to Home > Format > Row Height.
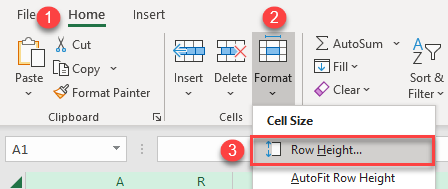
3. In the pop-up screen, (1) set Row height (for example, we set 20 here), and (2) click OK
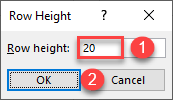
As a result, all cells in the worksheet now have the same height (20).
Make All Columns the Same Width
Similarly, we can make all columns the same width by following these steps:
1. Select all cells in the worksheet. To do this, click on the arrow in the upper left corner of the gridlines.
2. In the Ribbon, go to Home > Format > Column Width.
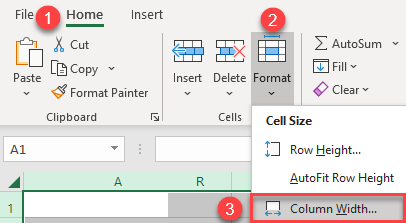
3. In the pop-up screen, (1) set Column width (for example, we set 15 here), and (2) click OK.
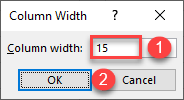
As a result, all cells in the worksheet now have the same height (15). Now the whole worksheet has cells with the same height and width.
Make All Rows the Same Height by Dragging
Another way to make all rows the same height is to drag a row boundary while all rows are selected.
1. Select all cells in the worksheet. To do this, click on the arrow in the upper left corner of the gridlines.
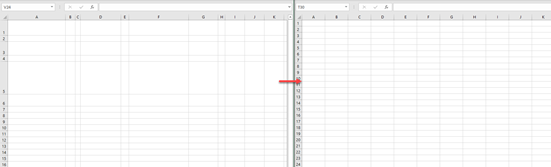
2. Now, click on the line between any two rows’ numbers and drag the cursor up or down to resize a row. This resizing will actually resize all the rows in the worksheet. While we’re dragging the cursor, we’ll see row heights in points and pixels, so we can set an exact value if we want.
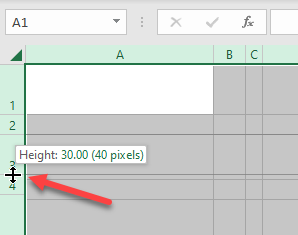
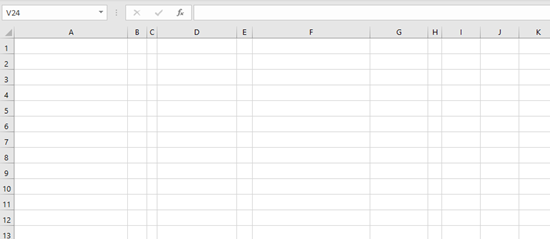
As you can see in the picture below, we set the same row height for all rows in the sheet.
Make All Columns the Same Width by Dragging
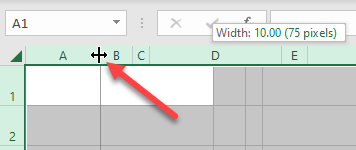
Just like sizing rows, as shown above, we can also make all columns the same width by dragging the cursor right or left.
1. Select all cells in the worksheet. To do this, click on the arrow in the upper left corner of the gridlines.
2. Now, click on the line between any column letter and drag the cursor left or right in order to resize a column. As we saw previously, this resizing will affect all the columns in the worksheet. While we’re dragging the cursor, we’ll see columns width in points and pixels, so we can set an exact value if we want.
Again, we achieved the same result and made all the columns the same width.
Note that macros can also be used to change row height and column width.
Make All Rows the Same Height in Google Sheets
To make all rows the same height in Google Sheets, do the following:
1. First, select Row 1 by clicking on its header and press CTRL + SHIFT + DOWN to select all visible rows.
2. Next, (1) click on any row heading (numbers) and (2) press Resize rows 1-1000.
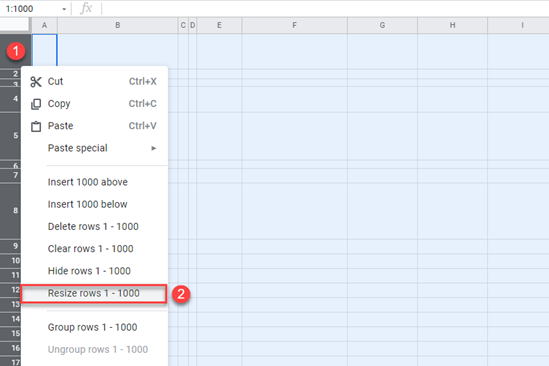
3. In the pop-up screen, (1) select Specify row height and (2) set row height, for example, 25. (3) Click OK.
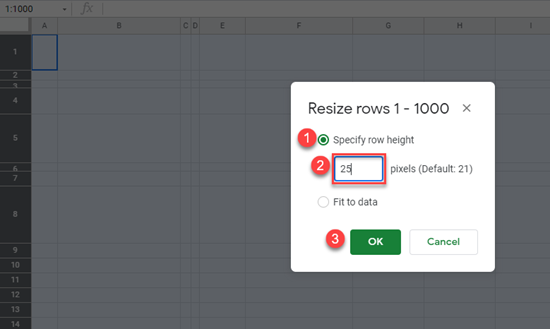
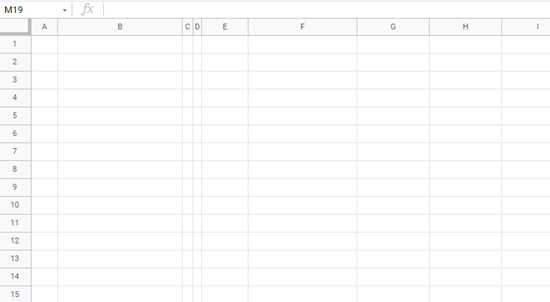
As a result, all cells have the same height (25).
Make All Columns the Same Width in Google Sheets
Now we can also make all columns the same width in Google Sheets.
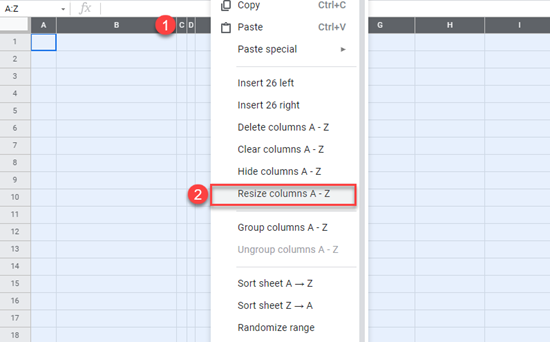
1. First, select Column A by clicking on its header and press CTRL + SHIFT + RIGHT in order to select all visible columns.
2. Next, (1) click on any column heading (letter) and (2) press Resize columns A-Z.
3. In the pop-up screen, (1) select Enter new column width in pixels and (2) set column width, for example, 50. (3) Click OK.
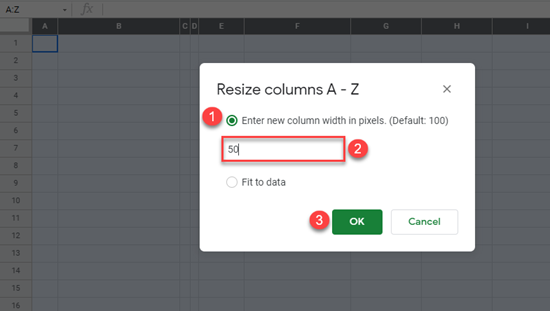
Finally, all cells in this sheet have the same height and width.
We can also resize all rows or columns in Google Sheets by dragging. This works exactly the same as shown above for Excel.

By default, when you create a new workbook in Excel, the row height and column width is always the same for all cells. However, you can easily change the height and width for one or more rows and columns.
For new Excel workbooks, the default row height for all the rows is 15, with the default font of Calibri and default font size of 11 points. The default column width for all the columns is 8.38. The default row height for each row depends on the largest font and font size chosen in any of the cells in that row (you can assign different fonts and font sizes for different cells). However, you can choose a specific height for any of the rows as well as a specific column width for any of the columns. The height can be different for different rows and the width different for different columns.
If you want to adjust one row, you can move the cursor over the bottom border of the row heading until it turns into a bar with a double arrow. Then, click on the border and drag it up or down to change the height of the row above the border. As you drag the cursor, the changing height displays in a popup.

You can do the same thing to change the width of a column: drag the double-arrow cursor to the left or right on the right border of the column. The width of the column to the left of the border changes width. The width of other columns are not affected.
RELATED: How to Show and Hide Row and Column Headers in Excel
You can be more exact when specifying the height of one or more rows by entering a specific number for the height. To do this, move your mouse over a row heading until it turns into a right arrow. Then, click on the row heading to select the entire row. If you don’t see the row headings, they might be hidden.
To select more than one row, click on the first row heading you want to select and drag up or down to select contiguous rows. If the rows you want to select are not contiguous, click the first row heading and then press Ctrl and click on the headings for the other rows you want to select, just like you do to select multiple files in File (or Windows) Explorer.
Either right-click on any selected row or press Shift+F10 on your keyboard. Select “Row Height” from the popup menu.
Enter a new value for the row height for the selected rows on the Row Height dialog box and click “OK”.
NOTE: You should note what the default, or original, values for row height and column width are before changing them, in case you want to revert back to those values.
You can specify an exact width for one or more columns the same way. Select the columns using the column headings, just like you did for the rows, but drag left or right to select multiple contiguous rows. Then, press Shift+F10 and select “Column Width” from the popup menu.
Enter an exact width for the selected columns on the Column Width dialog box and click “OK”.
Here’s what our worksheet looks like with the height of the first three rows and the width of the first three columns changed.
You can change the row height back to the default height, but it many not necessarily be the standard default height. The current default height will be one that fits the largest font and font size used in that row. In other words, the row height of the selected row will be changed to automatically fit the contents of that row.
To automatically fit the row height, select the rows you want to resize to their default height, make sure the Home tab is active, click “Format” in the Cells section, and then select “AutoFit Row Height” from the Cell Size drop-down menu.
To automatically fit one row, you can move the mouse over the bottom border of the desired row heading until it turns into a bar with a double (up and down) arrow, just like when you dragged the border to change the row height. This time, double-click on the border. The row height changes to fit the largest font and font size used in that row.
There is also an option to autofit the width of selected columns, but it works slightly differently. The AutoFit Row Height options automatically changes the row height to fit the largest font and font size whether or not there is any content in any cells in that row.
When you select one or more columns and then select “AutoFit Column Width” from the “Cell Size” menu in the Cells section of the Home tab, a selected column will only change size if there is content in any cell in that column. Otherwise, if all the cells in the column are empty, the size of that column will not be affected.
You can also automatically change the width of a column to fit the widest contents in that column by moving the mouse over the border on the desired column heading until it turns into a bar with an double (left and right) arrow, just like when you dragged the border to change the column width. This time, double-click on the border. The column width changes to fit the widest cell contents in that column. This also only works on columns that are not completely empty.
Because the default row height is affected by the font and font size assigned to the cells in each row, you cannot specify a value for the default row height. However, the default column width for all the columns in the current worksheet can be changed. To specify a different column width for all the columns in the current worksheet, make sure the Home tab is active, click “Format” in the Cells section, and then select “Default Width” from the Cell Size drop-down menu.
Enter a value for the Standard column width on the Standard width dialog box and click “OK”. The width of all the columns on the current worksheet change to the specified width, no matter how wide the contents are in any of the cells.
RELATED: How to Hide Cells, Rows, and Columns in Excel
You can also convert rows into columns and columns into rows, delete blank rows and columns, hide rows and columns, freeze rows and columns, and print the row and column headings in Excel.
READ NEXT
- › How to Shrink or Expand Cells to Fit Text in Microsoft Excel
- › How to Set Row Height and Column Width in Excel Using the Keyboard
- › How to Lock Column Width and Row Height in Microsoft Excel
- › How to Resize All Columns and Rows in Microsoft Excel
- › How to Add and Remove Columns and Rows in Microsoft Excel
- › How to Shrink Text to Fit a Cell in Microsoft Excel
- › How to Use the IMAGE Function in Microsoft Excel
- › Liquid Metal vs. Thermal Paste: Is Liquid Metal Better?
A neat looking worksheet is always better than a shabby and unorganized one. You can tell if a sheet has been handled repeatedly by different people by just one look at it.
You will find it unorganized and shabby, often with rows and columns of varying sizes. Nobody likes that!
Maybe you were the one destined to put the sheet back in shape and make it nice and neat with trimmed cells that are evenly sized! In this Excel tutorial, we will help you do just that.
We will show you how you can set the column width and row height of all your cells so that they are all the same size. We will also show you how you can make sure that all the cells are well fitted around the content for added neatness.
In the end, we will show you how you can speed up this process by using simple VBA macro codes.
Setting the Column Width and Row Height of All Cells to a Specific Size
When you open a fresh Excel worksheet, you will always find the cells to be of a specific width and height by default. The default row height is 15 and the default column width is 8.43.
However, as you work on these cells, the heights and widths of the cells keep expanding to accommodate the contents of your cells.
In the end, what you get is a hodgepodge of cells of varying heights and widths.
Giving these cell sizes some uniformity though is quite easy. Here’s how you can achieve this.
If you want to resize your entire worksheet, do the following:
- Click on the ‘Select All’ button on the top-left of the Excel window.

- Set the Column width for all the cells. Right-click on any column header. Select ‘Column Width’ from the popup menu. Enter the size to which you want to set all the columns.
- Set the Row height for all the cells. Right-click on any row, select ‘Row Height’ from the popup menu. Enter the size to which you want to set all the rows.

That’s all. You will get all your cells uniformly adjusted to your required size.

Setting the Column Width and Row Height of Selected Cells to a Specific Size
If you want to resize only selected cells, do the following:
- Drag and select all your required cells. If there are a lot of cells that you need to select, click on the cell at the top left corner of your required selection, then pressing down on the SHIFT key, click on the cell at the bottom right corner of your required selection.
- Set the column width for the selected cells. Under the Home tab, select ‘Format’ (from the Cells group). Select ‘Column Width’ and enter the size to which you want to set all the columns in the small ‘Column Width’ window that appears.
- Set the row height for the selected cells. Under the Home tab, select ‘Format’ (from the Cells group). Select ‘Row Height’ and enter the size to which you want to set all the columns in the small ‘Row Height’ window that appears.
Your selected cells will now be equally resized to your requirement.
Applying the Same Column Width and Row Height by Using a Mouse
- Apply the same column width by selecting the column headers of all the cells you want to adjust.
- Drag the boundary of any one of the selected column headers to the width you like. When you release the mouse button, you will find all the other selected columns resized to the same width.

- Similarly, you can apply the same row height by selecting the row headers of all the cells you want to adjust.
- Drag the boundary of any one of the selected row headers to the height you like. When you release the mouse button, you will find all the other selected rows resized to the same height.

Changing the Column Width and Row Height to Auto-fit the Contents
In case you want to further make your sheet look neat, you can adjust the cell sizes to the height/ width of the cell with the highest height/ width.
- Select the column headers of the cells you want to adjust.
- Double click the boundary of any one of the selected column headers. You will find all the selected columns adjusted to fit the contents of the widest cell in each column.
- Similarly, select the row headers of the cells you want to adjust
- Double click the boundary of any one of the selected row headers. You will find all the selected rows adjusted to fit the contents of the cell with the most height in each row.
Using VBScript
If you are comfortable using VBScript, you can easily speed up the above processes by copying and pasting a short script into your developer window.
- Select the rows and columns that you want to adjust.
- From the Developer Menu Ribbon, select Visual Basic.
- Once your VBA window opens, Click Insert->Module. Now you can start adding your code.
Using VBScript to Set the Selected Cells to a Specific Size
Let us assume that you want to set all the selected cells to a column width of 10 and a row height of 20.
You can then copy and paste the following lines to your Developer window:
Sub makeequalsize()
Selection.ColumnWidth = 10
Selection.RowHeight = 20
End Sub
You can also choose to specify the range of cells that you want to set to a specific size.
For example, if you want to set the size for the range A2 to G12, you can use the following code:
Sub makeequalsize()
Range("A2:G12").ColumnWidth = 10
Range("A2:G12").RowHeight = 20
End Sub
Note: You can replace the column width and row height according to your preference.
Using VBScript to Set the Selected Cells to the Same Size as a Specific Cell
If you have a reference cell with the perfect size that you want to copy to all other cells in your selection, say cell B5, then copy and paste the following lines:
Sub makeequalsize()
Selection.ColumnWidth = Columns("B").ColumnWidth
Selection.RowHeight = Rows("5").RowHeight
End Sub
You can also choose to specify the range of cells that you want to set to the size of a particular cell.
For example, if you want to set the size for the range A2 to G12 to the size of cell B5, you can use the following code:
Sub makeequalsize()
Range("A2:G12").ColumnWidth = Columns("B").ColumnWidth
Range("A2:G12").RowHeight = Rows("5").RowHeight
End Sub
Note: You can replace the column name “B” and row number “5” with the corresponding column name and row number of your preferred cell.
Using VBScript to Auto-fit the Contents of All Selected Cells
To adjust the cell sizes to the height/ width of the cell with the highest height/ width, you can use AutoFit as follows:
To autofit the column width of the selected cells, copy-paste the following lines:
Sub autofitColumns()
Selection.Columns.AutoFit
End Sub
To autofit the row height of selected cells, copy-paste the following lines:
Sub autofitRows()
Selection.Rows.AutoFit
End Sub
To autofit both, you can combine the two commands as follows:
Sub autofitAllCells()
Selection.Columns.AutoFit
Selection.Rows.AutoFit
End Sub
Conclusion
In this tutorial, you saw how you can adjust cell sizes to make your worksheet look uniform and neat.
We have shown you how you can either set the cells to a specific height and width or adjust the height and width to match that of a specific cell.
In the end, we also showed how you can use VBA Script to programmatically and quickly get this done so that you can get this done for multiple sheets quickly.
Other Excel tutorials you may find useful:
- How to Find Merged Cells in Excel
- How to Subtract Multiple Cells from One Cell in Excel
- How to Select Every Other Cell in Excel
- How to Select Alternate Columns in Excel (or every Nth Column)
- How to Set a Row to Print on Every Page in Excel
- How to Press Enter in Excel and Stay in the Same Cell?
- How to Show Ruler in Excel? (Ruler Grayed Out)
- Autofit Column Width in Excel (Shortcut)