

Try it!
Change margins in your document to change the layout and make sure everything fits.
Apply a predefined margin setting
-
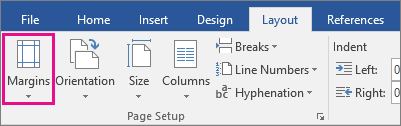
Select Layout > Margins.

-
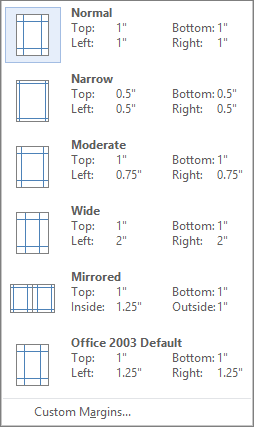
Select the margin measurements you want.
Note: If your document contains multiple sections, the new margins apply only to the selected sections.
Create a custom margin
-
Select Layout > Margins.
-
Select Custom Margins.
-
In Margins, use the Up and Down arrows to enter the values you want.
-
Select OK when done.
Change default margins
-
Select Layout > Margins > Custom Margins.
-
Set your margins.
-
Select Set As Default.
-
Confirm your selection.
Want more?
Set page margins in Word
Discover more Word training at LinkedIn Learning
Need more help?
Want more options?
Explore subscription benefits, browse training courses, learn how to secure your device, and more.
Communities help you ask and answer questions, give feedback, and hear from experts with rich knowledge.
Change margins
In Word, each page automatically has a one-inch margin. You can customize or choose predefined margin settings, set margins for facing pages, allow extra margin space to allow for document binding, and change how margins are measured.
-
Select Layout > Margins.
-
Select the margin configuration you want, or select Custom Margins to define your own margins.
Important:
Office 2010 is no longer supported. Upgrade to Microsoft 365 to work anywhere from any device and continue to receive support.
Upgrade now
What would you like to do?
-
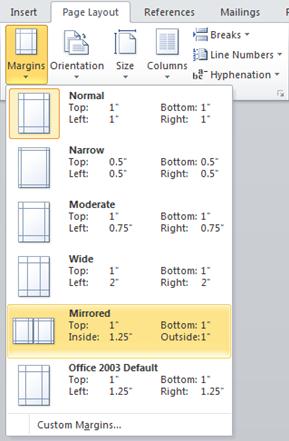
On the Page Layout tab, in the Page Setup group, choose Margins and the Margins gallery appears.
-
Choose the margin type that you want to apply.
Note: If your document contains multiple sections, the new margin type will only be applied to the current section. To apply the new margin type to multiple sections, be sure to select each one.
3. Make your new margin settings the default for your template. Each new document based on that template will automatically use the new margin settings.
-
Choose Margins after you select a new margin, and then choose Custom Margins.
-
In the Page Setup dialog box, choose Set As Default.
-
On the Page Layout tab, in the Page Setup group, choose Margins and the Margins gallery appears.
-
At the bottom of the Margins gallery, choose Custom Margins.
-
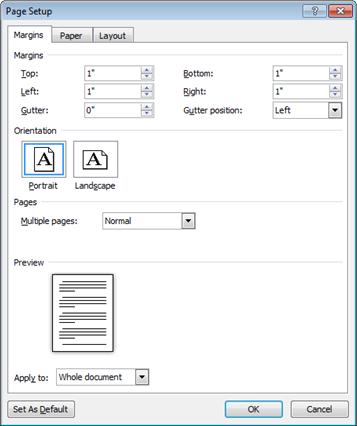
In the Page Setup dialog box, enter new values for the margins.
More tips about margins
-
Change the margins for only a section of a document by selecting the text and entering the new margins in the Page Setup dialog box. In the Apply to box, click Selected text. Microsoft Word automatically inserts section breaks before and after the text with new margin settings.
-
Most printers require a minimum width for margin settings. If your settings are too narrow, Microsoft Word displays the message One or more margins are set outside the printable area of the page. Click Fix to automatically increase the margin width. If you ignore the message, Word will display another message asking whether you want to continue.
-
Minimum margin settings for printing depend on your printer, printer driver, and paper size. To learn about your minimum settings, check your printer manual.
Use mirror margins to set up facing pages for double-sided documents, such as books or magazines. When you choose mirror margins, the margins of the left page are a mirror image of those on the right page. The inside margins are the same width, and the outside margins are the same width.
-
On the Page Layout tab, in the Page Setup group, click Margins >Mirrored.
Note: To change margin widths, click Custom Margins at the bottom of the Margins gallery. Enter new values in the Inside and Outside boxes.
A gutter margin adds extra space to the side margin, top margin, or inside margins of a document that you plan to bind to help ensure that text isn’t obscured by binding.
1. Gutter margins for binding
2. Mirror margins for facing pages
To set the gutter margin
-
On the Page Layout tab, in the Page Setup group, click Margins.
-
Click Custom Margins.
-
In the Gutter box, enter a width for the gutter margin.
-
In the Gutter position box, click Left or Top.
Note: The Gutter position box is not available when you use the Mirror margins, 2 pages per sheet, or Book fold option. For those options, the gutter position is determined automatically.
Word can display lines in your document to represent text boundaries.
-
On the File tab, click Options.
-
Click Advanced, and then select the Show text boundaries check box under Show document content.
The page margins appear in your document as dotted lines.
Note: You can view page margins in either Print Layout view or Web Layout view, and the text boundaries don’t appear on the printed page.
Important:
Office 2007 is no longer supported. Upgrade to Microsoft 365 to work anywhere from any device and continue to receive support.
Upgrade now
What would you like to do?
Microsoft Word offers several page margin options. You can use the default page margins or specify your own.
-
Add margins for binding
A gutter margin adds extra space to the side margin, top margin, or inside margins of a document that you plan to bind to help ensure that text isn’t obscured by binding.
1. Gutter margins for binding
2. Mirror margins for facing pages
-
Set margins for facing pages
Use mirror margins to set up facing pages for double-sided documents, such as books or magazines. In this case, the margins of the left page are a mirror image of those of the right page. The inside margins are the same width, and the outside margins are the same width. -
Note: You can set gutter margins for a document that has mirror margins if the document needs extra space for binding.
-
Add a book fold
Using the Book fold option in the Page Setup dialog box, you can create a booklet. Use the same option to create a menu, invitation, event program, or any other type of document with a single center fold.

1. Word inserts a single, center book fold
After you set up a document as a booklet, work with it just as you would any document to insert text, graphics, and other visual elements.
-
Most printers require a minimum width for margin settings. If you try to set margins that are too narrow, Microsoft Word displays the message One or more margins are set outside the printable area of the page. Click Fix to automatically increase the margin width. If you ignore the message, Word will display another message asking whether you want to continue.
-
Minimum margin settings depend on your printer, printer driver, and paper size. To learn about your minimum margin settings, check the printer manual.
-
On the Page Layout tab, in the Page Setup group, click Margins.
-
Click the margin type that you want. For the most common margin width, click Normal.
Note: When you click the margin type that you want, your entire document automatically changes to the margin type that you have selected.
-
You can specify your own custom margin settings. Click Margins, click Custom Margins, and then in the Top, Bottom, Left, and Right boxes, enter new values for the margins.

-
To change the default margins, click Margins after you select a new margin, and then click Custom Margins. In the Page Setup dialog box, click the Default button, and then click Yes. The new default settings are saved in the template on which the document is based. Each new document based on that template automatically uses the new margin settings.
-
To restore the original margin settings, click Margins and then click Custom Margins. Change the margins for Top, Bottom, Left, and Right to 1″. Then click the Default button and click Yes.
-
To change the margins for part of a document, select the text, and then set the margins that you want by entering the new margins in the Page Setup dialog box. In the Apply to box, click Selected text. Microsoft Word automatically inserts section breaks before and after the text that has the new margin settings. If your document is already divided into sections, you can click in a section or select multiple sections and then change the margins.
-
Click the Microsoft Office Button
, and then click Word Options. -
Click Advanced, and then click the Show text boundaries check box under Show document content.
The page margins appear in your document as dotted lines.
 , and then click Word Options.
Note: You can view page margins in either Print Layout view or Web Layout view, and the text boundaries do not appear on the printed page.
When you choose mirror margins, the margins of the left page are a mirror image of those on the right page. The inside margins are the same width, and the outside margins are the same width.
-
On the Page Layout tab, in the Page Setup group, click Margins >Mirrored.
-
Click Margins > Custom Margins, and in the Inside and Outside boxes, enter the widths that you want.
A gutter margin setting adds extra space to the side margin or top margin of a document that you plan to bind. A gutter margin helps ensure that text isn’t obscured by the binding.
-
On the Page Layout tab, in the Page Setup group, click Margins >Custom Margins.
-
In the Multiple pages list, click Normal.
-
In the Gutter box, enter a width for the gutter margin.
-
In the Gutter position box, click Left or Top.
Note: The Gutter position box is not available when you use the Mirror margins, 2 pages per sheet, or Book fold option. For those options, the gutter position is determined automatically.
-
Click on the text box you created to highlight it.
-
Click on the Format tab in the ribbon.
-
Click the small button in the lower left of the Size group.
-
In the Format Text Box window, click the Text Box tab.
-
In the Internal margin section, you can customize the margins to your desired size.
-
Click OK.
If this article did not answer your question, you can chat with a Microsoft virtual agent or a person at any time.
Need more help?
Want more options?
Explore subscription benefits, browse training courses, learn how to secure your device, and more.
Communities help you ask and answer questions, give feedback, and hear from experts with rich knowledge.
Find solutions to common problems or get help from a support agent.
Select Layout > Margins. Select Custom Margins. In Margins, use the Up and Down arrows to enter the values you want. Select OK when done.
Change default margins
- Select Layout > Margins > Custom Margins.
- Set your margins.
- Select Set As Default.
- Confirm your selection.
Contents
- 1 How do I make 1.0 margins in Word?
- 2 How do I set 25mm margins in Word?
- 3 What is margin How do we set the margin?
- 4 How do I set Margins in Word 2010?
- 5 How do you make a 0.5 inch border in Word?
- 6 What is 1.5 spacing word?
- 7 What is the command for adjusting paper size?
- 8 Why are margins not working in Word?
- 9 Can I change the Margins on one page in Word?
- 10 Which are margin settings in Word 2016?
- 11 How do I set Margins in Word 2003?
- 12 How do I set Margins in Word 2007?
- 13 How do you fix print margins?
- 14 Why are my margins different when I print?
- 15 How do you fix some margins outside the printable area?
- 16 What is spacing in MS Word?
- 17 How do you change the alignment in Word?
- 18 Is 2.0 spacing the same as double spacing?
- 19 How do I fix margins in Word for Mac?
- 20 How do I show margins in Word 2013?
How do I make 1.0 margins in Word?
Click the Page Layout tab. Click Margins, then click Custom Margins. Enter your desired default margins into the Top, Left, Bottom, and Right fields, then click Set as Default. Click Yes to confirm the new default margins.
How do I set 25mm margins in Word?
To set margins in Word, first click the “Layout” tab in the Ribbon. Then click the “Margins” drop-down button in the “Page Setup” button group. In this drop-down is a “Last Custom Setting” option, six preset margin choices, and a “Custom Margins” command.
What is margin How do we set the margin?
A margin is a space separating text or other elements from the edge of the paper commonly adjusted through the page setup.Most programs allow for the top, bottom, left, and right margins to be set. The standard margin settings are 1″ top and bottom and 1.25″ left and right.
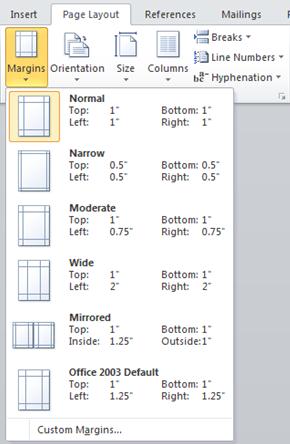
How do I set Margins in Word 2010?
How to Change Page Margins in Microsoft Word 2010
- Open your document in Word 2010.
- Select the Page Layout tab.
- Click the Margins button.
- Choose the desired page margin setting.
How do you make a 0.5 inch border in Word?
Add a border
Click the Page Layout tab. In Word 2013 and 2016, click the Design tab instead. In the Page Background group, click the Page Borders option. In the Borders and Shading window (shown below), if not already selected, click the Page Border tab.
What is 1.5 spacing word?
Press Ctrl+1 for single-spacing, Ctrl+5 for 1.5 spacing, or Ctrl+2 for double-spacing. Click to view larger image.
What is the command for adjusting paper size?
To do this, go to Layout > Size > More Paper Sizes. In the “Page Setup” dialog box, click “Paper,” and then click the drop-down arrow next to “Paper Size.” Select the paper size you want to make the default for all future documents.
Why are margins not working in Word?
If your document is in Print Layout view and the top and bottom margins appear to be cut off, the option for hiding margins has been switched on. Here’s how to switch it off: Point to the top or bottom of a page until the pointer becomes a double-pointed arrow, and then double-click.
Can I change the Margins on one page in Word?
Go to the Layout tab and click the Margins drop-down menu. Once the different preset margin formats are displayed, select one from the selection that suits your needs.You’ve just inserted section breaks to change the margin on one page in MS Word.
Which are margin settings in Word 2016?
Word also allows you to customize the size of your margins in the Page Setup dialog box.
- From the Layout tab, click Margins. Select Custom Margins from the drop-down menu.
- The Page Setup dialog box will appear.
- Adjust the values for each margin, then click OK.
- The margins of the document will be changed.
How do I set Margins in Word 2003?
When adjusting the margins for your entire document, use the Page Setup dialog box.
- From the File menu, select Page Setup…
- Select the Margins tab.
- In the Margins section, adjust the margins as needed.
- Click OK.
How do I set Margins in Word 2007?
Follow these steps to make the changes stick:
- In the ribbon, click the Page Layout tab.
- Click the Margins tool in the Page Setup group.
- Click Custom Margins.
- Change your right and left margins to one inch.
- Click the Default button.
- Click Yes.
How do you fix print margins?
Click “Margins” on the Page Layout tab, then select “Custom Margins” and use the up or down arrows to select the margins that you want. On some applications, click the “Page” tab and use the up or down arrows in the Margins field to set the margins for the document.
Why are my margins different when I print?
If Track Changes is turned on, Word may be set to print “Final Showing Markup,” which can cause some funky margins in the printout. If you suspect this is the case, choose to a different printing mode (in the Print dialog box) or resolve all the outstanding changes before printing.
How do you fix some margins outside the printable area?
From the Microsoft Word Document:
- Select the Layout Tab.
- Select the Small Arrow at the bottom right corner of the Page Setup Section. The Page Setup screen will open.
- Select the Margins Tab.
- Make Sure the Top, Bottom, Left and Right page margins are configured to at least 0.16″ or higher.
- Select OK to save changes.
What is spacing in MS Word?
About line spacing
Line spacing is the space between each line in a paragraph. Word allows you to customize the line spacing to be single spaced (one line high), double spaced (two lines high), or any other amount you want. The default spacing in Word is 1.08 lines, which is slightly larger than single spaced.
How do you change the alignment in Word?
How to Adjust Paragraph Alignment in Word
- Click anywhere in a paragraph you want to align, or select multiple paragraphs.
- Click an alignment option in the Paragraph group. Shortcuts: To align left, press Ctrl + L. To align right, press Ctrl + R. To align center, press Ctrl + C. To justify, Ctrl + J.
Is 2.0 spacing the same as double spacing?
A 2.0 value will mean double spacing. Remember that the double spacing will take place from whatever part in the text your cursor is positioned. Place your cursor on the very top of the page if you want the entire document to be double spaced.
How do I fix margins in Word for Mac?
Here’s how to change the margins in a Microsoft Word document on your Mac:
- Open Microsoft Word on your Mac, and then create a new document.
- From the Format menu, select Document. The window shown below appears.
- Change the values in the the Top, Bottom, Left, and Right fields to adjust the margins.
- Click OK.
How do I show margins in Word 2013?
- Click PAGE LAYOUT > Margins.
- At the bottom, click Custom Margins.
- In the Page Setup box, enter new values for the margins.
Not all documents fit inside Word’s default one-inch margin between the text and the edge of the page. To change the margins in your Word documents, use one of several choices, from predefined margins that make it easy to apply a different size margin, to the customized margins adjustable to fit your needs.
These directions work with all currently supported desktop versions of Word and Word for Mac, while Word Online offers limited margin capabilities.
Quickly Change Margins in Word
To make the margins in your document smaller or larger, use Word’s Narrow, Moderate, or Wide margins. To print your document on both sides of the paper and put it in a three-ring binder, use the Mirror margin setting.
Mirror margins cannot be set in Word Online. However, if you view a document with mirror margins in Word Online, the mirror margins are preserved.
To apply a predefined margin, select Layout > Margins and choose the predefined margin you want to use.
In Word Online, Word 2010 and Word 2007, the Layout tab is labeled as Page Layout. The steps to change margins remain the same.
Use the Ruler to Adjust Margins in Word
The horizontal ruler displayed below the Word menu provides another way to change the margins in your document.
Before you begin, display the ruler. If the ruler is not displayed above your document, select View and place a checkmark next to Ruler to display the ruler. You’ll also need to work in Print view. Select View > Print Layout to display the document in print view.
The ruler is not available in Word Online.
Here’s how to change the margins using the ruler:
- Change the left margin: Place the cursor over the left indents until it changes to a double-headed arrow. Drag the margin to the right to make it wider or to the left to make it narrower.
- Change the right margin: Place the cursor over the right indent until it changes to a double-headed arrow. Drag the margin to the left to make it wider or to the right to make it narrower.
Create Custom Margins
When you need a certain size margin for a document, use the custom settings.
Here’s how to set a custom margin size:
- Select Layout > Margins > Custom Margins.
- Change the size for the Top, Bottom, Left, and Right margins.
- Select Set As Default to set the new margin settings as the default for the current template. This margin setting will be used in each new document you create based on that template. This feature is not available in Word Online.
- Select OK when you’re finished.
Create Gutter Margins
Documents that will be bound need extra margin space for the binding. This gutter margin ensures the binding doesn’t interfere with the white space around the text.
To add a gutter margin, select Layout > Margins > Custom Margins and type a width in the Gutter box.
You cannot create gutter margins in Word Online. Switch to the desktop version of Word to set gutter margins.
Create Mirror Margins
Documents printed on both sides of the page and bound, such as books and magazines, use a special margin setting. These mirror margins ensure the right and left pages are mirror images of each other.
To create mirror margins, select Layout > Margins and select Mirrored. To change the size of the mirror margins, select Layout > Margins > Custom Margins and change the size of the Inside or Outside margins.
Set Margins for a Section of Your Document
When your document is divided into sections, you can apply different margin sizes to different sections. This feature is not available in Word Online.
To change the margins for a single section:
- Select the section in the document where you want a different margin size.
- Select Layout > Margins > Custom Margins.
- Type new values for the Top, Bottom, Right, and Left margins.
- From the Apply to list, select This Section.
- Select OK when you’re done.
View Page Margins
Word can display boundary lines that show you where the margins are in your document. These boundary lines appear as dotted lines. The margin boundaries cannot be viewed in Word Online.
To view the page margins:
- Select File > Options. In Word 2007, select the Microsoft Office button and select Word Options.
- Select Advanced.
- Scroll down to the Show document content section and select Show text boundaries.
- Select OK.
Thanks for letting us know!
Get the Latest Tech News Delivered Every Day
Subscribe

If you have requirements for a paper or document, you may be wondering how to change the margins in Word. We’ll walk you through it!
When you’re setting up a document in Microsoft Word, you may need to adjust the margins. You might be creating a document for a school that requires specific margins or one for your business where you simply prefer certain spacing.
Depending on which platform you’re using, Word not only gives you a selection of fixed margin settings but a custom option as well. Since these options differ slightly per your Word version, we’ll show you how to change the margins and where they vary in Word on Windows, Mac, the web, and in the mobile app.
Change the Margins in Word on Your Desktop or the Web
How you adjust the margins in Word is the same in the application on Windows, Mac, and the web. The differences are the preset options you can pick from and a few custom margin settings.
Fixed Margin Settings
Open your Word document and go to the Layout tab. Click the Margins drop-down arrow on the top left side of the ribbon. You’ll first see the fixed margin settings you can choose from.
You can choose Normal, Narrow, Moderate, or Wide in all three Word locations. And you can see the number of inches per margin next to each preset option.

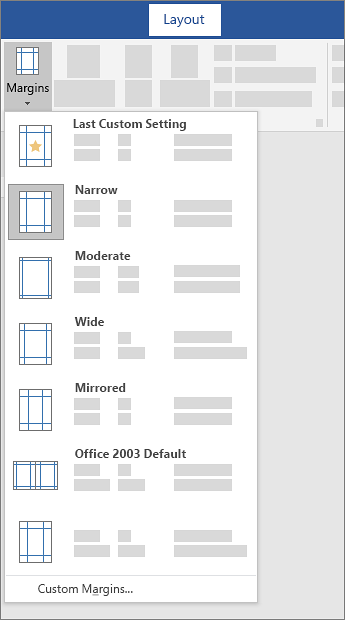
There are two additional fixed options that vary per platform:
- Mirrored: Available in Word on Windows and Mac.
- Office 2003 Default: Available in Word on Windows and the web.

Choose the preset margin setting you want to use for your document, which will apply immediately. If you prefer to use Custom Margins, this is available on Windows, Mac, and the web as well.
Custom Margin Settings
Select Custom Margins at the bottom of the Margins drop-down list. Enter a number in inches or use the arrows to adjust the Top, Bottom, Left, and Right margins.

Custom margins in Word on the web
In Word on Windows and Mac, you can take your margin settings a step further by selecting where to apply the custom settings, whether or not to use Gutter settings, and if you prefer a different page orientation for those margins (on Mac, click Page Setup to change the orientation).

Custom margins in Word on Windows (left) and Mac (right)
You also have the option to apply these custom margins as your default setting by clicking the button on the bottom left.
If you’re working in Microsoft Word on your mobile device, you can also change the margins for a document there.
- Open your Word document and tap the three dots on the right side of the toolbar above your keyboard.
- Switch to the Layout tab.
- Select Margins.
- Tap a fixed margin setting to apply it. You can use Normal, Narrow, Moderate, Wide, or Mirrored.

Custom Margin Settings on Mobile
To use your own margins settings in the mobile app, follow the same steps as above but choose Custom Margins below the presets in Step 4.
Select each location, Top, Bottom, Left, and Right, enter the number in inches, and tap Done after each. You can then return to your document to keep working.

Prepare Your Document by Setting the Margins in Word
Changing your margins in Word takes only a couple of clicks or taps, so it’s worth the time to get your document set up before you begin. Although you can change the margins later if you discover that different settings would work better, remember that your document items may shift undesirably.
For additional help with your layout in Microsoft Word, take a look at how to work with page and section breaks or how to use outline view in Word.
![]()