
Excel for Microsoft 365 Excel for Microsoft 365 for Mac Excel 2021 for Mac Excel 2019 Excel 2019 for Mac Excel 2016 Excel 2016 for Mac Excel 2013 Excel 2010 More…Less
If you have tasks in Microsoft Excel that you do repeatedly, you can record a macro to automate those tasks. A macro is an action or a set of actions that you can run as many times as you want. When you create a macro, you are recording your mouse clicks and keystrokes. After you create a macro, you can edit it to make minor changes to the way it works.
Suppose that every month, you create a report for your accounting manager. You want to format the names of the customers with overdue accounts in red, and also apply bold formatting. You can create and then run a macro that quickly applies these formatting changes to the cells you select.
How?
|
|
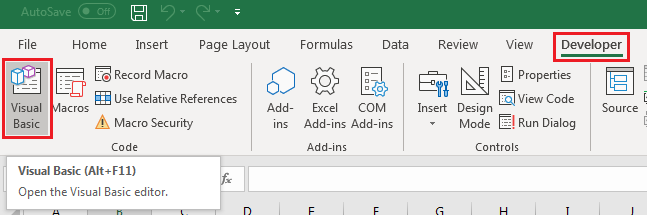
Before you record a macro Macros and VBA tools can be found on the Developer tab, which is hidden by default, so the first step is to enable it. For more information, see Show the Developer tab. |


|
|
Record a macro
|

|
|
Take a closer look at the macro You can learn a little about the Visual Basic programming language by editing a macro. To edit a macro, in the Code group on the Developer tab, click Macros, select the name of the macro, and click Edit. This starts the Visual Basic Editor. See how the actions that you recorded appear as code. Some of the code will probably be clear to you, and some of it may be a little mysterious. Experiment with the code, close the Visual Basic Editor, and run your macro again. This time, see if anything different happens! |

Next steps
-
To learn more about creating macros, see Create or delete a macro.
-
To learn about how to run a macro, see Run a macro.
How?
|
|
Before you record a macro Make sure the Developer tab is visible on the ribbon. By default, the Developer tab is not visible, so do the following:
|
|
|
Record a macro
|
|
|
Take a closer look at the macro You can learn a little about the Visual Basic programming language by editing a macro. To edit a macro, in the Developer tab, click Macros, select the name of the macro, and click Edit. This starts the Visual Basic Editor. See how the actions that you recorded appear as code. Some of the code will probably be clear to you, and some of it may be a little mysterious. Experiment with the code, close the Visual Basic Editor, and run your macro again. This time, see if anything different happens! |
Need more help?
You can always ask an expert in the Excel Tech Community or get support in the Answers community.
Need more help?
![]()
Download Article
![]()
Download Article
This wikiHow teaches you how to enable, create, run, and save macros in Microsoft Excel. Macros are miniature programs which allow you to perform complex tasks, such as calculating formulas or creating charts, within Excel. Macros can save significant amounts of time when applied to repetitive tasks, and thanks to Excel’s «Record Macro» feature, you don’t have to know anything about programming in order to create a macro.
Things You Should Know
- Macros make it easy to automatic tasks in Microsoft Excel.
- To create macros yourself, you’ll need to enable macros in the Developer menu of Excel.
- Saving a macro-enabled spreadsheet is a little different than saving a spreadsheet without macros.
-

1
Open Excel. Double-click the Excel app icon, which resembles a white «X» on a green box, then click Blank workbook.
- If you have a specific file which you want to open in Excel, double-click that file to open it instead.
-
2
Click File. It’s in the upper-left side of the Excel window.
- On a Mac, click Excel in the upper-left corner of the screen to prompt a drop-down menu.
Advertisement
-
3
Click Options. You’ll find this on the left side of the Excel window.
- On a Mac, you’ll click Preferences… in the drop-down menu.
-
4
Click Customize Ribbon. It’s on the left side of the Excel Options window.[1]
- On a Mac, click instead Ribbon & Toolbar in the Preferences window.
-
5
Check the «Developer» box. This box is near the bottom of the «Main Tabs» list of options.
-
6
Click OK. It’s at the bottom of the window. You can now use macros in Excel.
- On a Mac, you’ll click Save here instead.


Advertisement
-
1
Enter any necessary data. If you opened a blank workbook, enter any data which you want to use before proceeding.
- You can also close Excel and open a specific Excel file by double-clicking it.
-
2
Click the Developer tab. It’s at the top of the Excel window. Doing so opens a toolbar here.
-
3
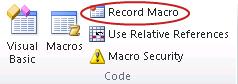
Click Record Macro. It’s in the toolbar. A pop-up window will appear.
-
4
Enter a name for the macro. In the «Macro name» text box, type in the name for your macro. This will help you identify the macro later.
-
5
Create a shortcut key combination if you like. Press the ⇧ Shift key along with another letter key (e.g., the E key) to create the keyboard shortcut. You can use this keyboard shortcut to run the macro later.
- On a Mac, the shortcut key combination will end up being ⌥ Option+⌘ Command and your key (e.g., ⌥ Option+⌘ Command+T).
-
6
Click the «Store macro in» drop-down box. It’s in the middle of the window. Doing so prompts a drop-down menu.
-
7
Click This Workbook. This option is in the drop-down menu. Your macro will be stored inside your spreadsheet, making it possible for anyone who has the spreadsheet to access the macro.
-
8
Click OK. It’s at the bottom of the window. Doing this saves your macro settings and begins recording.
-
9
Perform the macro’s steps. Any step you perform between clicking OK and clicking Stop Recording while be added to the macro. For example, if you wanted to create a macro which turns two columns’ worth of data into a chart, you would do the following:
- Click and drag your mouse across the data to select it.
- Click Insert
- Select a chart shape.
- Click the chart that you want to use.
-
10
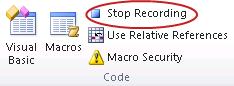
Click Stop Recording. It’s in the Developer toolbar. This will save your macro.


Advertisement
-
1
Understand why you have to save the spreadsheet with macros enabled. If you don’t save your spreadsheet as a macro-enabled spreadsheet (XLSM format), the macro won’t be saved as part of the spreadsheet, meaning that other people on different computers won’t be able to use your macro if you send the workbook to them.
-
2
Click File. It’s in the upper-left corner of the Excel window (Windows) or the screen (Mac). Doing so will prompt a drop-down menu.
-
3
Click Save As. This option is on the left side of the window (Windows) or in the drop-down menu (Mac).
-
4
Double-click This PC. It’s in the column of save locations near the left side of the window. A «Save As» window will open.
- Skip this step on a Mac.
-
5
Enter a name for your Excel file. In the «Name» text box, type in the name for your Excel spreadsheet.
-
6
Change the file format to XLSM. Click the «Save as type» drop-down box, then click Excel Macro-Enabled Workbook in the resulting drop-down menu.[2]
- On a Mac, you’ll replace the «xlsx» at the end of the file’s name with xlsm.
-
7
Select a save location. Click a folder in which you want to save the Excel file (e.g., Desktop).
- On a Mac, you must first click the «Where» drop-down box.
-
8
Click Save. It’s at the bottom of the window. Doing so will save your Excel spreadsheet to your selected location, and your macro will be saved along with it.


Advertisement
-
1
Open the macro-enabled spreadsheet. Double-click the spreadsheet that has the macro in it to open the spreadsheet in Excel.
-
2
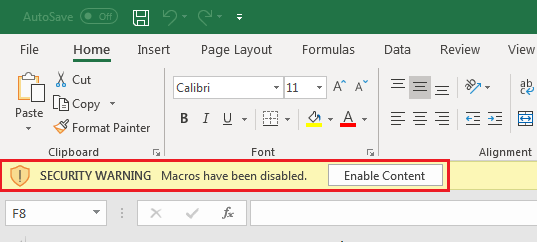
Click Enable Content. It’s in a yellow bar at the top of the Excel window. This will unlock the spreadsheet and allow you to use the macro.
- If you don’t see this option, skip this step.
-
3
Click the Developer tab. This option is at the top of the Excel window.
- You can also just press the key combination you set for the macro. If you do so, the macro will run, and you can skip the rest of this method.
-
4
Click Macros. You’ll find it in the Developer tab’s toolbar. A pop-up window will open.
-
5
Select your macro. Click the name of the macro which you want to run.
-
6
Click Run. It’s on the right side of the window. Your macro will begin running.
-
7
Wait for the macro to finish running. Depending on how large your macro is, this can take several seconds.


Advertisement
Add New Question
-
Question
Can I use a macro that I create in other spreadsheets and future spreadsheets on the same pc?

Yes, you can use a macro that you crate in other spreadsheets and future spreadsheets on the same pc.
-
Question
How can I write macros that will change a spreadsheet as soon as I create it?
You will first need a basic understanding of VBA. There are many tutorials on this.
Ask a Question
200 characters left
Include your email address to get a message when this question is answered.
Submit
Advertisement
Video
-
Macros are generally useful for automating tasks which you must perform often, such as calculating payroll at the end of the week.
Thanks for submitting a tip for review!
Advertisement
-
Although most macros are benign, some macros can maliciously change or delete information on your computer. Never open a macro from a source which you don’t trust.
Advertisement
About This Article
Article SummaryX
1. Enable Developer options in Excel.
2. Click the Developer tab.
3. Click Record Macro.
4. Enter the macro name and details.
5. Click OK.
6. Perform the macro’s steps.
7. Click Stop Recording.
Did this summary help you?
Thanks to all authors for creating a page that has been read 710,423 times.
Is this article up to date?
Although running a macro in Excel isn’t hard, there are lots of ways to run them. Some ways are meant to make using macros easier, while other ways can change the way a user interacts with your workbook entirely. In this article we’ll cover some obvious ways to run macros run like the Macros List and Button controls, and some more obscure ways like the VB Editor and Events.
First: Ensure Macros are Enabled
Excel’s security features will disable macros by default. When opening a macro-enabled workbook, users are typically prompted if they’d like to enable macros.
If you’re not able to run macros, try following these instructions:
- Save the workbook
- Close the workbook, then open it again
- When the workbook loads, you’ll see a Security Warning prompt (pictured below). Click Enable Content.
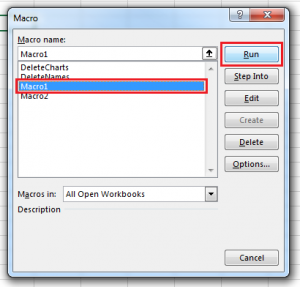
Run a Macro from the Macro List
A list of macros can be accessed from the View tab. To view this list:
- Select the View tab
- Click the button labelled Macros to bring up the Macro list
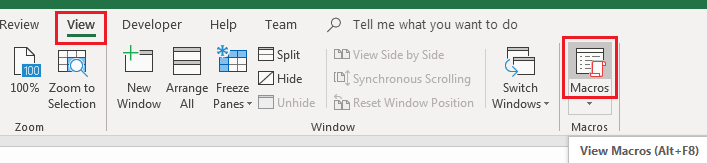
- Select the macro you want to run from the list, then click the Run button
You can also show the Macro List at any time by pressing ALT+F8.
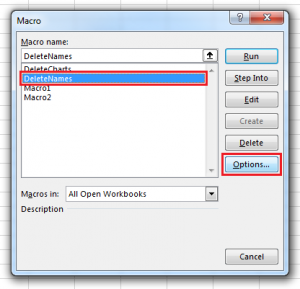
Run a Macro using a Keyboard Shortcut
You can assign a keyboard shortcut to a macro that you use often, in the form of CTRL+<letter> or CTRL+SHIFT+<letter>. To do this:
- Bring up the Macro List (View > Macros, or ALT+F8)
- Select the macro you want to apply a shortcut to
- Click Options… to show the Macro Options sub-dialog
- In the textbox under Shortcut Key, type a single letter and then click OK. If you hold the SHIFT key while typing the letter, the label next to the box will show SHIFT as part of the shortcut
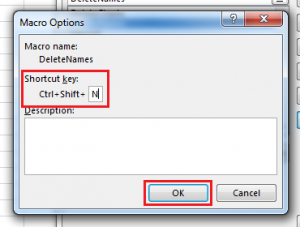
NOTE: it is highly recommended that you use SHIFT when creating a shortcut key! Excel uses CTRL+ shortcuts for itself, e.g. CTRL+C to Copy, or CTRL+V to Save. If you create a macro shortcut using these or other Excel shortcuts, you’ll overwrite the Excel shortcut until you re-assign the macro shortcut.
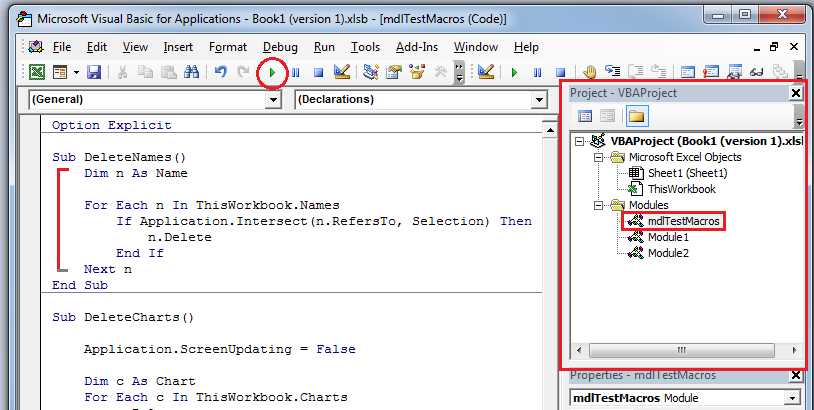
Run a Macro from the VB Editor
Macros can also be run from the VB Editor. The VB Editor allows you to review a macro’s code and make any changes you want before running it.
To run a macro in the VB Editor:
- Open the VB Editor (Developer tab > Visual Basic, or ALT+F11)
- In the Project window, double-click the module containing the macro you want to test
- In the module’s code window, place the cursor anywhere on the macro’s code between “Sub” and “End Sub”
- Click the Run button on the toolbar, or press keyboard shortcut F5
Run a Macro using a Button or Shape
It’s often useful to have a control on the worksheet that a user can click to run a macro, like a Button control or a Shape. This is much quicker for end-users than opening lists of macros or digging through macro code in the VB Editor.
Information about how to create a clickable Button or Shape can be found here: Add a Button and Assign a Macro in Excel.
Auto-Run a Macro using Events in VBA
It’s possible to make a macro run when something happens in Excel – for example, when a workbook is opened or when a cell value is changed. These are called Events, and you can write VBA code for them to call macros or perform other operations.
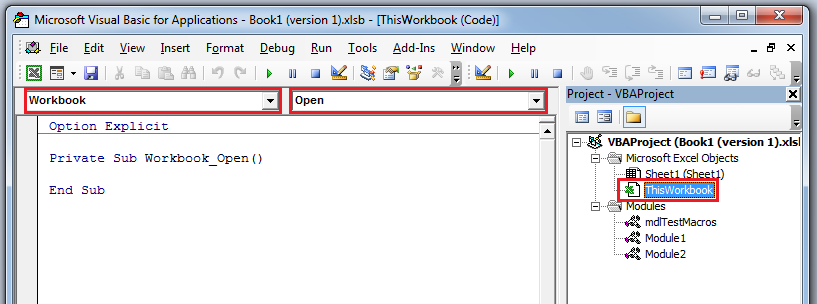
To write code for an event, you’ll need to use the VB Editor. For example, to view events for the workbook:
- Open the VB Editor (ALT+F11)
- Double-click the ThisWorkbook object in the VB Editor’s Project Window
- Choose “Workbook” from the dropdown on the top-left of the code window
- Click the dropdown on the right to see a list of events
The following are a small, but useful sample of Excel Events that you could run macros from.
Workbook_Open()
The Workbook_Open() event fires when a workbook is opened. If you get the Security Warning after opening a workbook, this event fires after clicking “Enable Content”.
Private Sub Workbook_Open()

    MsgBox "Workbook Opened!"

End Sub
Workbook_BeforeClose(Cancel as Boolean)
Workbook_BeforeClose() fires when the user tries to close the workbook. It happens before any checks are done to see if the workbook needs to be saved.
The Cancel parameter can be set to True to stop the workbook from closing.
Private Sub Workbook_BeforeClose(Cancel As Boolean)

    If MsgBox("Are you sure?", vbYesNo + vbQuestion, "Close") = vbNo Then

        Cancel = True

    End If

End Sub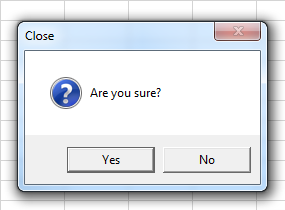
Worksheet_Change(ByVal Target As Range)
Worksheet_Change() fires when the value of a cell is changed – whether it’s changed by a macro, by a copy/paste operation, or by an external link. It does not fire when a value is recalculated via a formula, though.
The Target parameter represents the cells whose value have changed.
If you change the value of other cells inside this event, the event will fire again. This can possibly cause an infinite loop. If you need to change cell values without triggering this event, consider setting Application.EnableEvents to False first, and then set it back to True at the end of the event procedure.
Private Sub Worksheet_Change(ByVal Target As Range)

    MsgBox "Cells changed: " & Target.Address

    Application.EnableEvents = False
    Range("A2").Value = Range("A2").Value + Target.Cells.Count
    Application.EnableEvents = True

End Sub
Worksheet_SelectionChange(ByVal Target As Range)
This event fires whenever different cells are selected with the targeting reticle. The Target parameter represents the new cells that have been selected.
You can trigger this event with code as well, i.e. “Range(“A1”).Select”. As with Worksheet_Change(), you should be careful about selecting other cells inside this event, since you can cause an infinite loop. Use Application.EnableEvents.
Private Sub Worksheet_SelectionChange(ByVal Target As Range)

    If Target.Address = "$A$1" Then

        MsgBox "Cursor in home position."

    End If

End Sub
Stop a Running Macro
A running macro can be interrupted by pressing ESC or CTRL+BREAK. By default, an interrupted macro will show the following dialog:
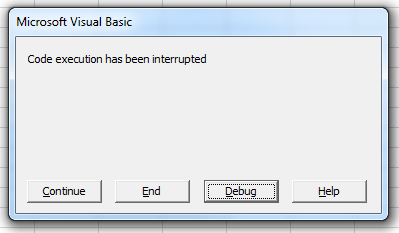
Clicking End will stop the macro, while Continue will resume it. Clicking Debug will open the macro in the VB Editor and focus the line of code that execution was paused on. (Inside the VB Editor you can stop or resume the macro using the Run or End buttons on the toolbar.)
Application.EnableCancelKey
You can disable the ability to stop a macro with ESC or CTRL+BREAK by setting the Application.EnableCancelKey property. This property has three possible values:
- xlInterrupt – this is the default value, which makes Excel show the dialog above
- xlDisabled – removes the ability to stop a running macro
- xlErrorHandler – when an interrupt attempt is made, an error is thrown that can be handled in code
Whenever code execution stops, Excel always resets the value of Application.EnableCancelKey back to xlInterrupt.
A good reason for using this property is security. For example, if you had a macro that temporarily unprotected parts of your workbook, a user could potentially stop the macro right after the unprotect and gain access to content you didn’t intend them to have. By setting Application.EnableCancelKey, you can completely disable their ability to do this, or handle their interruption gracefully with an Error Handler that re-protects the workbook.
Sub UpdateBaseData(ByVal NewData As Range, ByVal Target As Range)

    Application.EnableCancelKey = xlDisabled

    Target.Worksheet.Unprotect "MyPassword"
    NewData.Copy Target
    Target.Worksheet.Protect "MyPassword"

    Application.EnableCancelKey = xlInterrupt

End Sub
Force-Close Excel with the Windows Task Manager
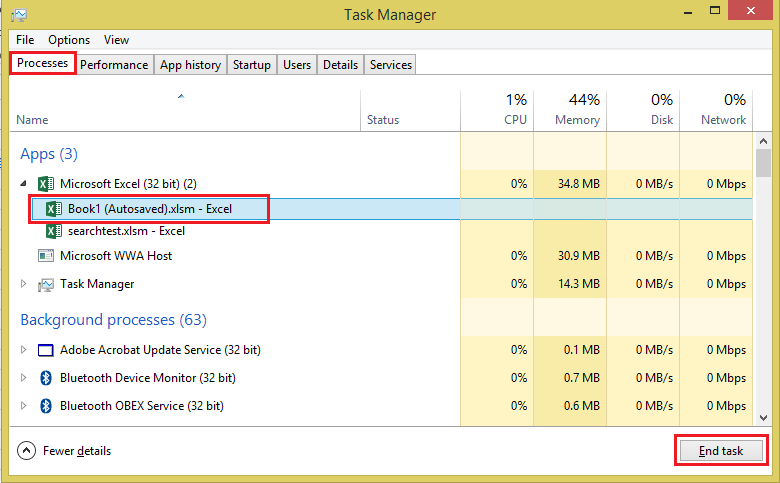
If the macro has ‘hung’, or Excel has become too busy to acknowledge an interrupt attempt, you may need to force-close Excel itself with the Windows Task Manager. (NOTE: if you do this, you may lose any unsaved work, and have to rely on an auto-recover version of your workbook.)
- Open the Task Manager directly using CTRL+SHIFT+ESC
- Select the “Processes” tab
- Expand the “Microsoft Excel” item to show all workbooks
- Select the workbook you want to close, then click End Task in the bottom-right corner
Содержание
- Способы записи макросов в Excel
- Вариант 1: Автоматическая запись макросов
- Запуск макроса
- Редактирование макроса
- Вариант 2: Написание кода макроса с нуля
- Вопросы и ответы
Макросы в Microsoft Excel позволяют значительно ускорить работу с документами в этом табличном редакторе. Эта возможность достигается путем автоматизации повторяющихся действий, записанных в специальный код. Давайте разберем, как создать макросы в программе и как их можно отредактировать.
Макрос записывается двумя способами: автоматически и вручную. Воспользовавшись первым вариантом, вы просто записываете определенные действия в Microsoft Excel, которые выполняете в данный момент времени. Потом можно будет воспроизвести эту запись. Такой метод очень легкий и не требует знания кода, но применение его на практике довольно ограничено. Ручная запись, наоборот, требует знаний программирования, так как код набирается вручную с клавиатуры. Однако грамотно написанный таким образом код может значительно ускорить выполнение процессов.
Вариант 1: Автоматическая запись макросов
Прежде чем начать автоматическую запись макросов, нужно включить их в программе Microsoft Excel. Для этого воспользуйтесь нашим отдельным материалом.
Подробнее: Включение и отключение макросов в Microsoft Excel
Когда все готово, приступаем к записи.
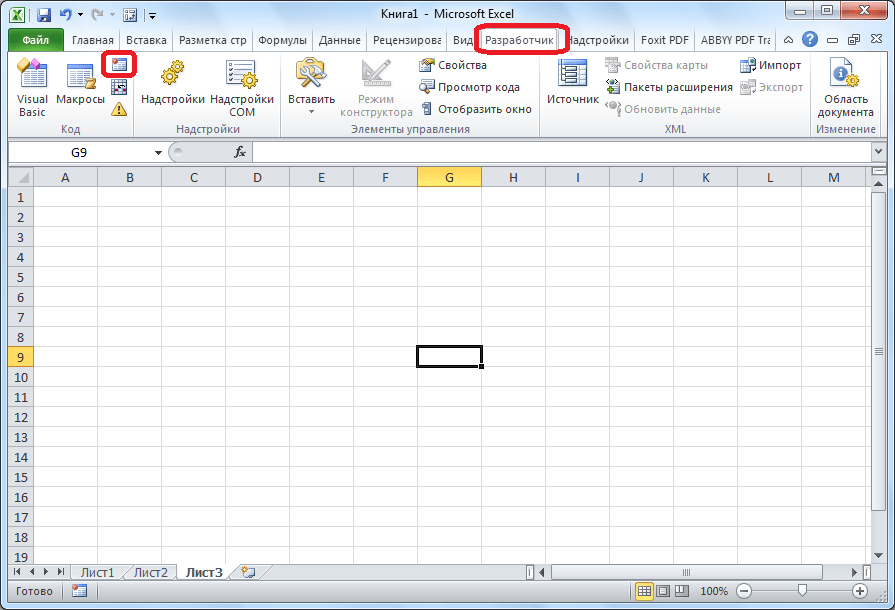
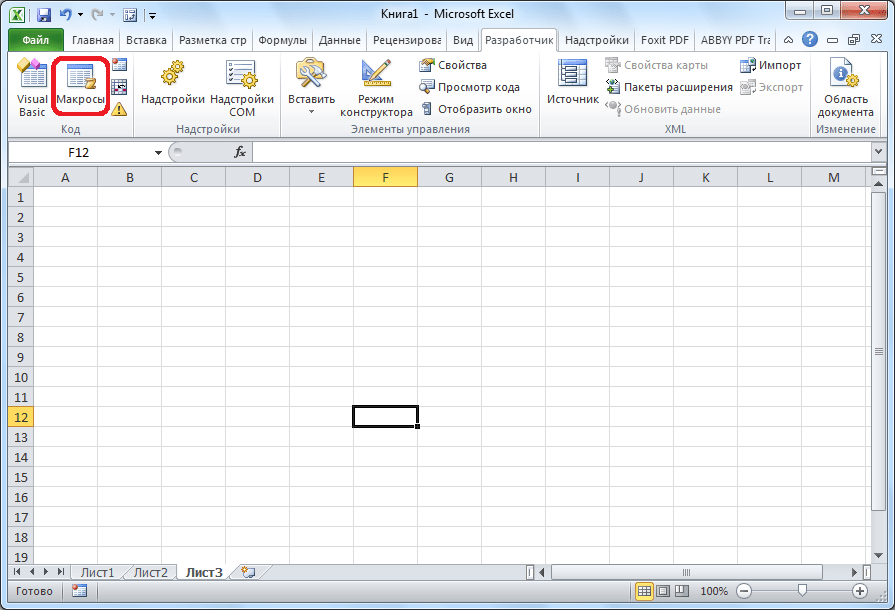
- Перейдите на вкладку «Разработчик». Кликните по кнопке «Запись макроса», которая расположена на ленте в блоке инструментов «Код».
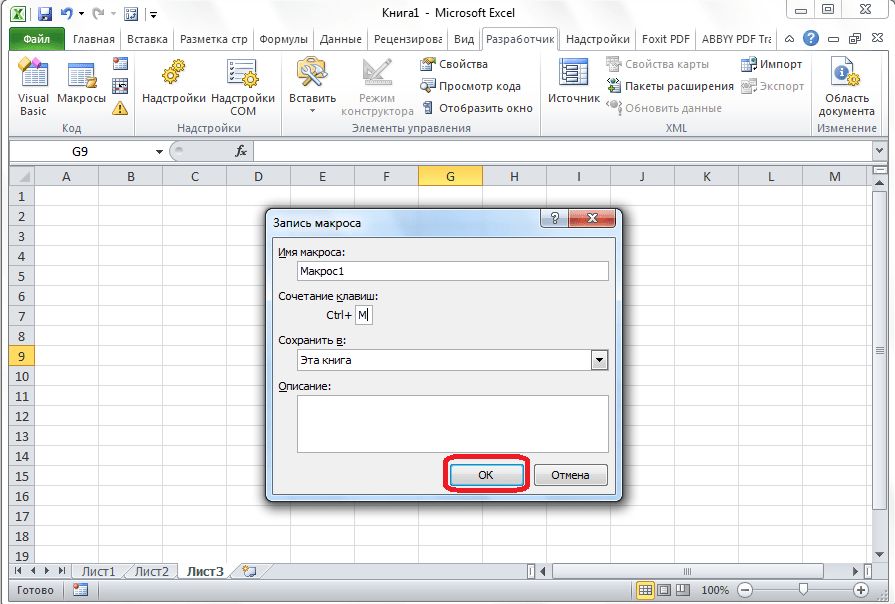
- Открывается окно настройки записи макроса. Тут можно указать любое имя для него, если установленное по умолчанию вас не устраивает. Главное, чтобы имя это начиналось с буквы, а не с цифры, а также в названии не должно быть пробелов. Мы оставили название по умолчанию – «Макрос1».
- Тут же при желании можно установить сочетание клавиш, при нажатии на которые макрос будет запускаться. Первой клавишей обязательно должна быть Ctrl, а вторую пользователь устанавливает самостоятельно. Мы в качестве примера установили клавишу М.
- Далее следует определить, где будет храниться макрос. По умолчанию он расположен в этой же книге (файле), но при желании можно установить хранение в новой книге или в отдельной книге макросов. Мы оставим значение по умолчанию.
- В самом нижнем поле можно оставить любое подходящее по контексту описание макроса, но это делать не обязательно. Когда все настройки выполнены, жмем на кнопку «OK».
- После этого все ваши действия в данной книге (файле) Excel будут записываться в макрос до тех пор, пока вы сами не остановите запись.
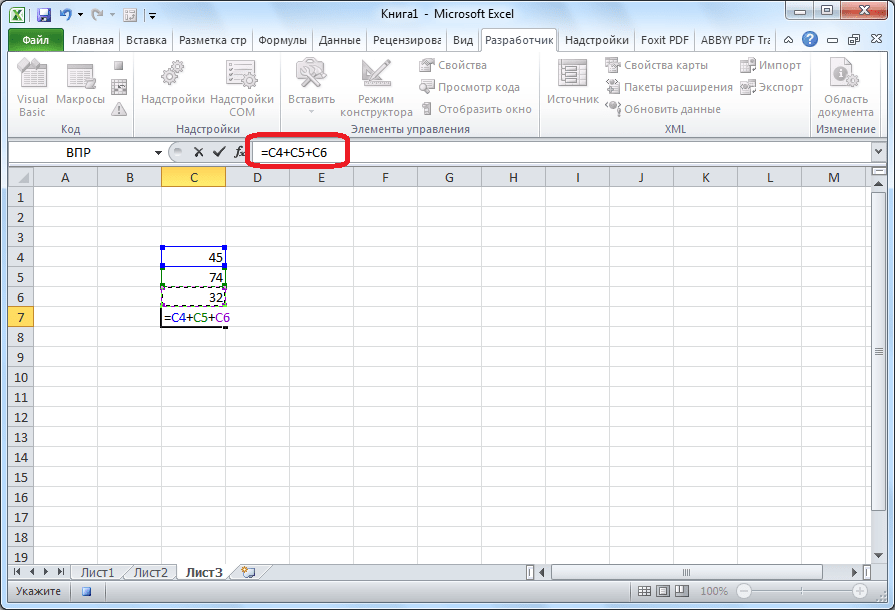
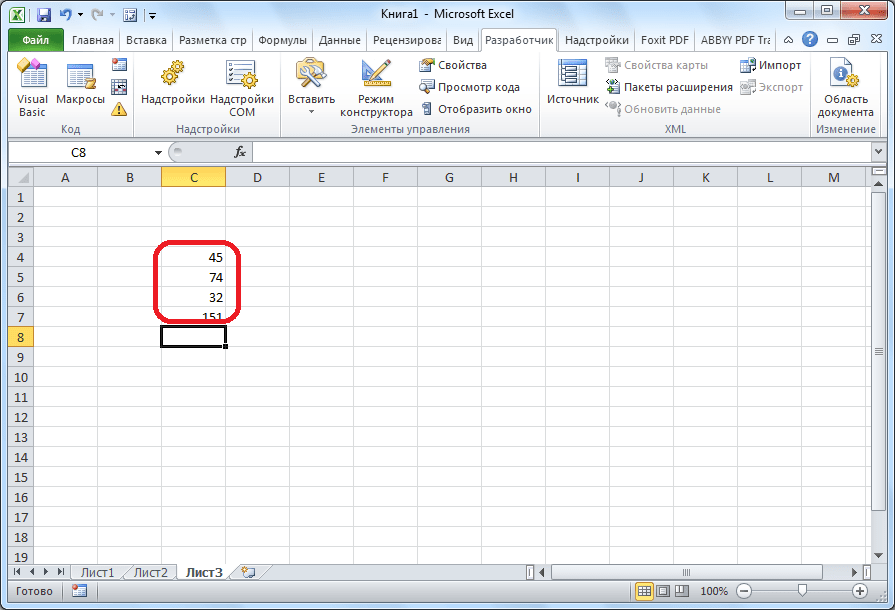
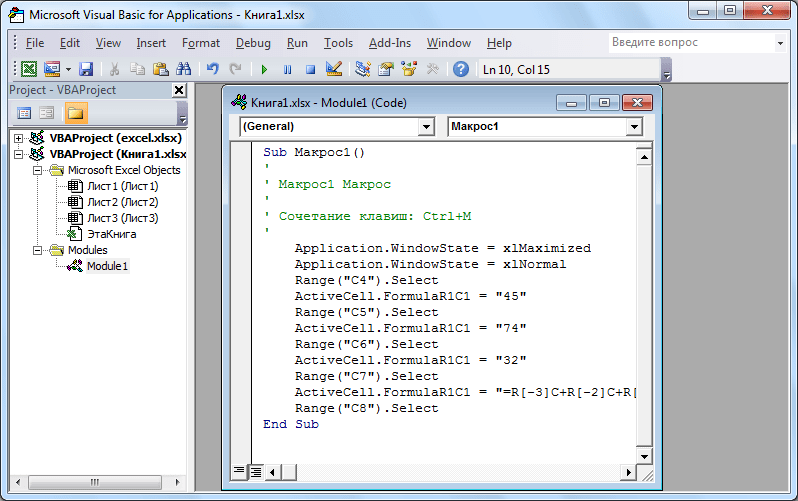
- Для примера запишем простейшее арифметическое действие: сложение содержимого трех ячеек (=C4+C5+C6).
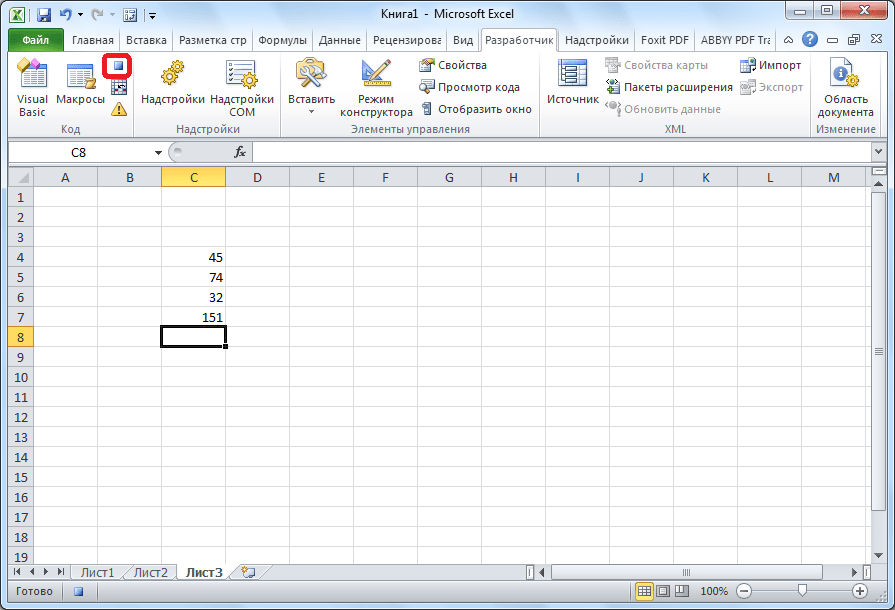
- Когда алгоритм был выполнен, щелкаем на кнопку «Остановить запись». Эта кнопка преобразовалась из кнопки «Запись макроса» после включения записи.
Запуск макроса
Для проверки того, как работает записанный макрос, выполним несколько простых действий.
- Кликаем в том же блоке инструментов «Код» по кнопке «Макросы» или жмем сочетание клавиш Alt + F8.
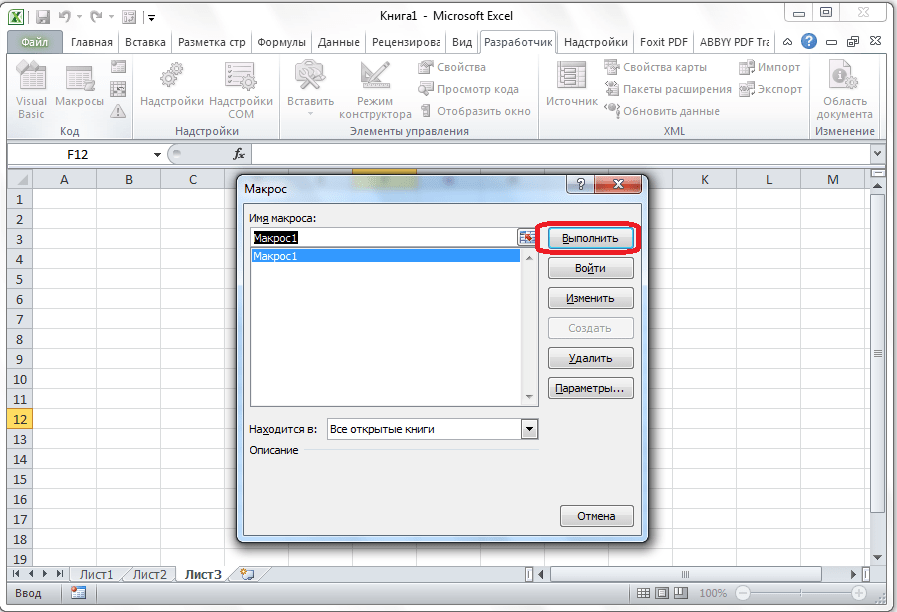
- После этого открывается окно со списком записанных макросов. Ищем макрос, который мы записали, выделяем его и кликаем на кнопку «Выполнить».
- Можно поступить еще проще и не вызывать даже окно выбора макросов, так как на первом этапе мы задали сочетание клавиш для быстрого вызова макроса. В нашем случае это Ctrl + М. Жмем данную комбинацию на клавиатуре, после чего он запускается.
- Как видим, он выполнил в точности все те действия, которые были записаны ранее.
Редактирование макроса
Естественно, при желании вы можете корректировать созданный макрос, чтобы всегда поддерживать его в актуальном состоянии и исправлять некоторые неточности, допущенные во время процесса записи.
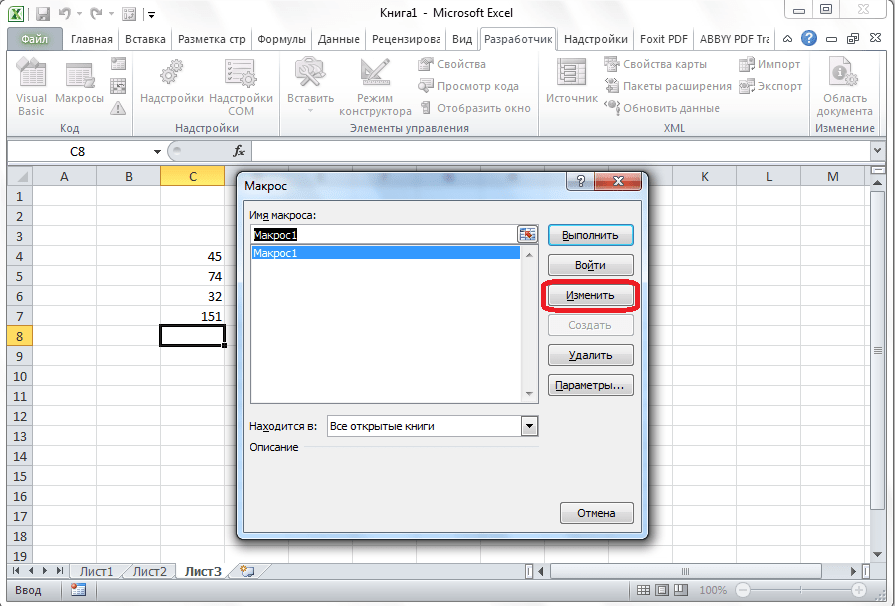
- Снова щелкаем на кнопку «Макросы». В открывшемся окне выбираем нужный и кликаем по кнопке «Изменить».
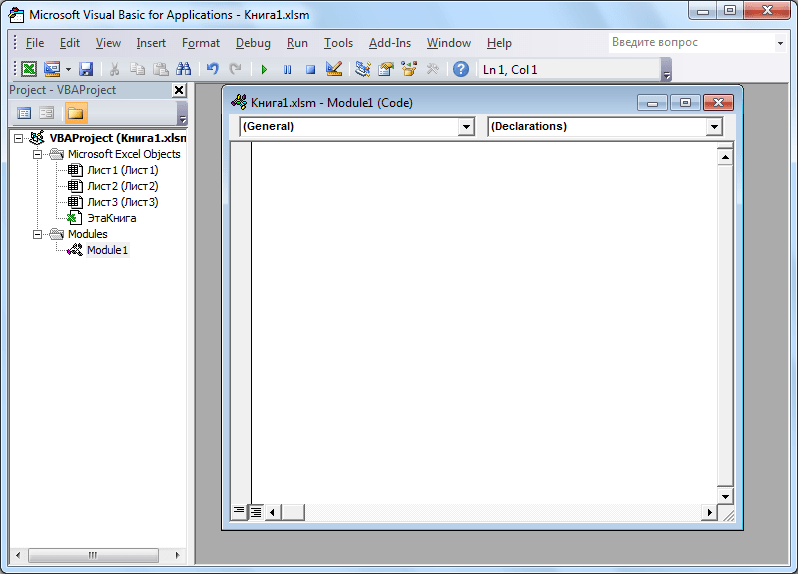
- Открывается «Microsoft Visual Basic» (VBE) – среда, где происходит их редактирование.
- Запись каждого макроса начинается с команды
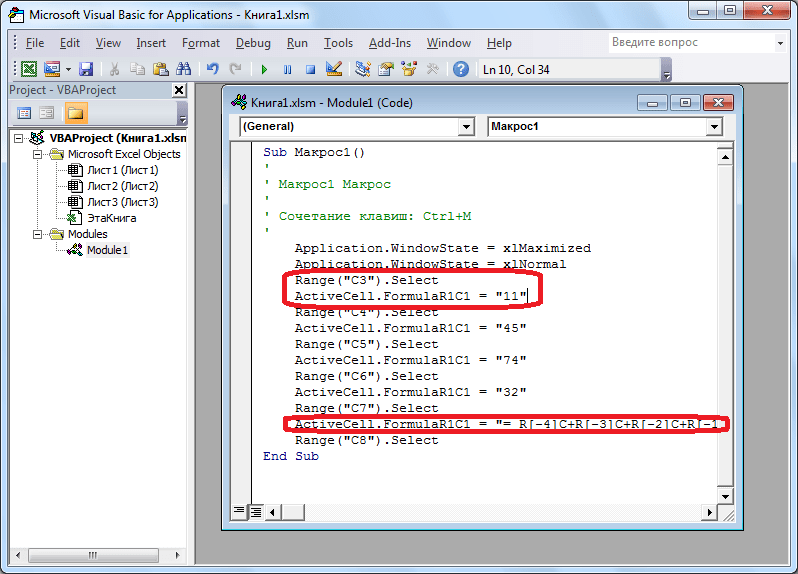
Sub, а заканчивается командойEnd Sub. Сразу же послеSubуказывается имя макроса. ОператорRange("…").Selectуказывает выбор ячейки. Например, при команде «Range(«C4»).Select» выбирается ячейка «C4». ОператорActiveCell.FormulaR1C1используется для записи действий в формулах и других расчетов. - Попытаемся немного изменить макрос, дописав выражение:
Range("C3").Select

ActiveCell.FormulaR1C1 = "11" - Выражение
ActiveCell.FormulaR1C1 = "=R[-3]C+R[-2]C+R[-1]C"заменим наActiveCell.FormulaR1C1 = "= R[-4]C+R[-3]C+R[-2]C+R[-1]C". - Закрываем редактор и запускаем макрос. Как видим, вследствие введенных нами изменений была добавлена дополнительная ячейка с данными. Она также была включена в расчет общей суммы.
- В случае если макрос слишком большой, его выполнение может занять значительное время, но внесением ручного изменения в код мы можем ускорить процесс. Добавляем команду
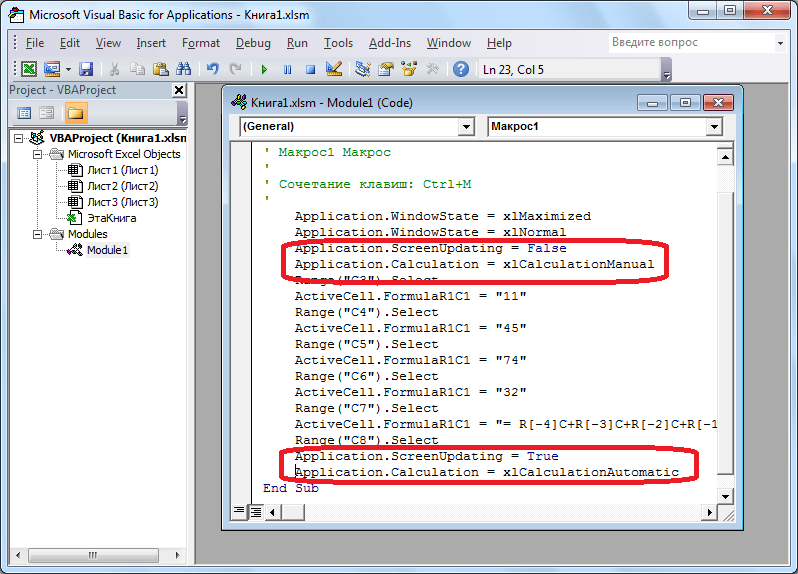
Application.ScreenUpdating = False. Она позволит сохранить вычислительные мощности, а значит, ускорить работу. Это достигается путем отказа от обновления экрана во время выполнения вычислительных действий. Чтобы возобновить обновление после выполнения макроса, в его конце пишем командуApplication.ScreenUpdating = True. - Добавим также команду
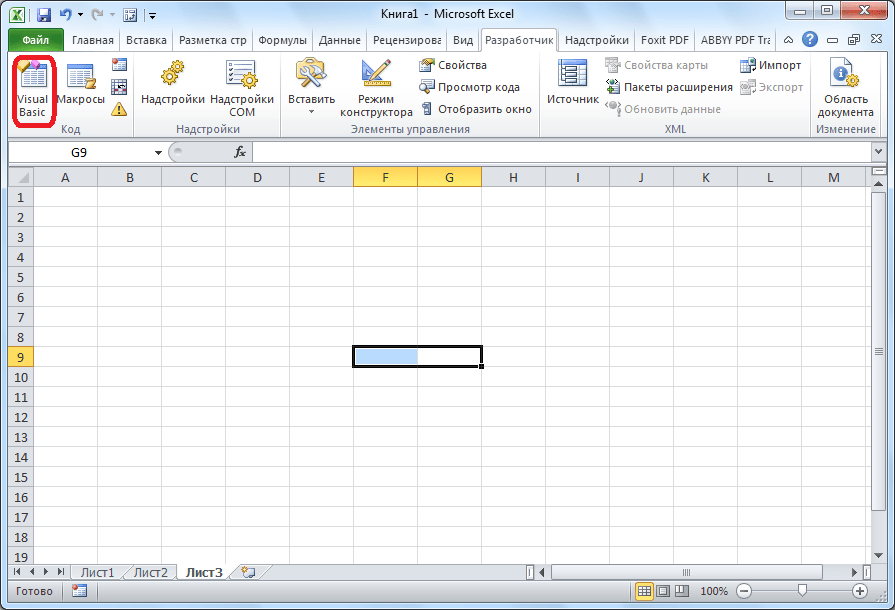
Application.Calculation = xlCalculationManualв начало кода, а в его конец дописываемApplication.Calculation = xlCalculationAutomatic. Этим мы сначала отключаем автоматический пересчет результата после каждого изменения ячеек, а в конце макроса – включаем. Таким образом, Excel подсчитает результат только один раз, а не будет его постоянно пересчитывать, чем сэкономит время. - Чтобы приступить к этому, нужно нажать на кнопку «Visual Basic», которая расположена в самом начале ленты разработчика.
- Откроется окно редактора VBE, которое уже было продемонстрировано в предыдущем варианте.
- Программист пишет там код макроса вручную.

Вариант 2: Написание кода макроса с нуля
Продвинутые пользователи могут выполнять не только редактирование и оптимизацию записанных макросов, но и записывать их код с нуля.
Как видим, макросы в Microsoft Excel могут значительно упростить выполнение рутинных и однообразных процессов. Тем не менее в большинстве случаев для этого больше подходят макросы, код которых написан вручную, а не автоматически записанные действия. Кроме того, его код можно оптимизировать через редактор VBE для ускорения процесса выполнения задачи.
Еще статьи по данной теме:
Помогла ли Вам статья?
What is MACRO in Excel?
A macro in excel is a series of instructions in the form of code that helps automate manual tasks, thereby saving time. Excel executes those instructions in a step-by-step manner on the given data. For example, it can be used to automate repetitive tasks such as summation, cell formatting, information copying, etc. thereby rapidly replacing repetitious operations with a few clicks.
There are two methods to create the macros – The first is when you can record the macro, where Excel records every step automatically and then repeats it. The second is coding with VBAVBA code refers to a set of instructions written by the user in the Visual Basic Applications programming language on a Visual Basic Editor (VBE) to perform a specific task.read more, which requires good subject knowledge
Before recording a macro, the user has to activate the Developer tab in Excel. The Developer tabEnabling the developer tab in excel can help the user perform various functions for VBA, Macros and Add-ins like importing and exporting XML, designing forms, etc. This tab is disabled by default on excel; thus, the user needs to enable it first from the options menu.read more is a built-in option in Excel to create macros, generate VBA applications, design forms, import or export XML files, etc. Since it is disabled in Excel by default, it has to be enabled before creating and recording the macrosRecording macros is a method whereby excel stores the tasks performed by the user. Every time a macro is run, these exact actions are performed automatically. Macros are created in either the View tab (under the “macros” drop-down) or the Developer tab of Excel.
read more.
Table of contents
- What is MACRO in Excel?
- Enable the Developer tab
- Examples of Macros in Excel
- Example #1
- Example #2
- Adding the Macro Button
- How to View the Code of Macros?
- Creating Macro by Writing VBA Code
- How to Save the Recorded Macro in Excel?
- How to Enable “Macro Security Settings”?
- Frequently Asked Questions (FAQs)
- Recommended Articles
Let us learn the method to enable the Developer tab in Excel.
Enable the Developer tab
Below are the steps to activate the Developer tab in the Excel toolbar.
- Click on “options” in the File menu (as shown in the succeeding image).

- On clicking the “options”, the “Excel options” window will pop up.

- Select “customize ribbon” in the “Excel options” which provides a list of options in a dialog box.
Under “customize the ribbon”, select “main tabs”. Among the list of checkboxes, select “developer” and click “ok”.
- The worksheet displays the Developer tab, as highlighted in the succeeding image.

- The user can view options like “visual basic”, “macros”, “record macro”, etc. on the ribbon of Developer tab (as displayed in the image below).


Examples of Macros in Excel
Let us understand how to add macros in excel with the help of the following example.
Example #1
A list of data with different names is available in the table below. Some names have “.” symbol. We want to replace the “.” symbol with “_” by using macros in Excel.
You can download this Macro Excel Template here – Macro Excel Template

The steps to add an excel macro are listed as follows:
- Click the “record macro” option in the Developer tab.

- The “record macro” window will pop out. Name the macro “ReplaceDot” in the “macro name” box. To assign a keyboard shortcutAn Excel shortcut is a technique of performing a manual task in a quicker way.read more, type “Ctrl+q” in the “shortcut key” box.
Select the option “This Workbook” in the “store macro in” box, which will ensure the macro is stored in the particular workbook.
It is optional to fill the “description” box explaining the task. Finally, click the “ok” button.

- The “ReplaceDot” macro will start recording the user actions in Excel. The user will observe the “stop recording” button appearing in the Developer tab.

- Let us now start replacing the “.(dot)” in the names with “_(underscore)” by using the “find and replace” option. Enter “.” in the “find” and “ _” in the “replace” option, respectively. Then click the “replace all” button.
Note: Use the shortcut key “Ctrl+H” to use “find and replace” option.


- The “replace all” option replaces all the “.” (dots) with the “_” (underscores). The number of replacements and the resulting output is shown in the succeeding image.

- The final output is displayed in the below image.

- In the end, click the “stop recording” button on the Developer tab to stop the macro recording.
Example #2
We want to run the same task for a new list of names (displayed in the below image). We will run the macro “ReplaceDot,” created in the Developer ribbon.

- Select the “enable macro” option from the Developer ribbon to view the list of macros created in the Macro window. The users can choose and run the macros based on their requirement.
The succeeding image shows the result of macros running on the new list of names.

Adding the Macro Button
Let us assign a button to the macro instead of choosing the “enableTo enable macros simply means to run or execute a macro in a particular file in order to save the time spent on repetitive actions. To enable macros, select “enable all macros” from the “trust center” of the File tab (in the “options” button).
read more macroTo enable macros simply means to run or execute a macro in a particular file in order to save the time spent on repetitive actions. To enable macros, select “enable all macros” from the “trust center” of the File tab (in the “options” button).
read more” option.
There are many groups like Add-ins, Controls, and XML under the Developer ribbon.

- The user can choose the type of button to be created. Select the first button from “form controls” in the Controls tab.

- Drag the selected button anywhere in the Excel sheet. The “assign macro” dialogue box opens. The macros to be assigned are listed in the “macro name” box.
- Select the macro “ReplaceDot,” appearing in the list and click “ok”.

- A button appears in the worksheet. Right click the button and use “edit text” option to change the button text as “Button 3.” It is created on the right-hand side of the sheet, as shown in the below image.

- Select the new name list to implement the same task by running macros, as indicated in the previous section.

- Click the “Button 3” to run the assigned macro “ReplaceDot”.

- To change the button name, use the “edit text” option to replace the text “Button 3” with “ReplaceDot”.

Using the above steps, we can create, record, and assign the macro for various tasks and automate it.
How to View the Code of Macros?
The users can view the code for a recorded macro. Excel generates the code based on the steps carried out while recording the macro.
We can access the code using the shortcut “Alt+F11” or by editing the macro that was created earlier.
Let us view the code for the “ReplaceDot” macro using the following steps:
- Open the worksheet that contains the “ReplaceDot” macro. In the View tab, click the option “macros”. Select the “ReplaceDot” macro from the list and click the “edit” button.

- The “Microsoft Visual Basic for Applications” will be launched. The user can write or edit the code using this application. The below image shows the code of the “ReplaceDot” macro.

Creating Macro by Writing VBA Code
Before writing the VBA code, let us understand the “head” and “tail” of macros, which are the “sub” and “end sub.”

The user places the lines of VBA codes in the keyword “sub”. It executes the instructions in the code. The “end sub” keyword stops the execution of the “sub.”
Generally, there are two types of macros.
- “System Defined Function” – It performs actions like creating a link of all the worksheet names, deleting all worksheets and so on.
- “User-Defined Function” – To create a User Defined Function User Defined Function in VBA is a group of customized commands created to give out a certain result. It is a flexibility given to a user to design functions similar to those already provided in Excel.read more(UDF) in macro, the user uses the “function and end function” as the “head” and “tail” of the codes.
Note: A function returns a value, whereas the sub does not.
A macro is written on the Visual Basic EditorThe Visual Basic for Applications Editor is a scripting interface. These scripts are primarily responsible for the creation and execution of macros in Microsoft software.read more (VBE) of the “Microsoft Visual Basic for Applications”.
Let us learn the steps to write a simple macro in the VBA.
- Click the “module 1” in the “module” properties displayed on the left-hand side panel of the VBE window, and start writing the macro.

- Begin with “sub” followed by the macro name and end with “end sub”. The code is written between the “sub” and “end sub.”
The below image shows the “sub” and “end sub” for the macro named “simplemacro ( )”.
- Write code to display text in the message box. The “MsgBoxVBA MsgBox function is an output function which displays the generalized message provided by the developer. This statement has no arguments and the personalized messages in this function are written under the double quotes while for the values the variable reference is provided.read more” displays an input text message. All text in VBAText is a worksheet function in excel but it can also be used in VBA while using the range property. It is similar to the worksheet function and it takes the same number of arguments. These arguments are the values which needs to be converted.read more should be enclosed in double quotes.
For example, the code: MsgBox “Good Morning” (shown in the below image) displays the message “Good Morning” in the text box.

- The output is displayed in the succeeding image.

Hence, the same macro can be assigned buttons to automate the task.
How to Save the Recorded Macro in Excel?
After recording, the user saves the macro to reuse in any other worksheet in the future.
Let us follow the below-mentioned steps to save the macro:
- In the macro-enabled workbook, click “save as.”
- Select the “Excel macro-enabled workbook” option in the “save as type” box while saving the file.
- Finally, save the macros with the “.xlsm” file extension.

The guidelines for saving the macro names are stated as follows:
- Make sure that the name of recorded macros should start with letters (alphabets) or underscore.
- Use letters, numeric, and underscore characters.
- Avoid space, symbols, or punctuation marks.
- Maintain a maximum length of about 80 characters.
Note: When the user saves a macro’s name with space, Excel issues a warning (as shown in the succeeding image).

How to Enable “Macro Security Settings”?
In this section, let us learn to enable the “Macros security settings”.
When a user opens a workbook containing macros, a security warning – “Macros have been disabled” is displayed under the ribbon. Choose the “enable content” option in the box.

To eliminate the security warning, we need to change the “trust center settings” by using the following steps:
- Under the “trust center settings” in the File options, click “macro settings”.
- Choose the button, “Disable all macros with notification.”
- The security is enabled in the “Macro Security” of the Developer ribbon.

Note 1: The user can create absolute macros (functioning from cell A1) that help to reuse the macro in other worksheets.
Note 2: The usage of directional keys (rather than a mouse) for navigation in macros is reliable to add, delete, and change the data in the worksheet.
Frequently Asked Questions (FAQs)
1. What are macros in Excel?
Macros are a set of simple programs or instructions to automate the common and repetitive tasks performed in the Excel worksheet. It can be recorded, saved, and run multiple times as per the user’s requirement.
It is a time-saving tool involved in preparing data reports and manipulating data carried out frequently in a worksheet.
2. How to enable macros in Excel?
The users can eliminate the security warning in the worksheet and enable macros by using the following steps:
• Click “options” in the File tab.
• Select “trust center” in the “options” window.
• Choose the option “trust center settings”.
• Click “macro settings” on the left side of the navigation pane.
• Select “enable all macros” and click “ok”.
3. What is the difference between macro and VBA?
The difference between macro and VBA is stated as follows.
• Macros are programming codes that function in the Excel worksheet to perform automated and repetitive tasks. It saves the user’s time and extends the efficiency of Excel.
• Visual Basic for Applications (VBA) is a programming language of Excel used for creating macros.
Recommended Articles
This has been a tutorial to Macros in Excel. Here we discuss how to add Macros in Excel along with , along with practical examples and a downloadable template. You may also look at these useful functions in Excel –
- Excel Open XMLXML (Extensible Markup Language) is a text-based mark-up language that stores & organizes data in a human & machine-readable format. As it follows a specific script, you need to fulfill a particular set of prerequisites for importing the data into Excel or opening Excel Data into this format. read more
- VBA MacrosVBA Macros are the lines of code that instruct the excel to do specific tasks, i.e., once the code is written in Visual Basic Editor (VBE), the user can quickly execute the same task at any time in the workbook. It thus eliminates the repetitive, monotonous tasks and automates the process.read more
- MsgBox in Excel VBAVBA MsgBox function is an output function which displays the generalized message provided by the developer. This statement has no arguments and the personalized messages in this function are written under the double quotes while for the values the variable reference is provided.read more