

Word includes a custom dictionary in addition to the default main dictionary. There are a few ways you can add words to Word’s custom dictionary. We’ll show you how.
Word includes a custom dictionary in addition to the default main dictionary. You can add words to Word’s custom dictionary as you do a spell check or using the context menu.
If you have a lot of words you want to add to Word’s custom dictionary, you can manually edit the custom dictionary. You can also add third-party dictionaries with specialized words, like medical and legal dictionaries. Today we’ll show you how to manually edit the custom dictionary, create a new custom dictionary, and add third-party dictionaries.
Where are Word’s Custom Dictionaries?
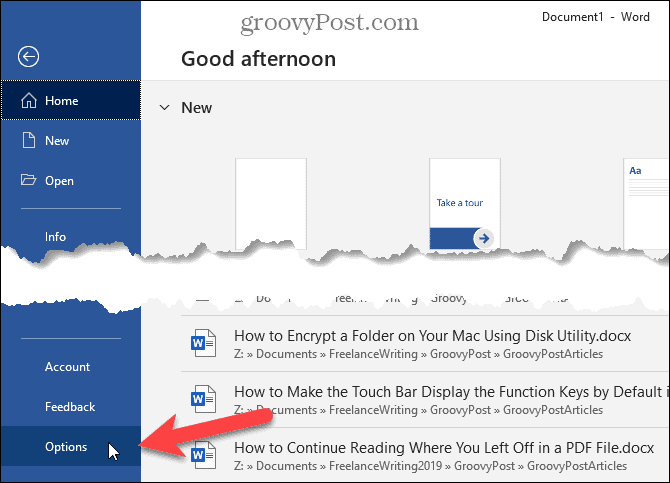
To access the custom dictionaries in Word, click the File tab. Then, click Options.
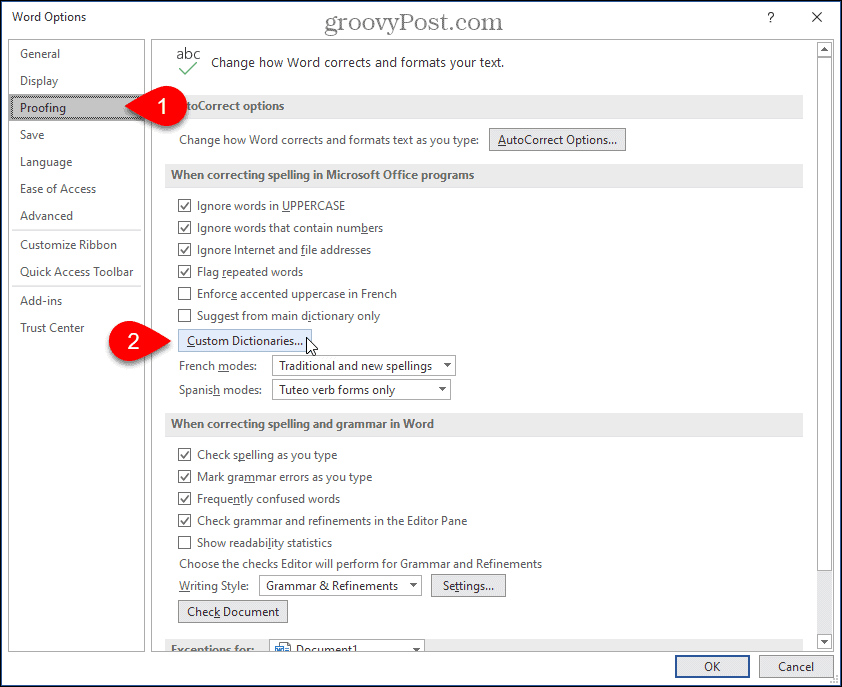
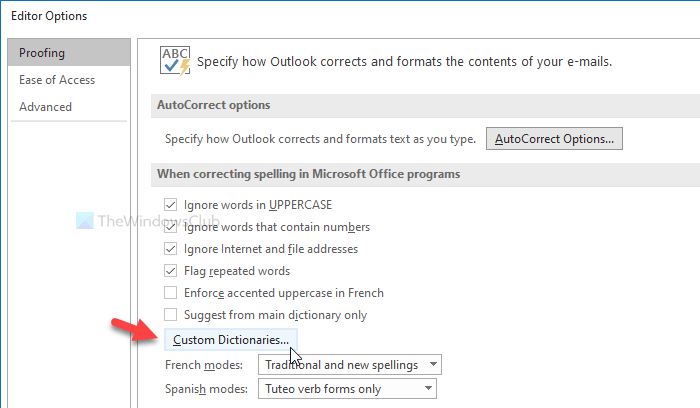
On the Word Options dialog, click Proofing on the left. Then, scroll down on the right and click Custom Dictionaries in the When correcting spelling in Microsoft Office programs section.
All available custom dictionaries are listed on the Custom Dictionaries dialog. You can deactivate a dictionary by clearing the check box to the left of that dictionary.

Manually Add and Remove Words in Word’s Custom Dictionary
To add and remove words in a custom dictionary, select the dictionary you want to edit in the Dictionary List on the Custom Dictionaries dialog. Then, click Edit Word List.

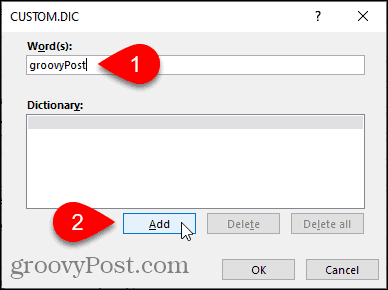
Enter the word you want to add in the Word(s) box on the dialog for the selected dictionary and click Add.
To remove a word from the selected dictionary, select the word in the Dictionary list, and click Delete. If you want to remove all the words from the dictionary, click Delete All.
To accept your changes and close the dialog, click OK.

Add Words to Word’s Custom Dictionary Using the Context Menu
You can also add words to the default custom dictionary when you have the setting enabled for automatically checking to spell as you type.
To enable this option, go to File > Options > Proofing, In the When correcting spelling and grammar in Word section, check the Check spelling as you type box. Then, click OK.

You should also check to see which custom dictionary is the default, so words are added to the correct custom dictionary.
On the Custom Dictionaries dialog, the current default custom dictionary is labeled. To change the default, select the dictionary you want to make the default and click Change Default.

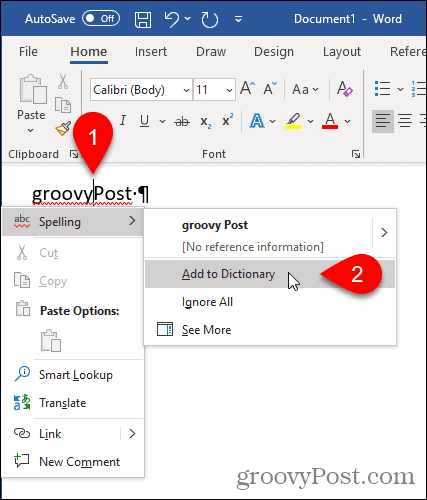
Now, when you right-click on a word marked as misspelled (with a red, squiggly underline), go to Spelling > Add to Dictionary.
Add a Third-Party Custom Dictionary
If you write special types of documents, like medical or legal documents, you can add a third-party dictionary to Word. This allows you to quickly and easily add many specialty words to Word for use when checking spelling.
To add a third-party dictionary, open the Custom Dictionaries dialog. For our example, we’re going to add the Raj&Co free medical dictionary.
A custom dictionary must be selected to be able to add a custom dictionary. Select any of the dictionaries in the list and then click Add.
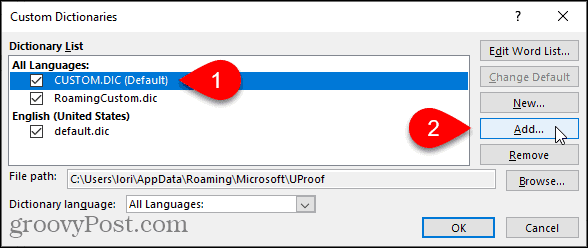
On the Add Custom Dictionary dialog, navigate to the location of the third-party custom dictionary you want to add. Then, select the .dic file and click Open.

The added dictionary displays in the Dictionary List. Click OK.

Add a New Additional Custom Dictionary
As we’ve shown, you can have multiple custom dictionaries that Word uses when checking spelling. In addition to third-party dictionaries, you may want to split up your own custom dictionaries. For example, maybe you want one dictionary for personal use and one for work.
To create a new custom dictionary, open the Custom Dictionaries dialog, and then click New.
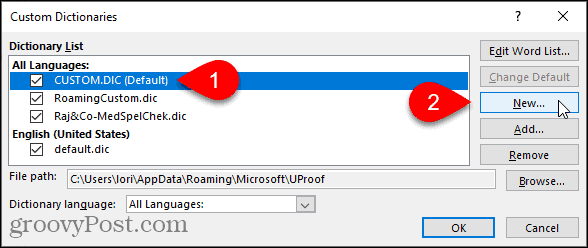
The location for the custom dictionaries is C:Users<username>AppDataRoamingMicrosoftUProof (change “<user name>” to your Windows user name) by default and this directory is selected on the Create Custom Dictionary dialog box. Enter a name for your new custom dictionary in the File name edit box and click Save.
NOTE: You must keep the .dic extension on the file name.

Add words to your new dictionary as you did when manually adding words to an existing dictionary. Click Edit Word List, add your words, and then click OK on both dialogs.

Remove a Custom Dictionary
If you ‘re not using a custom dictionary anymore, you can remove it from Word.
Open the Custom Dictionaries dialog, select the dictionary you want to remove, and then click Remove.
NOTE: The .dic file is NOT removed from your hard drive, only from the list of custom dictionaries in Word.

Change the Language Associated with a Custom Dictionary
When you add or create a new custom dictionary, Word associates all languages with that dictionary, which means the dictionary is used to check spelling in any language. If you want to associate a specific language with a custom dictionary, you can choose the language for that dictionary. Word will then use that dictionary when you spell check a document written in that language.
To change the language associated with a custom dictionary, open the Custom Dictionaries dialog. Select the dictionary for which you want to change the language in the Dictionary List and then select the language you want from the Dictionary language drop-down list.
Click OK on the Custom Dictionaries dialog and then again on the Word Options dialog.

Back Up Your Custom Dictionaries
It’s a good idea to back up your custom dictionaries in case you need to transfer them to another computer or copy them back to the same computer if you need to reinstall Office.
Copy the files in the C:Users<user name>AppDataRoamingMicrosoftUproof (change “<user name>” to your Windows user name) directory to another drive. Then, you can simply copy these files back to the same directory (or equivalent user directory) to restore them.
![]()
All Microsoft Word users have a default custom dictionary that acts as a catchall for their spelling preferences. In fact, every time you right-click on a flagged word (which may or may not be misspelled) and select “Add to Dictionary,” that word goes to your default custom dictionary. However, you can create additional custom dictionaries in Microsoft Word for specific documents.
This tutorial explains the following:
1. How to create a custom dictionary
2. How to add words to a custom dictionary
3. How to add or remove a custom dictionary for a specific file
This tutorial is available as a YouTube video showing all the steps in real time.
Watch more than 100 other writing-related software tutorials on my YouTube channel.
The images below are from Word for Microsoft 365. These steps also apply to Word 2021, Word 2019, Word 2016, and Word 2013. In addition, the steps are similar for Word 2010.
1. Select the File tab.

2. Select Options in the Backstage view.

3. Select Proofing in the Word Options dialog box.

4. Select the Custom Dictionaries button.

5. Select any of the available options in the Custom Dictionaries dialog box to make the New button available. (If All Languages or English is selected, the New button will be grayed out, which means it is unavailable.)

6. Select the New button.

7. Choose a file location for your new dictionary in the Create Custom Dictionary dialog box. Note that the default location chosen by Word will be appropriate for most users. See the Pro Tip below for additional information.

Pro Tip: By default, Word will save your new custom dictionary in the UProof folder connected to your user name, which means that only you can access that dictionary. If you want to share your new dictionary, save the file in another folder accessible by other Word users in your organization.
See step 6 in How to Add or Remove a Custom Dictionary for a Specific File, below, for instructions on adding dictionaries saved in other locations.
8. Type the name of your new custom dictionary in the File name text box.

9. Select the Save button.

The Create Custom Dictionary dialog box will close automatically, and your new dictionary will appear in the Custom Dictionary dialog box.

10. (Optional Step) Uncheck the new dictionary if you do not want it to be automatically applied to current or future documents.
11. Select the OK button in the Custom Dictionary dialog box.

Now, let’s populate your newly created custom dictionary.
How to Add Words to a Custom Dictionary
This section assumes that you closed the Custom Dictionary dialog box after completing the previous section. If your Custom Dictionary dialog box is still open, you can skip to step 5.
If you want to edit the existing words in your default custom dictionary or another custom dictionary, visit “How to Edit Your Custom Dictionary in Microsoft Word.”
1. Select the File tab (see figure 1).
2. Select Options in the Backstage view (see figure 2).
3. Select Proofing in the Word Options dialog box (see figure 3).
4. Select the Custom Dictionaries button (see figure 4).
5. Select your new dictionary in the Custom Dictionaries dialog box (see figure 10).
6. Select the Edit Word List button.

7. Type one word at a time into the Word(s) text box in the Edit Word List dialog box.

8. Select the Add button for each word.

9. Select the OK button when you are finished adding words to save your changes. The Custom Dictionaries dialog box will close automatically.

In an upcoming tutorial, we’ll use a simple text editor such as Notepad to add multiple words at once to a custom dictionary.
How to Add or Remove a Custom Dictionary for a Specific File
By default, Word’s Editor (which is the new name for the spelling and grammar check) applies all custom dictionaries to your documents unless specific dictionaries are manually unchecked in the Custom Dictionary dialog box. Therefore, I strongly encourage you to review the Custom Dictionary dialog box regularly to ensure that Word is using the dictionaries that you want—and none that you don’t.
The following steps show how to (1) add or remove a custom dictionary already connected to your document and (2) add a custom dictionary currently unconnected to your document (i.e., a dictionary saved outside of the UProof folder).
Add or Remove a Custom Dictionary Already Connected to Your Document
1. Select the File tab (see figure 1).
2. Select Options in the Backstage view (see figure 2).
3. Select Proofing in the Word Options dialog box (see figure 3).
4. Select the Custom Dictionaries button (see figure 4).
5. Check or uncheck specific dictionaries in the Custom Dictionaries dialog box (see figure 10).
6. Select the OK button to save your changes. The Custom Dictionaries dialog box will close automatically (see figure 16).
Add a Custom Dictionary Currently Unconnected to Your Document (Outside File)
1. Select the File tab (see figure 1).
2. Select Options in the Backstage view (see figure 2).
3. Select Proofing in the Word Options dialog box (see figure 3).
4. Select the Custom Dictionaries button (see figure 4).
5. Select any of the available options in the Custom Dictionaries dialog box to make the Add button available (see figure 5). (If All Languages or English is selected, the Add button will be grayed out, which means it is unavailable)
6. Select the Add button in the Custom Dictionaries dialog box.

7. Navigate to the location of the dictionary you want to add in the Add Custom Dictionary dialog box and select the dictionary file.

8. Select the Open button.

The Add Custom Dictionary dialog box will close automatically, and the dictionary you just selected will appear in the Custom Dictionaries dialog box.

9. Select the OK button to save your changes and close the Custom Dictionaries dialog box (see figure 16).
Related Resources
How to Create an Exclusion Dictionary in Microsoft Word
How to Create and Customize Headings in Microsoft Word
Updated January 06, 2022
Download PC Repair Tool to quickly find & fix Windows errors automatically
If you want to add a Custom Dictionary in Microsoft Word, Excel, Outlook, or other Office apps, here is what you will have to do. It is possible to create and include your custom dictionary in those apps without any add-in.
Let’s assume that your business uses some terms that always get marked by Office apps. If so, you can add a word to your dictionary. After doing that, those apps won’t find those words wrong. However, if you have, let’s say, fifty or a hundred words that you want to include in the dictionary, it is better to create a custom dictionary. This tutorial has the exact steps you will have to follow if you want to create and include a custom dictionary in any Microsoft Office app.
For your information, this article included Outlook’s screenshot. However, you can perform the same in other apps as well.
To add a custom dictionary in Word, Excel, and Outlook, follow these steps-
- Open Notepad on your computer.
- Write one word per line.
- Save the file with a .dic extension.
- Open Outlook on your PC.
- Click on File > Options.
- Go to the Mail tab.
- Click Spelling and Autocorrect > Custom Dictionaries.
- Select the language and click the Add button.
- Choose the .dic file.
- Click the OK button.
If you want to learn more, keep reading.
At first, you will have to create a custom dictionary. To do so, open Notepad or any other text editor on your computer. Then, write down all the words one per line. Click on File > Save As and choose a location where you want to save it. Give it a name with .dic extension (e.g., mycustomdictionary.dic), choose All Files from the Save as type drop-down list, and click the Save button.
After that, open Outlook on your PC, go to File > Options, and switch to the Mail tab.
If you want to import the dictionary in Word or Excel, you will have to visit the Proofing tab.
In the Mail tab, click on Spelling and Autocorrect button visible in the Compose messages section.
In the next window, click on the Custom Dictionaries button as visible in the When correcting spelling in Microsoft Office programs section.
After that, it shows all the languages (e.g., English-India, English- United States, etc.). It is better to choose the CUSTOM.DIC in All Languages label, and click the Add button.

Now, select the .dic file that you created earlier. Now, click on the OK button to save the change.
While selecting the custom dictionary, you might encounter an error message that says something like this-
Files without Unicode encoding can’t be added to the dictionary list. Save the file as a Unicode file to add it to the dictionary list.

If you see this error, do the following.
At first, create the custom dictionary as mentioned here. Then, show all hidden files and folders on your PC. After that, navigate to the following path-
C:Users<username>AppDataRoamingMicrosoftUProof
Here you will see a file named CUSTOM.DIC. Move this file to somewhere safe. After that, paste your custom dictionary file in the UProof folder and rename it to CUSTOM.DIC.
Now, try the same steps as mentioned above to import a custom dictionary.
That’s all! Hope it helps.

When he is not writing about Microsoft Windows or Office, Sudip likes to work with Photoshop. He has managed the front end and back end of many websites over the years. He is currently pursuing his Bachelor’s degree.
Примечание: Эта статья выполнила свою задачу, и в скором времени ее использование будет прекращено. Чтобы избежать появления ошибок «Страница не найдена», мы удаляем известные нам ссылки. Если вы создали ссылки на эту страницу, удалите их, и вместе мы обеспечим согласованность данных в Интернете.
Настраиваемый словарь полезен, если, например, ваша работа зависит от конкретной терминологии, например юридических терминов. Кроме того, вы можете создать настраиваемый словарь, включающий имена рабочих контактов, чтобы вы знали, что вы правильно задействуете их имена.
Когда вы используете средство проверки орфографии, оно сравнивает слова в документе со словами в основном словаре. Этот словарь содержит наиболее распространенные слова, но в нем могут отсутствовать имена собственные, технические термины и акронимы. Кроме того, в некоторых словах в основном словаре и в файле могут по-разному использоваться прописные буквы. Добавив эти слова или варианты с прописными буквами в настраиваемый словарь, можно предотвратить их пометку как ошибочных при проверке орфографии. Вы можете создавать настраиваемые словари в дополнение к словарю, который включен в приложения Office для Mac и используется по умолчанию.
Примечание: Изменение любого параметра настраиваемого словаря в одном из приложений Office для Mac влияет на все другие приложения. Например, если пользователь изменил многие параметры настраиваемого словаря в приложении Word, эти изменения будут учтены при следующем запуске PowerPoint или Excel.
Добавление слова из документа в настраиваемый словарь
-
В документе выделите слово, которое нужно добавить.
-
В меню Сервис выберите пункт Правописание.
Примечание: Диалоговое окно Правописание не откроется, если ошибки правописания не обнаружены или вы пытаетесь добавить слово, которое уже есть в словаре.
-
В меню Добавлять слова в выберите словарь, в который нужно добавить слово.
-
Нажмите кнопку Добавить.
Создание настраиваемого словаря в Word
Новый настраиваемый словарь можно сохранить в любом месте на компьютере. Если же вы хотите предоставить доступ к словарю другим пользователям, сохраните его в сетевой папке.
Примечание: Любой настраиваемый словарь, созданный в Word, будет использоваться во всех остальных приложениях Office для Mac.
-
Убедитесь в том, что открыт какой-либо документ.
Если открытых документов нет, выполнить дальнейшие действия не удастся.
-
В меню Word выберите пункт Настройки.
-
В разделе Средства разработки и проверки правописания выберите пункт Правописание.
-
В разделе Проверка орфографии выберите пункт Словари.
-
Нажмите кнопку Создать.
Важно: Если откроется диалоговое окно Преобразовать файл или Преобразование файла, не вносите никаких изменений, а просто нажмите кнопку ОК. (Правильный параметр кодировки текста — Другая кодировка: Юникод 5.1 (прямой порядок байтов).)
-
В поле Сохранить как введите имя настраиваемого словаря.
Примечание: Как только вы создадите настраиваемый словарь, Office для Mac автоматически начнет использовать его при проверке орфографии.
-
Нажмите Сохранить, а затем нажмите кнопку ОК еще раз, чтобы закрыть диалоговое окно Правописание.
Импорт настраиваемого словаря в Word
Диалоговое окно Вспомогательные словари в Word содержит список имеющихся настраиваемых словарей, которые приложение может использовать при проверке орфографии. Если нужный вам словарь, например купленный у сторонней компании, установлен на компьютере, но отсутствует в поле «Список словарей», его можно добавить в этот список.
-
Убедитесь в том, что открыт какой-либо документ.
Если открытых документов нет, выполнить дальнейшие действия не удастся.
-
В меню Word выберите пункт Настройки.
-
В разделе Средства разработки и проверки правописания выберите пункт Правописание.
-
В разделе Проверка орфографии выберите пункт Словари.
-
Нажмите Добавить, а затем найдите и дважды щелкните настраиваемый словарь, который нужно импортировать.
Если расширение имени файла словаря отличается от DIC, в раскрывающемся меню Включить выберите пункт Все файлы.
Добавление, удаление и редактирование слов в настраиваемом словаре в Word
Настраиваемый словарь можно редактировать в Word. Вы можете изменять слова в словаре и добавлять в него новые. Но помните, что Word не начнет автоматически использовать отредактированный настраиваемый словарь, так что вы должны выбрать его. Измененная версия словаря будет доступна во всех приложениях Office.
-
Убедитесь в том, что открыт какой-либо документ.
Если открытых документов нет, выполнить дальнейшие действия не удастся.
-
В меню Word выберите пункт Настройки.
-
В разделе Средства разработки и проверки правописания выберите пункт Правописание.
-
В разделе Проверка орфографии выберите пункт Словари.
-
Щелкните имя словаря, который требуется изменить, а затем нажмите Изменить.
При появлении сообщения о том, что Word прекращает проверять орфографию, когда вы редактируете словарь, нажмите кнопку ОК, а затем, если откроется диалоговое окно Преобразование файла — Вспомогательный словарь, снова нажмите кнопку ОК.
Важно: Если откроется диалоговое окно Преобразовать файл или Преобразование файла, не вносите никаких изменений, а просто нажмите кнопку ОК. (Правильный параметр кодировки текста — Другая кодировка: Юникод 5.1 (прямой порядок байтов).)
-
Внесите в файл словаря все необходимые изменения, а затем выберите в меню Файл команду Сохранить.
Примечание: Каждое добавляемое слово нужно вводить в отдельной строке.
-
В меню Файл выберите команду Закрыть.
Изменение языка, связанного с настраиваемым словарем
По умолчанию при создании нового вспомогательного словаря приложение задает словарь для всех языков, а это значит, что словарь используется при проверке орфографии в тексте на любом языке. Однако вы можете связать настраиваемый словарь с определенным языком, чтобы приложение использовало словарь только при проверке орфографии в тексте на определенном языке.
-
Убедитесь в том, что открыт какой-либо документ.
Если открытых документов нет, выполнить дальнейшие действия не удастся.
-
В меню Word выберите пункт Настройки.
-
В разделе Средства разработки и проверки правописания выберите пункт Правописание.
-
В разделе Проверка орфографии выберите пункт Словари.
-
Щелкните имя настраиваемого словаря, который нужно изменить, и выберите в раскрывающемся меню Язык тот язык, который вы хотите связать со словарем.
Примечания:
-
Если установить Office 2016 для Mac на одном компьютере с Office для Mac 2011, то все настраиваемые словари, которые вы добавили и включили в Office для Mac 2011, будут автоматически скопированы в Office 2016 для Mac. Если Office обнаружит созданные ранее настраиваемые словари не в папке по умолчанию, а в других расположениях, то, возможно, появится запрос на предоставление дополнительных разрешений для доступа к файлам. Если вы увидите подобное сообщение, просто выберите один или несколько файлов и нажмите Выбрать, чтобы открыть доступ к настраиваемым словарям.
-
Дополнительные сведения об установке Office 2016 для Mac, в том числе о том, как запускать Office 2016 для Mac на компьютере с Office для Mac 2011, можно найти в статьях Установка Office на компьютере с Windows или Mac OS.
См. также
Добавление, изменение и отключение автоматических исправлений
Проверка орфографии и грамматики на другом языке
A quick look at your dictionary options in Word
Even if you, like me, only speak one language there are still some powerful language and dictionary options in Word to keep in mind.
All copies of Microsoft Office (recent versions anyway) come with English dictionaries. ‘Dictionaries’ plural because there’s many variants supplied. You’d expect English (US) and English (UK) but there’s many others available:
- Australia
- Belize
- Canada
- Caribbean
- Hong Kong
- India
- Indonesia
- Ireland
- Jamaica
- Malaysia
- New Zealand
- Philippines
- Singapore
- South Africa
- Trinidad and Tobago
- United Kingdom
- United States
- Zimbabwe
Of course, all language variants have a lot of common spellings but differences like the common ones color/colour etc. and less well known ones like spelled/spelt.
Other languages that are included with the ‘English’ version of Office are French and Spanish – with a similarly large number of variations including French for France and Canadian Quebecois.
To get the languages supplied with your version of Office, go to Control Panel | Programs and Features (or similar in earlier versions of Windows), choose Microsoft Office and then change settings. You’ll repeat some of the installation steps including Customize where you can find and select additional languages or features available in that language.
Usually the appropriate one for you is chosen automatically during setup. The Office installation picks up your region setting from Windows to choose the default language in Word. But that’s not always correct. Sometimes Windows has the wrong region setting, most commonly with the US defaults applied when you don’t live there. That will result in Word having the English (US) dictionary by default. Happily that’s easy to change.
Changing the default language
To change Word’s default language, go to Review | Language | Set Proofing Language

Then choose the language you want from the long list. Not all languages on the list are installed on your computer. Look for the ‘ABC’ icon on the left to see which languages are installed. In this example you can see that the English and French languages are installed but not the few in-between on the alphabetical list.

To change the default language, click on the language you want then click ‘Set as Default’.

You’ll then see a message for you to confirm the change and remind you which template will be affected. That’s usually the ‘Normal’ template which is the basis for blank documents and sometimes others.

Templates
Word templates can store a default language for documents based on that template. If you write documents in different languages you could create a template for each language eg Normal-English.dotx Normal-French.dotx etc.
Paragraphs
You can change the language (for spelling and thesaurus purposes) within a document. For example, if you have a letter with both English and Spanish sections – Word can spell check each using the right dictionary.
These days, Word has an ‘autodetect’ feature which should figure out which language is being typed and change the dictionary. But sometimes it doesn’t work or you want a specific language variant (e.g. Spanish (Spain) or Spanish (Mexico) instead of Spanish (US) ).
Select the paragraphs or just words in the ‘other’ language. Go to Review | Language | Set Proofing Language from the long list. You can select a language that isn’t installed on your computer – Word will keep the language setting even though it can’t spell or grammar check it.
No Proofing
Sometimes there’s technical text or details that Word can’t understand – i.e. there’s red squiggly lines all over the place. A common example is programming code.
You can stop the spell checking for selected words or paragraphs by choosing Review | Language | Set Proofing Language and selecting ‘Do not check spelling or grammar’. This is the same as the special ‘No Proofing’ language in earlier versions of Word.
Styles
You can set the language as part of a style – either paragraph or character style. That’s handy when you have many paragraphs in a different language from the majority of the document.
For example, a style for formatting computer code might be in a fixed space font like Courier New plus the ‘Do not check spelling or grammar’ option under Language in the Styles options.
Make your own dictionary
As I’m sure most people know, you can add words to the Word dictionary (actually a separate custom.dic dictionary). Choose a word which has a red line underneath, right-mouse click and choose ‘Add to dictionary) then the word is recognized as correct in that document and other documents.
Interface language vs. document language
We’ve been talking here about the dictionary language used in Office for spell check, grammar, thesaurus and hyphenation of documents.
There’s another language option for the text on labels and menus – the interface language. Usually that’s automatically selected according to the specific software you bought or selection made when downloading. However it is possible to change interface language with optional packs from Microsoft.
That’s it for the moment, there’s a lot more detail in the Word language support but that’s the highlights.