
Содержание
- Microsoft Excel — 5 Default Settings You Want to Change Now
- Have you Considered These? Thank Me In The Comments! 🙂
- 1 — Turn off Excel’s Start Screen — By Default, it Opens Each Time
- 2 —When the “Home” Key is Pressed, Go to Cell A1!
- 3 — Activate the Developer Ribbon Toolbar
- 4 — Customize the Quick Access Toolbar (“QAT”)
- 5 —Change The Auto-Save Time, Depending on Preference
- About Don
- “What Do You Do?”
- How to reset default settings in Excel ?
- Method 1: Reset Excel using the Registry editor
- Method 2: Reset Excel using Powershell
- Method 3: Completely uninstall Office with SetupProd_OffScrub Tool and Reinstall
- How to reset Excel 2010 settings to Default?
- 4 Answers 4
- How to set a default template in Excel
- Summary
- Settings that can be saved in a template
- The process
- Common startup folder locations
- Can’t find XLSTART?
- Set your own startup directory
- Test to make sure your template is being used
- Setting a default Excel template on the Mac
- Template for new sheets
Microsoft Excel — 5 Default Settings You Want to Change Now
Have you Considered These? Thank Me In The Comments! 🙂
1 — Turn off Excel’s Start Screen — By Default, it Opens Each Time
We don’t really want to see the Start screen (image above) each time we open Excel, do we?
But, we mostly accept that “this is the way it is”, click the Blank Workbook and start.
Here’s how to turn it off.
Go to “File → Options → General” and uncheck “Show the Start screen…”
If you DO WANT to access the Start Screen, click on “ File →New” when you are in an open workbook and it appears.
2 —When the “Home” Key is Pressed, Go to Cell A1!
For some reason, the default setting in Excel when the “Home” key is pressed is to take you to column A in whatever row you are in (e.g., I’m in J50 — press Home — cursor goes to cell A50).
“CTRL + Home” takes you to A1.
To change this, we simply need to activate a “Lotus Compatibility” setting (it was the default in Lotus — love that spreadsheet back in the day…).
Go to “File → Options → Advanced” and check “Transition navigation keys”
Not activated by default — Microsoft obviously considers this an “advanced” setting. But, just the basics of macros and accessing the Visual Basic Editor (don’t let it scare you…).
If you work in Excel, or with workbooks developed by others, you WILL encounter a “macro-enabled” file (the .xlsm extension). So have this Ribbon handy right from the get-go!
Go to “File →Options →Customize Ribbon” setting and check the “Developer” tab on the right side of the screen. Good to go!
The following does a great job of stepping though this!
Reduce the time you spend accessing the Ribbon menus by putting your most frequently accessed items on the QAT toolbar.
Shoot for 5–10 items to get started. It will build from there!
Go to “File →Options →Quick Access Toolbar”. Select commands from the right “menu” and Add>> them to the left. When you close out, they will appear on your QAT.
Additionally, “right-click” on most Ribbon menu items and a shortcut menu appears — modify your QAT right from here.
5 —Change The Auto-Save Time, Depending on Preference
The default auto-save time is 10 minutes.
If you are really cautious, you may want this at 5 minutes. Just know you can change the default setting!
Go to “File →Options →Save”, under “Save workbooks”
There you go. Five items rarely thought about that will pay you dividends every day in your use of Excel!
Are there any you would recommend?
About Don
Don is passionate about helping professionals and organizations keep up and adapt to the changing business world that we operate in.
“What Do You Do?”
I frequently get this question. My response (it’s not what you think!)? Check it out here!
Источник
How to reset default settings in Excel ?

Microsoft Excel is a spreadsheet tool with a lot of functionality. In most cases, you won’t need to change Excel’s default settings, but you can customize them using the Excel Options feature, which gives you access to all settings.
Excel’s default settings are the default configuration that comes with the program when you first install it.Default Workbook, default font style and size, default cell alignment, default file format, row height and column width, default print settings, and so on are some of the preset settings.Here we will look how to reset these settings to default.
Please enable JavaScript
Excel’s default options won’t erase your data. Excel’s font, alignment, number formats, and other settings will only be affected by resetting the preset settings. It will not delete your data, including worksheets, workbooks, add-ins or macros and others.
Note that: Before applying changes please close currently opening Excel files.
Method 1: Reset Excel using the Registry editor
Registry Editor is a graphical program that stores all of the configurations related to the operating system, software, and settings.
Changes to the registry file may be corrupted at any time. Use your software, even your operating system, with caution. Only do as instructed in the instruction.
The steps are as follows:
1 Press Ctrl + R to open Run.
2 Type regedit and press Enter
3 On the popup, click on the ‘Yes‘ button. This will open registry as shown below. fig. Type regedit in Run and Press Ok Button
4 On the right pane, expand HKEY_CURRENT_USER. fig. Expand HKEY CURRENT USER
5 Expand Software fig. Expand Software
6 Expand Microsoft fig. Expand Microsoft
7 Expand Office fig. Expand Office Folder
At the top search bar, verify that you are inside the following path:
8 Here, you may get a different version of office like 14.0, 15.0,16.0, and soon.
- If you are using Excel 2007, Then Expand 12.0
- If you are using Excel 2010, Then Expand 14.0
- If you are using Excel 2013, Then Expand 15.0
- If you are using Excel 2016 or later then Expand 16.0
Here, I am going to reset Excel 2019, So I will Expand 16.0 as shown below.
9 Then right-click on Excel Folder and click on Delete it. fig. Right Click on Desire Office Version and then click on Delete
10 Close the Registry Editor
11 Open Excel and you will find Excel reset to default settings.
Method 2: Reset Excel using Powershell
Powershell is a powerful tool, and we’ll utilize Cmdlets to remove that folder from the Registry. We’ll delete the Excel folder with the help of Remove-Item. The steps are as follows
1 Press Win + R to open Run Command
2 Type Powershell and press Enter. This will open the blue screen program which is a PowerShell program.
3 Type below command and replace with your installed office version
If you are using Excel 2007 then type:
If you are using Excel 2010 then type:
If you are using Excel 2013 then type:
If you are using Excel 2016 or later then type:
Here, I am using Excel 2019 so I will use the last command as shown below:
What this Command is doing?
This command is removing all items recursively present inside the path «HKCU:SoftwareMicrosoftOffice\Excel» of Registry File.
Method 3: Completely uninstall Office with SetupProd_OffScrub Tool and Reinstall
Removing Excel or Office packages from the control panel may not solve the problem of resetting Excel to default because the preferences are stored on your computer. However, by using the SetupProd OffScrub tools, you are completely uninstalling Office, and when you reinstall Office, Excel will have default settings.
This software automatically uninstalling everything related to the selected version of the Office Package. It works for Microsoft 365, Office 2019, Office 2016, Office 2013, Office 2010, or Office 2007.
You can download from this link: Download Link
You then again reinstall the office package again.
Sometimes you only like to reset Excel Ribbon and Quick Access toolbar to default then follow the below steps:
1 Click on File
2 Click on Options or sometimes More > Options
3 Click on Custom Ribbon at the right pane.
4 Then at left, click on all checkbox and then under Customization Dropdown set to «Reset all customizations«
5 If you want to Customize Quick Access Toolbar, click on «Quick Access Toolbar» on left.
6 Then at left, select the option at the top and then under Customization Dropdown set to «Reset all customizations«.
Источник
How to reset Excel 2010 settings to Default?
Excel’s cells are very small when at 100% zoom (see screenshot below):

I have searched Excel’s menu but couldn’t find anything relevant. I tried to install Microsoft Fixit but it said it wasn’t supported by my operating system (Windows 7 Home Basic).
Can anyone help restore the look of my sheet to ‘as default’ please?

4 Answers 4
You can reset the customized user settings automatically by using Microsofts Fixit, click the link (http://download.microsoft.com/download/B/0/C/B0C6EEE0-47D4-47FD-AA50-CABAA515D0D8/MicrosoftFixit50274.msi) to download Microsoft Fix it 50274 Click Run in the File Download dialog box, and follow the steps in the Fix it wizard.
- Close all office programs.
- Press Win + R
- Type regedit and press Enter .
- First backup this key HKEY_CURRENT_USERSoftwareMicrosoftOffice14.0Excel
- Then delete it.
- Reopen excel.

Step 1
Click the Start button and open the «Control Panel.»
Step 2
Click the «Uninstall a program» link under Programs.
Step 3
Scroll down and highlight «Microsoft Office.»
Step 4
Click the «Change» button and wait for a new window to open.
Step 5
Click to select the «Repair» option and click «Continue» to authorize your computer to repair Microsoft Excel to its default settings.
Источник
How to set a default template in Excel

Summary
Excel has the ability to use a custom template for all new workbooks. If you find yourself making the same changes to new workbooks (changing row height, font size, zoom, etc.) a default custom template can save you time and trouble.
Do you find yourself creating new workbooks in Excel, then making the same changes to every one? Maybe you like to change font size, zoom percent, or the default row height?
If so, you can save yourself time and trouble by setting a default template for Excel to use each time you create a new workbook. As long as you name the template correctly, and put it in the correct location, Excel will use your custom template to create all new workbooks.
Note: biggest challenge with this tip is figuring out the right location for the template file. This can be maddeningly complex, depending on which platform and version of Excel you use. If you get frustrated and can’t make things work, you can set your own startup folder manually, as described below.
Settings that can be saved in a template
A template can hold many custom options. Here are a few examples of settings that can be saved in a workbook template:
- Font formatting and styles
- Display options and zoom settings
- Page setup and print options
- Column widths and row heights
- Page formats and print area settings for each sheet
- The number (and type) of sheets in new workbooks
- Placeholder text (titles, column headers, etc.)
- Data validation settings
- Macros, hyperlinks and ActiveX controls
- Workbook calculation options
Remember: these settings only apply to new workbooks created after a custom template file is installed.
The process
- Open a new blank workbook and customize the options as you like
- Save the workbook as an Excel template with the name «book» (Excel will add .xltx) *
- Move the template to the startup folder used by Excel
- Disable Start screen at General > Start up options) **
- Quit and relaunch Excel to be sure settings are fresh
- Test to be sure Excel is using the template when new workbooks are created
* Based on comments, it seems the name of your workbook must be localized for your version of Excel. For example, if you’re using the Czech version, you need to use «Sešit» instead of «book».
* * Not strictly required, but the «New blank workbook» option on the Start screen seems to ignore a custom template (?).
Common startup folder locations
Whenever Excel is launched, it establishes what is called a «startup folder», which is named XLSTART. The key is to put your template file into this folder so that Excel will find it. Unfortunately, the exact location of XLSTART varies according to the versions of Excel and Windows you use. Here are some common locations:
C:Program FilesMicrosoft OfficeOFFICExXLSTART
C:UsersuserAppDataMicrosoftExcelXLSTART
C:UsersuserAppDataRoamingMicrosoftExcelXLSTART
Can’t find XLSTART?
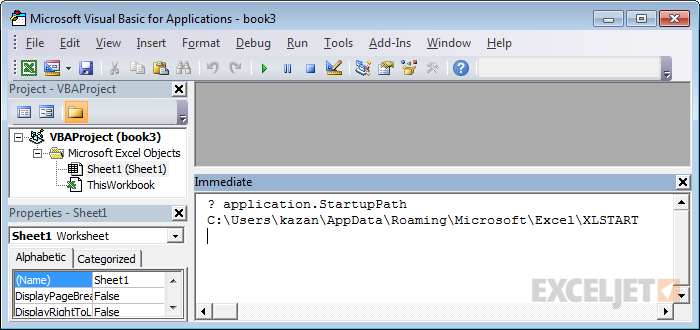
If you can’t find the startup folder for excel (XLSTART), you can use the VBA editor to confirm Excel’s start up path:
- Run Excel
- Open the VBA editor (Alt + F11)
- Open the immediate window (Control + G)
- Type: ? application.StartupPath in the window
- Press Enter
The startup path will appear below the command. Once you’ve confirmed the location of XLSTART, drop in your template file.
Set your own startup directory
If you can’t find Excel’s startup directory, or if burying your template deep in an application hierarchy just seems wrong, you can tell Excel to look in your own startup folder by setting an option as follows:
- Create a directory called «xlstart» where you like
- Put your custom template in the new directory
- At Options > Advanced > General > Open all files in, enter the path to xlstart
- Test to make sure the template is working
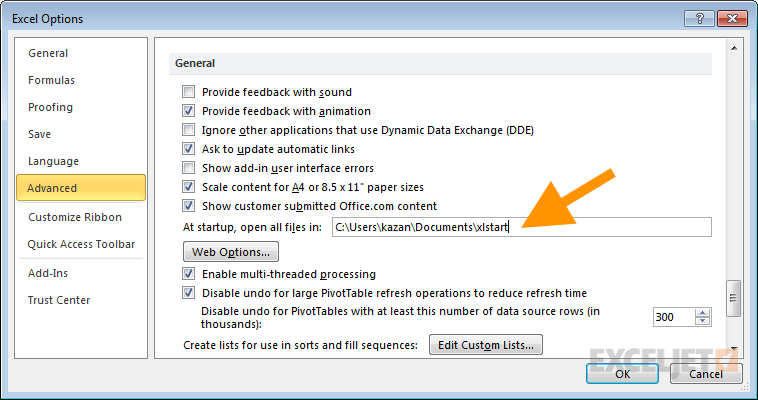
Telling Excel about your own startup folder. make sure you use the correct path on your computer!
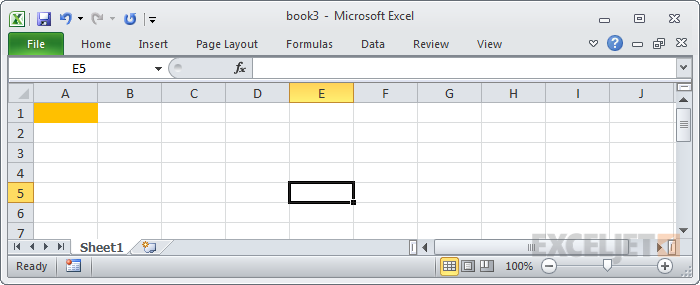
Test to make sure your template is being used
After you go through the steps to set up a default template, make sure you test to confirm your template is being used. One easy way to do this is to (temporarily) give cell A1 in your template a bright yellow or orange fill. That way, you can immediately see if your custom template is being used. Once you’re sure things are working, remove the marker.
Setting a default Excel template on the Mac
The process for setting a default Excel template on a Mac is similar to the steps above for Windows. Again, confirming the startup folder can be tricky, depending on whether y ou have Excel 2011 or 2016 installed (2008 not tested). In Excel 2016, according to Microsoft, there is currently no startup folder .
Also, as of mid-2016, the name of the template should be «workbook» (manually remove the .xltx extension) not «book», as described in this good article on Excelsemipro. (The location mentioned in this article also seems to have changed in later 2011 versions).
Because of confusion around the startup folder, here’s what I recommend on a Mac:
- Create a new directory in your home documents folder called «xlstart«
- Go to Preferences > General > At startup, open all files in, and set xlstart as path
- Open a new workbook and customize the options as you like
- Save the workbook as an Excel template with the name «workbook.xltx» inside xlstart
- Manually remove the extension «.xltx» so that the file is named only «workbook«
- Quit and relaunch Excel to be sure settings are updated
- Test to be sure Excel is using the template when new workbooks are created
I tested this with Excel 2011 and Excel 2016 installed on the same Mac in May 2016, and both used the same template as expected.
Note: Tested again in January 2020. Step #5 above (removing the extension) was not needed. Also, I was able to use ‘book.xltx’ for the filename, like the Windows version.
Template for new sheets
A workbook template controls the look and layout of sheets already in the workbook, but not new sheets. When you insert a new sheet,it will inherit Excel’s sheet defaults. If you want to control new sheets with your own template, follow the process below.
- Open a new blank workbook and delete all sheets except one
- Make desired customizations to the sheet
- Save as an Excel template named «sheet.xltx» to the location determined above **
- Close the file
** If using a non-English version of Excel, you may need to localize this name.
To test that the sheet template is working, open a workbook and add a new sheet. You should see your customizations all newly inserted sheets.
Источник
Other than the top row, which is a header, I’d like one column to always have a default value, ideally added when that row is not empty… so I don’t have an infinite number of rows with just the default value.
I couldn’t find a way to set default values at all — I do not want the user able to edit this.
asked Sep 17, 2010 at 8:51
![]()
1
You can fill that column with formula =IF(D4="";"";"default value"), assuming you’re in row 4 and column D will be filled in later on.
(Use =IF(D4="","","default value")
if your version of Excel separates function arguments with commas.)
Translation:
- If the row 4 is not filled in, then the result is blank so nothing is shown.
- If the row 4 is filled and the user has entered a value in column D, then your default value is shown.
- The user can fill in any other value instead of this formula, thereby simply overwriting the formula which isn’t needed anymore anyway.
- You can protect the column if you don’t want the user to overwrite your default value.
![]()
answered Sep 17, 2010 at 10:20
![]()
1
the hard but more convenient way is to give the default value in the first case and then copy them to all other vertical cells by using the cursor at the right hand corner till there is a cross and pull it down to the last cell. this is useful only in relatively small samples.
very useful if you are calculating in the cell by applying a formula in the first cell.
Smsv
answered Jun 29, 2016 at 17:48
![]()
0
It may seem like an insignificant matter, but getting your Office applications set up properly before you start working is a smart move. Think about all the times you have had to change formatting options on existing workbooks and tally up that time — it adds up.

Three tips that will help you to reset Excel’s default formatting. Set them once, and never again.
#1: Setting Formatting Options for Workbooks
Excel does not offer many options that allow you to set formatting defaults for your workbooks. However, you can work around this by modifying the formatting in a blank workbook, then saving it as the default template.
- Open Excel to a blank workbook.
- Format the blank file with all options desired. For example, set margins, cell color formats, or set up a header or footer. Make sure to remove any values you entered in cells to test formatting unless you want them to appear in every blank workbook.
- Once your changes are made, click on the File tab and choose Save As.
- From the “Files of type” drop-down list, select “Excel Template (*.xltx)” and change the file name to “Book.”
- Set the “Save in” location to theXLSTART folder. This folder is typicallylocated in a path similar to C:Program Files/Microsoft Office/Office14/XLSTART.
- The quickest way to find its location is to use the Immediate window in the Visual Basic Editor (VBE), as follows:
- Press [Alt]+[F11] to launch the VBE.
- If the Immediate window isn’t visible, press [Ctrl]+g.
- In the Immediate window, type ? application. StartupPath and press Enter.
VBA will display the path to XLStart. 
- Click Save.
- Quit and re-open Excel. The blank workbook should contain the formatting you previously set.

#2: Changing the Default Font for New Workbooks
We all have our quirks; that’s what makes us unique. One of these things can be the font you choose as your default. To change the default font used in new workbooks in Excel, follow these steps:
- Click on the File tab.
- Select Options at the bottom left.
- Under General options there is a section for “When creating new workbooks.”
- Here you can select the option to change the font and font size for all new workbooks.
- Click OK.
- Close and re-open Excel.
After you restart Excel, any new workbook you create will be set for the new font properties you selected. Note that existing workbooks will not be affected.
#3: Setting Formatting Options for Workbooks
Why does Excel always open up with three blank worksheets? If you’ve found yourself continually deleting those extra two, stop already. Excel offers a way for you to specify the defaults for new workbooks, which includes number of worksheets. Follow the steps below:
- Click on the File tab and choose Excel Options.
- In the General group, navigate to the section titled “When creating new workbooks.”
- You can change the number of sheets created in a new workbook by changing the “Include this many sheets” option.
- Click OK after making your selections.
- Close and re-open Excel.
Excel will use your options from now on when creating a new workbook, saving you time when setting up each new file.
Have any Excel or general Office tips to share? Post them in the comments section.
Also Read
- Advanced Formatting Tricks for Excel users
- Excel Tips for Creating Stylish Spreadsheets
- Excel 2013: Conditional Formatting
Resources: Excel Formatting
Courtesy: vitalyst.com
Related
Do you find yourself creating new workbooks in Excel, then making the same changes to every one? Maybe you like to change font size, zoom percent, or the default row height?
If so, you can save yourself time and trouble by setting a default template for Excel to use each time you create a new workbook. As long as you name the template correctly, and put it in the correct location, Excel will use your custom template to create all new workbooks.
Note: biggest challenge with this tip is figuring out the right location for the template file. This can be maddeningly complex, depending on which platform and version of Excel you use. If you get frustrated and can’t make things work, you can set your own startup folder manually, as described below.
Settings that can be saved in a template
A template can hold many custom options. Here are a few examples of settings that can be saved in a workbook template:
- Font formatting and styles
- Display options and zoom settings
- Page setup and print options
- Column widths and row heights
- Page formats and print area settings for each sheet
- The number (and type) of sheets in new workbooks
- Placeholder text (titles, column headers, etc.)
- Data validation settings
- Macros, hyperlinks and ActiveX controls
- Workbook calculation options
Remember: these settings only apply to new workbooks created after a custom template file is installed.
The process
- Open a new blank workbook and customize the options as you like
- Save the workbook as an Excel template with the name «book» (Excel will add .xltx) *
- Move the template to the startup folder used by Excel
- Disable Start screen at General > Start up options) **
- Quit and relaunch Excel to be sure settings are fresh
- Test to be sure Excel is using the template when new workbooks are created
* Based on comments, it seems the name of your workbook must be localized for your version of Excel. For example, if you’re using the Czech version, you need to use «Sešit» instead of «book».
* * Not strictly required, but the «New blank workbook» option on the Start screen seems to ignore a custom template (?).
Common startup folder locations
Whenever Excel is launched, it establishes what is called a «startup folder», which is named XLSTART. The key is to put your template file into this folder so that Excel will find it. Unfortunately, the exact location of XLSTART varies according to the versions of Excel and Windows you use. Here are some common locations:
C:Program FilesMicrosoft OfficeOFFICExXLSTART
C:UsersuserAppDataMicrosoftExcelXLSTART
C:UsersuserAppDataRoamingMicrosoftExcelXLSTART
Can’t find XLSTART?
If you can’t find the startup folder for excel (XLSTART), you can use the VBA editor to confirm Excel’s start up path:
- Run Excel
- Open the VBA editor (Alt + F11)
- Open the immediate window (Control + G)
- Type: ? application.StartupPath in the window
- Press Enter
The startup path will appear below the command. Once you’ve confirmed the location of XLSTART, drop in your template file.

Set your own startup directory
If you can’t find Excel’s startup directory, or if burying your template deep in an application hierarchy just seems wrong, you can tell Excel to look in your own startup folder by setting an option as follows:
- Create a directory called «xlstart» where you like
- Put your custom template in the new directory
- At Options > Advanced > General > Open all files in, enter the path to xlstart
- Test to make sure the template is working

Telling Excel about your own startup folder…make sure you use the correct path on your computer!
Test to make sure your template is being used
After you go through the steps to set up a default template, make sure you test to confirm your template is being used. One easy way to do this is to (temporarily) give cell A1 in your template a bright yellow or orange fill. That way, you can immediately see if your custom template is being used. Once you’re sure things are working, remove the marker.

Setting a default Excel template on the Mac
The process for setting a default Excel template on a Mac is similar to the steps above for Windows. Again, confirming the startup folder can be tricky, depending on whether you have Excel 2011 or 2016 installed (2008 not tested). In Excel 2016, according to Microsoft, there is currently no startup folder.
Also, as of mid-2016, the name of the template should be «workbook» (manually remove the .xltx extension) not «book», as described in this good article on Excelsemipro. (The location mentioned in this article also seems to have changed in later 2011 versions).
Because of confusion around the startup folder, here’s what I recommend on a Mac:
- Create a new directory in your home documents folder called «xlstart«
- Go to Preferences > General > At startup, open all files in, and set xlstart as path
- Open a new workbook and customize the options as you like
- Save the workbook as an Excel template with the name «workbook.xltx» inside xlstart
- Manually remove the extension «.xltx» so that the file is named only «workbook«
- Quit and relaunch Excel to be sure settings are updated
- Test to be sure Excel is using the template when new workbooks are created
I tested this with Excel 2011 and Excel 2016 installed on the same Mac in May 2016, and both used the same template as expected.
Note: Tested again in January 2020. Step #5 above (removing the extension) was not needed. Also, I was able to use ‘book.xltx’ for the filename, like the Windows version.
Template for new sheets
A workbook template controls the look and layout of sheets already in the workbook, but not new sheets. When you insert a new sheet,it will inherit Excel’s sheet defaults. If you want to control new sheets with your own template, follow the process below.
- Open a new blank workbook and delete all sheets except one
- Make desired customizations to the sheet
- Save as an Excel template named «sheet.xltx» to the location determined above **
- Close the file
** If using a non-English version of Excel, you may need to localize this name.
To test that the sheet template is working, open a workbook and add a new sheet. You should see your customizations all newly inserted sheets.
Microsoft Excel is a spreadsheet tool with a lot of functionality. In most cases, you won’t need to change Excel’s default settings, but you can customize them using the Excel Options feature, which gives you access to all settings.
Excel’s default settings are the default configuration that comes with the program when you first install it.Default Workbook, default font style and size, default cell alignment, default file format, row height and column width, default print settings, and so on are some of the preset settings.Here we will look how to reset these settings to default.
Changes made using Excel Options will be applied to all the excel files. And if you ever want to go back to the original settings, there is no single button in Excel that would allow you to revert back all. Furthermore, changing all parameters one by one is not possible. So, In this article, Ourtechroom will show you how to reset all of the settings in Excel.
Excel’s default options won’t erase your data. Excel’s font, alignment, number formats, and other settings will only be affected by resetting the preset settings. It will not delete your data, including worksheets, workbooks, add-ins or macros and others.
Note that: Before applying changes please close currently opening Excel files.
Note that: Before applying changes please close currently opening Excel files.
Method 1: Reset Excel using the Registry editor
Registry Editor is a graphical program that stores all of the configurations related to the operating system, software, and settings.
Changes to the registry file may be corrupted at any time. Use your software, even your operating system, with caution. Only do as instructed in the instruction.
The steps are as follows:
1 Press Ctrl + R to open Run.
2 Type regedit and press Enter
3 On the popup, click on the ‘Yes‘ button. This will open registry as shown below.

4 On the right pane, expand HKEY_CURRENT_USER.

5 Expand Software

6 Expand Microsoft

7 Expand Office

At the top search bar, verify that you are inside the following path:
HKEY_CURRENT_USERSoftwareMicrosoftOffice

8 Here, you may get a different version of office like 14.0, 15.0,16.0, and soon.
- If you are using Excel 2007, Then Expand 12.0
- If you are using Excel 2010, Then Expand 14.0
- If you are using Excel 2013, Then Expand 15.0
- If you are using Excel 2016 or later then Expand 16.0
Here, I am going to reset Excel 2019, So I will Expand 16.0 as shown below.
9 Then right-click on Excel Folder and click on Delete it.

10 Close the Registry Editor
11 Open Excel and you will find Excel reset to default settings.
Method 2: Reset Excel using Powershell
Powershell is a powerful tool, and we’ll utilize Cmdlets to remove that folder from the Registry. We’ll delete the Excel folder with the help of Remove-Item. The steps are as follows
1 Press Win + R to open Run Command
2 Type Powershell and press Enter. This will open the blue screen program which is a PowerShell program.
3 Type below command and replace with your installed office version
Remove-Item -Path HKCU:SoftwareMicrosoftOffice\Excel -Recurse
If you are using Excel 2007 then type:
Remove-Item -Path HKCU:SoftwareMicrosoftOffice12.0Excel -Recurse
If you are using Excel 2010 then type:
Remove-Item -Path HKCU:SoftwareMicrosoftOffice14.0Excel -Recurse
If you are using Excel 2013 then type:
Remove-Item -Path HKCU:SoftwareMicrosoftOffice15.0Excel -Recurse
If you are using Excel 2016 or later then type:
Remove-Item -Path HKCU:SoftwareMicrosoftOffice16.0Excel -Recurse
Here, I am using Excel 2019 so I will use the last command as shown below:

What this Command is doing?
This command is removing all items recursively present inside the path «HKCU:SoftwareMicrosoftOffice\Excel» of Registry File.
Method 3: Completely uninstall Office with SetupProd_OffScrub Tool and Reinstall
Removing Excel or Office packages from the control panel may not solve the problem of resetting Excel to default because the preferences are stored on your computer. However, by using the SetupProd OffScrub tools, you are completely uninstalling Office, and when you reinstall Office, Excel will have default settings.
This software automatically uninstalling everything related to the selected version of the Office Package. It works for Microsoft 365, Office 2019, Office 2016, Office 2013, Office 2010, or Office 2007.
You can download from this link: Download Link
You then again reinstall the office package again.
FAQ:
How to reset Reset Excel Ribbon and Quick Access toolbar?
Sometimes you only like to reset Excel Ribbon and Quick Access toolbar to default then follow the below steps:
1 Click on File
2 Click on Options or sometimes More > Options
3 Click on Custom Ribbon at the right pane.
4 Then at left, click on all checkbox and then under Customization Dropdown set to «Reset all customizations«
5 If you want to Customize Quick Access Toolbar, click on «Quick Access Toolbar» on left.
6 Then at left, select the option at the top and then under Customization Dropdown set to «Reset all customizations«.