
You can change the default settings for new documents by making changes to the Normal template that new documents are based on. You can modify the Normal template to change its default formatting or content so that any new document that you create will use the new settings.
Important: If you mistakenly modify the Normal template, you can easily restore the default behavior by deleting, renaming, or moving it. The Normal template is automatically recreated the next time that you open Word. However, the same cannot be said for other templates. You should always create a copy of any other template before you change it.
Change the default font
Changing the default font in any template means that the font is used in every new document that is based on that template. For example, the default font for new blank documents is based on the Normal template.
-
Open the template or a document based on the template whose default settings you want to change.
-
On the Format menu, click Font, and then click the Font tab.
-
Make any changes that you want, and then click Default.
Note: Most of the styles in Word are based on the Normal style. Changing the default font also changes the Normal style, which affects any other style that is built on the Normal style.
Change the default character spacing
Changing the default character spacing in any template means that the settings for scale, spacing, position, kerning, and other typographic features are used in every new document that is based on that template. For example, the character spacing for new blank documents is based on the Normal template.
-
Open the template or a document based on the template whose default settings you want to change.
-
On the Format menu, click Font, and then click the Advanced tab.
-
Make any changes that you want, and then click Default.
Change the default margins
Changing the default margins in any template means that the margin settings are used in every new document that is based on that template. For example, the margins for new blank documents are based on the Normal template.
-
Open the template or a document based on the template whose default settings you want to change.
-
On the Format menu, click Document, and then click the Margins tab.
-
Make any changes that you want, and then click Default.
Change the default layout
Changing the default layout in any template means that the section breaks, headers and footers, and other layout attributes are used in every new document that is based on that template. For example, the layout attributes for new blank documents are based on the Normal template.
-
Open the template or a document based on the template whose default settings you want to change.
-
On the Format menu, click Document, and then click the Layout tab.
-
Make any changes that you want, and then click Default.
Change other default settings in the Normal template
You can customize the Normal template and change default settings for many aspects of a document, such as text formatting, paragraph formatting, document formatting, styles, text, pictures, AutoText entries, and keyboard shortcuts. To make changes to Normal.dotm, you must open the file from Word. If you open Normal.dotm from the Finder, Word will create a new blank document based on the template.
-
On the File menu, click Open.
-
In the Open dialog box, browse to the folder that contains the Normal.dotm file.
-
If you are using Word 2016 for Mac, go to /Users/username/Library/Group Containers/UBF8T346G9.Office/User Content/Templates
-
If you are using Word for Mac 2011, go to /Users/username/Library/Application Support/Microsoft/Office/User Templates/My Templates
Note: If you are using Mac OS X 10.7 (Lion), the Library folder is hidden by default. To browse to the Library folder from the Open dialog box, press COMMAND + SHIFT + G , and in the Go to folder box, type ~/Library.
-
-
Double-click Normal.dotm. The Normal template opens.
-
In the Normal template, make the changes that you want.
-
Save and close the Normal template.
Tips:
-
If you make extensive changes to your Normal template, we recommend that you periodically back up the file. To back up your Normal template, copy the file and rename it, or move it to another location.
-
You can quickly and easily format a whole document to give it a professional and modern look by applying a document theme. A document theme is a set of formatting choices that can include a color scheme (a set of colors), a font scheme (a set of heading and body text fonts), and an effects scheme (a set of lines and fill effects). To apply a theme:
-
In Word 2016 for Mac, on the Design tab, click Themes, and then choose a theme.
-
In Word for Mac 2011, on the Home tab, under Themes, click Themes, and then choose a theme.
-
-
You can change the page margins in your doc and create custom margins. But the next time you create a new document, Word for the web will revert to the Normal margin setting of one inch on each side of the page.
Change the default layout
- Open the template or a document based on the template whose default settings you want to change.
- On the Format menu, click Document, and then click the Layout tab.
- Make any changes that you want, and then click Default.
Contents
- 1 How do I change the default file format in Microsoft Office?
- 2 How do I change the default style in Word 2016?
- 3 What is the default file format in Microsoft Word?
- 4 How do I change the format of a Word document?
- 5 How do I get rid of default bold in Word?
- 6 What does set as default mean on word?
- 7 How do I change the default save as file type?
- 8 How do I get rid of Bold?
- 9 How do I change text from Bold to normal in Word?
- 10 How do I change text from Bold to normal?
- 11 How do I reset my settings to default?
- 12 How do I change my default office in Windows 10?
- 13 How do you change a file format?
- 14 How do I change the default save as file type Windows 10?
- 15 How do I delete all bold words?
- 16 How do you remove bold from table of contents?
How do I change the default file format in Microsoft Office?
From the Word menu, select Preferences…. In the Preferences window, click Save. From the menu next to “Save Word files as:”, select the format you want as the default.
How do I change the default style in Word 2016?
How to change your Word 2016 default font style
- Open Word.
- Open any document or create a new document.
- Click the Home tab in the top left corner.
- Under the Fonts block, click the expand button.
- Select your desired Font style.
- Click Set as Default in the bottom left corner.
What is the default file format in Microsoft Word?
.docx
While most programs can read most file types, not every program can read every file type. The default file type is . docx (Word Document). This file extension works in most Microsoft Word programs.
How do I change the format of a Word document?
To change the file type, open the document, on File menu, click Save & Send. From center pane, click Change File Type and from right side, select desired file type. Now just click Save As to save the document as specified file type.
How do I get rid of default bold in Word?
Click Format > Font… Select Not Bold in the Font Style list. Click OK. Click Replace All.
What does set as default mean on word?
In the computer world, the word default means, what your computer will do when you don’t tell it to do something else.When you type a document on your computer, the font selected is probably Times New Roman, Arial, Helvetica or Garamond.
How do I change the default save as file type?
Go to Control Panel > Default programs and select Associate a file type or protocol with a program. 2. From the list of file extensions, select the extension that you want to change the default program to open with and then click Change program.
How do I get rid of Bold?
Verify that Ctrl+B is correctly assigned to the Bold command. Look in the Customize Keyboard dialog box (File tab | Options | Customize Ribbon | Customize). As an alternative, try using Ctrl+SpaceBar (which clears direct font formatting from the selection), or you could try Ctrl+Shift+Bold.
How do I change text from Bold to normal in Word?
Select all text in your document (I think “alt a” command without the quotes) and click on “B” in the format area on your ribbon. Press “B” again if the entire document becomes bold text. All the bold text will become normal.
How do I change text from Bold to normal?
Note: If you just need to convert to regular text, press Ctrl + B in the Find What box and then click in the Replace With box and press Ctrl + B twice. This tells Word to replace Bold with Not Bold.
How do I reset my settings to default?
How to factory reset your Android
- Access System in Android Settings. Tap Advanced to reveal more options.
- Tap on Advanced in System settings.
- Tap Reset options.
- Start the factory reset on Android.
- Press Reset Phone.
- Press Erase everything to begin clearing data from your device.
- The Factory data reset is in progress.
How do I change my default office in Windows 10?
Change default programs in Windows 10
- On the Start menu, select Settings > Apps > Default apps.
- Select which default you want to set, and then choose the app. You can also get new apps in Microsoft Store.
- You may want your .
How do you change a file format?
You can also do it by right-clicking on the unopened file and clicking on the “Rename” option. Simply change the extension to whatever file format you want and your computer will do the conversion work for you.
How do I change the default save as file type Windows 10?
To set the default Save file format
- Click Tools > Settings.
- In the Settings dialog box, click the Files icon.
- In the Files Settings dialog box, click the Document tab.
- Choose a file format from the “Default save file format” list box.
- Click OK.
How do I delete all bold words?
Deleting Regular Text between Bold Text
- Press Ctrl+H. Word displays the Replace tab of the Find and Replace dialog box.
- Make sure there is nothing in either the Find What or Replace With boxes.
- Place the insertion point in the Find What box.
- Press Ctrl+B two times.
- Click Replace All.
How do you remove bold from table of contents?
You should be able to remove any explicit formatting from the TOC itself by selecting the entire TOC and pressing Ctrl+Space Bar and Ctrl+Q. This works because, again, the explicit formatting (which was transferred by Word) is removed and the underlying TOC styles show through.
If you often share Microsoft Office files with people using an older version of Word, Excel, or Powerpoint, you might want to change the default file format for saving, so you don’t have to constantly change it at save time. Here’s how to customize how these files are saved.
All versions of Office from 2007 and above use the same default file formats, so you don’t have to worry about compatibility if you and your team are working in, say, Word 2007, 2010, 2013, or 2016. However, if anyone’s stuck in Word 2003 or earlier, you can streamline your workflow by automatically saving files in the older format for Word 97-2003. You can also set Word to automatically save files in other formats, such as plain text, PDF, or rich text format. Likewise, you can change Excel’s default file format to CSV or XML, and PowerPoint to OpenDocument Presentation or Strict Open XML Presentation.
In this example, we’re using Word, but the steps are the same for Excel and PowerPoint 2016 as well.
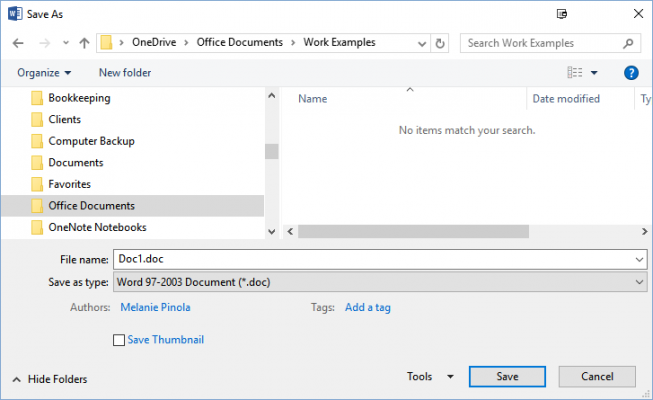
1. Create a new document or open an existing one.
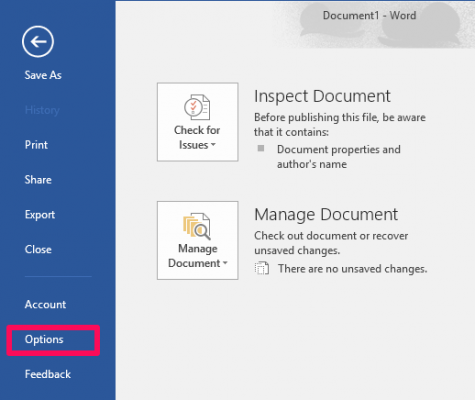
2. Click the File tab on the ribbon.
3. Click Options in the left menu.
4. Click Save in the Options window.

5. Select the default file format in the drop-down box next to «Save files in this format.»
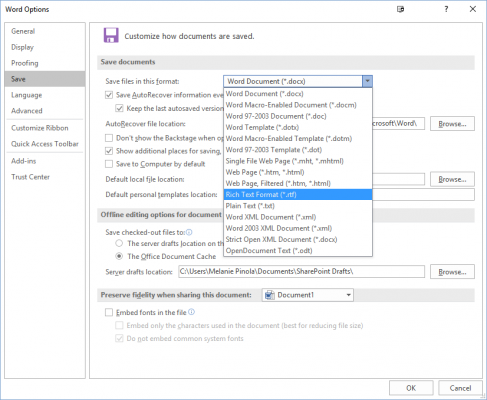
6. Click OK.
Going forward, any new files you save in the program will use that file extension. If you want to change it back to the default, just head to the setting again.
- How to Change Your Office 2016 Theme
- How to Upgrade to Office 2016
- How to Mail Merge in Office 2016
Get instant access to breaking news, the hottest reviews, great deals and helpful tips.
 Please Note:
This article is written for users of the following Microsoft Word versions: 97, 2000, 2002, and 2003. If you are using a later version (Word 2007 or later), this tip may not work for you. For a version of this tip written specifically for later versions of Word, click here: Setting a Default Document Format.
![]()
Written by Allen Wyatt (last updated October 6, 2018)
This tip applies to Word 97, 2000, 2002, and 2003
Normally, Word saves your documents in what is known as Word format. Technically, this means different things for different versions of Word. One simple way of looking at it, however, is that it means your documents are stored in a peculiar way that is understood by your version of Word, but may not be understood by other programs.
If you do a lot of work creating documents for other versions of Word or other programs, you may want to specify a different default file format for your documents. Word makes this easy by following these steps:
- Choose Options from the Tools menu. Word displays the Options dialog box.
- Make sure the Save tab is selected. (See Figure 1.)
- Use the Save Word Files As drop-down list to select a default file format.
- Click on OK.

Figure 1. The Save tab of the Options dialog box.
WordTips is your source for cost-effective Microsoft Word training.
(Microsoft Word is the most popular word processing software in the world.)
This tip (1253) applies to Microsoft Word 97, 2000, 2002, and 2003. You can find a version of this tip for the ribbon interface of Word (Word 2007 and later) here: Setting a Default Document Format.
Author Bio
With more than 50 non-fiction books and numerous magazine articles to his credit, Allen Wyatt is an internationally recognized author. He is president of Sharon Parq Associates, a computer and publishing services company. Learn more about Allen…
MORE FROM ALLEN
Unwanted Page Breaks in Cross-References
You can use fields to cross-reference different text in a document. If you get unwanted results from the …
Discover More
Sorting by Fill Color
Sorting data in a worksheet is easy, unless you want to sort by the color used to fill a range of cells. There are ways …
Discover More
Turning Off Borders for Data Series
Don’t want a border to appear around a data series represented in a Microsoft Graph chart? You can easily control the …
Discover More
More WordTips (menu)
Inserting a File Name without an Extension
Sometimes you might like to insert a file name into your document without including the file extension. The FILENAME …
Discover More
Controlling Document Properties
Word keeps track of quite a bit of document-related information that it refers to as «properties.» Here’s how to control …
Discover More
A Real AutoSave
When you enable AutoSave in Word, it doesn’t really save your document; it just saves a temporary file that allows your …
Discover More
If you’re changing the same format attributes every time you open a new Word document, you’re working harder than necessary. Modify the template once and work smarter.
 When Microsoft started pushing its products toward web content, it decided the defaults should be web (screen) friendly, not printer friendly. If you’re still part of the printer era, you might find the web-based defaults unsuitable. All Office apps come with defaults that you might not care for, but Word is probably the worst offender. Whether your organization has a set of formatting conventions you must meet or you just don’t like Calibri, you may find yourself resetting at least a few defaults every time you start a new document.
Fortunately, Word bases new documents on the Normal template, and you can customization that file to eliminate repetitive changes when creating new documents. Once you customize the Normal template, every new document you create will exhibit your customizations. In this article, I’ll show you how to change a few simple default properties: the font, the font size, and a web-based spacing property.
I’m using Word 2016 desktop on a Windows 10 64-bit system. You can update Word 2003’s template, Normal.dot, but there are no instructions in this article. There’s no downloadable demonstration file for this technique.
A good start
The best template begins with a new blank document. Click New on the Quick Access Toolbar or choose New from the File tab. In older (menu) versions, choose the New Template command.
You might be tempted to base a template on a content-filled document by removing the content and saving the empty file as a template file (.dotx or .dotm). I recommend that you don’t. Everything that’s in that document will be in your template and, consequently, every new document you create. That means your documents will contain all the good stuff and all the bad stuff–something you might not recognize as a troublemaker until later.
For the same reason, I recommend that you keep customizations to the Normal template to a minimum. Also, documenting your changes is always a good idea.
SEE: Office Q&A: Word page numbering and Excel’s Find feature
Modify Normal style
Modifying the template’s Normal style is the quickest way to reset all three of the properties mentioned earlier. (Normal is both the name of the template and the name of a paragraph style.) The template, by default, uses the Normal style as the base for several other styles. So changing the Normal style will affect all those descendant styles. That’s probably what you want; if it isn’t, this method isn’t for you.
To modify the Normal style, do the following:
- Right-click Normal in the Quick Styles gallery and choose Modify.
- In the Formatting section, choose Arial as the font and 10 as the size (Figure A). Notice that the list updates as you make changes.
- To change the spacing, choose Paragraph from the Format dropdown (Figure B).
- In the resulting dialog, check the Don’t Add Space Between Paragraphs Of The Same Style option in the Spacing section (Figure C) and click OK.
Figure A
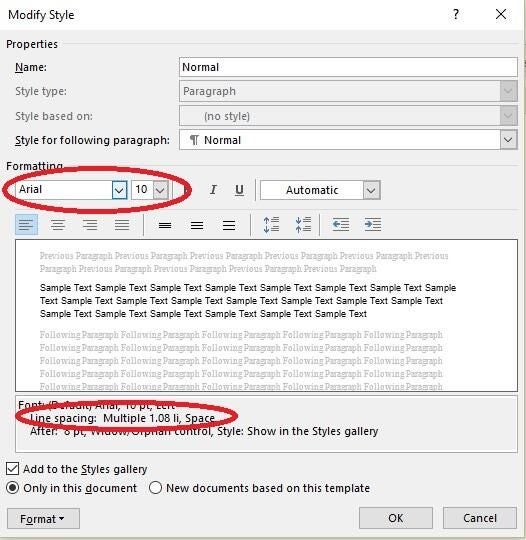
Change the font and font size.
Figure B

Access paragraph attributes.
Figure C

Omit the specialized web spacing.
You’re not done just yet. As is, the changes will be saved by the current file only. To update the Normal template, you must check the New Documents Based On This Template option (Figure D) and then click OK.
Figure D

Be sure to make the changes permanent by updating the Normal template.
As you can see in Figure E, the default font is Arial and the default font size is 10. In addition, there’s no additional spacing between the two lines of text. Every new document you open will now exhibit the modified Normal style.
Figure E

Word updates the Normal style immediately.
You might want to modify Body Text as well. This style is identical to Normal except for line spacing. The difference between Normal and Body Text is that Body Text style has no dependent styles, so you can alter it without changing other styles.
Quick template tips
If you modify the Normal template, keep a backup copy of the modified file. If the worst happens, you won’t have to rebuild the template. Instead, use Windows Explorer to find your working copy of the Normal template. For Word 2016, you should find it here:
C:UsersyourusernameAppDataRoamingMicrosoftTemplates
Then, rename the template file and paste a copy of your backed-up modified template into the same folder, making sure to name it Normal.dotm (or Normal.dotx).
If you decide to modify the template file manually, or if you can’t find the template file, launch the Visual Basic Editor (VBE) and enter the following statement in the Immediate window:
NormalTemplate.OpenAsDocument
Doing so will open the Normal template for you–you don’t need to know its location!
Simple but time-saving
Changing a few formats at the template level probably seems like a simple task to some of you, but it’s one of the questions I receive most about Word. If you spend time revamping each new document, consider modifying the Normal template instead.
However, I generally recommend that you not alter it too much. If you have a lot of specialized formatting needs, create a custom template and apply it as needed instead.
Send me your question about Office
I answer readers’ questions when I can, but there’s no guarantee. Don’t send files unless requested; initial requests for help that arrive with attached files will be deleted unread. You can send screenshots of your data to help clarify your question. When contacting me, be as specific as possible. For example, “Please troubleshoot my workbook and fix what’s wrong” probably won’t get a response, but “Can you tell me why this formula isn’t returning the expected results?” might. Please mention the app and version that you’re using. I’m not reimbursed by TechRepublic for my time or expertise when helping readers, nor do I ask for a fee from readers I help. You can contact me at susansalesharkins@gmail.com.
More Office how-to’s
- How to collect and modify data using an Access web app
- How to display an Office file’s full location in the Quick Access Toolbar
- How to display the filename and path in a Word document or title bar