
Open the template or a document based on the template whose default settings you want to change. On the Format menu, click Document, and then click the Layout tab. Make any changes that you want, and then click Default.
Contents
- 1 How do I set my settings to default?
- 2 How do I set Word to open in default mode?
- 3 How do I change my default settings in Windows 10?
- 4 How do I fix Microsoft display settings?
- 5 How do I change my Word document from read only to normal?
- 6 Why is my Word doc read only?
- 7 Why are all my documents read only?
- 8 How do I make word default to DOCX?
- 9 How do I make Word My default in Windows 10?
- 10 How do I make Office 365 my default program?
- 11 How do I fix Microsoft Settings personalization?
- 12 What does MS-Settings display mean?
- 13 Why is my Settings not opening on Windows 10?
- 14 How do I permanently turn off read-only?
- 15 How do I turn off read-only?
- 16 How do I stop Word from saving documents as read-only?
- 17 Why does my Word document keep saving as read only?
- 18 How do I stop Word from opening in read only mode on Mac?
- 19 How do I stop Word from opening in read mode?
- 20 What does set as default mean on word?
Go to Settings > Apps. Click Default apps in the pane on the left. You’ll see your default apps for common uses here, like Email, Music player, Web browser, and more. Click an app to see others installed on your system that can take its place, then select the one you’d like to set as default.
How do I set Word to open in default mode?
Open Word In Full Edit Mode
- Click the “File” menu in the upper left corner.
- Click “Options”
- Click “Trust Center” in the left pane.
- Click “Trust Center Settings”
- Click “Protected View”
- Uncheck all 3 options under protected view and click “OK”
How do I change my default settings in Windows 10?
You can reset Windows 10 to its defaults app by following this steps.
- Go to Settings.
- Choose System.
- On the left side, select Default app.
- Under Reset to the Microsoft recommended defaults, click Reset.
How do I fix Microsoft display settings?
There are 4 methods that may help you solve the “ms-settings: display” issue.
- Reset Windows Store Cache.
- Fix system corruptions with DISM tool.
- Restore System to an early point.
- Delete Registry Key: ms-settings.
How do I change my Word document from read only to normal?
Remove read only
- Click the Microsoft Office Button. , and then click Save or Save As if you have previously saved the document.
- Click Tools.
- Click General Options.
- Clear the Read-only recommended check box.
- Click OK.
- Save the document. You might need to save it as another file name if you have already named the document.
Why is my Word doc read only?
Turn Off The Trust Center Options To Remove Word Opening In Read Only. Trust Center is a feature in Word that blocks certain documents from being fully opened with editing capabilities on your computer. You can disable the feature in the program and that should fix the read only issue you’re facing with your document.
Why are all my documents read only?
You may find that when you are opening files, they open as read-only. In some cases, this is for added security, such as when you are opening files from the internet, and other times, it can be due to a setting that can be changed.
How do I make word default to DOCX?
How to change the default app for . docx file
- Press Windows + I key to launch Settings.
- Click on Apps and select Default apps from the left pane.
- Now scroll down and click on Choose default apps by file type.
- Scroll and look for . doc, . dochtml, . docm, . docx, . docxml, . dot, . dothtml and .
How do I make Word My default in Windows 10?
First Method: Set Defaults by App
- Go to the taskbar and right-click the Windows icon.
- Select Settings from the list.
- Click Apps.
- Go to the left pane, then choose Default Apps from the list.
- Click the ‘Set defaults by app’ link.
- Scroll down until you see Microsoft Word.
How do I make Office 365 my default program?
On the Start menu, select Settings > Apps > Default apps. Select which default you want to set, and then choose the app. You can also get new apps in Microsoft Store. Apps need to be installed before you can set them as the default.
How do I fix Microsoft Settings personalization?
Solution for ms-settings:personalization-background error
- Step 1: Download Reset Windows Update Tool. Go to Reset Windows Update Tool official page and download the latest version.
- Step 2: Install Reset Windows Update Tool. Install Reset Windows Update Tool.
- Step 3: Run Reset Windows Update Tool.
- Step 4: Verify your work.
What does MS-Settings display mean?
What is the ms-settings:display error? In general, this error pops up for some Windows users when they try to open Display settings or the personalize option from the right-click menu on desktop.In this case, the program that can’t be accessed is one of the basic Windows components: the Settings application.
Why is my Settings not opening on Windows 10?
If Updates and Settings are not opening the issue might be caused by file corruption, and in order to fix it you need to perform an SFC scan. This is relatively simple and you can do it by following these steps: Press Windows Key + X and choose Command Prompt (Admin) from the menu.
How do I permanently turn off read-only?
Here’s how:
- On File Explorer, right-click on OneDrive, and then select Properties.
- On the General tab under Attributes, uncheck Read-only, and then click OK.
- There will be a prompt asking if you want to apply changes to all folders, subfolders, and files. Click OK.
How do I turn off read-only?
Read-only Files
- Open Windows Explorer and navigate to the file you want to edit.
- Right-click the file name and select “Properties.”
- Select the “General” tab and clear the “Read-only” check box to remove the read-only attribute or select the check the box to set it.
How do I stop Word from saving documents as read-only?
Then click File > Save As (or press F12). In the Save As dialog, click the Tools button at the bottom and choose General Options. In the next dialog, uncheck the “Read-only recommended” box and click OK. Then save, close, and reopen the document to edit it normally.
Why does my Word document keep saving as read only?
Also check in C:Users<UserName>AppDataRoamingMicrosoftTemplates to make sure that there are no temp files there too.Make sure the document you are trying to save is not an Outlook attachment that’s still open in Outlook. Set your anti-virus (AV) software to not scan Word 365 files.
How do I stop Word from opening in read only mode on Mac?
Right-click its icon, and select “Get Info” to enter the file’s Info window. 2. Check if the selection “Locked” in General is enabled. If so, disable it and the files will quit Read-only mode.
How do I stop Word from opening in read mode?
Disable Reading View for Microsoft Word
- Open Microsoft Word and begin a blank document.
- Click File in the upper-left. (+)
- Click Options at the bottom of the left ribbon. (+)
- In the General tab, under Start up options, uncheck the setting to ‘Open e-mail attachments and other uneditable files in reading view’.
- Click OK.
What does set as default mean on word?
In the computer world, the word default means, what your computer will do when you don’t tell it to do something else.When you type a document on your computer, the font selected is probably Times New Roman, Arial, Helvetica or Garamond.
-
MiniTool
-
MiniTool News Center
- How to Reset Microsoft Office (Word) to Default Settings
By Alisa | Follow |
Last Updated September 14, 2022
![]()
If your Microsoft Office products are not working properly, you can reset Microsoft Office settings to default to see if it helps. 2 ways for how to reset Microsoft Word to default settings are also provided. To recover deleted or lost files for free, MiniTool Power Data Recovery helps.
If your Microsoft Office products like Word or Excel have problems, you can try to reset Microsoft Office settings to see if it can help fix the issues. Also learn how to reset Microsoft Word to default settings in 2 ways.
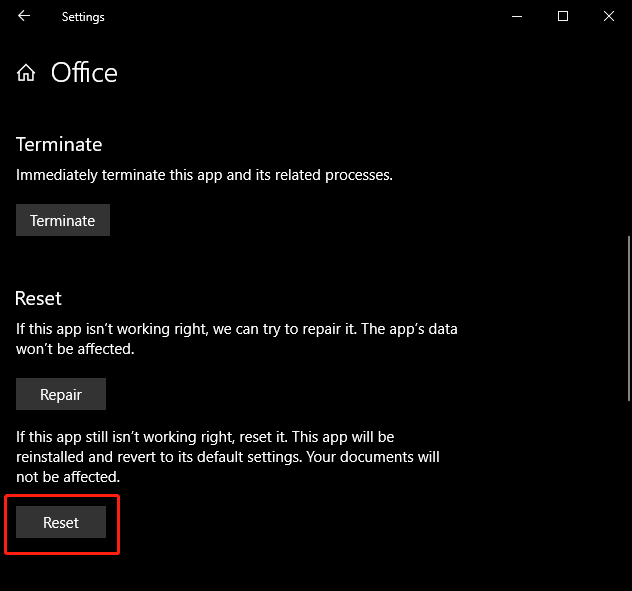
How to Reset Microsoft Office Settings
- Press Windows + S to open the Windows Search dialog.
- Type office in the search box, right-click Office app and select App settings.
- Click the Reset button under the Reset section to reset Microsoft Office. It will reinstall Microsoft Office and revert to default settings.
Alternatively, you can also go to C:Program FilesMicrosoft OfficeOffice16 in File Explorer. Right-click the OSPPREARM.exe file and select Run as administrator. Click Yes in the UAC window to reset Microsoft Office settings.
How to Reset Microsoft Word to Default Settings – 2 Ways
If you want to restore Microsoft Word to its default settings, you can try the 2 ways below.
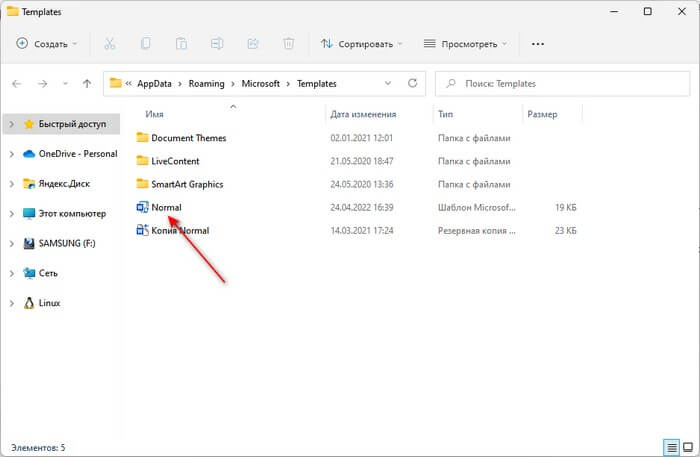
Way 1. Rename the Normal.dotm file
- Close all Microsoft Office programs.
- Press Windows + E to open File Explorer. Click the View tab and click Options. Click View tab and tick Show hidden files, folders, and drives under Hidden files and folders. Click OK to save the settings.
- Next, press Windows + R to open the Windows Run dialog.
- Type %appdata%MicrosoftTemplates in the Run dialog and press Enter.
- Find and right-click the Normal.dotm file and select Rename. Change the file name as Normal.old. After you rename the file, Microsoft Word will have to create a new file with its original factory settings.
- After this, you can follow the operation above to hide the hidden files and folders again if you want.
Way 2. Reset Microsoft Word to default settings with Registry
- Press Windows + R, type regedit in the Run dialog, and press Enter to open Windows Registry.
- For Office 2016/2019/365, navigate to: HKEY_CURRENT_USERSoftwareMicrosoftOffice16.0Word.
- Select the Word key and press Delete to delete the key.
- Close Registry Editor and restart your computer. Open Word again and it should be reset to default settings.
Note: Editing the registry can be risky, it’s advised you back up your Windows registry before you do some edits.
Free Office Recovery Software to Recover Deleted/Lost Files
To help users restore lost data and recover deleted files, MiniTool Software offers MiniTool Power Data Recovery.
MiniTool Power Data Recovery is a professional data recovery program for Windows. It helps you recover deleted or lost documents, photos, videos, or any other type of files from various storage devices. You can use it to recover data from a Windows PC or laptop, USB flash drive, SD/memory card, external hard drive, SSD, etc. You can even use this program to recover data from a corrupted or formatted hard drive or recover data from an unbootable PC.
Even novice users can easily operate this program. It is a 100% clean program. Its free edition lets you recover up to 1GB data.
Bottom Line
This post offers a guide for how to reset Microsoft Office settings and how to reset Microsoft Word to default settings. For more computer tips and tricks, please visit MiniTool News Center.
About The Author

Position: Columnist
Alisa is a professional English editor with 4-year experience. She loves writing and focuses on sharing detailed solutions and thoughts for computer problems, data recovery & backup, digital gadgets, tech news, etc. Through her articles, users can always easily get related problems solved and find what they want. In spare time, she likes basketball, badminton, tennis, cycling, running, and singing. She is very funny and energetic in life, and always brings friends lots of laughs.
Sometimes Microsoft Word may not work properly due to user modifications or changes made by other programs. In these cases, the easiest way to restore Word functionality is to reset it to the factory default settings.
In this tutorial, you will find detailed instructions on how to reset Word to default settings in order to remove any modifications made by you or others.
How to Restore Word Default Settings.
Step 1. Delete the «Normal» Template.
The first method to restore the word settings is to delete all the modifications that have been made and stored in the Normal.dot template.
1. Close Microsoft Word.
2. Press Windows ![]() + R keys to open the run command box.
+ R keys to open the run command box.
3. Type %appdata%MicrosoftTemplates and press Enter.

4. Find and delete the Normal.dotm file.

5. Now open Word and check if the problem, is solved. If not, continue to step 2.
Step 2. Reset Word settings in Registry.
Like many programs, Word saves all settings and modifications made in the registry. To remove the stored Word Settings from Registry in order to force Word to load with the default settings, proceed as follows:
1. Close Word.
2. Press Windows ![]() + R keys to open the run command box.
+ R keys to open the run command box.
3. Type regedit and press Enter.

4. In Registry Editor navigate to the following key, according your Office version:
- Word 2007: HKEY_CURRENT_USERSoftwareMicrosoftOffice12.0Word
- Word 2010: HKEY_CURRENT_USERSoftwareMicrosoftOffice14.0Word
- Word 2013: HKEY_CURRENT_USERSoftwareMicrosoftOffice15.0Word
- Word 2016, 2019 & Office 365: HKEY_CURRENT_USERSoftwareMicrosoftOffice16.0Word
5. Finally, expand the Word key and select and delete these subkeys:
- Data
- Options
* Note: When prompted click Yes to confirm your decision. (this will force Word to recreate the «Options» registry key at the next run with the default settings)

6. Close the Registry Editor.
7. Open Word and you’re done.
Step 3. Uninstall & Re-Install Microsoft Office.
The final method, to fix Word problems is to completely uninstall and reinstall Office on your PC.
1. Download the Microsoft Support and Recovery Assistant (SARA) utility.
2. When the download is completed double click to run the SetupProd_OffScrub.exe application.
3. Click Install to install the SARA utility.

4. When the installation is completed, click Agree and then click Yes.

5. Wait until the ‘Microsoft Support and Recovery Assistant’ troubleshooting the issue.
6. Select the checkbox, at the left of the Office product name to select all the installed Office products and click Next.

7. Now wait until the Office removal process is complete and when this is done, restart your computer.
8. After restart, proceed and reinstall Office by following the instructions from these links:
- Office 365
- Office 2019
- Office 2016
- Office 2013
That’s all folks! Did it work for you?
Please leave a comment in the comment section below or even better: like and share this blog post in the social networks to help spread the word about this problem.
If this article was useful for you, please consider supporting us by making a donation. Even $1 can a make a huge difference for us.

Если при использовании текстового редактора Microsoft Word в работе приложения возникают ошибки, у пользователя возникает вопрос о том, как сбросить Ворд к настройкам по умолчанию. Этот метод позволит решить многие возникшие проблемы.
Настройка Word по умолчанию помогает избавиться от проблем, вызванных изменением конфигурации программы. Многие пользователи самостоятельно меняют настройки Ворд по умолчанию. Бывает и другой вариант, когда сторонние программы применяют модификации, например, добавляя плагины, макросы или другие надстройки в Word.
Содержание:
- Как сбросить настройки Word по умолчанию — 1 способ
- Как вернуть Ворд к стандартным настройкам — 2 способ
- Как сбросить Ворд по умолчанию с помощью редактора реестра — 3 способ
- Выводы статьи
- Как сбросить Word по умолчанию (видео)
В результате из-за измененных параметров, Word стал работать совсем не так как хотелось бы пользователю. Во многих случаях отменить проблемные параметры не представляется возможным из-за того, что пользователь не помнит или не знает, что именно и когда было изменено.
Чтобы исправить проблемы, необходимо вернуть в Ворд стандартные настройки. В связи с этим возникает вопрос: как сбросить Word?
Вы можете в Word сбросить настройки по умолчанию несколькими способами, о которых вы узнаете ниже. Перед проведением изменений на компьютере, касающихся редактора Word, ознакомьтесь со следующими обстоятельствами:
- Некоторые настройки могут быть сброшены только после полной переустановки программы Word.
- Не используйте MS Word во время проведения сброса приложения. Имейте в виду, что во время работы текстового редактора применяемые изменения могут быть перезаписаны, поэтому не получится вернуться к стандартным параметрам.
В этом руководстве вы найдете инструкции о том, как сбросить настройки в Ворде по умолчанию несколькими способами. Материалы из этой статьи подходят для версий Word 2021, Word 2019, Word 2016, Word 2013, Word 2010, Word 2007, Word 2003.
Как сбросить настройки Word по умолчанию — 1 способ
Сначала мы рассмотрим наиболее часто применяемый способ, как сбросить настройки Ворда по умолчанию. Метод заключается в перезаписи обычного шаблона с параметрами по умолчанию.
Часто ошибки случаются из-за шаблона «Обычный» (Normal.dotm или Normal.dot). Этот шаблон имеет расширения «*.dot» и «*.dotm». В обычном шаблоне содержатся стили и другие параметры, влияющие внешний вид нового документа.
В процессе работы с Word пользователи вносят свои изменения, которые затем применяются ко всем новым документам. Бывает, что в программе используются совсем не те параметры, которые нужны пользователю. Чтобы исправить ситуацию, необходимо выполнить в Word сброс настроек по умолчанию.
Нам нужно изменить имя текущего файла шаблона (или удалить этот файл), чтобы он не применялся в Word. При новом запуске программа Microsoft Word автоматически создаст новый файл обычного шаблона с параметрами по умолчанию.
Шаблон «Обычный» (Normal.dotm) находится по пути:
C:UsersИмя_пользователяAppDataRoamingMicrosoftTemplates
Проделайте следующие действия:
- Нажмите на клавиши «Win» + «R».
- В диалоговом окне «Выполнить» введите команду — «%appdata%/Microsoft/Templates».

- Нажмите на клавишу «Enter».
- В открывшемся окне Проводника в паке «Templates» найдите файл «Normal.dotm».
- Удалите файл «Normal» (по умолчанию он отображается без расширения имени файла), или переименуйте этот файл, например, в «Old.Normal».
- Откройте программу Word, в которой сразу после запуска создется новый файл «Normal.dotm» с установками по умолчанию.
- Посмотрите была ли решена проблема или нет.
Этот метод позволяет удалить все изменения, которые вносились пользователем в настройки Word. Не всегда данный способ решает все возникающие проблемы. Поэтому далее мы рассмотрим еще два варианта, как сбросить Ворд до заводских настроек.
Как вернуть Ворд к стандартным настройкам — 2 способ
В некоторых случаях пользователю нужно сбросить настройки ленты, сочетаний клавиш и панели быстрого доступа. Для этого вы можете воспользоваться стандартными настройками в параметрах Word.
Выполните следующее:
- В окне открытого документа Word нажмите на «Файл».
- Войдите в «Параметры».
- В окне «Параметры Word» откройте вкладку «Настроить ленту» или «Панель быстрого доступа».
- В опции «Настройки:» нажмите на кнопку «Сброс».
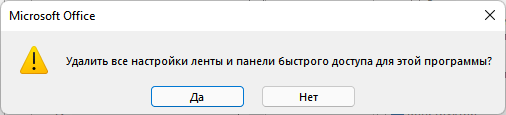
- В выпадающем меню выберите пункт «Сброс всех настроек».
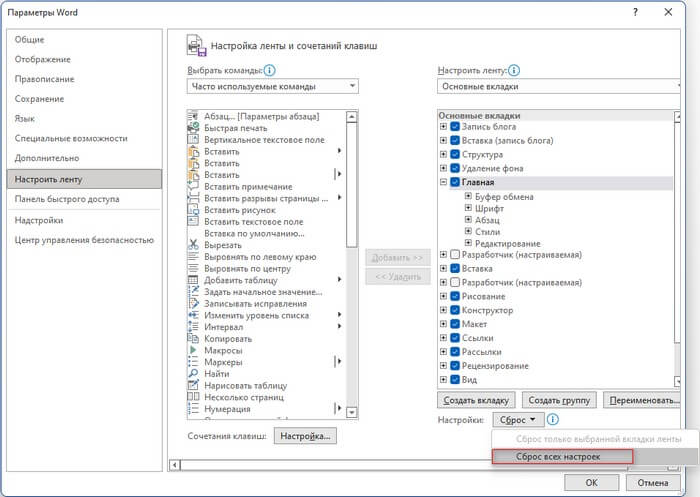
- В открывшемся окне нажмите на кнопку «Да», чтобы удалить все настойки ленты и панели быстрого доступа.
- Нажмите на кнопку «ОК», чтобы выйти из настроек программы.
- Перезапустите приложение Microsoft Word.
С помощью встроенного системного инструмента — редактора реестра Windows вы можете в Word сбросить настройки по умолчанию.
Нам нужно будет удалить несколько разделов реестра, относящихся к программе Word. После удаление записей в реестре, при новом запуске Word ранее удаленные разделы реестра будут заново созданы с параметрами по умолчанию. Таким образом мы сможем сбросить Word по умолчанию.
Перед выполнением работ в системном реестре Windows рекомендуется создать резервную копию реестра. Если что-то пошло не так, с помощью резервной копии вы сможете восстановить измененные значения реестра.
Пройдите последовательные шаги:
- Закройте окно программы Word.
- В поле поиска Windows введите «regedit», а затем запустите это приложение на компьютере.
- В окне «Редактор реестра» пройдите по пути в соответствующих версиях программы.
В Word 2021, Word 2019, Word 2016, Microsoft 365:
HKEY_CURRENT_USERSoftwareMicrosoftOffice16.0Word
В Word 2013:
HKEY_CURRENT_USERSoftwareMicrosoftOffice15.0Word
В Word 2010:
HKEY_CURRENT_USERSoftwareMicrosoftOffice14.0Word
В Word 2007:
HKEY_CURRENT_USERSoftwareMicrosoftOffice12.0Word
В W0rd 2003:
HKEY_CURRENT_USERSoftwareMicrosoftOffice11.0Word
- Выделите раздел «Data».
- Щелкните правой кнопкой мыши по разделу «Data», а в контекстном меню нажмите «Удалить».
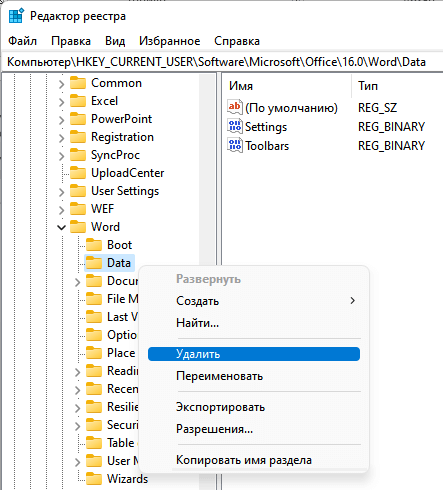
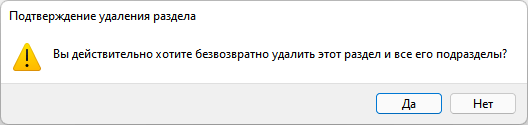
- В окне «Предупреждение удаления раздела» нажмите на кнопку «Да».
- Выделите раздел «Options».
- Щелкните по нему правой кнопкой мыши, выберите «Удалить».
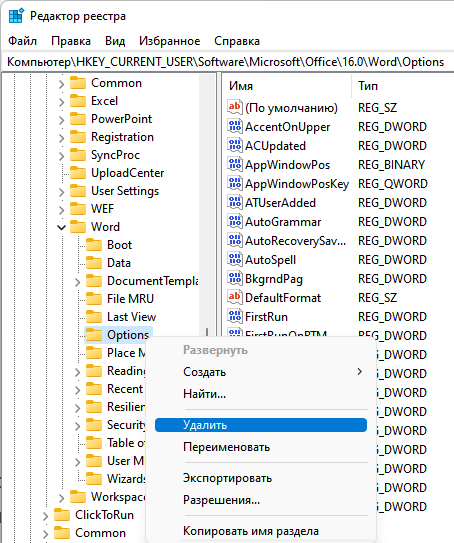
- Подтвердите удаление раздела.
- Перезагрузите компьютер.
- Запустите редактор, чтобы выполнить в Word сброс настроек по умолчанию, когда программа заново создаст удаленные разделы со стандартными настройками.
В некоторых случаях потребуется переустановка Microsoft Office на компьютере. Сначала вам нужно будет удалить полностью офисный пакет приложений, потом перезагрузить ПК, а затем вам необходимо снова установить MS Office на компьютер.
Выводы статьи
В работе редактора Microsoft Word могут возникнуть проблемы из-за неправильных настроек или по другим причинам. Чтобы устранить проблему, пользователю необходимо знать, как вернуть настройки Ворд по умолчанию.
С помощью нескольких способов пользователь может восстановить настройки Ворда по умолчанию: методом удаления, а затем автоматического создания файла «Normal.dotm», сбросом настроек ленты и панели быстрого доступа, удалением и воссозданием разделов реестра в Windows, относящихся к этому редактору.
Как сбросить Word по умолчанию (видео)
Похожие публикации:
- Как сделать междустрочный интервал в Word — 4 способа
- Как сделать сноски в Word
- Как сделать вертикальный текст в Word — 5 способов
- Как убрать красные подчеркивания в Word — 3 способа
- Режим чтения Word: как включить или как убрать
![]()
Download Article
A step-by-step guide to resetting your default Word template back to factory settings
![]()
Download Article
- Windows
- macOS
- Video
- Q&A
- Tips
|
|
|
|
After using Microsoft Word for many projects, you may find that the program no longer runs the way it did when it was first installed. The default settings for one or more features—such as fonts, toolbar placement, and autocorrect options—might be different after clicking the wrong thing or moving things around by accident. Uninstalling and reinstalling Word won’t help because those preferences are saved on your computer; you’ll need to find and rename the Normal template file so Word can create a new one. This wikiHow teaches you how to restore Microsoft Word to its original layout and settings on Windows and macOS.
Things You Should Know
- You must delete or rename the Normal template (Normal.dotm) for Word to create a new one.
- On Windows, go to your User folder → «AppData» → «Roaming» → «Microsoft» → «Templates».
- On Mac, open the «Library» folder → «Group Containers» → «UBF8T346G9.Office» → «User Content» → «Templates».
-

1
Close Microsoft Word. Be sure to save any open documents. You won’t be able to reset any of your settings while the application is open.
- This method requires modifying the Windows registry, which is an advanced task. Before you edit the registry, it’s a good idea to back it up so you can restore it if something goes wrong.
-
2
Press ⊞ Win+E. This opens the File Explorer. You can also open File Explorer by clicking it in the Windows menu.
Advertisement
-
3
Set the File Explorer to show hidden files and folders. This is necessary for displaying a folder you’ll need to edit:
- Click the View menu at the top of File Explorer.
- Click Options at the top-right corner of the window.
- Click the View tab.
- Select Show hidden files, folders, and drives under «Hidden files and folders».
- Click Apply, and then click OK.
-
4
Navigate to your Users folder in File Explorer. To do this, click the address bar at the top of File Explorer, type C:Users, and then press Enter.
- If Windows is installed on another drive, replace C with the appropriate drive letter.
-
5
Navigate to your Microsoft Templates folder. Follow these steps:
- Double-click the folder for your username in the right panel.
- Double-click the AppData folder (this is usually hidden).
- Double-click the Roaming folder.
- Double-click the Microsoft folder.
- Double-click the Templates folder.
-
6
Rename the «Normal.dotm» file to Normal.old. This file contains many of your Word options—when you rename the file, Word will have to create a new file with its original factory settings.[1]
Here’s how to rename the file:- Right-click Normal.dotm and select Rename.
- Remove .dotm from the end of the file name and replace it with .old.
- Press the Enter key.
- Now that you’re finished in File Explorer, it’s a good idea to go back to View > Options > View and rehide hidden files and folders.
-
7
Press ⊞ Win+R. This key combination opens the Run window, which is where you’ll be able to open the registry editor for the remaining settings changes.
-
8
Type regedit and click OK. This opens the registry editor.[2]
- You may have to click Yes to open the editor.
-
9
Double-click HKEY_CURRENT_USER. It’s in the left panel of the registry editor. This expands more options inside.
-
10
Double-click SOFTWARE. It’s in the new set of folders that expanded in the left panel. More folders will appear.
-
11
Double-click Microsoft. It’s also in the left panel. Even more folders will expand.
-
12
Double-click Office. More folders will expand.
-
13
Double-click the correct folder for your version of Word. The next folder you’ll enter depends on which version of Word you’re using:
- Word 365, 2019, and 2016: Double-click the 16.0 folder.
- Word 2013: Double-click the 15.0 folder.
- Word 2010: Double-click the 14.0 folder.
- Word 2007: Double-click the 12.0 folder.
- Word 2003: Double-click the 11.0 folder.
-
14
Click the Word folder one time. Don’t double-click—just click it once to select it.
-
15
Press the Del key to delete the key. When you’re prompted to confirm, click Yes to do so.
- Now that you’ve made these changes, you can close the registry editor and File Explorer. Restart your computer.
- You can now start from scratch in Word.


Advertisement
-
1
Close Word and all other Office applications. You’ll need to move some files around, and you won’t be able to do so while Office applications are open.
- This method should work on all modern versions of Word for macOS, including Word 2016, Word 2019, and Word 365.
-
2
Open the Finder
. It’s the two-toned smiley face icon on the left side of the Dock.
-
3
Press the ⌥ Option key as you click the Go menu. It’s at the top of the screen. This displays a menu that contains the Library folder, which would’ve been hidden if you hadn’t used the Option key.[3]
-
4
Click the Library folder. A list of files will appear.
-
5
Double-click the Group Containers folder. It’s inside of the Library folder. Another set of files and folders will appear.
-
6
Double-click the UBF8T346G9.Office folder. Yet another folder and file list will appear.
-
7
Double-click the User Content folder. Don’t worry, you’re almost there!
-
8
Double-click the Templates folder. This is the folder that contains the file containing your Word settings.
-
9
Rename the normal.dotm file. To rename it:
- Click normal.dotm one time to select it.
- Press the Return key.
- Delete the part that says «.dotm» and replace it with .old.
- Press Return to save the new file name, which is now normal.old.
-
10
Close Finder and restart your computer. When you open Word again, it will automatically recreate the normal.dotm file, giving you a fresh start.[4]


Advertisement
Add New Question
-
Question
How do I stop a dot from showing on my document in Microsoft Word whenever I press the space bar?

File —> Options —> Display. Go down to ‘Always show these formatting marks on the screen’ and uncheck ‘spaces’.
Ask a Question
200 characters left
Include your email address to get a message when this question is answered.
Submit
Advertisement
Video
-
Understand that when you make all these changes, there are still a couple of settings that can then only be changed by a complete reinstall. For instance, the company name you entered when you first installed Word is actually stored in the Word program file.
-
Remember that you cannot reset Microsoft Word while the program is running. This is because Word saves configuration information as it exits. If you make changes while the program is still running, exiting the program afterward will overwrite the re-set.
Thanks for submitting a tip for review!
Advertisement
About This Article
Article SummaryX
1. Close Microsoft Word.
2. Set the File Explorer to show hidden files and folders.
3. Navigate to C:UsersusernameAppDataRoamingMicrosoftTemplates in File Explorer.
4. Rename the «Normal.dotm» file to Normal.old.
5. Open the Registry Editor.
6. Navigate to HKEY_USERS.DEFAULTSoftwareMicrosoftOffice
7. Double-click your version of Word.
8. Delete the Word key.
9. Restart Word.
Did this summary help you?
Thanks to all authors for creating a page that has been read 498,758 times.