
You can split fonts into two main styles. There are serif fonts (with lines flicking out of each letter) and sans-serif fonts (without the lines). Serif fonts tend to be easier to read, but they look more formal. This article will show you some of the best ones in Word.
The best serif fonts in Microsoft Word are Times New Roman, Garamond, and Palatino Linotype. They all work well to show a more formal look in your writing. They’re also very easy to read, making them solid choices if you’re looking to write an essay or academic paper.
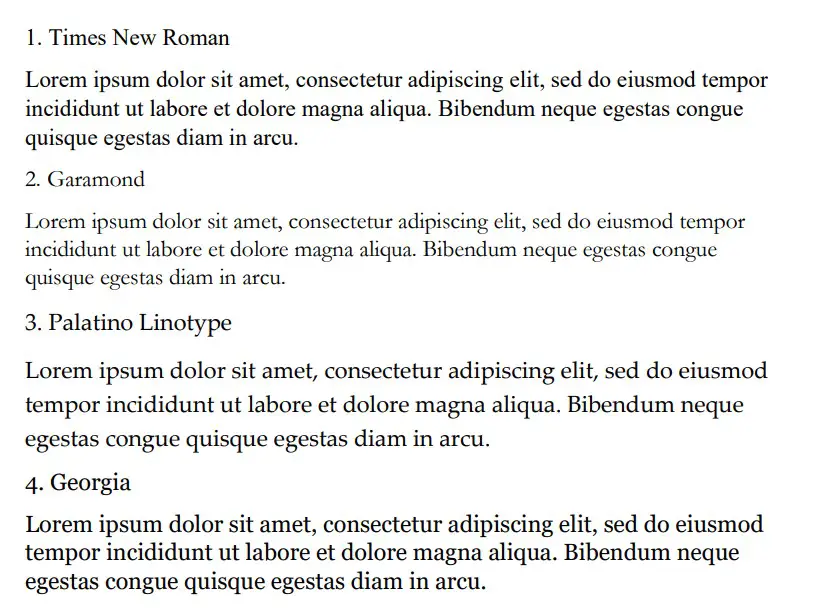
Times New Roman
Times New Roman is the default Microsoft Word font. You really can’t go wrong with it. Everyone knows what it looks like, and everyone uses it as the default serif font in Word. If you don’t actively change your font, it’s likely that you’re writing in Times New Roman.
It is a very professional font that has been proven to be one of the easiest to read on paper. It also makes your writing look more trustworthy, which works wonders when you use it for something like an academic or scientific paper.
You will find that Times New Roman is one of the most popular fonts in the world. It’s such a good choice because of how popular it is, and it can fit in just about anywhere in your writing. It works well for titles and in the main body of the text.
Garamond
Garamond is another great serif font that works really well. It comes in at a close second to Times New Roman, which is saying a lot considering how popular Times New Roman is. Garamond is fairly easy to read, and it even comes in slightly smaller in size.
Garamond is a great font that makes your writing much more concise. The smaller size of this font allows you to fit more words onto your page without feeling like you’re writing an essay full of gibberish and waffle.
If people decided to choose a different serif font in place of Times New Roman, it’s likely that Garamond would rank quite highly as their next favorite pick.
Palatino Linotype
Palatino Linotype is a great font choice that a lot of people enjoy using. It feels a bit fresher than some of the other serif fonts, and the size of the letters makes it a little more appealing when you are writing it for more informal purposes.
You will find that Palatino Linotype looks good wherever you put it. It can be both in a heading or in the main text body. As long as you like the look of the font, you’ll find a great place to put it to make sure it fits in.
The letters on Palatino Linotype feel a little more “open” than those of Times New Roman and Garamond. That’s what makes it a better choice if you’re looking for something that’s a little bit easier to read or comes across with more informal energy.
Georgia
Georgia is a very popular choice that a lot of essay writers are recommended to use. Many academics also vouch for Georgia, making it a really good choice if you’re looking to capture a more formal and trustworthy look.
People say that Georgia works really well as a heading. While this is definitely true, there is nothing wrong with using it as part of the main body of your text either. It can work in just about any situation, which makes it a great serif font choice.
While it’s not as popular as Times New Roman, it’s definitely up there in terms of how many people use it. It’s a fairly generic serif font, so there aren’t any specific style choices that stand it out from some of the rest.
Cambria
Cambria is another great serif font that is a default choice in Microsoft Word. While it isn’t automatically set as a font choice, it is automatic if you use the specific Word style that allows you to write headings and sub-headings.
Cambria is one of the best choices to introduce new ideas with headings and sub-headings. Of course, you don’t have to be limited to including it as a heading. If you want it as the text body, too, that’s fine.
You’ll find that this ranks highly in popularity compared to many of the other fonts. It looks really good on the page because of the more “square” feel that the letters have.
Bodoni MT
Bodoni MT is a classical serif font that works well. People like to use this font for novels, which shows that it must be an easy-to-read choice. The purpose of novels is to have thousands of words page after page, so having an easy-to-read font is always going to be ideal.
Bodoni MT is one of the thicker fonts on this list. It almost looks like it is written in bold, which really helps it to stand out from some of the other options. It works really well when it’s used to write multiple words at the same time.
The serif style looks very similar to some of the best fonts on this list, too. While this doesn’t allow Bodoni MT to be unique, it does allow it to have a familiar look and feel to it.
Bookman Old Style
Bookman Old Style is another great font that is common for novels. Again, if it works well in novels, you can bet that it works well in any situation when you might need someone to read through what you’re writing carefully.
Bookman Old Style is a large font. It allows the letters to appear more free and open compared to many of the other choices. This makes it a great font that’s worth trying out.
Lucida Bright
Lucida Bright is a good font choice. It’s part of the famous Lucida font family, and it works really well to show a large serif style. Lucida Bright is one of the larger fonts on this list, making it a great choice if you’re trying to make your writing really easy to read.
Some people would argue that Lucida Bright is too large for most formal documents. It does mean that you’ll take up a few extra pages because of your larger font choice, but this isn’t always a problem. Sometimes, it’s refreshing to include a larger font.
Modern No. 20
Modern No. 20 is an interesting serif font that doesn’t often get used. It’s a great choice nonetheless, and it applies to situations where some of the other serif fonts might feel a bit too pretentious or samey.
Modern No. 20 has very sharp serifs on its letters. While all of the fonts discussed so far have decent serif accents, Modern No. 20 seems to have some of the largest serifs that really help it to bring a unique style to your writing.
It’s much smaller than most of the other options too. It makes for a great choice if you’re trying to include a lot of information in one area without feeling like you have to fill up a lot of pages to get it to work.
Rockwell
Rockwell is a great option that many people like to use. It comes from the Rockwell family, which has made its name with more obvious and impactful fonts like ExtraBold and Condensed. Rockwell on its own is a great option for your serif-font needs.
It fits a similar style to most of the other serif fonts. There is nothing particularly unique that makes it stand out, which is usually a good thing. People don’t like their serif fonts to look out of place in their writing, and Rockwell will fit in no matter where you put it.
Poor Richard
Poor Richard is a great font in Microsoft Word that deserves more attention. It’s a very attractive font that comes with small lower-case letters. The capital letters tend to dwarf the lower-case ones, making it an interesting font style that the other serif fonts don’t have.
This font style is both a blessing and a curse, depending on how you look at it. It’s a blessing because it means that Poor Richard has a unique personality that allows it to stand out from the rest of the serif crowd.
It’s a curse because the uniqueness and size of the font in its style mean it doesn’t work very well formally. You’ll find that Poor Richard is a much better serif font for your informal writing.
Perpetua
Perpetua follows the same general idea as Poor Richard. It’s not all that popular, but it deserves to be. It’s a great font with an interesting style (most of which comes from the way some of the letters go below the written line, like the “p’s” and “q’s”).
Perpetua works really well in formal and informal contexts. It’s worth trying to use it yourself to see whether you can get along with it. A lot of people think it’s an attractive font, but it doesn’t often get used because it’s not a very well-known name.
You may also like:
12 Smallest Fonts In Microsoft Word
12 Best Cursive Fonts in Microsoft Word
12 Most Scary Fonts for Halooween in Microsoft Word

Martin holds a Master’s degree in Finance and International Business. He has six years of experience in professional communication with clients, executives, and colleagues. Furthermore, he has teaching experience from Aarhus University. Martin has been featured as an expert in communication and teaching on Forbes and Shopify. Read more about Martin here.
When it comes to creating a compelling and effective document, one of the most important tools at your disposal is the font (also known as «typeface»).
Fonts do much more than improve—or hamper—the legibility of your piece. They set a tone. They’ve got personalities. They evoke feelings. As such, fonts can either reinforce or undermine your brand.


Because fonts are so important, you may want to change the default fonts in Microsoft Word. In this article, you’ll see, step-by-step how to add fonts to Microsoft Word so you can change the default fonts in your document.
You’ll also learn tips on where to find the best Microsoft Word fonts and how to choose the best ones for your document.
(Note: In the tutorials below, I use Microsoft Word for macOS. If you’re on Windows or a different version of Word, then your interface will look different.)
Why Use Premium Fonts in Your Microsoft Word Document?
When it comes to creating documents that get and keep your readers’ attention, fonts are some of your most powerful tools. The right fonts:
- reinforce your branding
- express the right tone
- direct the reader’s attention
- improve readability
You might be tempted to use free fonts for Microsoft Word in your next document. But remember, those built-in MS Word fonts are exactly the same fonts that everyone else is using. Or, you might find a free Microsoft Word fonts download. But free fonts are often not as well-designed as premium fonts.
You can easily add fonts to Microsoft Word from outstanding sources like Envato Elements or GraphicRiver. To be able to download unlimited fonts, then look to Envato Elements. You get access to thousands of fonts. Download as many as you need for one small subscription price.


For one-off projects, GraphicRiver is a great source of the best Microsoft Word fonts on a pay-per-use basis.
And lastly, use the tips above to choose and use fonts effectively in your document. The misuse and overuse of fonts are sure signs of an amateur.
How to Change Microsoft Word Default Font
Word comes with default fonts, but you can change the font to match your branding or to change the tone and personality of the document.
You’ll find that dozens of fonts are already built into Word, and you can replace the default fonts with those. And you can also add new fonts. We’ll talk about how to add fonts to Microsoft Word later in this post.
To change the Microsoft Word default font, you’ve got three options:
1. How to Change the Microsoft Word Default Font for a Block of Text
This is a quick method that’s good to use if you want to change the default font only for one or a few bits of text. Here are the steps:
Step 1. Select the Text


Step 2. Open the Font Selection Tool


Click on the Font selection tool on the ribbon. You must be on the Home tab to see the buttons for formatting text. The Microsoft Word fonts list opens.
Step 3. Find the font you wish to use.
The Microsoft Word fonts list shows the Theme Fonts, Recent Fonts, and All Fonts. Scroll down farther to see all the fonts available on your computer. This includes fonts that are built-in as well as fonts you’ve added, listed in alphabetical order. The fonts list also gives you a preview of what each font looks like.
Click on the font you wish to use. A triangle next to the font means there are further selections you can make.


Step 4. Change the Font Size
Go to the font-size button to change the font size.


Or, click the Increase Font Size or Decrease Font Size buttons to change the font size by increments.
Step 5. Change Other Text and Paragraph Settings
Use the other buttons on the ribbon to add emphasis (bold, italics, underline), change the font color, and apply other effects.


We’ve now changed the default font in Microsoft Word.


2. How to Replace the Default Font Based on Paragraph Style
By changing the font used for a paragraph style, the change is applied globally in your document for all text with that paragraph style. Use this if you want to change the default font for large sections of text.
Follow the steps on how to change the Microsoft Word default font for a paragraph style:
Step 1. Select the Text
Highlight text that’s representative of the paragraph style you want to re-format. Make sure it’s got the paragraph style you want to change.


In this example, I’ll replace the default font for the Normal paragraph style.
Step 2. Apply the Font Settings You Wish to Use
Follow the steps in Method 1 to change the font, font size, font color, and apply other settings. You may also want to change the paragraph settings, such as alignment, line spacing, etc.


Step 3. Apply the New Formatting to the Paragraph Style
With the cursor in the paragraph you’ve formatted, click on the Styles button on the ribbon. This opens the paragraph Styles selection.


The current paragraph style will be highlighted. In this case, it’s the Normal style. Right-click on the Normal style, then click on Update Normal to Match Selection.


All other paragraphs with the Normal style are updated with the new font and settings you made.


3. How to Change the Font Based on Paragraph Styles Button
This method has the same end-result as Method 2. It changes the default font for a specific paragraph style. The steps are slightly different, as you’ll see:
Step 1. Open the Styles Settings
Click on the Styles button on the ribbon. This displays the paragraph styles.


Step 2. Modify the Paragraph Style
Right-click on the style you wish to change. Click Modify…


The Modify Style dialog opens.


Change the font, font size, and other settings. The box shows a preview of what the paragraph will look like when the settings you chose are applied. If you’re happy with the way it looks, click OK.


The new font (and other settings) will be applied to all paragraphs with that paragraph style.
How to Add Fonts to Microsoft Word
Right out of the box, Microsoft Word comes with dozens of fonts built in. But what if you want to use a font and you don’t see it on the Microsoft Word fonts list?
In that case, you add the font to Microsoft Word. I’ll walk you through how to do that in this section:
Step 1. Find New Fonts
The first step is to find the font you want to use. There are many sources of custom fonts. One to consider is Envato Elements, where you can download an unlimited number of fonts for one small subscription price.
To find a font you like, log into your Envato Elements account.


On the search bar, click on the downward arrow, then select Fonts.


Type a keyword into the search bar, depending on what kind of font you’re looking for. Click the search icon. The most relevant results appear.


Refine the results by Categories, Spacing, Optimum Size, and Properties. You can also sort the results by popularity (Popular) and newness (New).
Click on a font image or name to see its details.


When you find a font you like, click on any of the Download buttons on the page.


The Add this file to a project dialog box pops up.


Select a project to add the font file to. Or, click Create new project to add it to a new project. For this example, I’ll add the font to my existing tutorial project. Click the Add & Download button.
The file manager opens (Finder, if you’re on macOS; File Explorer, if you’re on Windows). Specify where you want to save the font file on your computer. Click Save.


The font files are now saved on your computer as a zip file.


Double-click on the zip file to unzip it.


Double-click on the font file itself to open it. It’ll usually have an extension like OTF or TTF. Click Install Font.


This adds the font to your computer’s fonts library.


The new font should now appear in the All Fonts list in Microsoft Word. To confirm, click on the Fonts button on the ribbon and scroll down the list until you see the new font. If you don’t see it, you may have to restart your computer.


Now, follow any of the methods above to change the default font with the new one.
2 Types of Fonts
Now that you know how to add fonts to Microsoft Word and replace the default fonts in your document, it would help for you to know more about fonts. This will help you choose the best fonts for your Word document.
There are two basic types of fonts you can use in your documents:
1. Serif Fonts
Serif fonts have little lines at the end of each stroke, like this:


Common examples of serif fonts include:


Various research studies have shown that, when it comes to printed matter, serif fonts are the easiest to read and result in the best comprehension.
2. Sans Serif Fonts
As the name implies, sans serif fonts don’t have little lines at the end of each stroke (“sans” means “without” in French):


These are some of the most common sans serif fonts:


Citing research by the Software Usability Research Laboratory, Drew E. Whitman in his book Ca$vertising, noted that sans serif fonts are the most legible fonts to use on a computer screen. Specifically, Arial, Courier, and Verdana were considered the best for online reading.
But these studies were conducted when the resolution of online screens was still very low (below 100 dpi) compared to printed materials (300 dpi). As computer screen resolutions get closer to 300 dpi, serif fonts may prove to be legible both online and offline.
In the meantime, you can use both serif and sans serif fonts in one document—if you know how. Read on for tips on how to use combine fonts.
5 Tips on Using Typography Effectively in Your Word Documents
It’s easy to get carried away with fonts! You may find that having so many kinds of fonts available at your fingertips unleashes your creativity. Yet, as with most things, fonts can either enhance or sabotage your document.
Follow these tips to harness the power of typography:
1. Keep It Simple
When it comes to choosing fonts, legibility is of utmost importance. Sure, it’s easier than ever now for you to find the most creative and outrageous fonts. But if nobody can read your text, then they defeat their purpose. If you must use an ornate font, restrict it to one letter or word.
2. Stick to Two Fonts
A document that’s dripping with many different fonts makes it look amateurish, confusing, and incoherent. For best results, stick to a maximum of two fonts: one serif and one sans serif. (More on this in tip #4).
Remember, use formatting like bold, italics, underlines, different font sizes and colors to add emphasis and variety.
3. Match the Tone and Goals for the Document
Fonts have personality, so pick the ones that match the tone and goals of the document. For example, the fonts for a 16th birthday party invitation will be different from the ones in a financial business report.
When in doubt, pre-test the document. Show it to other people, especially those who are like the intended audience. Make sure they can comprehend the document, first, and that they respond favorably.
4. Choose Fonts Appropriate for the Document’s Intended Use
Whether the document will be printed out or consumed on a computer screen will also affect your choice of fonts.
If you’re making a printed document, use the sans serif font for headings and the serif font for body text. For a web-based document, switch it: Use a serif font for headings and sans serif for body text.
5. Use Handwritten, Cursive, and Decorative Fonts Sparingly


There are other font types that may not fit easily in either serif or sans serif categories. These include handwritten, cursive, and decorative fonts. Handwritten fonts, as the name says, look like they were written by hand. These are extremely popular and useful for adding a warm, personal touch on materials. They can range from casual to glamorous.
Cursive fonts are a kind of handwritten font that look like they’re written in longhand. Beware of using cursive and handwritten fonts because they can be difficult to read. Use them for short bits of text you want to emphasize.
You can easily find handwritten fonts in marketplaces like Envato Elements or GraphicRiver.
Decorative fonts have special effects or treatments. They may be serif or sans serif. And some handwritten fonts can be considered decorative as well.
Here’s a sampling of the decorative fonts available in Envato Elements:
5 Best Font Styles for 2020
Designers come up with new fonts every day. Below are five of the best and freshest Microsoft Word font styles we’re seeing for 2020, along with two fresh examples of each style:
1. Vintage Fonts
Vintage fonts evoke the aesthetic of times past. If you’re working on a document that’s about a specific time, you’re bound to find a font to match.
Anthique — Vintage Typeface


Anthique is reminiscent of handmade Victorian hand lettering but with a modern flavor. It works best for materials that relate to the early 1800s. The font includes three variations in TTF and OTF formats. It also supports multilingual characters.
Middle Class Script


Middle Class is a script font that’s evocative of the bold style of the ’60s and ’70s. It’s got a hand-drawn and layered style, and includes punctuation, common ligatures, and extra swashes (lines).
2. Brush Script Fonts
Brush script fonts are handwritten fonts that look like they were written with a brush, such as a calligraphy or a paintbrush. These are increasingly popular as brands want to add a personal touch to their materials.
Eberthany Brush Script


Eberthany is a modern brush script signature font that works for:
- social media posts
- logos
- wedding invitations
- labels
- quotes
- and more
It works best with software that supports OpenType fonts like Adobe Illustrator CS, Adobe Photoshop CC, Adobe InDesign, and Corel Draw.
Mistrully Brush Script


Mistrully is a stylish brush script that looks like natural handwriting. It comes with special swashes or handwritten lines that you can use to add emphasis. Mistrully works well for logos, social media posts, advertisements, product designs and labels, stationery, among others.
3. Font Duos
Font Duos take the guesswork out of choosing fonts that work well together. These two-for-one font packages are designed to complement each other. You only need to pick the font duo that aligns with your branding and the tone of the material you’re designing. Examples of font duos include:
Chiladepia — Font Duo


The Chiladepia Font Duo is made up of two handwritten fonts. One’s a cursive font and the other’s a sans serif font. This font duo would work well on a computer screen. Use the cursive font for titles or headers and the sans serif font for the rest of the document.
Perkin | Duo Font Pack


The Perkin Duo Font combines a bold sans serif and a serif font. The sans serif font is best for titles and headings, while the serif font works great for body text. This duo is ideal for printed materials.
4. 3D Decorative Fonts
3D decorative fonts look like they’re popping off the pages. These fonts are incredibly eye-catching. For that reason, they’re great for titles. But, they’re not the most legible fonts, so use them sparingly for short bits of text.
Ultra — Modern Font


If you’re creating a futuristic document, then consider the Ultra — Modern Font. It’s got a modern and futuristic style. This pack is actually made up of four font styles: regular, bold, 3D, and bold 3D. It also comes in both OTF and TTF formats.
Under Construction 3D Color Font


Under Construction is a stunning 3D decorative font to use on materials related to industry, construction, technology, and the like. Each letter looks like it floats on top of the page. It’s a color or SVG OpenType font, which works only in Photoshop CC 2017+, Illustrator CC 2018, and some Mac apps.
5. Tech Sans Serif Fonts
Tech sans serif fonts have gone a long way since the pixelized arcade fonts of the ‘80s. Many are also much more legible and modern. Below are two examples:
Azuria — Technology Science Font


The Azuria — Technology Science Font evokes technology, science, and outer space. Its metallic, 3D look would work well in video games, movie titles, and tech-related branding. The font includes all Latin letters from A-Z, numbers, and punctuation marks.
Cyborg — Futuristic Technology Typeface


Cyborg is another futuristic tech font. Inspired by science fiction, it’s perfect for titles related to space, technology, and science. It comes in OTF, TTF, and WOFF formats.
Put Fonts to Work in Your Microsoft Word Document Today
As you’ve learned in this article, you don’t need to stick to the default fonts in Microsoft Word. Follow the steps outlined above to replace the default fonts with ones that are more appropriate to your document.
Now that you understand how to add fonts to Microsoft Word, you’re ready to start taking advantage of the unique look a professionally designed font can give your documents.
At Envato Elements and GraphicRiver we’ve got some of the best Microsoft Word fonts available. Take a look at our Microsoft Word fonts list today. Download your favorites for your next MS Word document.
You’ve undoubtedly heard the terms Serif and Sans-Serif Fonts when it comes to design – but what’s the difference? This post breaks down the key differences between Serif and Sans-Serif fonts and how they came to be. We also look at how you can use them most effectively in your designs and promotions.
In the complex world of typography, it can be hard to know how to use different fonts, let alone what type of “Serif” they are. If you’re a designer, you will understand all of this, but it can be a little confusing for those who haven’t studied or worked in design.
Let’s change that!
While you read this article’s guide to using Serif and Sans-serif fonts – remember that both families of fonts exist within Easil. Our team of Easil Graphic Designers has carefully chosen fonts for you. You can see them in our professionally designed templates and text graphics. So, your job has been made that much easier.
So, now you can get started straight away, playing with different kinds of fonts for your designs!
What is the Difference between Serif and Sans-Serif Fonts?
When creating your own text, one of the first decisions to be made is whether to select a font that is Serif or Sans Serif. But what are they, and how do they differ, exactly?
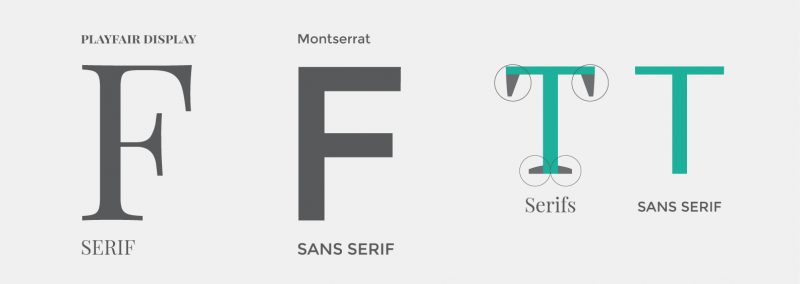
In a nutshell, it’s all about the small features on the ends of strokes in some fonts. Those fonts that have them are called “Serifs” or “Serif fonts.” Those that don’t are called “Sans-Serifs” or “San-Serif Fonts.” Here’s an image showing the difference between Serif and Sans Serif fonts:
Choosing between Serif and Sans Serif Fonts should be based on several considerations pertaining to the project in hand – and the style of design.
The origin of serifs
Serifs were believed to have originated in the Latin Alphabet with words carved into stone in Roman Antiquity. The Roman letter outlines were first painted onto stone, and the stone carvers followed the brush marks, which flared at stroke ends and corners, creating serifs.
Serif fonts are usually used in lengthy text, such as books, newspapers, and most magazines and are the most commonly used printed typestyle due to perceived readability. After all, when you strive to create something beautiful and remarkable to look at, the main goal is to have your message clear and readable!
Some common Serif typefaces are Times New Roman, Georgia, Palatino, and Garamond – however, there are thousands more.
The origin of Sans-serif fonts
Sans-serif letters began to appear in printed media as early as 1805. They were popular due to their clarity and legibility in advertising and display use when printed very large or very small.
Sans-serif fonts have become the most prevalent for displaying text on computer screens, partly because screens tend to struggle to show fine serif details in small type.
Some commonly used Sans-serif typefaces are Arial, Helvetica, and Tahoma, but there are thousands more.
Hot Tip: For other shorter text settings – such as titles, credits, column headings, as well as text in infographics – a Sans-serif typeface is a good choice. Its simplified letterforms are unencumbered by Serifs, which can impede the readability of characters at very small sizes.
6 Tips for Using Serif and Sans Serif Fonts Together
- Be Guided by Designers and use Templates – If you’re not a designer, you don’t have to learn how to be one! This means you don’t have to learn how to be the perfect font-pairing master for Serif and Sans Serif fonts. Instead, use font combinations that exist, designed by designers. All you have to do is take advantage of someone else doing all the hard work. For example, use the templates in Easil to find great font combinations that feature Serif and Sans-Serif fonts together.
- Get inspired with Free Fonts. Check out our complete guide to using Free Fonts to find Serif and Sans-Serif Fonts.
- Use our mega Font Pairing Guide. It is perfect for discovering combinations of fonts (including Serif and Sans-Serif fonts) that work together.
- Don’t add too many fonts. Restrict your design to 2 x fonts if possible so that your ratio of Serif vs Sans-Serif fonts can be balanced. One of each should be enough for most designs.
- Consider the “mood” of your fonts. There is a key difference in “mood” between Serif and Sans Serif fonts. Serif fonts tend to be classic or formal. Some might even say they are elegant! Sans Serif fonts are usually described as modern, friendly, and minimal. They are stylishly simplistic in the absence of decorative strokes.
- Determine the font that best suits you. When looking at Serif and Sans Serif fonts, how you use them will vary depending on a number of factors. It depends on the type of project and the mood you want to convey. Things like color and the types of images that you are designing are also worth considering. When it comes to Sans and Sans-Serif fonts, there will always be a difference – but both types of font can be used in a wide number of projects and applications.
Myths about Serif and Sans-Serif Fonts
Although there are guidelines on how to use Serif and Sans-Serif fonts, there are always exceptions to the rule. As such, there are a few myths we should debunk:
- Serif Fonts are More Formal than Sans-Serif – although the “mood” of Serif Fonts can be formal or classic, it’s not clear cut. It’s possible for Sans-Serif fonts also to have the classic feel of yesteryear! When you pair the right type of Serif font with a Sans-Serif, both can be classic!
- Sans Serif Fonts are more suitable for Heading Text – yes, they do suit headings, but there are so many factors that come into play when it comes to “attention-grabbing” fonts. A Serif font can also command attention. Think about traditional newspapers! They often have bold Serif fonts as headings.
- Serifs are for traditional print, and Sans Serifs are for the web – it’s not that black and white. Some Serif typefaces can look beautiful online, and you’ll see many Sans-Serif fonts used effectively in printed material, books, and magazines. Screen resolution has changed, and the way we consume material has changed. It’s all about choosing the right font for the project, so don’t be afraid to debunk a few myths.
Other Related Fonts
Without confusing the issue, many other fonts are used and available in Easil. There are Slab fonts, Handwritten fonts, and Display fonts, the list goes on.
Display fonts are quite ‘unique’ or ‘fancy’ by appearance and are used primarily in large headings and minimal application – you’ll see many of these font families in our post about free fonts here and our post about font pairing here.
In Conclusion
You’ll be spoiled with a number of type styles and font families to choose from in Easil and in our Easil templates. Take advantage of it and use this post to help you determine the most effective use of a Serif or Sans-serif font… or both.
Generally – your message needs to be clear and concise. A Sans-serif font is a good choice for headings and small text where clarity and readability are paramount. A Serif font is good to use on larger blocks of printed text like on a flyer.
But remember to consider the whole context rather than just relying on a set of rules when you make your design choices. Try different font combinations and be creative!
Over to You
Are you all schooled up now in the difference between Sans and Sans Serif Fonts? Ready to rock your designs with fonts?
Каждый бренд стремится к созданию собственного, уникального стиля оформления логотипа, рекламы, сайта, социальных сетей и других площадок. Для решения этой сложной и ответственной задачи необходимо не только разработать композицию и подобрать цветовые сочетания, но отыскать подходящие шрифты, ведь именно они вторыми после текста транслируют целевой аудитории сообщение. Как понять, какой шрифт подойдёт бренду? Для начала выбрать один из двух вариантов: Serif или Sans Serif.
Создайте свой логотип онлайн за 5 минут в Turbologo. Поместите свой логотип на визитки, бланки, другую сопутствующую графику и скачайте в один клик.
Создать логотип бесплатно

Шрифты различаются важной составляющей начертания — засечками. Засечки представляют собой небольшие декоративные штрихи, выходящие за границы элементов букв. Сейчас засечки считаются «украшениями», однако изначально они выполняли важную функцию. Засечки помогали читать напечатанный текст быстрее (буквы как будто соединялись друг с другом, образуя единую линию — взгляд не «терялся» на странице, было легче удерживать внимание).
10-20 лет назад считалось, что начертания с засечками подходят лишь для напечатанного на бумаге текста. Дело в том, что было распространено следующее мнение: при чтении с экрана текста, написанного шрифтом с засечками, быстрее устает зрение. Такая «теория» сформировалась из-за того, что в начале 2000-х годов качество мониторов компьютеров было в целом на низком уровне: любой текст читался сложнее, чем на бумаге.
С 2010-х ситуация кардинально изменилась: появились щадящие зрение экраны – теперь отлично читаются все шрифты.
Обратите внимание: сейчас большинство официальных электронных документов оформляется именно при помощи начертаний с засечками – никаких сложностей и проблем их изучение не вызывает.
К группе Serif относятся шрифты с засечками. Общеизвестный пример начертания — Times New Roman. Декоративные линии бывают острыми или тупыми, объёмными и плоскими, полупрозрачными и насыщенными: у каждого семейства начертаний Serif есть свой особый стиль. Засечки дополняют как прописные, так и строчные буквы, цифры и другие символы.

Sans Serif — рубленые шрифты без засечек. Самые распространенные варианты — Arial и Calibri. Sans Serif появились в начале XIX века. В основном они применялись для создания крупных рекламных объявлений: текст, выполненный посредством такого начертания, был более разборчивым и четким, читался издалека.

Sans Serif отличаются большей универсальностью, нежели Serif. В то же время весомое преимущество шрифтов с засечками — придание любому символу уникальных черт.
Существует мнение, что засечки подчёркивают индивидуальные особенности начертания каждой буквы: «спутать» их между собой становится сложнее. Весомый недостаток Sans Serif заключается в меньшем числе декоративных элементов: из дизайнерских решений доступны лишь изменения жирности, высоты, отступа и межбуквенного расстояния.
Почему важно тщательно выбирать шрифты для логотипа?
Любая деталь, размещенная на эмблеме компании, оказывает прямое влияние на восприятие бренда. Каждый бизнес транслирует собственный месседж. Донести его в понятной и простой форме призван фирменный стиль, важной составляющей которого является начертание.
Serif и Sans Serif оказывают различное воздействие на эмоциональное состояние целевой аудитории.
Так, начертания с засечками относятся к классическим (их также называют формальными). Шрифты без засечек — более современные и креативные. Неверный выбор стиля опасен тем, что может несколько исказить сообщение, следовательно, помешать достичь поставленных целей по продвижению, увеличению узнаваемости и продажам.
Бесспорное преимущество Sans Serif заключается в адаптивности: начертания без засечек проще масштабируются. Дело в том, что Sans Serif не отличается большим количеством деталей: символы будут оставаться разборчивыми даже при многократном уменьшении. Кстати, именно по этой причине начертания группы применяют более 70% компаний.
Смысловая нагрузка Serif и Sans Serif
Шрифты Serif транслируют уверенность, устойчивость, надёжность, стабильность приверженность традициям. Такие начертания используются на протяжении сотен лет — ещё со времён зарождения книгопечатания.
Ассоциации подтверждаются результатами многочисленных исследований: нередко шрифты с засечками респонденты называют «элегантными» и «научными».
Serif - оптимальный вариант для оформления дизайна компаний, позиционирующих себя как надёжные и серьезные предприятия.
Отметим, что часто при выборе шрифтов с засечками элементы букв контрастны в толщине линий: эта деталь привлекает повышенное внимание и является неким символом творчества, готовности принимать нестандартные решения.
Начертания Sans Serif транслируют инновационность, динамичность и доступность. Часто эти шрифты ассоциируются с минимализмом и лёгкостью: они довольно просты и лаконичны, выглядят современно и аккуратно.
Результаты опросов свидетельствуют о том, что Sans Serif многие считают неформальными: это лучший вариант для бизнеса, связанного с технологиями, и необычных стартапов.
Советы по выбору идеального шрифта для логотипа компании

В последние несколько лет заметна тенденция избавления от засечек: все чаще владельцы бизнеса отказываются от применения этих элементов в пользу рубленых шрифтов. Нужно ли следовать такой моде или есть варианты преобразовать начертание с засечками, чтобы оно стало более актуальным и современным?
Не стоит перекраивать дизайн-концепцию фирменного знака из-за моды: из-за такой тенденции могут появиться сотни одинаковых «безликих» символов, утерявших всякую индивидуальность и оригинальность. Ответьте на два важных вопроса, прежде чем действительно «упразднить» текст, выполненный при помощи Serif, на логотипе, сайте и рекламных материалах:
- Какую идею вы хотите донести до целевой аудитории? Если сейчас бизнес достиг такого уровня, когда ощущается острая необходимость сократить дистанцию с потребителями продукции, примерить более современный, непринуждённый образ, от засечек действительно можно отказаться. Если ценностью является солидность бренда, его устойчивость на рынке, надёжность и серьезность, не отказывайтесь от начертания с засечками.
- Посредством каких площадок вы чаще взаимодействуете с аудиторией? На печатных материалах всё-таки лучше оставить Serif, для онлайн-страниц подойдёт Sans Serif, он же является универсальным вариантом, так как отличается большей адаптивностью.
Как определиться со шрифтом для логотипа?

- Поинтересуйтесь тенденциями в сфере оформления эмблем и изучите дизайны лого конкурентов: обратите внимание на характеры брендов, их самопрезентации и позиционирование, применяемые маркетинговые и коммуникативные стратегии, исследуйте ценности, которые они транслируют своим целевым аудиториям.
- Наложите на макет дизайна фирменного знака разные шрифты: создайте несколько вариантов, различающихся лишь начертаниями. Посмотрите, как будут смотреться различные шрифты на печатных носителях и в онлайн-пространстве. Это поможет понять, справляется ли начертание с возложенными на него задачами, а также прочувствовать, ценить эмоции, которые вызывает цельная композиция.
- Если определиться с одним вариантом не получилось, используйте сразу 2-3 шрифта, но подходите к их выбору максимально вдумчиво и тщательно! Рассмотрите несколько комбинаций: наверняка найдется вариант, который придется по душе.
Шрифт — важный элемент дизайна логотипа каждого бренда. Начертание не только транслирует основную мысль, заложенную в тексте, но задаёт настроение, обладает дополнительным значением — вызывает определенные чувства и эмоции. Изучайте опыт других компаний, экспериментируйте, но не перегружайте оформление деталями и акцентами. Помните, что шрифт является маркером индивидуальности: демонстрирует аудитории, как именно позиционирует себя сама компания.
![]()
Продуктовый и графический дизайнер с опытом работы более 10 лет. Пишу о брендинге, дизайне логотипов и бизнесе.
Sans-serif typefaces are a favored choice for current and avant-garde layouts, offering an unadorned and understated appearance. If you are conceptualizing a webpage, a notice, or an emblem, sans-serif typefaces can assist in crafting a striking and streamlined aesthetic.
Our compilation of gratis sans-serif typefaces encompasses a range of styles, from time-honored and ageless to striking and emotive. Delve into our library and unearth the ideal sans-serif typeface for your upcoming project.
All of our typefaces are crafted by seasoned typographers and graphic designers, guaranteeing top-quality and visually captivating typography. We provide an array of sans-serif typefaces that are multi-purpose and can be utilized for a diverse range of design functions, including branding, editorial design, web design, and more.
Our user-friendly interface facilitates the effortless exploration and perusal of our library by category, style, or keyword. You can preview each typeface and download it free of charge, with no obligation to register or subscribe.
Whether you are in pursuit of a sans-serif typeface for a modest website design, an uncluttered emblem, or a daring poster, our collection has an offering that will suit your purpose. We also regularly augment our library with new and stimulating sans-serif typefaces, so make certain to revisit frequently for fresh inspiration.
Acquire one of our free sans-serif typefaces today and enrich your typography with an up-to-the-minute and sophisticated appearance!