Excel stores date and time values as serial numbers in the back end.
This means that while you may see a date such as “10 January 2020” or “01/10/2020” in a cell, in the back-end, Excel is storing that as a number. This is useful as it also allows users to easily add/subtract date and time in Excel.
In Microsoft Excel for Windows, “01 Jan 1900” is stored as 1, “02 Jan 1900” is stored as 2, and so on.
Below, both columns have the same numbers, but Column A shows numbers and Column B shows the date that’s represented by that number.

This is also the reason that sometimes you may expect a date in a cell but end up seeing a number. I see this happening all the time when I download data from databases or web-based tools.
It happens when the cell format is set to show a number as a number instead of a date.
So how can we convert these serial numbers into dates?
That’s what this tutorial is all about.
In this tutorial, I would show you two really easy ways to convert serial numbers into dates in Excel
Note: Excel for Windows uses the 1900 date system (which means that 1 would represent 01 Jan 1900, while Excel for Mac uses the 1904 date system (which men’s that 1 would represent 01 Jan 1904 in Excel in Mac)
So let’s get started!
Convert Serial Numbers to Dates Using Number Formatting
The easiest way to convert a date serial number into a date is by changing the formatting of the cells that have these numbers.
You can find some of the commonly used date formats in the Home tab in the ribbon
Let me show you how to do this.
Using the In-Built Date Format Options in the Ribbon
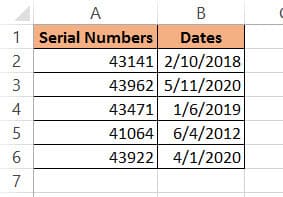
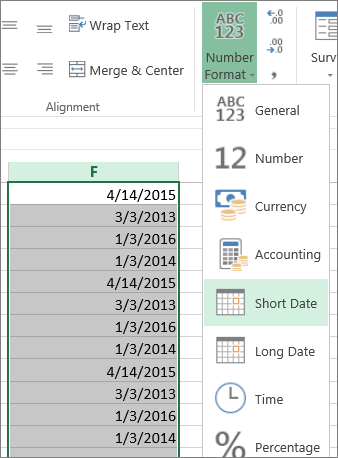
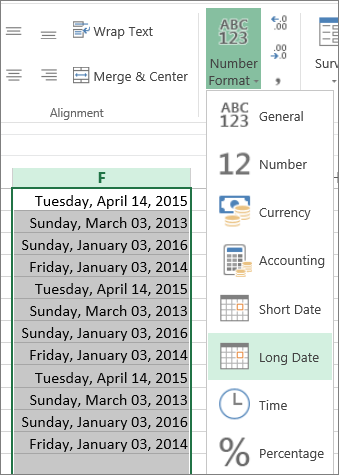
Suppose you have a data set as shown below, and you want to convert all these numbers in column A into the corresponding date that it represents.

Below are the steps to do this:
- Select the cells that have the number that you want to convert into a date

- Click the ‘Home’ tab

- In the ‘Number’ group, click on the Number Formatting drop-down

- In the drop-down, select ‘Long Date’ or Short Date’ option (based on what format would you want these numbers to be in)


That’s it!
The above steps would convert the numbers into the selected date format.

The above steps have not changed the value in the cell, only the way it’s being displayed.
Note that Excel picks up the short date formatting based on your system’s regional setting. For example, if you’re in the US, then the date format would be MM/DD/YYYY, and if you are in the UK, then the date format would be DD/MM/YYYY.
While this is a quick method to convert serial numbers into dates, it has a couple of limitations:
- There are only two date formats – short date and long date (and that too in a specific format). So, if you want to only get the month and the year and not the day, you won’t be able to do that using these options.
- You cannot show date as well as time using the formatting options in the drop-down. You can either choose to display the date or the time but not both.
So, if you need more flexibility in the way you want to show dates in Excel, you need to use the Custom Number Formatting option (covered next in this tutorial).
Sometimes when you convert a number into a date in Excel, instead of the date you may see some hash signs (something like #####). this happens when the column width is not enough to accommodate the entire date. In such a case, just increase the width of the column.
Creating a Custom Date Format Using Number Formatting Dialog Box
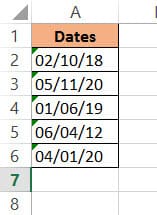
Suppose you have a data set as shown below and you want to convert the serial numbers in column A into dates in the following format – 01.01.2020
Note that this option is not available by default in the ribbon method that we covered earlier.
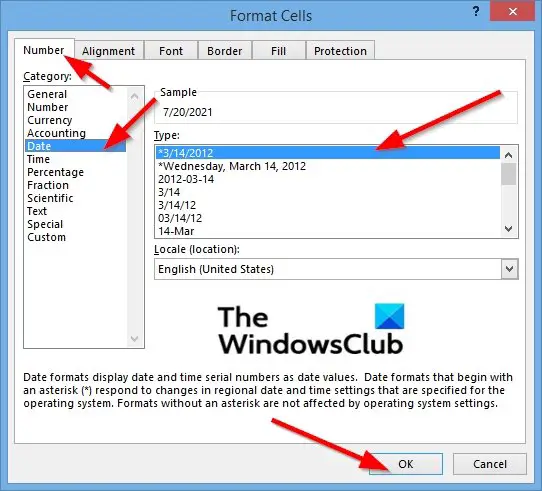
Below are the steps to do this:
- Select the cells that have the number that you want to convert into a date
- Click the ‘Home’ tab
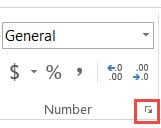
- In the Numbers group, click on the dialog box launcher icon (it’s a small tilted arrow at the bottom right of the group)

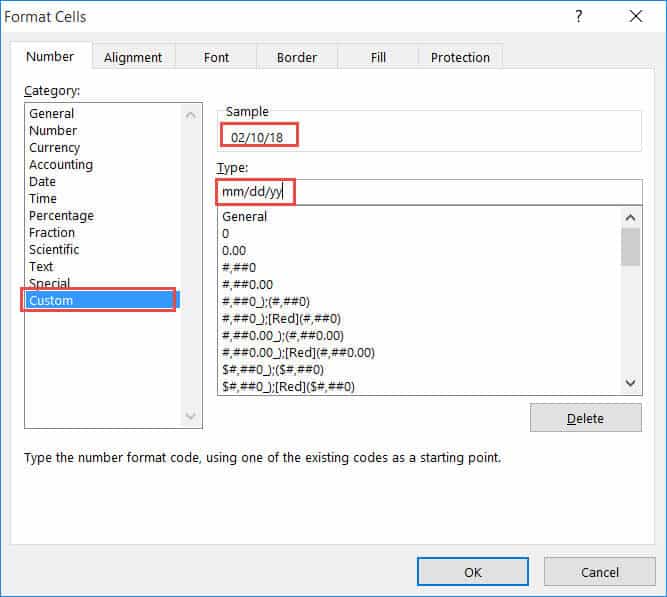
- In the ‘Format Cells’ dialog box that opens up, make sure the ‘Number’ tab selected

- In the ‘Category’ options on the left, select ‘Date’
- Select the desired formatting from the ‘Type’ box.
- Click OK


The above steps would convert the numbers into the selected date format.

As you can see, there are more date formatting options in this case (as compared with the short and long date we got with the ribbon).
And in case you do not find the format you are looking for, you can also create your own date format.
For example, let’s say that I want to show the date in the following format – 01/01/2020 (which is not already an option in the format cells dialog box).
Here is how I can do this:
- Select the cells that have the numbers that you want to convert into a date
- Click the Home tab
- In the Numbers group, click on the dialog box launcher icon (it’s a small tilt arrow at the bottom right of the group)
- In the ‘Format Cells’ dialog box that opens up, make sure the ‘Number’ tab selected
- In the ‘Category’ options on the left, select ‘Custom’
- In the field on the right, enter
mm/dd/yyyy
- Click OK


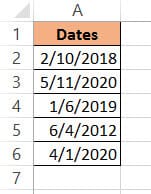
The above steps would change all the numbers into the specified number format.

With custom format, you get full control and it allows you to show the date in whatever format you want. You can also create a format where it shows the date as well time in the same cell.
For example, in the same example, if you want to show date as well as time, you can use the below format:
mm/dd/yyyy hh:mm AM/PM
Below is the table that shows the date format codes you can use:
| Date Formatting Code | How it Formats the Date |
| m | Shows the Month as a number from 1–12 |
| mm | Show the months as two-digit numbers from 01–12 |
| mmm | Shows the Month as three-letter as in Jan–Dec |
| mmmm | Shows the Months full name as in January–December |
| mmmmm | Shows the Month name first alphabet as in J-D |
| d | Shows Days as 1–31 |
| dd | Shows Days as 01–31 |
| ddd | Shows Days as Sun–Sat |
| dddd | Shows Days as Sunday–Saturday |
| yy | Shows Years as 00–99 |
| yyyy | Shows Years as 1900–9999 |
Also read: How to Convert Text to Date in Excel (Easy Formulas)
Convert Serial Numbers to Dates Using TEXT Formula
The methods covered above work by changing the formatting of the cells that have the numbers.
But in some cases, you may not be able to use these methods.
For example, below I have a data set where the numbers have a leading apostrophe – which converts these numbers into text.

If you try and using the inbuilt options to change the formatting of the cells with this data set, it would not do anything. This is because Excel does not consider these as numbers, and since dates for numbers, Excel refuses your wish to format these.
In such a case, you can either convert these text to numbers and then use the above-covered formatting methods, or use another technique to convert serial numbers into dates – using the TEXT function.
The TEXT function takes two arguments – the number that needs to be formatted, and the format code.
Suppose you have a data set as shown below, and you want to convert all the numbers and column A into dates.

Below the formula that could do that:
=TEXT(A2,"MM/DD/YYYY")
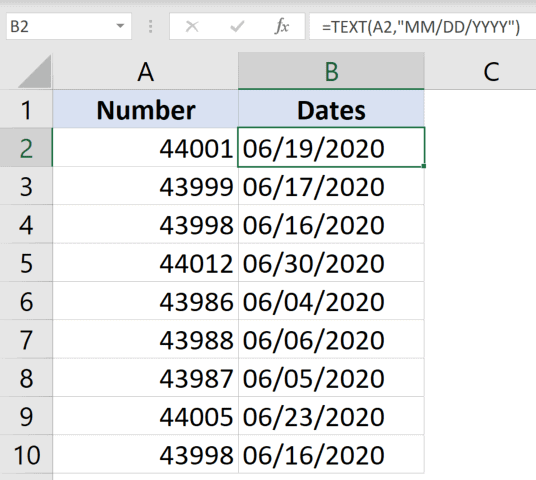
Note that in the formula I have specified the date formatting to be in the MM/DD/YYYY format. If you need to use any other formatting, you can specify the code for it as the second argument of the TEXT formula.
You can also use this formula to show the date as well as the time.
For example, if you want the final result to be in the format – 01/01/2020 12:00 AM, use the below formula:
=TEXT(A2,"mm/dd/yyyy hh:mm AM/PM")
In the above formula, I have added the time format as well so if there are decimal parts in the numbers, it would be shown as the time in hours and minutes.
If you only want the date (and not the underlying formula), convert the formulas into static values by using paste special.
One big advantage of using the TEXT function to convert serial numbers into dates is that you can combine the TEXT formula result with other formulas. For example, you can combine the resulting date with the text and show something such as – The Due Date is 01-Jan-2020 or The Deadline is 01-Jan-2020
Note: Remember dates and time are stored as numbers, where every integer number would represent one full day and the decimal part would represent that much part of the day. So 1 would mean 1 full day and 0.5 would mean half-a-day or 12 hours.
So these are two simple ways you can use to convert serial numbers to dates in Microsoft Excel.
I hope you found this tutorial useful!
Other Excel tutorials you may like:
- How to SUM values between two dates (using SUMIFS formula)
- How to Stop Excel from Changing Numbers to Dates Automatically
- How to Remove Time from Date/Timestamp in Excel
- Calculate the Number of Months Between Two Dates in Excel
- Excel DATEVALUE Function – Convert Date in Text into Serial Date Formats
- How to Convert Numbers to Text in Excel
- How to Compare Dates in Excel (Greater/Less Than, Mismatches)
- Convert Scientific Notation to Number or Text in Excel
- How To Convert Date To Serial Number In Excel?
I got a column called DateOfBirth in my csv file with Excel Date Serial Number Date
Example:
  36464
  37104
  35412
When i formatted cells in excel these are converted as
  36464 => 1/11/1999
  37104 => 1/08/2001
  35412 => 13/12/1996
I need to do this transformation in SSIS or in SQL. How can this be achieved?
![]()
Hadi
35.7k13 gold badges68 silver badges123 bronze badges
asked Dec 12, 2012 at 23:40
![]()
1
The marked answer is not working fine, please change the date to «1899-12-30» instead of «1899-12-31».
select dateadd(d,36464,'1899-12-30')
![]()
answered Oct 1, 2014 at 20:16
![]()
You can cast it to a SQL SMALLDATETIME:
CAST(36464 - 2 as SMALLDATETIME)
MS SQL Server counts its dates from 01/01/1900 and Excel from 12/30/1899 = 2 days less.
answered Jan 8, 2015 at 22:01
![]()
Ricardo SouzaRicardo Souza
16k6 gold badges37 silver badges69 bronze badges
2
tldr:
select cast(@Input - 2e as datetime)
Explanation:
Excel stores datetimes as a floating point number that represents elapsed time since the beginning of the 20th century, and SQL Server can readily cast between floats and datetimes in the same manner. The difference between Excel and SQL server’s conversion of this number to datetimes is 2 days (as of 1900-03-01, that is). Using a literal of 2e for this difference informs SQL Server to implicitly convert other datatypes to floats for very input-friendly and simple queries:
select
    cast('43861.875433912' - 2e as datetime) as ExcelToSql, -- even varchar works!
    cast(cast('2020-01-31 21:00:37.490' as datetime) + 2e as float) as SqlToExcel

-- Results:
-- ExcelToSql                          SqlToExcel
-- 2020-01-31 21:00:37.490        43861.875433912
answered Jan 31, 2020 at 22:36
![]()
Tim LehnerTim Lehner
14.7k4 gold badges58 silver badges76 bronze badges
this actually worked for me
dateadd(mi,CONVERT(numeric(17,5),41869.166666666664)*1440,'1899-12-30')
(minus 1 more day in the date)
referring to the negative commented post
![]()
answered Sep 10, 2014 at 6:48
![]()
drinkydrinky
911 silver badge5 bronze badges
2
SSIS Solution
The DT_DATE data type is implemented using an 8-byte floating-point number. Days are represented by whole number increments, starting with 30 December 1899, and midnight as time zero. Hour values are expressed as the absolute value of the fractional part of the number. However, a floating point value cannot represent all real values; therefore, there are limits on the range of dates that can be presented in DT_DATE. Read more
From the description above you can see that you can convert these values implicitly when mapping them to a DT_DATE Column after converting it to a 8-byte floating-point number DT_R8.
Use a derived column transformation to convert this column to 8-byte floating-point number:
(DT_R8)[dateColumn]
Then map it to a DT_DATE column
Or cast it twice:
(DT_DATE)(DT_R8)[dateColumn]
You can check my full answer here:
- Is there a better way to parse [Integer].[Integer] style dates in SSIS?
answered Jun 18, 2017 at 5:29
![]()
HadiHadi
35.7k13 gold badges68 silver badges123 bronze badges
Found this topic helpful so much so created a quick SQL UDF for it.
CREATE FUNCTION dbo.ConvertExcelSerialDateToSQL
(
    @serial INT
)
RETURNS DATETIME
AS
BEGIN
    DECLARE @dt AS DATETIME
    SELECT @dt =
        CASE
            WHEN @serial is not null THEN CAST(@serial - 2 AS DATETIME)
            ELSE NULL
        END
    RETURN @dt
END
GO
answered Dec 8, 2015 at 16:46
![]()
user692942user692942
16.2k7 gold badges78 silver badges173 bronze badges
1
I had to take this to the next level because my Excel dates also had times, so I had values like this:
42039.46406 --> 02/04/2015 11:08 AM
42002.37709 --> 12/29/2014 09:03 AM
42032.61869 --> 01/28/2015 02:50 PM
(also, to complicate it a little more, my numeric value with decimal was saved as an NVARCHAR)
The SQL I used to make this conversion is:
SELECT DATEADD(SECOND, (
                        CONVERT(FLOAT, t.ColumnName) -
                        FLOOR(CONVERT(FLOAT, t.ColumnName))
                       ) * 86400,
               DATEADD(DAY, CONVERT(FLOAT, t.ColumnName), '1899-12-30')
              )
answered Mar 6, 2018 at 17:14
![]()
hurleystyleehurleystylee
5921 gold badge10 silver badges18 bronze badges
In postgresql, you can use the following syntax:
SELECT ((DATE('1899-12-30') + INTERVAL '1 day' * FLOOR(38242.7711805556)) + (INTERVAL '1 sec' * (38242.7711805556 - FLOOR(38242.7711805556)) * 3600 * 24)) as date
In this case, 38242.7711805556 represents 2004-09-12 18:30:30 in excel format
answered Jul 1, 2019 at 0:39
![]()
In addition of @Nick.McDermaid answer I would like to post this solution, which convert not only the day but also the hours, minutes and seconds:
SELECT DATEADD(s, (42948.123 - FLOOR(42948.123))*3600*24, dateadd(d, FLOOR(42948.123),'1899-12-30'))
For example
42948.123to2017-08-01 02:57:07.00042818.7166666667to2017-03-24 17:12:00.000
answered Mar 27, 2017 at 12:48
![]()
NicolaesseNicolaesse
2,38111 gold badges48 silver badges69 bronze badges
You can do this if you just need to display the date in a view:
CAST will be faster than CONVERT if you have a large amount of data, also remember to subtract (2) from the excel date:
CAST(CAST(CAST([Column_With_Date]-2 AS INT)AS smalldatetime) AS DATE)
If you need to update the column to show a date you can either update through a join (self join if necessary) or simply try the following:
You may not need to cast the excel date as INT but since the table I was working with was a varchar I had to do that manipulation first. I also did not want the «time» element so I needed to remove that element with the final cast as «date.»
UPDATE [Table_with_Date]
SET [Column_With_Excel_Date] = CAST(CAST(CAST([Column_With_Excel_Date]-2 AS INT)AS smalldatetime) AS DATE)
If you are unsure of what you would like to do with this test and re-test! Make a copy of your table if you need. You can always create a view!
![]()
CDspace
2,61918 gold badges33 silver badges36 bronze badges
answered Aug 10, 2017 at 16:56
![]()
Google BigQuery solution
Standard SQL
Select Date, DATETIME_ADD(DATETIME(xy, xm, xd, 0, 0, 0),  INTERVAL xonlyseconds SECOND) xaxsa
from (
  Select Date, EXTRACT(YEAR FROM xonlydate) xy, EXTRACT(MONTH FROM xonlydate) xm, EXTRACT(DAY FROM xonlydate) xd, xonlyseconds
  From (
     Select Date
        , DATE_ADD(DATE '1899-12-30', INTERVAL cast(FLOOR(cast(Date as FLOAT64)) as INT64) DAY )   xonlydate
        , cast(FLOOR( ( cast(Date as FLOAT64) - cast(FLOOR( cast(Date as FLOAT64)) as INT64)  ) * 86400 ) as INT64) xonlyseconds
     FROM (Select '43168.682974537034' Date) -- 09.03.2018  16:23:28
   ) xx1
 )
![]()
marc_s
726k174 gold badges1326 silver badges1449 bronze badges
answered Aug 3, 2018 at 13:41
![]()
Selcuk AkbasSelcuk Akbas
7011 gold badge8 silver badges20 bronze badges
1
This worked for me because sometimes the field was a numeric to get the time portion.
Command:
dateadd(mi,CONVERT(numeric(17,5),41869.166666666664)*1440,'1899-12-31')
![]()
V31
7,6263 gold badges26 silver badges44 bronze badges
answered Jul 28, 2014 at 16:22
![]()
When you bring in data from other sources, it is not uncommon to get the dates in the form of serial numbers, like 42088.
Moreover, Excel inherently stores dates in the form of integers and then formats it according to the required date settings.
So when you apply certain formulas to dates or when you format a cell in the Number format, you often end up getting a serial number.
Although this form of storing dates seems unintuitive, it makes sense because it’s easier for Excel to perform various calculations with dates when in integer form.
Since it’s difficult for us humans to understand this date format though, it becomes necessary to convert these serial numbers to a recognizable date format.
In this tutorial, we will see three ways to convert a serial number to date format in Excel.
Understanding the Concept of Serial Numbers
Excel stores date in the form of integers or serial numbers. The serial starts from January 1, 1900, and increases by 1 for each day since then. That means January 1, 1900, has the serial 1, the next day has the serial 2, and so on.
In this way, the serial for June 1, 2019, is 43617, because it is exactly 43,617 days after January 1, 1900.
Throughout this tutorial, we are going to use the following set of date serial numbers.
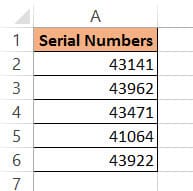
We will use the above three methods to convert these serial numbers to dates in different formats.
Method 1: Converting Serial Number to Date using the TEXT function
The TEXT function in Excel converts any numeric value (like date, time, and currency) into text with the given format. We can use this function to convert our serial number to any date format.
Here’s the syntax for the TEXT function:
= TEXT (serial_number, date_format_code)
In this function,
- serial_number is the numeric value or reference to the cell that you want to convert.
- date_format_code is the date format you want to convert the serial number to.
The TEXT function essentially applies the date_format_code that you specified on the provided serial_number and returns a text string with that format. For example, if you have the serial number “43141” in cell A2, then =TEXT(A2,”dd/mm/yy”) will return “10/02/18”
The format code will depend on the format that you want your converted date to appear. Here are some basic building blocks for the format codes that you can use:
Format Codes for Day of the Month:
You can use the following basic format codes to represent day values:
- d – one or two-digit representation of the day (eg: 3 or 30)
- dd – two-digit representation of the day (eg: 03 or 30)
- ddd – the day of the week in abbreviated form (eg: Sun, Mon)
- dddd – full name of the day of the week (eg: Sunday, Monday)
So,
- if you apply =TEXT(A2, “d”) to the sample dataset, it will return “10”.
- if you apply =TEXT(A2, “dd”), then it will return “10”.
- if you apply =TEXT(A2, “ddd”) to the sample dataset, it will return “Sat”.
- if you apply =TEXT(A2, “dddd”), then it will return “Saturday”.
Format Codes for Year:
You can use the following basic format codes to represent year values:
- yy – two-digit representation of year (e.g. 20 or 12)
- yyyy – four-digit representation of year (e.g. 2020 or 2012)
So,
- if you apply =TEXT(A2, “yy”) to the sample dataset, it will return “18”.
- if you apply =TEXT(A2, “yyyy”), then it will return “2018”.
Format Codes for Month of the Year:
You can use the following basic format codes to represent month values:
- m – one or two-digit representation of the month (eg; 8 or 12)
- mm – two-digit representation of the month (eg; 08 or 12)
- mmm – month abbreviated in three letters (eg: Aug or Dec)
- mmmm – month expressed with the full name (eg: August or December)
So,
- if you apply =TEXT(A2, “m”) to the sample dataset, it will return “2”.
- if you apply =TEXT(A2, “mm”), then it will return “02”.
- if you apply =TEXT(A2, “mmm”), then it will return “Feb”.
- if you apply =TEXT(A2, “mmmm”), then it will return “February”.
Let us see how we can apply the TEXT function to our sample dataset to convert all the serial numbers to different date formats.
We will first see how to convert the serial numbers in column A to the format shown in column B in the image below:
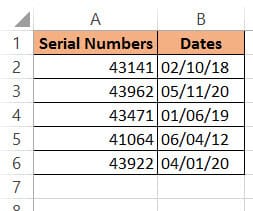
Below are the steps to do this:
- Click on a blank cell where you want the converted date to be displayed (B2)
- Type the formula:
=TEXT(A2,”mm/dd/yy”).
- Press the Return key.
- This should display the serial number in our required date format. Copy this to the rest of the cells in the column by dragging down the fill handle or double-clicking on it.

- Copy this column’s formula results by pressing CTRL+C or Cmd+C (if you’re on a Mac).
- Right-click on the column and form the popup menu that appears, press Paste Values from the Paste Options.
- This will store the formula results as permanent values in the same column. Now you can go ahead and remove column A if you want to.


The result you get in column B will differ according to the format code you used in step 2. Here are some format codes along with the type of result you will get when applied to cell A2:
| Function | Result |
| =TEXT(A2, “dd/mm/yy”) | 02/10/18 |
| =TEXT(A2, “mm-dd-yy”) | 02-10-18 |
| TEXT(A2,”dddd, mmmm d, yyyy”)”) | Saturday, February 10, 2018 |
This means you can use the TEXT function to convert serial numbers to any date format of your choice. All you need to do is change the format_code according to your requirement.
Note: Using this formula, your converted date is in text format. If you want to convert it to date format, you need to use the Format Cells feature.
Also read: How To Combine Date and Time in Excel (3 Easy Ways)
Method 2: Converting Serial Number to Date using Format Cells
This method makes use of Excel’s FormatCells dialog box. The Format Cells dialog box is very versatile and lets you perform different kinds of formatting from one place.
You can use Format Cells to convert the serial numbers in our sample dataset into dates as follows:
- Select all the cells containing the serial numbers that you want to convert (A2:A6).
- Right-click on your selection and select Format Cells from the popup menu that appears. Alternatively, you can select the dialog box launcher in the Number group under the Home tab.

- This will open the Format Cells dialog box. Click on the Number tab
- Under Category on the left side of the box, select the Date option.
- This will display a number of formatting options for the date on the right side.
- Select the format that you want.
- If you don’t find an option for the format you want to use, then you can use the Custom option from the Category list on the left. This lets you convert the cell to a custom date format.
- Check if your required date format is available among the format codes under Type. If not, you can type in your format code in the input box just below Type.
- Click OK to close the Format Cells dialog box.

All your selected cells should now be converted to date with your required format.
Note that these cells do not have the little green triangles at the top left corners. This is because these cells are of type date, and not text. So, you can perform any kind of date operations on them.
Also read: How to Add Minutes to Time in Excel?
Method 3: Converting Serial Number to date using VBA
If you’re comfortable with coding or using VBA, then you can use this method to quickly get all your serial numbers converted to date in one go.
Here’s the VBA code. You can copy and save this code somewhere for future use:
Sub convert_serial_num_to_date()
Dim rng As Range
Dim cell As Range
Set rng = Application.Selection
For Each cell In rng
cell.Offset(0, 1).Value = CDate(cell.Value)
Next cell
End Sub
Here are the steps you need to follow if you want to apply the above code to your dataset:
- From the Developer Menu Ribbon, select Visual Basic.
- Once your VBA window opens, Click Insert->Module. Now you can start coding. Type or copy-paste the above lines of code into the module window. Your code is now ready to run.
- Go to your worksheet and select the range of cells containing the serial numbers you want to convert. Make sure the column next to it is blank because this is where the code will display the results.
- Navigate to Developer->Macros-> convert_serial_num_to_date->Run.
You will now see the serial numbers converted to dates in the column next to your selection.
If you want to, you can now delete the original column containing the serial numbers.
In this tutorial, we saw three simple ways in which you can convert date serial numbers to actual dates in Excel. These included the use of the TEXT function, the Format Cells feature, and the VBA script.
Using the TEXT function usually results in cells that are of the text format so it requires subsequent conversion of these cells to the date format.
Using Format Cells, however, you can apply the operation directly on the original cells and the results you get are of the date type. So, you can directly start applying the cells to date-related operations. T
The VBA script that we provided in this tutorial used CDate() to quickly convert the serial number to its date equivalent. Moreover, the script results in cells that are of type date.
So again, it’s easier to use these results in subsequent date operations.
We hope you found the pointers we provided in this tutorial helpful and easy to apply.
Other Excel tutorials you may like:
- How to Convert Date to Month and Year in Excel
- How to Convert Decimal to Fraction in Excel
- How to Convert Radians to Degrees in Excel
- How to Add Days to a Date in Excel
- How to Sort by Date in Excel (Single Column & Multiple Columns)
- How to Convert Date to Day of Week in Excel
- How to Convert Month Number to Month Name in Excel
- Find Last Monday of the Month Date in Excel
- How to Change Date and Time to Date in Excel
Excel for Microsoft 365 Excel for the web Excel 2021 Excel 2019 Excel 2016 Excel 2013 Excel 2010 Excel 2007 More…Less
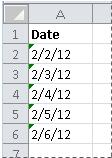
Occasionally, dates may become formatted and stored in cells as text. For example, you may have entered a date in a cell that was formatted as text, or the data might have been imported or pasted from an external data source as text.
Dates that are formatted as text are left-aligned in a cell (instead of right-aligned). When Error Checking is enabled, text dates with two-digit years might also be marked with an error indicator:  .
.
Because Error Checking in Excel can identify text-formatted dates with two-digit years, you can use the automatic correction options to convert them to date-formatted dates. You can use the DATEVALUE function to convert most other types of text dates to dates.
If you import data into Excel from another source, or if you enter dates with two-digit years into cells that were previously formatted as text, you may see a small green triangle in the upper-left corner of the cell. This error indicator tells you that the date is stored as text, as shown in this example.
You can use the Error Indicator to convert dates from text to date format.
Notes: First, ensure that Error Checking is enabled in Excel. To do that:
-
Click File > Options > Formulas.
In Excel 2007, click the Microsoft Office button
 , then click Excel Options > Formulas.
 -
In Error Checking, check Enable background error checking. Any error that is found, will be marked with a triangle in the top-left corner of the cell.
-
Under Error checking rules, select Cells containing years represented as 2 digits.
 , then click Excel Options > Formulas.
Follow this procedure to convert the text-formatted date to a normal date:
-
On the worksheet, select any single cell or range of adjacent cells that has an error indicator in the upper-left corner. For more information, see Select cells, ranges, rows, or columns on a worksheet.
Tip: To cancel a selection of cells, click any cell on the worksheet.
-
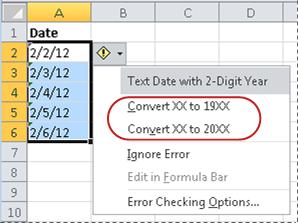
Click the error button that appears near the selected cell(s).
-
On the menu, click either Convert XX to 20XX or Convert XX to 19XX. If you want to dismiss the error indicator without converting the number, click Ignore Error.
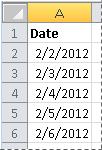
The text dates with two-digit years convert to standard dates with four-digit years.
Once you have converted the cells from text-formatted dates, you can change the way the dates appear in the cells by applying date formatting.

If your worksheet has dates that were perhaps imported or pasted that end up looking like a series of numbers like in the picture below, you probably would want to reformat them so they appear as either short or long dates. The date format will also be more useful if you want to filter, sort, or use it in date calculations.

-
Select the cell, cell range, or column that you want to reformat.
-
Click Number Format and pick the date format you want.
The Short Date format looks like this:
The Long Date includes more information like in this picture:
To convert a text date in a cell to a serial number, use the DATEVALUE function. Then copy the formula, select the cells that contain the text dates, and use Paste Special to apply a date format to them.
Follow these steps:
-
Select a blank cell and verify that its number format is General.
-
In the blank cell:
-
Enter =DATEVALUE(
-
Click the cell that contains the text-formatted date that you want to convert.
-
Enter )
-
Press ENTER, and the DATEVALUE function returns the serial number of the date that is represented by the text date.
What is an Excel serial number?
Excel stores dates as sequential serial numbers so that they can be used in calculations. By default, January 1, 1900, is serial number 1, and January 1, 2008, is serial number 39448 because it is 39,448 days after January 1, 1900.To copy the conversion formula into a range of contiguous cells, select the cell containing the formula that you entered, and then drag the fill handle
across a range of empty cells that matches in size the range of cells that contain text dates.
-
-
After you drag the fill handle, you should have a range of cells with serial numbers that corresponds to the range of cells that contain text dates.
-
Select the cell or range of cells that contains the serial numbers, and then on the Home tab, in the Clipboard group, click Copy.
Keyboard shortcut: You can also press CTRL+C.
-
Select the cell or range of cells that contains the text dates, and then on the Home tab, in the Clipboard group, click the arrow below Paste, and then click Paste Special.
-
In the Paste Special dialog box, under Paste, select Values, and then click OK.
-
On the Home tab, click the popup window launcher next to Number.
-
In the Category box, click Date, and then click the date format that you want in the Type list.
-
To delete the serial numbers after all of the dates are converted successfully, select the cells that contain them, and then press DELETE.
 across a range of empty cells that matches in size the range of cells that contain text dates.
Need more help?
You can always ask an expert in the Excel Tech Community or get support in the Answers community.
Need more help?
Introduction
For a little project of mine, I needed to convert a serial date number to day/month/year (DMY) and vice versa. The serial number came from date field in a converted Paradox database and seemed to be exactly the same as the serial date in Microsoft Excel, hence the article name. After some Googling, I learned that the Excel serial date is related to Julian date, and found a speedy algorithm to convert these numbers to DMY and vice versa.
Excel Serial Date Number
Now what is an Excel serial date number? 37477 is a serial date number and is the number of days since 1-1-1900. 37477 actually translates to Aug 9, 2002, the date of writing this article.
The number of days since 1-1-1900 isn’t that hard to calculate of course, once you know the leap years. Microsoft Excel however contains a bug with its date calculation: it considers 29-02-1900 as a valid date, but 1900 isn’t a leap year! 29-02-1900 is not a valid date!
According to the stories, Microsoft decided to duplicate this date bug from Lotus 123, which was the dominating spreadsheet application at the time Excel was being written. This allowed Excel to open Lotus 123 spreadsheets without date problems.
(Note that a serial date number may also contain a fraction that denotes the time. It’s actually the percentage of 24 hours, but that’s not for this article.)
Mac Excel Serial Date number
Excel on the Apple Mac uses a slightly different Serial Date number base: the number of days since 1-1-1904. That’s why Excel also features a «1904 Date System» checkbox in its Options (Calculation tab). I won’t go into this further.
Translating Serial Date Number to DMY
First of all, credit where credit is due. I got the basic algorithm from here. It’s about converting a Julian date to DMY using integer calculations. I won’t bore you with the theory (following the above hyperlink), but the original Julian has a different base date.
With an addition of a certain number, the algorithm comes close to the Excel serial date. And when the 29-02-1900 issue is handled, we’ve got an Excel serial date to Day, Month, Year calculation!
void ExcelSerialDateToDMY(int nSerialDate, int &nDay,
                          int &nMonth, int &nYear)
{
            if (nSerialDate == 60)
    {
        nDay    = 29;
        nMonth    = 2;
        nYear    = 1900;

        return;
    }
    else if (nSerialDate < 60)
    {
                        nSerialDate++;
    }

        int l = nSerialDate + 68569 + 2415019;
    int n = int(( 4 * l ) / 146097);
            l = l - int(( 146097 * n + 3 ) / 4);
    int i = int(( 4000 * ( l + 1 ) ) / 1461001);
        l = l - int(( 1461 * i ) / 4) + 31;
    int j = int(( 80 * l ) / 2447);
     nDay = l - int(( 2447 * j ) / 80);
        l = int(j / 11);
        nMonth = j + 2 - ( 12 * l );
    nYear = 100 * ( n - 49 ) + i + l;
}
Calculate an Excel serial date from Day, Month, Year. The function assumes that the day, month and year are valid date numbers.
int DMYToExcelSerialDate(int nDay, int nMonth, int nYear)
{
            if (nDay == 29 && nMonth == 02 && nYear==1900)
        return 60;

        long nSerialDate =
            int(( 1461 * ( nYear + 4800 + int(( nMonth - 14 ) / 12) ) ) / 4) +
            int(( 367 * ( nMonth - 2 - 12 * ( ( nMonth - 14 ) / 12 ) ) ) / 12) -
            int(( 3 * ( int(( nYear + 4900 + int(( nMonth - 14 ) / 12) ) / 100) ) ) / 4) +
            nDay - 2415019 - 32075;

    if (nSerialDate < 60)
    {
                        nSerialDate--;
    }

    return (int)nSerialDate;
}
Download PC Repair Tool to quickly find & fix Windows errors automatically
Trying to use an Excel Date and Time function, but Excel returns a serial number instead of date; this is because Excel stores dates and times in serial numbers in the backend; for instance, when you see a date such as 7/25/2021 or 21 July 2021, Excel will store these dates as numbers in the backend.
How do I change a number into a date format in Excel?
Microsoft Excel has a feature to change a number into a date, and it is quite simple to do. This tutorial will explain the steps to change a number into a date format in Excel.
To convert a serial number to a date format, follow the steps below.
- Select the cell you want to format.
- On the Home tab in the Number group, click the bottom right arrow.
- In the Format Cells dialog box, click the Number tab.
- Click Date
- On the Date page, choose the date format you want the serial number to be displayed.
- Then click OK
Select the cell you want to format.
![]()
Click the bottom right arrow on the Home tab in the Number group or press Ctrl + 1 together.
A Format Cells dialog box will pop up.
In the dialog box, click the Number tab.
Click Date on the left pane.
On the Date page, choose the date format you want from the display box.
Then click OK.

The serial number will become a date.
How do you format a date in Excel?
To format a date; the day is written first, the month second, then the year (dd-mm-yyyy), and in some countries such as some eastern countries like Iran, China, and Korea, it is the opposite the year is first, the month second and the day is last (yyyy-mm-dd).
We hope this tutorial helps you understand; how to convert a serial number to a date format in Excel; if you have questions about the tutorial, let us know.
Shantel has studied Data Operations, Records Management, and Computer Information Systems. She is quite proficient in using Office software. Her goal is to become a Database Administrator or a System Administrator.
Improve Article
Save Article
Like Article
Improve Article
Save Article
Like Article
This article will discuss the conversion of an excel serial date to DateTime in Python.
The Excel “serial date” format is actually the number of days since 1900-01-00 i.e., January 1st, 1900. For example, the excel serial date number 43831 represents January 1st, 2020, and after converting 43831 to a DateTime becomes 2020-01-01.
By using xlrd.xldate_as_datetime() function this can be achieved. The xlrd.xldate_as_datetime() function is used to convert excel date/time number to datetime.datetime object.
Syntax: xldate_as_datetime (xldate, datemode)
Parameters: This function accepts two parameters that are illustrated below:
- xldate: This is the specified excel date that will converted into datetime.
- datemode: This is the specified datemode in which conversion will be performed.
Return values: This function returns the datetime.datetime object.
First, call xlrd.xldate_as_datetime(date, 0) function to convert the specified Excel date to a datetime.datetime object. Then, call datetime.datetime.date() function on the returned datetime.datetime object to return the date as a datetime.date object. Lastly, call datetime.date.isoformat() function to convert the returned datetime.date object to a ISO format date string.
Let’s see some examples to illustrate the above algorithm:
Example: Python program to convert excel serial date to string date
Python3
import xlrd
xl_date = 43831
datetime_date = xlrd.xldate_as_datetime(xl_date, 0)
date_object = datetime_date.date()
string_date = date_object.isoformat()
print(string_date)
print(type(string_date))
Output:
2020-01-01
<class 'str'>
Example 2: Python program to convert excel serial number to DateTime
Python3
import xlrd
xl_date = 43831
datetime_date = xlrd.xldate_as_datetime(xl_date, 0)
date_object = datetime_date.date()
print(date_object)
print(type(date_object))
Output:
2020-01-01
<class 'datetime.date'>
Like Article
Save Article
Excel has a special way of storing dates by assigning serial numbers. The serial number “1” refers to January 1, 1900, and serial dates increment by 1 for every day thereafter.
Calculations involving dates are possible because Excel treats dates as numbers. When the result we obtain is in number form, we can convert the serial number into date by following these methods:
- Change format in Format Cells
- Use TEXT function
 Figure 1. Final result: Convert serial number to date
Using Format Cells to convert serial number to date
As an example, the serial number for January 1, 2019 is 43466. To convert the number 43466 into date, we follow these steps:
- Select the cell containing the serial number
- Right click and select Format Cells
 Figure 2. Format Cells option in menu
- In the Format Cells dialog box, click the Number tab and select the Date category
- Choose the preferred date format in Type. The Sample box above it will show a preview of the date using the selected type.
 Figure 3. Format Cells dialog box
As a result, the serial number will be converted to a date with the specific format “dd/mm/yyyy”.
 Figure 4. Output: Using Format Cells to convert serial number to date
Using formula to convert serial number to date
We can also the TEXT function in a formula to convert a serial number to date.
Syntax of TEXT
=TEXT(value,format_text)
- format_text is the format code enclosed in quotation marks.
Example 1:
In cell C3, enter the formula =TEXT(B3,"mm/dd/yyyy") and press Enter.
 Figure 5. Output: Entering the formula using TEXT
The serial number 43466 is instantly converted into date. Note, the resulting date is now in text format. We can also specify a different date format such as in below example.
Example 2:
In cell D4, enter the formula =TEXT(B3,"mmmm dd, yyyy") and press Enter.
 Figure 6. Output: Using formula to convert serial number to date
Instant Connection to an Excel Expert
Most of the time, the problem you will need to solve will be more complex than a simple application of a formula or function. If you want to save hours of research and frustration, try our live Excelchat service! Our Excel Experts are available 24/7 to answer any Excel question you may have. We guarantee a connection within 30 seconds and a customized solution within 20 minutes.
If you have to work with a date stamp in Microsoft Excel that includes date and time, you can use these simple expressions to extract both components, making them easier to work with.

Working with dates and times is a common need in an Excel sheet. If you’re lucky, the structure supports the way you use the sheet. Sometimes we inherit a sheet, or we have to accommodate a new request. In a nutshell, a date serial value can contain the date and time or only the date or time. Eventually, you might need to know how to extract the date and time from a serial value that combines both. In this article, I’ll show you a simple function, TRUNC() that can do both.
SEE: 69 Excel tips every user should master (TechRepublic)
I’m using Microsoft 365 on a Windows 10 64-bit system, but you can use earlier versions. You can work with your own data or download the demonstration .xlsx and .xls files. The browser edition supports the expressions in this article.
About date arithmetic in Excel
Unless you’re new to Excel, you’re probably a bit familiar with the way Excel stores dates and times using serial values. This section is a short review.
Dates usually look as you expect; for example, April 6, 2021, or 4/6/2021. There are other date formats that you’ll also recognize. Using specific date and time formats, you can display a date or time in many ways. That’s not how Excel stores a date, though—not as the formatted string that you see. Rather, Excel stores the value as a serial value where January 1, 1900, has a date serial value of 1 and adds 1 for every day moving forward in time. If you were to do the math, you’d find that the date serial value for April 6, 2021, is 44292.
SEE: Windows 10: Lists of vocal commands for speech recognition and dictation (free PDF) (TechRepublic)
To see this for yourself, enter the date April 6, 2021. Excel will display it as shown in Figure A because that’s the default date format. Don’t worry if you see something a bit different because you might be working with a different default (if someone changed it). To the right is the same date entered the same way, but the format is different; I changed it to General so you can the stored serial value. When you enter a date string, Excel formats it as a date using the date format, d-mmm-yy.
Figure A

The date is an integer; time is a decimal value. A day equals 24 hours. Twelve hours is half a day, or 0.50. For a comprehensive breakdown, see Table A. In the following sections, you’ll be working with complete serial values—dates that include both a date and time.
Table A
|
Format h:mm:ss |
Time Serial |
Time Equivalent |
|
23:59:59 |
0.999988426 |
23 hours, 59 minutes, and 59 seconds |
|
1:00:00 |
0.041666667 |
1 hour |
|
23:00:00 |
0.958333333 |
23 hours |
|
0:01:00 |
0.000694444 |
1 minute |
|
0:59:00 |
0.040972222 |
1 minute and 59 seconds |
|
0:00:01 |
1.15741E-05 |
1 second |
|
0:00:59 |
0.00068287 |
59 seconds |
How to extract the date in Excel
You’ll often work with date values that have no decimal value or time values. When the two are combined into one value, such as 44292.0412, they can be difficult to work with. For example, 44292.0412, 44292.0413, and 44292.000695 aren’t the same value, even though they share the same date. Figure B shows three combined serial values. Again, I entered the dates as literal date strings in the first column. To expose the serial values, I applied the General format to column C.
Figure B

Column D contains the simple function
=TRUNC(B3)
copied to the remaining cells. As you can see, Excel applies the General format automatically and returns only the integer portion of the combined serial value in column B. You might be wondering why I didn’t use INT(). You can, but TRUNC() returns only the integer digits; INT() rounds a number down to the nearest integer. Because we’re working with positive dates values, it won’t matter, but negative dates are possible, so TRUNC() is the safer route.
How to extract the time in Excel
Dealing with time is often more difficult than dealing with dates. However, in this case, it’s nearly as simple using the TRUNC() function. Figure C shows the result of using the simple expression
=B3-TRUNC(B3)
and copying it to the remaining cells. In a nutshell, this expression subtracts the integer portion (the date) from the combined serial value. For example, the expression in E3 evaluates as follows:
=B3-TRUNC(B3)
=44292.375-TRUNC(44292.375)
=44292.375-44292
.375
Figure C

MOD() can be used, but TRUNC() evaluates only the exact components: the integer and the decimal. At this point, you can see the serial values that represent the date and time, but you don’t see the actual date and time strings that make sense to you.
How to add the formatting
The serial values don’t make sense to the viewer, so let’s format columns C and D, so they display something meaningful. First, select D3:D5, right-click the selection and choose Format Cells from the resulting submenu. In the resulting dialog, choose Date from the Category list. (You could also use the Format dropdown in the Number group.) The Type preview will update accordingly with examples. Choose the format that suits your needs, such as Wednesday, March 14, 2021, as shown in Figure D. Next, select E3:E5, right-click, choose Format Cells and choose Time from the Category list. Choose 1:30:55 PM from the Type list.
Figure D

Figure E shows the results of formatting both columns of extracted serial values. The formatted values match perfectly to the combined serial values. We didn’t lose or add a thing. All we did was extract the integer and decimal values from the serial values in column B
Figure E

Return to Excel Formulas List
Download Example Workbook
Download the example workbook
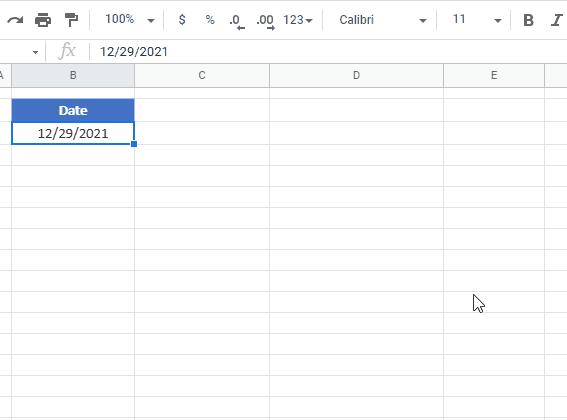
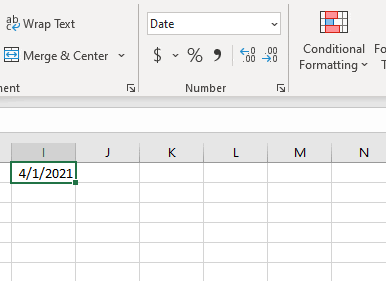
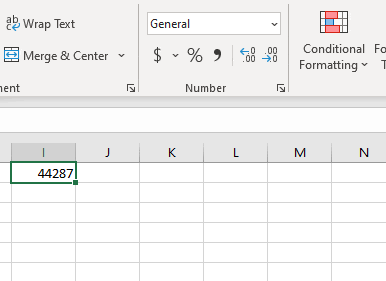
This tutorial will demonstrate how to convert a date to a serial number corresponding to that date (or vis-a-versa) in Excel and Google Sheets
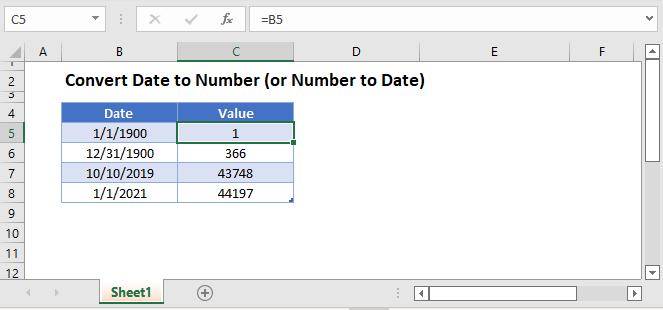
Date to Number
To convert a date to a serial number, all you need to do is change the formatting to General:
However, this won’t work if the date is stored as text.
Date Stored as Text to Number
If the date is stored as text, you can use DATEVALUE convert it to an Excel date:
=DATEVALUE(B3)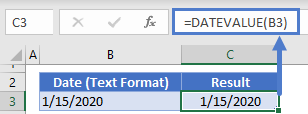
Then you can change the formatting to general to see the serial number.
Number to Date
To convert a serial number to a date, all you need to do is the change the formatting from General (or Number) to a date format (ex. Short Date):
Convert Date to Number in Google Sheets
All of the above examples work exactly the same in Google Sheets as in Excel.