

on
July 12, 2012, 12:43 AM PDT
A quick way to create a list of sequential numbers in Word
Creating a list of sequential numbers isn’t as difficult as it might sound at first. If you can create a table, you can create a list of sequential numbers.
 Creating a sequential list of numbers, in Word, sounds like an intimidating task. Sure, you can create a numbered list quickly enough, but that feature works with additional text – you’re numbering something. If you want a list of just numbers, you have to work a bit harder. Word’s SEQ field might come to mind, but that solution is better suited to template-type numbering. In order words, this field works great if you’re numbering documents, labels, and so on. It doesn’t work so well if you just want to create a list of sequential numbers. You can use it that way, but it’ll be more work than it’s worth.
Another way
Instead of working harder than you need to, insert a one-column table with as many rows as necessary to accommodate your list. Then, using Word’s numbering feature, number that column. Finally, convert the table to text. The resulting list is a fixed numbered list, so you’ll have to live with its limitations; when you can do so, this method definitely beats most alternative solutions.
To illustrate this simple technique, we’ll create a sequential list from 1 to 100. First, we need to insert a table with one column and one hundred rows:
- Position your cursor where you want the table.
- Click the Insert tab. Then, choose Insert Table from the Table dropdown in the Tables group. In Word 2003, choose Insert from the Table menu and then choose Table.
- In the resulting dialog, enter 1 in the Number Of Columns field and 100 in the Number Of Rows field.
- Click OK. The resulting table will have one column and one hundred rows.
The next step is to number the column, as follows:
- Select the table by clicking the Table Selector (the small square in the table’s top-left corner that I’ve circled in the figure above).
- Click the Home tab.
- Click Numbering in the Paragraph group. In Word 2003, Numbering is on the Formatting toolbar. At this point, you have a one-column table with one hundred rows displaying a sequential list of 1 to 100.
Converting the table to text is the last step:
- With the table selected, click the contextual layout tab. Then, choose Convert To Text in the Data group. In Word 2003, choose Convert from the Table menu, and then select Table To Text.
- In the resulting dialog, click OK, as the table uses paragraph marks to denote columns by default. You now have a numbered list, but no table or list items-just numbers.
The results is a numbered list and as such, has the same pros and cons. For instance, you can quickly remove the period character following each number and the indention property, as follows:
- Right-click anywhere in the list, choose Numbering from the resulting context menu and then choose Define New Number Format.
- In the Number Format field, delete the period character.
- From the Alignment dropdown, choose Right.
- Click OK.
You can change the numbers in the list by restarting the sequence or by specifying a new start number. You can change the list’s style. You can do anything to this list that you can do to a normal numbered list because it is a numbered list, with one exception: the list, while easy to format, is fixed. If you delete an item, the list updates accordingly, but I haven’t found a way to add numbers.
-
Software
Asked by: Prof. Margarete Homenick
Score: 4.7/5
(44 votes)
As an example of how you can do this, follow these steps:
- Position the insertion point where you want the sequential number to appear. …
- Press Ctrl+F9 to insert field braces. …
- Type «seq NumList» (without the quote marks).
- Press F9 to update the field information.
Can you do automatic numbering in Word?
Go to File > Options > Proofing. Select AutoCorrect Options, and then select the AutoFormat As You Type tab. Select or clear Automatic bulleted lists or Automatic numbered lists.
How do you do continuous numbering in Word?
Click Select in the Editing group on the Home tab, and then click Select All. Or press CTRL+A. Do one of the following: To number consecutively throughout the document, click Continuous.
What is sequential numbering?
Sequential Numbering is a popular feature on custom-printed forms Sequential Numbering, also known as Consecutive Numbering, refers to the printing of ascending or descending identification numbers so that each printed unit receives its own unique number.
What are sequential digits?
Sequential Digits. An integer has sequential digits if and only if each digit in the number is one more than the previous digit. Return a sorted list of all the integers in the range [low, high] inclusive that have sequential digits. Example 1: Input: low = 100, high = 300 Output: [123,234]
40 related questions found
What is a sequential number called?
Each number in a sequence is called a term . … For example, consider the sequence {5,15,25,35,…} In the sequence, each number is called a term. The number 5 has first position, 15 has second position, 25 has third position and so on. The nth term of a sequence is sometimes written an .
What are consecutive numbers?
Consecutive numbers are numbers that follow each other in order from the smallest number to the largest number. The difference between consecutive numbers is always fixed and it follows a pattern. For example 1, 2, 3 are the first three consecutive natural numbers.
How do you find a sequence of numbers?
First, find the common difference for the sequence. Subtract the first term from the second term. Subtract the second term from the third term. To find the next value, add to the last given number.
How do you denote a sequence?
One way to specify a sequence is to list all its elements. For example, the first four odd numbers form the sequence (1, 3, 5, 7). This notation is used for infinite sequences as well. For instance, the infinite sequence of positive odd integers is written as (1, 3, 5, 7, …).
What is sequential number example?
An example of this type of number sequence could be the following: 1, 4, 9, 16, 25, 36, 49, 64, 81, … The sequence consists of repeatedly squaring of the following numbers: 1, 2, 3, 4 etc. since the 10th number of the sequence is missing, the answer will be 102 = 100.
What are number sequences?
A number sequence is a list of numbers that are linked by a rule. If you work out the rule, you can work out the next numbers in the sequence. In this example, the difference between each number is 6. So the rule for this sequence is to add 6 each time. Now you can work out the next number in the sequence: 27 + 6 = 33.
What is the example of sequence number?
Example: 1, 4, 7, 10, 13, 16, 19, 22, 25, … This sequence has a difference of 3 between each number.
What is an example of sequential order?
The definition of sequential is things in consecutive or logical order, or is following a certain prescribed order. If there is a three part process and the steps must be done in a certain logical order, this is an example of the steps of the process being sequential. Succeeding or following in order.
What sequence of number is printed?
Sequential numbering printing refers to printing numbers in sequential order on sets of forms or other printed pieces. Each form or piece gets a unique number and is printed in either ascending or descending numerical order.
What are sequence numbers used for?
The sequence number is a counter used to keep track of every byte sent outward by a host. If a TCP packet contains 1400 bytes of data, then the sequence number will be increased by 1400 after the packet is transmitted.
What are the 4 types of sequence?
There are mainly four types of sequences in Arithmetic, Arithmetic Sequence, Geometric Sequence, Harmonic Sequence, and Fibonacci Sequence.
How do you teach number sequences?
Demonstrate how to match one number to each object, one through five. Say each number as you place it in sequence. Then, have students match each number, in order, to the objects (our program uses bus stops). You can get them started by placing the 1 and having them continue the number sequence from there.
Do sequences always start at 1?
Sequences can actually start at any number we like. The notation for a sequence with general term an typically is written {eq}{ a_n…
What do you call a sequence with no definite number of terms?
A sequence is called finite or infinite according as the number of terms in it is finite or infinite.
What are the 2 types of sequence?
Types of Sequence and Series
- Arithmetic Sequences.
- Geometric Sequences.
- Harmonic Sequences.
- Fibonacci Numbers.
 Please Note:
This article is written for users of the following Microsoft Word versions: 97, 2000, 2002, and 2003. If you are using a later version (Word 2007 or later), this tip may not work for you. For a version of this tip written specifically for later versions of Word, click here: Sequentially Numbering Elements in Your Document.
![]()
Written by Allen Wyatt (last updated September 16, 2021)
This tip applies to Word 97, 2000, 2002, and 2003
Word allows you to automatically number items in your document. For instance, you can automatically number figures, tables, or illustrations. If you later reorder these items, Word automatically updates the numbers so they are in order. To sequentially number items in your text, follow these steps:
- Position the insertion point where you want the sequential number to appear. For instance, this would be in the caption for the table or figure.
- Press Ctrl+F9 to insert field brackets. Make sure the insertion point stays between the brackets.
- Type «seq » followed by the name of the element. This name is up to you, but should be the same for each item in this sequence. For instance, you could type «seq figures» or «seq tables» (without the quote marks).
- Press F9 to update the field information. Word replaces the field with the next number in the sequence you have specified.
WordTips is your source for cost-effective Microsoft Word training.
(Microsoft Word is the most popular word processing software in the world.)
This tip (92) applies to Microsoft Word 97, 2000, 2002, and 2003. You can find a version of this tip for the ribbon interface of Word (Word 2007 and later) here: Sequentially Numbering Elements in Your Document.
Author Bio
With more than 50 non-fiction books and numerous magazine articles to his credit, Allen Wyatt is an internationally recognized author. He is president of Sharon Parq Associates, a computer and publishing services company. Learn more about Allen…
MORE FROM ALLEN
Understanding Date and Time Formatting Codes
Want to apply a custom format to your dates and times? To do it effectively you need to understand the custom formatting …
Discover More
Ctrl+V Pasting is Flakey
When you copy and paste a formula, you usually want to see the formula where you pasted. If you don’t get the formula, …
Discover More
Saving in Two Locations
When you save a workbook to disk, you may want to automatically save a duplicate workbook in a separate location. This …
Discover More
Multilevel numbering in Word is the #1 headache for many people working with large documents.
Believe it or not, it’s not complicated. It just takes somebody to lead the way and point out the pitfalls you need to avoid.
Today that pleasure falls to me!
Before I start, grab your free multilevel numbering troubleshooting guide that shows you the steps to get multilevel numbering working properly first time, every time, together with answers to over 20 FAQs and plenty of real client examples constructed step by step to help you fix what isn’t working with your numbering.

1. What Multi-level Numbering Looks Like
Often used in the legal profession or in large corporate documents, multilevel numbering creates a logical hierarchy and easy navigation within the document. The headings can also be summarised later on in a table of contents. Here is a simple example:

2. How to Set Up Multilevel Numbering
Here is the correct process:
1. Select the text that you want to number (this can be a section of text or the whole document).

2. Select the Home tab.
3. Click the multilevel numbering icon in the Paragraph group.
![]()
4. You can either select an existing layout from the list to use as a starting point, or you can create a new numbering system from scratch. As you hover over each thumbnail image, Word provides a larger image of the numbering system.
5. Choose Define New Multilevel List to display the control dialog.

The dialog box can be broken down as follows:
Step #1 Click level to modify
In the top left is a list of levels. As you select each level, the settings in the rest of the dialog box changes.
Level 1 is the highest level, i.e. the main headings such as chapter or section titles.
Level 2 is subordinate to level 1.
Level 3 is subordinate to level 2.

Step #2 Enter formatting for number
This is where the level number is constructed. If you include a previous level number, it will be displayed with a grey background, as will the number for the current level.
Type anything you wish to put in between the numbers such as dots, dashes, brackets etc.
Clear any text in the ‘Enter formatting for this number’ box.
Step #3 Include level number from
When creating a subordinate level (or child level), you can first specify the level number of the parent.
For example, for section 3.2
- ‘3’ is the parent level (level 1) and
- ‘2’ is the child level (level 2)

Step #4 Number style for this level
Each level can have its own number style. It may be a standalone style, e.g. 1, 2, 3 or a, b, c or continue on from a higher level, e.g. 1.1.1 or 1.a.i.
- When creating 1.1 numbering, this option is 1, 2, 3.
- When creating 1.a numbering, this option is a, b, c

Step #5 Font
Set the font formatting for the selected level, if you want.

Step #6 Position
What position from the left margin do you want items for each level of numbering. For example, level 1 items may be 0cm from the left margin, level 2, 1cm from the left margin and level 3, 2cm from the left margin.
Here’s what they mean:
- The Aligned At determines how far from the left margin the number appears.
- The Text indent at figure determines how far from the left margin the text following the number is.

6. Click OK to save all the settings and close the dialog box.
The text you selected in step 1 now looks like this.

The next part is where the magic happens …
3. How to Apply Multilevel Numbering
Once you have created your numbering system:
1. Position the cursor at the beginning of a line.

2. Press the TAB key to move the text down a level (demote).

3. Press the SHIFT and TAB keys together to move the text up a level (promote).

If you prefer, you can also click the indent icon to demote and the outdent icon to promote between levels.
![]()
4. How to Change Multilevel Settings
Once you have created your numbering system:
1. Reselect all text that is using the multilevel numbering.
2. Click the multilevel numbering icon and select Define New Multilevel List (yes, you choose this option even if you are modifying an existing multilevel list).

The original settings that you defined are redisplayed.
3. In the top-left box select the level that you wish to change, then change your settings.
4. Repeat for the other settings.
5. Click OK to save the settings. Your numbered list should now reflect your new settings.
5. Linking Multilevel Numbering to Styles
Each level of a multilevel numbering system can be linked to a style. This means that as you apply styles throughout the document, the numbering is applied appropriately and automatically. You can either use the built-in Heading 1, Heading 2, Heading 3 styles or use your own custom styles.
1. In the Numbering dialog box, click the MORE button in the bottom-left corner to expand the dialog box.
2. Select level to modify in the top-left box.
3. Open the Link level to style drop-down list and choose the style you wish to connect to the numbering level.

4. Click OK.
5. In the document, apply the Heading 1, Heading 2, Heading 3 styles where needed.
It’s a good idea to create a body text style and apply that where appropriate, so that the body text does not inadvertently get caught up in the multi-level numbering.
6. Select the whole document (or the portion of the document where you want to apply your numbered sections).
7. Click the icon in the Paragraph group (Home tab).
8. Select your custom numbering style from the gallery. The thumbnail image should show the linked styles.

6. How to Use Styles to Set Number Levels
1. Select all the text that you wish to apply the same number level to. Alternatively, if you wish to go line by line, you can place the cursor anywhere in a line of text.
2. In the Styles gallery, click the style that corresponds to the number level you wish to apply. For example, to apply the top level numbering click Heading 1 and for the third level numbering click Heading 3 (assuming those are the styles you assigned).
The numbering and all the numbering settings will be applied to the selected text or the paragraph in which the cursor was positioned.

And that, my friend, is how you do multilevel numbering in Word with no loose ends.
How to set up a dual-multilevel numbering system in Word
7. Two resources to help you
1. Grab your free multilevel numbering troubleshooting guide.

2. Watch over my shoulder as I set up multilevel numbering from scratch.

8. What next?
I hope you found plenty of value in this post. I’d love to hear your biggest takeaway in the comments below together with any questions you may have.
Have a fantastic day.


About the author
Jason Morrell
Jason loves to simplify the hard stuff, cut the fluff and share what actually works. Things that make a difference. Things that slash hours from your daily work tasks. He runs a software training business in Queensland, Australia, lives on the Gold Coast with his wife and 4 kids and often talks about himself in the third person!
SHARE
You can automatically number items in your document. Most of you already know this. You can also automatically number figures, tables, illustrations, etc. If you decide to reorder those items, Word will automatically update the numbers so that the are in the correct order.
Follow the steps below to learn how to sequentially number items in your text:
- Place your cursor where you would like the sequential number to appear. (i.e., caption for a table).
- Click CTRL + F9 to insert field brackets. You cannot insert the braces manually as it will not work.
- Key in seq followed by the name of the element you are numbering. The name is your choice but it should be the same for each item in this particular sequence. (i.e., seq figures).
- Click F9 to update your field information.
Word has now replaced the field with the next number in the sequence you have specified.
After spending way too much time manually typing numbers for my genealogy documents and files, I finally found a way to generate an automatic list of nicely formatted sequential numbers. Now I can quickly make:
- divider tabs for MRIN family numbers
- file folder tabs
- sticky labels to correspond with my photo file numbering system
Many people like to use a “real” filename for their family photos, but because so many of the photos from my grandmother’s collection are “subject unknown,” I decided to use an informative letter-number filename.
The first two letters indicate the item is from the Arline Kinsel archive; the next letter indicates the Photo collection, the numbers indicate the photograph’s individual file number:
AK-P001 = Arline Kinsel archive Photo 001
In the past, I manually prepared a sheet of labels in Microsoft Word, but this was clumsy and time-consuming. Lately, however, I have used a very easy SEQ script that is already available in the program; I just didn’t know it was there.
I found these easy to follow instructions at Allen Wyatt’s WordTips and adapted them for my own use.
Here’s what I do to make sequentially numbered photo labels
- Open or download a Word Template for the labels I want to use; such as #5422 Multi-Use Labels.
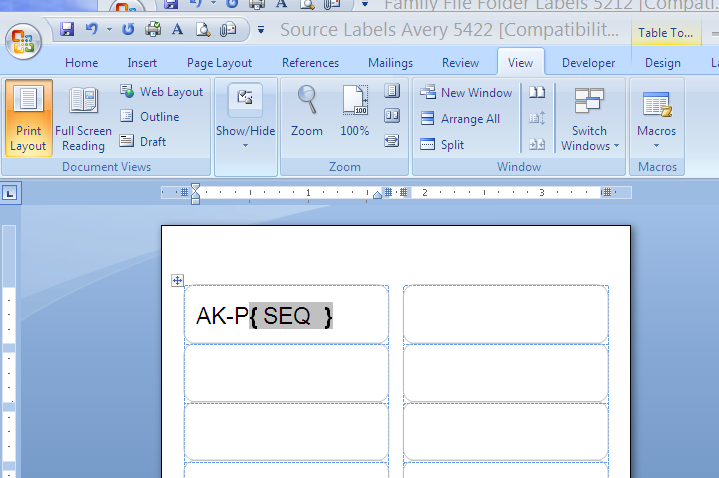
- In the first label space, type the recurring prefix: AK-P0 [zero]. (see example 1)
- Immediately following the prefix, type Ctrl+F9 and Word inserts a field.
- Type SEQ and a space; type a name for the sequence numbers, such as Photo.
- Press F9. A number appears in the field.
- Format the text with font, size, style.
- Copy the first label using Ctrl + C.
- Paste the contents to each label in the left column using Ctrl + V.
- I now have one column of labels, all the same.
- Select and Copy this column (Ctrl + C) and paste into the second column (Ctrl + V).
- I now have a full sheet of labels all the same.
- Select ALL using Ctrl + A.
- Press F9. All fields are updated with sequential numbers.
Hooray! Do you have another method to create easy sequential numbers?
Steps 1-3, optional add a leading zero
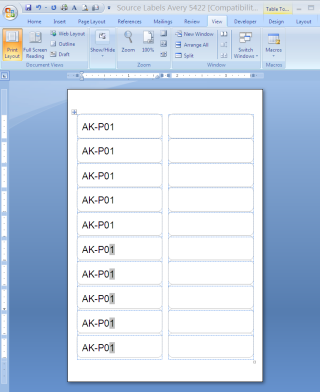
Step 9 – one column formatted for numbering
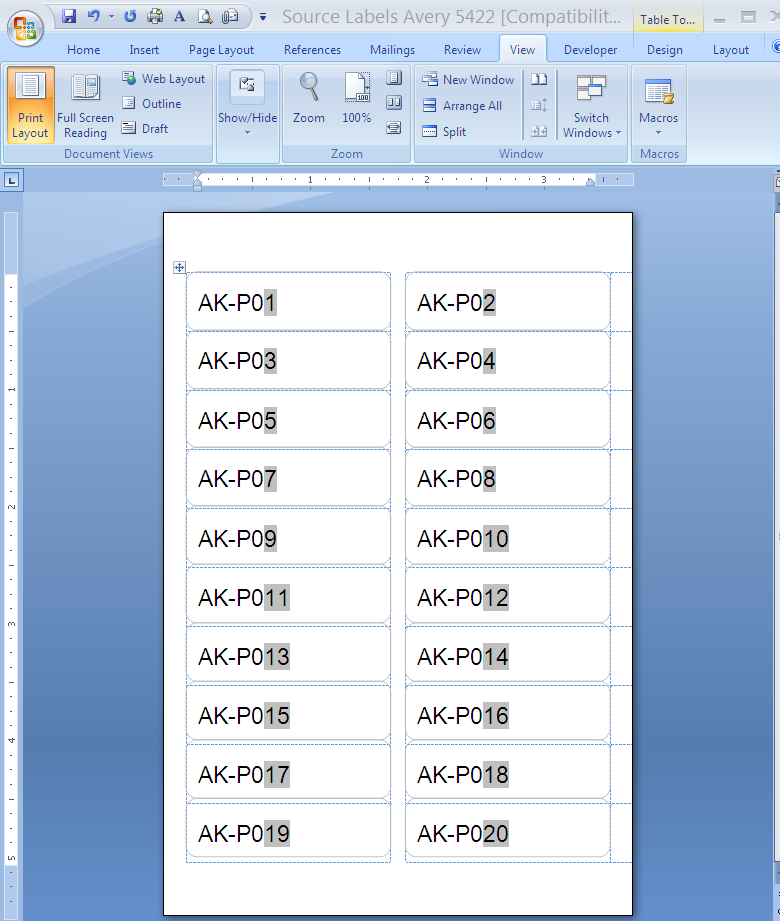 The completed sheet of labels.
If you need to customize an existing numbered list (see
how to create a numbered list) or apply your
specifications to the number format, use the Define New Number Format dialog box.
I. To create a custom numbering format, do the following:
1. On the Home tab, in the Paragraph group,
choose the Numbering button:

2. In the Numbering list, click
Define New Number Format… item to display the Define New Number Format dialog
box:

3. In the Define New Number Format dialog box:
- Number style — Specifies the numbering style that you want. Choices include Arabic numerals,
uppercase and lowercase Roman numerals, uppercase and lowercase alphabet letters, and word series
(1st, One, and First). You can also choose no numbers at all, killing the sequential numbering. - Font… — Specifies the special font or font attributes (such as bold, italic, and underline)
and the point size for the numbers. A standard Font dialog box appears when this button is chosen. - Number format — Types the characters, if any that you want to come before each number. If you
want each number enclosed in parentheses, for example, type an opening parenthesis before the number
in this box.
Do not type over this number in this box! If you do so, even replacing it with another
number, you will break the automatic numbering; each number in the list will be the same. - Alignment — Sets the distance from the left, centered or right margin that Word places the
number.
II. To create a custom multilevel list format, following:
On the Home tab, in the Paragraph group, choose the Multilevel List button and
click Define New Multilevel List… item to display the Define new Multilevel List dialog
box:

If the button in the lower-left corner is the More >> button, click it. Word displays an
extra panel at the right of the dialog box, so you see the full dialog box, as shown here. Word also
changes the More >> button to a << Less button that you can click to hide the
extra section of the dialog box again.
- In the Click Level To Modify, select the list level you want to change. Word selects the
first level, 1, when you open the Define New Multilevel List dialog box. - If you need to link this numbered list level to a particular style, select the style in the Link
Level To Style drop-down list. - Use the controls in the Number Format area to specify the number format.
- In the Number Style For This Level drop-down list, select the number format you want
to use. For example:- «1, 2, 3,»
- «i, ii, iii,»
- «A, B, C.»
- To include the number from the previous level (or a higher level), choose the level from the
Include Level Number From drop-down list. (This drop-down list is unavailable for the
first level because there’s no level above it.) For example: if Level 1 uses «1, 2, 3»
numbering and Level 2 uses «a, b, c» numbering, applying Level 1 in the Include Level
Number From drop-down list to Level 2 changes the Level 2 numbering to 1a, 1b, and
so on. - Word displays the number formatting you’ve chosen in the Enter Formatting For Number
text box. Type any changes for the text of the format into this text box. For example, you
might edit the «A)» format to «Section A)» so that each instance of the number included the
word «Section.» - To specify font formatting, click the Font button. Word displays the Font
dialog box. Choose the font, font style, size, and any extras (such as color or effects),
and then click the OK button. - To customize the numbering, use the Start At spinner to change the starting number.
If you want to restart numbering after a certain level, select the Restart List After
check box and choose that level in the drop-down list. (The Restart List After
controls aren’t available for the first level in the list, because there’s no higher level.) - Select the Legal Style Numbering check box if you want to use legal-style numbering:
changing any roman numeral to an Arabic numeral. For example, 1.1.1 instead of
I.1.1.
- In the Number Style For This Level drop-down list, select the number format you want
- Use the controls in the Position box to customize where the number appears.
- In the Number Alignment drop-down list, choose Left, Centered, or
Right. - In the Aligned At text box, choose the position at which to align the number.
- In the Text Indent At text box, set the indent position for the text.
- In the Follow Number With drop-down list, select the character to include after the
number: a tab, a space, or nothing. If you choose a tab, you can select the Add Tab Stop
At check box and set the distance at which to place a tab stop.
- In the Number Alignment drop-down list, choose Left, Centered, or
Note: more details are available
in the Numbered lists section
in the Work with bulleted, numbered and multi-level lists lesson
of the Create basic documents free course.
See also this tip in French:
Comment personnaliser une liste numérotée.
Scenario:
- You have a Word document that uses outline numbering for each chapter/section heading (e.g. 1.1, 1.2, 2.4.3 etc.).
- You have table and figure captions in this document that are numbered in two long sequences — one for tables, one for figures (e.g. Table 1 through 53; Figure 1 through 26).
- You want to convert the caption number sequences from a single number sequence to a separate sequence in each chapter/section (e.g. Table 3.2 for the second table in chapter 3).
- You want to do this because your document is long and readers can’t easily find the tables/figures they want as numbers like Table 34 are meaningless unless you find the table captions before/after ‘Table 34’. By changing the numbering sequence to include the chapter numbers, your readers will have guideposts to aid their search — if they are in Section 5, they will know that Table 3.2 is back in Section 3 and is the second table in that section.
- Ultimately, you want to help your readers find the information they want as quickly as possible.
Prerequisites:
This set of steps ONLY works if you use automated outline numbering for your heading styles. This post does not describe how to set that up (instead see the links in this post: https://cybertext.wordpress.com/2008/09/23/word-2007-outline-numbering/).
***************
There are three main steps in this procedure — updating the table and figure caption numbering, then updating any cross-references that refer to these tables (including any List of Tables of List of Figures you’ve inserted).
Step 1: Update the caption numbering for tables
- Place your cursor in front of ANY automated caption number for ANY table.

- Go to the References tab and click Insert Caption to open the Caption dialog box.
- Change the Label to Table.
- Click Numbering to open the Caption Numbering dialog box.
- Select the Include Chapter Numbering check box.
- Optional: Change the Separator. It’s unlikely you’ll need to change the Format or the Style, so leave those as they are.
- Click OK to close the Caption Numbering dialog box. Doing this automatically updates ALL table caption numbers in the document.
- Click Close to close the Caption dialog box.


Step 2: Update the caption numbering for figures
- Place your cursor in front of ANY automated caption number for ANY figure.
- Go to the References tab and click Insert Caption to open the Caption dialog box.
- Change the Label to Figure.
- Click Numbering to open the Caption Numbering dialog box.
- Select the Include Chapter Numbering check box.
- Optional: Change the Separator. It’s unlikely you’ll need to change the Format or the Style, so leave those as they are.
- Click OK to close the Caption Numbering dialog box. Doing this automatically updates ALL figure caption numbers in the document.
- Click Close to close the Caption dialog box.


Step 3: Update all the cross-references to the figures and tables throughout the document
- Press Ctrl+A to select the entire document.
- Right-click and select Update Field.
- If you’re asked about updating the Table of Contents, select Update entire table, then click OK.
- If you’re asked about updating the Table of Figures, select Update entire table, then click OK. You might be asked about this twice if you have both a list of tables and a list of figures.

When finished, all your cross-references should now reflect the new numbering sequences. NOTE: Sometimes you have to repeat these steps and update a second time to get them to all update correctly.

See also:
- https://cybertext.wordpress.com/2014/01/31/word-updating-automated-caption-and-cross-reference-numbering/
[Links last checked March 2014]