
1. Quick visual separators using the keyboard
Type 3 dashes ( — ) to display a single line separator
![]()
Type 3 equals signs ( === ) to display a double line separator
![]()
Type 3 hashes ( ### ) to display a triple line separator
![]()
Type 3 underscores ( ___ ) to display a thick separator
![]()
Type 3 asterisks ( *** ) to display a dotted line separator
![]()
Type 3 tildes ( ~~~ ) to display a wavy line separator
![]()
2. Adding a paragraph border separator for lots more choice
There is also a Horizontal Line tool you can use.
1. Position the cursor where the line is to be inserted.
2. Select the Home tab | Paragraph group, or
Table Tools | Design tab (if you are working with a table).
3. Click the drop-down arrow on the Border icon.
4. Select Horizontal Line.

5. For more choices, click Borders and Shading instead of Horizontal LIne.
6. Choose a line style, line colour and line width.
7. Click the border icons around the preview so that only the top or bottom icon is on.

And that, my friend, is how you add some visual interest to an otherwise dull-looking document.
Here are some other advanced text effects you may be interested in.
I hope you found plenty of value in this post. I’d love to hear your biggest takeaway in the comments below together with any questions you may have.
Have a fantastic day.


About the author
Jason Morrell
Jason loves to simplify the hard stuff, cut the fluff and share what actually works. Things that make a difference. Things that slash hours from your daily work tasks. He runs a software training business in Queensland, Australia, lives on the Gold Coast with his wife and 4 kids and often talks about himself in the third person!
SHARE
There are many word processing tools available but once worked in the comfort of Microsoft Word, you may not like any other software. It is pretty sure no one exactly knows the complete features Word offers. Adding dividers is one such hidden features and you can do this with shortcuts. In this article we will show how to add dividers in Microsoft Word documents quickly.
Related: How to fix slow Microsoft Word and speed up you productivity?
You can add dividers with different methods.
- Use hyphen and underscore
- Using other symbol shortcuts
- Insert image as divider
- Insert from the menu
1. Using Hyphens and Underscores
The simplest and most easy method is to use continuous hyphens and underscores. You can continuously press hyphen or underscore to insert the divider line between paragraphs. The advantage is that you can define the length and alignment of the divider as per your need.
- Divider using hyphens: —————–
- Divider using underscore: ____________
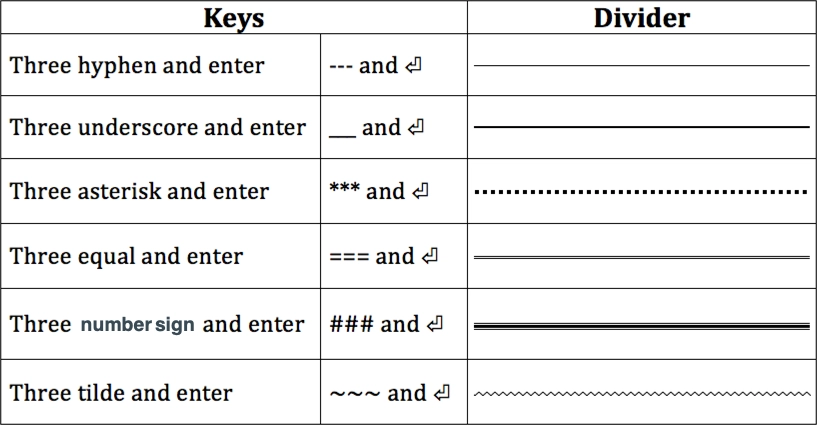
2. Quick Way to Add Dividers with Shortcuts
When you want to insert a full width divider between two sections or elements, you can use the following shortcuts.
- Press hyphens for three or more times and press the enter key (— and ⏎). This will create a full width divider as a thin continuous line.
- Press three asterisks and enter (*** and ⏎) to if you want a dotted line.
- Use three equal signs and enter (=== and ⏎) to add a double line.
- Use three underscores and enter (___ and ⏎) to make a divider with medium thickness.
- Type three number signs and enter key (### and ⏎) to create a thicker line with borders.
- And finally with three tildes and enter (~~~ and ⏎) to create a wavy divider line.
Below picture explains the shortcut keys and the display of the divider in Word document.
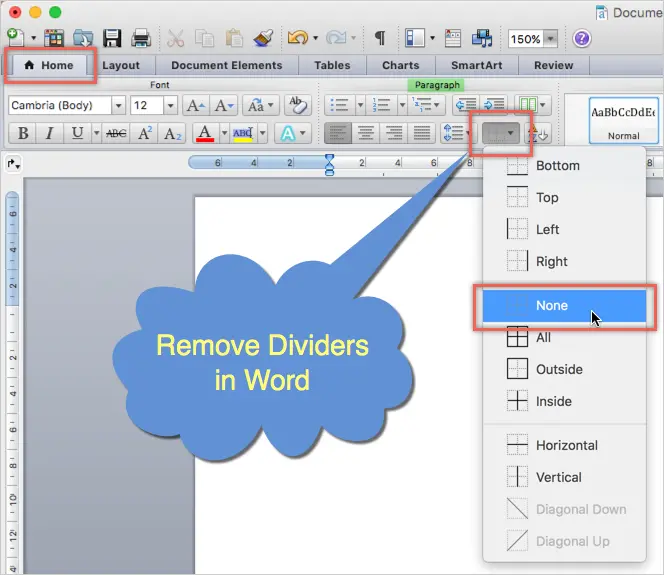
Deleting Dividers Inserted with Shortcuts
Well, you have created the dividers using the above shortcuts and now is the time to see how to delete them. You may find it difficult to delete since those dividers are not actually lines – they are bottom borders act like an underline. In fact, you can simply click on the “Borders” icon to insert divider in Word. Since “Borders” option by default uses “Bottom Border” clicking on it will insert a line similar to the above shortcuts. Follow the below instructions in order to delete the dividers.
- Position your cursor on the previous line of the divider. If you have an element like paragraph before the divider then select the paragraph.
- Click on the “Home” tab and then click the small arrow next to “Border” button in the “Paragraph” group.
- Select “No Border” or “None” option from the list.
This works on all Word versions like 2019, Microsoft 365, etc. on all platforms like Windows 10 / 11. This also works on Microsoft Word for Mac.
3. Using Images for Dividers
Using image is another option to insert divider image on your Word document. You can create suitable images and insert between elements as an object. Remember, not to copy image from website and paste on your document. Word will take long time to extract the image and also link the image to the webpage from where you are copying. The best option is to right click and save the image to your computer. After that, you can either copy paste from local computer or insert the image from menu.
4. Using Horizontal Line as Divider
The last option to insert divider in Word documents is using horizontal line menu option available. You can access this option under “Paragraph” group in “Home” tab. However, this option varies in Word 2016 onwards and earlier versions.
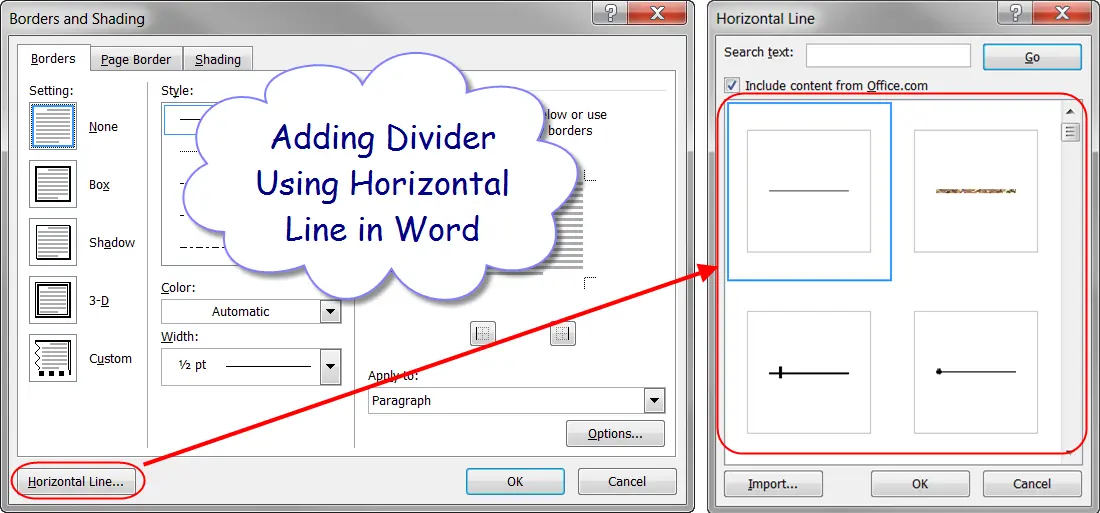
Word 2010 or Earlier
- Click on the “Borders and Shading” button and click on the “Horizontal Line” option to insert a divider on your document.
- If you want to insert a fancy divider, choose the menu option click on the “Horizontal Line…” button. On the popup box, select the divider style you want to insert.
Word 2016 or Later
- If you use Word 2016 or later versions like Microsoft 365, click on the small arrow next to “Border” icon. This is available in “Paragraph” group under “Home” menu.
- Choose “Horizontal Line” option to insert a grey color divider line.
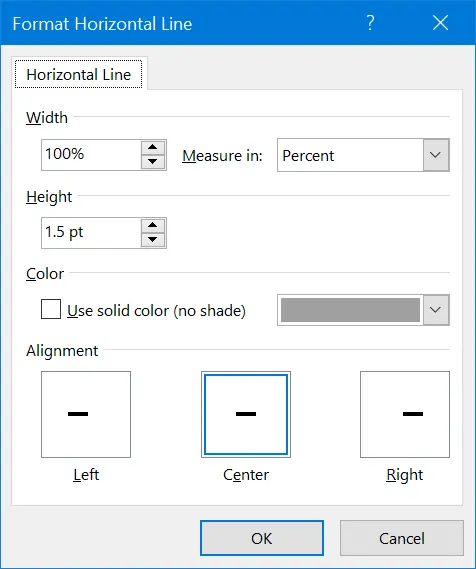
- Double click on the divider to open the “Format Horizontal Line” pop-up.
- Choose the color, alignment, width and height for your divider.
- Unlike dividers inserted with shortcuts, you can move the horizontal lines by dragging it to required place in your document.
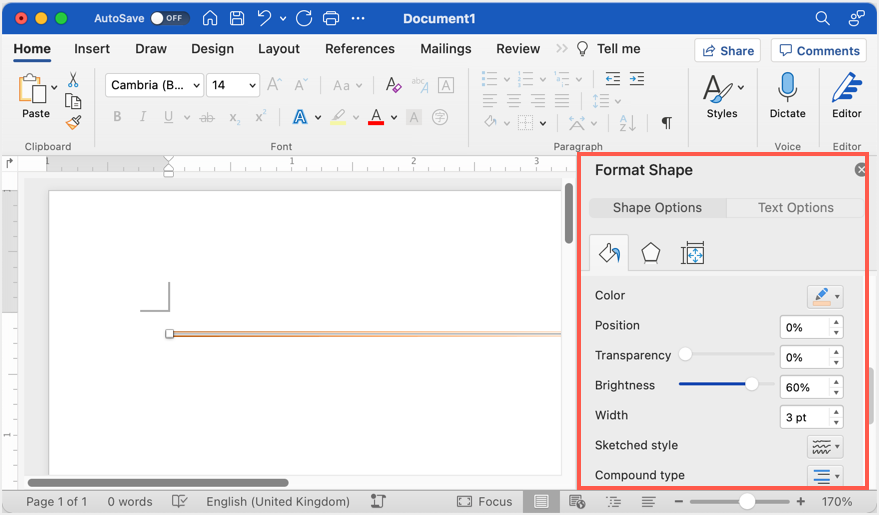
Horizontal line is a perfect option for inserting dividers in Word and it will also work on Word Microsoft 365 subscription in Mac also. However, double clicking on horizontal line in Mac Word will open “Format Shape” options in the sidebar. You can go to “Shape Options” tab and start customizing the color, thickness and other styles of the line.
Corralling information in a Microsoft Word document isn’t all about headers and paragraph formatting. You may find yourself needing to draw a line in the virtual sand, and with Word, all you need to do is tell it where and how. Word’s Shapes collection lets you make horizontal and vertical lines to separate content on your pages.
Using a Word Separator Symbol
Inserting a symbol between words is a great way to make a heading predominant or to keep words separate for readers who are quickly scanning a document. Instead of using hyphens or asterisks, try using an ASCII or Unicode (hex) symbol as a word divider, available inside Microsoft Word.
To do this, place the cursor where you want the symbol to appear click the «Insert» menu, then select «Symbols» and then «More Symbols.» Select the one you want from the table that appears. You can also filter the list by selecting the Unicode or ASCII options.
MS Word Separator Line
Drawing a horizontal line across the page to separate paragraphs is very straightforward if you’re not too fussy about how the line appears. Just place the cursor in a blank line between sentences and hit the hyphen key several times. When you press Return, the hyphens transform into a single long hyphen.
To draw a custom line in a document to separate words, use the Shapes option. Scroll to the place on the page to place the divider. To add extra space for the divider, press the “Enter” key. Click the “Insert” tab. Click the “Shapes” button on the ribbon and choose the “Line” option, the first one in the Lines subcategory.
Press and hold down the “Ctrl” key, which keeps your divider line straight. Position the cursor near the left margin under the place you want to divide. Press and hold down the left mouse button and drag the cursor to the right, drawing the divider. Release the mouse button and the “Ctrl” key.
Click the divider line once it appears. When the new Tools tab opens, click the “Shape Outline” menu on the ribbon. Here you can format the divider by making it thicker, changing its color and choosing a different line style.
Using Clip Art to Divide Content
Microsoft Word has an extensive collection of clip art you can use to separate content on a page, including bars and scrollwork, which can add a dash of elegance to a page. To find some clip art, select «Online Pictures» from the Insert tab.
Enter a word that describes the art you are looking for. Using words like «divider,» «scrollwork,» «border» or «flowers,» should help you find the perfect artwork to divide your content.
![]()
Download Article
![]()
Download Article
Line breaks end a current line and lets you continue the text on another line. These are useful for separating paragraphs from each other, without the space registering as an empty line that can have characters on it. Manually putting in line breaks is useful for address blocks as well as poems because they omit the extra space between lines. To learn how to add a line break in MS Word, begin with step 1.
Steps
-

1
Find a Word document. Using your computer’s file browser, find a document with the extension .doc or .docx.
-
2
Open the document. Once you’ve found it, double-click the file and it will open in Microsoft Word.
Advertisement
-
3
Locate and click on the area where you want to insert a line break. Scroll through the document until you locate where you want to insert a line break, and click the area. This will place the cursor in that area.
-
4
Insert the line break. Hit the key combination Shift + Enter to create a line break. You will now be able to add content in the line right after the break.
- Notice that the cursor will not situate itself in the blank space where the break is when you click on the space. This is the line break.


Advertisement
Add New Question
-
Question
What is the difference between a line break and a paragraph break

The line break, which is done by hitting shift and enter, is a smaller break to just hop in a new line. A paragraph break, however, makes a bigger space and looks more like a new section.
Ask a Question
200 characters left
Include your email address to get a message when this question is answered.
Submit
Advertisement
Video
-
An alternative way of opening a Word file is to launch MS Word first. Once open, click “File” at the top-left of the screen then “Open.” Search for the document you want to open in the file browser that popped up. Once you’ve found it, select the file then click “Open” at the bottom right of the window.
Thanks for submitting a tip for review!
Advertisement
About This Article
Thanks to all authors for creating a page that has been read 218,061 times.
Is this article up to date?
Microsoft Word
A great way to make your Word document easier to read and more visually appealing is to separate sections in the document by inserting a graphical horizontal line. Word provides a number of attractive graphical horizontal lines from which you can choose.
Follow these steps to insert a horizontal line in your
document:
- Put
your cursor in the document where you want to insert the horizontal line. - Go to
Format | Borders And Shading. - On the
Borders tab, click the Horizontal Line button. - Scroll
through the options and select the desired line. - Click
OK.
You can also insert your own custom horizontal lines. To insert
a custom line, follow these steps:
- Go to
Format | Borders And Shading. - Click the
Horizontal Line button. - Click
the Import button. - Navigate
to the file that contains the line you want to add and click the Add
button to add the line to the Horizontal Line Gallery. - Click
OK to add the line to the current document.
Horizontal lines are treated as any other graphic image;
they can be copied, moved, resized, and colored like any other picture object.
To format the line, right-click it and select Format Horizontal line to change
the line’s properties such as color, size, and alignment.
Microsoft Excel
Use conditional formatting to view formula cells in Excel
If you need to find and check the formulas in a Microsoft
Excel worksheet that contains hundreds of cells, you could press [Ctrl][~] to display them all at once. However, you would have to
press the shortcut keys again to see if the resulting value for the formula was
correct. You could also use the Special command under Edit | Go To: to
highlight all of the formula cells in a worksheet, but once you click on one
cell to see the underlying formula in the formula bar, the rest of the cells
are no longer selected. The method that I recommend is to use conditional
formatting to highlight the cells that have formulas. With conditional
formatting, the cells stay highlighted even after you click on one cell to view
the underlying formula.
To use conditional formatting, create a Visual Basic
function that automatically checks for formulas in cells. Follow these steps:
- Open
the Excel file containing the formulas to be checked. - Press
[ALT][F11] - Go
to Insert | Module. - Enter the following code at the
prompt.
Function IsFormula(Check_Cell As Range)
IsFormula
= Check_Cell.Hasformula
End Function - Press [ALT][Q].
- Select
the cells to be examined for formulas (e.g., select A5:H1000 with A5 as the
active cell). - Go
to Format | Conditional Formatting. - Select
Formula Is from the Cell Value Is drop-down list. - Enter
=IsFormula(A5) - Click
the Format button. - Choose
Yellow in the Color drop-down list. - Click
OK twice.
All formulas in the current workbook are highlighted in
yellow and will remain so when you reopen the workbook, as long as macros are
enabled.
Microsoft Access
Divide Word documents into sections using horizontal lines
A great way to make your Word document easier to read and
more visually appealing is to separate sections in the document by inserting a
graphical horizontal line. Word provides a number of attractive graphical
horizontal lines from which you can choose.
Follow these steps to insert a horizontal line in your
document:
- Put
your cursor in the document where you want to insert the horizontal line. - Go to
Format | Borders And Shading. - On the
Borders tab, click the Horizontal Line button. - Scroll
through the options and select the desired line. - Click
OK.
You can also insert your own custom horizontal lines. To insert
a custom line, follow these steps:
- Go to
Format | Borders And Shading. - Click the
Horizontal Line button. - Click
the Import button. - Navigate
to the file that contains the line you want to add and click the Add
button to add the line to the Horizontal Line Gallery. - Click
OK to add the line to the current document.
Horizontal lines are treated as any other graphic image;
they can be copied, moved, resized, and colored like any other picture object.
To format the line, right-click it and select Format Horizontal line to change
the line’s properties such as color, size, and alignment.
Editorial standards
When we see two lines of words in an MS Word document, we don’t get to see what is separating them. There are severl characters that act as line break. There are several names; line break, new line, carriage return, paragraph break etc.
Today, while doing a bit of data processing, I was required to remove all the line breaks (carriage return) in an MS-Word document and replace line breaks with a comma. I was processing a long list of email addresses with one email address per line. And I wanted this list to become a comma separated list (CSV); so as to use it somewhere else.
In MS-Word, paragraph break is represented by invisible character (¶) which looks like a horizontally flipped P letter. You can toggle the visibility of this character by clicking a button given on the Home tab in MS Word. The button bears the same ¶ symbol. You should click this button to be able to see what exactly is separating the lines.
Our tips on MS-Word make your life easier and increase your productivity at work.
If lines are breaking because of paragraph break then ¶ will appear at the end of the lines. If lines are breaking due to line break (carriage return), a left-angled arrow symbol will appear at the end. Let’s first see how to deal with paragraph break:
How to Remove / Replace Paragraph Break
- Open the Word document that you want to work on
- Press CTRL + H to bring up the Find and Replace box
- In the “Find what” box type ^p [this upward arrow character is called caret and is usually available on a number key]
- In “Replace with” box type a comma
- Click on Replace All button.
Thus all the paragraph breaks in you document will get replaced by a comma. You can use whatever character(s) you like in “Replace with” box. For example, if you want to replace every paragraph break with two paragraph breaks –then you should type ^p^p in “Replace with” box.
If you simply want to remove paragraph breaks; just leave the “Replace with” box blank. And you’ll get a monolithic chunk of text!
READ ALSO: How to find ant replace formatting
How to Remove / Replace Line Break, Carriage Return (Enter key)
Follow the same process as given above. Instead of finding paragraph sign (^p), now you should look for line break or carriage return sign (represented by ^l). Therefore, type ^l in “Find what” box and replace it something else (or with nothing).
NOTE: This article is part of my MS Word Guide. This guide solves your day to day MS Word problems. Easily!
So, this is how you can replace line breaks, paragraph breaks and carriage returns in MS Word document. Please le t me know if you have any questions about this topic. I will be glad to try and assist you. Thank you for using TechWelkin.
I want Microsoft Word to display page breaks between pages, instead of this line separator between my pages as in the following picture:
How can I change this?
![]()
Heptite
19.1k5 gold badges58 silver badges70 bronze badges
asked May 23, 2016 at 21:58
![]()
Place your mouse pointer exactly on the separator line and double click. This toggles the display of white space between pages.
answered May 23, 2016 at 23:34
![]()
AtzmonAtzmon
3,0911 gold badge15 silver badges22 bronze badges
You can go to Word Options choose Display and under Page Display Options click in the square near Show White Space Between Pages in Print Layout View
Or like Atzmon’s advice for quicker way just point on the top or bottom edge of a page and double-click.
answered May 24, 2016 at 6:38
![]()
SamSam
8846 silver badges11 bronze badges
Follow these steps:
- Click the Microsoft Office Button, and then click Word Options.
- In the left pane, click Customize.
- In the Choose commands from list, click All Commands.
- Click White Space Between Pages, click Add, and then click OK.
The White Space Between Pages option will appear on the Quick Access Toolbar.
![]()
answered Dec 31, 2018 at 9:17
![]()