
Word for Microsoft 365 Word 2021 Word 2019 Word 2016 Word 2013 More…Less
Once you have a table in Word, you might decide to split that table into two or more tables. This way, you can create smaller tables, or add text in between two tables.
-
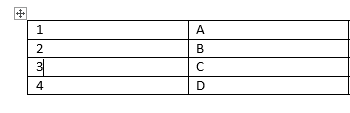
Put your cursor on the row that you want as the first row of your second table. In the example table, it’s on the third row.

When you click inside the table, two new Table tools tabs appear on the ribbon: DESIGN and LAYOUT. These tools are visible only when you are in the table, for example, when you add content to the cells.
-
On the LAYOUT tab, in the Merge group, click Split Table.
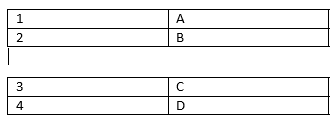
The table splits into two tables.
You can split the table further, as long as there are multiple rows.

See Also
Insert a table — Word
Convert text to a table or a table to text
Use a formula in a Word or Outlook table
How to merge two tables
Need more help?
![]()
Download Article
![]()
Download Article
What if you have one table of data in Word and you want to split it? Splitting a table in Word could be useful in a myriad of ways, like if you want to create smaller tables or add text and other document elements to your data. This wikiHow article teaches you how to split a table in Word on your computer since the feature isn’t available on the mobile app.
-
1
Open the Word document you want to edit. Find and double-click the file you want to edit on your computer, and open it in Microsoft Word.
-
2
Click the table you want to split. This will reveal two new tabs above the toolbar ribbon at the top of your document: Design and Layout.
- If you want to add a new table to your document, click the Insert tab at the top, and click Table on the toolbar.
Advertisement
-
3
Click the row where you want to split your table. The row you select here will be the first row of your second table after splitting.
- For example, if you click the third row of your table, your first table will have two rows after splitting, and your second table will start from the third row.
-
4
Click the Layout tab on the toolbar ribbon. When your table is selected, you can use the tools in this tab to edit its layout.
-
5
Click Split Table icon on the Layout toolbar. This button looks like a four-row table icon split in the middle. You can find it next to Merge Cells and Split Cells in the Merge group.
- This icon will not be visible if you don’t have your cursor clicked in a table row.
- This will split your table into two tables.[1]
- You can also press the keyboard shortcut: Ctrl + Shift + Enter to split the table at your cursor.


Advertisement
Ask a Question
200 characters left
Include your email address to get a message when this question is answered.
Submit
Advertisement
Thanks for submitting a tip for review!
About This Article
Article SummaryX
1. Open the Word document.
2. Click the table.
3. Click the row you want to split from.
4. Click the Layout tab on the toolbar.
5. Click Split Table.
Did this summary help you?
Thanks to all authors for creating a page that has been read 52,208 times.
Is this article up to date?
In the following article, we will introduce you 5 quick and effective ways to split a table in your Word document.
Once in a while, you will meet the need to split a table into several for varying reasons, be it for privacy or teamwork. Anyway, you should know Word is totally capable of this operation and there is more than one way to complete the task.
For instance, we catalog our 5 methods into 2 categories.
Category 1: Split a Table Horizontally
Splitting a table in horizontal way is to separate it into several tables and leave them in vertical order. There are 2 methods under this category. Just read on.
Method 1: Use Table Tool
- Firstly, place your cursor at any cell in the row where a new table starts. For example, we here put cursor at row 4 column 1, right behind “DataNumen Word Repair”.
- Second, click “Layout” under “Table Tools”.
- Third, click “Split Table” in “Merge” group.


Now here is the result you will achieve:
Method 2: Use Keyboard Shortcuts
- Repeat step 1 in method 1.
- Then press “Ctrl+ Shift+ Enter”. And you shall get the exact result as in method 1.
Category 2: Split a Table Vertically
To split a table in vertical way means to break it into a couple of small tables and manage them in horizontal order. 3 methods are waiting for you in the bellowing text.
Method 1: Drag to Split a Table
- First thing is to put cursor below the target table and press “Enter” at least twice to get more than one paragraph mark. If you cannot see the paragraph mark, you should click a symbol in “Paragraph” group under “Home” tab. Once you click it, you can see all the hidden formatting symbols.

- Then select the area where should be a new table. We here will select the second column.
- Click and drag it to the second paragraph mark. Now the second column becomes table 2.

- Next click the plus sign on the upper-left of table 2 to select it.
- And drag and place it on the right side of table 1.


Method 2: Remove Table Borders
- At first, place cursor anywhere in a row where a new table goes.
- Then right click.
- Choose “Insert” on list-menu.
- Now you have two options. You can choose either “Insert Columns to the Left” or “Insert Columns to the Right”.

- When finish step 4 you will get a new column in highlight. Right click.
- Then choose “Borders and Shading” to open the same-name dialog box.

- Click “All” under “Borders” option first.
- Then in “Preview” area, click the left three buttons to remove the “Top Border”, “Inside Horizontal Border” and “Bottom Border”.
- Finally, click “OK”.


Method 3: Erase Table Borders
- At first, repeat first 4 steps in “Method 2: Remove Table Borders”.
- Then click “Design” under “Table Tools”.
- Next click “Eraser” in “Draw Borders” group.

- Now your cursor will turn into an eraser shape. Just click the borders which you don’t need.
- Finally click “Eraser” again to exit the mode.

Here is what you will have:
Comparison of 3 Methods in Category 2
| Methods | Advantages | Disadvantages |
| Drag to Split a Table | You can drag a part of a table and make it a new one directly. | 1. You have to drag the new table to another place before put it in row with the other one.
2. You have to make sure you press “Enter” twice at least or the new table will join the other one. |
| Remove Table Borders | The two or more tables you get will be in row with each other. | 1. You have to remove table borders.
2. You cannot move new tables. |
| Erase Table Borders | 1. The two or more tables you get will be in row with each other.
2. The effect of erasing borders is better. |
1. You have to remove table borders.
2. You cannot move new tables. |
Quickly Deal with Corrupt File
In a word, we know Word is susceptible to errors. So it’s of high possibility for you to come across a corrupt file. Often what you need then is a professional tool which can repair corrupt Word. Such a tool can largely reduce your downtime and help your work go back on track soon.
Author Introduction:
Vera Chen is a data recovery expert in DataNumen, Inc., which is the world leader in data recovery technologies, including Excel damage repair and pdf repair software products. For more information visit www.datanumen.com
Organizing text and numerical information on a table is a great way to present them. After all, the rows and columns can be customized. However, you may encounter difficulties like splitting a table horizontally into two separate ones. This is because it’s usually already too late before you realize that the data in your table is best split up. Well, you’re in luck! MS Word offers more than one way to split tables horizontally in your document.

Now, there are about two ways to split a table horizontally in Word.
- Using the Split Table button
- Using shortcut keys
Let’s dive right in.
Method 1: Using the Split Table button.
If you prefer using just your mouse to split a table, you are only around three clicks away with this method. Here, we will be looking at the Ribbon or the basic toolbar located at the top of your MS Word window.
Below are steps to access the Split Table button in Word.
Step 1: Open up a Word document.
First off, we’ll need to open up a Word document. Feel free to use your own personal file if you already have one open. Otherwise, you can always choose to create a new blank one. Just make sure to insert a table before proceeding to the next step.

Step 2: Click on a table row.
Once your document is ready, go ahead and click on the row that you want to turn into the header of the new table.
For this example, we’ll click on the third row.

Step 3: Access the Split Table button.
With your cursor staying on the table, you can click the Layout tab under the Table Tools category displayed last on the Ribbon. As mentioned earlier, the Ribbon is a basic toolbar found at the top of your MS Word window. From the Layout tab and click the Split Table button.

Note that the Table Tools tab will only be visible if the table is selected beforehand.
Congratulations! You’ve just used the Split Table button to fix the problem. Still a little puzzled? Don’t fret, here’s an easier one.
Method 2: Using Shortcut Keys
There’s no faster way to split a table horizontally in Word than by simply pressing a combination of keys on your keyboard. This method allows you to split your table without removing your focus from the screen.
Here’s how you can do just that.
Step 1: Open up a Word document.
Before we get started, we’ll need to open up a Word document. If you don’t have one yet, then you can start a new one and make sure there’s a table in it. With this, we’re already halfway done.

Step 2: Click on the row.
Once your document is open, click on the row where you want the table to be split. Note that MS Word will turn the selected row into a new table header. Next, press the CTRL + SHIFT + Enter keys on your keyboard.
For this example, we’ll click on the fourth row.

After using the shortcut keys, this is the result we got.

Wonderful job! You’ve just used a shortcut key to split a table horizontally in Word.
Merging Split Tables in Word
If you happen to be in a situation where you need to reattach two separate tables, we got you. In this section, we’ll show you the steps on how to merge split tables when the Undo button just won’t cut it.
Take note that the method presented below simply connects the whole row of the selected cells on a table to the one it is directed to.
To merge a table with one below it, simply select the entire first table and press the ALT + SHIFT + ARROW DOWN keys on your keyboard. Conversely, use the ALT + SHIFT + ARROW UP keys after selecting the second table.
If there are text or other objects between the tables, just continue pressing the arrow key to the direction of the table you want to keep. You can even move the selected cells in between the rows of that table.
For this example, we’ll select the first table and merge it with the second one.

If you have fewer columns on the second table, applying the same steps will give us a table like the one below.

Conclusion
Congratulations! You’ve reached the end of this tutorial. We hope we helped you figure out how to split a table horizontally in Word. Before you go, allow us to give you a quick rundown of what we’ve discussed.
There are a handful of reasons why you’d split tables horizontally in Word. Whatever yours is, you’ll surely find it to be essential. In this article, we showed you two methods to easily split tables in Word. We demonstrated how to access the Split Table button and what the keyboard shortcut is.
We hope you’ve found this article helpful!
Содержание
- Как разорвать таблицу в Ворде?
- Как разорвать таблицу в Word 2003?
- Универсальный метод разбиения таблиц
- Универсальный усложненный метод разрыва таблиц
- Вопросы и ответы

Ранее мы уже писали о том, что программа Word, входящая в состав офисного пакета от Microsoft, позволяет работать не только с текстом, но и с таблицами. Набор инструментов, представленных для этих целей, поражает широтой выбора. Поэтому неудивительно, что таблицы в Ворде можно не только создавать, но и изменять, редактировать, причем, как содержимое столбцов и ячеек, так и их внешний вид.
Урок: Как в Word сделать таблицу
Говоря непосредственно о таблицах, стоит отметить, что во многих случаях они упрощают работы не только с числовыми данными, делая их представление более наглядным, но и непосредственно с текстом. Боле того, числовое и текстовое содержимое может вполне свободно соседствовать в одной таблице, на одном листе столь многофункционального редактора, коим является программа Ворд от компании Майкрософт.
Урок: Как объединить две таблицы в Word
Однако, иногда необходимо не только создать или объединить таблицы, но и выполнить действие кардинально противоположное — разъединить одну таблицу в Ворде на две или более частей. О том, как это сделать, и пойдет речь ниже.
Урок: Как добавить строку в таблицу в Word
Как разорвать таблицу в Ворде?
Примечание: Возможность разделения таблицы на части присутствует во всех версиях MS Word. Используя данную инструкцию, можно разбить таблицу в Ворде 2010 и более ранних версиях программы, мы же показываем это на примере Microsoft Office 2016. Некоторые пункты могут отличаться визуально, их название может быть немного иным, но смысла выполняемых действий это не меняет.
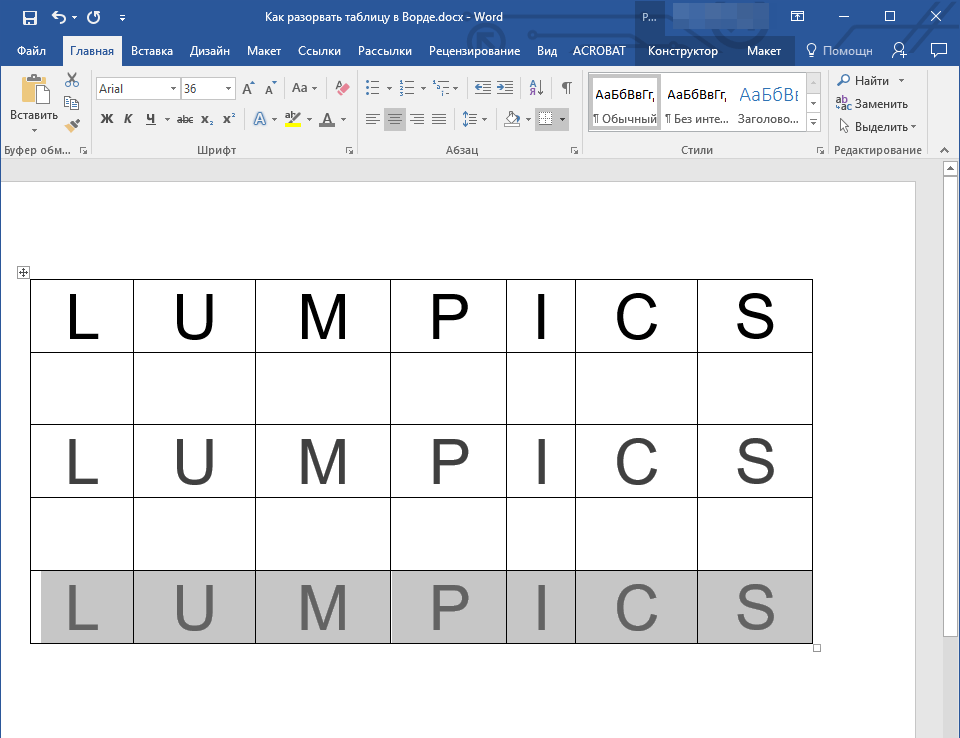
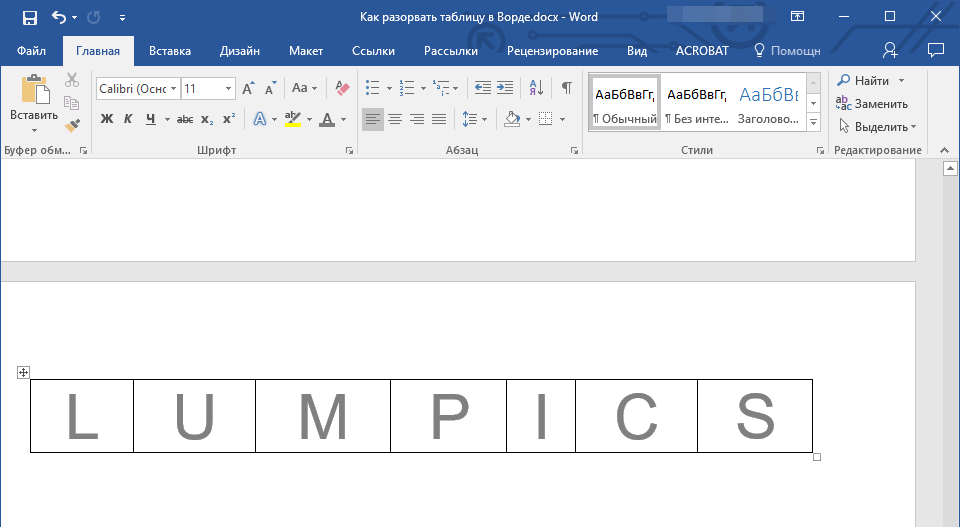
1. Выделите строку, которая должна стать первой во второй (отделяемой таблице).
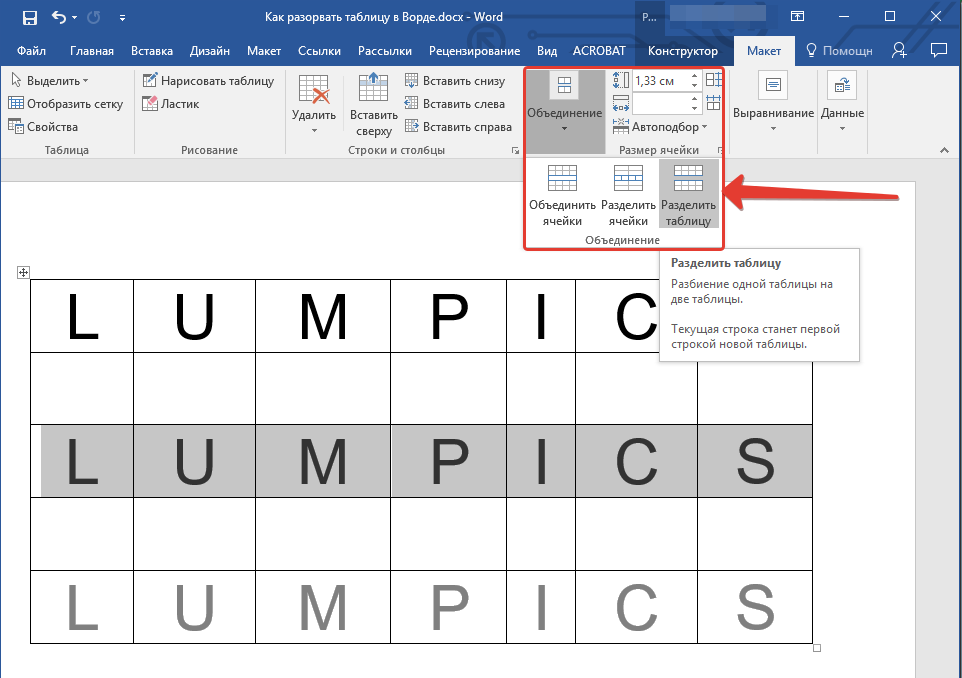
2. Перейдите во вкладку “Макет” (“Работа с таблицами”) и в группе “Объединить” найдите и выберите пункт “Разбить таблицу”.
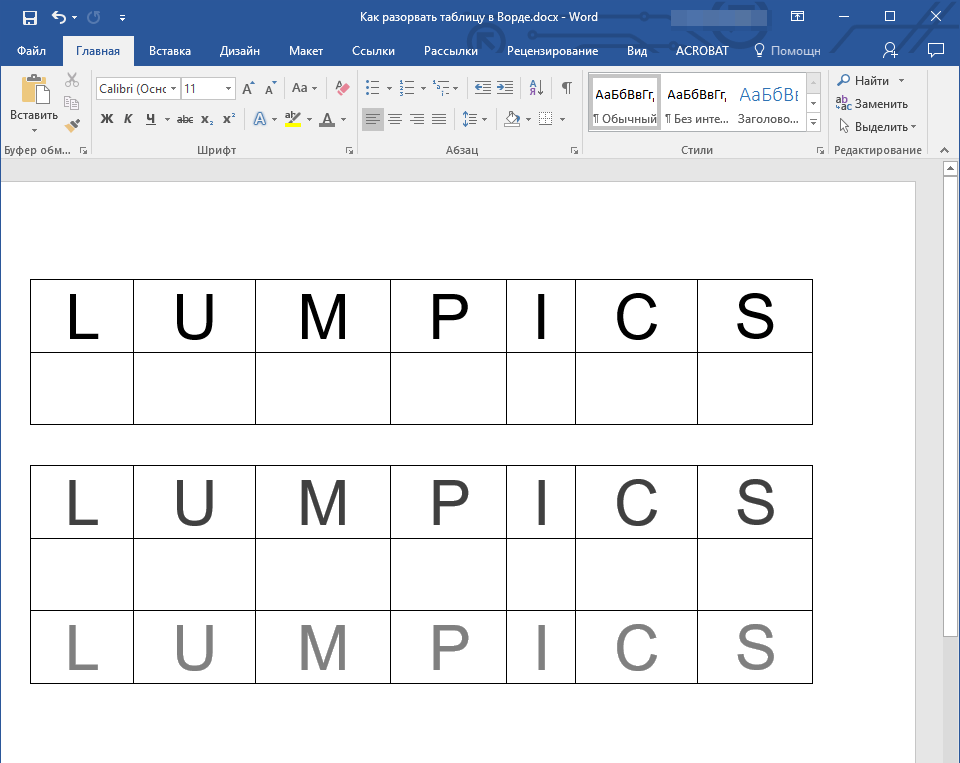
3. Теперь таблица разделена на две части

Как разорвать таблицу в Word 2003?
Инструкция для этой версии программы немного отличается. Выделив строку, которая будет началом новой таблицы, необходимо перейти во вкладку “Таблица” и в развернувшемся меню выбрать пункт “Разбить таблицу”.
Универсальный метод разбиения таблиц
Разорвать таблицу в Ворде 2007 — 2016, а также в предыдущих версиях этого продукта можно и с помощью горячих комбинаций клавиш.
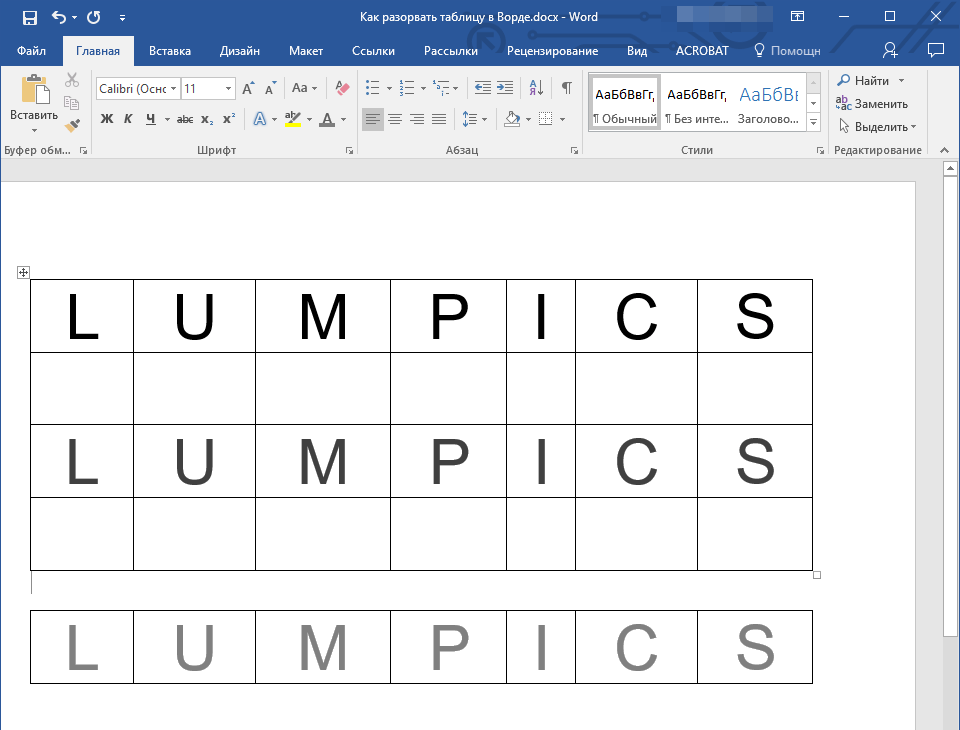
1. Выделите строку, которая должна стать началом новой таблицы.
2. Нажмите комбинацию клавиш “Ctrl+Enter”.
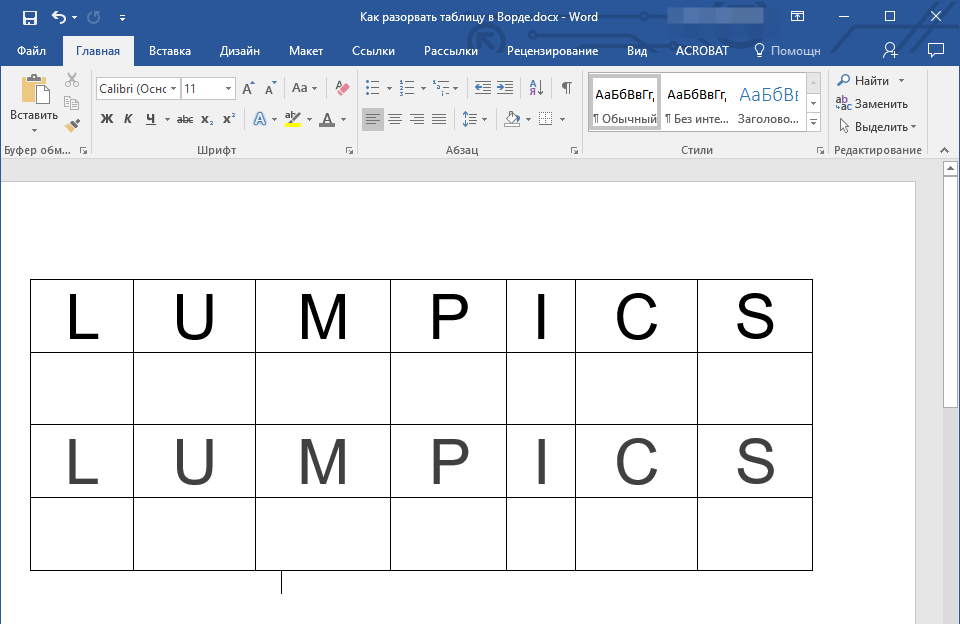
3. Таблица будет разделена в необходимом месте.
При этом, стоит отметить, что использование данного метода во всех версиях Word делает продолжение таблицы на следующей странице. Если вам именно это и нужно было изначально, ничего не меняйте (это ведь куда проще, чем много раз жать Enter, пока таблица не переедет на новую страницу). Если же вам необходимо, чтобы вторая часть таблицы располагалась на той же странице, что и первая, установите указатель курсора после первой таблицы и нажмите кнопку “BackSpace” — вторая таблица переедет на расстояние в одну строку от первой.
Примечание: Если вам необходимо снова объединить таблицы, установите курсор в строку между таблицами и нажмите “Delete”.
Универсальный усложненный метод разрыва таблиц
Если вы не ищите легких путей или же, если вам изначально требуется переместить создаваемую вторую таблицу на новую страницу, можно просто создать разрыв страницы в необходимом месте.

1. Установите курсор в той строке, которая должна быть первой в новой странице.
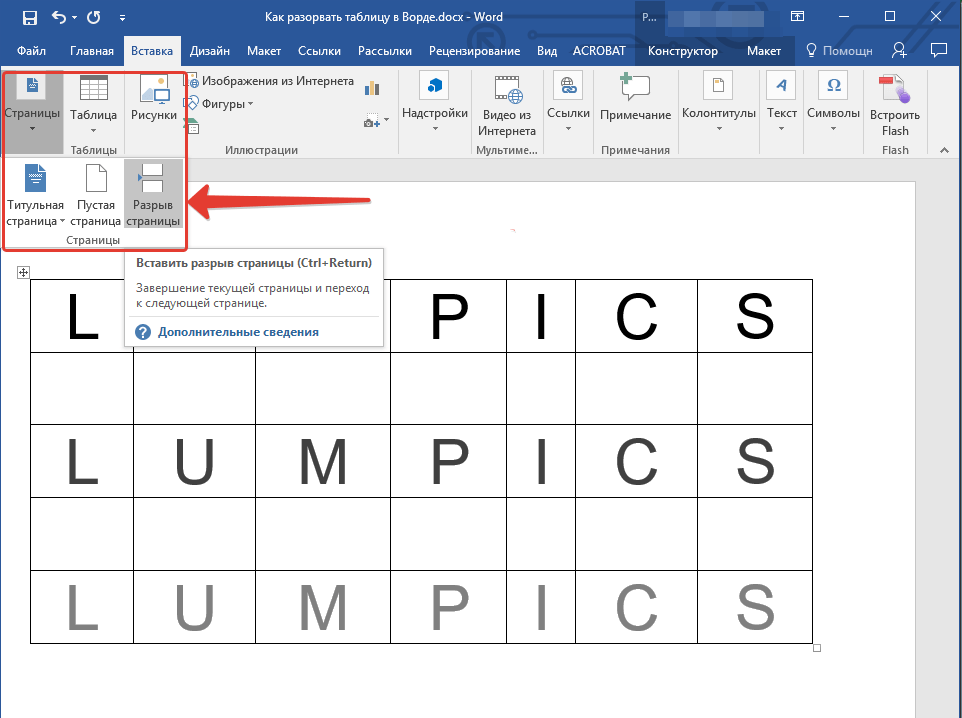
2. Перейдите во вкладку “Вставка” и нажмите там на кнопку “Разрыв страницы”, расположенную в группе “Страницы”.
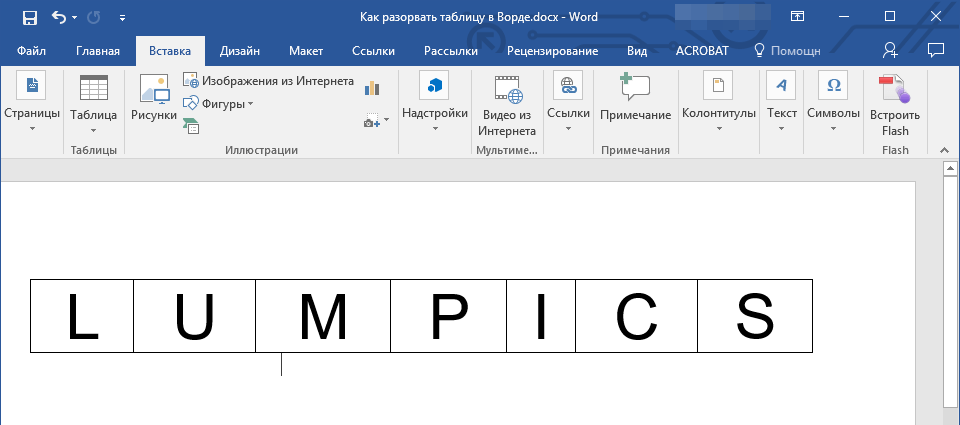
3. Таблица будет разделена на две части.
Разделение таблицы произойдет именно так, как вам это и было нужно — первая ее часть останется на прежней странице, вторая — переедет на следующую.
На этом все, теперь вы знаете о всех возможных способах разделения таблиц в Ворде. Искренне желаем вам высокой продуктивности в работе и обучение и только положительных результатов.

If you want to split or merge tables in Word, this tutorial shows you how, even if your tables have captions or header rows.
If you use tables in Microsoft Word to arrange items in your document or display structured data, there may come a time when you need to split a table into two. On the other hand, you might have two tables that you want to merge into one.
It’s not difficult to split and merge tables in Word; you have to know the right steps.
How to Split a Table in Word
You can split a single table into two tables with a convenient ribbon button.
- Place your cursor in the cell that you want to move to the new table.
- Go to the Layout tab.
- Click Split Table in the Merge section of the ribbon.

You’ll then see your table break into two.

Splitting a Table With a Caption
If you have a caption for your table, it will move to the second table after the split. So you’ll need to correct this afterward or remove the caption before the split and add it to each table afterward.

Splitting a Table With a Header Row
When you split a table, the header row remains with the top table. It takes a few clicks if you want to add a header row to the second table after splitting them.
Select the top row of the table and right-click. When the toolbar displays, click the Insert arrow and select Insert Above.

You then have a new row to insert the headers.
While you can join two tables together in Word, there isn’t a handy ribbon button to do so. You’ll use a simple drag-and-drop action.
- Select the bottom table to display the handle (four-sided arrow) on the top left.
- Drag the handle until you see the outline of the table directly below the last row of the top table.
- Release when the tables are lined up.

Your two tables should become one.

Merging Tables With Captions
If the tables you’re joining together have captions, these will both move down below the merged table. You can correct this and remove the caption you don’t want afterward or delete the captions before merging the tables and then add one to the final table.

Merging Tables With Header Rows
When you join tables that have header rows, that row in the second table becomes a regular row when the table is merged. You can then remove that row from the merged table.
Select the row in the table and right-click. When the toolbar displays, click the Delete arrow and select Delete Rows.

The row will vanish, leaving you with a finished, merged table.
Split or Merge Tables in Microsoft Word
Whether you want to combine one or more tables or break them up into separate ones, it’s simple to do in Microsoft Word. And if it’s table cells that you want to work with, check out our how-to for splitting and merging table cells in Word.
Make sure you keep up with our new tutorials by following us on Twitter or liking us on Facebook!
![]()

You can easily merge and split cells in Microsoft Word to make your tables more interesting and more suited to the data you are trying to share. When you merge two or more cells, you are bringing them together in one cell. When you split a cell, you are dividing it from one cell into multiple cells.
You can merge and split tables on the individual cell level, as well as on the larger, table-wide level. In this article, I’ll show you how to merge and split table cells and tables in Word.
Merging cells in a table combines two or more adjacent cells of the same size into one larger cell.
First, select the cells you want to merge. They can be adjacent cells in a row or column.

Or they can be adjacent cells that span multiple rows and columns.
When you have your cells selected, right-click any of the selected cells, and then choose the “Merge Cells” command on the context menu.
If you prefer using Word’s menus, you can also head to the Table Tools “Layout” tab, and then click the “Merge Cells” button there.
Either way, your cells are now merged.
How to Split Cells In A Word Table
Splitting table cells in Word is only slightly more complicated than merging them. You can use the split command to one or more cells into a set number of rows and columns. Here’s how it works.
Let’s first say that we just one to split a single cell into two cells. First select the cell you want to split.
Then, right-click the selected cell and choose the “Split Cells” command from the context menu. (You can also head to Table Tools > Layout > Split Cells on the Word Ribbon if you prefer.)
This opens the Split Cells window. By default, it’s set up to split the selected cell(s) into two columns, which is exactly what we want. You can just go ahead and click the “OK” button to make the split. Input the number of rows and columns you would like to split your cell into.
And that cell we selected is now two cells.
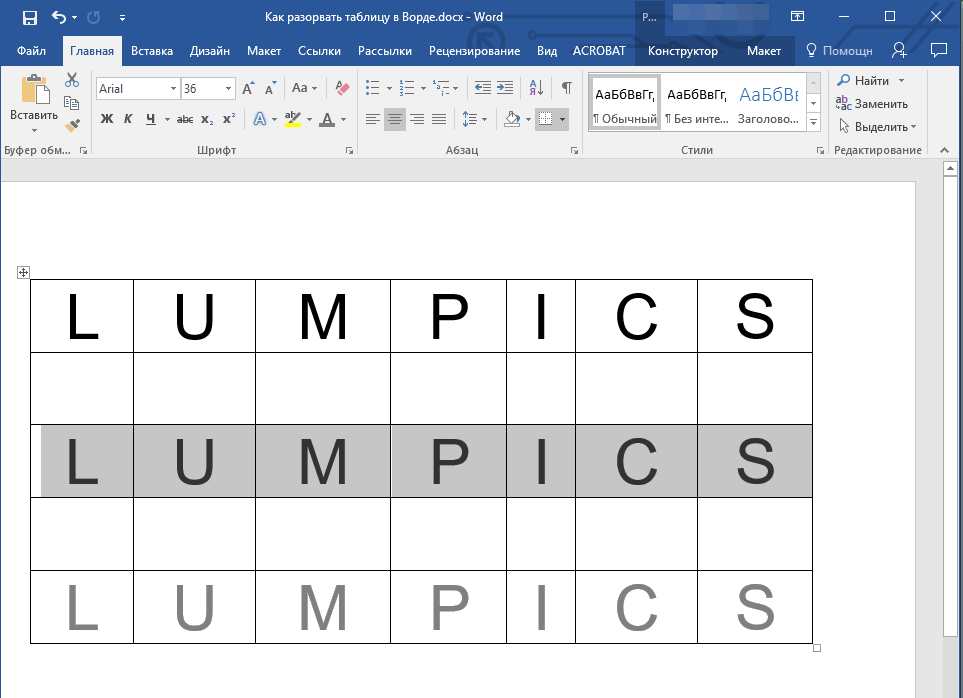
As you probably guessed from the options in that Split Cells window, you can also get a little more complex with cell splitting. Let’s say we had a table like the one shown below. And we want to take those selected cells (the ones in gray under the second column header) and turn them into two big rows of three columns each.
We’d head to Table Tools > Layout > Split Cells (a lot of times the Split Cells command doesn’t show up on the context menu when you have multiple cells selected, so it’s easier to use the Ribbon button). In the Split Cells window, we’d select three columns and two rows. We also want those cells merged before being split, so make sure that option is selected.
When we hit “OK” the table turns out just like you’d expect.
And obviously, this is just a quick look. You can get just about as complicated with your table layout as you’d want.
How to Split a Table in Word
You can split an entire table in Word. This can be useful for splitting long tables into two separate tables—mostly in hopes of dealing with formatting issues that multi-page tables can sometimes cause.
First, click to place your insertion point in the cell where you would like your table split to begin. The cell that contains the insertion point will become the top row of the second table.
Head to Table Tools > Layout, and then click the “Split Table” button.
Your table is now split into two tables.
How to Merge a Table in Word
And as you might expect, you can also merge tables together. There’s no button on the menu for this one, though. You have to do it by dragging and dropping.
Hover your pointer over the table you would like to merge until the table’s handle (the plus sign) appears at its top left corner. You can click and drag the table using that handle.
Drag the table until its top row aligns with the bottom row of the table you’re merging into.
When you release your mouse button, Word merges the two tables.
Now you know how to easily merge and split tables and table cells in Microsoft Word. Of course, like with any other Word feature, this one takes some playing with. Especially if you’re doing complex merges and splits (or merging together long tables), formatting can sometimes get a little weird.
READ NEXT
- › How to Make a Calendar in Microsoft Word
- › How to Merge and Split Tables in Google Docs
- › How to Make Your Word Document More Accessible to Everyone
- › HoloLens Now Has Windows 11 and Incredible 3D Ink Features
- › How Long Do CDs and DVDs Last?
- › How to Install Unsupported Versions of macOS on Your Mac
- › Liquid Metal vs. Thermal Paste: Is Liquid Metal Better?
- › This New Google TV Streaming Device Costs Just $20
Работая с документами в Ворд, пользователи часто испытывают потребность в создании и форматировании таблиц. В частности, может понадобиться разбить ее на несколько частей. Многие при этом испытывают затруднения, считая функционал для работы с таблицами в этом редакторе громоздким и не приспособленным для решения данной задачи. Но в действительности разбить таблицу в Ворд очень легко.
Способы разделения таблицы в Ворд
В процессе работы с таблицей может возникнуть необходимость разделить ее, если она не умещается на странице или необходимо вписать между двумя ее частями какой-нибудь текст, либо (в редких случаях) понадобится разбить свое творение по вертикали. И такая возможность предусмотрена в Ворд. Сделать это можно несколькими способами.
Способ 1: Горячие клавиши
Таким способом легче всего достичь необходимого результата. Для этого нужно:
- Поместить курсор в строку, по которой планируется проводить разделение объекта.

- Применить комбинацию клавиш Ctrl+Shift+Enter. После этого таблица приобретет требуемый вид.


После разбивки позиция курсора будет автоматически установлена в промежуток между двумя получившимися частями, чтобы при необходимости можно было сразу вводить текст.
Способ 2: Меню
Данный способ также нельзя отнести к особо сложным. Порядок действий такой:
- Поместить курсор в строку так же, как и при первом способе. При этом в верхней части документа откроется меню работы с таблицами. В нем нужно перейти на вкладку «Макет».

- В появившемся окне нажать на пиктограмму с надписью «Разделить таблицу».


Результат у проведенной манипуляции будет точно таким же, как и предыдущий. Проводить разбивку таким образом можно до тех пор, пока не останется единственная строка.
Способ 3: Разрыв страницы
Разрыв страницы применяется в тех случаях, когда нужно, чтобы отделяемая часть объекта оказалась на отдельной странице. Сделать это можно как с помощью горячих клавиш, так и через меню. Начало процедуры аналогично тому, как делалось в первых двух способах. Затем есть два варианта действий:
- Использовать комбинацию клавиш Ctrl+Enter;
- В меню документа перейти на вкладку «Вставка» и выбрать «Разрыв страницы»:


Оба варианта приведут к одинаковому результату, который будет выглядеть таким образом:

Как видим, разделенные части таблицы находятся на разных страницах документа.
Способ 4: Разбивка по вертикали
Разбивать таблицу по вертикали может понадобиться далеко не каждому, но все-таки данный вариант также стоит рассмотреть. Сразу оговоримся, что фактического разделения объекта на две части при этом не происходит. Но если в дальнейшем планируется распечатывать документ, то такой способ придется как нельзя кстати. Делается это так:
- В планируемом месте разделения в таблицу вставляется еще один столбец. Для этого в месте предполагаемого разделения нужно щелкнуть правой кнопкой мыши и выбрать вставку столбца. Вставлять слева или справа зависит от позиции курсора на выбор пользователя.

Результат должен получиться таким:

- Удалить границы вставленного столбца. Для этого нужно выделить его и в меню работы с таблицами во вкладке «Границы» выбрать «Нет границы».

В результате получатся две части таблицы с отсутствующими краями в месте разрыва.

На самом деле столбец никуда не делся, просто стал невидимым из-за отсутствия границ. - Завершить разбиение объекта, установив недостающие границы столбцов. Делается это из того же меню, что и удаление границ.

Все, можно любоваться получившимся результатом:


Читайте также: Пишем вертикальный текст в Ворд
Таким образом, используя текстовый процессор MS Word, можно гибко управлять созданными таблицами. Для этого предусмотрены разные способы, удовлетворяющие требования самых взыскательных пользователей.

When using tables in Word, if the data in the table is so large that you want to split it up, but still want to keep the numbered position, in order to divide it into separate data, how will you do it?
Yes! we will do it Split table in Word, of course.
The table division will help users easily identify different data areas, previously entered. Or the table is too small but the data is similar, we will merge it. In my opinion, this is a very good trick that you need to know if you often use a text editor.
OK! Today I will guide you how to split table and merge table in Word The most detailed way, please follow along ^^
Read more:
#first. How to split a table in Word
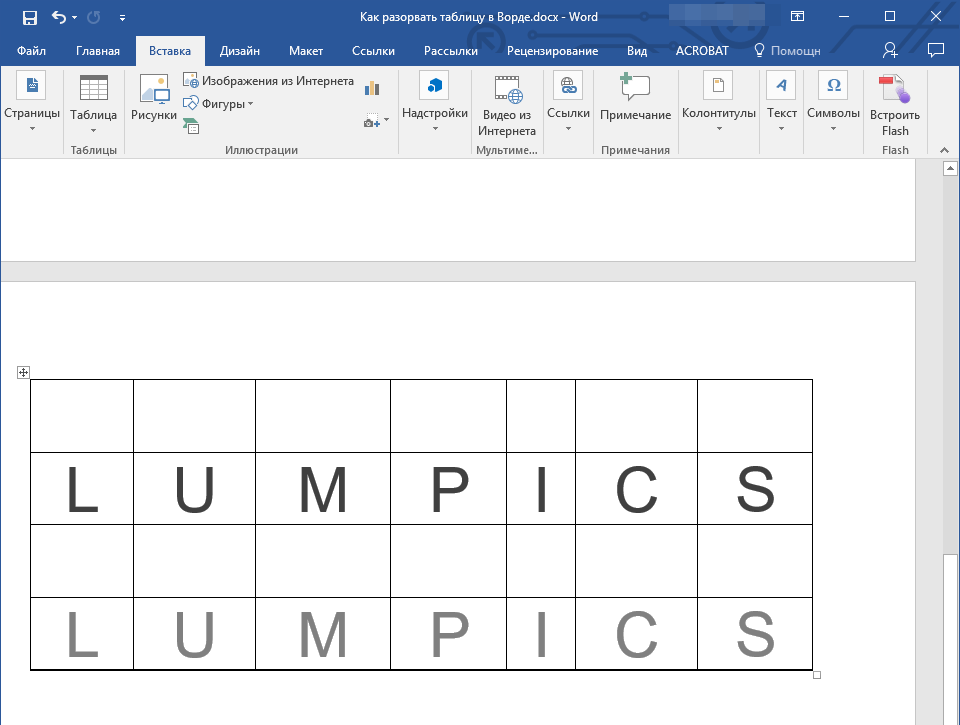
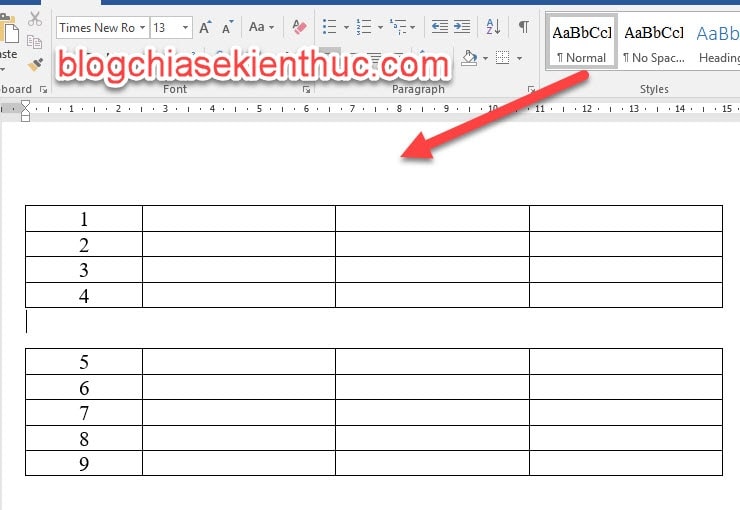
For a specific example, here I will create a table with 9 rows and 4 columns as shown below.
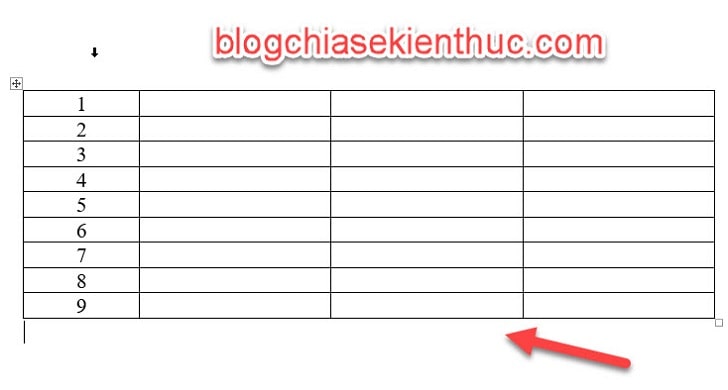
Threads: Now I will divide this table into 2 small tables, 1 table contains the numbers from 1 to 4, and the other table is from 5 to 9. I will do the following, you guys follow along:
Perform:
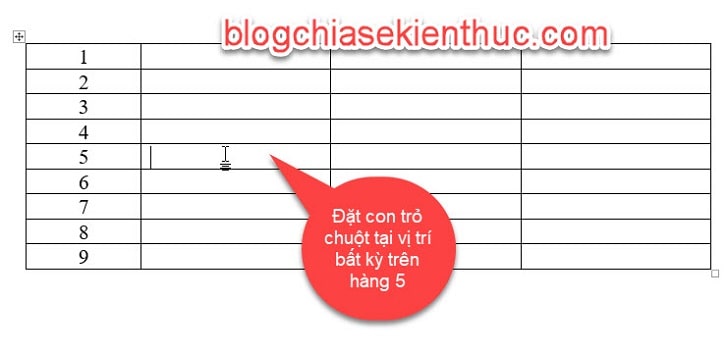
+ Step 1: Place the mouse pointer over any cell of the row where you want that row to be the first row of the second table after the split.
Here I want hàng thứ 5 is the first row of the 2nd table, so I will position the mouse pointer at any position on hàng 5.
+ Step 2: Hover over Tab Layout => then select Split Table in section Merge.
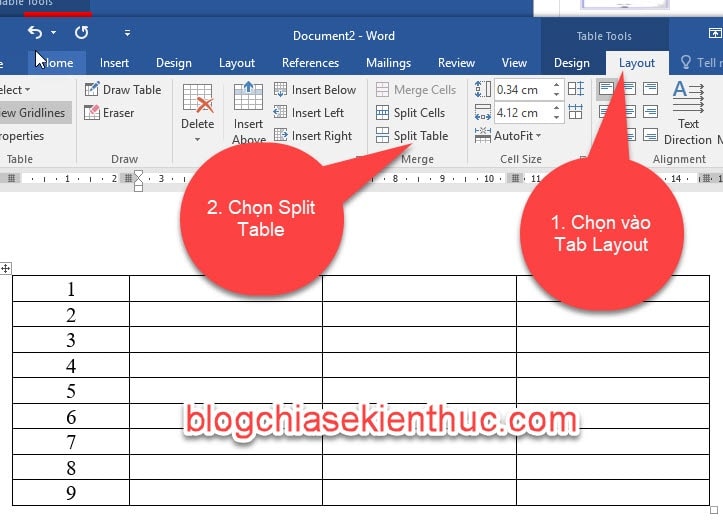
Result: So the table has been divided into 2, if you want to split it further, you do the same as above as long as the table has more than 1 row.
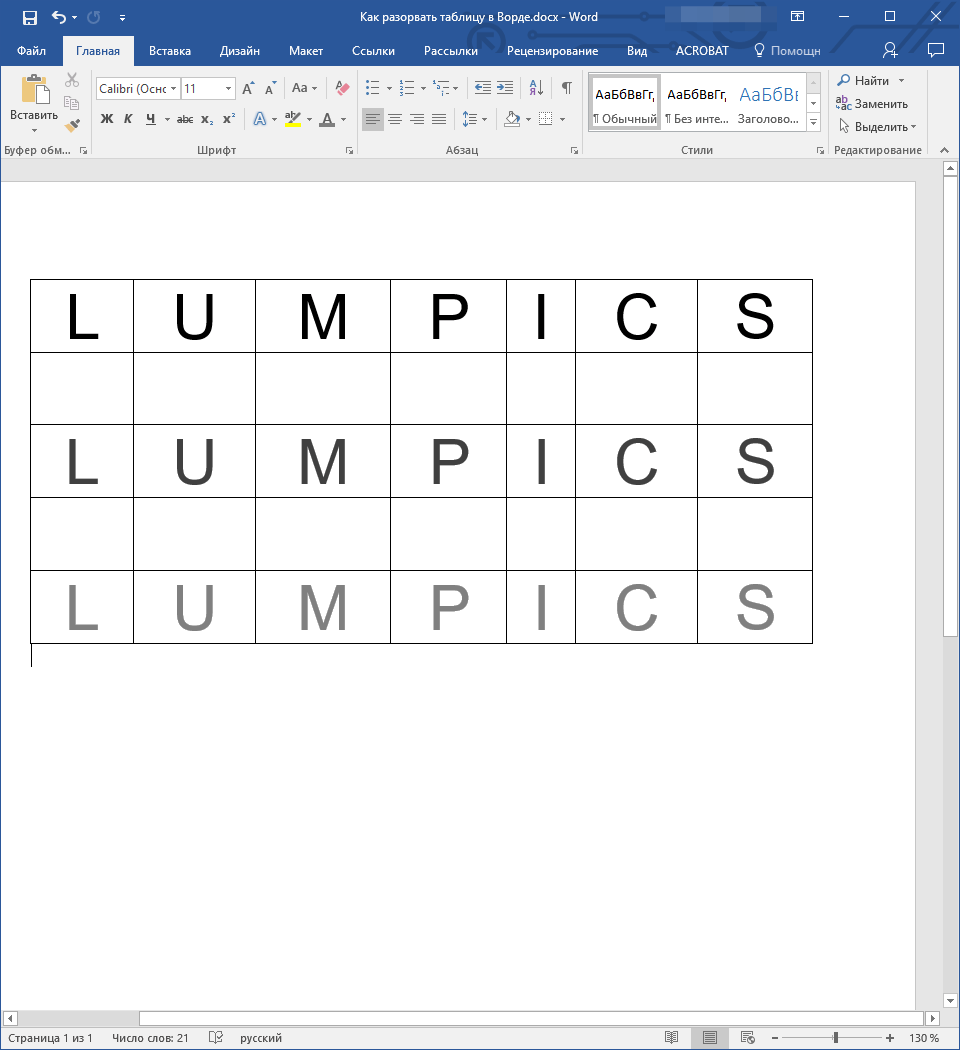
This is also the trick to use in case the table is right at the top of the document, and you can’t press Enter Let it be 1 line down.
Applying the Split Table button will help you push the whole table down to an empty row quickly.
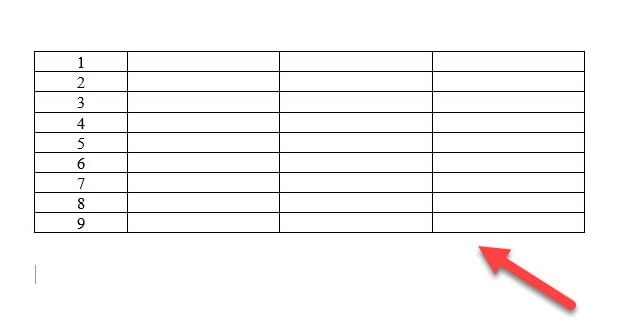
#2. How to merge tables in Word
Now I will show you how to merge 2 tables together.
+ Step 1: Drag the mouse pointer to the 2nd table position => Appear mũi tên 4 chiều as shown below.

+ Step 2: Hold down the left mouse button on that icon => and drag the mouse closer to the position of the last line of table 1 => Then release the mouse.

Result: So we have joined 2 tables into 1 table.
#3. Epilogue
So in this article, I have detailed instructions for you How to divide tables and merge tables in Word okay then. This is a trick you will definitely need at some point when using the Word application.
Hopefully with this approach you will easily handle tables in documents quickly and easily. Good luck !
CTV: Ngoc Cuong – techtipsnreview
The article achieved: 5/5 stars – (There are 5 reviews)
Note: Was this article helpful to you? Don’t forget to rate the article, like and share it with your friends and family!
Source: How to split a table in Word, and merge a table in Word
– TechtipsnReview