
Watch Video – How to Split Each Excel Sheet Into Separate Files
If you have an Excel workbook with many worksheets, there is no easy way to split each of these sheets into separate Excel files and save separately.
This could be needed when you sheets for different months or regions or products/clients and you want to quickly get a separate workbook for each sheet (as an Excel file or as PDFs).
While there is a manual way to split sheets into separate workbooks and then save it, it’s inefficient and error-prone.
In this tutorial, I will give you a simple VBA code that you can use to quickly (in a few seconds) split all the worksheets into their own separate files and then save these in any specified folder.
Split Each Worksheet Into a Separate Excel File
Suppose you have a workbook as shown below where you have a worksheet for each month.

To split these sheets into a separate Excel file, you can use the below VBA code:
'Code Created by Sumit Bansal from trumpexcel.com
Sub SplitEachWorksheet()
Dim FPath As String
FPath = Application.ActiveWorkbook.Path
Application.ScreenUpdating = False
Application.DisplayAlerts = False
For Each ws In ThisWorkbook.Sheets
    ws.Copy
    Application.ActiveWorkbook.SaveAs Filename:=FPath & "" & ws.Name & ".xlsx"
    Application.ActiveWorkbook.Close False
Next
Application.DisplayAlerts = True
Application.ScreenUpdating = True
End Sub
There are a few things you need to make sure before using the above VBA code:
- Create a folder where you want to get all the resulting files.
- Save the main Excel file (which has all the worksheets that you want as separate files) in this folder.
Once you have this done, then you can put the above VBA code in the file and run the code.
The above code is written in a way that it picks up the location of the folder using the path of the file (in which the code is run). This is why it’s important to save the file in the folder first and then use this code.
How does the VBA code work – The above code uses a simple For Next loop that goes through each worksheet, creates a copy of the worksheet in an Excel workbook, and then saves this Excel workbook in the specified folder (which is the same that has the main file with all the sheets).
Below are the steps to place this VBA code in the Excel workbook (these will be same for all the other methods shown in this tutorial):
Where to put this code?
Below are the steps to place the code in the Visual Basic Editor where it can be executed:
The above steps would instantly split the worksheets into separate Excel files and save these. It takes only a second if you have less number of worksheets. In case you have a lot, it may take some time.
The name of each saved file is the same as that of the sheet name it had in the main file.

Since you have placed a VBA code in the Excel workbook, you need to save this with a .XLSM format (which is the macro-enabled format). This will ensure the macro is saved and works when you open this file next.
Note that I have used the lines Application.ScreenUpdating = False and Application.DisplayAlerts = False in the code so that everything happens in the backend and don’t see things happening on your screen. Once the code runs and split the sheets and saves these, we turn these back to TRUE.
As a best practice, it’s recommended to create a backup copy of the main file (which has the sheets that you want to split). This will ensure you don’t lose your data in case anything goes wrong or if Excel decides to become slow or crash.
Split Each Worksheet and Save as a Separate PDFs
In case you want to split the worksheets and save these as PDF files instead of the Excel files, you can use the below code:
'Code Created by Sumit Bansal from trumpexcel.com
Sub SplitEachWorksheet()
Dim FPath As String
FPath = Application.ActiveWorkbook.Path
Application.ScreenUpdating = False
Application.DisplayAlerts = False

For Each ws In ThisWorkbook.Sheets
    ws.Copy
    Application.ActiveSheet.ExportAsFixedFormat Type:=xlTypePDF, Filename:=FPath & "" & ws.Name & ".xlsx"
    Application.ActiveWorkbook.Close False
Next

Application.DisplayAlerts = True
Application.ScreenUpdating = True
End Sub
Things you need to make sure before using this code:
- Create a folder where you want to get all the resulting files.
- Save the main Excel file (which has all the worksheets that you want as separate files) in this folder.
The above code split each sheet in the Excel file and save it as a PDF in the same folder where you have saved the main Excel file.
Split Only those Worksheets that Contain a Word/Phrase into Separate Excel Files
In case you have a lot of sheets in a workbook and you only want to split only those sheets that have a specific text in it, you can do that as well.
For example, suppose you have an Excel file where you data for multiple years and each sheet in the file has the year number as the prefix. Something as shown below:
Now, let’s say you want to split all the sheets for 2020 and save these as separate Excel files. To do this, you need to somehow check the name of each worksheet and only those sheets that have the number 2020 should be split and saved, and the rest should be left untouched.
This can be done using the following VBA macro code:
'Code Created by Sumit Bansal from trumpexcel.com
Sub SplitEachWorksheet()
Dim FPath As String
Dim TexttoFind As String
TexttoFind = "2020"
FPath = Application.ActiveWorkbook.Path
Application.ScreenUpdating = False
Application.DisplayAlerts = False

For Each ws In ThisWorkbook.Sheets
    If InStr(1, ws.Name, TexttoFind, vbBinaryCompare) <> 0 Then
        ws.Copy
        Application.ActiveWorkbook.SaveAs Filename:=FPath & "" & ws.Name & ".xlsx"
        Application.ActiveWorkbook.Close False
    End If
Next

Application.DisplayAlerts = True
Application.ScreenUpdating = True
End Sub
In the above code, I have used a variable TexttoFind, which has been assigned to “2020” in the beginning.
The VBA code then uses the For Next loop in VBA to go through each worksheet and then check the name of each worksheet INSTR function. This function checks whether the worksheet name has the word 2020 in it or not. If it does, it will return a position number where it finds this text (which is 2020 in this case).
And if it doesn’t find the text we are looking for, it returns 0.
This is used with the IF Then condition. So if a sheet name has the text string 2020 in it, it will be split and saved as a separate file. And if it doesn’t have this text string, the IF condition would not be met and nothing would happen.
You may also like the following Excel tutorials:
- How to Compare Two Excel Sheets
- How to Reduce Excel File Size
- Combine Data from Multiple Workbooks in Excel
- How to Recover Unsaved Excel Files [All Options + Precautions]
- How to Automatically Open Specific Excel File on Startup
- How to Split Multiple Lines in a Cell into a Separate Cells / Columns
- Excel VBA Split Function
- How to Import XML File into Excel | Convert XML to Excel
- How to Split Screen in Excel (Compare Side-by-Side)
It could be necessary to divide a huge workbook into many Excel files by storing each worksheet as a distinct Excel file. You might, for instance, divide a workbook into many separate Excel files and then give each file to a different person to manage. You can keep your data safe and assign particular individuals to manage different types of data by doing this. Lets imagine The name of the student may be in column A of a worksheet that contains data, and you may need to automatically divide this data into numerous worksheets according on the name in column A. A fresh worksheet will be created for each student. The Split Date tool in Kutools for Excel helps to split sheets in excel into separate files column selection and row selection. This article contains steps to split important data in sheets, rows and columns.
Splitting Sheets using a selected column:
-
If you have a range of data, like in the screenshot below, and wish to swiftly divide it into many worksheets based on column A in a workbook, separate each name into a new worksheet. Kelly, for instance, will be divided into one worksheet. You may complete it as follows:
To divide a range of data into numerous worksheets depending on a column, please choose the range first.
-
Then, by selecting Home > Worksheet > Split Data, use the tool. Please choose Specific column from the drop-down list in the Split Date into Multiple Worksheets dialogue box before choosing the column you wish to divide the data based on.
-
You can now see that each name in the column will be separated into a different worksheet and you have split sheets in Excel in separate files within a new workbook once you click OK to split the data. See illustration
SPLITTING SHEETS INTO MULTIPLE WORKSHEETS DEPENDING ON THE NUMBER OF ROWS:
-
If you have a range of data, like in the screen shot below, and you want to swiftly split sheets in Excel into separate files, divide it into several worksheets based on the number of rows, You may write it down like this:
please pick the range that you want to do so.
-
Using Home > Worksheet > Split Data to apply the utility. Please choose Fixed rows and enter the desired number of rows in the box provided in the Split Date into Multiple Worksheets dialogue box.
-
Please state the name of the new worksheet. The name of the new worksheet might be Row Numbers. New files will be created in a separate folder. Check screenshots given below:
Did you learn about how to split sheets in Excel into separate files? You can follow WPS Academy to learn more features of Word Document, Excel Spreadsheets and PowerPoint Slides.
You can also download WPS Office to edit the word documents, excel, PowerPoint for free of cost. Download now! And get an easy and enjoyable working experience
This post will guide you how to save each worksheet to separate CSV files in your workbook in Excel. How do I save multiple or all worksheets to separate csv file in Excel 2013/2016. How to export all worksheets to separate txt files with VBA macro in Excel.
Assuming that you have a workbook that has four different worksheets, sheet1, sheet2, sheet3, and sheet4. And You want each worksheet as its own CSV file and we also want the CSV file name to take into account its Excel Source as well as the workbook where it originates. To achieve the result of exporting multiple worksheets separate csv files, you have to use VBA Macro to save all worksheets in the current workbook to separated csv files. Here are the steps:
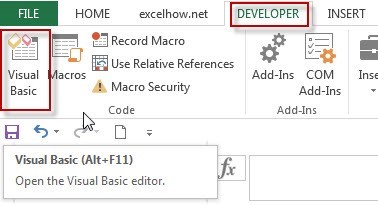
Step1: open your excel workbook and then click on “Visual Basic” command under DEVELOPER Tab, or just press “ALT+F11” shortcut.
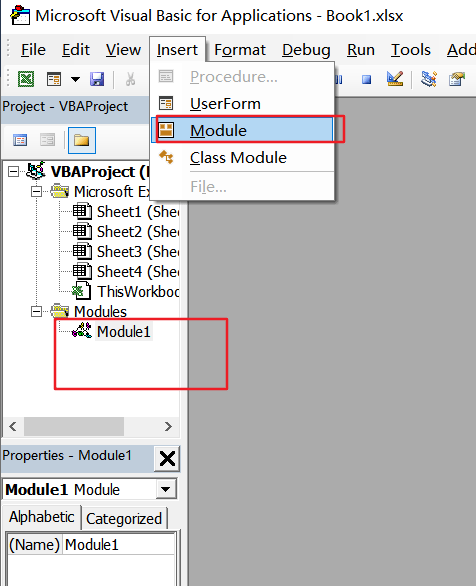
Step2: then the “Visual Basic Editor” window will appear.
Step3: click “Insert” ->”Module” to create a new module.
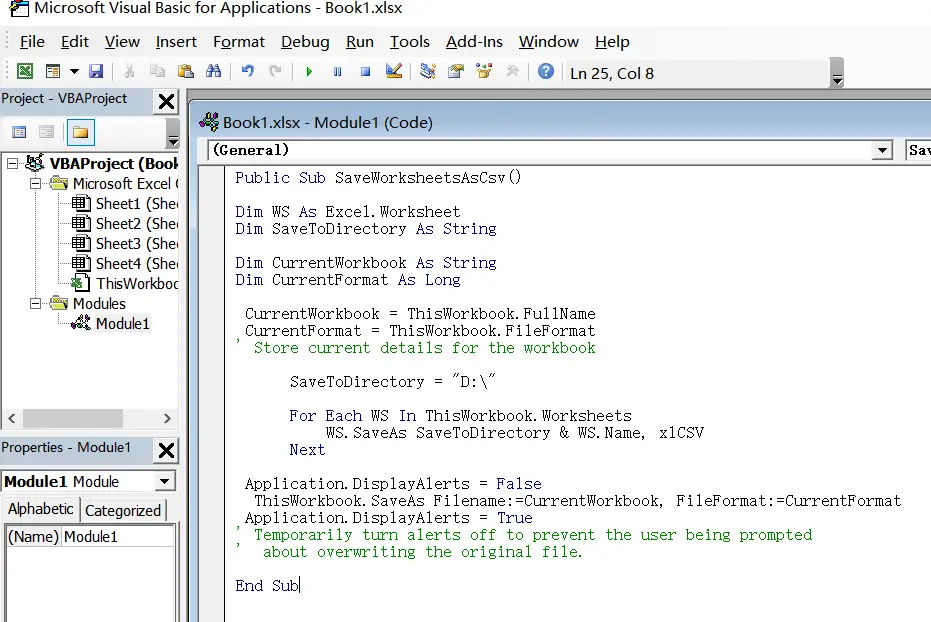
Step4: paste the below VBA code into the code window. Then clicking “Save” button.
Public Sub SaveWorksheetsAsCsv()

Dim WS As Excel.Worksheet
Dim SaveToDirectory As String

Dim CurrentWorkbook As String
Dim CurrentFormat As Long

 CurrentWorkbook = ThisWorkbook.FullName
 CurrentFormat = ThisWorkbook.FileFormat
' Store current details for the workbook

      SaveToDirectory = "D:tmp"

      For Each WS In ThisWorkbook.Worksheets
          WS.SaveAs SaveToDirectory & WS.Name, xlCSV
      Next

 Application.DisplayAlerts = False
  ThisWorkbook.SaveAs Filename:=CurrentWorkbook, FileFormat:=CurrentFormat
 Application.DisplayAlerts = True
' Temporarily turn alerts off to prevent the user being prompted
'  about overwriting the original file.

End Sub
Step5: back to the current worksheet, then run the above excel macro. Click Run button.
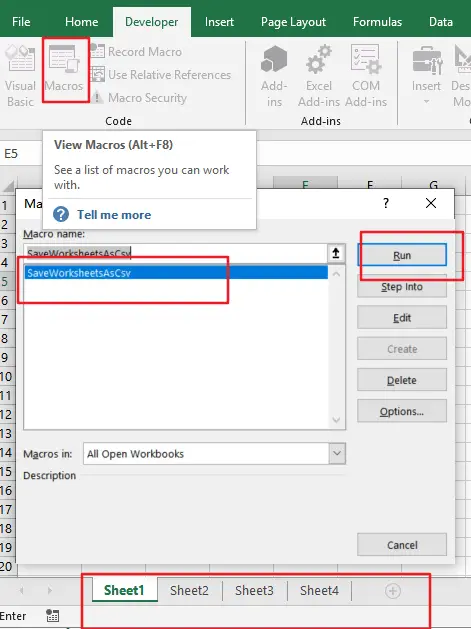
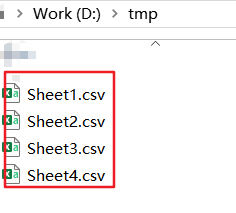
Step6: you would see that all worksheet has been converted to a single CSV files in the specified directory. This example will save csv file into D:tmp directory. You need to change the variable “SaveToDirectory ” as you need. or you can also create a temp directory called tmp in disk D partition.
2. Export Each Sheet to Separate Text Files
If you want only convert each worksheet to separate text files for your active workbook, you can also use an Excel VBA Macro to achieve the result. Just using the following VBA code:
Public Sub SaveWorksheetsAsCsv()

Dim WS As Excel.Worksheet
Dim SaveToDirectory As String

Dim CurrentWorkbook As String
Dim CurrentFormat As Long

 CurrentWorkbook = ThisWorkbook.FullName
 CurrentFormat = ThisWorkbook.FileFormat
' Store current details for the workbook

      SaveToDirectory = "D:tmp"

      For Each WS In ThisWorkbook.Worksheets
          WS.SaveAs SaveToDirectory & WS.Name & ".txt"
      Next

 Application.DisplayAlerts = False
  ThisWorkbook.SaveAs Filename:=CurrentWorkbook, FileFormat:=xlText
 Application.DisplayAlerts = True
' Temporarily turn alerts off to prevent the user being prompted
'  about overwriting the original file.

End Sub
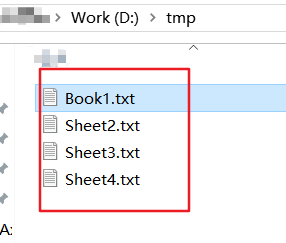
Let’s see the result:
3. Conclusion
By using VBA code, you can create a custom macro that will iterate through each sheet in your workbook and save it as a separate CSV file. This code can be customized to suit your specific needs and can be easily modified to include additional functionality or to save the files in a different format.
Overall, if you frequently work with large Excel workbooks that contain multiple sheets, using VBA code to save each sheet as a separate CSV file is a great way to streamline your workflow and improve your productivity.
This tutorial explains how to split Excel sheet into multiple files based on column. Here I will talk about two different methods to split Excel sheet into different sheets. These methods basically go for a specified column and then group the unique values. After that, they extract the data for these values and then put it in different sheets. Later you can save those sheets as separate Excel files. In the following tutorial, I will do the same using an Excel plugin and through VBA code.
If you have a single Excel file which contains repeated data about an entity then you can split that. For instance, if you have record about different clients in your sheet with multiple records, then you can split that in separate sheets. This will result in an organized data and you will end up having data about different clients in different sheets. All you have to do is just hit a few clicks to execute VBA code.
Method 1: Split Excel Sheet into Multiple Files Based on Column using VBA Code
If you know how to execute VBA code inside Excel, then this is one of the best methods to easily split an Excel sheet. Here I will list two VBA snippets that you can run in the target Excel sheet. The fist snippet extracts data from the specified column and will place the data in different sheets. The second snippet will save those sheets as separate files in the same directory where the source Excel File is.
Here are the steps to use VBA code to split Excel sheet based on column.
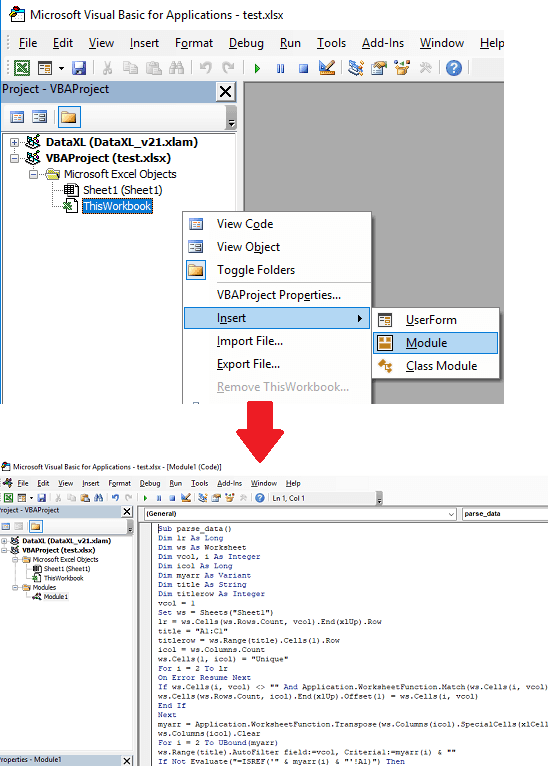
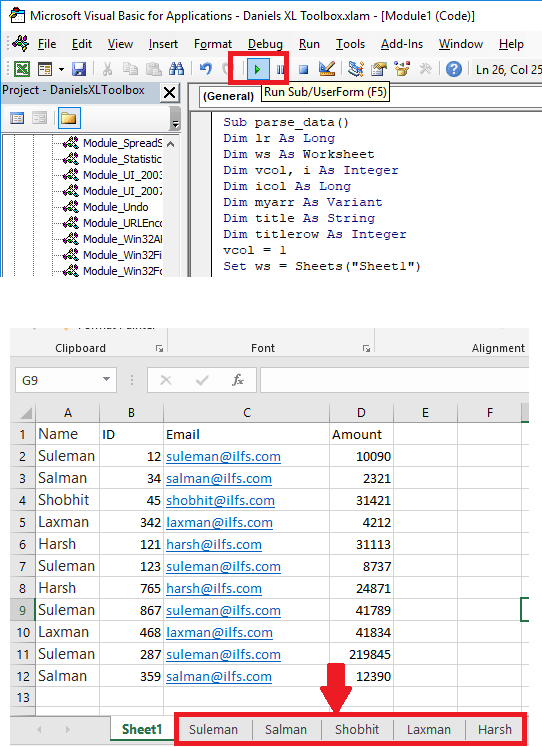
Step 1: Open Excel and then load the sheet in it that you want to split. After that, open VBA editor by pressing Alt + F11 key combination.

Step 2: In the VBA editor, you can right click in left pane to insert a new module. See the screenshot below. And then in the new module, you can paste this code.
Sub parse_data()

Dim lr As Long

Dim ws As Worksheet

Dim vcol, i As Integer

Dim icol As Long

Dim myarr As Variant

Dim title As String

Dim titlerow As Integer

vcol = 1

Set ws = Sheets("Sheet1")

lr = ws.Cells(ws.Rows.Count, vcol).End(xlUp).Row

title = "A1:C1"

titlerow = ws.Range(title).Cells(1).Row

icol = ws.Columns.Count

ws.Cells(1, icol) = "Unique"

For i = 2 To lr

On Error Resume Next

If ws.Cells(i, vcol) <> "" And Application.WorksheetFunction.Match(ws.Cells(i, vcol), ws.Columns(icol), 0) = 0 Then

ws.Cells(ws.Rows.Count, icol).End(xlUp).Offset(1) = ws.Cells(i, vcol)

End If

Next

myarr = Application.WorksheetFunction.Transpose(ws.Columns(icol).SpecialCells(xlCellTypeConstants))

ws.Columns(icol).Clear

For i = 2 To UBound(myarr)

ws.Range(title).AutoFilter field:=vcol, Criteria1:=myarr(i) & ""

If Not Evaluate("=ISREF('" & myarr(i) & "'!A1)") Then

Sheets.Add(after:=Worksheets(Worksheets.Count)).Name = myarr(i) & ""

Else

Sheets(myarr(i) & "").Move after:=Worksheets(Worksheets.Count)

End If

ws.Range("A" & titlerow & ":A" & lr).EntireRow.Copy Sheets(myarr(i) & "").Range("A1")

Sheets(myarr(i) & "").Columns.AutoFit

Next

ws.AutoFilterMode = False

ws.Activate

End Sub
Source
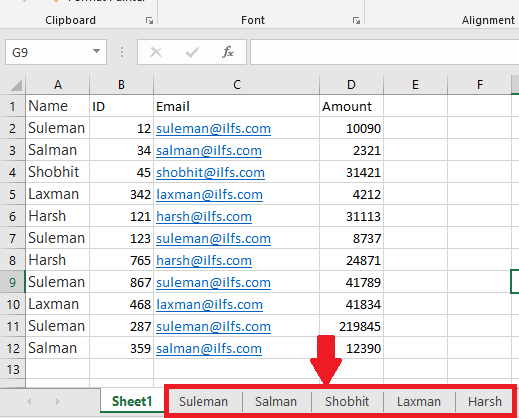
Step 3: Now, run this code by hitting the F5 key. Or, you can click on the play button from the toolbar to do the same. As you do that, you will see that it will create different sheets with the different unique values from the column.
Step 4: Now, at this point, we still have sheets saved in Excel File. To export them as separate Excel files, you have to run another VBA code. Delete all the code from the current window and then paste the following code. Run it and then it will create separate files in the same folder where the source Excel file was.
Sub Splitbook()

'Updateby20140612

Dim xPath As String

xPath = Application.ActiveWorkbook.Path

Application.ScreenUpdating = False

Application.DisplayAlerts = False

For Each xWs In ThisWorkbook.Sheets

xWs.Copy

Application.ActiveWorkbook.SaveAs Filename:=xPath & "" & xWs.Name & ".xlsx"

Application.ActiveWorkbook.Close False

Next

Application.DisplayAlerts = True

Application.ScreenUpdating = True

End Sub

In this way, you can split an Excel sheet into multiple sheets based on column. All you have to do is run two different code snippets and get the job done at your fingertips.
Method 2: Split Excel Sheet into Multiple Files Based on Column using an Excel Plugin
Data XL is a free Excel addin which you can use to split an Excel sheet into multiple files based on column. You can simply install it and then use it to split any Excel sheet. It works in exactly same manner like the above code does. You can install it through its XALM file and then start using it to split sheets based on the column. It provides you with a simple GUI to handle the sheet splitting operation. It just takes the range that you want to split along with the column that will be used to split the sheet. After that, just a couple of clicks you have to press and you will end up having multiple Excel files in the same directory.
Here are steps to use this plugin to split an Excel sheet into multiple files based on column.
Step 1: Download the Data XL plugin for Excel from above link and then you can open it by just double clicking on it.
Step 2: Open the Excel sheet that you want to split through this plugin. After that, you can click on “Split Data Tool” from the “DATA XL” tab of the Excel ribbon. After that, fill out the details like data range, specify the column that will be used to split the data, etc.
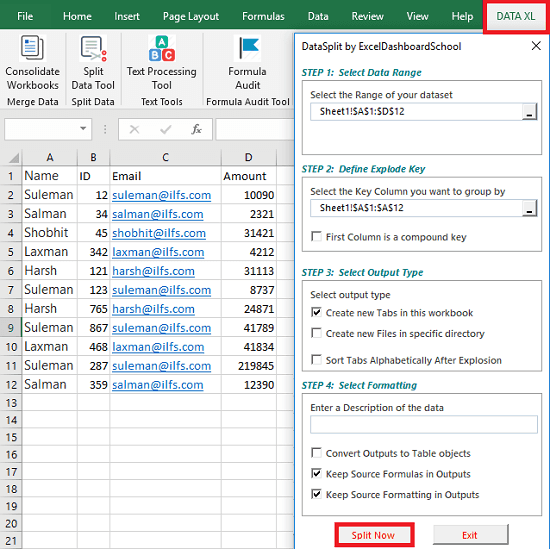
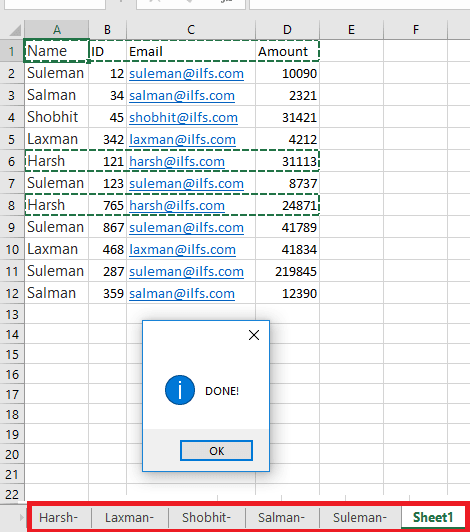
Step 3: Finally, hit the “Split Now” button to split the sheet according to the column that you have specified. It will immediately split the sheet and will create separate worksheet into different tabs of Excel. See this screenshot.
Although there is an option to directly specify a folder where you want to save split data as separate Excel files. But this option doesn’t seem to be working in Windows 10. So, after you have the split data in different sheets, you can save them to separate Excel files using VBA code that I have mentioned in the above method.
Final thoughts
The methods that I have explained above can easily split Excel sheet based on a column. It depends on you which method you want to use to split an Excel. Both the methods work fine and can easily split an Excel sheet in just a few seconds. So, if you are looking for ways to split Excel sheet according to one of its column, then this tutorial will be helpful.
Microsoft Excel is excellent at so many day-to-day tasks. But now and then, you encounter one of its shortcomings: the size of a spreadsheet. Read on to find out how to make an Excel spreadsheet smaller or split a large CSV file into multiple files.
Why Split a Large CSV Into Multiple Files?
You might be thinking, “Why would I need to split a large Excel file into multiple smaller files?” It’s an interesting question, especially as Excel has a spreadsheet row limit of 1,048,576.
Over 1 million rows sounds phenomenal. However, hitting the row limit is easier than you think, especially during certain tasks. For example, if you’re marketing via email, you might import a CSV file containing millions of email addresses.
The only problem is, how do you manage a spreadsheet with that many addresses in? Furthermore, what if someone sends you a CSV that is already over the limit (from another program)?
If that sounds like an issue you’re likely to face, check out the following five ways to split a large CSV or Excel file into multiple smaller files.
Don’t have a large CSV file handy but want to play along at home? I’m using the COVID-19 Open Research Dataset in the examples, which you can download and use too.
1. Break Up CSV Files Using a Program
There are several useful CSV splitter programs out there. Here are two of the best. Fair warning, though, as these programs are working, they sometimes run into memory issues, which is a common problem for CSV-splitting programs.
Free Huge CSV Splitter
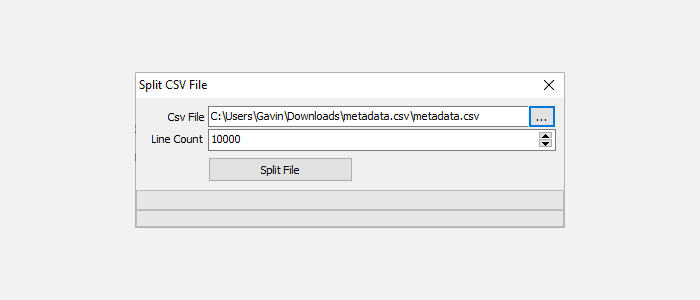
The Free Huge CSV Splitter is a basic CSV splitting tool. You input the CSV file you want to split, the line count you want to use, and then select Split File. The line count determines the number of output files you end up with.
CSV Splitter
CSV Splitter is the second tool. It offers much the same functionality as Free Huge CSV Splitter, albeit with a slightly sleeker design. It splits your CSV into small chunks rapidly, allowing you to determine the line count you want to use.
2. Use a Batch File
Next up, create a programmable batch file. You can use a batch file to process the CSV into smaller chunks, customizing the file to deliver different chunks.
Open a new text document, then copy and paste the following:
@echo offsetlocal ENABLEDELAYEDEXPANSION
REM Edit this value to change the name of the file that needs splitting. Include the extension.
SET BFN=HCAHPSHospital.csv
REM Edit this value to change the number of lines per file.
SET LPF=2500
REM Edit this value to change the name of each short file. It will be followed by a number indicating where it is in the list.
SET SFN=HosptialSplitFile
REM Do not change beyond this line.
SET SFX=%BFN:~-3%
SET /A LineNum=0
SET /A FileNum=1
For /F "delims==" %%l in (%BFN%) Do (
SET /A LineNum+=1
echo %%l >> %SFN%!FileNum!.%SFX%
if !LineNum! EQU !LPF! (
SET /A LineNum=0
SET /A FileNum+=1
)
)
endlocal
Pause
You’ll need to configure the batch file before running. I’ll tell you what each command does, and you can alter it to suit the size of your batch file, as well as the required output.
- «SET BFN=» should point to the CSV you need to break down
- «SET LPF=» is the number of rows you’d like to limit your new file to
- «SET SFN=» is the new naming scheme for your split files
Once you’ve entered your variables, head to File > Save As. Choose a filename, and select Save. Then, select your newly saved text file and press F2 to rename it. Replace the .txt extension with .bat and press OK when the warning appears. Now, you can split your large CSV file into smaller output files.
3. Use a PowerShell Script to Break Up a CSV File
You can use batch files for a wide range of day-to-day tasks. But PowerShell scripts are faster, especially for this type of processing and division.
The following script quickly cuts your large CSV into smaller files.
First up, press CTRL + X to open the Windows Power Menu, then select PowerShell. If PowerShell isn’t an option, input powershell in your Start Menu search bar and select the Best Match.
Now, copy and paste the following script:
$InputFilename = Get-Content 'C:filelocation'$OutputFilenamePattern = 'output_done_'
$LineLimit = 50000
$line = 0
$i = 0
$file = 0
$start = 0
while ($line -le $InputFilename.Length) {
if ($i -eq $LineLimit -Or $line -eq $InputFilename.Length) {
$file++
$Filename = "$OutputFilenamePattern$file.csv"
$InputFilename[$start..($line-1)] | Out-File $Filename -Force
$start = $line;
$i = 0
Write-Host "$Filename"
}
$i++;
$line++
}
Replace the file location in the first line with your CSV file, then run the script. The script outputs the smaller CSV files in your user directory. For example, my CSV files are found at C:UsersGavin with file name output_done_1.csv. You can change the output name by altering the $OutputFilenamePattern = ‘output_done_’ line.
You can find the original script at SPJeff.
4. Break Up a Large CSV Using Power Pivot
Your penultimate solution to breaking up a large CSV file into small bits doesn’t actually break it down. Rather, it lets you load your massive CSV file into Excel and use the Power Pivot tool to open it. That’s right; you can effectively ignore the Excel line limit and manage the file within the program.
You achieve this by creating a data link to the CSV file, then using Power Pivot to manage the contents. For a full explanation and tutorial, read Jose Barreto’s blog detailing the process.
In short, Barreto creates a Pivot Table using “up to 8.5 million rows with no problem at all.” The above image comes from the blog post, showing a total of 2 million rows in use in Excel.
Remember, this process doesn’t split the CSV into small chunks. However, it does mean you can manipulate the CSV in Excel, which is a very handy alternative. If you need more tips, find out how to use a Pivot Table for data analysis.
5. Break Up Large CSV Online Using Split CSV
There are also online services that break your big CSV file into smaller bits. One such option is Split CSV, a free online CSV splitter.
Split CSV managed the COVID-19 dataset fine, splitting it into handy chunks. As with other tools, you define the line count for each file and let it split it up. However, I didn’t have a large CSV file to hand to test with, and, as such, your experience may vary.
Split CSV includes premium options, too. For a subscription fee, you can use a custom delimiter, choose a selection of output file types, remove certain characters from the output files, and delete duplicate lines.
Break Down Your CSV Files Into Easily Manageable Chunks
You now have five solutions for breaking your CSV files into small bits, making them easy to manage. The solutions vary in speed and the size of the CSV files they can manage, so you may have to experiment to find the solution that works best for you. And the best part of all? These CSV splitting techniques work on Windows 10 and Windows 11. You can even use the online CSV splitting tool on macOS and Linux!
Here is one that will give you a visual file chooser to pick the folder you want to save the files to and also lets you choose the CSV delimiter (I use pipes ‘|’ because my fields contain commas and I don’t want to deal with quotes):
' ---------------------- Directory Choosing Helper Functions -----------------------
' Excel and VBA do not provide any convenient directory chooser or file chooser
' dialogs, but these functions will provide a reference to a system DLL
' with the necessary capabilities
Private Type BROWSEINFO    ' used by the function GetFolderName
    hOwner As Long
    pidlRoot As Long
    pszDisplayName As String
    lpszTitle As String
    ulFlags As Long
    lpfn As Long
    lParam As Long
    iImage As Long
End Type

Private Declare Function SHGetPathFromIDList Lib "shell32.dll" _
                                             Alias "SHGetPathFromIDListA" (ByVal pidl As Long, ByVal pszPath As String) As Long
Private Declare Function SHBrowseForFolder Lib "shell32.dll" _
                                           Alias "SHBrowseForFolderA" (lpBrowseInfo As BROWSEINFO) As Long

Function GetFolderName(Msg As String) As String
    ' returns the name of the folder selected by the user
    Dim bInfo As BROWSEINFO, path As String, r As Long
    Dim X As Long, pos As Integer
    bInfo.pidlRoot = 0&    ' Root folder = Desktop
    If IsMissing(Msg) Then
        bInfo.lpszTitle = "Select a folder."
        ' the dialog title
    Else
        bInfo.lpszTitle = Msg    ' the dialog title
    End If
    bInfo.ulFlags = &H1    ' Type of directory to return
    X = SHBrowseForFolder(bInfo)    ' display the dialog
    ' Parse the result
    path = Space$(512)
    r = SHGetPathFromIDList(ByVal X, ByVal path)
    If r Then
        pos = InStr(path, Chr$(0))
        GetFolderName = Left(path, pos - 1)
    Else
        GetFolderName = ""
    End If
End Function
'---------------------- END Directory Chooser Helper Functions ----------------------

Public Sub DoTheExport()
    Dim FName As Variant
    Dim Sep As String
    Dim wsSheet As Worksheet
    Dim nFileNum As Integer
    Dim csvPath As String


    Sep = InputBox("Enter a single delimiter character (e.g., comma or semi-colon)", _
                   "Export To Text File")
    'csvPath = InputBox("Enter the full path to export CSV files to: ")

    csvPath = GetFolderName("Choose the folder to export CSV files to:")
    If csvPath = "" Then
        MsgBox ("You didn't choose an export directory. Nothing will be exported.")
        Exit Sub
    End If

    For Each wsSheet In Worksheets
        wsSheet.Activate
        nFileNum = FreeFile
        Open csvPath & "" & _
             wsSheet.Name & ".csv" For Output As #nFileNum
        ExportToTextFile CStr(nFileNum), Sep, False
        Close nFileNum
    Next wsSheet

End Sub


Public Sub ExportToTextFile(nFileNum As Integer, _
                            Sep As String, SelectionOnly As Boolean)

    Dim WholeLine As String
    Dim RowNdx As Long
    Dim ColNdx As Integer
    Dim StartRow As Long
    Dim EndRow As Long
    Dim StartCol As Integer
    Dim EndCol As Integer
    Dim CellValue As String

    Application.ScreenUpdating = False
    On Error GoTo EndMacro:

    If SelectionOnly = True Then
        With Selection
            StartRow = .Cells(1).Row
            StartCol = .Cells(1).Column
            EndRow = .Cells(.Cells.Count).Row
            EndCol = .Cells(.Cells.Count).Column
        End With
    Else
        With ActiveSheet.UsedRange
            StartRow = .Cells(1).Row
            StartCol = .Cells(1).Column
            EndRow = .Cells(.Cells.Count).Row
            EndCol = .Cells(.Cells.Count).Column
        End With
    End If

    For RowNdx = StartRow To EndRow
        WholeLine = ""
        For ColNdx = StartCol To EndCol
            If Cells(RowNdx, ColNdx).Value = "" Then
                CellValue = ""
            Else
                CellValue = Cells(RowNdx, ColNdx).Value
            End If
            WholeLine = WholeLine & CellValue & Sep
        Next ColNdx
        WholeLine = Left(WholeLine, Len(WholeLine) - Len(Sep))
        Print #nFileNum, WholeLine
    Next RowNdx

EndMacro:
    On Error GoTo 0
    Application.ScreenUpdating = True

End Sub
Asked
10 years, 1 month ago
Viewed
144k times
I think the title says it all for this question but to elaborate a bit further:
I have a .xlsx file which contains a few dozen sheets. I want to output all of those sheets as separate .xlsx files. Automated naming of them isn’t necessary. Does excel have a function to export sheets to a separate file?
asked Mar 6, 2013 at 21:48
![]()
It is not a built-in feature.
However, if you run this code, it should do the job.
Sub SaveSheets()
    Dim strPath As String
    Dim ws As Worksheet

    Application.ScreenUpdating = False

    strPath = ActiveWorkbook.Path & ""
    For Each ws In ThisWorkbook.Sheets
        ws.Copy
        'Use this line if you want to break any links:
        BreakLinks Workbooks(Workbooks.Count)
        Workbooks(Workbooks.Count).Close True, strPath & ws.Name & ".xlsx"
    Next

    Application.ScreenUpdating = True
End Sub

Sub BreakLinks(wb As Workbook)
    Dim lnk As Variant
    For Each lnk In wb.LinkSources(xlExcelLinks)
        wb.BreakLink lnk, xlLinkTypeExcelLinks
    Next
End Sub
To run the code, do the following:
- Open the VBA editor (Alt+F11)
- In the tree in the top left corner, right click on your workbook and insert a new module
- Copy the above code into this module
- Close the VBA editor
- In Excel press Alt+F8 to run macros and select
SaveSheets
or see How do I add VBA in MS Office?
![]()
answered Mar 6, 2013 at 21:58
![]()
Peter AlbertPeter Albert
2,9401 gold badge17 silver badges25 bronze badges
6
-
When you right-click the tab of an Excel sheet, you can select Move or Copy…

-
In the resulting dialog, you can select a target work book. Select (new book).
-
Click OK. Your sheet is now inside a new document.


answered Mar 14, 2013 at 20:06
![]()
Oliver SalzburgOliver Salzburg
85.7k62 gold badges259 silver badges306 bronze badges
I tried Peter Albert’s solution and it didn’t work for me, so I found a solution in this post (“Excel – save worksheets as separate files”) at Diary of a computer geek.
It works great.
You should rename sheets that contain dots
to get correctly named files with .xls extensions.
Sub CreateNewWBS()
Dim wbThis As Workbook
Dim wbNew As Workbook
Dim ws As Worksheet
Dim strFilename As String

    Set wbThis = ThisWorkbook
    For Each ws In wbThis.Worksheets
        strFilename = wbThis.Path & "/" & ws.Name
        ws.Copy
        Set wbNew = ActiveWorkbook
        wbNew.SaveAs strFilename
        wbNew.Close
    Next ws
End Sub
Use instructions to create and run this macro from Peter Albert’s post
or from How do I add VBA in MS Office?
![]()
answered May 17, 2014 at 15:29
![]()
hrvoj3ehrvoj3e
2112 silver badges4 bronze badges
5
Try 4 easy methods to accomplish this
by Matthew Adams
Matthew is a freelancer who has produced a variety of articles on various topics related to technology. His main focus is the Windows OS and all the things… read more
Updated on August 31, 2022
Reviewed by
Vlad Turiceanu

Passionate about technology, Windows, and everything that has a power button, he spent most of his time developing new skills and learning more about the tech world. Coming… read more
- When users open two Excel files at once, they are not opened in separate windows.
- In order to view and compare the content of two separate files, you need to open them side by side.
- Our guide will show you how to open Excel files side by side on Windows.

When you open multiple files in Excel, those files do not open in separate windows. Instead, users can switch between them by clicking their thumbnail previews on Windows 10’s taskbar.
However, some users might need to open two MS Excel files in separate windows so they can view their contents side by side.
In the guides below you will find out how users can open two or more Excel files in multiple windows.
How can I have two Excel windows open side by side?
1. Open two Excel windows and place them side by side
- You can open the Excel application multiple times to have a couple of Excel windows on the desktop. To do that, click the Excel icon to open the software.
- Then click Excel’s icon again to open the software for a second time. Thereafter, you’ll have two Excel windows on the desktop.
- Click the Restore Down buttons on the windows.

- Then you can drag one window to the left of the desktop to fill the left side.
- Drag the other window to the right of the desktop to fill the right side of the desktop as shown directly below.

- Then click File > Open in both windows to open spreadsheets in them.


2. Press the Shift Key to open multiple Excel files side by side
Alternatively, you can open multiple Excel windows by pressing and holding the Shift key. First, open the Excel software. Then hold the Shift key, and click Excel’s taskbar icon. That will open another window for the application that users can drag to both desktop sides as outlined above.
3. Add the Office Tab to Excel
Users can also open spreadsheets in separate windows with the Office Tab extension for Excel. That’s a $29 add-on for Excel that adds spreadsheet tabs to Excel, and users can try out a one-month free trial for Office Tab.
After installing that add-on, Excel will include alternative tabs for separate spreadsheets. Then users can right-click a spreadsheet tab and select its Open in New Window context menu option.

- Excel Running Slow? 4 Quick Ways to Make It Faster
- Fix: Excel Stock Data Type Not Showing
- Best Office Add-Ins: 15 Picks That Work Great in 2023
- 4 Ways to Fix Office 365 Error Code 0x80048823
4. Use the View Side by Side option
1. Launch Excel.
2. Click File > Open to open a couple of spreadsheets.
3. Choose the View tab.
4. Select the View Side by Side option in the Window group.
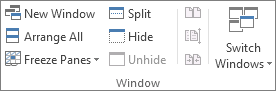
5. Alternatively, users can select the New Window option to open another spreadsheet in separate window.
Users utilizing full versions of Excel 2019-2007 can select a View Side by Side option to compare two spreadsheets. The option is built-in on the app, and is very easy to toggle on.
So, there are a few ways users can open Excel spreadsheets in separate windows. Then users can drag windows to the left and right sides of the Windows desktop to view both the spreadsheets’ contents.
However, note that Windows XP and Vista don’t include the Windows Snap feature for arranging windows on the left and right sides of the desktop.
For any more questions or suggestions, don’t hesitate to reach for the comments section below.
![]()
Newsletter
Download PC Repair Tool to quickly find & fix Windows errors automatically
Microsoft Excel is Office Suite’s database management tool wherein you can record data in its rows and columns and perform a myriad of analysis on it. If you’re someone who relies very heavily on Excel, for either your personal or professional use, you may feel the need to be able to access two Excel spreadsheets at the same time. While there is a way for you to open two Excel workbooks at the same time, you can also open separate files in separate windows. In this article, we will be discussing 4 ways in which you can do so.

Each of the four ways is really simple once you find out about them, but they may not be apparent at a first glance.
- Open Excel files in separate windows using the Shift key and the Taskbar
- Open Excel files in separate windows with the Start menu
- Open Excel files in separate windows by creating a shortcut
- Open Excel files in separate windows with the Office Tab
1] Open Excel files in separate windows using the Shift key and the Taskbar
- Have your first Excel workbook already open on your computer
- Now, press the Shift key and click on the Excel file icon from the taskbar
- This will open a new, blank Excel workbook. You can use this blank workbook as a prompt to open any other workbook you’ve previously worked on and want to access simultaneously with the file opened initially
- Click on File > select the workbook of your choice
As you can see, we now have two Excel files running simultaneously in two separate windows
2] Open Excel files in separate windows with the Start menu
This method is just as easy as the first one. Do as follows:
- Search for Excel from the search option of your Taskbar and open Microsoft Excel
- Click on File and open the workbook you want to work on
- If you want to open another file in a separate window, simply repeat the first two steps
This way, you can open as many files in separate windows as you want.
3] Open Excel files in separate windows by creating a shortcut
Thirdly, you can take the help of a manually created shortcut. You can make one by following the steps below:
- Open File Explorer and visit the Office folder by visiting the following location. You can straight away copy and paste the address below, based on your Office version
- Once you’re there, locate the Excel application, right-click on it and select ‘Create a shortcut’
- Confirm this action and you’ll find an Excel shortcut on your desktop. Every time you click on it, a new Excel window opens
4] Open Excel files in separate windows with the Office Tab
The fourth method requires you to install an application/add-in called the Office Tab. This utility presents you with an option called ‘Open in a new window,’ making it the easiest and quickest way to do so. If you’re someone who finds himself working on multiple spreadsheets regularly, this tool can come in very handy for you.
- Once you’ve installed Office Tab, open the workbooks you want to use in separate windows
- These workbooks will, by default, all be opened in one window and tabbed at the top
- Right-click on the workbook you want to take to a separate tab and click on ‘Open In New Window’
- This will do the job. Your workbooks will now appear in separate tabs.
Why can I not open multiple Excel files?
You can open multiple Excel files by making some changes in the way you start Excel. Don’t double-click on the workbook to open it, instead right-click on one of the files you want to open. Similarly, you can open multiple excel files while keeping the selection set intact.
Can I open multiple Excel files at once?
Yes, you can. Instead of double-clicking to open a file, you can create a “selection set.” To open multiple files, click on the first file, hold the Shift key and click on the last file in the sequence.

Shiwangi loves to dabble with and write about computers. Creating a System Restore Point first before installing new software, and being careful about any third-party offers while installing freeware is recommended.