
VBA Code to Send Emails From Excel
In VBA, to send emails from Excel, we can automatically automate our mailing feature to send emails to multiple users at a time. However, to do so, we need to remember that we may do it by outlook, another product of outlook, so we need to enable outlook scripting in VBA. Once done, we use the .Application method to use outlook features.
VBA’s versatility is just amazing. VBA coders love Excel because by using VBA, we not only can work within Excel. Rather, we can also access other Microsoft tools. For example, we can access PowerPoint, Word, and Outlook by using VBAMicrosoft Outlook has a VBA reference that can be used to control Outlook. This makes it easy to automate repetitive activities in Outlook. To use VBA in Outlook, you’ll need to enable the developer feature, just like in Excel.read more. So I was impressed when I heard of sending emails from Excel. Yes, it is true. We can send emails from excel. This article will show you how to send emails from Excel with attachments using VBA CodingVBA code refers to a set of instructions written by the user in the Visual Basic Applications programming language on a Visual Basic Editor (VBE) to perform a specific task.read more.
Table of contents
- VBA Code to Send Emails From Excel
- Set Reference to Microsoft Office Library
- 13 Easy Steps to Send Emails from Excel
- Step #1
- Step #2
- Step #3
- Step #4
- Step #5
- Step #6
- Step #7
- Step #8
- Step #9
- Step #10
- Step #11
- Step #12
- Step #13
- Recommended Articles

You are free to use this image on your website, templates, etc, Please provide us with an attribution linkArticle Link to be Hyperlinked
For eg:
Source: VBA Send Email from Excel (wallstreetmojo.com)
Set Reference to Microsoft Office Library
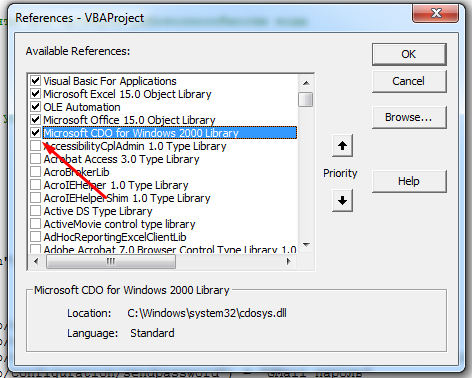
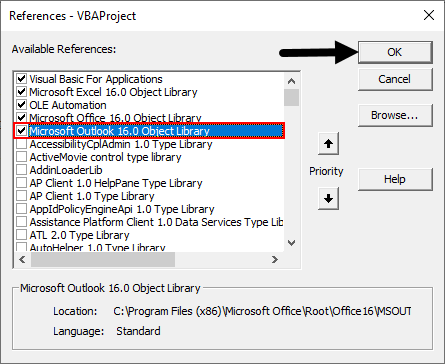
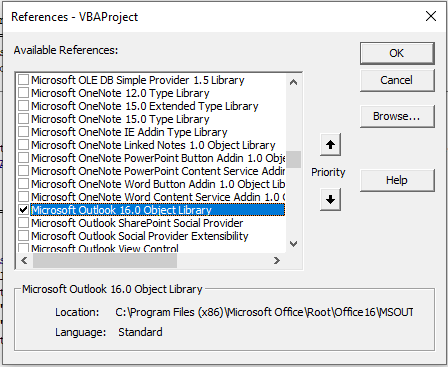
We need to send emails from Outlook. Since Outlook is an external objec, we first need object reference to “Microsoft Outlook 16.0 Object Library.”
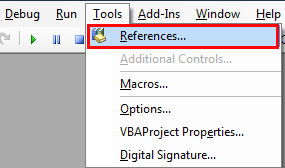
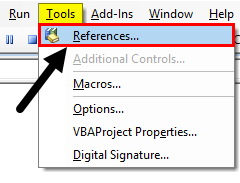
- 1. In VBA, Go to Tools > References.

- Now, we will see the object reference library. In this window, we need to set the reference to “Microsoft Outlook 16.0 Object Library.”

- After setting the object reference, click on “OK.”
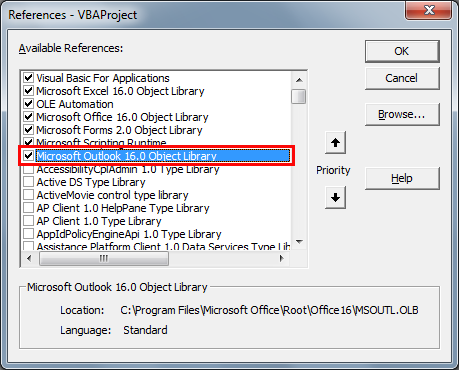
Now, we can access Outlook objects in VBA coding.
13 Easy Steps to Send Emails from Excel
Writing the code to send an email with an attachment from Excel is quite complicated but worth spending some time.
You can download this VBA Send Email Excel Template here – VBA Send Email Excel Template
Follow the below steps to write your first email excel macroA macro in excel is a series of instructions in the form of code that helps automate manual tasks, thereby saving time. Excel executes those instructions in a step-by-step manner on the given data. For example, it can be used to automate repetitive tasks such as summation, cell formatting, information copying, etc. thereby rapidly replacing repetitious operations with a few clicks.
read more.
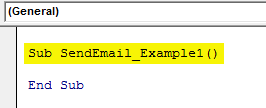
Step #1
Start the sub procedure in VBASUB in VBA is a procedure which contains all the code which automatically gives the statement of end sub and the middle portion is used for coding. Sub statement can be both public and private and the name of the subprocedure is mandatory in VBA.read more.
Code:
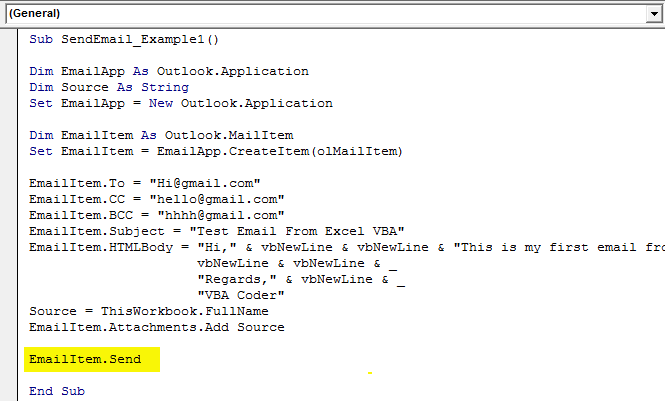
Sub SendEmail_Example1()

End Sub
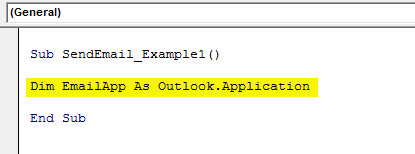
Step #2
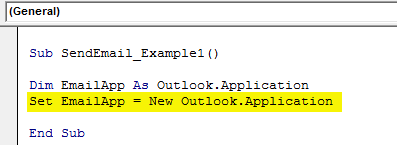
Declare the variable Outlook.Application
Code:
Dim EmailApp As Outlook.Application 'To refer to outlook application
Step #3
The above variable is an object variable. Therefore, we need to create an instance of a new object separately. Below is the code to create a new instance of the external object.
Code:
Set EmailApp = New Outlook.Application 'To launch outlook application
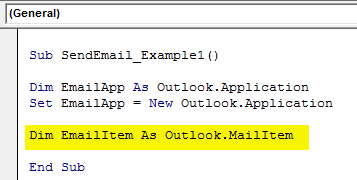
Step #4
Now, to write the email, we declare one more variable as “Outlook.MailItem”.
Code:
Dim EmailItem As Outlook.MailItem 'To refer new outlook email
Step #5
To launch a new email, we need to set the reference to our previous variable as “CreateItem.”
Code:
Set EmailItem = EmailApp.CreateItem(olMailItem) 'To launch new outlook email
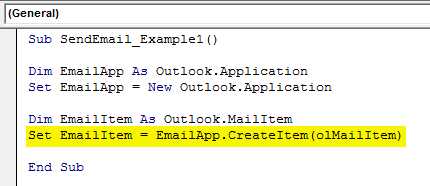
Now, the variable “EmailApp” will launch outlook. In the variable “EmailItem,” we can start writing the email.
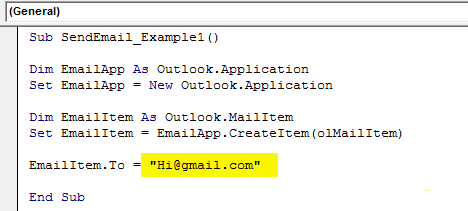
Step #6
We need to be aware of our items while writing an email. First, we need to decide to whom we are sending the email. So for this, we need to access the “TO” property.
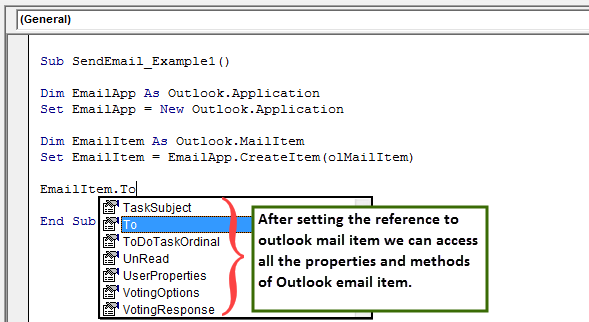
Step #7
Enter the email ID of the receiver in double quotes.
Code:
EmailItem.To = "[email protected]"
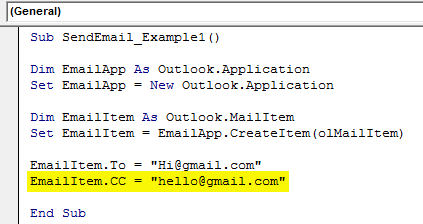
Step #8
After addressing the main receiver, if you would like to CC anyone in the email, we can use the “CC” property.
Code:
EmailItem.CC = "[email protected]"
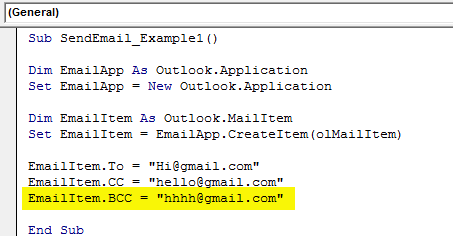
Step #9
After the CC, we can set the BCC email ID as well.
Code:
EmailItem.BCC = "[email protected]"
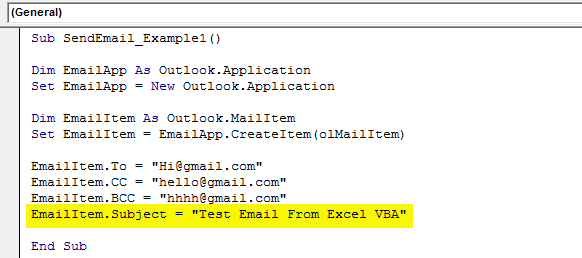
Step #10
We need to include the subject of the email we are sending.
Code:
EmailItem.Subject = "Test Email From Excel VBA"
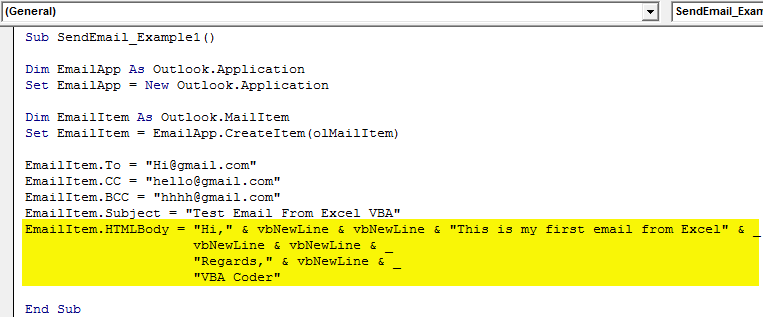
Step #11
We need to write the email body using HTML body type.
Code:
EmailItem.HTMLBody = "Hi," & vbNewLine & vbNewLine & "This is my first email from Excel" & _
                     vbNewLine & vbNewLine & _
                     "Regards," & vbNewLine & _
                     "VBA Coder" 'VbNewLine is the VBA Constant to insert a new line
Step #12
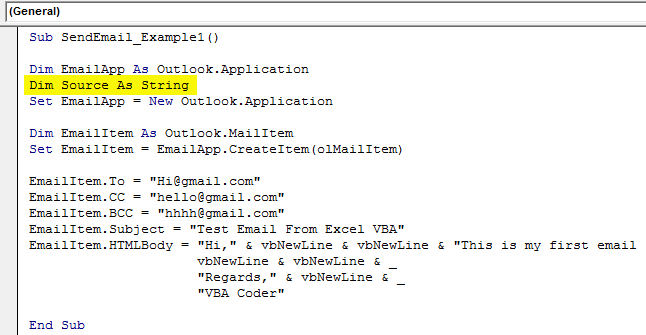
We are working on if we want to add an attachment to the current workbook. Then, we need to use the attachments property. First, declare a variable source as a string.
Code:
Dim Source As String
Then in this variable, write ThisWorkbook.FullName after Email body.
Code:
Source = ThisWorkbook.FullName
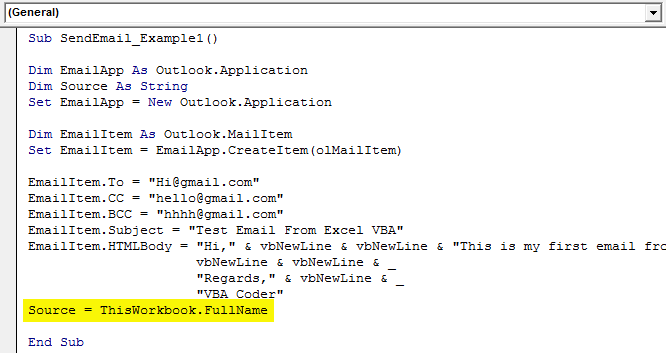
In this VBA Code, ThisWorkbook is used for the current workbook and .FullName is used to get the full name of the worksheet.
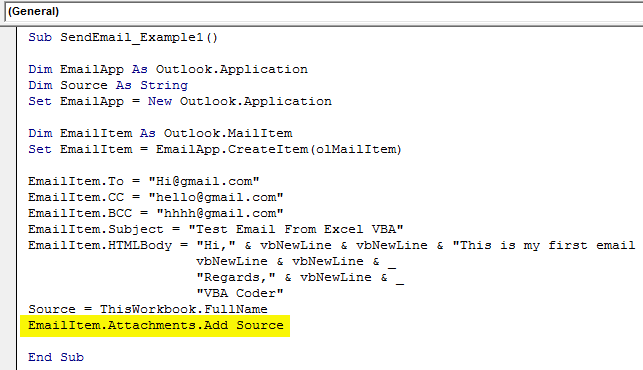
Then, write the following code to attach the file.
Code:
EmailItem.Attachments.Add Source
Step #13
Finally, we need to send the email to the mentioned email IDs. We can do this by using the “Send” method.
Code:
EmailItem.Send
We have completed the coding part.
Code:
Sub SendEmail_Example1()

Dim EmailApp As Outlook.Application
Dim Source As String
Set EmailApp = New Outlook.Application

Dim EmailItem As Outlook.MailItem
Set EmailItem = EmailApp.CreateItem(olMailItem)

EmailItem.To = "[email protected]"
EmailItem.CC = "[email protected]"
EmailItem.BCC = "[email protected]"
EmailItem.Subject = "Test Email From Excel VBA"
EmailItem.HTMLBody = "Hi," & vbNewLine & vbNewLine & "This is my first email from Excel" & _
vbNewLine & vbNewLine & _
"Regards," & vbNewLine & _
"VBA Coder"
Source = ThisWorkbook.FullName
EmailItem.Attachments.Add Source

EmailItem.Send

End Sub
Run the above code. It will send the email with the mentioned body with the current workbook as the attachment.
Recommended Articles
This article has been a guide to VBA Send Email from Excel. Here, we learn how to write VBA code to send emails from Excel with attachments along with an example and downloadable Excel template. You can learn more about VBA from the following articles: –
- VBA TimeValue Function
- Dictionary in VBA
- Create Progress Bar in VBA
- GetOpenFilename VBA

Excel позволяет создавать диаграммы высокого качества, работать с огромным количеством данных, обрабатывать картинки, блок-схемы и многое другое. И даже если вам и этого не достаточно, можно использовать Excel для автоматической отправки писем с помощью встроенного VBA редактора.
Данная статья описывает три способа отправки писем с помощью VBA в Excel. Вы можете скачать файл с примером отправки email с помощью VBA в Excel.
Отправить письмо в Excel с помощью VBA
Один из самых простых способов для автоматизации отправки почты с Excel заключается в вызове функции Create («ObjectOutlook.Application»). Данная функция возвращающает ссылку на ActiveX объект (в данном случает приложение Outlook), которое затем используется для создания и отправки электронной почты.
Чтобы проверить данный способ в работе, скопируйте и вставьте код ниже в VB редактор.
|
1 |
Sub Send_Email_Using_VBA() |
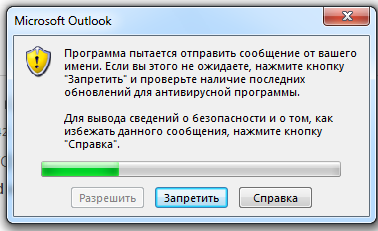
В качестве напоминания: Когда вы пытаетесь отправить письмо вышеуказанным способом, система безопасности будет выдавать каждый раз предупреждающее окно, в котором будет говориться о том, что Программа пытается отправить сообщение от вашего имени… и возможности обойти этот шаг нет.
К счастью, существует еще два способа, с помощью которых данный вопрос может быть решен: первый – через использование CDO, второй – имитирующий использование событий нажатий клавиш клавиатуры.
Отправить письмо в Excel с помощью CDO
Что такое CDO? CDO является библиотекой объектов, которая предоставляет интерфейс Messaging Application Programming Interface (MAPI). CDO позволяет манипулировать обменом данных, и отправлять и получать сообщения.
Использование CDO может быть предпочтительно в случаях, когда вы хотите предотвратить появление вплывающих окон безопасности Программа пытается отправить сообщение от вашего имени… и следовательно, предотвратить задержку отправки сообщения.
В нашем примере мы используем функцию CreateObject («CDO.Message»). Важно отметить, что необходимо правильно установить конфигурацию SMTP сервера, чтобы не допустить появления ошибок Run-time error 2147220973(80040213) или sendUsing configuration value is invalid. Пример ниже настроен на отправку сообщений через почту Google (Gmail). Для других почтовых серверов, вам потребуется ввести свои значения SMTP-сервера и SMTP-порта.
|
1 |
Sub CDO_Mail_Small_Text_2() |
Обратите внимание, чтобы воспользоваться данным методом вам необходимо подключить библиотеку CDO в редакторе макросов Tool –> References.
Отправить письмо в Excel с помощью Send Keys
Другой способ отправки email с помощью Excel – использование команды ShellExecute, которая выполняет любую программу в VBA. Команда ShellExecute используется для загрузки документа с соответствующей программой. По сути, вы создаете объект String (текстовые данные) и передаете его в качестве параметра для функции ShellExecute. Остальная часть операций выполняется в окнах. Автоматически определяется, какая программа связана с данным типом документа и используется для загрузки документа. Вы можете использовать функцию ShellExecute, чтобы открыть Internet Explorer, Word, Paint и множество других приложений. В коде ниже используется задержка в три секунды, чтобы убедиться, что отправляемое письмо корректно и для возможности предотвратить отправку, если вы вдруг нашли какие-нибудь недочеты.
|
1 |
Sub Send_Email_Using_Keys() |
Cкачать файл с примером отправки email с помощью VBA в Excel
VBA Send Email From Excel
VBA is not only limited to data in excel. We can send emails through VBA and this is what we will learn in this article. It requires considerable knowledge of VBA and its methods to write the code to send emails from excel. Before we move to write and sending emails from excel let us know what this automation means. This type of automation means accessing a feature of another application using any other application. Now the mailing feature is offered by Microsoft in Outlook, we will use methods and properties of outlook in excel to send emails. To send an email we need to know the basic of email also. In layman’s term, what is the process and what is the requirement to send an email? An Email consists of an email address of the sender if there is a CC (Carbon Copy ) or a BCC and a subject line with an email body.
How to Send Emails From Excel VBA?
Let us learn how to send emails through outlook from excel in VBA by an example. In this example, we will also send an attachment to the receiver, the same excel file we will be writing the code.
You can download this VBA Send Email Excel Template here – VBA Send Email Excel Template
Follow the below steps to send email from Excel Using VBA code:
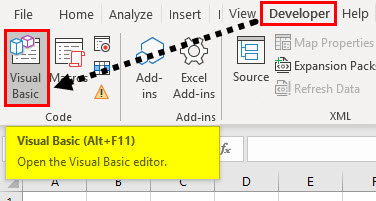
Step 1: In the Developer Tab click on Visual Basic to open the VB Editor.
Before we move into writing codes to send an email, we need to know this that outlook is an external object and we need to refer it in the VBA.
Step 2: Go to Tools and then select References.
Step 3: Clicking on the reference will open a wizard box for us, find a reference for Microsoft Outlook Object library and check it and then click on Ok.
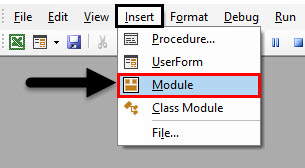
Step 4: Click on insert tab and insert a module in the VBA project.
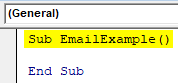
Step 5: Define a subprocedure as shown below.
Code:
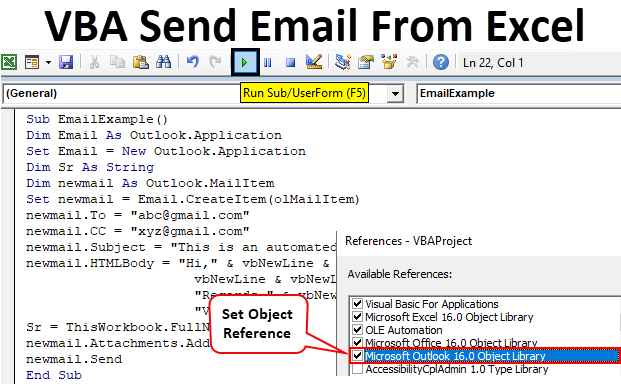
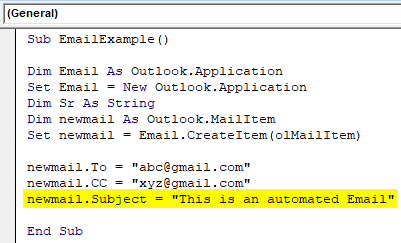
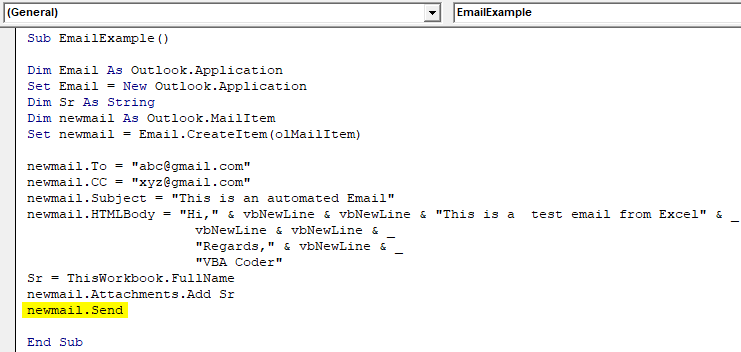
Sub EmailExample()

End Sub
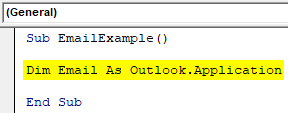
Step 6: By giving reference to the outlook above, we can now access the properties of outlook in VBA. Now let us declare a variable as an outlook application.
Code:
Dim Email As Outlook.Application
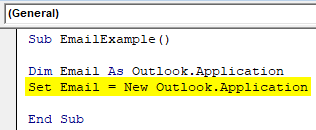
Step 7: Like FSO, this variable is an object variable, so to access any other application we need to create some instances, create an instance as shown below using the SET keyword.
Code:
Set Email = New Outlook.Application
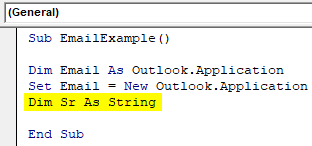
Step 8: Since we want to send an attachment to the receiver we need to declare one variable as String which will hold the path for the attachment.
Code:
Dim Sr As String
Step 9: Now let us start with the mailing part in this code, to send an email we need to define another variable which will use the property of outlook to refer to a new email as shown below.
Code:
Dim newmail As Outlook.MailItem

Step 10: Similar to above with using another application in the example we need to create instances, now we need to create an instance for a new email which will open the new email using the set keyword.
Code:
Set newmail = Email.CreateItem(olMailItem)
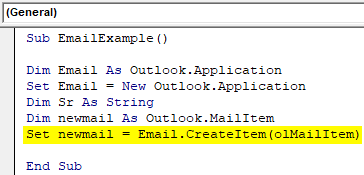
Before we move further let me explain our progress so far, the first instance will open outlook for us while the second instance will open the new email for us.
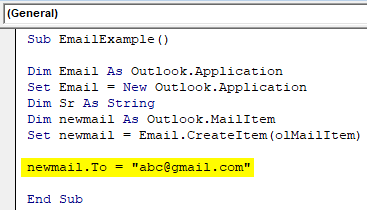
Step 11: As I have explained above about what is the requirement to send an email. The first requirement is a receiver which is “To” in an email. So let us use the To property of outlook in excel as follows.
Code:
newmail.To = "[email protected]"
Step 12: Since we have used the To property we have some another feature to use such as the Carbon Copy or the CC property of outlook.
Code:
newmail.CC = "[email protected]"
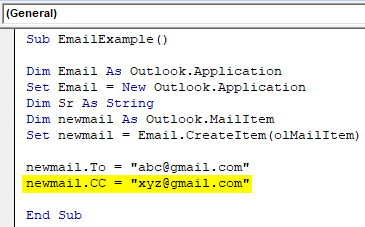
Similarly, we can use the BCC property.
Note: BCC property is used when we want to hide the email address of the BCC receiver from the other receivers.
What is the next step in sending an email?
Step 13: It is subject. When we write the instance name with a dot operator we can see the option for a subject as follows.
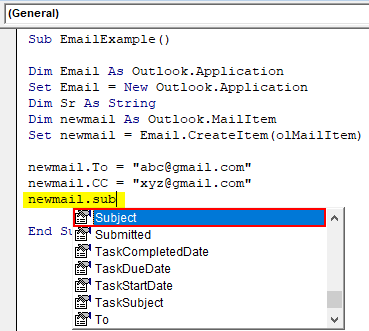
Step 14: Press Tab on the subject IntelliSense and write a random subject as shown below.
Code:
newmail.Subject = "This is an automated Email"
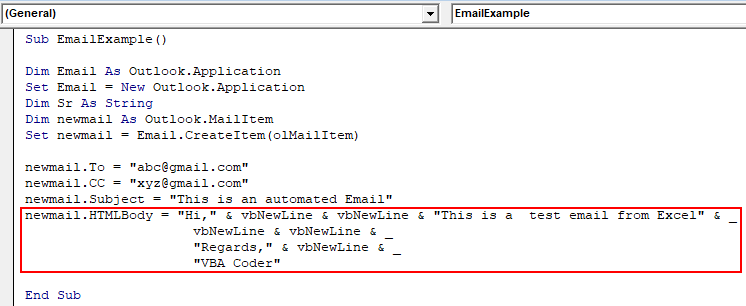
Step 15: The next step in writing an email is a body for the email. Like the properties, we used above with the instance let us use the body property of the outlook to write the body as follows.
Code:
newmail.HTMLBody = "Hi," & vbNewLine & vbNewLine & "This is a test email from Excel" & _
vbNewLine & vbNewLine & _
"Regards," & vbNewLine & _
"VBA Coder"
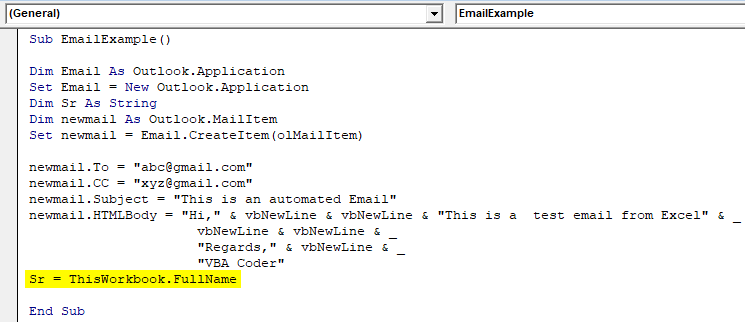
Step 16: Now we have created an email with a body and subject line in it. The next step is to add an attachment to the email. Since we want to send the current worksheet to the receiver we will use the path as follows,
Code:
Sr = ThisWorkbook.FullName
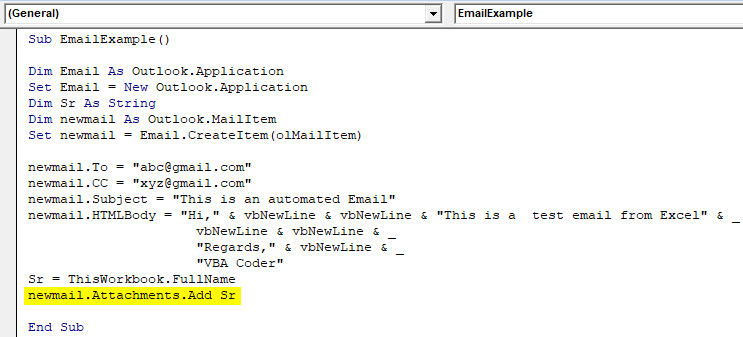
Step 17: Now we can send the attachment using the attachment property as shown below.
Code:
newmail.Attachments.Add Sr
Step 18: Now finally we need to send the email. Like in outlook we press the send button to send an email, similarly, we will use the send properties of outlook as follows.
Code:
newmail.Send
Final Full code
So below is the final code on how to send an email from Excel with the help of VBA.
Code:
Sub EmailExample()

Dim Email As Outlook.Application
Set Email = New Outlook.Application
Dim Sr As String
Dim newmail As Outlook.MailItem
Set newmail = Email.CreateItem(olMailItem)

newmail.To = "[email protected]"
newmail.CC = "[email protected]"
newmail.Subject = "This is an automated Email"
newmail.HTMLBody = "Hi," & vbNewLine & vbNewLine & "This is a test email from Excel" & _
vbNewLine & vbNewLine & _
"Regards," & vbNewLine & _
"VBA Coder"
Sr = ThisWorkbook.FullName
newmail.Attachments.Add Sr
newmail.Send

End Sub
When we run the above code we need to wait for a few seconds for the code to execute and we can check out sent box in outlook that the email has been sent through excel.
Things to Remember
- We use another application to send an email from excel.
- To use another application we create instances.
- Before using outlook as another application we need to refer to Outlook objects from the reference tab.
- We need to know the requirements of an email to send an email.
Recommended Articles
This is a guide to VBA Send Email From Excel. Here we discuss how to send emails with attachments from excel using VBA code along with an example and downloadable excel template. Below are some useful excel articles related to VBA –
- VBA Hyperlink
- VBA Outlook
- VBA Get Cell Value
- VBA Web Scraping
This tutorial introduces how to send email from Excel using VBA and VBScript.
It also demonstrates SSL, HTML Email, Email Queue and Exchange Web Service (EWS) usage.
Sections:
- Send email from MS Excel using VBA and SMTP protocol
- Common SMTP Transport Error
- TLS 1.2
- Where can I get my SMTP email server address, user and password?
- Gmail, Hotmail, Outlook.COM, Office365 and Yahoo SMTP Server Settings
- Email Address Syntax and Multiple Recipients
- From, ReplyTo, Sender and Return-Path
- Mail Priority
- Troubleshooting
- 32bit/x64 ActiveX DLL
- Distribution
Send email from MS Excel using VBA and SMTP protocol
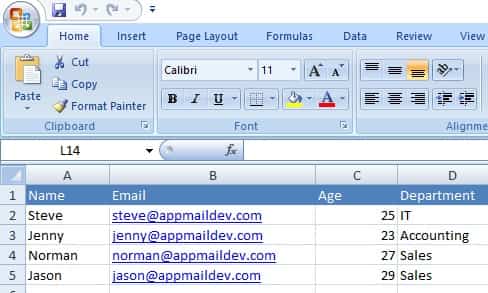
To better demonstrate how to send email using SMTP protocol in Excel + VBA, let’s open MS Excel and input the data like this:
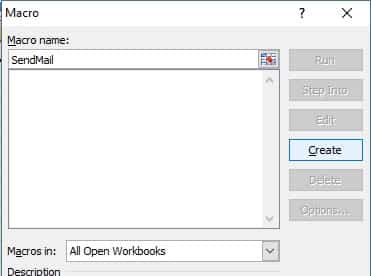
After you input the data, press Alt+F8, open the Macro dialog box, input SendMail and click Create
Input the following codes in Module1
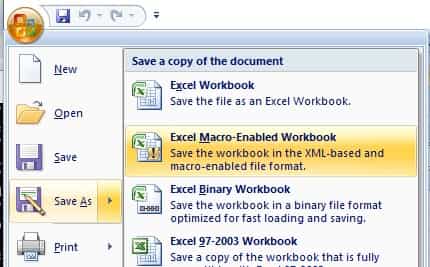
Then you can close the VBA IDE and back to Excel and click File -> Save As -> select Excel Macro Enabled Workbook and save it as Sample.xlsm.
Installation
EASendMail is a SMTP component which supports all operations of SMTP/ESMTP protocols
(RFC 821, RFC 822, RFC 2554). Before you can use the following example codes,
you should download the EASendMail Installer and install it on your machine at first.
Add Reference
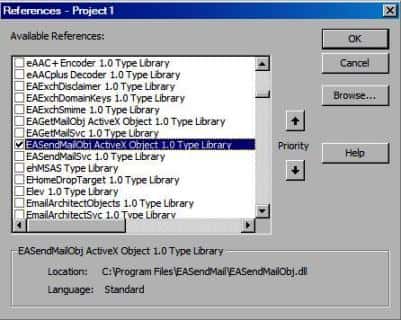
To use EASendMail SMTP ActiveX Object in VBA project, the first step is “Add reference
of EASendMail to your project”. Open VBA IDE by press Alt+F11, Please select menu -> Tools -> References ->
and select EASendMailObj ActiveX Object, click OK, the reference will be added
to current VBA project, and you can start to use it to send email in your project.
[Excel + VBA — Send Email — Example]
After the reference is added, click ThisWorkBook and input the following codes:
Please enable Macro if you closed and re-opened this file, otherwise the codes cannot be executed.
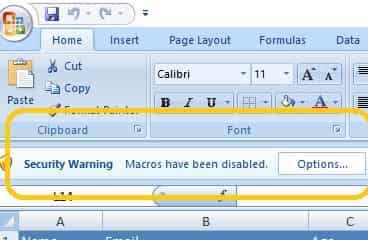
Important
You need to access the Trust Center in the Excel Options dialog box. Click the Microsoft Office Button, and then click Excel Options.
In the Trust Center category, click Trust Center Settings, and then click the Macro Settings category.
' To use the following codes, please download and install
' https://www.emailarchitect.net/webapp/download/easendmail.exe on your machine

Option Explicit

Private WithEvents oSmtp As EASendMailObjLib.Mail
Private CurrentEmailIsFinished As Boolean
Private HasErrorWithEmail As Boolean
Private ErrorDescription As String

Private Sub InitVariables()
    CurrentEmailIsFinished = True
    HasErrorWithEmail = False
    ErrorDescription = ""
End Sub

Private Sub oSmtp_OnAuthenticated()
    Application.StatusBar = "Authenticated"
End Sub

Private Sub oSmtp_OnClosed()
    CurrentEmailIsFinished = True
End Sub

Private Sub oSmtp_OnConnected()
    Application.StatusBar = "Connected"
End Sub

Private Sub oSmtp_OnError(ByVal lError As Long, ByVal ErrDescription As String)
    HasErrorWithEmail = True
    CurrentEmailIsFinished = True
    ErrorDescription = ErrDescription
End Sub

Private Sub oSmtp_OnSending(ByVal lSent As Long, ByVal lTotal As Long)
    Application.StatusBar = "Sending " & lSent & "/" & lTotal & " ..."
End Sub

Public Sub SendMailFromWorkBook()

    Dim oSheet
    Set oSheet = ThisWorkbook.Sheets(1)
    Dim i, rows
    rows = oSheet.UsedRange.rows.Count

    Dim sender, name, address, subject, bodyTemplate, body, bodyFormat
    bodyFormat = 0 'Text body format

    ' Please change sender address to yours
    sender = "test@emailarchitect.net"
    subject = "Test email from Excel and VBA"

    ' Use a body template to build body text based on recipient's name
    bodyTemplate = "Dear {name}," & Chr(13) & Chr(10) & Chr(13) & Chr(10) & _
        "This is a test email from Excel using VBA, do not reply."

    Dim emailSent
    emailSent = 0

    ' enumerate all email addresses in sheet1
    For i = 2 To rows
        name = Trim(oSheet.Cells(i, 1))
        address = Trim(oSheet.Cells(i, 2))
        body = Replace(bodyTemplate, "{name}", name)

        If Not SendMailTo(sender, name, address, subject, body, bodyFormat) Then
            Exit Sub
        End If

        emailSent = emailSent + 1
    Next

    Application.StatusBar = "Total " & emailSent & " email(s) sent."

End Sub

Function SendMailTo(sender, name, address, subject, body, bodyFormat)

    Set oSmtp = New EASendMailObjLib.Mail
    oSmtp.LicenseCode = "TryIt"

    ' Please change server address, user, password to yours
    oSmtp.ServerAddr = "mail.emailarchitect.net"
    oSmtp.UserName = "test@emailarchitect.net"
    oSmtp.Password = "yourpassword"

    ' Set server port, if 25 port doesn't work, try to use 587 port
    oSmtp.ServerPort = 25

    ' Using TryTLS,
    ' If smtp server supports TLS, then TLS connection is used; otherwise, normal TCP connection is used.
    ' https://www.emailarchitect.net/easendmail/sdk/?ct=connecttype
    oSmtp.ConnectType = 4

    ' If your server is Exchange 2007 or later version, you can use EWS protocol.
    ' https://www.emailarchitect.net/easendmail/sdk/?ct=protocol
    ' Set Exchange Web Service Protocol - EWS - Exchange 2007/2010/2013/2016
    ' oSmtp.Protocol = 1

    oSmtp.FromAddr = sender
    oSmtp.AddRecipient name, address, 0

    oSmtp.subject = subject
    oSmtp.bodyFormat = bodyFormat
    oSmtp.BodyText = body

    ' You can add attachment like this:
    ' Add attachment from local disk
    ' If oSmtp.AddAttachment("d:test.jpg") <> 0 Then
        ' Application.StatusBar = "Failed to add attachment with error:" & oSmtp.GetLastErrDescription()
        ' SendMailTo = False
        ' Exit Function
    'End If

    Application.DisplayStatusBar = True
    Application.StatusBar = "Connecting " & oSmtp.ServerAddr & " ..."

    oSmtp.Asynchronous = 1
    InitVariables
    CurrentEmailIsFinished = False
    oSmtp.SendMail

    Do While Not CurrentEmailIsFinished
        ' Wait for the email sending, you can do other thing here
        DoEvents
    Loop

    If HasErrorWithEmail Then
        Application.StatusBar = "Failed to send email to " & address & "; " & ErrorDescription
        SendMailTo = False
    Else
        Application.StatusBar = "Message to " & address & " has been submitted to server."
        SendMailTo = True
    End If

    Set oSmtp = Nothing
End Function
and click Module1 and change the codes to:
ThisWorkbook.SendMailFromWorkBook
Close VBA IDE and back to Excel, press Alt+F8 to open Macro dialog box, select SendMail and click Run.
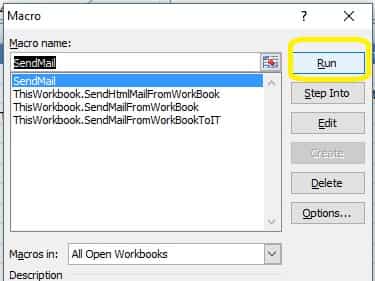
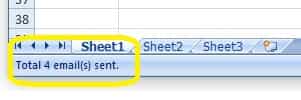
You will see the status and result at Excel status bar.
Common SMTP Transport Error
When you execute above example code, if it returned an error about “Networking connection/Socket”
or “No such host”, it is likely that your SMTP server address is not correct.
If it threw an exception about “5xx Relay denied”, it is likely that you did not
set user authentication. Another common error is “5xx Must issue a STARTTLS command
first” or “No supported authentication marshal found!”, that is because
your SMTP server requires user authentication under SSL connection. You can set
the SSL connection to solve this problem. You can learn more detail in Troubleshooting section.
TLS 1.2
TLS is the successor of SSL, more and more SMTP servers require TLS 1.2 encryption now.
If your operating system is Windows XP/Vista/Windows 7/Windows 2003/2008/2008 R2/2012/2012 R2,
and you got connection error with SSL/TLS connection,
you need to enable TLS 1.2 protocol in your operating system like this:
Enable TLS 1.2 on Windows XP/Vista/7/10/Windows 2008/2008 R2/2012
Where can I get my SMTP email server address, user and password?
Because each email account provider has different server address, so you should
query your SMTP server address from your email account provider. To prevent spreading
email from the server, most SMTP servers also require user authentication. User
name is your email address or your email address without domain part, it depends
on your email provider setting.
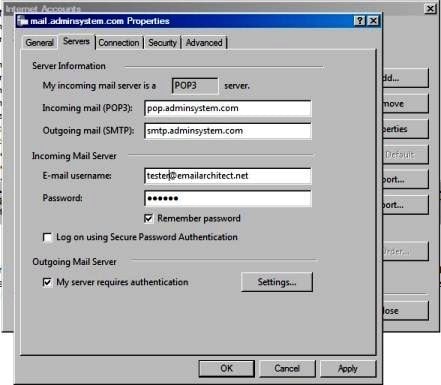
Finally, if you have already set your account in your email client such as Outlook
or Window Mail, you can query your SMTP server address, user in your email client.
For example, you can choose menu -> “Tools” — > — “Accounts” — > “Your email
account” — > “Properties” — > “Servers” in Outlook express or Windows Mail
to get your SMTP server, user. Using EASendMail to send email does not require you
have email client installed on your machine or MAPI, however you can query your
exist email accounts in your email client.
Email Address Syntax and Multiple Recipients
The following example codes demonstrates how to specify display name and email address by different syntax.
' For single email address (From, ReplyTo, ReturnPath), the syntax can be:
' ["][display name]["]<email address>.
' For example:
"Tester, T" <test@adminsystem.com>
Tester <test@adminsystem.com>
<test@adminsystem.com>
test@adminsystem.com

' For mulitple email address (To, CC, Bcc), the syntax can be:
' [single email],[single email]...
' (,;rn) can be used to separate multiple email addresses.
' For example:
"Tester, T" <test1@adminsystem.com>, Tester2 <test2@adminsystem.com>,
   <test3@adminsystem.com>, test4@adminsystem.com
[VBA — Email Syntax — Example]
Here are some examples:
oSmtp.FromAddr = "Tester<test@adminsystem.com>"
oSmtp.FromAddr = "test@adminsystem.com"
oSmtp.FromAddr = "<test@adminsystem.com>"

' Using AddRecipientEx to add To, Cc and Bcc in VB 6.0/Visual Basic 6.0
' Multiple addresses are separated with (,)
' The syntax is like this: "test@adminsystem.com, test1@adminsystem.com"
oSmtp.AddRecipientEx "test1@adminsystem.com, test2@adminsystem.com", 0
oSmtp.AddRecipientEx "Test1<test@adminsystem.com>, Test2<test2@adminsystem.com>", 0

' You can also add carbon copy (CC) or blind carbon copy (BCC) in the email.
oSmtp.AddRecipientEx "CC recipient<cc@adminsystem.com>", 1
oSmtp.AddRecipientEx "Bcc recipient<bcc@adminsystem.com>", 2
From, ReplyTo, Sender and Return-Path
From, Reply-To, Sender and Return-Path are common email headers in email message.
You should always set From property at first, it is a MUST to identify the email sender.
The following table lists the header and corresponding properties:
| Header | Property |
| From | Mail.FromAddr |
| Reply-To | Mail.ReplyTo |
| Sender | Mail.Sender |
| Return-Path | Mail.ReturnPath |
-
From
This property indicates the original email sender. This is what you see as the “FROM” in most mail clients.
-
Reply-To
This property indicates the reply address. Basically, when the user clicks “reply” in mail client, the Reply-To value should be used as the recpient address of the replied email. If you don’t set this property, the Reply address is same as From address.
-
Sender
This property indicates the who submit/send the email. When the user received the email, the email client displays:
From: “sender address” on behalf of “from address”.
If you don’t set this property, the Sender address is same as From address. Sender property is common used by mail listing provider. This property also takes effect to DKIM/DomainKeys signature, if Sender is different with From address, then you should sign DKIM/DomainKeys based on Sender domain instead of From address domain. -
Return-Path
This property indicates the delivery notification report address. If you don’t set this property, the Return-Path address is same as From address. This property also takes effect to SPF record, if Return-Path is different with From address, then remote SMTP server checkes SPF record of Return-Path instead of From address.
[VBA — From, ReplyTo, Sender and Return-Path in Email — Example]
The following example codes demonstrate how to specify From, Reply-To, Sender and Return-Path in Email. With the following example codes:
- If the email couldn’t be delivered to recipient, a non-delivery report will be sent
toreport@emailarchitect.net. - If the user received the email, the email client will display:
sender@emailarchitect.net
on behalf offrom@adminsystem.com. - If the user click “reply”, the replied email will be sent to
reply@adminsystem.com.
' [VB, VBA - From, ReplyTo, Sender and Return-Path]
Dim oSmtp As New EASendMailObjLib.Mail
oSmtp.LicenseCode = "TryIt"
oSmtp.FromAddr = "from@adminsystem.com"
oSmtp.ReplyTo = "reply@adminsystem.com"
oSmtp.Sender = "sender@emailarchitect.net"
oSmtp.ReturnPath = "report@emailarchitect.net"

'[VBScript, ASP - From, ReplyTo, Sender and Return-Path]
Dim oSmtp
Set oSmtp = Server.CreateObject("EASendMailObj.Mail")
oSmtp.LicenseCode = "TryIt"
oSmtp.FromAddr = "from@adminsystem.com"
oSmtp.ReplyTo = "reply@adminsystem.com"
oSmtp.Sender = "sender@emailarchitect.net"
oSmtp.ReturnPath = "report@emailarchitect.net"
Mail Priority
If you want to set Higher or Lower priority to your email, you can use Priority prority
' Set high priority
oSmtp.Priority = 1 'High priority
Troubleshooting
When you send email in above simple VB project, if it returned an error, please have a look at the following tips:
“No Such Host” Error
This error means DNS server cannot resolve SMTP server, you should check if you input correct server address. If your server address is correct, you should check if your DNS server setting is correct.
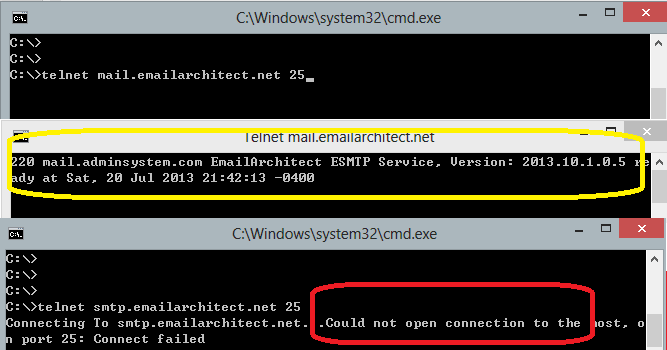
Common “Socket/Networking Connection” Error
This error means there is a problem with networking connection to SMTP server. You can use Windows built-in Telnet command to detect the networking connection.
Using Telnet to detect networking connection to SMTP server
Note
Notice: in Windows 2008/Windows 8 or later version, Telnet Client is not installed
by default, you should enable this command in Control Panel -> Programs and ->
FeaturesTurn Windows feature on or off -> have Telnet Client checked.
Under DOS command prompt, input “telnet [serveraddress] [port]”:
telnet mail.emailarchitect.net 25
press enter.
If the networking connection to your SMTP server is good, it should return a message
like 220 .... If it returns Could not open connection to ..., that means the
networking connection to SMTP server is bad, or outbound 25 port is blocked by anti-virus
software, firewall or ISP. Please have a look at the following screenshot:
SMTP 25, 587, 465 port
25 port is the default SMTP server port to receive email. However, some ISP block outbound 25 port to prevent user to send email directly to other SMTP server. Therefore, many email providers also provide an alternative port 587 to receive email from such users. 465 port is the common port used to receive email over implicit SSL connection. If you use telnet to test 465 port, it doesn’t return the “220…”, because it requires SSL hand shake. But if the connection is ok, telnet returns a flash cursor.
“5xx … IP address block or on black list or bad reputation” Exception
This error means SMTP server blocks your IP address or email content. You can try to set user/password in your codes to do user authentication and try it again. If email client set user authentication, most SMTP servers do not check client source IP address in black list.
“5xx user authenticaton” Error
TThis error means user authentication is failed, you should check whether you input correct user/password. Password is always case-sensitive.
“5xx relay denied” Error
For anti-spam policy, most SMTP servers do not accept the email to outbound domain without user authentication. You should set user/password in the codes and try it again.
“5xx Must issue a STARTTLS command first”
This error means SMTP server requires SSL/TLS connection. You should enable SSL/TLS connection like this:
' If your smtp server requires TLS connection, please add this line
oSmtp.ConnectType = 1
“No supported authentication marshal found!”
This error means SMTP server doesn’t support user authentication or it requires user authentication over SSL/TLS connection. You can try to remove user/password in your codes and try it again.
Other error returned by SMTP server
If SMTP server returns an error, it usually returns description about this error. Some descriptions also include a HTTP link, you can go to this linked web page to learn more detail. You can also use the following codes to generate a log file to learn all SMTP session between client and server.
[VBA — Using log file to detect SMTP server response — Example]
oSmtp.LogFileName = "d:smtp.txt"
32bit/x64 ActiveX DLL
Seperate builds of run-time dll for 32 and x64 platform
| File | Platform |
| Installation PathLibnativex86EASendMailObj.dll | 32 bit |
| Installation PathLibnativex64EASendMailObj.dll | 64 bit |
Distribution
-
Standard EXE
For VB6, C++, Delphi or other standard exe application, you can distribute EASendMailObj.dll with your application to target machine without COM-registration and installer.
To learn more detail, please have a look at Registration-free COM with Manifest File. -
Script
For ASP, VBScript, VBA, MS SQL Stored Procedure, you need to install EASendMail on target machine by EASendMail installer, both 32bit/x64 DLL are installed and registered.
Next Section
In this section, I introduced how to send text email in Excel VBA project using SMTP protocol.
At next section I will introduce how to send HTML email to specified recipients based on Excel data.
Return to VBA Code Examples
This tutorial will show you how to send emails from Excel through Outlook using VBA.
Sending the Active Workbook
Function SendActiveWorkbook(strTo As String, strSubject As String, Optional strCC As String, Optional strBody As String) As Boolean
   On Error Resume Next
   Dim appOutlook As Object
   Dim mItem As Object
'create a new instance of Outlook
   Set appOutlook = CreateObject("Outlook.Application")
   Set mItem = appOutlook .CreateItem(0)
   With mItem
     .To = strTo
     .CC = ""
     .Subject = strSubject
     .Body = strBody
     .Attachments.Add ActiveWorkbook.FullName
'use send to send immediately or display to show on the screen
    .Display 'or .Send
   End With
'clean up objects
  Set mItem = Nothing
  Set appOutlook = Nothing
End Function
The function above can be called using the procedure below
Sub SendMail()
   Dim strTo As String
   Dim strSubject As String
   Dim strBody As String
'populate variables
   strTo = "jon.smith@gmail.com"
   strSubject = "Please find finance file attached"
   strBody = "some text goes here for the body of the email"
'call the function to send the email
   If SendActiveWorkbook(strTo, strSubject, , strBody) = true then
      Msgbox "Email creation Success"
   Else
      Msgbox "Email creation failed!"
   End if
End Sub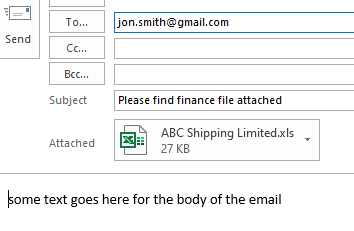
Using Early Binding to refer to the Outlook Object Library
The code above uses Late Binding to refer to the Outlook Object. You can add a reference to Excel VBA, and declare the Outlook application and Outlook Mail Item using Early Binding if preferred. Early Binding makes the code run faster, but limits you as the user would need to have the same version of Microsoft Office on their PC.
Click on the Tools menu and References to show the reference dialog box.
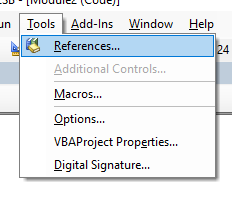
Add a reference to the Microsoft Outlook Object Library for the version of Office that you are using.
You can then amend your code to use these references directly.

A great advantage of early binding is the drop down lists that show you the objects that are available to use!
Sending a Single Sheet from the Active Workbook
To send a single sheet, you first need to create a new workbook from the existing workbook with just that sheet in it, and then send that sheet.
Function SendActiveWorksheet(strTo As String, strSubject As String, Optional strCC As String, Optional strBody As String) As Boolean
   On Error GoTo eh
'declare variables to hold the objects required
   Dim wbDestination As Workbook
   Dim strDestName As String
   Dim wbSource As Workbook
   Dim wsSource As Worksheet
   Dim OutApp As Object
   Dim OutMail As Object
   Dim strTempName As String
   Dim strTempPath As String
'first create destination workbook
   Set wbDestination = Workbooks.Add
   strDestName = wbDestination.Name
'set the source workbook and sheet
   Set wbSource = ActiveWorkbook
   Set wsSource = wbSource.ActiveSheet
'copy the activesheet to the new workbook
   wsSource.Copy After:=Workbooks(strDestName).Sheets(1)
'save with a temp name
   strTempPath = Environ$("temp") & ""
   strTempName = "List obtained from " & wbSource.Name & ".xlsx"
   With wbDestination
      .SaveAs strTempPath & strTempName
'now email the destination workbook
      Set OutApp = CreateObject("Outlook.Application")
      Set OutMail = OutApp.CreateItem(0)
      With OutMail
         .To = strTo
         .Subject = strSubject
         .Body = strBody
         .Attachments.Add wbDestination.FullName
'use send to send immediately or display to show on the screen
         .Display 'or .Display
      End With
      .Close False
  End With
'delete temp workbook that you have attached to your mail
   Kill strTempPath & strTempName
'clean up the objects to release the memory
   Set wbDestination = Nothing
   Set wbSource = Nothing
   Set wsSource = Nothing
   Set OutMail = Nothing
   Set OutApp = Nothing
Exit Function
eh:
   MsgBox Err.Description
End Function
and to run this function, we can create the following procedure
Sub SendSheetMail()
   Dim strTo As String
   Dim strSubject As String
   Dim strBody As String
   strTo = "jon.smith@gmail.com"
   strSubject = "Please find finance file attached"
   strBody = "some text goes here for the body of the email"
   If SendActiveWorksheet(strTo, strSubject, , strBody) = True Then
      MsgBox "Email creation Success"
   Else
      MsgBox "Email creation failed!"
   End If
End Sub
VBA Coding Made Easy
Stop searching for VBA code online. Learn more about AutoMacro — A VBA Code Builder that allows beginners to code procedures from scratch with minimal coding knowledge and with many time-saving features for all users!

Learn More!