
Project Online Desktop Client Publisher for Microsoft 365 Excel 2021 Word 2021 PowerPoint 2021 Project Professional 2021 Project Standard 2021 Publisher 2021 Excel 2019 Word 2019 PowerPoint 2019 Project Professional 2019 Project Standard 2019 Publisher 2019 Excel 2016 Word 2016 PowerPoint 2016 Project Professional 2016 Project Standard 2016 Publisher 2016 Excel 2013 Word 2013 PowerPoint 2013 Project Professional 2013 Project Standard 2013 Publisher 2013 Excel 2010 Word 2010 Project 2010 Project Standard 2010 Publisher 2010 More…Less
If you have Outlook installed as part of Microsoft Office, and set as your default email app, you can send your document as an email attachment. If you are using Excel, Publisher, or Word, you can also send your file as the body of an email message.
If Outlook is not your default email application you’ll need to configure it as the default in order to use this feature. For more information see: Make Outlook the default program for email, contacts, and calendar.
Send as an attachment
Excel, PowerPoint, and Word
-
Click File > Share, and then choose one of the following options:
Note: The options you see will vary depending on the Office program you’re using.
-
Upload to OneDrive Uploads your file to your OneDrive account where you can then share through a direct link or an email message.
-
Attach a copy instead Choose to attach a the file to an email, or attach a PDF of the file.
-
-
Enter the recipients’ aliases, edit the subject line and message body as necessary, and then click Send.
OneNote, Visio, Publisher, and Project
-
Click File > Share, and then choose one of the following options:
Note: The options you see will vary depending on the Office program you’re using.
-
Share with People (OneNote and Visio) Lets you enter name or email address for who you want to send to, set whether you want them to edit, require the user signs in before editing, and an optional message.
This option requires that your file is uploaded to OneDrive.
-
Send a Link (Visio) Allows everyone to work on the same copy of the file, see the latest changes, and keeps your email size small.
To send a link, the file must be saved to a Web server or shared folder.
-
Send as Attachment Opens an email message with a copy of the file in its original file format attached.
-
Send as PDF Opens an email message with a copy of the file in .pdf format attached.
-
Send as XPS Opens an email message with a copy of the file in .xps format attached.
-
-
Enter the recipients’ aliases, edit the subject line and message body as necessary, and then click Send.
Send as the body of an email message
If you are using Excel, Publisher, or Word, you can send your file as the actual email message content — not as an attachment. To do this, first you need to add the Send to Mail Recipient command to the Quick Access Toolbar. See Customize the Quick Access Toolbar to learn how to add commands.
-
Open the file you want to send.
-
In the Quick Access Toolbar, click Send to Mail Recipient to open an email message. Your file will appear in the body of the message.
-
Enter the recipients’ aliases, edit the subject line and message body as necessary, and then click Send.
Send as an attachment
Excel, PowerPoint, Project, Publisher, Visio, and Word
-
Click File > Share > Email, and then choose one of the following options:
-
Send as Attachment Opens an email message with a copy of the file in its original file format attached.
-
Send as PDF Opens an email message with a copy of the file in .pdf format attached.
-
Send as XPS Opens an email message with a copy of the file in .xps format attached.
-
Send as Internet Fax Opens a web page where you can choose from a list of providers that let you send a fax over the Internet.
Note: The options you see will vary depending on the Office program you’re using.
-
-
Enter the recipients’ aliases, edit the subject line and message body as necessary, and then click Send.
OneNote
-
Click File > Send, and then choose one of the following options:
-
Send as Attachment Opens an email message with both a copy of the file in its original file format and a copy of the file as a web page attached.
-
Send as PDF Opens an email message with a copy of the file in .pdf format attached.
-
-
Enter the recipients’ aliases, edit the subject line and message body as necessary, and then click Send.
Send as the body of an email message
If you are using Excel, Publisher, or Word, you can send your file as the actual email message content — not as an attachment. To do this, first you need to add the Send to Mail Recipient command to the Quick Access Toolbar. See Customize the Quick Access Toolbar to learn how to add commands.
-
Open the file you want to send.
-
In the Quick Access Toolbar, click Send to Mail Recipient to open an email message. Your file will appear in the body of the message.
-
Enter the recipients’ aliases, edit the subject line and message body as necessary, and then click Send.
Send as an attachment
The following instructions apply to Excel, PowerPoint, Project, Publisher, Visio, and Word.
-
Click File.
-
Click Save & Send.
-
Select Send Using E-mail, and then choose one of the following options:
-
Send as Attachment Opens an email message with a copy of the file in its original file format attached.
-
Send as PDF Opens an email message with a copy of the file in .pdf format attached.
-
Send as XPS Opens an email message with a copy of the file in .xps format attached.
Note: The PDF and XPS options are not available in Project 2010.
-
-
Enter the recipients’ aliases, edit the subject line and message body as necessary, and then click Send.
The following instructions apply to OneNote 2010:
-
Click File.
-
Click Send, and then choose one of the following options:
-
E-mail Page as Attachment Opens an email message with both a copy of the file in its original file format and a copy of the file as a web page attached.
-
E-mail Page as PDF
Opens an e-mail message with a copy of the file in .
pdf
format attached.
-
-
Enter the recipients’ aliases, edit the subject line and message body as necessary, and then click Send.
Send as the body of an email message
If you are using Excel, Publisher, or Word, you can send your file as the actual email message content — not as an attachment. To do this, first you need to add the Send to Mail Recipient command to the Quick Access Toolbar. See Customize the Quick Access Toolbar to learn how to add commands.
To send your file as the body of an email message, follow these steps:
-
Open the file you want to send.
-
In the Quick Access Toolbar, click Send to Mail Recipient
 to open an email message. Your file will appear in the body of the message.
 -
Enter the recipients’ aliases, edit the subject line and message body as necessary, and then click Send.
 to open an email message. Your file will appear in the body of the message.
See also
Attach files or insert pictures in Outlook email messages
Reduce the size of pictures and attachments
View, open, or save attachments
Need more help?
In this post we’re going to learn how to send emails from Excel. It’s possible to do this using VBA, but that’s the old way from the 90’s and we’re in 2018.
We are going to explore Microsoft Flow. This is a new product from Microsoft that allows us to automate workflows between apps. It’s not just Microsoft Office apps that can be automated. There are a ton of third party connections available. We can easily create rules that automatically do things like:
- Save any email attachments to a OneDrive folder.
- Get a notification on your phone when someone updates a table in your spreadsheet.
- Track all company Twitter mentions in a spreadsheet.
- Sync your Outlook calendar to your Google calendar.
- Forward emails to Slack.
The awesome part about Microsoft Flow is that it requires no code! We can design and build out your process (flow) in a couple minutes with an easy to use graphical interface.
In this post, we’ll be building a flow that schedules and sends an email template from Outlook based on the data in an Excel file.
Sign Up for Microsoft Flow
For this post, we’ll need to sign up for a Microsoft Flow account or sign into an existing Office 365 account.
There’s a free version which allows for 750 flows a month. If you have Office 365, then you already have Microsoft Flow and can use up to 2,000 flows per month.
Head to the Microsoft Flow website at https://flow.microsoft.com and click on either the Sign in or Sign up free button. Then either log in with your Office 365 credentials or provide the necessary information to create an account.
In the flow recipe we’ll be creating in this post, we’ll also need a OneDrive account. If you have Office 365, then you already have a OneDrive account. If not, then you can easily create a free one here https://onedrive.live.com.
A Quick Tour of Microsoft Flow
My Flows
In the My Flows tab of the site, we see all our flows listed that we have built. There’s a lot that can be done from this page.
- There’s an icon that shows which connections have been used for the flow.
- The name of the flow is listed.
- We can deactivate a flow to temporality stop it from running.
- We can share a flow with another user.
- We can edit a flow.
- We can create new flows either based on an existing template or starting from scratch with a blank flow.
Approvals
Flows allow us to create approval steps in our processes.
Imagine creating a flow to automatically email a quote generated from a spreadsheet to a potential client. You might want someone to review it and approve the email before it is actually sent. This is a step that can be added to any flow and is all managed from the Approvals tab.
Templates
A lot of what we may want to create might have already been built by the Microsoft team or someone else. In the Templates tab, there are a ton of pre-built flows that you can use as is, or customize for your use.
Click on any of the templates and see a more detailed explanation of what the flow does and what it needs to connect with to work.
Connectors
Connectors are the pieces you use to build out your automated process. In the Connectors tab, there are a ton of connections available for just about every popular online service including all the office applications.
There are many connections.
- Office apps like Excel, Outlook, OneDrive etc…
- Other Microsoft products like PowerApps and Power BI.
- Google office productivity suite.
- Twitter, Facebook, YouTube and other social apps.
- Many other online tools.
We can click on any of the connections to see further details about what type of actions we can do with it.
Setting Up Our Excel File
The first thing we’re going to need to do is set up our Excel File in OneDrive. We can create a new Excel workbook in OneDrive and add data to it for use with our emails.
In this example, we’re going to be creating and sending emails from Outlook based on the data in Excel. For each row of data, we are going to be sending the client an email telling them the current account balance that is owed.
We don’t need to create the whole email in Excel, just the data for the parts that will be different for each email we want to send.
- Date – We are going to delay sending out our emails based on this date.
- Email Address – This is the email address we are going to send an email to.
- Name – This is going to be used in body of the email to address the recipient by name.
- Account Balance – This is going to be used in the body of the email to tell the recipient their current account balance.
We will need to add the data into an Excel Table, as this is the only Excel object that Microsoft Flow will recognize.
To create a table, we can select the data and go to the Insert tab and use the Table command. We can also use the Ctrl + T keyboard shortcut to create a table.
Once we have a table with our data, we need to make sure to give it a good name instead of the default Table1 name. With the table selected we can go to the Table Tools Design tab and give it a new name from the Properties section. We will name the table Emails.
This will make any flows created with the data a lot easier to understand later on. Proper column heading names will help later on too.
Creating Our First Blank Flow
When logged into Microsoft Flow, go to the My flows tab and click on the Create from Blank button. The next screen will show you some popular triggers to start your flow with, but we want a blank flow, so we can click on the Create from blank button again.
Adding Our Flow Trigger
The first thing we need to do when creating our flow is add a trigger. This is exactly what it sounds like, it’s something that will trigger the flow to execute.
In this case, we’re going to create a button that we can press from the Microsoft Flow app to run the flow.
- Search for button to narrow down the list of available triggers and find the mobile button.
- Select Flow button for mobile from the connection options.
- Choose the Triggers section of the results. Each connection might have several trigger and action options available.
- Click on the Flow button for mobile trigger.
Getting Data from Excel to the Flow
After we trigger our flow with the button, we’re going to want it to do something. These will be the actions we add in the next steps of our flow process.
The first action we want to do is get the data from our Excel table.
Click on the New step button to add the next step to the flow. Then select Add an action from the menu.
Search for Excel to narrow down the list of connections then select the Excel – Get rows action. This action will get all the rows of data from the specified table in a given workbook.
Now we can select the File name from our OneDrive using the file icon and then select the appropriate Table name from the drop down menu, our table was named Emails.
Creating a Delay Based on the Date Field in Excel
In this example, we want to send each email out at a particular date and time based on the Date field in the Excel data. We can add a schedule step into the flow to accomplish this.
Create a New step and Add an action. Then search for delay and choose the Schedule – Delay until action.
The delay step will require a timestamp input. We can hard code a single value here, but it’s also possible to Add dynamic content so the timestamp depends on the values in our Excel file. Note, that flow will interpret the timestamp data in Excel as being UTC.
Click into the timestamp input field and the dynamic content pop up will display.
Under the Get rows section of the dynamic content pop up, select the Date field from our Excel table.
When we add the date from our Get rows action, something sort of magical happens. Flow will automatically place the delay step inside an Apply to Each step. Flow realizes we don’t want to just perform our actions once, but we likely want to perform our actions for each row of data in the Excel table.
This is exactly what we want. We could have added this in ourselves before adding the delay step. But it’s nice to know it’ll tell us if we forget.
Create the Email Template for Each Row of Data
Now we are ready to add our email step after the delay. This will be added inside the Apply to Each step since we want to send an email for each row of the data in our table.
Press the Add an action button found inside the Apply to each step.
This time we can search for Outlook to narrow down the results and choose the Office 365 Outlook – Send an email action.
We can then create an email template, referencing fields from our data where appropriate. In the To input section we would add our Email Address field from our data since this contains the email address to which we want to send the email.
Add a Notification Step
Since this flow will delay the emails, we might want some sort of confirmation when each email is actually sent. For this, we could add a notification step. This will send us a notification when each email is sent.
Again, we want this step inside the Apply to each step, so press the Add an action button at the bottom of the Apply to each step. Search for notification to narrow down the results and choose the Notifications – Send me a mobile notification action.
We can then add Text to the alert to specify which email was sent.
To actually receive the notification on our mobile device, we will need to install the Microsoft Flow app. We can download either the Android app here or the Apple app here.
Saving and Naming the Flow
Now that we’ve finished building our flow process, we need to save it. Click on the Save icon in the upper right hand corner of the web app.
We’ll also want to give the new flow a descriptive name. Click on the default name found in the top left hand corner of the web app then rename it appropriately.
Running the Flow
Now that we’ve built our flow process, named and saved it, we are ready to use it. We can now run the flow a few different ways.
Since the trigger we created to run the flow was the mobile app button, we can run the flow from our mobile device with the app installed. Go to the Buttons section of the mobile app, then press the button for our email flow.
We can also run the flow from the web app in the My flows tab. Click on the 3 ellipse icon on the right side of the flow and choose Run now from the options.
Either method will start the flow.
If the date field is in the past, then those emails will be sent immediately. Future dates will have emails delayed. Even though future dated emails are not sent, they are still created by flow, so changing the data in the Excel table after running will not change future dated emails.
Conclusions
Microsoft Flow is simple to use and very powerful. We’re in the modern era and no longer need to be programmers to create useful automation’s that save tons of time.
We were able to easily create a flow that sends emails based on the data in a connected Excel table.
If you can use a mouse and have some ideas about processes you’d like to automate, then Microsoft Flow is meant for you.
I’d love to hear about all the cool things you build with Microsoft Flow, so let me know in the comments below!
About the Author
John is a Microsoft MVP and qualified actuary with over 15 years of experience. He has worked in a variety of industries, including insurance, ad tech, and most recently Power Platform consulting. He is a keen problem solver and has a passion for using technology to make businesses more efficient.
- Интернет
- Рассылка почты
Пример макроса, отправляющего письма со вложениями из Excel через почтовый клиент Outlook:
Sub Отправить_Письмо_из_Outlook()

    'отправляем письмо без вложений
    res = SendEmailUsingOutlook("name@domain.ru", "Текст письма 1", "Тема письма 1")
    If res Then Debug.Print "Письмо 1 отправлено успешно" Else Debug.Print "Ошибка отправки"


    'отправляем письмо с 1 вложением
    attach$ = ThisWorkbook.FullName    ' прикрепляем текущий файл Excel
    res = SendEmailUsingOutlook("name@domain.ru", "Текст письма 2", "Тема письма 2", attach$)
    If res Then Debug.Print "Письмо 2 отправлено успешно" Else Debug.Print "Ошибка отправки"


    'отправляем письмо с несколькими вложениями
    Dim coll As New Collection    ' заносим в коллекцию список прикрепляемых файлов
    coll.Add "C:Documents and SettingsAdminРабочий столTyres.jpg"
    coll.Add "C:Documents and SettingsAdminРабочий столcalc.xls"
    coll.Add ThisWorkbook.FullName    ' прикрепляем текущий файл Excel

    res = SendEmailUsingOutlook("name@domain.ru", "Текст письма 3", "Тема письма 3", coll)
    If res Then Debug.Print "Письмо 3 отправлено успешно" Else Debug.Print "Ошибка отправки"
End Sub
Макрос использует функцию SendEmailUsingOutlook, которая:
- принимает в качестве параметров адрес получателя письма, тему и текст письма, список вложений
- запускает Outlook, формирует письмо, и отправляет его
- возвращает TRUE, если отправка прошла успешно, или FALSE, если с отправкой почты вызникли проблемы
Код функции SendEmailUsingOutlook:
Function SendEmailUsingOutlook(ByVal Email$, ByVal MailText$, Optional ByVal Subject$ = "", _
                               Optional ByVal AttachFilename As Variant) As Boolean
    ' функция производит отправку письма с заданной темой и текстом на адрес Email
    ' с почтового ящика, настроенного в Outlook для отправки писем "по-умолчанию"
    ' Если задан параметр AttachFilename, к отправляемому письму прикрепляется файл (файлы)

    On Error Resume Next: Err.Clear
    Dim OA As Object: Set OA = CreateObject("Outlook.Application")
    If OA Is Nothing Then MsgBox "Не удалось запустить OUTLOOK для отправки почты", vbCritical: Exit Function

    With OA.CreateItem(0)   'создаем новое сообщение
        .To = Email$: .Subject = Subject$: .Body = MailText$
        If VarType(AttachFilename) = vbString Then .Attachments.Add AttachFilename
        If VarType(AttachFilename) = vbObject Then    ' AttachFilename as Collection
            For Each file In AttachFilename: .Attachments.Add file: Next
        End If
        For i = 1 To 100000: DoEvents: Next    ' без паузы не отправляются письма без вложений
        Err.Clear: .Send
        SendEmailUsingOutlook = Err = 0
    End With
    Set OutApp = Nothing
End Function
Пример макроса, с получением параметров письма из ячеек листа Excel:
Sub Отправить_Письмо_из_Outlook()
    ' адрес получателя - в ячейке A1, текст письма - в ячейке A2
    res = SendEmailUsingOutlook(Cells(1, 1), Range("a2"), "Тема письма 1")
    If res Then Debug.Print "Письмо 1 отправлено успешно" Else Debug.Print "Ошибка отправки"
End Sub
- 176178 просмотров
Не получается применить макрос? Не удаётся изменить код под свои нужды?
Оформите заказ у нас на сайте, не забыв прикрепить примеры файлов, и описать, что и как должно работать.
Зачастую базы данных e-mail адресов электронной почты либо ведутся в приложении Excel, либо экспортируются в Excel-файл из других источников, поэтому для многих пользователей актуальным становится вопрос рассылки писем на основе данных, содержащихся в Excel-файлах.
Стандартные возможности Excel ограничиваются отправкой активной рабочей книги по электронной почте (Кнопка Office/Отправить/Электронная почта), в то время как возможности Visual Basic for Application предоставляют пользователям Excel и Outlook практически неограниченные возможности. Существует множество различных способов отправки электронной почты прямо из приложения Excel, как при помощи почтовых клиентов, таких как Outlook или The Bat, так и без их использования. В этой статье речь пойдет об отправке почты из Excel при помощи почтовой программы Outlook.
Отправка писем макросом
Отправка писем, информация для которых содержится в файлах Excel, может быть реализована различными способами, при помощи макроса, написанного для Excel, который вызывает приложение Outlook и отправляет через него письма, при помощи макроса, написанного для Outlook, который вызывает приложение Excel и берет данные для писем из Excel-файла, или же смешанным способом, когда используются процедуры и функции как в одном, так и в другом приложении. По ссылкам приведены примеры простейших макросов по отправке электронных писем для Excel и для Outlook.
Готовая надстройка для Excel по рассылке электронных писем, созданная на основе макроса, сочетает в себе широкие возможности VBA и простоту в использовании. Ниже представлено диалоговое окно надстройки.

При помощи полей, расположенных в левой части диалогового окна можно выбрать способ рассылки и задать диапазоны ячеек, данные из которых будут использоваться при формировании электронных писем. Опции правой части диалогового окна позволяют использовать дополнительные параметры, например, подставлять имена получателей в темы и/или тексты писем, отправлять html-файл в теле письма либо использовать стандартную подпись Outlook, которая также представляет собой html-файл. Кроме того разными почтовыми сервисами используются различные ограничения на отправку писем по размеру, по количеству, по скорости отправки и так далее (рекомендуется ознакомиться с ними заранее), и для того чтобы не выходить за рамки этих ограничений, в надстройке предусмотрена опция «Использовать задержку между письмами», которая позволяет настроить паузу между отправкой писем.
Возможности надстройки
С этой надстройкой Вы сможете:
1. Отправлять на разные адреса электронной почты письма одинакового содержания и с одной темой;
* в ячейке для адреса получателя может быть указано несколько адресов электронной почты без пробелов, через знак-разделитель «;» (при этом получатель письма будет видеть все эти адреса).
2. отправлять на разные адреса электронной почты индивидуальные письма со своим содержанием и разными темами;
3. формировать электронные письма из Excel-таблиц путем выделения диапазонов, содержащих необходимую информацию;
4. создавать персональные электронные письма, используя имена получателей в темах и/или в тексте писем (при выборе опций, использующих имена адресатов, поле для выбора диапазона с именами становится активным);
5. устанавливать паузу между отправкой писем;
6. вставлять html-файл в тело письма либо добавлять к тексту письма стандартную подпись, созданную в Outlook;
7. добавлять изображения (картинки) к письму, созданному на основе html-файла;
8. добавлять во вложения к письмам одинаковый набор файлов;
9. добавлять к каждому письму отдельное вложение;
10. отправлять письма из разных аккаунтов, используемых в Microsoft Outlook;
11. форматировать отправляемый текст при помощи html-тэгов прямо в ячейках;
12. создавать электронные письма, но не отправлять их автоматически, а сохранять в черновики для проверки, корректировки и последующего отправления вручную;
13. одним кликом мыши вызывать диалоговое окно макроса прямо из панели инструментов Excel.

 надстройка для рассылки писем из Excel через Microsoft Outlook
Внимание! При автоматизированной рассылке писем необходимо помнить о том, что:
1. При отправке сообщений при помощи макросов и надстроек может появляться окно подтверждения отправки для каждого письма (о том как избавиться от этого окна можно прочитать отдельно);
2. в некоторых почтовых сервисах, как платных так и бесплатных, действуют различные ограничения на отправку писем, например по количеству отправляемых писем в час или в сутки, по максимальному размеру отправляемых писем, по количеству писем, отправленных на несуществующие адреса и так далее. При несоблюдении таких ограничений Ваш почтовый ящик может быть заблокирован;
3. при использовании паузы между отправкой писем в этой надстройке, Excel будет заблокирован до полного окончания отправки писем.
Видео по работе с надстройкой
Как отправить письма с разных адресов?
В приложении Outlook может быть настроено несколько учетных записей, при этом отправка писем ведется с того адреса, который используется по умолчанию. Если необходимо сделать так, чтобы рассылка велась с другого адреса, можно написать этот адрес в ячейках столбца на листе Excel и в поле «Учетные записи» диалогового окна надстройки выделить эти ячейки. Более того, можно отправлять письма с разных аккаунтов (все они должны быть настроены в Outlook). Для этого на рабочем листе Excel создается список учетных записей, с которых будет вестись рассылка и диапазон ячеек этого списка указывается в поле «Учетные записи». 
Как добавить вложения к письмам?
В надстройке реализовано два разных способа добавления вложений к отправляемым письмам. Установка флажка в поле «Добавить файлы во вложение» позволяет прицепить несколько файлов, при этом выбранный набор файлов будет прикреплен к каждому письму почтовой рассылки. Можно прикрепить индивидуальное вложение к каждому письму, в таком случае используется поле «Вложения», а на рабочем листе для каждого адресата прописывается полный путь к файлу. Этим способом можно вложить только по одному файлу в каждое письмо. Также можно комбинировать описанные выше способы отправки вложений, то есть уникальный файл вложить при помощи поля «Вложения», а одинаковые для всех файлы вложить при помощи установки флажка в поле «Добавить файлы во вложение». Может возникнуть необходимость отправки нескольких персональных файлов каждому адресату. В таком случае необходимо для каждого письма создавать индивидуальные архивы и отправлять их через поле «Вложения». Создание архивов можно выполнять программно, в автоматическом режиме.
Как вставить картинку в письмо?
При рассылке электронных писем с помощью надстройки, предусмотрена возможность добавления к письму изображений. При этом изображения можно прикрепить к письму, как обычные вложения, а можно вставить в тело письма.
1. Для отправки картинок обычными вложенными файлами достаточно просто установить флажок в поле «Добавить файлы во вложение» и при помощи кнопки обзора выбрать необходимые файлы, не зависимо от того используется html-файл или нет;
2. Чтобы вставить картинку в тело письма, необходимо использовать html-файл. Картинку предварительно нужно выложить в сеть интернет, чтобы она была доступна получателям писем, поместив ее на сервер любого файлобменника, например на www.imageup.ru (либо другой сервис, предоставляющий прямые ссылки). В свою очередь в html-файле достаточно в нужном месте вставить ссылку на эту картинку, а также указать размеры картинки, при этом если ссылка указана правильно, получатель письма должен увидеть изображение в теле письма. Ссылка должна иметь вид:
<img src=’http://macros-vba.ru/files/Logo.png’ height=39 width=165> если изображение размещено на сайте, или
<img src=’http://www.imageup.ru/img67/2780968/123123.jpg’ height=39 width=165> если изображение размещено на сервере файлобменника (адрес картинки сгенерирован файлобменником).
Создать html-файл можно при помощи текстового редактора Word, для этого при сохранении файла необходимо выбрать тип файла «Веб-страница (*.htm; *.html)». После сохранения файла, его необходимо открыть при помощи блокнота или текстового редактора NotePad++, вставить в нужное место документа ссылку на картинку, после чего сохранить внесенные изменения.
Как отправить письмом отформатированный текст?
Механизм, используемый для автоматической рассылки писем, позволяет отправлять только неотформатированный текст, то есть, если в ячейках Excel для рассылки приготовлен текст, имеющий переносы строк, измененные цвета и размеры шрифтов, отступы и так далее, то при автоматическом формировании писем все эти настройки формата текста игнорируются. Тем не менее, осуществить отправку отформатированного текста все-таки можно, для этого в тексте писем достаточно использовать html-тэги, например, для переноса строки — тэг br, заключенный в угловые скобки <>, а для того чтобы сделать текст жирным — тэги b и /b, также в угловых скобках каждый. Разобраться достаточно просто.
Как совместить текст из ячеек с текстом html-файла?
При помощи html-тэгов можно решить и более сложную задачу. Предположим, необходимо сделать рассылку отформатированного определенным образом текста в html-файле, обратившись при этом к адресатам по именам. Часть текста при этом содержится в ячейках на рабочем листе, другая часть в html-файле. При помощи html-тэгов в ячейках рабочего листа и подбора параметров шрифта в html-файле можно добиться одинакового отображения текста.

Для решения этой задачи удобнее предварительно объединить имена адресатов с текстом письма при помощи текстовой функции «СЦЕПИТЬ», сохранить результат преобразования в виде значений и уже после этого добавлять необходимые html-тэги. В примере на изображении показано как при помощи тэгов осуществить выравнивание текста по центру, задать курсив, название, размер и цвет шрифта. Образцы файлов прилагаются. После того как все необходимые тэги сформированы в одной ячейке, их можно быстро подставить в начале и в конце значений остальных ячеек столбца. Поможет в этом надстройка для подстановки символов и значений.
Каким образом можно письма сформировать, но не отправлять?
При установке флажка в поле «Создать, но не отправлять» сформированные письма не отправляются автоматически, а сохраняются в папку «Черновики», предоставляя возможность произвести проверку, при необходимости внести изменения и отправить проверенные почтовые сообщения в ручном режиме.
Другие материалы по теме:

Excel позволяет создавать диаграммы высокого качества, работать с огромным количеством данных, обрабатывать картинки, блок-схемы и многое другое. И даже если вам и этого не достаточно, можно использовать Excel для автоматической отправки писем с помощью встроенного VBA редактора.
Данная статья описывает три способа отправки писем с помощью VBA в Excel. Вы можете скачать файл с примером отправки email с помощью VBA в Excel.
Отправить письмо в Excel с помощью VBA
Один из самых простых способов для автоматизации отправки почты с Excel заключается в вызове функции Create («ObjectOutlook.Application»). Данная функция возвращающает ссылку на ActiveX объект (в данном случает приложение Outlook), которое затем используется для создания и отправки электронной почты.
Чтобы проверить данный способ в работе, скопируйте и вставьте код ниже в VB редактор.
|
1 |
Sub Send_Email_Using_VBA() |
В качестве напоминания: Когда вы пытаетесь отправить письмо вышеуказанным способом, система безопасности будет выдавать каждый раз предупреждающее окно, в котором будет говориться о том, что Программа пытается отправить сообщение от вашего имени… и возможности обойти этот шаг нет.
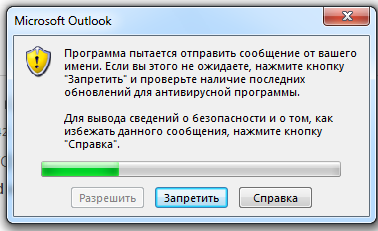
К счастью, существует еще два способа, с помощью которых данный вопрос может быть решен: первый – через использование CDO, второй – имитирующий использование событий нажатий клавиш клавиатуры.
Отправить письмо в Excel с помощью CDO
Что такое CDO? CDO является библиотекой объектов, которая предоставляет интерфейс Messaging Application Programming Interface (MAPI). CDO позволяет манипулировать обменом данных, и отправлять и получать сообщения.
Использование CDO может быть предпочтительно в случаях, когда вы хотите предотвратить появление вплывающих окон безопасности Программа пытается отправить сообщение от вашего имени… и следовательно, предотвратить задержку отправки сообщения.
В нашем примере мы используем функцию CreateObject («CDO.Message»). Важно отметить, что необходимо правильно установить конфигурацию SMTP сервера, чтобы не допустить появления ошибок Run-time error 2147220973(80040213) или sendUsing configuration value is invalid. Пример ниже настроен на отправку сообщений через почту Google (Gmail). Для других почтовых серверов, вам потребуется ввести свои значения SMTP-сервера и SMTP-порта.
|
1 |
Sub CDO_Mail_Small_Text_2() |
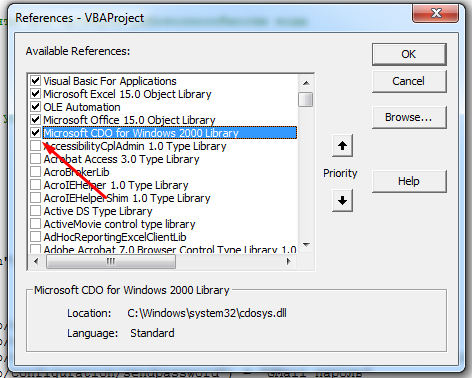
Обратите внимание, чтобы воспользоваться данным методом вам необходимо подключить библиотеку CDO в редакторе макросов Tool –> References.
Отправить письмо в Excel с помощью Send Keys
Другой способ отправки email с помощью Excel – использование команды ShellExecute, которая выполняет любую программу в VBA. Команда ShellExecute используется для загрузки документа с соответствующей программой. По сути, вы создаете объект String (текстовые данные) и передаете его в качестве параметра для функции ShellExecute. Остальная часть операций выполняется в окнах. Автоматически определяется, какая программа связана с данным типом документа и используется для загрузки документа. Вы можете использовать функцию ShellExecute, чтобы открыть Internet Explorer, Word, Paint и множество других приложений. В коде ниже используется задержка в три секунды, чтобы убедиться, что отправляемое письмо корректно и для возможности предотвратить отправку, если вы вдруг нашли какие-нибудь недочеты.
|
1 |
Sub Send_Email_Using_Keys() |
Cкачать файл с примером отправки email с помощью VBA в Excel