
A multiple-selection list box is list of choices that looks like a scrollable list of check boxes instead of a typical list box. Users can select as many check boxes as necessary from the list. Depending on how you design the multiple-selection list box, users may also be able to type their own list item next to one of the check boxes.
In this article
-
When to use a multiple-selection list box
-
The user experience
-
Compatibility considerations
-
Insert a multiple-selection list box
-
Layout tips
When to use a multiple-selection list box
Use a multiple-selection list box when you want to:
-
Enable users to select multiple items in a list.
-
Enable users to type their own value in a list.
-
Show most or all of the items in a list on the form by default.
-
Display values retrieved from a fixed list, from the form template’s data source, or from an external data source, such as a database or Microsoft Windows SharePoint Services list.
In the following illustration, users can assign expenses in an expense report form to multiple categories by selecting check boxes in a multiple-selection list box. The form designer has chosen to permit custom categories. Consequently, users can enter a value in an empty box next to the last check box in the list.
After you insert a multiple-selection list box on your form template, you must specify the values that you want to appear in it. Otherwise, users will see an empty box when they open a form that is based on your form template. In the Multiple Selection List Box Properties dialog box, you can type the entries yourself or configure the multiple-selection list box to retrieve entries from a database or other data source.
Related controls
Microsoft Office InfoPath includes controls that are similar to multiple-selection list boxes but that serve different purposes. To decide which of these controls works best on your form template, refer to the following list:
List box Like a multiple-selection list box, a standard list box allows users to select values in a list. However, with a list box, users can select only one item in the list. Like a multiple-selection list box, a list box displays all of the items in the list by default.
Drop-down list box Like any other list, a drop-down list box offers users a list of choices. However, with drop-down list boxes, the list entries are hidden until the user clicks the control. Users can select only one item from a drop-down list.
Combo box If you want your users to be able to type their own list entry or choose a value from a predefined list, use a combo box instead of a multiple-selection list box. Users can select only one item from a combo box.
Option buttons Like a multiple-selection list box, a group of option buttons enables users to select from a list of choices. Unlike multiple-selection list boxes, users can select only one option from a group of option buttons. In addition, with option buttons, users click a small circle to make a choice instead of clicking an item in a list box.
Top of Page
The user experience
With multiple-selection list boxes, users make choices by selecting or clearing check boxes in a box on the form. If the number of check boxes exceeds the height of the control, a scroll bar appears on the right side of the box so that users can see the remaining choices.
You can design your form template so that users can type their own entry in the list, if necessary. In this case, a check box with an edit box appears as the last item in the list.
To enter a custom value, users select the check box next to the edit box and then type their entry in the area next to the check box. For this to be possible, you must select the Allow users to enter custom values check box in the Multiple-Selection List Box Properties dialog box when you insert the multiple-selection list box onto your form template.
Top of Page
Compatibility considerations
When you design a form template in InfoPath, you can choose to design a browser-compatible form template. When you design a browser-compatible form template, multiple-selection list box controls are unavailable in the Controls task pane because they cannot be displayed in a Web browser.
Top of Page
Insert a multiple-selection list box
The procedure for inserting a multiple-selection list box differs slightly depending on whether you are designing a new, blank form template or basing the design of your form template on a database or other external data source.
The following illustration shows how a multiple-selection list box looks when it is selected in design mode, before the form template designer has manually added the list box entries.
Controls can be bound or unbound. When a control is bound, it is connected to a field or group in the data source so that data entered into the control is saved in the underlying form (.xml) file. When a control is unbound, it is not connected to a field or group, and data entered into the control is not saved. When you select or move your pointer over a control, text and a binding icon appear in the upper-right corner of the control. The text indicates the group or field to which the control is bound in the data source. The icon indicates whether the control is correctly bound to that group or field. When the binding is correct, a green icon appears. If there’s something wrong with the binding, you’ll see a blue or red icon instead.
The data source for the form template consists of fields and groups that appear in a hierarchical view in the Data Source task pane. Multiple-selection list boxes are always bound to repeating fields inside a group. Repeating fields allow you to store more than one value in the field. In the following example, the Category multiple-selection list box on the form template is bound to the category repeating field in the Data Source task pane.
When you design a new, blank form template, the Automatically create data source check box in the Controls task pane is selected by default. This enables InfoPath to automatically create fields and groups in the data source as you add controls to the form template. These fields and groups are represented by folder and file icons in the Data Source task pane.
If you base the design of your form template on an existing Extensible Markup Language (XML) file, database, or Web service, InfoPath derives the fields and groups in the Data Source task pane from that existing data source.
Insert a multiple-selection list box
-
On the form template, place the cursor where you want to insert the control.
-
If the Controls task pane is not visible, click More Controls on the Insert menu, or press ALT+I, C.
-
In the Controls task pane, do one of the following:
-
To automatically create a repeating field in the data source that is bound to the multiple-selection list box, select the Automatically create data source check box.
-
To bind the multiple-selection list box to an existing repeating field, clear the Automatically create data source check box.
Note: If the check box is unavailable, the data source is locked. For example, if you base the design of your form template on an XML Schema, you may not be able to add new fields or groups to the data source in InfoPath. This restriction helps to prevent you from inadvertently making changes to the schema that may render it invalid.
-
-
Under Insert controls, click Multiple-Selection List Box.
-
If you cleared the Automatically create data source check box in step 3, select a repeating field in the Multiple-Selection List Box Binding dialog box to which you want to bind the multiple-selection list box.
-
On the form template, type the label text above or to the left of the multiple-selection list box, followed by a colon (:).
-
To specify the values that you want to use as the entries in the list, double-click the multiple-selection list box.
-
Click the Data tab.
-
Do one of the following to populate the list box:
Type the list box values yourself
This option is useful when you have a predetermined, limited set of values, and you don’t expect those values to change in the future. If the values do happen to change, you must publish an updated version of your form template so that users can see and use the latest list entries.
-
Click Add.
-
In the Value box, type the text that you want to store if a user selects this entry.
-
In the Display name box, type the text that you want to display for this entry, and then click OK.
-
Repeat steps 1 through 3 for each entry that you want to add to the list box.
-
To test your changes, click Preview on the Standard toolbar, or press CTRL+SHIFT+B.
Use values from another part of the form
This option is useful when you want the values in your list to change, depending on other values that the users enter into their form.
-
Under List box entries, click Look up values in the form’s data source.
The entries in the list box must be associated with a particular repeating group or repeating field on your form template.
-
Click Select XPath
 next to the Entries box, and then in the Select a Field or Group dialog box, click the repeating field or repeating group that contains the fields that will provide the values for the list box, and then click OK.
 -
Click Select XPath
next to the Value box, click the field that contains the possible values for the items in the list box, and then click OK. One of these values will be saved in the underlying XML when a user clicks an item in the list box. -
Click Select XPath
next to the Display name box, click the field that contains the values that are displayed in the list box, and then click OK.Tip: To prevent display name values from appearing multiple times in the list box, select the Show only entries with unique display names check box.
Use values from a database, Web service, XML document, or SharePoint site
This option is useful when you want the values in a list box to be up-to-date or refreshed regularly. The values are typically stored in a database or other external data source and are retrieved every time the form is opened.
-
Click Look up values from an external data source.
-
Do one of the following:
-
If you already added a data connection, click it in the Data Connection box.
-
To add a new data connection, click Add, and then follow the instructions in the Data Connection Wizard.
The entries in the list box must be associated with a particular repeating field or repeating group.
-
-
Click Select XPath
next to the Entries box, and then in the Select a Field or Group dialog box, click the group or field that contains the fields that will provide the values for the list box, and then click OK. -
Click Select XPath
next to the Value box, click the field that contains the possible values for the items in the list box, and then click OK. One of these values will be saved in the underlying XML when a user clicks an item in the list box. -
Click Select XPath
next to the Display name box, click the field that contains the values that are displayed in the list box, and then click OK.Tip: To prevent display name values from appearing multiple times in the list box, select the Show only entries with unique display names check box.
-
-
If you want users to be able to type their own value at the bottom of the multiple-selection list box, select the Allow users to enter custom values check box.
 next to the Entries box, and then in the Select a Field or Group dialog box, click the repeating field or repeating group that contains the fields that will provide the values for the list box, and then click OK.
Top of Page
Layout tips
Use the following tips to help you refine the appearance, size, and other aspects of a multiple-selection list box:
-
To change the width of several multiple-selection list boxes at once, select the multiple-selection list boxes whose size you want to change, press ALT+ENTER, click the Size tab, and then in the Width box, type a new number.
-
To change the background color for several multiple-selection list boxes at once, select the multiple-selection list boxes that you want to change, on the Format menu, click Borders and Shading, and then on the Shading tab, make the necessary adjustments.
-
To customize the font that appears next to the check boxes in a multiple-selection list box, use the Font and Font Size boxes on the Formatting toolbar. To change the font and font size for all of the multiple-selection list boxes on your form template at once, click the multiple-selection list box that contains the formatting that you want, and then on the Format menu, click Apply Font to All Multiple-Selection List Box Controls.
-
To adjust the spacing between a multiple-selection list box and the objects that surround it on the form template, experiment with margin settings on the Size tab in the Multiple-Selection List Box Properties dialog box. Using margins to increase the spacing offers a finer degree of control than using paragraph breaks to increase the spacing.
Top of Page
INTELLIGENT WORK FORUMS
FOR COMPUTER PROFESSIONALS
Contact US
Thanks. We have received your request and will respond promptly.
Log In
Come Join Us!
Are you a
Computer / IT professional?
Join Tek-Tips Forums!
- Talk With Other Members
- Be Notified Of Responses
To Your Posts - Keyword Search
- One-Click Access To Your
Favorite Forums - Automated Signatures
On Your Posts - Best Of All, It’s Free!
*Tek-Tips’s functionality depends on members receiving e-mail. By joining you are opting in to receive e-mail.
Posting Guidelines
Promoting, selling, recruiting, coursework and thesis posting is forbidden.
Students Click Here
Selection list in Word DocumentSelection list in Word Document(OP) 9 Feb 07 11:40 I am working on a word document that I need to embedd a selection list into. The list needs to have 3 options as follows: «A service fee of three-hundred ($300.00) shall be remitted to us prior to delivery of the electronic files» I used the AutoText feature which worked great, but I need these options available for all my users. Is their a way to embedd a drop down menu that they can select these otpions from within the Word Document. My other option is just to list the three and have a check box in front of each, but thats no fun. Even a popup windows that appears when the document is opened asking them to selection the project size. This is the only part of th document that gets midified. Everything else is standard. Any insight to this is appreciated. Thank You Red Flag SubmittedThank you for helping keep Tek-Tips Forums free from inappropriate posts. |
Join Tek-Tips® Today!
Join your peers on the Internet’s largest technical computer professional community.
It’s easy to join and it’s free.
Here’s Why Members Love Tek-Tips Forums:
- Talk To Other Members
- Notification Of Responses To Questions
- Favorite Forums One Click Access
- Keyword Search Of All Posts, And More…
 Talk To Other Members
Register now while it’s still free!
Already a member? Close this window and log in.
Join Us Close

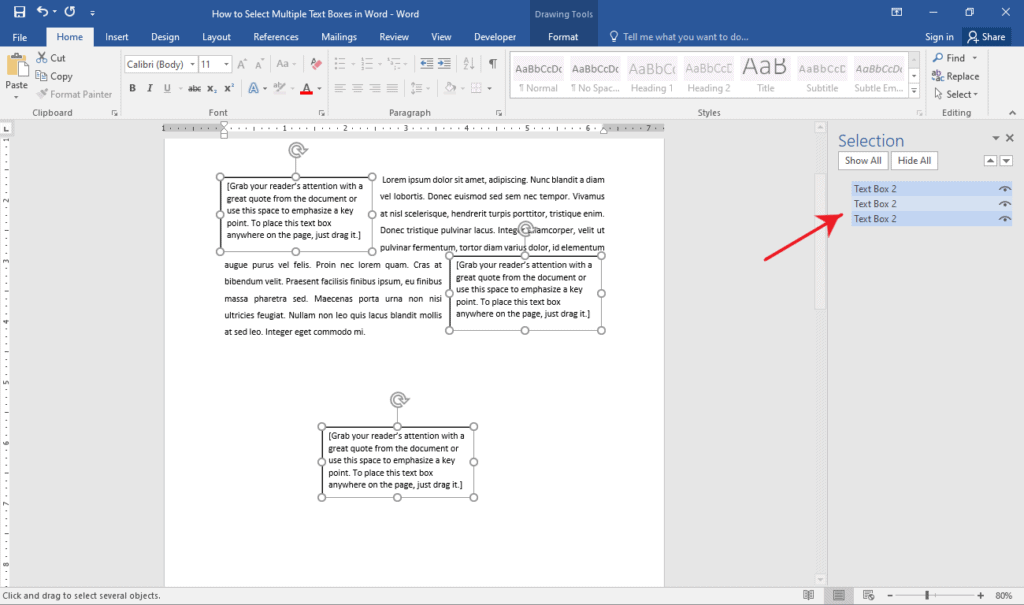
- Using the CTRL key and your mouse
- Using the Select Objects tool
- Using the Selection Pane
Method 1: Using the CTRL Key and Your Mouse
Step 1: Open your MS Word document.

Step 2: Click on the text boxes.
Once your document is ready, select a text box in your document. You can do this by clicking on any of the four sides of your text box.
Now, press and hold the CTRL key and click the next one.
Repeat the same steps to go over all of the text boxes in your document.

Method 2: Using the Select Objects Tool
Step 1: Open an MS Word document.

Step 2: Zoom out your document.
To be able to select all text boxes on a page, zoom out your document to view the entire page.
You can do this by clicking the Zoom Out button found at the bottom right corner of your window.
Keep clicking until all your text boxes on a page are visible.

Step 3: Access the Select Objects tool.
Now that your document is ready, go to the Editing group found at the rightmost part of the Home tab.
Click the Select Objects drop-down menu and select the Select Objects tool.

Now, click the upper right portion of your document and drag your cursor to its bottom right.

This will select all the text boxes on the respective page.
Method 3: Using the Selection Pane
The Selection Pane lists down all objects in your document. This way, you can easily select your text boxes throughout your document from the list.
The disadvantage though is that this method requires the text boxes to be in a different text wrapping format other than the default.
Step 1: Open up a Word document.

Step 2: Display the Selection Pane.
Click the Select drop-down menu found at the rightmost part of the Home tab. On the list of options, select the Selection Pane.
This will display the Selection Pane on the right side of your window.
You should see a list of text boxes you have in your document.

Step 3: Select your text boxes.
On the Selection Pane, press and hold the CTRL key while clicking each text box that you want to select.
Conclusion
We hope you’ve found this article helpful!
|
05-22-2018, 11:59 AM |
|||
|
|||
|
Multiple-Selection List in Word 2016 I am trying to create a template that has a drop-down list where you can select all that apply. I am not a coder or programmer, just someone who uses Word. Any help?
|


|
05-24-2018, 06:44 PM |
|
Your description is rather vague. What do you want to select and what is supposed to happen when you make a selection?
__________________
|
- Remove From My Forums
-
Question
-
Hello,
My VBA-fu is weak. Is there a relatively easy way to allow a user to make multiple selections from a dropdown list in Word 2013? Ideally I would like those multiple selections to then be added to the body of a letter, replacing if possible the dropdown
list. Any help would be massively appreciated!Crow
Tealeaf
Answers
-
In a word, no — dropdowns only all one item to be selected. Besides which, if the selection of an item was to replace the dropdown, there’d then be no dropdown to select a second or subsequent item from.
Cheers
Paul Edstein
[MS MVP — Word]-
Proposed as answer by
Thursday, November 12, 2015 2:01 AM
-
Marked as answer by
Fei XueMicrosoft employee
Wednesday, November 25, 2015 1:47 AM
-
Proposed as answer by