
How to Quickly Select Cells, Rows, Columns and Entire Tables in Microsoft Word
by Avantix Learning Team | Updated August 21, 2022
Applies to: Microsoft® Word® 2010, 2013, 2016, 2019, 2021 and 365 (Windows)
There are many different ways of selecting in tables in Microsoft Word. Check out these Word tips, tricks and shortcuts to select an entire table, a single cell, an entire row or column or even multiple rows or columns in tables.
Recommended article: 10 Microsoft Word Shortcuts for Moving Around in Tables
Do you want to learn more about Microsoft Word? Check out our virtual classroom or live classroom Word courses >
1. Select an entire table using a mouse
To select an entire table, move your mouse over the table until an icon with 4 arrows appears in the upper-left corner of the table and then click the icon to select the entire table.
Below is the table selection icon which appears on the top left of tables:
2. Select an entire table using a keyboard and mouse
If your press Alt and double-click anywhere in a table, the entire table will be selected (Word also opens the Research pane).
3. Select an entire table using a keyboard
To select an entire table using a keyboard, position the cursor in the first cell of the table. Press Alt + Shift + End on your keyboard to select to the end of the first row and then press Alt + Shift + Page Down to select to the last cell.
4. Select a cell using a mouse
To select an individual cell, move the mouse to the left side of the cell until it turns into a black right arrow and then click to select the cell.
5. Select a cell using a keyboard
To use the keyboard to select a cell, position the cursor at the beginning of the cell and then press Shift + right arrow on your keyboard. Keep pressing Shift + right arrow until the entire cell is selected.
6. Select a row or rows using a mouse
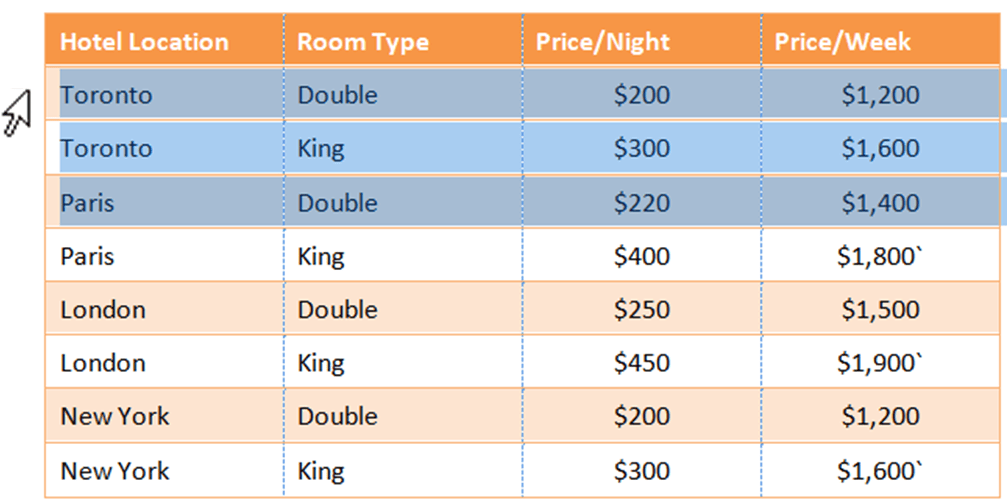
To select a row in a table, move the cursor to the left of the row until it changes into a right arrow. Click to select the current row or drag up to down to select multiple rows.
Below is the right arrow that appears when you position your cursor to the left of rows and is used for selecting rows in tables:
7. Select rows using a mouse and keyboard
To select multiple contiguous rows, move the cursor to the left of the first row until it changes into a white right arrow and then click to select the row. Press Shift and click with the white right arrow on the last row you want to select.
To select multiple non-contiguous rows, move the cursor to the left of the first row until it changes into a white right arrow and then click to select the row. Press Ctrl and click with the white right arrow on subsequent rows.
8. Select a row or column using a keyboard
To select a row using a keyboard, position the cursor in the first cell of the row you want to select and then press Alt + Shift + End on your keyboard to select to the end of the row.
To select a column using a keyboard, position the cursor in the first cell of the column you want to select and then press Alt + Shift + Page Down on your keyboard to select to the end of the column.
9. Select a column or columns using a mouse
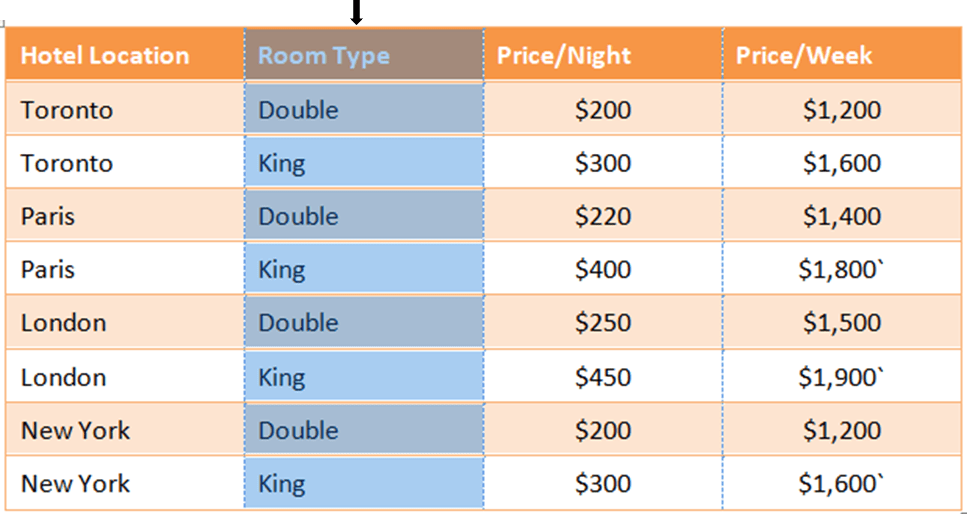
To select a column in a table, move the cursor to the top of the column until it changes into a down arrow. Click to select the current column or drag right or left to sele9.ct multiple columns.
Below is the down arrow that appears when you position your cursor at the top of a column and is used for selecting columns in tables:
10. Select columns using a mouse and keyboard
To select multiple contiguous columns, move the cursor to the top of the first column until it changes into a black down arrow and then click to select the column. Press Shift and click with the black down arrow on the last column you want to select.
To select multiple non-contiguous columns, move the cursor to the top of the first column until it changes into a black down arrow and then click to select the column. Press Ctrl and click with the black down arrow on subsequent columns.
Subscribe to get more articles like this one
Did you find this article helpful? If you would like to receive new articles, JOIN our email list.
More resources
4 Ways to Create a Table in Word
14 Shortcuts to Quickly Select Text in Microsoft Word
How to Insert, Format and Update Cross-References in Word
Microsoft Word Tricks to Keep Text Together (Words, Lines or Paragraphs)
How to Format Microsoft Word Tables Using Table Styles (Ultimate Guide)
Related courses
Microsoft Word: Intermediate / Advanced
Microsoft Excel: Intermediate / Advanced
Microsoft PowerPoint: Intermediate / Advanced
Microsoft Word: Long Documents Master Class
Microsoft Word: Styles, Templates and Tables of Contents
Microsoft Word: Designing Dynamic Word Documents Using Fields
VIEW MORE COURSES >
Our instructor-led courses are delivered in virtual classroom format or at our downtown Toronto location at 18 King Street East, Suite 1400, Toronto, Ontario, Canada (some in-person classroom courses may also be delivered at an alternate downtown Toronto location). Contact us at info@avantixlearning.ca if you’d like to arrange custom instructor-led virtual classroom or onsite training on a date that’s convenient for you.
Copyright 2023 Avantix® Learning
Microsoft, the Microsoft logo, Microsoft Office and related Microsoft applications and logos are registered trademarks of Microsoft Corporation in Canada, US and other countries. All other trademarks are the property of the registered owners.
Avantix Learning |18 King Street East, Suite 1400, Toronto, Ontario, Canada M5C 1C4 | Contact us at info@avantixlearning.ca

Just like selecting text and images in Word is a very common task in Word, so is selecting content in a table. There may be times you want to select a single cell, an entire row or column, multiple rows or columns, or an entire table.
Selecting an Individual Cell
To select an individual cell, move the mouse to the right side of the cell until you see it turn into a black arrow that points up and to the right. Click in the cell at that point to select it.

To use the keyboard to select a cell, put the cursor anywhere in the cell. Press “Shift” and then press the right arrow key until the whole cell is selected including the end-of-cell marker to the right of the content in the cell as shown in the following image.
Selecting a Row or Column
To select a row in a table, move the cursor to the left of the row until it turns into a white arrow pointing up and to the right, as shown in the following image. To select multiple rows this way, drag the mouse down over the other rows once you’ve selected one row.
NOTE: The plus icon that displays is used to insert a row at that location in the table so do not click that icon to select the row.
You can also use the mouse to select multiple, non-contiguous rows, or rows that are not connected. To do this, select one row using the mouse, press “Ctrl”, and then click on each row you want to add to the selection.
NOTE: This is similar to selecting multiple, non-contiguous files in or File Explorer (Windows 8 and 10) or Windows Explorer (Windows 7).
To select a row using the keyboard, select the first cell in the row using the keyboard as described above and then press the “Shift” key. While the “Shift” key is pressed, keep pressing the right arrow key to select each cell in the row until you’ve selected all the cells in the row and the end-of-row marker as shown in the following image.
To select multiple rows using the keyboard, keep the “Shift” pressed and press the down arrow key once for each subsequent row you want to select.
NOTE: When using the keyboard to select rows, you cannot select non-contiguous rows.
To select a column, move the mouse over the column until you see a black down arrow and then click to select that column.
To select multiple columns, hold the mouse down when you click in the first column to be selected using the black arrow cursor and drag over the other columns to select them.
To select non-contiguous columns, select one column using the mouse, press “Ctrl”, and then click on the other columns using the black arrow cursor.
To use the keyboard to select a column, select the first cell in the column using the keyboard as described above and then press the “Shift” key. While the “Shift” key is pressed, keep pressing the down arrow key to select each cell in the column until you’ve selected all the cells in the column, as shown in the following image.
Selecting multiple columns using the keyboard is done in a similar way to selecting multiple rows. Once you select one column, keep the “Shift” key pressed while you press the right or left arrow key for each subsequent column you want to select. You cannot select non-contiguous columns using the keyboard.
Selecting an Entire Table
To select an entire table, move your mouse over the table until you see the table selection icon in the upper-left corner of the table.
Click the table selection icon to select the entire table.
Using the Ribbon to Select All or Part of a Table
You can also use the ribbon to select any part of a table or an entire table. Put the cursor in any cell in the table and click the “Layout” tab under “Table Tools”.
In the “Table” section, click “Select” and select an option from drop-down menu, depending on what part of the table you want to select.
NOTE: The “Select” button on the “Layout” tab will only select the one cell, row, or column where the cursor is currently located.
The entire table can also be selected by holding down the “Alt” key and double-clicking on the table. Note that this also opens the “Research” pane and searches for the word on which you double-clicked.
READ NEXT
- › How to Adjust Cell Spacing for a Table in Microsoft Word
- › How to Nest a Table Within a Table in Word
- › How to Convert a Table to an Image in Microsoft Word
- › How to Convert Text to a Table in Microsoft Word
- › How to Convert a Row to a Column in a Microsoft Word Table
- › How to Automatically Resize a Table in Microsoft Word
- › How to Create a Table Template in Microsoft Word
- › HoloLens Now Has Windows 11 and Incredible 3D Ink Features
 Please Note:
This article is written for users of the following Microsoft Word versions: 2007, 2010, 2013, 2016, 2019, Word in Microsoft 365, and 2021. If you are using an earlier version (Word 2003 or earlier), this tip may not work for you. For a version of this tip written specifically for earlier versions of Word, click here: Selecting a Column or Row in a Table.
![]()
Written by Allen Wyatt (last updated June 18, 2022)
This tip applies to Word 2007, 2010, 2013, 2016, 2019, Word in Microsoft 365, and 2021
There are two ways to select a column within a table:
- Position the insertion point in any cell within the column, display the Layout tab of the ribbon, then click Select | Select Column.
- Move the mouse cursor just above the column you want to select. It will turn into a downward pointing arrow. Click on the left mouse button.
The two ways to select a row within a table are very similar:
- Position the insertion point in any cell within the row, display the Layout tab of the ribbon, then click Select | Select Row.
- Move the mouse cursor just to the left of the row you want to select, and then click on the left mouse button.
Note that the above references to «Layout tab of the ribbon» refers to the Layout tab that appears near the right side of the ribbon, to the right of the Table Design tab. This secondary Layout tab appears only after placing the insertion point within the table.
WordTips is your source for cost-effective Microsoft Word training.
(Microsoft Word is the most popular word processing software in the world.)
This tip (10341) applies to Microsoft Word 2007, 2010, 2013, 2016, 2019, Word in Microsoft 365, and 2021. You can find a version of this tip for the older menu interface of Word here: Selecting a Column or Row in a Table.
Author Bio
With more than 50 non-fiction books and numerous magazine articles to his credit, Allen Wyatt is an internationally recognized author. He is president of Sharon Parq Associates, a computer and publishing services company. Learn more about Allen…
MORE FROM ALLEN
Creating a Calendar Tool
Word has no way to add a calendar to your document that can be used for inserting dates, but you can add a calendar tool …
Discover More
Adjusting Your View of 3-D Graphs
Do you use Excel’s charting capabilities to display three-dimensional views of your data? The program provides a way that …
Discover More
Editing a Building Block Entry
Once you’ve created a Building Block, you may believe that it is «set in stone» and cannot be changed. Not so! You can …
Discover More

The First and Last Word on Word! Bestselling For Dummies author Dan Gookin puts his usual fun and friendly candor back to work to show you how to navigate Word 2013. Spend more time working and less time trying to figure it all out! Check out Word 2013 For Dummies today!
More WordTips (ribbon)
Placing Text in Empty Table Cells
Tables are often used to organize information into an understandable format. If your company requires that tables in …
Discover More
Unwanted Vertical Lines in a Table
When you print a table that includes borders, those borders should be crisp and clear on the printout. If you get some …
Discover More
Converting Tables to Text
Need to convert all the tables in your document into plain text? This tip provides a macro that can make quick work of a …
Discover More
Subscribe
FREE SERVICE: Get tips like this every week in WordTips, a free productivity newsletter. Enter your address and click «Subscribe.»
View most recent newsletter.
Videos
Links and Sharing

Use Alt to select columns of text.
Most text selection in Word involves selecting horizontally – selecting a line or a paragraph of text. Sometimes, though, you need to select a vertical slab of text. To do that, hold down the Alt key while you click and drag your mouse over the text.
This comes in handy when someone sends you an email or other document with the lines indented. When you copy the email into Word, you end up with empty space at the beginning of each line. To instantly eliminate the spaces and shift the whole block of text over, hold down the Alt key, click immediately to the left of the first character in the top line, then drag down and to the left to highlight the spaces. Press Delete to erase them. You can use the same technique to eliminate unwanted characters when you copy an email into Word in which each line has been preceded with a quote character, such as >.
You can also use this technique to select a vertical column within a slab of text, although this works best when you’re dealing with monospaced fonts where each character is the same width.