- Remove From My Forums
-
Question
-
Word 2010. How to select all picutres inserted in a document? I need to add border to each image but failed to locate all images at once.
Any help will be appreciated.
Answers
-
Well you can’t select them at once, but you can find them.
Using CTRL-F, you can search for ^g, this will give you all pictures as a result.Simple click the result, and you can make the preferred changes to the picture.
Hope this helps.
-
Proposed as answer by
Sunday, December 31, 2017 3:43 PM
-
Marked as answer by
Danielshah
Monday, January 8, 2018 2:43 PM
-
Proposed as answer by
-
Hi Daniel,
Agree with AntoonBouw that it may not supported to select all images in a document at once.
I followed the instructions provided by AntoonBouw and it worked great. Additionally, you may consider adding the Picture Border option to Quick Access Toolbar so that it can more convenient:
Select a image, go to Picture Tools, right click Picture Borders, click Add to Quick Access Toolbar, so that you can quickly add border by clicking the button on the QAT:
HoptHopHHYopHH
Regards,
Yuki Sun
Please remember to
mark the replies as answers if they helped. If you have feedback for TechNet Subscriber Support, contact
tnsf@microsoft.com.
Click
here to learn more. Visit the dedicatedforum to share, explore and
talk to experts about Microsoft Teams.-
Edited by
Yuki SunMicrosoft contingent staff
Monday, January 1, 2018 7:59 AM -
Proposed as answer by
Yuki SunMicrosoft contingent staff
Tuesday, January 2, 2018 10:00 AM -
Marked as answer by
Danielshah
Monday, January 8, 2018 2:43 PM
-
Edited by
-
When using:
Find = ^g
The only pictures that will be found are those that are formatted in-line with text;
pictures with any other kind of wrapping will not be found. Accordingly, the most efficient approach may be to use a macro — which will also allow you to differentiate shape/inlineshape types. For example:Sub FormatPics() Application.ScreenUpdating = False Dim Rng As Range, Shp As Shape, iShp As InlineShape ' Pictures in all story ranges in the document are processed. For Each Rng In ActiveDocument.StoryRanges ' Go through the shapes in the story range. For Each Shp In Rng.ShapeRange With Shp ' Restrict borders to pictures If .Type = msoPicture Then ' Apply the required formatting With .Line .Weight = 1 .ForeColor = wdColorRed End With End If End With Next Shp ' Go through the inlineshapes in the story range. For Each iShp In Rng.InlineShapes With iShp ' Restrict borders to pictures If .Type = wdInlineShapePicture Then ' Apply the required formatting With .Borders .Enable = True .OutsideLineWidth = 1 .OutsideColor = wdColorRed End With End If End With Next iShp Next Rng Application.ScreenUpdating = True End Sub
Cheers
Paul Edstein
[MS MVP — Word]-
Proposed as answer by
Yuki SunMicrosoft contingent staff
Tuesday, January 2, 2018 9:59 AM -
Marked as answer by
Danielshah
Monday, January 8, 2018 2:43 PM
-
Proposed as answer by
I don’t believe there is a simple way to select all images at once unless they are all In Line with Text. If they are, then you can loop them through to make formatting changes using the following example:
Dim iShape As InlineShape

For Each iShape In ActiveDocument.InlineShapes
    With iShape
        .Width = InchesToPoints(2)
        .Height = InchesToPoints(1.5)
    End With
Next iShape
I’m not sure if you want to format the pictures or some text around the pictures, but you can do either (or both).
If the images are not all In Line with Text, then you probably want to build something around the following, which moves you to the next graphic:
Selection.GoTo What:=wdGoToGraphic, Which:=wdGoToNext, Count:=1, Name:=""
The difference with this code is that it puts the cursor in front of the next graphic, but it doesn’t actually select it, so you would need to add to it. If you wanted to loop through an entire document, here’s some code that will do just that. It will find each graphic and type the word «Test» before it… until it finds no more graphics.
Selection.HomeKey unit:=wdStory
Do Until ActiveDocument.Bookmarks("Sel") = ActiveDocument.Bookmarks("EndOfDoc")
    Selection.GoTo What:=wdGoToGraphic, Which:=wdGoToNext, Count:=1, Name:=""
    Selection.MoveRight unit:=wdWord, Count:=1, Extend:=True
        If Selection.Type = 7 Then
            Selection.Collapse wdCollapseStart
            Selection.TypeText Text:="TEST"
            Selection.MoveRight unit:=wdWord, Count:=1, Extend:=False
        Else
            Exit Sub
        End If
Loop
It would help if we knew exactly what you were trying to do.
Sometimes you want to insert several images at a time in your MS word file. Microsoft Word can not select multiple images at a time by default. Don’t worry. Here we share the two most straightforward ways to select multiple images. There are three different ways to select and insert multiple images in word.
- Select and insert multiple images on one page in MS word.
- Select and insert multiple images into a table.
How to Select and Insert multiple Images on one page in Ms word?
Now we insert images using tables. First, we go to the Insert menu and select the picture option.

Here we show a dialog box. Now open the folder and select the images and click the insert button.

Now we show all those images in the word file.

If you want to move any image then select the image, and right click. Now select the Wrap text and Font of text. Now you can easily move the image.
How to select and Insert multiple Images into a table in Ms word
There at first we customize our word page size and layout. So, go to the menu bar and select the page layout option. Next select orientation and then landscape.

Now you can customize the pages margins. Here we select the top and bottom margins 0.3 inches. And click ok.

Next go to the insert option and select your table. Your table looks like the image below. In every cell we insert images.

You can resize all the cells.
Here we set the cell high 2.73 inches and width 3.33 inches. Now your table looks like this-

Now go to the picture option to select your images and click insert. Here you can resize your image height and weight. Just go to format and choose the size of the image.

Finally show your image as like

Now fill the every cell with your images as the same process. And all images look like-

3 Ways to Extract Images from a Word File
by Avantix Learning Team | Updated April 7, 2021
Applies to: Microsoft® Word® 2010, 2013, 2016, 2019 or 365 (Windows)
In Microsoft Word, images can be extracted one by one or you can extract all images by converting a Word document to a zip file or saving it as a web page. Extracting all images is helpful if you’d like to find pictures that are inflated in size or reuse pictures in other files. In this article, we’ll use 3 methods to extract images (we’re referring to images or pictures that have been inserted into your Word document, not shapes or SmartArt you’ve created).
Recommended article: How to Reduce the Size of a Microsoft Word Document (10 Ways to Compress a Word File)
Do you want to learn more about Word? Check out our virtual classroom or live classroom Word courses >
Extracting one image at a time using Save as Picture
You can extract individual images and save them as new files using Save As Picture.
There are two benefits to this method:
- You can give each image a meaningful name and save it in a specific location.
- You can save the image as a different file type.
To save an image as a new file:
- Right-click the image and then click Save as Picture from the drop-down menu.
- In the Save as type drop-down menu, select the image file format you want to use. You can save a picture in many formats but common choices are JPG or JPEG (Joint Photographics Experts Group) or PNG (Portable Network Graphics).
- In the File name box, type a name for the file.
- Navigate to the desired location.
- Click Save.
Displaying file extensions in Windows
In order to use the zip procedure (below), you may need to display file extensions in Windows if they are not showing automatically.
If you’re using Windows 8 or 10:
- In File Explorer, click the View tab in the Ribbon.
- In the Show/Hide group, click the File name extensions check box.
If you’re using Windows 7:
- In Windows Explorer, click Folder and Search Options and then click Organize.
- On the View tab, under Files and Folders, clear the check box for Hide extensions for known file types.
- Click OK.
Extracting all images by changing the file to a zip format
If you want to extract all images, the following trick works with any Microsoft Word file using XML (Extensible Markup Language) format. XML files are stored as a package and can therefore be unzipped. They also end with an «x» such as .docx.
In order to use the zip method, you will need a document created in Word 2007 or a later version and File Explorer or Windows Explorer must be set so that it shows file names with extensions (see the following section if extensions are not displayed).
To extract all image files from a Microsoft Word file:
- In File Explorer or Windows Explorer, select the document (it should have a .dotx extension) with the images you wish to extract.
- Right-click and choose Copy or press Ctrl + C.
- Right-click and choose Paste or press Ctrl + V.
- Right-click the copy of the document and choose Rename.
- Change the file extension from .dotx to .zip (Windows must be set to display file extensions).
- Press Enter. A dialog box appears warning you that the file may become unusable if you change the extension.
- Click Yes to continue. The file icon changes to a folder icon.
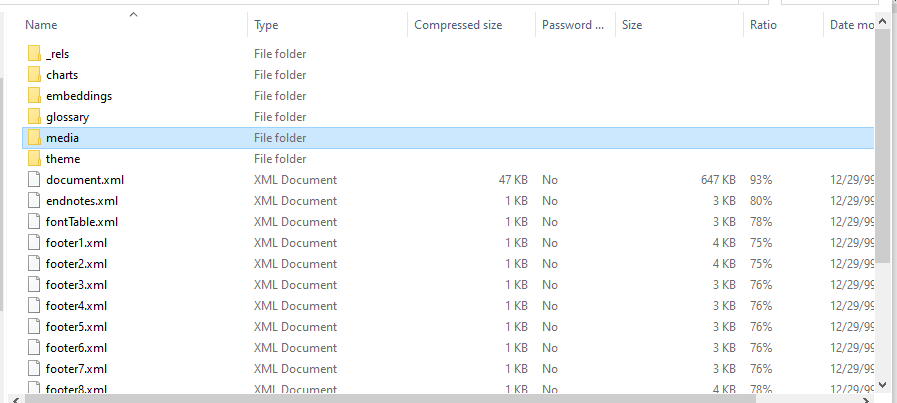
- Double-click the zipped folder. The zipped folder contains multiple folders (some contain information such as XML code or properties).
- Double-click the Word folder.
- Double-click the media folder to view image, video and audio files. Each file is given a generic name.
- Copy these files (or the entire folder) to another location to use in other documents and to rename the files. Copying to another location will unzip the files. You can also click the Extract button in Windows Explorer to extract the files to another location.
Below is a sample Word folder (with a media folder) created during this process:
Extracting all images by saving the Word file as a web page
Unlike PowerPoint, Microsoft Word files can be saved as web pages (HTML format). If you save a Word file as a web page, then separate files are created for pictures and media files.
To extract all image files from a Microsoft Word file by saving the file as a web page:
- Click the File tab in the Ribbon and select Save As.
- From the Save As Type drop-down menu, select Web Page.
- Enter a new name for the file. A .htm extension will be added.
- Click OK.
- A dialog box may appear indicating that you may lose some formatting. Click Continue. Word will change the view to Web Layout View.
- Close the file.
- In File Explorer or Windows Explorer, navigate to the location in which you had saved the file. A folder should have been created with the same name and «files» at the end.
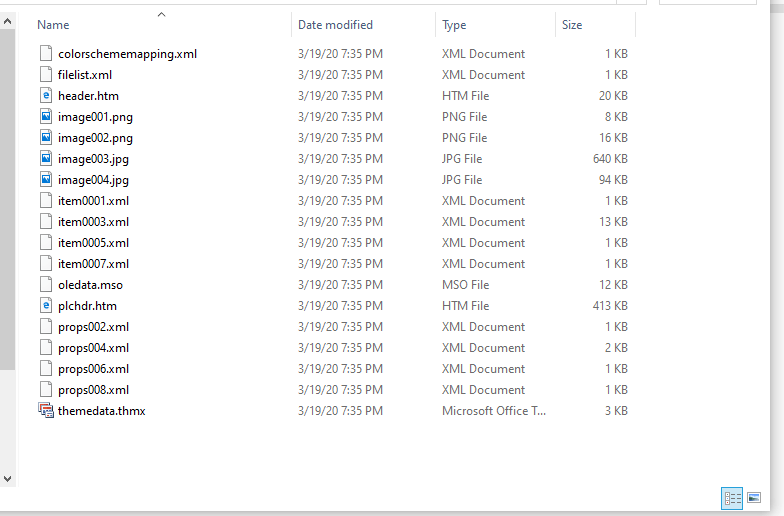
- Double-click the folder. Image, video and audio files should appear in this folder. Each file is given a generic name.
- Right-click any of the files to rename them.
Below are the contents of a folder that was created when a Word file was saved as a web page:
When you open Word again, click the View tab and select Print Layout (the default view).
It’s up to you which method you’d prefer but the last two are the easiest if you are extracting multiple images.
Subscribe to get more articles like this one
Did you find this article helpful? If you would like to receive new articles, join our email list.
More resources
How to Double Space in Word (4 Ways)
14 Shortcuts to Quickly Select Text in Microsoft Word
How to Check Word Count in Microsoft Word (4 Ways)
How to Show or Hide White Space in Word Documents
How to Create a Hanging Indent or First Line Indent in Microsoft Word
Related courses
Microsoft Word: Intermediate / Advanced
Microsoft Excel: Intermediate / Advanced
Microsoft PowerPoint: Intermediate / Advanced
Microsoft Word: Long Documents Master Class
Microsoft Word: Styles, Templates and Tables of Contents
Microsoft Word: Designing Dynamic Word Documents Using Fields
VIEW MORE COURSES >
Our instructor-led courses are delivered in virtual classroom format or at our downtown Toronto location at 18 King Street East, Suite 1400, Toronto, Ontario, Canada (some in-person classroom courses may also be delivered at an alternate downtown Toronto location). Contact us at info@avantixlearning.ca if you’d like to arrange custom instructor-led virtual classroom or onsite training on a date that’s convenient for you.
Copyright 2023 Avantix® Learning
Microsoft, the Microsoft logo, Microsoft Office and related Microsoft applications and logos are registered trademarks of Microsoft Corporation in Canada, US and other countries. All other trademarks are the property of the registered owners.
Avantix Learning |18 King Street East, Suite 1400, Toronto, Ontario, Canada M5C 1C4 | Contact us at info@avantixlearning.ca


