
Use Go to Special in Excel to Find, Select, Replace and Format Cells
by Avantix Learning Team | Updated May 1, 2021
Applies to: Microsoft® Excel® 2010, 2013, 2016, 2019 and 365 (Windows)
You can use Go To Special in Excel to quickly find and select cells of a specific type within your worksheet. It only selects cells in the current worksheet, not the entire workbook. Go To Special also searches within the selected range if a range has been selected. You can find many useful things using the Go To Special dialog box including formulas, constants, blanks, visible cells and conditional formatting. After you select multiple cells with Go To Special, you can enter data in the selected cells by pressing Ctrl + Enter or by apply formatting.
Recommended article: 10 Excel Data Entry Tricks and Shortcuts Every User Should Know
Do you want to learn more about Excel? Check out our virtual classroom or live classroom Excel courses >
You can use Go To Special to select cells that meet specific criteria including:
- Formulas (numbers, text, logicals, errors)
- Constants (numbers, text, logicals, errors)
- Blank cells
- Precedents and dependents
- Visible cells
You can access Go To Special in several ways:
- Press Ctrl + G and then select Special in the dialog box
- Press F5 and then select Special in the dialog box
- Use the Find & Select drop-down menu on the Home tab in the Ribbon
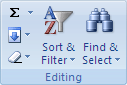
The Go to Special command appears on the Home tab in the Editing group. Click Find & Select and choose Go to Special from the drop-down menu.
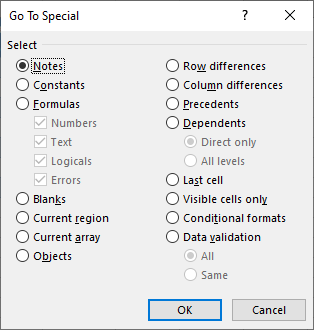
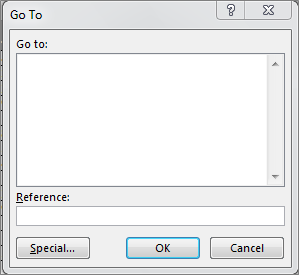
The Go To Special dialog box appears as follows:

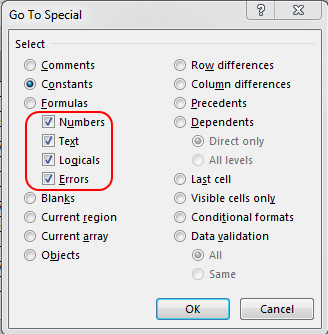
Finding and selecting constants
In the Go to Special dialog box, if you select Constants and press Enter or click OK, Excel selects all cells with constants. Once you have selected constants, under Formulas, you will be able to check numbers, text, logicals or errors.
If you select all constants and then choose a fill color or other formatting, you can see all the inputs in your worksheet.
Finding and selecting formulas
In the Go to Special dialog box, if you select:
- Formulas and press Enter or click OK, Excel selects all cells with formulas.
- Formulas (with only Numbers checked) and press Enter or click OK, Excel selects all cells that return a number.
- Formulas (with only Text checked) and press Enter or click OK, Excel selects all cells that return text
- Formulas (with only Logicals checked) and press Enter or click OK, Excel selects all cells that return logicals (true or false).
- Formulas (with only Errors checked) and press Enter or click OK, Excel selects all cells that return errors. That can be a great way to find and then fix errors.
Selecting all of the formulas in a worksheet using Go to Special can be a great way of checking structure and consistency.
Finding and selecting blanks
In the Go to Special dialog box, if you select Blanks and press Enter or click OK, Excel selects all blank cells where it perceives data ranges (it won’t select all blank cells in the worksheet). If you have selected a range first, it will find and select blanks within that range.
This can be very useful if you want to quickly format or fill blank cells.
Finding and selecting the current region or array
In the Go to Special dialog box, if you select:
- Current Region and press Enter or click OK, Excel selects all cells in the current region. It is more common to click in the desired data range and then to press Ctrl + * or Ctrl + A.
- Current Array and press Enter or click OK, Excel selects the entire array if the active cell is within the array.
This is helpful if you want to delete an array, because the entire array must be selected to delete it.
Finding and selecting row and column differences
In the Go to Special dialog box, if you select:
- Row differences and press Enter or click OK, Excel selects all cells that are different from the active cell in the selected row. To use this, first select the cells you want to compare, tab to the cell you want to use as the basis for comparison and then select Go to Special. If more than one row is selected, the comparison is performed for each row based on the cell in the same column as the first active cell.
- Column differences and press Enter or click OK, Excel selects all cells that are different from the active cell in the selected column. To use this, first select the cells you want to compare, tab to the cell you want to use as the basis for comparison and then select Go to Special. If more than one column is selected, the comparison is performed for each column based on the cell in the same row as the first active cell.
This can be useful as an auditing tool to highlight inconsistent formulas in a row or column and to spot differences across multiple columns.
Finding and selecting precedents and dependents
In the Go to Special dialog box, if you select:
- Precedents and press Enter or click OK, Excel selects the cells that are referenced by the formula in the active cell. Under Dependents, if you selected Direct only, Excel finds only cells that are directly referenced by formulas. If you clicked All levels, Excel would find all cells that are directly or indirectly referenced by the cells in the selection. You could then apply a fill color or other formatting to the precedent cells.
- Dependents and press Enter or click OK, Excel selects the cells that are affected by changes in the active cell. Under Dependents, if you selected Direct only, Excel finds only cells that are directly affected by changes in the active cell. If you clicked All levels, Excel would find all cells that are directly or indirectly affected by changes in the active cell. You could then apply a fill color or other formatting to the dependent cells.
This also provides an alternative to the Trace Dependents or Trace Precedents commands in Excel.
Finding and selecting the last cell
In the Go to Special dialog box, if you select Last cell and press Enter or click OK, Excel selects the last cell that contains data or formatting.
Finding and selecting visible cells
In the Go to Special dialog box, if you select Visible cells only and press Enter or click OK, Excel selects only the visible cells in a selection where there are hidden cells.
This can be useful for formatting only visible cells or copying only visible cells.
Finding and selecting conditional formats
In the Go to Special dialog box, if you select Conditional Formats and press Enter or click OK, Excel selects only the cells that have conditional formats applied. Under Data validation, if you select All, Excel finds all cells with conditional formatting. Under Data validation, if you had selected Same, Excel finds cells that have the same conditional formats as the active cell.
This can be helpful for finding, editing and removing conditional formatting. The Manage Rules command in the Conditional Formatting drop-down menu can also be used to find cells with conditional formats.
Finding and selecting data validations
In the Go to Special dialog box, if you select Data Validation and press Enter or click OK, Excel selects all cells that have data validation applied. If you click All under Data Validation, Excel finds all cells that have data validation applied. If you click Same, Excel finds all cells that have the same data validation as the active cell.
This can be very helpful if you want to find and remove data validation.
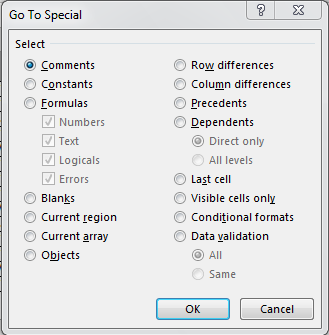
Finding and selecting comments
In the Go to Special dialog box, if you select Comments and then press Enter or click OK, Excel selects all cells with comments.
This can be very useful if you want to clear all comments from your worksheet.
Finding and selecting objects
In the Go to Special dialog box, if you select Objects and press Enter or click OK, Excel selects all objects such as shapes, images and charts. This would be a good way to select all objects and delete them.
Check out Go to Special. It’s a great tool in Excel that can save you lots of time.
This article was first published on October 15, 2014 and has been updated for clarity and content.
Subscribe to get more articles like this one
Did you find this article helpful? If you would like to receive new articles, join our email list.
More resources
How to Quickly Delete Blank Rows in Excel (5 Ways)
10 Great Excel Keyboard Shortcuts for Filtering Data
How to Replace Blank Cells in Excel with a Value from a Cell Above
How to Use Flash Fill in Excel to Clean or Extract Data (Beginner’s Guide)
How to Replace Blank Cells in Excel with Zeros (0), Dashes (-) or Other Values
Related courses
Microsoft Excel: Intermediate / Advanced
Microsoft Excel: Data Analysis with Functions, Dashboards and What-If Analysis Tools
Microsoft Excel: Introduction to Visual Basic for Applications (VBA)
VIEW MORE COURSES >
Our instructor-led courses are delivered in virtual classroom format or at our downtown Toronto location at 18 King Street East, Suite 1400, Toronto, Ontario, Canada (some in-person classroom courses may also be delivered at an alternate downtown Toronto location). Contact us at info@avantixlearning.ca if you’d like to arrange custom instructor-led virtual classroom or onsite training on a date that’s convenient for you.
Copyright 2023 Avantix® Learning
Microsoft, the Microsoft logo, Microsoft Office and related Microsoft applications and logos are registered trademarks of Microsoft Corporation in Canada, US and other countries. All other trademarks are the property of the registered owners.
Avantix Learning |18 King Street East, Suite 1400, Toronto, Ontario, Canada M5C 1C4 | Contact us at info@avantixlearning.ca
Excel for Microsoft 365 Excel 2021 Excel 2019 Excel 2016 Excel 2013 Excel 2010 Excel 2007 Access 2007 More…Less
Use the Go To command to quickly find and select all cells that contain specific types of data, such as formulas. Also, use Go To to find only the cells that meet specific criteria,—such as the last cell on the worksheet that contains data or formatting.
Follow these steps:
-
Begin by doing either of the following:
-
To search the entire worksheet for specific cells, click any cell.
-
To search for specific cells within a defined area, select the range, rows, or columns that you want. For more information, see Select cells, ranges, rows, or columns on a worksheet.
Tip: To cancel a selection of cells, click any cell on the worksheet.
-
-
On the Home tab, click Find & Select > Go To (in the Editing group).

Keyboard shortcut: Press CTRL+G.
-
Click Special.
-
In the Go To Special dialog box, click one of the following options.
|
Click |
To select |
|---|---|
|
Comments |
Cells that contain comments. |
|
Constants |
Cells that contain constants. |
|
Formulas |
Cells that contain formulas. Note: The check boxes below Formulas define the type of formula. |
|
Blanks |
Blank cells. |
|
Current region |
The current region, such as an entire list. |
|
Current array |
An entire array if the active cell is contained in an array. |
|
Objects |
Graphical objects, including charts and buttons, on the worksheet and in text boxes. |
|
Row differences |
All cells that differ from the active cell in a selected row. There is always one active cell in a selection—whether this is a range, row, or column. By pressing the Enter or Tab key, you can change the location of the active cell, which by default is the first cell in a row. If more than one row is selected, the comparison is done for each individual row of that selection, and the cell that is used in the comparison for each additional row is located in the same column as the active cell. |
|
Column differences |
All cells that differ from the active cell in a selected column. There is always one active cell in a selection, whether this is a range, row, or column. By pressing the Enter or Tab key, you can change the location of the active cell—which by default is the first cell in a column. When selecting more than one column, the comparison is done for each individual column of that selection. The cell that is used in the comparison for each additional column is located in the same row as the active cell. |
|
Precedents |
Cells that are referenced by the formula in the active cell. Under Dependents, do either of the following:
|
|
Dependents |
Cells with formulas that refer to the active cell. Do either of the following:
|
|
Last cell |
The last cell on the worksheet that contains data or formatting. |
|
Visible cells only |
Only cells that are visible in a range that crosses hidden rows or columns. |
|
Conditional formats |
Only cells that have conditional formats applied. Under Data validation, do either of the following:
|
|
Data validation |
Only cells that have data validation rules applied. Do either of the following:
|
Need more help?
You can always ask an expert in the Excel Tech Community or get support in the Answers community.
Need more help?
See all How-To Articles
This tutorial demonstrates how to use the Go To Special feature in Excel.
Go To Special
In Excel, you can simultaneously select all cells with certain conditions using Go To Special.
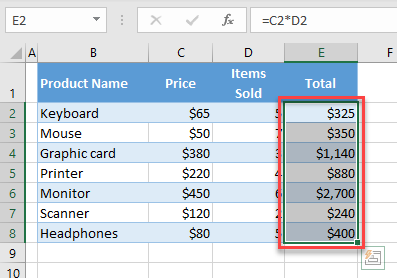
Say you have the following data set including Product Name in Column B, Price in Column C, Items Sold in Column D, and Total in Column E. Column E’s values are calculated with a formula (multiplication of Columns C and D).
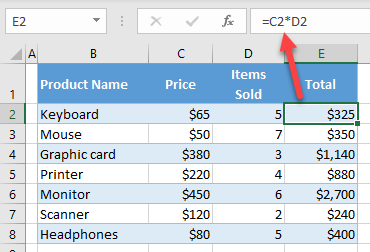
Go To Formulas
You can use the Go To Special option to select all cells containing formulas.
- In the Ribbon, go to Home > Find & Select > Go To Special… (or use the CTRL + G shortcut).
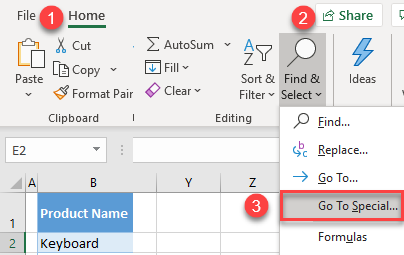
- In the Go To Special window, select Formulas, and click OK.
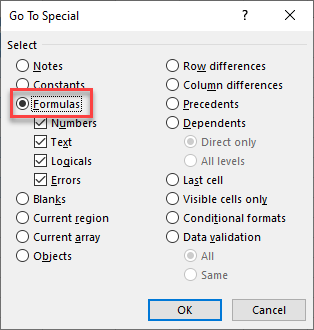
As a result, the range E2:E8 is selected, as these cells contain formulas.
Other Criteria
As you can see in the Go To Special window, there are different conditions to select by, including:
- Notes – select all notes in the sheet.
- Constants – all populated cells that don’t contain a formula.
- Formulas – all cells containing a formula. Here, you can also select the type of formula (Numbers, Text, or Logicals) or formulas returning Errors.
- Blanks.
- Current region.
- Current array.
- Objects – select all kinds of objects like drawings, shapes, pictures, form controls, etc.
- Row differences – select all differences between two rows.
- Column differences – select all differences between two columns.
- Precedents – cells used in formulas.
- Dependents – formulas with cell references.
- Last cell – select the last populated cell in the worksheet.
- Visible cells only – select only cells that are not filtered out or hidden.
- Conditional formats – select all cells containing conditional formatting rules.
- Data validation – select all cells that have data validation rules.
For more on how to use the Go To feature, see Jump to Cell and Go To Cell, Row, or Column.
Selecting special cells in a sheet, for example, cells containing Constants, Formulas, blank cells, and more, enables you to copy, move, delete, color, fill, or protect these cells.
We use ‘Go to special’ tool to select the constants, formulas, blank cells etc.
Let’s take an example and understand:-
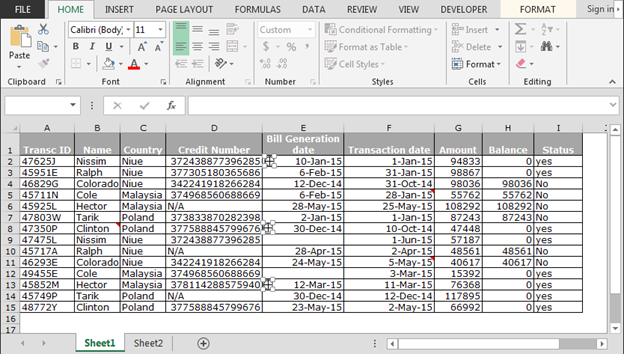
We have credit card’s payment data in which we have details about payment received or not.

How to select constant?
In constant, we consider numbers, text, logical, or errors. To select constant, follow the steps below:-
- Press the shortcut key to open ‘Go to Special’ dialog box Ctrl+G.
- ‘Go to’ dialog box will appear.

- Click on Special button.
- ‘Go to Special’ dialog box will open.

- Click on Constants.
- All constants will get active.
- Click on ‘ok’.
- Entire data will be selected except the blanks and formulas.

How to select Comment?
To select the comment containing cells follow the steps below:-
- Press the shortcut key to open ‘Go to Special’ dialog box Ctrl+G.
- ‘Go to’ dialog box will appear.

- Click on Special button.
- ‘Go to Special’ dialog box will open.
- Click on Comments.
- Click on ‘ok’.
- All cells containing comments will get selected.

How to select Formula containing cells?
To select formula containing cells, follow the steps below:-
- Press the shortcut key to open ‘Go to Special’ dialog box Ctrl+G.
- ‘Go to’ dialog box will appear.
- Click on Special button.
- ‘Go to Special’ dialog box will open.
- Click on Formulas.

- Only formula containing cells will get selected.

How to select objects?
To select the objects follow the steps below:-
- Press the shortcut key to open ‘Go to Special’ dialog box Ctrl+G.
- ‘Go to’ dialog box will appear.

- Click on Special button.
- ‘Go to Special’ dialog box will open.
- Click on Objects.

- All the available objects in the sheet will get selected. Now we can move them, delete them and copy them.
In this way, we can use ‘Go to Special’ option to select the objects, blanks and many more in Microsoft Excel.
![]()
If you liked our blogs, share it with your friends on Facebook. And also you can follow us on Twitter and Facebook.
We would love to hear from you, do let us know how we can improve, complement or innovate our work and make it better for you. Write us at info@exceltip.com
Skip to content
Выделение ячеек в Excel по значению и по цвету
Найдите ячейки по вашим критериям
Используя этот простой инструмент для Excel, вы можете находить ячейки с одинаковыми данными, а также ячейки, содержащие формулы, комментарии, изображения или условные форматы. Вы также можете выделить уникальные записи и пустые ячейки, выбрать текстовые значения, числа или даты, соответствующие определенным критериям.
-
60-дневная безусловная гарантия возврата денег
-
Бесплатные обновления на 2 года
-
Бесплатная и бессрочная техническая поддержка
С помощью инструмента Select by Value & Color вы сможете:
Выделить все ячейки с одинаковым значением
Выберите интересующую вас ячейку и затем выделите все остальные ячейки, содержащие то же значение.
Выделить ячейки с числами и датами по различным условиям
Найдите числовые значения, которые равны или не равны, больше или меньше указанного вами числа; в пределах или за пределами определенного диапазона; минимальное, максимальное или уникальные.
Найти специальные ячейки
Ищите ячейки с константами или формулами, которые содержат текст, числа, логические значения или ошибки.
Найти ячейки с определенной заливкой или цветом шрифта
Выделите все ячейки, которые имеют тот же цвет фона или шрифта, что и выбранная ячейка.
Выделить текстовые ячейки по самым разным шаблонам
Найдите текстовые значения, которые начинаются, заканчиваются или содержат определенные символы; точно соответствует или не совпадает с вашим текстом, уникальными данными и многим другим.
Выбрать ячейки определенного типа
Выделите все ячейки с комментариями, константами, формулами, объектами, условными форматами или просто пустые.

Что такое инструмент «Select by Value/Color» и зачем он мне нужен?
Речь идет не только о поиске ячеек по цвету и значению. Этот инструмент предлагает много различных вариантов для быстрого выделения ячеек в соответствии с вашими критериями.
С помощью надстройки вы можете:
- Найти ячейки по цвету шрифта выбранной в данный момент ячейки.
- Выделить все ячейки тем же цветом фона, что и выбранная ячейка.
- Найдите ячейки с теми же данными, что и выбранная ячейка.
- Выделите ячейки, содержащие комментарии, значения, формулы, пробелы, объекты, условные форматы или просто пустые.
Кроме того, вы можете выбрать числа, даты или текстовые ячейки, которые:
- Больше или меньше указанного значения
- Равны или не равны заданному значению
- В пределах или за пределами определенного диапазона
- Текстовые строки, начинающиеся или заканчивающиеся определенными символами
- Текст, содержащий или не содержащий указанные символы
- Максимальные или минимальные значения
- Уникальные данные
Как найти одинаковые данные с помощью этой утилиты?
Выберите любую ячейку, содержащую данные, которые вы ищете, и выберите «Все ячейки с одинаковым значением» (All cells with the same value). Инструмент выделит все ячейки, содержащие те же данные, что и в выбранной ячейке.
Мне нужно выделить все ячейки с числами больше 100. Как я могу это сделать?
Это можно сделать с помощью опции «Выбрать по значению» (Select by Value). Укажите свой диапазон поиска и отметьте «Числа» (Numbers). Выберите пункт «Выбрать ячейки которые больше» (Select cells that are greater), введите 100 в соответствующее поле и нажмите «Выбрать» . Все ячейки, содержащие числа больше 100, будут выделены.
Могу ли я выделить все ячейки с условным форматированием?
Как найти в Excel ячейки, содержащие изображения?
Опция Select Special Cells поможет. Выберите Выбрать ячейки, содержащие объекты (Select cells containing objects), и все ячейки с изображениями будут найдены.
Может ли эта утилита помочь мне найти даты, попадающие в определенный диапазон?
Да, программа предлагает такую возможность. Выберите свою область поиска и запустите надстройку Select by Value. Отметьте пункт «Даты» (Date). Затем выберите «Выбрать ячейки, которые находятся в диапазоне» (Select cells that are in the range) , определите этот диапазон и нажмите «Выбрать» .
Таким же образом вы можете найти даты, выходящие за пределы вашего диапазона, и даты, которые больше или меньше определенных дат.
Скачать Ultimate Suite
Below is an overview of how to use the Go To Special function in Excel to improve your speed.
What is the Go To Special Function in Excel?
The Go To Special Function[1] in Excel allows you to quickly select all cells that meet certain criteria, such as cells containing:
- Formulas (numbers, text, logicals, errors)
- Constants (numbers, text, logicals, errors)
- Blank cells
- Objects
- Precedents and dependents
There are three ways to access Go To:
- Press the F5 key
- Press Ctrl + G
- On the Home ribbon under “Find and Select” choose “Go To”
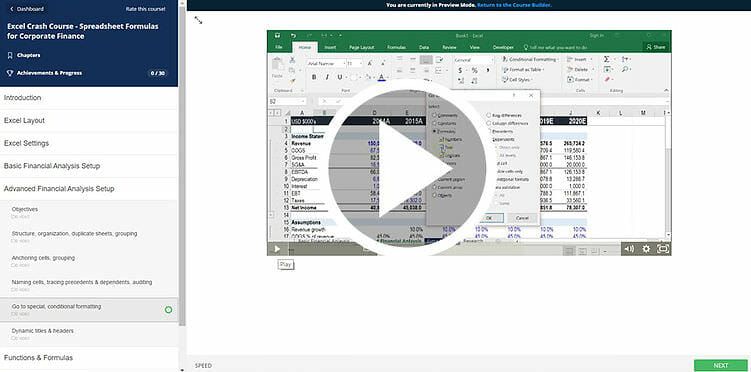
To see a video tutorial of Go To Special, check out our free Excel Crash Course.
Example of Go To Special in Excel
Below is an example of how to select all hardcoded (constant) numbers in a financial model.
Step 1: Press F5, click Special, then select constants and check only the numbers box
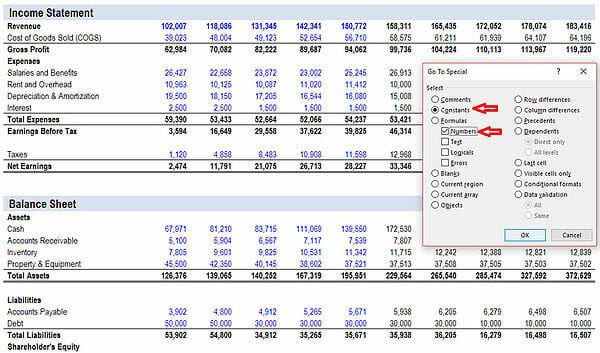
Step 2: Click OK and you will see all constants (hardcoded numbers) selected

Why Use Go To Special?
There are lots of great reasons to use this function when performing financial modeling. Not only does it allow you to speed up your navigation – it also allows you to thoroughly audit a spreadsheet or workbook.
Here is a list of all Excel shortcuts to speed up your modeling.
One great example of the function is to select all hardcoded numbers in a spreadsheet. This allows for easy formatting of all selected cells with one click. It also implies that all unselected cells are formulas, and therefore you can quickly make sure the model is set up properly in terms of assumptions, calculations, and outputs.
Another great reason to use the function is for organizing large amounts of data. It can be helpful to select all blank cells and delete them all at once.
Free Excel Crash Course
Learn Go To Special (F5) with CFI’s Free Excel Crash Course. This course gives you the most important spreadsheet formulas, Excel keyboard shortcuts (Mac and PC), and functions, all in one concise tutorial.
More Resources
Thank you for reading CFI’s guide to Go To Special. To keep learning and developing your Excel skills, check out these additional CFI resources:
- Excel shortcuts
- Excel formulas list
- Index Match Match
- Find and replace
- IF AND functions in Excel
- See all Excel resources