
Key Notes
- You can use the Range property as well as Cells property to use the Select property to select a range.
Select a Single Cell
To select a single cell, you need to define the cell address using the range, and then you need to use the select property. Let’s say if you want to select cell A1, the code would be:
Range("A1").Select
And if you want to use the CELLS, in that case, the code would be:
Cells(1,1).Select
Select a Range of Cells
To select an entire range, you need to define the address of the range and then use the select property. For example, if you want to select the range A1 to A10, the code would be:
Range("A1:A10").Select
Select Non-Continues Range
To select a non-continuous range, you need to use a comma within the cell or range addresses, and then use the select the property. Let’s say if you want to select the range A1 to A10 and C5 to C10, the code would be:
Range("A1:A10, C5:C10").Select
And if you want to select single cells that are non-continuous, the code would be:
Range("A1, A5, A9").Select
Select a Column
To select a column, let’s say column A, you need to write code like the following:
Range("A:A").Select
And if you want to select multiple columns, in that case, the code would be like the following:
Range("A:C").Select
Range("A:A, C:C").Select
Select a Row
In the same way, if you want to select a row, let’s say row five, the code would be like the following.
Range("5:5").Select
And for multiple rows, the code would be:
Range("1:5").Select
Range("1:1, 3:3").Select
Select All the Cells of a Worksheet
Let’s say you want to select all the cells in the worksheet, just like you use the keyboard shortcut Control +A. You need to use the following code.
ActiveSheet.Cells.Select
Cells.Select
“Cells” refer to all the cells in the worksheet, and then select property selects them.
Select Cells with Data Only
Here “Cells with Data” only mean a section in the worksheet where cells have data and you can use the following code.
ActiveSheet.UsedRange.SelectSelect a Named Range
If you have a named range, you can select it by using its name.
Range("my_range").Select
In the above code, you have the “my_range” named range and then the select property, and when you run this macro, it selects the specified range.
Select an Excel Table
If you work with Excel tables, you can also select them using the select property. Let’s say you have a table with the name “Data”, then the code to select that table would be:

If you want to select a column instead of the entire table, then the code would be, like the following:
Range("Data[Amount]").Select
And if you want to select the entire column including the header, then the code you can use:
Range("Data[[#All],[Amount]]").Select
You can also use the OFFSET property to select a cell or a range by navigating from a cell or a range. Let’s suppose you want to select a cell that is four columns right and five rows down from the A1; you can use the following code.
Range("A1").Offset(5, 4).Select
More Tutorials
- Count Rows using VBA in Excel
- Excel VBA Font (Color, Size, Type, and Bold)
- Excel VBA Hide and Unhide a Column or a Row
- Excel VBA Range – Working with Range and Cells in VBA
- Apply Borders on a Cell using VBA in Excel
- Find Last Row, Column, and Cell using VBA in Excel
- Insert a Row using VBA in Excel
- Merge Cells in Excel using a VBA Code
- SELECT ALL the Cells in a Worksheet using a VBA Code
- ActiveCell in VBA in Excel
- Special Cells Method in VBA in Excel
- UsedRange Property in VBA in Excel
- VBA AutoFit (Rows, Column, or the Entire Worksheet)
- VBA ClearContents (from a Cell, Range, or Entire Worksheet)
- VBA Copy Range to Another Sheet + Workbook
- VBA Enter Value in a Cell (Set, Get and Change)
- VBA Insert Column (Single and Multiple)
- VBA Named Range | (Static + from Selection + Dynamic)
- VBA Range Offset
- VBA Sort Range | (Descending, Multiple Columns, Sort Orientation
- VBA Wrap Text (Cell, Range, and Entire Worksheet)
- VBA Check IF a Cell is Empty + Multiple Cells
⇠ Back to What is VBA in Excel
Helpful Links – Developer Tab – Visual Basic Editor – Run a Macro – Personal Macro Workbook – Excel Macro Recorder – VBA Interview Questions – VBA Codes
In this Article
- Select a Single Cell Using VBA
- Select a Range of Cells Using VBA
- Select a Range of Non-Contiguous Cells Using VBA
- Select All the Cells in a Worksheet
- Select a Row
- Select a Column
- Select the Last Non-Blank Cell in a Column
- Select the Last Non-Blank Cell in a Row
- Select the Current Region in VBA
- Select a Cell That is Relative To Another Cell
- Select a Named Range in Excel
- Selecting a Cell on Another Worksheet
- Manipulating the Selection Object in VBA
- Using the With…End With Construct
VBA allows you to select a cell, ranges of cells, or all the cells in the worksheet. You can manipulate the selected cell or range using the Selection Object.
Select a Single Cell Using VBA
You can select a cell in a worksheet using the Select method. The following code will select cell A2 in the ActiveWorksheet:
Range("A2").SelectOr
Cells(2, 1).SelectThe result is:

Select a Range of Cells Using VBA
You can select a group of cells in a worksheet using the Select method and the Range object. The following code will select A1:C5:
Range("A1:C5").SelectSelect a Range of Non-Contiguous Cells Using VBA
You can select cells or ranges that are not next to each other, by separating the cells or ranges using a comma in VBA. The following code will allow you to select cells A1, C1, and E1:
Range("A1, C1, E1").SelectYou can also select sets of non-contiguous ranges in VBA. The following code will select A1:A9 and B11:B18:
Range("A1:A9, B11:B18").SelectSelect All the Cells in a Worksheet
You can select all the cells in a worksheet using VBA. The following code will select all the cells in a worksheet.
Cells.SelectSelect a Row
You can select a certain row in a worksheet using the Row object and the index number of the row you want to select. The following code will select the first row in your worksheet:
Rows(1).SelectSelect a Column
You can select a certain column in a worksheet using the Column object and the index number of the column you want to select. The following code will select column C in your worksheet:
Columns(3).SelectVBA Coding Made Easy
Stop searching for VBA code online. Learn more about AutoMacro — A VBA Code Builder that allows beginners to code procedures from scratch with minimal coding knowledge and with many time-saving features for all users!

Learn More
Select the Last Non-Blank Cell in a Column
Let’s say you have data in cells A1, A2, A3 and A4 and you would like to select the last non-blank cell which would be cell A4 in the column. You can use VBA to do this and the Range.End method.
The Range.End Method can take four arguments namely: xlToLeft, xlToRight, xlUp and xlDown.
The following code will select the last non-blank cell which would be A4 in this case, if A1 is the active cell:
Range("A1").End(xlDown).SelectSelect the Last Non-Blank Cell in a Row
Let’s say you have data in cells A1, B1, C1, D1, and E1 and you would like to select the last non-blank cell which would be cell E1 in the row. You can use VBA to do this and the Range.End method.
The following code will select the last non-blank cell which would be E1 in this case, if A1 is the active cell:
Range("A1").End(xlToRight).SelectSelect the Current Region in VBA
You can use the CurrentRegion Property of the Range Object in order to select a rectangular range of blank and non-blank cells around a specific given input cell. If you have data in cell A1, B1 and C1, the following code would select this region around cell A1:
Range("A1").CurrentRegion.SelectSo the range A1:C1 would be selected.
VBA Programming | Code Generator does work for you!
Select a Cell That is Relative To Another Cell
You can use the Offset Property to select a cell that is relative to another cell. The following code shows you how to select cell B2 which is 1 row and 1 column relative to cell A1:
Range("A1").Offset(1, 1).SelectSelect a Named Range in Excel
You can select Named Ranges as well. Let’s say you have named cells A1:A4 Fruit. You can use the following code to select this named range:
Range("Fruit").SelectSelecting a Cell on Another Worksheet
In order to select a cell on another worksheet, you first need to activate the sheet using the Worksheets.Activate method. The following code will allow you to select cell A7, on the sheet named Sheet5:
Worksheets("Sheet5").Activate
Range("A1").Select
Manipulating the Selection Object in VBA
Once you have selected a cell or range of cells, you can refer to the Selection Object in order to manipulate these cells. The following code selects the cells A1:C1 and sets the font of these cells to Arial, the font weight to bold, the font style to italics and the fill color to green.
Sub FormatSelection()
Range("A1:C1").Select

Selection.Font.Name = "Arial"
Selection.Font.Bold = True
Selection.Font.Italic = True
Selection.Interior.Color = vbGreen

End Sub
The result is:

Using the With…End With Construct
We can repeat the above example using the With / End With Statement to refer to the Selection Object only once. This saves typing and usually makes your code easier to read.
Sub UsingWithEndWithSelection()
Range("A1:C1").Select

With Selection
.Font.Name = "Arial"
.Font.Bold = True
.Font.Italic = True
.Interior.Color = vbGreen
End With

End SubWhen working with Excel, most of your time is spent in the worksheet area – dealing with cells and ranges.
And if you want to automate your work in Excel using VBA, you need to know how to work with cells and ranges using VBA.
There are a lot of different things you can do with ranges in VBA (such as select, copy, move, edit, etc.).
So to cover this topic, I will break this tutorial into sections and show you how to work with cells and ranges in Excel VBA using examples.
Let’s get started.
All the codes I mention in this tutorial need to be placed in the VB Editor. Go to the ‘Where to Put the VBA Code‘ section to know how it works.
If you’re interested in learning VBA the easy way, check out my Online Excel VBA Training.
Selecting a Cell / Range in Excel using VBA
To work with cells and ranges in Excel using VBA, you don’t need to select it.
In most of the cases, you are better off not selecting cells or ranges (as we will see).
Despite that, it’s important you go through this section and understand how it works. This will be crucial in your VBA learning and a lot of concepts covered here will be used throughout this tutorial.
So let’s start with a very simple example.
Selecting a Single Cell Using VBA
If you want to select a single cell in the active sheet (say A1), then you can use the below code:
Sub SelectCell()
Range("A1").Select
End Sub
The above code has the mandatory ‘Sub’ and ‘End Sub’ part, and a line of code that selects cell A1.
Range(“A1”) tells VBA the address of the cell that we want to refer to.
Select is a method of the Range object and selects the cells/range specified in the Range object. The cell references need to be enclosed in double quotes.
This code would show an error in case a chart sheet is an active sheet. A chart sheet contains charts and is not widely used. Since it doesn’t have cells/ranges in it, the above code can’t select it and would end up showing an error.
Note that since you want to select the cell in the active sheet, you just need to specify the cell address.
But if you want to select the cell in another sheet (let’s say Sheet2), you need to first activate Sheet2 and then select the cell in it.
Sub SelectCell()
Worksheets("Sheet2").Activate
Range("A1").Select
End Sub
Similarly, you can also activate a workbook, then activate a specific worksheet in it, and then select a cell.
Sub SelectCell()
Workbooks("Book2.xlsx").Worksheets("Sheet2").Activate
Range("A1").Select
End Sub
Note that when you refer to workbooks, you need to use the full name along with the file extension (.xlsx in the above code). In case the workbook has never been saved, you don’t need to use the file extension.
Now, these examples are not very useful, but you will see later in this tutorial how we can use the same concepts to copy and paste cells in Excel (using VBA).
Just as we select a cell, we can also select a range.
In case of a range, it could be a fixed size range or a variable size range.
In a fixed size range, you would know how big the range is and you can use the exact size in your VBA code. But with a variable-sized range, you have no idea how big the range is and you need to use a little bit of VBA magic.
Let’s see how to do this.
Selecting a Fix Sized Range
Here is the code that will select the range A1:D20.
Sub SelectRange()
Range("A1:D20").Select
End Sub
Another way of doing this is using the below code:
Sub SelectRange()
Range("A1", "D20").Select
End Sub
The above code takes the top-left cell address (A1) and the bottom-right cell address (D20) and selects the entire range. This technique becomes useful when you’re working with variably sized ranges (as we will see when the End property is covered later in this tutorial).
If you want the selection to happen in a different workbook or a different worksheet, then you need to tell VBA the exact names of these objects.
For example, the below code would select the range A1:D20 in Sheet2 worksheet in the Book2 workbook.
Sub SelectRange()
Workbooks("Book2.xlsx").Worksheets("Sheet1").Activate
Range("A1:D20").Select
End Sub
Now, what if you don’t know how many rows are there. What if you want to select all the cells that have a value in it.
In these cases, you need to use the methods shown in the next section (on selecting variably sized range).
Selecting a Variably Sized Range
There are different ways you can select a range of cells. The method you choose would depend on how the data is structured.
In this section, I will cover some useful techniques that are really useful when you work with ranges in VBA.
Select Using CurrentRange Property
In cases where you don’t know how many rows/columns have the data, you can use the CurrentRange property of the Range object.
The CurrentRange property covers all the contiguous filled cells in a data range.
Below is the code that will select the current region that holds cell A1.
Sub SelectCurrentRegion()
Range("A1").CurrentRegion.Select
End Sub
The above method is good when you have all data as a table without any blank rows/columns in it.
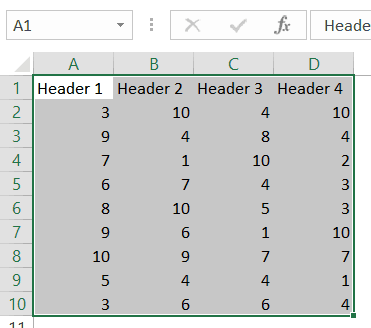
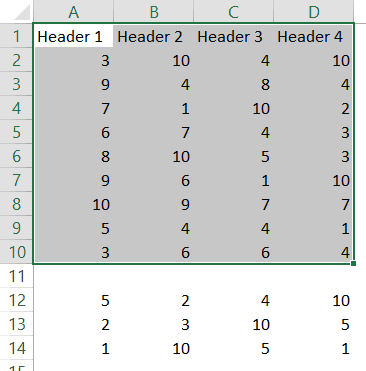
But in case you have blank rows/columns in your data, it will not select the ones after the blank rows/columns. In the image below, the CurrentRegion code selects data till row 10 as row 11 is blank.
In such cases, you may want to use the UsedRange property of the Worksheet Object.
Select Using UsedRange Property
UsedRange allows you to refer to any cells that have been changed.
So the below code would select all the used cells in the active sheet.
Sub SelectUsedRegion()
ActiveSheet.UsedRange.Select
End Sub
Note that in case you have a far-off cell that has been used, it would be considered by the above code and all the cells till that used cell would be selected.
Select Using the End Property
Now, this part is really useful.
The End property allows you to select the last filled cell. This allows you to mimic the effect of Control Down/Up arrow key or Control Right/Left keys.
Let’s try and understand this using an example.
Suppose you have a dataset as shown below and you want to quickly select the last filled cells in column A.
The problem here is that data can change and you don’t know how many cells are filled. If you have to do this using keyboard, you can select cell A1, and then use Control + Down arrow key, and it will select the last filled cell in the column.
Now let’s see how to do this using VBA. This technique comes in handy when you want to quickly jump to the last filled cell in a variably-sized column
Sub GoToLastFilledCell()
Range("A1").End(xlDown).Select
End Sub
The above code would jump to the last filled cell in column A.
Similarly, you can use the End(xlToRight) to jump to the last filled cell in a row.
Sub GoToLastFilledCell()
Range("A1").End(xlToRight).Select
End Sub
Now, what if you want to select the entire column instead of jumping to the last filled cell.
You can do that using the code below:
Sub SelectFilledCells()
Range("A1", Range("A1").End(xlDown)).Select
End Sub
In the above code, we have used the first and the last reference of the cell that we need to select. No matter how many filled cells are there, the above code will select all.
Remember the example above where we selected the range A1:D20 by using the following line of code:
Range(“A1″,”D20”)
Here A1 was the top-left cell and D20 was the bottom-right cell in the range. We can use the same logic in selecting variably sized ranges. But since we don’t know the exact address of the bottom-right cell, we used the End property to get it.
In Range(“A1”, Range(“A1”).End(xlDown)), “A1” refers to the first cell and Range(“A1”).End(xlDown) refers to the last cell. Since we have provided both the references, the Select method selects all the cells between these two references.
Similarly, you can also select an entire data set that has multiple rows and columns.
The below code would select all the filled rows/columns starting from cell A1.
Sub SelectFilledCells()
Range("A1", Range("A1").End(xlDown).End(xlToRight)).Select
End Sub
In the above code, we have used Range(“A1”).End(xlDown).End(xlToRight) to get the reference of the bottom-right filled cell of the dataset.
Difference between Using CurrentRegion and End
If you’re wondering why use the End property to select the filled range when we have the CurrentRegion property, let me tell you the difference.
With End property, you can specify the start cell. For example, if you have your data in A1:D20, but the first row are headers, you can use the End property to select the data without the headers (using the code below).
Sub SelectFilledCells()
Range("A2", Range("A2").End(xlDown).End(xlToRight)).Select
End Sub
But the CurrentRegion would automatically select the entire dataset, including the headers.
So far in this tutorial, we have seen how to refer to a range of cells using different ways.
Now let’s see some ways where we can actually use these techniques to get some work done.
Copy Cells / Ranges Using VBA
As I mentioned at the beginning of this tutorial, selecting a cell is not necessary to perform actions on it. You will see in this section how to copy cells and ranges without even selecting these.
Let’s start with a simple example.
Copying Single Cell
If you want to copy cell A1 and paste it into cell D1, the below code would do it.
Sub CopyCell()
Range("A1").Copy Range("D1")
End Sub
Note that the copy method of the range object copies the cell (just like Control +C) and pastes it in the specified destination.
In the above example code, the destination is specified in the same line where you use the Copy method. If you want to make your code even more readable, you can use the below code:
Sub CopyCell()
Range("A1").Copy Destination:=Range("D1")
End Sub
The above codes will copy and paste the value as well as formatting/formulas in it.
As you might have already noticed, the above code copies the cell without selecting it. No matter where you’re on the worksheet, the code will copy cell A1 and paste it on D1.
Also, note that the above code would overwrite any existing code in cell D2. If you want Excel to let you know if there is already something in cell D1 without overwriting it, you can use the code below.
Sub CopyCell()
If Range("D1") <> "" Then
Response = MsgBox("Do you want to overwrite the existing data", vbYesNo)
End If
If Response = vbYes Then
Range("A1").Copy Range("D1")
End If
End Sub
Copying a Fix Sized Range
If you want to copy A1:D20 in J1:M20, you can use the below code:
Sub CopyRange()
Range("A1:D20").Copy Range("J1")
End Sub
In the destination cell, you just need to specify the address of the top-left cell. The code would automatically copy the exact copied range into the destination.
You can use the same construct to copy data from one sheet to the other.
The below code would copy A1:D20 from the active sheet to Sheet2.
Sub CopyRange()
Range("A1:D20").Copy Worksheets("Sheet2").Range("A1")
End Sub
The above copies the data from the active sheet. So make sure the sheet that has the data is the active sheet before running the code. To be safe, you can also specify the worksheet’s name while copying the data.
Sub CopyRange()
Worksheets("Sheet1").Range("A1:D20").Copy Worksheets("Sheet2").Range("A1")
End Sub
The good thing about the above code is that no matter which sheet is active, it will always copy the data from Sheet1 and paste it in Sheet2.
You can also copy a named range by using its name instead of the reference.
For example, if you have a named range called ‘SalesData’, you can use the below code to copy this data to Sheet2.
Sub CopyRange()
Range("SalesData").Copy Worksheets("Sheet2").Range("A1")
End Sub
If the scope of the named range is the entire workbook, you don’t need to be on the sheet that has the named range to run this code. Since the named range is scoped for the workbook, you can access it from any sheet using this code.
If you have a table with the name Table1, you can use the below code to copy it to Sheet2.
Sub CopyTable()
Range("Table1[#All]").Copy Worksheets("Sheet2").Range("A1")
End Sub
You can also copy a range to another Workbook.
In the following example, I copy the Excel table (Table1), into the Book2 workbook.
Sub CopyCurrentRegion()
Range("Table1[#All]").Copy Workbooks("Book2.xlsx").Worksheets("Sheet1").Range("A1")
End Sub
This code would work only if the Workbook is already open.
Copying a Variable Sized Range
One way to copy variable sized ranges is to convert these into named ranges or Excel Table and the use the codes as shown in the previous section.
But if you can’t do that, you can use the CurrentRegion or the End property of the range object.
The below code would copy the current region in the active sheet and paste it in Sheet2.
Sub CopyCurrentRegion()
Range("A1").CurrentRegion.Copy Worksheets("Sheet2").Range("A1")
End Sub
If you want to copy the first column of your data set till the last filled cell and paste it in Sheet2, you can use the below code:
Sub CopyCurrentRegion()
Range("A1", Range("A1").End(xlDown)).Copy Worksheets("Sheet2").Range("A1")
End Sub
If you want to copy the rows as well as columns, you can use the below code:
Sub CopyCurrentRegion()
Range("A1", Range("A1").End(xlDown).End(xlToRight)).Copy Worksheets("Sheet2").Range("A1")
End Sub
Note that all these codes don’t select the cells while getting executed. In general, you will find only a handful of cases where you actually need to select a cell/range before working on it.
Assigning Ranges to Object Variables
So far, we have been using the full address of the cells (such as Workbooks(“Book2.xlsx”).Worksheets(“Sheet1”).Range(“A1”)).
To make your code more manageable, you can assign these ranges to object variables and then use those variables.
For example, in the below code, I have assigned the source and destination range to object variables and then used these variables to copy data from one range to the other.
Sub CopyRange()
Dim SourceRange As Range
Dim DestinationRange As Range
Set SourceRange = Worksheets("Sheet1").Range("A1:D20")
Set DestinationRange = Worksheets("Sheet2").Range("A1")
SourceRange.Copy DestinationRange
End Sub
We start by declaring the variables as Range objects. Then we assign the range to these variables using the Set statement. Once the range has been assigned to the variable, you can simply use the variable.
Enter Data in the Next Empty Cell (Using Input Box)
You can use the Input boxes to allow the user to enter the data.
For example, suppose you have the data set below and you want to enter the sales record, you can use the input box in VBA. Using a code, we can make sure that it fills the data in the next blank row.
Sub EnterData()
Dim RefRange As Range
Set RefRange = Range("A1").End(xlDown).Offset(1, 0)
Set ProductCategory = RefRange.Offset(0, 1)
Set Quantity = RefRange.Offset(0, 2)
Set Amount = RefRange.Offset(0, 3)
RefRange.Value = RefRange.Offset(-1, 0).Value + 1
ProductCategory.Value = InputBox("Product Category")
Quantity.Value = InputBox("Quantity")
Amount.Value = InputBox("Amount")
End Sub
The above code uses the VBA Input box to get the inputs from the user, and then enters the inputs into the specified cells.
Note that we didn’t use exact cell references. Instead, we have used the End and Offset property to find the last empty cell and fill the data in it.
This code is far from usable. For example, if you enter a text string when the input box asks for quantity or amount, you will notice that Excel allows it. You can use an If condition to check whether the value is numeric or not and then allow it accordingly.
Looping Through Cells / Ranges
So far we can have seen how to select, copy, and enter the data in cells and ranges.
In this section, we will see how to loop through a set of cells/rows/columns in a range. This could be useful when you want to analyze each cell and perform some action based on it.
For example, if you want to highlight every third row in the selection, then you need to loop through and check for the row number. Similarly, if you want to highlight all the negative cells by changing the font color to red, you need to loop through and analyze each cell’s value.
Here is the code that will loop through the rows in the selected cells and highlight alternate rows.
Sub HighlightAlternateRows()
Dim Myrange As Range
Dim Myrow As Range
Set Myrange = Selection
For Each Myrow In Myrange.Rows
If Myrow.Row Mod 2 = 0 Then
Myrow.Interior.Color = vbCyan
End If
Next Myrow
End Sub
The above code uses the MOD function to check the row number in the selection. If the row number is even, it gets highlighted in cyan color.
Here is another example where the code goes through each cell and highlights the cells that have a negative value in it.
Sub HighlightAlternateRows()
Dim Myrange As Range
Dim Mycell As Range
Set Myrange = Selection
For Each Mycell In Myrange
If Mycell < 0 Then
Mycell.Interior.Color = vbRed
End If
Next Mycell
End Sub
Note that you can do the same thing using Conditional Formatting (which is dynamic and a better way to do this). This example is only for the purpose of showing you how looping works with cells and ranges in VBA.
Where to Put the VBA Code
Wondering where the VBA code goes in your Excel workbook?
Excel has a VBA backend called the VBA editor. You need to copy and paste the code in the VB Editor module code window.
Here are the steps to do this:
- Go to the Developer tab.

- Click on the Visual Basic option. This will open the VB editor in the backend.
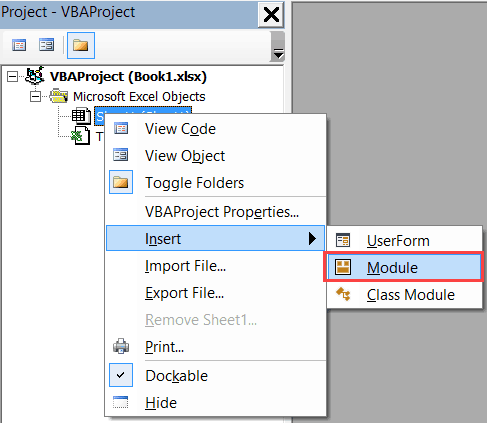
- In the Project Explorer pane in the VB Editor, right-click on any object for the workbook in which you want to insert the code. If you don’t see the Project Explorer, go to the View tab and click on Project Explorer.
- Go to Insert and click on Module. This will insert a module object for your workbook.

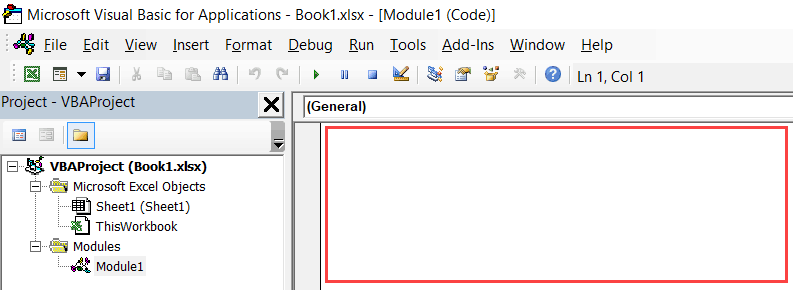
- Copy and paste the code in the module window.


You May Also Like the Following Excel Tutorials:
- Working with Worksheets using VBA.
- Working with Workbooks using VBA.
- Creating User-Defined Functions in Excel.
- For Next Loop in Excel VBA – A Beginner’s Guide with Examples.
- How to Use Excel VBA InStr Function (with practical EXAMPLES).
- Excel VBA Msgbox.
- How to Record a Macro in Excel.
- How to Run a Macro in Excel.
- How to Create an Add-in in Excel.
- Excel Personal Macro Workbook | Save & Use Macros in All Workbooks.
- Excel VBA Events – An Easy (and Complete) Guide.
- Excel VBA Error Handling.
- How to Sort Data in Excel using VBA (A Step-by-Step Guide).
- 24 Useful Excel Macro Examples for VBA Beginners (Ready-to-use).
One of the basic things you need to do in Excel VBA is to select a specific range to do something with it. This article will show you how to use Range, Cells, Offset and Resize to select a range in Excel VBA.
Select all the cells of a worksheet
Cells.SelectSelect a cell
Cells(4, 5).Select=
Range("E4").SelectIt seems Range() is much easier to read and Cells() is easier to use inside a loop.
Select a set of contiguous cells
Range("C3:G8").Select=
Range(Cells(3, 3), Cells(8, 7)).Select=
Range("C3", "G8").SelectSelect a set of non contiguous cells
Range("A2,A4,B5").SelectSelect a set of non contiguous cells and a range
Range("A2,A4,B5:B8").SelectSelect a named range
Range("MyRange").Select=
Application.Goto "MyRange"Select an entire row
Range("1:1").SelectSelect an entire column
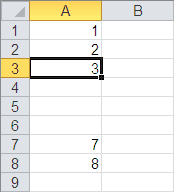
Range("A:A").SelectSelect the last cell of a column of contiguous data
Range("A1").End(xlDown).SelectWhen this code is used with the following example table, cell A3 will be selected.
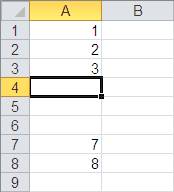
Select the blank cell at bottom of a column of contiguous data
Range("A1").End(xlDown).Offset(1,0).SelectWhen this code is used with the following example table, cell A4 will be selected.
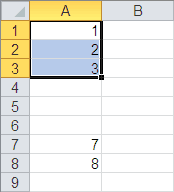
Select an entire range of contiguous cells in a column
Range("A1", Range("A1").End(xlDown)).SelectWhen this code is used with the following example table, range A1:A3 will be selected.
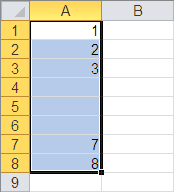
Select an entire range of non-contiguous cells in a column
Range("A1", Range("A" & Rows.Count).End(xlUp)).SelectNote: This VBA code supports Excel 2003 to 2013.
When this code is used with the following example table, range A1:A8 will be selected.
Select a rectangular range of cells around a cell
Range("A1").CurrentRegion.SelectSelect a cell relative to another cell
ActiveCell.Offset(5, 5).SelectRange("D3").Offset(5, -1).SelectSelect a specified range, offset It, and then resize It
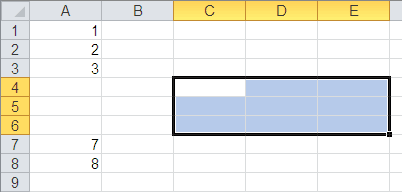
Range("A1").Offset(3, 2).Resize(3, 3).SelectWhen this code is used with the following example table, range C4:E6 will be selected.

Excel VBA Selecting Range
To select any kind of range in VBA we have a function called SELECT. It doesn’t mean that what type of cells we want to select in the Excel worksheet. But, If we want to use the range of cells or a combination of cells in VBA, then VBA Select is the function that would help us in selecting the range of cells we want. In actual, SELECT is an application in VBA which is used by applying it after we choose the range of cells to be select. Choosing the cells we want to select doesn’t mean that we are actually selecting it. We need to place SELECT after we fix the cells which we want to consider in our range. The good thing about Select is, it does not have any syntax to be followed.
How to Select a Range of Cells in Excel VBA?
We will learn how to select a range of cells in Excel by using the VBA Code. For this, follow the below steps:
You can download this VBA Selecting Range Excel Template here – VBA Selecting Range Excel Template
Example #1
To apply the SELECT application using VBA,
Step 1: Insert a new module inside Visual Basic Editor (VBE). Click on Insert tab > select Module.

Step 2: Write the subprocedure of VBA Selecting Range in the same name or in the different names which defines the operation we do.
Code:
Sub VBA_Range()

End Sub

Step 3: Now suppose, if we want to select the range of cells from cell A1 to B10 then use RANGE and in inverted quotes put the cells under range.
Code:
Sub VBA_Range()

Range("A1:B10")

End Sub

Step 4: Now to select the required application, after a dot and select the application called SELECT as shown below.
Code:
Sub VBA_Range()

Range("A1:B10").Select

End Sub

Step 5: Now we will compile the code by pressing function key F8 and to run the code, click on the Play button located below the menu bar. We will see in the current worksheet, cells from A1 to B10 are selected or covered in the highlighted area.

Example #2
There is another way to select any random cell range we want. For this, we will use the same coding pattern that we saw in example-2. For this, follow the below steps:
Step 1: Write the subprocedure for VBA Selecting Range.
Code:
Sub VBA_Range2()

End Sub

Step 2: Now in the Range function, we will put the random cells that we want to select in place of sequential range. Let’s put cell A1, B2 and C3 separated by commas into the brackets.
Code:
Sub VBA_Range2()

Range("A1, B2, C3").Select

End Sub

Step 3: Now if the run the code, we will see cell A1, B2 and C3 will now be selected with a highlighted portion as shown below.

Example #3
There is one more method to select the Range. Here we will be using define a variable for RANGE function first. For this, follow the below steps:
Step 1: Write the subprocedure for VBA Selection Range. And in that define a variable for RANGE.
Code:
Sub VBA_Range3()

Dim SelectRNG As Range

End Sub

Step 2: Then use SET with defined variable and use RANGE function along with the cells which we want to select.
Code:
Sub VBA_Range3()

Dim SelectRNG As Range
Set SelectRNG = Range("A1:B10")

End Sub

Step 3: At last, use the SELECT application with a defined variable as shown below.
Code:
Sub VBA_Range3()

Dim SelectRNG As Range
Set SelectRNG = Range("A1:B10")
SelectRNG.Select

End Sub

Step 4: Now again compile the code if required and run. We will see the range of cells A1 to B10 will get selected with the highlighted region.
Example #4
There is also another simplest way to select the range. For this, follow the below steps:
Step 1: For this again open a module and write the subprocedure for VBA Selecting Range. Now we will be using the function call CELLS. CELLS function in VBA allows us to choose the cells we want to select.
Code:
Sub VBA_Range4()

End Sub

Step 2: Now put the cell numbers in the vertex of the X and Y positions. If we want to select the cell B3 then X would be 3 and Y would be 2 as shown below.
Code:
Sub VBA_Range4()

Cells(

End Sub

Step 3: Now use the SELECT application after the CELLS as shown below.
Code:
Sub VBA_Range4()

Cells(3, 2).Select

End Sub

Step 4: Now if we run the code, we will see, the cursor will be now placed to cell B3 as shown below.
Pros of VBA Selecting Range
- Shown examples have different but easiest ways to select the range.
- Selecting the range using directly RANGE function with SELECT is the best one-line code.
- We can select cells as a range in continuously or randomly.
Things to Remember
- To have a proper visual of range getting selected, put the cursor away from the range we want to select.
- If we choose the randomly distributed cells as Range, then some operation becomes limited to it. Such as, we cannot copy or cut the data in such a pattern manually.
- Processes shown for selecting the range in all the above examples are not limited to these. We can try the combination of all the different examples simultaneously we want.
- Once coding is done, save the Excel file in Macro Enabled Excel format which would help in retaining and saving the code multiple times.
Recommended Articles
This is a guide to the VBA Selecting Range. Here we discuss how to Select a Range of Cells in Excel VBA along with practical examples and downloadable excel template. You can also go through our other suggested articles –
- VBA Input
- VBA Login
- VBA Month
- VBA Login
After the basic stuff with VBA, it is important to understand how to work with a range of cells in the worksheet. Once you start executing the codes practically, you need to work with various cells. So, it is important to understand how to work with various cells. One such concept is VBA’s “Selection of Range.” This article will show you how to work with the “Selection Range” in Excel VBA.
Selection and Range are two different topics, but when we say to select the range or selection of range, it is a single concept. RANGE is an object, “Selection” is a property, and “Select” is a method. People tend to be confused about these terms. It is important to know the differences in general.
Table of contents
- Excel VBA Selection Range
- How to Select a Range in Excel VBA?
- Example #1
- Example #2 – Working with Current Selected Range
- Things to Remember Here
- Recommended Articles
- How to Select a Range in Excel VBA?

You are free to use this image on your website, templates, etc, Please provide us with an attribution linkArticle Link to be Hyperlinked
For eg:
Source: VBA Selection Range (wallstreetmojo.com)
How to Select a Range in Excel VBA?
You can download this VBA Selection Range Excel Template here – VBA Selection Range Excel Template
Example #1
Assume you want to select cell A1 in the worksheet, then. But, first, we need to specify the cell address by using a RANGE object like below.
Code:

After mentioning the cell, we need to select and put a dot to see the IntelliSense list, which is associated with the RANGE object.

From this variety of lists, choose the “Select” method.
Code:
Sub Range_Example1()

  Range("A1").Select

End Sub

Now, this code will select cell A1 in the active worksheet.

To select the cell in the different worksheets, specify the worksheet by its name. To specify the worksheet, we need to use the “WORKSHEET” object and enter the worksheet name in double quotes.
For example, if you want to select cell A1 in the worksheet “Data Sheet,” specify the worksheet just like below.
Code:
Sub Range_Example1()

  Worksheets ("Data Sheet")

End Sub
Then continue the code to specify what we need to do in this sheet. For example, in “Data Sheet,” we need to select cell A1 so that the code will be RANGE(“A1”).Select.
Code:
Sub Range_Example1()

  Worksheets("Data Sheet").Range("A1").Select

End Sub
When you try to execute this code, we will get the below error.
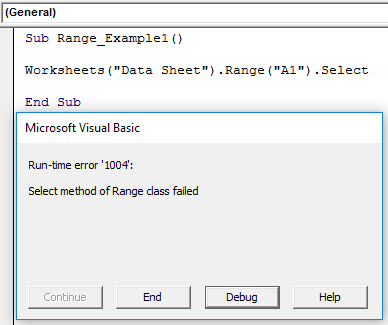
It is because “we cannot directly supply a range object and select method to the worksheets object.”
First, we need to select or activate the VBA worksheetWhen working with VBA, we frequently refer to or use the properties of another sheet. For instance, if we’re working on sheet 1 and need a value from cell A2 on sheet 2, we won’t be able to access it unless we first activate the sheet. So, to activate a sheet in VBA we use worksheet property as Worksheets(“Sheet2”). Activate.read more, and then we can do whatever we want.
Code:
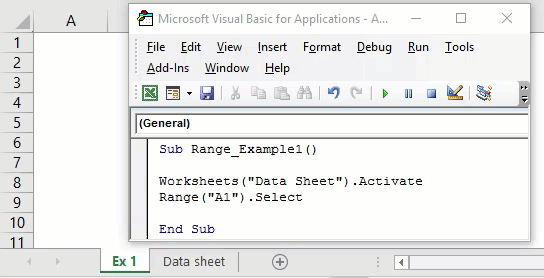
Sub Range_Example1()

  Worksheets("Data Sheet").Activate
  Range("A1").Select

End Sub
It will now select cell A1 in the worksheet “Data Sheet.”
Example #2 – Working with Current Selected Range
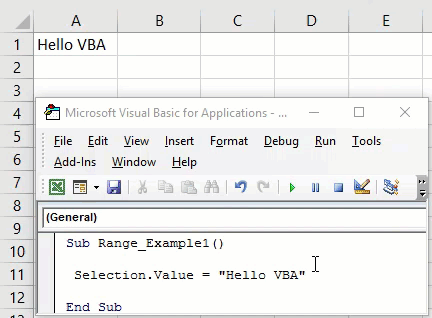
Selecting is different, and working with an already selected range of cells is different. For example, assume you want to insert a value “Hello VBA” to cell A1 then we can do it in two ways.
Firstly we can directly pass the VBA codeVBA code refers to a set of instructions written by the user in the Visual Basic Applications programming language on a Visual Basic Editor (VBE) to perform a specific task.read more as RANGE(“A1”).Value = “Hello, VBA.”
Code:
Sub Range_Example1()

  Range("A1").Value = "Hello VBA"

End Sub
This code will insert the value “Hello VBA” to cell A1, irrespective of which cell is currently selected.

Look at the above result of the code. When we execute this code, it has inserted the value “Hello VBA,” even though the currently selected cell is B2.
Secondly, we can insert the value into the cell using the “Selection” property. But, first, we need to select the cell manually and execute the code.
Code:
Sub Range_Example1()

  Selection.Value = "Hello VBA"

End Sub
What this code will do is insert the value “Hello VBA” to the currently selected cell. For example, look at the below example of execution.
When we executed the code, my current selected cell was B2. Therefore, our code inserted the same value to the currently selected cell.
Now, we will select cell B3 and execute. There also, we will get the same value.

Another thing we can do with the “selection” property is insert a value to more than one cell. So, for example, we will select the range of cells from A1 to B5 now.

If we execute the code for all the selected cells, we get the value “Hello VBA.”

So, the simple difference between specifying a cell address by RANGE object and Selection property is that the Range object code will insert value to the cells specified explicitly.
But in the Selection object, it does not matter which cell you are in. It will insert the mentioned value to all the selected cells.
Things to Remember Here
- We cannot directly supply the select method under the Selection property.
- The RANGE is an object, and selection is property.
- Instead of range, we can use the CELLS property.
Recommended Articles
This article is a guide to VBA Selection Range. Here, we learn how to select a range in Excel VBA along with examples and download an Excel template. Below are some useful Excel articles related to VBA: –
- VBA DoEvents
- Range Cells in VBA
- VBA Intersect
- VBA Switch Function
![]()
Download Article
![]()
Download Article
This wikiHow teaches you how to start using Visual Basic procedures to select data in Microsoft Excel. As long as you’re familiar with basic VB scripting and using more advanced features of Excel, you’ll find the selection process pretty straight-forward.
-
1
Select one cell on the current worksheet. Let’s say you want to select cell E6 with Visual Basic. You can do this with either of the following options:[1]
ActiveSheet.Cells(6, 5).Select
ActiveSheet.Range("E6").Select
-
2
Select one cell on a different worksheet in the same workbook. Let’s say our example cell, E6, is on a sheet called Sheet2. You can use either of the following options to select it:
Application.Goto ActiveWorkbook.Sheets("Sheet2").Cells(6, 5)
Application.Goto (ActiveWorkbook.Sheets("Sheet2").Range("E6"))
Advertisement
-
3
Select one cell on a worksheet in a different workbook. Let’s say you want to select a cell from Sheet1 in a workbook called BOOK2.XLS. Either of these two options should do the trick:
Application.Goto Workbooks("BOOK2.XLS").Sheets("Sheet1").Cells(2,1)
Application.Goto Workbooks("BOOK2.XLS").Sheets("Sheet1").Range("A2")
-
4
Select a cell relative to another cell. You can use VB to select a cell based on its location relative to the active (or a different) cell. Just be sure the cell exists to avoid errors. Here’s how to use :
-
Select the cell three rows below and four columns to the left of the active cell:
ActiveCell.Offset(3, -4).Select
-
Select the cell five rows below and four columns to the right of cell C7:
ActiveSheet.Cells(7, 3).Offset(5, 4).Select
-
Select the cell three rows below and four columns to the left of the active cell:
Advertisement
-
1
Select a range of cells on the active worksheet. If you wanted to select cells C1:D6 on the current sheet, you can enter any of the following three examples:
ActiveSheet.Range(Cells(1, 3), Cells(6, 4)).Select
ActiveSheet.Range("C1:D6").Select
ActiveSheet.Range("C1", "D6").Select
-
2
Select a range from another worksheet in the same workbook. You could use either of these examples to select cells C3:E11 on a sheet called Sheet3:
Application.Goto ActiveWorkbook.Sheets("Sheet3").Range("C3:E11")
Application.Goto ActiveWorkbook.Sheets("Sheet3").Range("C3", "E11")
-
3
Select a range of cells from a worksheet in a different workbook. Both of these examples would select cells E12:F12 on Sheet1 of a workbook called BOOK2.XLS:
Application.Goto Workbooks("BOOK2.XLS").Sheets("Sheet1").Range("E12:F12")
Application.Goto Workbooks("BOOK2.XLS").Sheets("Sheet1").Range("E12", "F12")
-
4
Select a named range. If you’ve assigned a name to a range of cells, you’d use the same syntax as steps 4-6, but you’d replace the range address (e.g., «E12», «F12») with the range’s name (e.g., «Sales»). Here are some examples:
-
On the active sheet:
ActiveSheet.Range("Sales").Select
-
Different sheet of same workbook:
Application.Goto ActiveWorkbook.Sheets("Sheet3").Range("Sales")
-
Different workbook:
Application.Goto Workbooks("BOOK2.XLS").Sheets("Sheet1").Range("Sales")
-
On the active sheet:
-
5
Select a range relative to a named range. The syntax varies depending on the named range’s location and whether you want to adjust the size of the new range.
- If the range you want to select is the same size as one called Test5 but is shifted four rows down and three columns to the right, you’d use:
ActiveSheet.Range("Test5").Offset(4, 3).Select
- If the range is on Sheet3 of the same workbook, activate that worksheet first, and then select the range like this:
Sheets("Sheet3").Activate ActiveSheet.Range("Test").Offset(4, 3).Select
- If the range you want to select is the same size as one called Test5 but is shifted four rows down and three columns to the right, you’d use:
-
6
Select a range and resize the selection. You can increase the size of a selected range if you need to. If you wanted to select a range called Database’ and then increase its size by 5 rows, you’d use this syntax:
Range("Database").Select Selection.Resize(Selection.Rows.Count + 5, _Selection.Columns.Count).Select
-
7
Select the union of two named ranges. If you have two overlapping named ranges, you can use VB to select the cells in that overlapping area (called the «union»). The limitation is that you can only do this on the active sheet. Let’s say you want to select the union of a range called Great and one called Terrible:
-
Application.Union(Range("Great"), Range("Terrible")).Select
- If you want to select the intersection of two named ranges instead of the overlapping area, just replace Application.Union with Application.Intersect.
-
Advertisement
-
1
Use this example data for the examples in this method. This chart full of example data, courtesy of Microsoft, will help you visualize how the examples behave:[2]
A1: Name B1: Sales C1: Quantity A2: a B2: $10 C2: 5 A3: b B3: C3: 10 A4: c B4: $10 C4: 5 A5: B5: C5: A6: Total B6: $20 C6: 20 -
2
Select the last cell at the bottom of a contiguous column. The following example will select cell A4:
ActiveSheet.Range("A1").End(xlDown).Select
-
3
Select the first blank cell below a column of contiguous cells. The following example will select A5 based on the chart above:
ActiveSheet.Range("A1").End(xlDown).Offset(1,0).Select
-
4
Select a range of continuous cells in a column. Both of the following examples will select the range A1:A4:
ActiveSheet.Range("A1", ActiveSheet.Range("a1").End(xlDown)).Select
ActiveSheet.Range("A1:" & ActiveSheet.Range("A1"). End(xlDown).Address).Select
-
5
Select a whole range of non-contiguous cells in a column. Using the data table at the top of this method, both of the following examples will select A1:A6:
ActiveSheet.Range("A1",ActiveSheet.Range("A65536").End(xlUp)).Select
ActiveSheet.Range("A1",ActiveSheet.Range("A65536").End(xlUp)).Select
Advertisement
Ask a Question
200 characters left
Include your email address to get a message when this question is answered.
Submit
Advertisement
Video
-
The «ActiveSheet» and «ActiveWorkbook» properties can usually be omitted if the active sheet and/or workbook(s) are implied.
Thanks for submitting a tip for review!
Advertisement
About This Article
Article SummaryX
1. Use ActiveSheet.Range(«E6»).Select to select E6 on the active sheet.
2. Use Application.Goto (ActiveWorkbook.Sheets(«Sheet2»).Range(«E6»)) to select E6 on Sheet2.
3. Add Workbooks(«BOOK2.XLS») to the last step to specify that the sheet is in BOOK2.XLS.
Did this summary help you?
Thanks to all authors for creating a page that has been read 167,714 times.
Is this article up to date?
I found a similar solution to this question in c# How to Select all the cells in a worksheet in Excel.Range object of c#?
What is the process to do this in VBA?
I select data normally by using «ctrl+shift over arrow, down arrow» to select an entire range of cells. When I run this in a macro it codes out A1:Q398247930, for example. I need it to just be
.SetRange Range("A1:whenever I run out of rows and columns")
I could easily do it myself without a macro, but I’m trying to make the entire process a macro, and this is just a piece of it.
Sub sort()
    'sort Macro
    Range("B2").Select
    ActiveWorkbook.Worksheets("Master").sort.SortFields.Clear
    ActiveWorkbook.Worksheets("Master").sort.SortFields.Add Key:=Range("B2"), _
      SortOn:=xlSortOnValues, Order:=xlAscending, DataOption:=xlSortNormal
    With ActiveWorkbook.Worksheets("Master").sort
        .SetRange Range("A1:whenever I run out of rows and columns")
        .Header = xlNo
        .MatchCase = False
        .Orientation = xlTopToBottom
        .SortMethod = xlPinYin
        .Apply
    End With
End Sub
edit:
There are other parts where I might want to use the same code but the range is say «C3:End of rows & columns». Is there a way in VBA to get the location of the last cell in the document?
asked Jul 30, 2013 at 18:50
![]()
C. TewaltC. Tewalt
2,2612 gold badges29 silver badges47 bronze badges
I believe you want to find the current region of A1 and surrounding cells — not necessarily all cells on the sheet.
If so — simply use…
Range(«A1»).CurrentRegion
answered Jul 30, 2013 at 19:17
![]()
ExcelExpertExcelExpert
3522 silver badges4 bronze badges
1
You can simply use cells.select to select all cells in the worksheet. You can get a valid address by saying Range(Cells.Address).
If you want to find the last Used Range where you have made some formatting change or entered a value into you can call ActiveSheet.UsedRange and select it from there. Hope that helps.
![]()
June7
19.5k8 gold badges24 silver badges33 bronze badges
answered Jul 30, 2013 at 19:11
![]()
chanceachancea
5,8083 gold badges28 silver badges39 bronze badges
2
you can use all cells as a object like this :
Dim x as Range
Set x = Worksheets("Sheet name").Cells
X is now a range object that contains the entire worksheet
answered Apr 15, 2015 at 11:47
![]()
you have a few options here:
- Using the UsedRange property
- find the last row and column used
- use a mimic of shift down and shift right
I personally use the Used Range and find last row and column method most of the time.
Here’s how you would do it using the UsedRange property:
Sheets("Sheet_Name").UsedRange.Select
This statement will select all used ranges in the worksheet, note that sometimes this doesn’t work very well when you delete columns and rows.
The alternative is to find the very last cell used in the worksheet
Dim rngTemp As Range
Set rngTemp = Cells.Find("*", SearchOrder:=xlByRows, SearchDirection:=xlPrevious)
If Not rngTemp Is Nothing Then
    Range(Cells(1, 1), rngTemp).Select
End If
What this code is doing:
- Find the last cell containing any value
- select cell(1,1) all the way to the last cell
![]()
answered Jul 30, 2013 at 20:32
![]()
Derek ChengDerek Cheng
5353 silver badges8 bronze badges
3
Another way to select all cells within a range, as long as the data is contiguous, is to use Range("A1", Range("A1").End(xlDown).End(xlToRight)).Select.
answered Mar 29, 2019 at 19:38
![]()
I would recommend recording a macro, like found in this post;
Excel VBA macro to filter records
But if you are looking to find the end of your data and not the end of the workbook necessary, if there are not empty cells between the beginning and end of your data, I often use something like this;
R = 1
Do While Not IsEmpty(Sheets("Sheet1").Cells(R, 1))
    R = R + 1
Loop
Range("A5:A" & R).Select 'This will give you a specific selection
You are left with R = to the number of the row after your data ends. This could be used for the column as well, and then you could use something like Cells(C , R).Select, if you made C the column representation.
![]()
answered Jul 30, 2013 at 19:25
![]()
MakeCentsMakeCents
7321 gold badge5 silver badges15 bronze badges
2
Sub SelectAllCellsInSheet(SheetName As String)
    lastCol = Sheets(SheetName).Range("a1").End(xlToRight).Column
    Lastrow = Sheets(SheetName).Cells(1, 1).End(xlDown).Row
    Sheets(SheetName).Range("A1", Sheets(SheetName).Cells(Lastrow, lastCol)).Select
End Sub
To use with ActiveSheet:
Call SelectAllCellsInSheet(ActiveSheet.Name)
answered Mar 14, 2017 at 20:57
![]()
Yehia AmerYehia Amer
5985 silver badges11 bronze badges
Here is what I used, I know it could use some perfecting, but I think it will help others…
''STYLING''

Dim sheet As Range

' Find Number of rows used
Dim Final As Variant
    Final = Range("A1").End(xlDown).Row

' Find Last Column
Dim lCol As Long
    lCol = Cells(1, Columns.Count).End(xlToLeft).Column

Set sheet = ActiveWorkbook.ActiveSheet.Range("A" & Final & "", Cells(1, lCol ))
With sheet
    .Interior.ColorIndex = 1
End With
answered Mar 16, 2019 at 4:29
![]()
I have found that the Worksheet «.UsedRange» method is superior in many instances to solve this problem.
I struggled with a truncation issue that is a normal behaviour of the «.CurrentRegion» method. Using [ Worksheets(«Sheet1»).Range(«A1»).CurrentRegion ] does not yield the results I desired when the worksheet consists of one column with blanks in the rows (and the blanks are wanted). In this case, the «.CurrentRegion» will truncate at the first record. I implemented a work around but recently found an even better one; see code below that allows copying the whole set to another sheet or to identify the actual address (or just rows and columns):
Sub mytest_GetAllUsedCells_in_Worksheet()
    Dim myRange

    Set myRange = Worksheets("Sheet1").UsedRange
    'Alternative code:  set myRange = activesheet.UsedRange

   'use msgbox or debug.print to show the address range and counts
   MsgBox myRange.Address
   MsgBox myRange.Columns.Count
   MsgBox myRange.Rows.Count

  'Copy the Range of data to another sheet
  'Note: contains all the cells with that are non-empty
   myRange.Copy (Worksheets("Sheet2").Range("A1"))
   'Note:  transfers all cells starting at "A1" location.
   '       You can transfer to another area of the 2nd sheet
   '       by using an alternate starting location like "C5".

End Sub
answered May 2, 2019 at 19:38
![]()
Maybe this might work:
Sh.Range(«A1», Sh.Range(«A» & Rows.Count).End(xlUp))
answered Oct 31, 2014 at 18:38
![]()
Refering to the very first question, I am looking into the same.
The result I get, recording a macro, is, starting by selecting cell A76:
Sub find_last_row()
    Range("A76").Select
    Range(Selection, Selection.End(xlDown)).Select
End Sub
answered Aug 7, 2015 at 12:40
![]()