
In this article I will explain how you can use VBA for word to select text.
–
Select Entire Document:
Using the code snippet below you can select the entire word document:
Selection.WholeStory
Result:

–
Select The Current Line:
Using the code below you can select the current line:
Sub  main()

Selection.HomeKey Unit:=wdLine

Selection.EndKey Unit:=wdLine, Extend:=wdExtend

End  Sub
Assume the cursor is somewhere in the middle of the line:

The first line moves the cursor to the start of the line:
Selection.HomeKey Unit:=wdLine
The next line move the cursor to the end of the line while selecting the text:
Selection.EndKey Unit:=wdLine, Extend:=wdExtend
Result:

–
Select to End of Line:
The code below will only select till the end of the line:
Selection.EndKey Unit:=wdLine, Extend:=wdExtend
Result:

–
Select to Start of Line:
The code below will select text up to the start of the line:
Selection.HomeKey Unit:=wdLine, Extend:=wdExtend
Result:

–
Select Certain Number of Characters:
Lets say we need to select only a certain number of characters from the current location of the cursor. The code below will select 5 characters to the right:
Selection.MoveRight Unit:=wdCharacter, Count:=5, Extend:=wdExtend
Result:

The code below will select 10 characters to the left:
Selection.MoveLeft Unit:=wdCharacter, Count:=10, Extend:=wdExtend
Result:

–
Select Text up to a Certain Character:
You might want to select text until you reach a certain character. For example a space character, “*”, “/”, …
The code below selects text until a space character is reached:
Sub  test()

Dim  flag As  Boolean

flag = True

While  flag = True

    Selection.MoveRight Unit:=wdCharacter, Count:=1, _

    Extend:=wdExtend

    'checks the last character to see if its a space

    If  Strings.Right(Selection.Range.Text, 1) = " " Then

        'if it was a space the loop flag will end

        flag = False

    End If

Wend

End  Sub

Result:

The line below selects one additional character to the right:
Selection.MoveRight Unit:=wdCharacter, Count:=1, _

Extend:=wdExtend
The if statement below checks to see if the last character selected is a space character:
If  Strings.Right(Selection.Range.Text, 1) = " " Then

...

End If
For more information about the Strings.Right function please see the article below. Although the article was written for Excel, it can be extended to VBA for Word:
- Excel VBA String Proccessing and Manipulation
See also:
- Word VBA, Move Cursor to Start of Document
- Word VBA, Move Cursor to End of Document
- Word VBA, Move Cursor to End of Line
- Word VBA, Move Cursor to Start of Line
- Excel VBA String Processing and Manipulation
- Word VBA Bookmarks
- Word VBA, Read All Lines
If you need assistance with your code, or you are looking for a VBA programmer to hire feel free to contact me. Also please visit my website www.software-solutions-online.com
Create Calculations in Word Tables Using Formulas
by Avantix Learning Team | Updated October 9, 2021
Applies to: Microsoft® Word® 2013, 2016, 2019 or 365 (Windows)
You can insert formulas in Word tables to perform calculations. These formulas can include functions such as SUM or AVERAGE or basic operators. When you insert formulas in Word tables, you are really inserting fields so the fields will need to be updated if the data in the table changes. For more complex calculations, it’s usually best to create formulas in Excel where they will update automatically.
Formulas and functions in Word tables only work with numbers. You can’t perform text calculations or output text.
Recommended article: 3 Simple Ways to Copy or Import Excel Data into Word (Linked or Unlinked)
Note: Buttons and Ribbon tabs may display in a different way (with or without text) depending on your version of Word, the size of your screen and your Control Panel settings. For Word 365 users, Ribbon tabs may appear with different names. For example, the Table Tools Design tab may appear as Table Design.
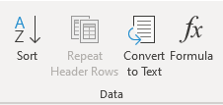
To insert a formula in a cell in a Word table, you’ll need to use the Function command on the Table Tools Layout or Table Layout tab in the Ribbon:
Do you want to learn more about Microsoft Word? Check out our virtual classroom or live classroom Word courses >
Understanding formula syntax
When you insert a table in Word, each column and row are identified like cells in Excel worksheets and each cell is assigned a cell reference. In a Word table, the first column would be column A and the first row would be row 1 so the first cell would be identified as A1. Therefore, you can create calculations that refer to cells (such as =A1+A2).
In Word and Excel, you can use the same basic operators:
- addition (+)
- subtraction (-)
- multiplication (*)
- division (/)
Typically, formulas in Word tables are created using common functions such as SUM, AVERAGE, MIN, MAX or COUNT and refer to a range. They must start with an equal sign (=).
You can refer to ranges of cells using ABOVE, LEFT, RIGHT or BELOW as the arguments for functions. If you’re trying to sum the cells at the bottom of a column, the formula would be =SUM(ABOVE). You can also combine these arguments. For example, you could enter a formula =SUM(ABOVE,LEFT) and it would sum all cells that are above and to the left of that cell. Functions can also refer to cell references such as =SUM(C1:C10). You can also refer to individual cells such =SUM(B1,C1,D5).
Word tables can also perform more complex calculations using the IF function with the syntax =IF(test,true,false). For example, =IF(A5>=1000,0,50) could be used to calculate a shipping cost of 50 if orders are less than 1000. You can also use the AND and OR functions with the IF function.
Inserting a formula in a table
To insert a formula in a table:
- Click in the cell where you want to enter a formula.
- Click the Table Tools Layout or Table Layout tab in the Ribbon.
- Select Function (fx) in the Data group. A dialog box appears. Word will typically insert a function and arguments in the Formula box.
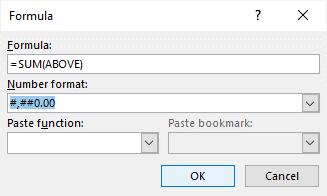
- If you want to accept the suggested formula, click OK. If you want to change the formula, click in the Formula box and enter a formula (starting with =). You can also choose other functions from the Paste Function drop-down menu.
- If necessary, select a format from the Format drop-down menu.
- Click OK. Word inserts the formula as a field and displays the results.
The Function dialog box appears as follows with a formula and a format selected:
Updating a formula
If the original data changes, you can right-click the Formula field and select Update from the drop-down menu or press F9. If you want to update all formulas in a table, select all of the cells in the table and press F9. To select the entire table, click the four arrows on the top left of the table.
Changing a formula
To change a formula in a table:
- Right-click the formula or error. A drop-down menu appears.
- Select Edit field.
- Make the desired changes.
- Click OK.
Updating all fields
To update all fields in all tables:
- Press Ctrl + A to select all.
- Press F9.
Formula fields are just one type of field you can use in Word. There are many other fields that can insert variable information in Word documents.
Subscribe to get more articles like this one
Did you find this article helpful? If you would like to receive new articles, join our email list.
More resources
4 Ways to Create a Table in Word
How to Insert Fields in Word (Built-in or Custom)
5 Ways to Insert the Division Symbol in Word (Type or Insert ÷)
How to Insert Reusable Text Snippets in Word with Quick Parts
10 Microsoft Word Tips, Tricks and Shortcuts for Selecting in Tables
Related courses
Microsoft Word: Intermediate / Advanced
Microsoft Excel: Intermediate / Advanced
Microsoft PowerPoint: Intermediate / Advanced
Microsoft Word: Long Documents Master Class
Microsoft Word: Styles, Templates and Tables of Contents
Microsoft Word: Designing Dynamic Word Documents Using Fields
VIEW MORE COURSES >
Our instructor-led courses are delivered in virtual classroom format or at our downtown Toronto location at 18 King Street East, Suite 1400, Toronto, Ontario, Canada (some in-person classroom courses may also be delivered at an alternate downtown Toronto location). Contact us at info@avantixlearning.ca if you’d like to arrange custom instructor-led virtual classroom or onsite training on a date that’s convenient for you.
Copyright 2023 Avantix® Learning
Microsoft, the Microsoft logo, Microsoft Office and related Microsoft applications and logos are registered trademarks of Microsoft Corporation in Canada, US and other countries. All other trademarks are the property of the registered owners.
Avantix Learning |18 King Street East, Suite 1400, Toronto, Ontario, Canada M5C 1C4 | Contact us at info@avantixlearning.ca
Microsoft 365, Microsoft Office, Microsoft Office for Mac, Microsoft Word, Office 2007, Office 2010, Office 2013, Office 2016, Office 2019, Office 2021 / Office LTSC, Office 365 /
11 March 2023
Here’s a complete list of the Word Function Key features from fast access to Help, jumping around the document, doc panes, spelling, grammar and managing field codes.
- F1 – Help, field jump
- F2 – move, Print Preview
- F3 – Change case
- F4 – Repeat
- F5 – Go To, jump to last edit
- F6 – Panes
- F7 – Spelling, Grammar etc
- F8 – Selection
- F9 – Field Codes
- F10
- F11 – more Field Codes
- F12 – Save, Open, Print
Let’s discuss in detail the functionality of the F-keys labelled F1 through F12 on your keyboard.
F1 – Help, field jump
- F1 – Displays the Word help pane. At times pressing F1 also takes you to Microsoft’s help support webpage and suggest similar topics about the function you are interested in researching. This mostly happens when a dialog box is open, during pressing F1.
- Alt+F1: If you have many fields in your Word document. This option makes you hop to the next field.
- Alt+Shift+F1: Takes you to the previous field in your Word document.
- Shift+F1: Opens the “Reveal Formatting” pane.
- Ctrl+F1: Displays or hides the ribbon. By hiding the ribbon only, the quick access toolbar will be displayed. An alternate way of obtaining this result is by right-clicking on the ribbon and selecting Collapse the Ribbon.
F2 – move, Print Preview
- F2: Moves Text or Graphic. Select the text/graphic that you want to move and press F2. Place the cursor where you want to move the text and Press enter key to reflect the changes in your word document. Press the Esc key to cancel.
- Ctrl + F2: Takes you to the Print preview page, where you can preview and print your document.
- Shift+F2: Works like your Ctrl +C. It copies your selected text in the word document.
- Alt+Shift+F2: Saves the document. Works like your Ctrl + S.
- Alt+Ctrl+F2: Open document window, where you can easily see and open a document.
F3 – Change case
- F3: Acts as a building block. Once an initial search is performed, F3 will find the next searched value to expand it to the full text.
- Alt+F3: Create new building block by adding an auto text entry from the selected text.
- Shift+F3: Changes the text in Word from upper to lowercase or Initial letter case at the beginning of every word.
- Ctrl+F3: Cut selected text from your Word document.
- Ctrl+Shift+F3: Insert the text from the clipboard (performed by Ctrl +F3) After inserting the text it also clears up the clipboard memory.
F4 – Repeat
- F4: Repeats your last command
- Shift+F4: Repeats the Last Find. Same as Find Next.
- Ctrl+F4: Asks to save your document before closing the active document.
- Alt+F4: Closes the active document, but always asks to save your recent work before quitting Word.
F5 – Go To, jump to last edit
- F5: Opens the Go To tab on the Find and Replace window. Using this function, you can quickly navigate to a page, section, line, comment, footnote or bookmark.
- Shift+F5: Moves to the previous modification you made in the current document. If you press again it takes you to the edit before the previous. It remembers two last changes made by you.
- Ctrl+Shift+F5: Displays the Bookmark dialog window.
- Alt+F5: Restores the document window size.
F6 – Panes
- F6: Switches between the document, taskbar, status bar and ribbon. This function helps to go to the window without using your mouse.
- Shift+F6: Moves from open dialog box back to the document.
- Ctrl+F6: Moves to the next open document
- Ctrl+Shift+F6: Moves to the previously open document
F7 – Spelling, Grammar etc
- F7: Opens the Editor dialog box and start spell check
- Shift+F7: Displays the thesaurus pane. If you have selected a word and pressed this function key it will look up the selected word in the Thesaurus pane.
- Alt+F7: Checks for the next spelling or grammar error in your word document.
- Alt+Shift+F7: Opens the Translation pane. If you have selected a text in your word document and quickly wants to translate it into another language available in the Translator option. It instantly does that for you.
F8 – Selection
- F8: In Word, if you select a section and Press F8 it extends selection for the rest of the text in the document
- Shift+F8: This option reduces the expansion of the selected text
- Ctrl+Shift+F8: Turns on/off extend selection mode. If switched on, the arrow keys extend the selection.
- Alt+F8 – Displays the “Macro” dialog box – create, run, edit or delete a macro.
F9 – Field Codes
- F9: Updates field codes in the word document
- Shift +F9: Show a field’s code in the word document
- Ctrl +F9: Inserts empty fields showing 2 curly brackets
- Ctrl + Shift +F9: Unlinks a field code
- Alt +F9: Toggles between field code and results.
F10
- F10: Pressing this key display single letter shortcuts to access the menu commands on Word. Same as pressing Alt.
- Shift+F10: Displays a context menu.
- Ctrl+F10: Maximizes or restores document window.
- Alt+F10: Displays selection task pane.
- Alt+Shift+F10: Displays a menu for an available selection. Same as right-mouse click.
F11 – more Field Codes
- F11: Moves to the next field in your document.
- Shift+F11: Moves to the previous field in your document
- Ctrl+F11: Locks a field code so that it cannot be modified
- Ctrl+Shift+F11: Unlock a field code
- Alt+F11: Opens a VBA editor to create a macro
F12 – Save, Open, Print
- F12: Opens the Save As window to save your document.
- Shift+F12: Saves your document.
- Ctrl+F12: Displays the Open window.
- Ctrl+Shift+F12: Open the Print window.
Three Microsoft Office function key alternatives
DAX functions in Excel that everyone should have
Excel Function Keys explained
In this chapter, we will discuss how to select text in Word 2010. Selecting a text is one of the most important skills required while editing a word document. You can perform various operations on a selected text; you can delete the selected text, copy it, move it, apply formatting to it, change its capitalization, etc.
The most common method of selecting a text is to click and drag the mouse over the text you want to select. Following table lists down a few other simple methods that will help you in selecting text in different scenarios −
| S.No | Component & Selection Method |
|---|---|
| 1 |
Selecting text between two points Click at the start of the block of text, hold down Shift, and click at the end of the block. |
| 2 |
Selecting a single word Double-click anywhere on the word you want to select. |
| 3 |
Selecting a paragraph Triple-click anywhere on the paragraph you want to select. |
| 4 |
Selecting a sentence Hold down the Ctrl key and click anywhere in the sentence you want to select. |
| 5 |
Selecting a column of text Hold down Alt, click and hold the mouse button, and drag over the column you want to select. |
Note that only one part of the document can be in the selected state. If you have one portion of the document in selected state and as soon as you try to select any other part of the document, previous part will automatically be de-selected.
Using the Selection Bar
The black shaded area in the following screen shot is called the selection bar. When you bring your cursor in this area, it turns into a rightward-pointing arrow.
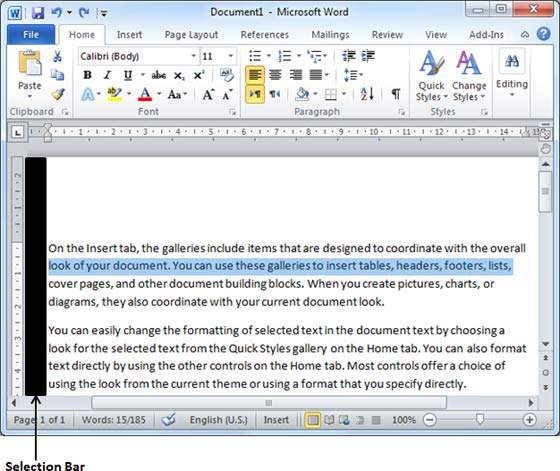
You can use the selection bar to select the various components of a document as described in the following table −
| S.No | Component & Selection Method |
|---|---|
| 1 |
Selecting a line Bring your mouse in the selection bar area and click in front of the line you want to select. |
| 2 |
Selecting a paragraph Bring your mouse in the selection bar area and double click in front of the paragraph you want to select. |
| 3 |
Selecting the document Bring your mouse in the selection bar area and triple-click. |
Using the Keyboard
Keyboard provides very good support when you want to select various components of the document as described in the following table −
| S.No | Key & Selection Method Selecting Text |
|---|---|
| 1 |
Ctrl + A Press Ctrl + A keys to select the entire document. |
| 2 |
Shift Keep pressing the Shift key and use any of the arrow keys to select the portion of text. |
| 3 |
F8 Press F8 and then use any of the arrows keys to select the portion of text. |
| 4 |
Ctrl + Shift + F8 Press Ctrl + Shift + F8 and then use any of the arrows keys to select column of the text. |
Function key
+SHIFT
+CTRL
+ALT
+CTRL+SHIFT
+ALT+SHIFT
+CTRL+ALT
F1
Displays the Help task pane
Opens Reveal Formatting task pane
Closes and reopens the current task pane
Goes to the next field
Goes to the previous field
Displays Microsoft System Information
F2
Moves text or graphics
Copies selected text
Opens Print Preview
Saves the active document
Opens the Open dialog box
F3
Inserts an AutoText
entry (if pressed after Microsoft Word displays the entry)
Switches case of selected text
Cuts selected text to the Spike
Creates an AutoText
entry from current selection
Inserts the contents of the Spike
F4
Repeats the last command or action (if possible)
Repeats last Find or Go To action
Closes the document window
Quits Microsoft Word
Closes the active window or dialog box
Quits Microsoft Word
F5
Displays the Go To dialog box
Moves to the last change
Restores the window size of the document window
Restores the program
window size
Edits a bookmark
F6
task pane and the program window
Switches to the next pane in a
document window that has been split
Switches to the previous pane in a document window that has been split
Switches to the next
document window when more than one document window is open
Moves from an open dialog box back to the document (for
dialog boxes that support this behavior)
Switches to the previous document window when more than
one document window is open
F7
Checks spelling
Opens Thesaurus
Moves the document window (when it isn�t maximized)
Finds the next misspelling or grammatical error
Updates linked
information in a Microsoft Word source document
F8
Turns on Extend mode
Extends a selection
Shrinks a selection
Resizes the document window (when it isn�t maximized)
Displays the Macros dialog box
Extends a selection or block (press an arrow key)
F9
Updates selected fields
Switches between displaying a field
code and its result
Inserts an empty field
Switches between all
field codes and their results
Unlinks a field
Runs GOTOBUTTON or
MACROBUTTON from the field that displays the field results
F10
Bar
Closes an open menu and submenu at the same time
Shortcut menu for the selected item
Displays a menu of
commands for the Help window when the Help window has active focus
Maximizes or restores the document window
Maximizes the program
window
Displays the menu or message for a smart tag (If more than one smart tag is
present, switches to the next smart tag and displays its menu or message)
F11
Goes to the next field
Goes to the previous field
Locks a field
Switches between
the Visual Basic Editor and the previous active window
Unlocks a field
Opens the Microsoft Script Editor
F12
Opens the Save As dialog box
Saves the active document
Opens the Open dialog box
Opens the Print dialog box
I’m not asking for «select All» texts in MS Word! neither using «CTRL» to select! or Even «Find». Ok?
My Question is : How Can I select all the words having e.g. «Home»
e.g.
I’m Going Home. I’m Coming Home. I love My Home.
I want to select all these «Home» and change their colors to RED (e.g.).
In My Case, The word I’ve been working on is repeated 1000 times. I can’t select them one by one!
If this is not Possible, Is there a word processor can solve my problem?
I Need Your Help! Thanks A lot
asked Nov 21, 2016 at 17:19
![]()

You can use find and replace all for that. Click the More > > button, which will then turn into less, and you can click on format which will allow you to adjust the font and its color then hit replace all.

answered Nov 21, 2016 at 17:23
![]()
NeoNeo
3,2897 gold badges35 silver badges44 bronze badges
2
You want «Find and Replace»: CTRL-H.
https://support.office.com/en-us/article/Find-and-replace-text-and-other-data-in-a-Word-document-c6728c16-469e-43cd-afe4-7708c6c779b7
«To search for text with specific formatting, type the text in the Find what box. To find formatting only, leave the box blank.
Click Format, and then select the formats that you want to find and replace. For example, to find highlighted text, click Format > Highlight; to find bold text, click Format > Font, and then in the Find Font dialog box, select Bold in the Font style list.
Click the Replace with box, click Format, and then select the replacement formats.
NOTE: If you also want to replace the text, type the replacement text in the Replace with box.
To find and replace each instance of the specified formatting, click Find Next, and then click Replace. To replace all instances of the specified formatting, click Replace All.»
answered Nov 21, 2016 at 17:23
![]()
meatspacemeatspace
85916 silver badges25 bronze badges
1