
In this Article
- Select Entire Rows or Columns
- Select Single Row
- Select Single Column
- Select Multiple Rows or Columns
- Select ActiveCell Row or Column
- Select Rows and Columns on Other Worksheets
- Is Selecting Rows and Columns Necessary?
- Methods and Properties of Rows & Columns
- Delete Entire Rows or Columns
- Insert Rows or Columns
- Copy & Paste Entire Rows or Columns
- Hide / Unhide Rows and Columns
- Group / UnGroup Rows and Columns
- Set Row Height or Column Width
- Autofit Row Height / Column Width
- Rows and Columns on Other Worksheets or Workbooks
- Get Active Row or Column
This tutorial will demonstrate how to select and work with entire rows or columns in VBA.
First we will cover how to select entire rows and columns, then we will demonstrate how to manipulate rows and columns.
Select Entire Rows or Columns
Select Single Row
You can select an entire row with the Rows Object like this:
Rows(5).SelectOr you can use EntireRow along with the Range or Cells Objects:
Range("B5").EntireRow.Selector
Cells(5,1).EntireRow.SelectYou can also use the Range Object to refer specifically to a Row:
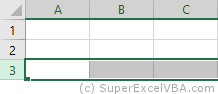
Range("5:5").SelectSelect Single Column
Instead of the Rows Object, use the Columns Object to select columns. Here you can reference the column number 3:
Columns(3).Selector letter “C”, surrounded by quotations:
Columns("C").SelectInstead of EntireRow, use EntireColumn along with the Range or Cells Objects to select entire columns:
Range("C5").EntireColumn.Selector
Cells(5,3).EntireColumn.SelectYou can also use the Range Object to refer specifically to a column:
Range("B:B").SelectSelect Multiple Rows or Columns
Selecting multiple rows or columns works exactly the same when using EntireRow or EntireColumn:
Range("B5:D10").EntireRow.Selector
Range("B5:B10").EntireColumn.SelectHowever, when you use the Rows or Columns Objects, you must enter the row numbers or column letters in quotations:
Rows("1:3").Selector
Columns("B:C").SelectSelect ActiveCell Row or Column
To select the ActiveCell Row or Column, you can use one of these lines of code:
ActiveCell.EntireRow.Selector
ActiveCell.EntireColumn.SelectSelect Rows and Columns on Other Worksheets
In order to select Rows or Columns on other worksheets, you must first select the worksheet.
Sheets("Sheet2").Select
Rows(3).Select
The same goes for when selecting rows or columns in other workbooks.
Workbooks("Book6.xlsm").Activate
Sheets("Sheet2").Select
Rows(3).Select
Note: You must Activate the desired workbook. Unlike the Sheets Object, the Workbook Object does not have a Select Method.
VBA Coding Made Easy
Stop searching for VBA code online. Learn more about AutoMacro — A VBA Code Builder that allows beginners to code procedures from scratch with minimal coding knowledge and with many time-saving features for all users!

Learn More
Is Selecting Rows and Columns Necessary?
However, it’s (almost?) never necessary to actually select Rows or Columns. You don’t need to select a Row or Column in order to interact with them. Instead, you can apply Methods or Properties directly to the Rows or Columns. The next several sections will demonstrate different Methods and Properties that can be applied.
You can use any method listed above to refer to Rows or Columns.
Methods and Properties of Rows & Columns
Delete Entire Rows or Columns
To delete rows or columns, use the Delete Method:
Rows("1:4").Deleteor:
Columns("A:D").DeleteVBA Programming | Code Generator does work for you!
Insert Rows or Columns
Use the Insert Method to insert rows or columns:
Rows("1:4").Insertor:
Columns("A:D").InsertCopy & Paste Entire Rows or Columns
Paste Into Existing Row or Column
When copying and pasting entire rows or columns you need to decide if you want to paste over an existing row / column or if you want to insert a new row / column to paste your data.
These first examples will copy and paste over an existing row or column:
Range("1:1").Copy Range("5:5")or
Range("C:C").Copy Range("E:E")Insert & Paste
These next examples will paste into a newly inserted row or column.
This will copy row 1 and insert it into row 5, shifting the existing rows down:
Range("1:1").Copy
Range("5:5").Insert
This will copy column C and insert it into column E, shifting the existing columns to the right:
Range("C:C").Copy
Range("E:E").Insert
Hide / Unhide Rows and Columns
To hide rows or columns set their Hidden Properties to True. Use False to hide the rows or columns:
'Hide Rows
Rows("2:3").EntireRow.Hidden = True

'Unhide Rows
Rows("2:3").EntireRow.Hidden = False
or
'Hide Columns
Columns("B:C").EntireColumn.Hidden = True

'Unhide Columns
Columns("B:C").EntireColumn.Hidden = False
Group / UnGroup Rows and Columns
If you want to Group rows (or columns) use code like this:
'Group Rows
Rows("3:5").Group

'Group Columns
Columns("C:D").Group
To remove the grouping use this code:
'Ungroup Rows
Rows("3:5").Ungroup

'Ungroup Columns
Columns("C:D").Ungroup
This will expand all “grouped” outline levels:
ActiveSheet.Outline.ShowLevels RowLevels:=8, ColumnLevels:=8and this will collapse all outline levels:
ActiveSheet.Outline.ShowLevels RowLevels:=1, ColumnLevels:=1Set Row Height or Column Width
To set the column width use this line of code:
Columns("A:E").ColumnWidth = 30To set the row height use this line of code:
Rows("1:1").RowHeight = 30AutoMacro | Ultimate VBA Add-in | Click for Free Trial!
Autofit Row Height / Column Width
To Autofit a column:
Columns("A:B").AutofitTo Autofit a row:
Rows("1:2").AutofitRows and Columns on Other Worksheets or Workbooks
To interact with rows and columns on other worksheets, you must define the Sheets Object:
Sheets("Sheet2").Rows(3).InsertSimilarly, to interact with rows and columns in other workbooks, you must also define the Workbook Object:
Workbooks("book1.xlsm").Sheets("Sheet2").Rows(3).InsertGet Active Row or Column
To get the active row or column, you can use the Row and Column Properties of the ActiveCell Object.
MsgBox ActiveCell.Rowor
MsgBox ActiveCell.ColumnThis also works with the Range Object:
MsgBox Range("B3").ColumnСодержание
- How to select cells/ranges by using Visual Basic procedures in Excel
- How to Select a Cell on the Active Worksheet
- How to Select a Cell on Another Worksheet in the Same Workbook
- How to Select a Cell on a Worksheet in a Different Workbook
- How to Select a Range of Cells on the Active Worksheet
- How to Select a Range of Cells on Another Worksheet in the Same Workbook
- How to Select a Range of Cells on a Worksheet in a Different Workbook
- How to Select a Named Range on the Active Worksheet
- How to Select a Named Range on Another Worksheet in the Same Workbook
- How to Select a Named Range on a Worksheet in a Different Workbook
- How to Select a Cell Relative to the Active Cell
- How to Select a Cell Relative to Another (Not the Active) Cell
- How to Select a Range of Cells Offset from a Specified Range
- How to Select a Specified Range and Resize the Selection
- How to Select a Specified Range, Offset It, and Then Resize It
- How to Select the Union of Two or More Specified Ranges
- How to Select the Intersection of Two or More Specified Ranges
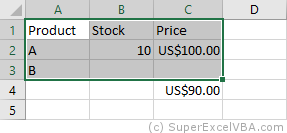
- How to Select the Last Cell of a Column of Contiguous Data
- How to Select the Blank Cell at Bottom of a Column of Contiguous Data
- How to Select an Entire Range of Contiguous Cells in a Column
- How to Select an Entire Range of Non-Contiguous Cells in a Column
- How to Select a Rectangular Range of Cells
- How to Select Multiple Non-Contiguous Columns of Varying Length
- Notes on the examples
- Свойство Range.Columns (Excel)
- Синтаксис
- Замечания
- Пример
- Поддержка и обратная связь
- VBA – Select (and work with) Entire Rows & Columns
- Select Entire Rows or Columns
- Select Single Row
- Select Single Column
- Select Multiple Rows or Columns
- Select ActiveCell Row or Column
- Select Rows and Columns on Other Worksheets
- VBA Coding Made Easy
- Is Selecting Rows and Columns Necessary?
- Methods and Properties of Rows & Columns
- Delete Entire Rows or Columns
- Insert Rows or Columns
- Copy & Paste Entire Rows or Columns
- Paste Into Existing Row or Column
- Insert & Paste
- Hide / Unhide Rows and Columns
- Group / UnGroup Rows and Columns
- Set Row Height or Column Width
- Autofit Row Height / Column Width
- Rows and Columns on Other Worksheets or Workbooks
- Get Active Row or Column
- VBA Code Examples Add-in
How to select cells/ranges by using Visual Basic procedures in Excel
Microsoft provides programming examples for illustration only, without warranty either expressed or implied. This includes, but is not limited to, the implied warranties of merchantability or fitness for a particular purpose. This article assumes that you are familiar with the programming language that is being demonstrated and with the tools that are used to create and to debug procedures. Microsoft support engineers can help explain the functionality of a particular procedure, but they will not modify these examples to provide added functionality or construct procedures to meet your specific requirements. The examples in this article use the Visual Basic methods listed in the following table.
The examples in this article use the properties in the following table.
How to Select a Cell on the Active Worksheet
To select cell D5 on the active worksheet, you can use either of the following examples:
How to Select a Cell on Another Worksheet in the Same Workbook
To select cell E6 on another worksheet in the same workbook, you can use either of the following examples:
Or, you can activate the worksheet, and then use method 1 above to select the cell:
How to Select a Cell on a Worksheet in a Different Workbook
To select cell F7 on a worksheet in a different workbook, you can use either of the following examples:
Or, you can activate the worksheet, and then use method 1 above to select the cell:
How to Select a Range of Cells on the Active Worksheet
To select the range C2:D10 on the active worksheet, you can use any of the following examples:
How to Select a Range of Cells on Another Worksheet in the Same Workbook
To select the range D3:E11 on another worksheet in the same workbook, you can use either of the following examples:
Or, you can activate the worksheet, and then use method 4 above to select the range:
How to Select a Range of Cells on a Worksheet in a Different Workbook
To select the range E4:F12 on a worksheet in a different workbook, you can use either of the following examples:
Or, you can activate the worksheet, and then use method 4 above to select the range:
How to Select a Named Range on the Active Worksheet
To select the named range «Test» on the active worksheet, you can use either of the following examples:
How to Select a Named Range on Another Worksheet in the Same Workbook
To select the named range «Test» on another worksheet in the same workbook, you can use the following example:
Or, you can activate the worksheet, and then use method 7 above to select the named range:
How to Select a Named Range on a Worksheet in a Different Workbook
To select the named range «Test» on a worksheet in a different workbook, you can use the following example:
Or, you can activate the worksheet, and then use method 7 above to select the named range:
How to Select a Cell Relative to the Active Cell
To select a cell that is five rows below and four columns to the left of the active cell, you can use the following example:
To select a cell that is two rows above and three columns to the right of the active cell, you can use the following example:
An error will occur if you try to select a cell that is «off the worksheet.» The first example shown above will return an error if the active cell is in columns A through D, since moving four columns to the left would take the active cell to an invalid cell address.
How to Select a Cell Relative to Another (Not the Active) Cell
To select a cell that is five rows below and four columns to the right of cell C7, you can use either of the following examples:
How to Select a Range of Cells Offset from a Specified Range
To select a range of cells that is the same size as the named range «Test» but that is shifted four rows down and three columns to the right, you can use the following example:
If the named range is on another (not the active) worksheet, activate that worksheet first, and then select the range using the following example:
How to Select a Specified Range and Resize the Selection
To select the named range «Database» and then extend the selection by five rows, you can use the following example:
How to Select a Specified Range, Offset It, and Then Resize It
To select a range four rows below and three columns to the right of the named range «Database» and include two rows and one column more than the named range, you can use the following example:
How to Select the Union of Two or More Specified Ranges
To select the union (that is, the combined area) of the two named ranges «Test» and «Sample,» you can use the following example:
that both ranges must be on the same worksheet for this example to work. Note also that the Union method does not work across sheets. For example, this line works fine.
returns the error message:
Union method of application class failed
How to Select the Intersection of Two or More Specified Ranges
To select the intersection of the two named ranges «Test» and «Sample,» you can use the following example:
Note that both ranges must be on the same worksheet for this example to work.
Examples 17-21 in this article refer to the following sample set of data. Each example states the range of cells in the sample data that would be selected.
How to Select the Last Cell of a Column of Contiguous Data
To select the last cell in a contiguous column, use the following example:
When this code is used with the sample table, cell A4 will be selected.
How to Select the Blank Cell at Bottom of a Column of Contiguous Data
To select the cell below a range of contiguous cells, use the following example:
When this code is used with the sample table, cell A5 will be selected.
How to Select an Entire Range of Contiguous Cells in a Column
To select a range of contiguous cells in a column, use one of the following examples:
When this code is used with the sample table, cells A1 through A4 will be selected.
How to Select an Entire Range of Non-Contiguous Cells in a Column
To select a range of cells that are non-contiguous, use one of the following examples:
When this code is used with the sample table, it will select cells A1 through A6.
How to Select a Rectangular Range of Cells
In order to select a rectangular range of cells around a cell, use the CurrentRegion method. The range selected by the CurrentRegion method is an area bounded by any combination of blank rows and blank columns. The following is an example of how to use the CurrentRegion method:
This code will select cells A1 through C4. Other examples to select the same range of cells are listed below:
In some instances, you may want to select cells A1 through C6. In this example, the CurrentRegion method will not work because of the blank line on Row 5. The following examples will select all of the cells:
How to Select Multiple Non-Contiguous Columns of Varying Length
To select multiple non-contiguous columns of varying length, use the following sample table and macro example:
When this code is used with the sample table, cells A1:A3 and C1:C6 will be selected.
Notes on the examples
The ActiveSheet property can usually be omitted, because it is implied if a specific sheet is not named. For example, instead of
The ActiveWorkbook property can also usually be omitted. Unless a specific workbook is named, the active workbook is implied.
When you use the Application.Goto method, if you want to use two Cells methods within the Range method when the specified range is on another (not the active) worksheet, you must include the Sheets object each time. For example:
For any item in quotation marks (for example, the named range «Test»), you can also use a variable whose value is a text string. For example, instead of
Источник
Свойство Range.Columns (Excel)
Возвращает объект Range , представляющий столбцы в указанном диапазоне.
Синтаксис
expression. Столбцы
выражение: переменная, представляющая объект Range.
Замечания
Чтобы вернуть один столбец, используйте свойство Item или аналогично включите индекс в круглые скобки. Например, и Selection.Columns(1) возвращают Selection.Columns.Item(1) первый столбец выделенного фрагмента.
При применении к объекту Range , который является выделенным с несколькими областями, это свойство возвращает столбцы только из первой области диапазона. Например, если объект Range имеет две области — A1:B2 и C3:D4, возвращает Selection.Columns.Count значение 2, а не 4. Чтобы использовать это свойство в диапазоне, который может содержать выбор из нескольких областей, проверьте Areas.Count , содержит ли диапазон несколько областей. Если это так, выполните цикл по каждой области в диапазоне.
Возвращаемый диапазон может находиться за пределами указанного диапазона. Например, Range(«A1:B2»).Columns(5).Select возвращает ячейки E1:E2.
Если буква используется в качестве индекса, она эквивалентна числу. Например, Range(«B1:C10»).Columns(«B»).Select возвращает ячейки C1:C10, а не ячейки B1:B10. В примере «B» эквивалентно 2.
Использование свойства Columns без квалификатора объекта эквивалентно использованию ActiveSheet.Columns . Дополнительные сведения см. в свойстве Worksheet.Columns .
Пример
В этом примере для каждой ячейки в столбце один в диапазоне с именем myRange задается значение 0 (ноль).
В этом примере отображается количество столбцов в выделенном фрагменте на листе Sheet1. Если выбрано несколько областей, в примере выполняется цикл по каждой области.
Поддержка и обратная связь
Есть вопросы или отзывы, касающиеся Office VBA или этой статьи? Руководство по другим способам получения поддержки и отправки отзывов см. в статье Поддержка Office VBA и обратная связь.
Источник
VBA – Select (and work with) Entire Rows & Columns
In this Article
This tutorial will demonstrate how to select and work with entire rows or columns in VBA.
First we will cover how to select entire rows and columns, then we will demonstrate how to manipulate rows and columns.
Select Entire Rows or Columns
Select Single Row
You can select an entire row with the Rows Object like this:
Or you can use EntireRow along with the Range or Cells Objects:
You can also use the Range Object to refer specifically to a Row:
Select Single Column
Instead of the Rows Object, use the Columns Object to select columns. Here you can reference the column number 3:
or letter “C”, surrounded by quotations:
Instead of EntireRow, use EntireColumn along with the Range or Cells Objects to select entire columns:
You can also use the Range Object to refer specifically to a column:
Select Multiple Rows or Columns
Selecting multiple rows or columns works exactly the same when using EntireRow or EntireColumn:
However, when you use the Rows or Columns Objects, you must enter the row numbers or column letters in quotations:
Select ActiveCell Row or Column
To select the ActiveCell Row or Column, you can use one of these lines of code:
Select Rows and Columns on Other Worksheets
In order to select Rows or Columns on other worksheets, you must first select the worksheet.
The same goes for when selecting rows or columns in other workbooks.
Note: You must Activate the desired workbook. Unlike the Sheets Object, the Workbook Object does not have a Select Method.
VBA Coding Made Easy
Stop searching for VBA code online. Learn more about AutoMacro — A VBA Code Builder that allows beginners to code procedures from scratch with minimal coding knowledge and with many time-saving features for all users!
Is Selecting Rows and Columns Necessary?
However, it’s (almost?) never necessary to actually select Rows or Columns. You don’t need to select a Row or Column in order to interact with them. Instead, you can apply Methods or Properties directly to the Rows or Columns. The next several sections will demonstrate different Methods and Properties that can be applied.
You can use any method listed above to refer to Rows or Columns.
Methods and Properties of Rows & Columns
Delete Entire Rows or Columns
To delete rows or columns, use the Delete Method:
Insert Rows or Columns
Use the Insert Method to insert rows or columns:
Copy & Paste Entire Rows or Columns
Paste Into Existing Row or Column
When copying and pasting entire rows or columns you need to decide if you want to paste over an existing row / column or if you want to insert a new row / column to paste your data.
These first examples will copy and paste over an existing row or column:
Insert & Paste
These next examples will paste into a newly inserted row or column.
This will copy row 1 and insert it into row 5, shifting the existing rows down:
This will copy column C and insert it into column E, shifting the existing columns to the right:
Hide / Unhide Rows and Columns
To hide rows or columns set their Hidden Properties to True. Use False to hide the rows or columns:
Group / UnGroup Rows and Columns
If you want to Group rows (or columns) use code like this:
To remove the grouping use this code:
This will expand all “grouped” outline levels:
and this will collapse all outline levels:
Set Row Height or Column Width
To set the column width use this line of code:
To set the row height use this line of code:
Autofit Row Height / Column Width
To Autofit a row:
Rows and Columns on Other Worksheets or Workbooks
To interact with rows and columns on other worksheets, you must define the Sheets Object:
Similarly, to interact with rows and columns in other workbooks, you must also define the Workbook Object:
Get Active Row or Column
To get the active row or column, you can use the Row and Column Properties of the ActiveCell Object.
This also works with the Range Object:

VBA Code Examples Add-in
Easily access all of the code examples found on our site.
Simply navigate to the menu, click, and the code will be inserted directly into your module. .xlam add-in.
Источник
VBA Select
It is very common to find the .Select methods in saved macro recorder code, next to a Range object.
.Select is used to select one or more elements of Excel (as can be done by using the mouse) allowing further manipulation of them.
Selecting cells with the mouse:
Selecting cells with VBA:
    'Range([cell1],[cell2])
    Range(Cells(1, 1), Cells(9, 5)).Select
    Range("A1", "E9").Select
    Range("A1:E9").Select
Each of the above lines select the range from «A1» to «E9».
VBA Select CurrentRegion
If a region is populated by data with no empty cells, an option for an automatic selection is the CurrentRegion property alongside the .Select method.
CurrentRegion.Select will select, starting from a Range, all the area populated with data.
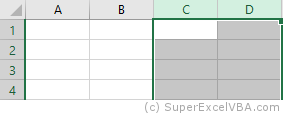
Range("A1").CurrentRegion.Select
Make sure there are no gaps between values, as CurrentRegion will map the region through adjoining cells (horizontal, vertical and diagonal).
Range("A1").CurrentRegion.SelectWith all the adjacent data

Not all adjacent data
«C4» is not selected because it is not immediately adjacent to any filled cells.
VBA ActiveCell
The ActiveCell property brings up the active cell of the worksheet.
In the case of a selection, it is the only cell that stays white.
A worksheet has only one active cell.
    Range("B2:C4").Select
    ActiveCell.Value = "Active"
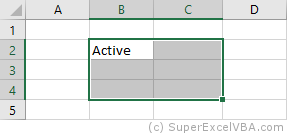
Usually the ActiveCell property is assigned to the first cell (top left) of a Range, although it can be different when the selection is made manually by the user (without macros).
The AtiveCell property can be used with other commands, such as Resize.
VBA Selection
After selecting the desired cells, we can use Selection to refer to it and thus make changes:
    Range("A1:D7").Select
    Selection = 7
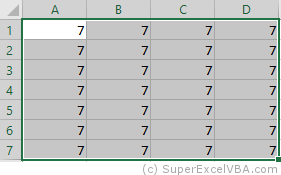
Selection also accepts methods and properties (which vary according to what was selected).
    Selection.ClearContents 'Deletes only the contents of the selection
    Selection.Interior.Color = RGB(255, 255, 0) 'Adds background color to the selection
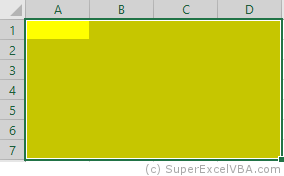
As in this case a cell range has been selected, the Selection will behave similarly to a Range. Therefore, Selection should also accept the .Interior.Color property.
RGB (Red Green Blue) is a color system used in a number of applications and languages. The input values for each color, in the example case, ranges from 0 to 255.
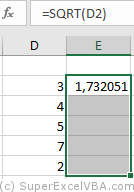
Selection FillDown
If there is a need to replicate a formula to an entire selection, you can use the .FillDown method
Selection.FillDown
Before the FillDown
After the FillDown
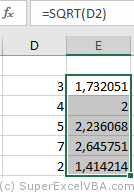
.FillDown is a method applicable to Range. Since the Selection was done in a range of cells (equivalent to a Range), the method will be accepted.
.FillDown replicates the Range/Selection formula of the first line, regardless of which ActiveCell is selected.
.FillDown can be used at intervals greater than one column (E.g. Range(«B1:C2»).FillDown will replicate the formulas of B1 and C1 to B2 and C2 respectively).
VBA EntireRow and EntireColumn
You can select one or multiple rows or columns with VBA.
    Range("B2").EntireRow.Select
    Range("C3:D3").EntireColumn.Select
The selection will always refer to the last command executed with Select.
To insert a row use the Insert method.
    Range("A7").EntireRow.Insert
    'In this case, the content of the seventh row will be shifted downward
To delete a row use the Delete method.
    Range("A7").EntireRow.Delete
    'In this case, the content of the eighth row will be moved to the seventh
VBA Rows and Columns
Just like with the EntireRow and EntireColumn property, you can use Rows and Columns to select a row or column.
    Columns(5).Select
    Rows(3).Select
To hide rows:
Range("A1:C3").Rows.Hidden = True
In the above example, rows 1 to 3 of the worksheet were hidden.
VBA Row and Column
Row and Column are properties that are often used to obtain the numerical address of the first row or first column of a selection or a specific cell.
    Range("A3:H30").Row 'Referring to the row; returns 3
    Range("B3").Column  'Referring to the column; returns 2
The results of Row and Column are often used in loops or resizing.
Consolidating Your Learning
Suggested Exercise
SuperExcelVBA.com is learning website. Examples might be simplified to improve reading and basic understanding. Tutorials, references, and examples are constantly reviewed to avoid errors, but we cannot warrant full correctness of all content. All Rights Reserved.
Excel ® is a registered trademark of the Microsoft Corporation.
© 2023 SuperExcelVBA | ABOUT
![]()
This example teaches you how to select entire rows and columns in Excel VBA. Are you ready?
Place a command button on your worksheet and add the following code lines:
1. The following code line selects the entire sheet.
Cells.Select

Note: because we placed our command button on the first worksheet, this code line selects the entire first sheet. To select cells on another worksheet, you have to activate this sheet first. For example, the following code lines select the entire second worksheet.
Worksheets(2).Activate
Worksheets(2).Cells.Select
2. The following code line selects the second column.
Columns(2).Select

3. The following code line selects the seventh row.
Rows(7).Select

4. To select multiple rows, add a code line like this:
Rows(«5:7»).Select

5. To select multiple columns, add a code line like this:
Columns(«B:E»).Select

6. Be careful not to mix up the Rows and Columns properties with the Row and Column properties. The Rows and Columns properties return a Range object. The Row and Column properties return a single value.
Code line:
MsgBox Cells(5, 2).Row
Result:

7. Select cell D6. The following code line selects the entire row of the active cell.
ActiveCell.EntireRow.Select

Note: border for illustration only.
8. Select cell D6. The following code line enters the value 2 into the first cell of the column that contains the active cell.
ActiveCell.EntireColumn.Cells(1).Value = 2

Note: border for illustration only.
9. Select cell D6. The following code line enters the value 3 into the first cell of the row below the row that contains the active cell.
ActiveCell.EntireRow.Offset(1, 0).Cells(1).Value = 3

Note: border for illustration only.
Tables are one of the most powerful features of Excel. Controlling them using VBA provides a way to automate that power, which generates a double benefit 🙂
Excel likes to store data within tables. The basic structural rules, such as (a) headings must be unique (b) only one header row allowed, make tables compatible with more complex tools. For example, Power Query, Power Pivot, and SharePoint lists all use tables as either a source or an output. Therefore, it is clearly Microsoft’s intention that we use tables.
However, the biggest benefit to the everyday Excel user is much simpler; if we add new data to the bottom of a table, any formulas referencing the table will automatically expand to include the new data.
Whether you love tables as much as I do or not, this post will help you automate them with VBA.
Tables, as we know them today, first appeared in Excel 2007. This was a replacement for the Lists functionality found in Excel 2003. From a VBA perspective, the document object model (DOM) did not change with the upgraded functionality. So, while we use the term ‘tables’ in Excel, they are still referred to as ListObjects within VBA.
Download the example file
I recommend you download the example file for this post. Then you’ll be able to work along with examples and see the solution in action, plus the file will be useful for future reference.
![]()
Download the file: 0009 VBA tables and ListObjects.zip
Structure of a table
Before we get deep into any VBA code, it’s useful to understand how tables are structured.
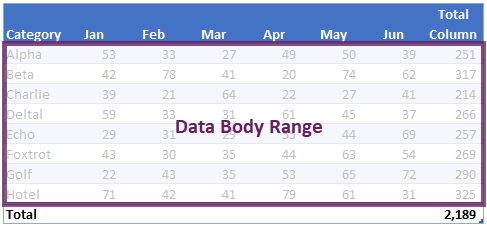
Range & Data Body Range
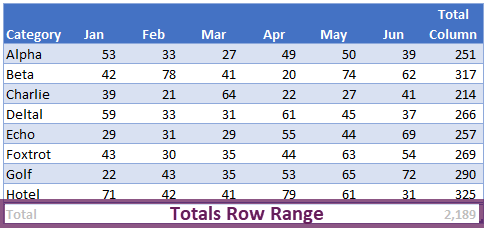
The range is the whole area of the table.
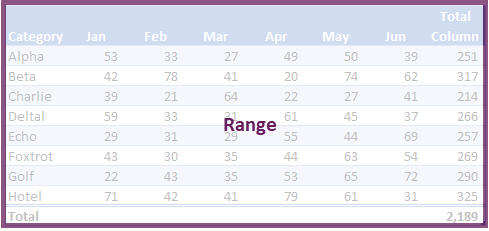
The data body range only includes the rows of data, it excludes the header and totals.
Header and total rows
The header row range is the top row of the table containing the column headers.
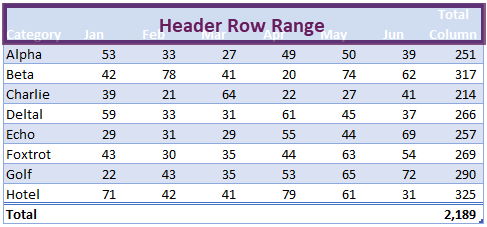
The totals row range, if displayed, includes calculations at the bottom of the table.
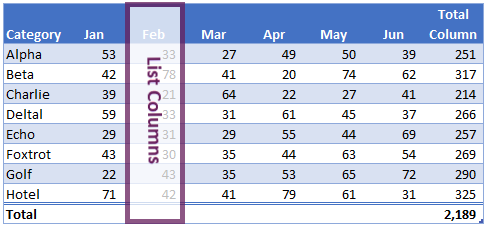
List columns and list rows
The individual columns are known as list columns.
Each row is known as a list row.

The VBA code in this post details how to manage all these table objects.
Referencing the parts of a table
While you may be tempted to skip this section, I recommend you read it in full and work through the examples. Understanding Excel’s document object model is the key to reading and writing VBA code. Master this, and your ability to write your own VBA code will be much higher.
Many of the examples in this first section use the select method, this is to illustrate how to reference parts of the table. In reality, you would rarely use the select method.
Select the entire table
The following macro will select the whole table, including the totals and header rows.
Sub SelectTable()

ActiveSheet.ListObjects("myTable").Range.Select

End Sub
Select the data within a table
The DataBodyRange excludes the header and totals sections of the table.
Sub SelectTableData()

ActiveSheet.ListObjects("myTable").DataBodyRange.Select

End Sub
Get a value from an individual cell within a table
The following macro retrieves the table value from row 2, column 4, and displays it in a message box.
Sub GetValueFromTable()

MsgBox ActiveSheet.ListObjects("myTable").DataBodyRange(2, 4).value

End Sub
Select an entire column
The macro below shows how to select a column by its position, or by its name.
Sub SelectAnEntireColumn()

'Select column based on position
ActiveSheet.ListObjects("myTable").ListColumns(2).Range.Select

'Select column based on name
ActiveSheet.ListObjects("myTable").ListColumns("Category").Range.Select

End Sub
Select a column (data only)
This is similar to the macro above, but it uses the DataBodyRange to only select the data; it excludes the headers and totals.
Sub SelectColumnData()

'Select column data based on position
ActiveSheet.ListObjects("myTable").ListColumns(4).DataBodyRange.Select

'Select column data based on name
ActiveSheet.ListObjects("myTable").ListColumns("Category").DataBodyRange.Select

End Sub
Select a specific column header
This macro shows how to select the column header cell of the 5th column.
Sub SelectCellInHeader()

ActiveSheet.ListObjects("myTable").HeaderRowRange(5).Select

End Sub
Select a specific column within the totals section
This example demonstrates how to select the cell in the totals row of the 3rd column.
Sub SelectCellInTotal()

ActiveSheet.ListObjects("myTable").TotalsRowRange(3).Select

End Sub
Select an entire row of data
The macro below selects the 3rd row of data from the table.
NOTE – The header row is not included as a ListRow. Therefore, ListRows(3) is the 3rd row within the DataBodyRange, and not the 3rd row from the top of the table.
Sub SelectRowOfData()

ActiveSheet.ListObjects("myTable").ListRows(3).Range.Select

End Sub
Select the header row
The following macro selects the header section of the table.
Sub SelectHeaderSection()

ActiveSheet.ListObjects("myTable").HeaderRowRange.Select

End Sub
Select the totals row
To select the totals row of the table, use the following code.
Sub SelectTotalsSection()

ActiveSheet.ListObjects("myTable").TotalsRowRange.Select

End Sub
OK, now we know how to reference the parts of a table, it’s time to get into some more interesting examples.
Creating and converting tables
This section of macros focuses on creating and resizing tables.
Convert selection to a table
The macro below creates a table based on the currently selected region and names it as myTable. The range is referenced as Selection.CurrentRegion, but this can be substituted for any range object.
If you’re working along with the example file, this macro will trigger an error, as a table called myTable already exists in the workbook. A new table will still be created with a default name, but the VBA code will error at the renaming step.
Sub ConvertRangeToTable()

tableName As String
Dim tableRange As Range

Set tableName = "myTable"
Set tableRange = Selection.CurrentRegion
ActiveSheet.ListObjects.Add(SourceType:=xlSrcRange, _
    Source:=tableRange, _
    xlListObjectHasHeaders:=xlYes _
    ).Name = tableName

End Sub
Convert a table back to a range
This macro will convert a table back to a standard range.
Sub ConvertTableToRange()

ActiveSheet.ListObjects("myTable").Unlist

End Sub
NOTE – Unfortunately, when converting a table to a standard range, the table formatting is not removed. Therefore, the cells may still look like a table, even when they are not – that’s frustrating!!!
Resize the range of the table
To following macro resizes a table to cell A1 – J100.
Sub ResizeTableRange()

ActiveSheet.ListObjects("myTable").Resize Range("$A$1:$J$100")

End Sub
Table styles
There are many table formatting options, the most common of which are shown below.
Change the table style
Change the style of a table to an existing pre-defined style.
Sub ChangeTableStyle()

ActiveSheet.ListObjects("myTable").TableStyle = "TableStyleLight15"

End Sub
To apply different table styles, the easiest method is to use the macro recorder. The recorded VBA code will include the name of any styles you select.
Get the table style name
Use the following macro to get the name of the style already applied to a table.
Sub GetTableStyleName()

MsgBox ActiveSheet.ListObjects("myTable").TableStyle

End Sub
Apply a style to the first or last column
The first and last columns of a table can be formatted differently using the following macros.
Sub ColumnStyles()

'Apply special style to first column
ActiveSheet.ListObjects("myTable").ShowTableStyleFirstColumn = True

'Apply special style to last column
ActiveSheet.ListObjects("myTable").ShowTableStyleLastColumn = True

End Sub
Adding or removing stripes
By default, tables have banded rows, but there are other options for this, such as removing row banding or adding column banding.
Sub ChangeStripes()

'Apply column stripes
ActiveSheet.ListObjects("myTable").ShowTableStyleColumnStripes = True

'Remove row stripes
ActiveSheet.ListObjects("myTable").ShowTableStyleRowStripes = False

End Sub
Set the default table style
The following macro sets the default table style.
Sub SetDefaultTableStyle()

'Set default table style
ActiveWorkbook.DefaultTableStyle = "TableStyleMedium2"

End Sub
Looping through tables
The macros in this section loop through all the tables on the worksheet or workbook.
Loop through all tables on a worksheet
If we want to run a macro on every table of a worksheet, we must loop through the ListObjects collection.
Sub LoopThroughAllTablesWorksheet()

'Create variables to hold the worksheet and the table
Dim ws As Worksheet
Dim tbl As ListObject

Set ws = ActiveSheet
'Loop through each table in worksheet
For Each tbl In ws.ListObjects

    'Do something to the Table....

Next tbl

End Sub
In the code above, we have set the table to a variable, so we must refer to the table in the right way. In the section labeled ‘Do something to the table…, insert the action to be undertaken on each table, using tbl to reference the table.
For example, the following will change the table style of every table.
tbl.TableStyle = "TableStyleLight15"
Loop through all tables in a workbook
Rather than looping through a single worksheet, as shown above, the macro below loops through every table on every worksheet.
Sub LoopThroughAllTablesWorkbook()

'Create variables to hold the worksheet and the table
Dim ws As Worksheet
Dim tbl As ListObject

'Loop through each worksheet
For Each ws In ActiveWorkbook.Worksheets

    'Loop through each table in worksheet
    For Each tbl In ws.ListObjects

        'Do something to the Table....

    Next tbl

Next ws

End Sub
As noted in the section above, we must refer to the table using its variable. For example, the following will display the totals row for every table.
tbl.ShowTotals = True
Adding & removing rows and columns
The following macros add and remove rows, headers, and totals from a table.
Add columns into a table
The following macro adds a column to a table.
Sub AddColumnToTable()

'Add column at the end
ActiveSheet.ListObjects("myTable").ListColumns.Add

'Add column at position 2
ActiveSheet.ListObjects("myTable").ListColumns.Add Position:=2
End Sub
Add rows to the bottom of a table
The next macro will add a row to the bottom of a table
Sub AddRowsToTable()

'Add row at bottom
ActiveSheet.ListObjects("myTable").ListRows.Add

'Add row at the first row
ActiveSheet.ListObjects("myTable").ListRows.Add Position:=1
End Sub
Delete columns from a table
To delete a column, it is necessary to use either the column index number or the column header.
Sub DeleteColumnsFromTable()

'Delete column 2
ActiveSheet.ListObjects("myTable").ListColumns(2).Delete

'Delete a column by name
ActiveSheet.ListObjects("myTable").ListColumns("Feb").Delete
End Sub
Delete rows from a table
In the table structure, rows do not have names, and therefore can only be deleted by referring to the row number.
Sub DeleteRowsFromTable()

'Delete row 2
ActiveSheet.ListObjects("myTable").ListRows(2).Delete

'Delete multiple rows
ActiveSheet.ListObjects("myTable").Range.Rows("4:6").Delete
End Sub
Add total row to a table
The total row at the bottom of a table can be used for calculations.
Sub AddTotalRowToTable()

'Display total row with value in last column
ActiveSheet.ListObjects("myTable").ShowTotals = True

'Change the total for the "Total Column" to an average
ActiveSheet.ListObjects("myTable").ListColumns("TotalColumn").TotalsCalculation = _
    xlTotalsCalculationAverage

'Totals can be added by position, rather than name
ActiveSheet.ListObjects("myTable").ListColumns(2).TotalsCalculation = _
    xlTotalsCalculationAverage
End Sub
Types of totals calculation
xlTotalsCalculationNone
xlTotalsCalculationAverage
xlTotalsCalculationCount
xlTotalsCalculationCountNums
xlTotalsCalculationMax
xlTotalsCalculationMin
xlTotalsCalculationSum
xlTotalsCalculationStdDev
xlTotalsCalculationVar
Table header visability
Table headers can be turned on or off. The following will hide the headers.
Sub ChangeTableHeader()

ActiveSheet.ListObjects("myTable").ShowHeaders = False

End Sub
Remove auto filter
The auto filter can be hidden. Please note, the table header must be visible for this code to work.
Sub RemoveAutoFilter()

ActiveSheet.ListObjects("myTable").ShowAutoFilterDropDown = False

End Sub
I have a separate post about controlling auto filter settings – check it out here. Most of that post applies to tables too.
Other range techniques
Other existing VBA techniques for managing ranges can also be applied to tables.
Using the union operator
To select multiple ranges, we can use VBA’s union operator. Here is an example, it will select rows 4, 1, and 3.
Sub SelectMultipleRangesUnionOperator()

Union(ActiveSheet.ListObjects("myTable").ListRows(4).Range, _
    ActiveSheet.ListObjects("myTable").ListRows(1).Range, _
    ActiveSheet.ListObjects("myTable").ListRows(3).Range).Select

End Sub
Assign values from a variant array to a table row
To assign values to an entire row from a variant array, use code similar to the following:
Sub AssignValueToTableFromArray()

'Assing values to array (for illustration)
Dim myArray As Variant
myArray = Range("A2:D2")

'Assign values in array to the table
ActiveSheet.ListObjects("myTable").ListRows(2).Range.Value = myArray

End Sub
Reference parts of a table using the range object
Within VBA, a table can be referenced as if it were a standard range object.
Sub SelectTablePartsAsRange()

ActiveSheet.Range("myTable[Category]").Select

End Sub
Counting rows and columns
Often, it is useful to count the number of rows or columns. This is a good method to reference rows or columns which have been added.
Counting rows
To count the number of rows within the table, use the following macro.
Sub CountNumberOfRows()

Msgbox ActiveSheet.ListObjects("myTable").ListRows.Count

End Sub
Counting columns
The following macro will count the number of columns within the table.
Sub CountNumberOfColumns()

Msgbox ActiveSheet.ListObjects("myTable").ListColumns.Count

End Sub
Useful table techniques
The following are some other useful VBA codes for controlling tables.
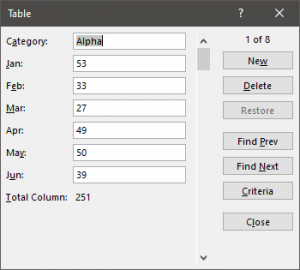
Show the table data entry form
If a table starts at cell A1, there is a simple data entry form that can be displayed.
Sub ShowDataEntryForm()

'Only works if Table starts at Cell A1
ActiveSheet.ShowDataForm

End Sub
The following screenshot shows the data form for the example table.
Check if a table exists
The following macro checks if a table already exists within a workbook. Change the tblName variable to adapt this to your requirements.
Sub CheckIfTableExists()

'Create variables to hold the worksheet and the table
Dim ws As Worksheet
Dim tbl As ListObject
Dim tblName As String
Dim tblExists As Boolean

tblName = "myTable"

'Loop through eac worksheet
For Each ws In ActiveWorkbook.Worksheets

    'Loop through each table in worksheet
    For Each tbl In ws.ListObjects

        If tbl.Name = tblName Then

            tblExists = True

        End If

    Next tbl

Next ws

If tblExists = True Then

    MsgBox "Table " & tblName & " exists."

Else

    MsgBox "Table " & tblName & " does not exists."

End If

End Sub
Find out if a table has been selected, if so which
The following macros find the name of the selected table.
Method 1
As you will see in the comments Jon Peltier had an easy approach to this, which has now become my preferred approach.
Sub SimulateActiveTable()

Dim ActiveTable As ListObject

On Error Resume Next
Set ActiveTable = ActiveCell.ListObject
On Error GoTo 0

'Confirm if a cell is in a Table
If ActiveTable Is Nothing Then
    MsgBox "Select table and try again"
Else
    MsgBox "The active cell is in a Table called: " & ActiveTable.Name
End If

End Sub
Method 2
This option, which was my original method, loops through each table on the worksheet and checks if they intersect with the active cell.
Sub SimulateActiveTable_Method2()

Dim ActiveTable As ListObject
Dim tbl As ListObject

'Loop through each table, check if table intersects with active cell
For Each tbl In ActiveSheet.ListObjects

    If Not Intersect(ActiveCell, tbl.Range) Is Nothing Then

        Set ActiveTable = tbl
        MsgBox "The active cell is in a Table called: " & ActiveTable.Name

    End If

Next tbl

'If no intersection then no tabl selected
If ActiveTable Is Nothing Then

    MsgBox "Select an Excel table and try again"

End If

End Sub
Conclusion
Wow! That was a lot of code examples.
There are over 30 VBA macros above, and even this does not cover everything, but hopefully covers 99% of your requirements. For your remaining requirements, you could try Microsoft’s VBA object reference library (https://docs.microsoft.com/en-us/office/vba/api/Excel.ListObject)

About the author
Hey, I’m Mark, and I run Excel Off The Grid.
My parents tell me that at the age of 7 I declared I was going to become a qualified accountant. I was either psychic or had no imagination, as that is exactly what happened. However, it wasn’t until I was 35 that my journey really began.
In 2015, I started a new job, for which I was regularly working after 10pm. As a result, I rarely saw my children during the week. So, I started searching for the secrets to automating Excel. I discovered that by building a small number of simple tools, I could combine them together in different ways to automate nearly all my regular tasks. This meant I could work less hours (and I got pay raises!). Today, I teach these techniques to other professionals in our training program so they too can spend less time at work (and more time with their children and doing the things they love).
Do you need help adapting this post to your needs?
I’m guessing the examples in this post don’t exactly match your situation. We all use Excel differently, so it’s impossible to write a post that will meet everybody’s needs. By taking the time to understand the techniques and principles in this post (and elsewhere on this site), you should be able to adapt it to your needs.
But, if you’re still struggling you should:
- Read other blogs, or watch YouTube videos on the same topic. You will benefit much more by discovering your own solutions.
- Ask the ‘Excel Ninja’ in your office. It’s amazing what things other people know.
- Ask a question in a forum like Mr Excel, or the Microsoft Answers Community. Remember, the people on these forums are generally giving their time for free. So take care to craft your question, make sure it’s clear and concise. List all the things you’ve tried, and provide screenshots, code segments and example workbooks.
- Use Excel Rescue, who are my consultancy partner. They help by providing solutions to smaller Excel problems.
What next?
Don’t go yet, there is plenty more to learn on Excel Off The Grid. Check out the latest posts:
VBA – Select (and work with) Entire Rows & Columns
- Select Entire Rows or Columns. Select Single Row. Select Single Column. Select Multiple Rows or Columns.
- Methods and Properties of Rows & Columns. Delete Entire Rows or Columns. Insert Rows or Columns.
- Rows and Columns on Other Worksheets or Workbooks.
- Get Active Row or Column.
How do I use InputBox in Excel VBA?
The InputBox function prompts the users to enter values. After entering the values, if the user clicks the OK button or presses ENTER on the keyboard, the InputBox function will return the text in the text box. If the user clicks the Cancel button, the function will return an empty string (“”).
How do I transpose multiple rows to columns in Excel?
Transpose data from rows to columns (or vice versa) in Excel for…
- Select the range of data you want to rearrange, including any row or column labels, and either select Copy.
- Select the first cell where you want to paste the data, and on the Home tab, click the arrow next to Paste, and then click Transpose.
- After rotating the data successfully, you can delete the original data.
How do I transpose every 6 rows in Excel?
1 Answer
- Type the following formula in cell D1 =INDEX($A:$A,ROW(A1)*6-6+COLUMN(A1))
- Now drag this formula up till cell I1.
- Now while the range D1:I1 is selected, drag it down till the time all your data is covered.
How do you transpose every nth row?
How do I transpose every N rows from one column to multiple columns in Excel. You need to type this formula into cell C1, and press Enter key on your keyboard, and then drag the AutoFill Handle to CEll D1. Then you need to drag the AutoFill Handle in cell D1 down to other cells until value 0 is displayed in cells.
What is an easy way to transpose a long list of numbers?
Here are the steps to transpose it:
- Select the cells where you want to transpose the dataset. Note that you need to select the exact number of cells as the original data.
- Enter =TRANSPOSE(A1:E5) in the active cell (which should be the top left cell of the selection and press Control Shift Enter.
How do I fix transpose in Excel?
To do this:
- Select a range of empty cells in the worksheet. Always remember that the number of blank cells you select should be equal to the number of cells you are trying to copy.
- This is an array formula and needs to be entered with CTRL+SHIFT+ENTER. Excel will automatically wrap the formula in braces {}.
What is the shortcut key for transpose in Excel?
Here’s how: Select the table that you want to transpose, and press Ctrl + C to copy it. Select the upper-left cell of the range where you want to paste the transposed data. Press the paste special transpose shortcut: Ctrl + Alt + V, then E.
How do I enable transpose in Excel?
TRANSPOSE function
- Step 1: Select blank cells. First select some blank cells.
- Step 2: Type =TRANSPOSE( With those blank cells still selected, type: =TRANSPOSE(
- Step 3: Type the range of the original cells. Now type the range of the cells you want to transpose.
- Step 4: Finally, press CTRL+SHIFT+ENTER.
How do you swap rows in Excel?
Select the data you want to swap. Press and hold the “Shift” key on your keyboard. Hover your mouse over the border between the two adjacent rows until it turns into a cross-arrow icon. Click and hold your mouse and “Shift” until you see a gray line appear under the row you want to switch the data with.
How do you swap rows?
Move Rows in Excel
- Select the row that you want to move.
- Hold the Shift Key from your keyboard.
- Move your cursor to the edge of the selection.
- Click on the edge (with left mouse button) while still holding the shift key.
- Move it to the row where you want this row to be shifted.
How do you swap columns and rows in Excel?
Transpose (rotate) data from rows to columns or vice versa
- Select the range of data you want to rearrange, including any row or column labels, and press Ctrl+C.
- Choose a new location in the worksheet where you want to paste the transposed table, ensuring that there is plenty of room to paste your data.
Can you make columns rows in Excel?
Just use Excel’s Transpose feature. Click the down arrow under the “Paste” button, and then click the “Transpose” button on the dropdown menu. Just like that, your rows become columns and your columns become rows—complete with any formatting you’d already applied to the original selection.
How many rows from 2007 does excel allow?
1,048,576 rows
How do I resize a column?
Select the column or columns that you want to change. On the Home tab, in the Cells group, click Format. Under Cell Size, click Column Width. In the Column width box, type the value that you want.
How do you automatically adjust the width of a column to fit the size of the longest entry?
AutoFit Column Width to Text
- Identify the column you wish to resize.
- Hover your mouse on the right boundary of the topmost cell of that column so that you see a cross or T shape. (
- Double-click on that right boundary.
- The column will automatically resize to fit the longest string of text in that column.
What are the two ways to resize column and rows?
You can manually adjust the column width or row height or automatically resize columns and rows to fit the data….Resize columns
- Select a column or a range of columns.
- On the Home tab, in the Cells group, select Format > Column Width.
- Type the column width and select OK.

This macro selects the column with the active cell.
Excel
- 6236
- 1216
- 0
- 0
1 Open MS Excel.
2 Create a blank workbook.
3 Go to Developer’s tab > click on «Visual Basic» button or hit Alt + F11.
4 Go to Insert tab > click on «Module» or hit M.
5 Copy the VBA code from below.
6 Paste the code in the newly created module.
7 Go to Run tab > click on «Run Sub/UserForm» or hit F5.
8 That’s it!
![]()
Advertisement
Code
'==========================================
' Select Active Column
'==========================================
Sub selectActiveColumn()
    Columns(ActiveCell.Column).Select
End Sub
![]()
Advertisement
Comments
![]()
Advertisement
![]()
Advertisement
![]()
VBAmacros.net
Code was successfully copied!
![]()
VBAmacros.net
Link was successfully copied!
![]()
VBAmacros.net
Please sign in!
![]()
VBAmacros.net
You’ve already voted!