
In Word, you can select all text in a document (Ctrl+A), or select specific text or items in a table by using the mouse or keyboard. You can also select text or items that are in different places. For example, you can select a paragraph on one page and a sentence on a different page.
Select all text
-
Click anywhere within the document.
-
Press Ctrl+A on your keyboard to select all text in the document.
Select specific text
You can also select a specific word, line of text, or one or more paragraphs.
-
Place your cursor in front of the first letter of the word, sentence, or paragraphs you want to select.
-
Click and hold while you drag your cursor to select the text you want.
Other ways to select text
-
To select a single word, quickly double-click that word.
-
To select a line of text, place your cursor at the start of the line, and press Shift + down arrow.
-
To select a paragraph, place your cursor at the start of the paragraph, and press Ctrl + Shift + down arrow.
Select text by using the mouse
Select text in the body of a document
Notes: To select an entire document, do one of the following:
-
On the Home tab, in the Editing group, click Select, and then click Select All.
-
Move the pointer to the left of any text until it turns into a right-pointing arrow, and then triple-click.
|
To select |
Do this |
|---|---|
|
Any amount of text |
Click where you want to begin the selection, hold down the left mouse button, and then drag the pointer over the text that you want to select. |
|
A word |
Double-click anywhere in the word. |
|
A line of text |
Move the pointer to the left of the line until it changes to a right-pointing arrow, and then click. |
|
A sentence |
Hold down CTRL, and then click anywhere in the sentence. |
|
A paragraph |
Triple-click anywhere in the paragraph. |
|
Multiple paragraphs |
Move the pointer to the left of the first paragraph until it changes to a right-pointing arrow, and then press and hold down the left mouse button while you drag the pointer up or down. |
|
A large block of text |
Click at the start of the selection, scroll to the end of the selection, and then hold down SHIFT while you click where you want the selection to end. |
|
An entire document |
Move the pointer to the left of any text until it changes to a right-pointing arrow, and then triple-click. |
|
Headers and footers |
In Print Layout view, double-click the dimmed header or footer text. Move the pointer to the left of the header or footer until it changes to a right-pointing arrow, and then click. |
|
Footnotes and endnotes |
Click the footnote or endnote text, move the pointer to the left of the text until it changes to a right-pointing arrow, and then click. |
|
A vertical block of text |
Hold down ALT while you drag the pointer over the text. |
|
A text box or frame |
Move the pointer over the border of the frame or text box until the pointer becomes a four-headed arrow, and then click. |
Select items in a table
|
To select |
Do this |
|---|---|
|
The contents of a cell |
Click in the cell. Under Table Tools, click the Layout tab. In the Table group, click Select, and then click Select Cell. |
|
The contents of a row |
Click in the row. Under Table Tools, click the Layout tab. In the Table group, click Select, and then click Select Row. |
|
The contents of a column |
Click in the column. Under Table Tools, click the Layout tab. In the Table group, click Select, and then click Select Column. |
|
The contents of multiple cells, rows, or columns |
Click in a cell, a row, or a column and then hold the left mouse button down while you drag across all the cells, rows, or columns that contain the content that you want to select. To select the contents of cells, rows, or columns that are not next to each other, click in the first cell, row, or column, press CTRL, and then click the additional cells, rows, or columns that contain the content that you want to select. |
|
The contents of an entire table |
Click in the table. Under Table Tools, click the Layout tab. In the Table group, click Select, and then click Select Table. |
Select text in different places
You can select text or items in a table that are not next to each other. For example, you can select a paragraph on one page and a sentence on a different page.
-
Select some text or an item in a table.
-
Hold down CTRL while you select any additional text or item in a table that you want.
Select text in Outline view
To view your document in Outline view, click the View tab, and then click Outline in the Document Views group.
|
To select |
Move the pointer to |
|---|---|
|
A heading |
The left of the heading until it changes to a right-pointing arrow, and then click. |
|
A heading, its subheading, and body text |
The left of the heading until it changes to a right-pointing arrow, and then double-click. |
|
A paragraph of body text |
The left of the paragraph until it changes to a right-pointing arrow, and then click. |
|
Multiple headings or paragraphs of body text |
The left of the text until it changes to a right-pointing arrow, and then drag up or down. |
Notes:
-
In Outline view, clicking once to the left of a paragraph selects the entire paragraph instead of a single line.
-
If you select a heading that includes collapsed subordinate text, the collapsed text is also selected (even though it is not visible). Any changes that you make to the heading — such as moving, copying, or deleting it — also affect the collapsed text.
Select text by using the keyboard
Select text in the body of a document
Note: To select an entire document, press CTRL+A.
|
To select |
Do this |
|---|---|
|
One character to the right |
Press SHIFT+RIGHT ARROW. |
|
One character to the left |
Press SHIFT+LEFT ARROW. |
|
A word from its beginning to its end |
Place the insertion point at the beginning of the word, and then press CTRL+SHIFT+RIGHT ARROW. |
|
A word from its end to its beginning |
Move the pointer to the end of the word, and then press CTRL+SHIFT+LEFT ARROW. |
|
A line from its beginning to its end |
Press HOME, and then press SHIFT+END. |
|
A line from its end to its beginning |
Press END, and then press SHIFT+HOME. |
|
One line down |
Press END, and then press SHIFT+DOWN ARROW. |
|
One line up |
Press HOME, and then press SHIFT+UP ARROW. |
|
A paragraph from its beginning to its end |
Move the pointer to the beginning of the paragraph, and then press CTRL+SHIFT+DOWN ARROW. |
|
A paragraph from its end to its beginning |
Move the pointer to the end of the paragraph, and then press CTRL+SHIFT+UP ARROW. |
|
A document from its end to its beginning |
Move the pointer to the end of the document, and then press CTRL+SHIFT+HOME. |
|
A document from its beginning to its end |
Move the pointer to the beginning of the document, and then press CTRL+SHIFT+END. |
|
From the beginning of a window to its end |
Move the pointer to the beginning of the window, and then press ALT+CTRL+SHIFT+PAGE DOWN. |
|
The entire document |
Press CTRL+A. |
|
A vertical block of text |
Press CTRL+SHIFT+F8, and then use the arrow keys. Press ESC to turn off the selection mode. |
|
The nearest character |
Press F8 to turn on selection mode, and then press LEFT ARROW or RIGHT ARROW; press ESC to turn off the selection mode. |
|
A word, a sentence, a paragraph, or a document |
Press F8 to turn on selection mode, and then press F8 once to select a word, twice to select a sentence, three times to select a paragraph, or four times to select the document. Press ESC to turn off the selection mode. |
Select items in a table
|
To select |
Do this |
|---|---|
|
The contents of the cell to the right |
Press TAB. |
|
The contents of the cell to the left |
Press SHIFT+TAB. |
|
The contents of adjacent cells |
Hold down SHIFT while you repeatedly press the appropriate arrow key until you’ve selected the contents of all the cells that you want. |
|
The contents of a column |
Click in the column’s top or bottom cell. Hold down SHIFT while you repeatedly press the UP ARROW or DOWN ARROW key until you have selected the contents of the column. |
|
The contents of an entire table |
Click in the table, and then press ALT+5 on the numeric keypad (with NUM LOCK off). |
Stop selecting the entire word
-
Click the File tab, and then click Options.
-
Click Advanced.
-
Under Editing options, clear the checkbox next to When selecting, automatically select entire word.
Important:
Office 2007 is no longer supported. Upgrade to Microsoft 365 to work anywhere from any device and continue to receive support.
Upgrade now
Select text by using the mouse
Select text in the body of a document
Note: To select an entire document, do one of the following:
-
On the Home tab, in the Editing group, click Select, and then click Select All.

-
Move the pointer to the left of any text until it turns into a right-pointing arrow, and then triple-click.

|
To select |
Do this |
|---|---|
|
Any amount of text |
Click where you want to begin the selection, hold down the left mouse button, and then drag the pointer over the text that you want to select. |
|
A word |
Double-click anywhere in the word. |
|
A line of text |
Move the pointer to the left of the line until it changes to a right-pointing arrow, and then click. |
|
A sentence |
Hold down CTRL, and then click anywhere in the sentence. |
|
A paragraph |
Triple-click anywhere in the paragraph. |
|
Multiple paragraphs |
Move the pointer to the left of the first paragraph until it changes to a right-pointing arrow, and then press and hold down the left mouse button while you drag the pointer up or down. |
|
A large block of text |
Click at the start of the selection, scroll to the end of the selection, and then hold down SHIFT while you click where you want the selection to end. |
|
An entire document |
Move the pointer to the left of any text until it changes to a right-pointing arrow, and then triple-click. |
|
Headers and footers |
In Print Layout view, double-click the dimmed header or footer text. Move the pointer to the left of the header or footer until it changes to a right-pointing arrow, and then click. |
|
Footnotes and endnotes |
Click the footnote or endnote text, move the pointer to the left of the text until it changes to a right-pointing arrow, and then click. |
|
A vertical block of text |
Hold down ALT while you drag the pointer over the text. |
|
A text box or frame |
Move the pointer over the border of the frame or text box until the pointer becomes a four-headed arrow, and then click. |
Select items in a table
|
To select |
Do this |
|---|---|
|
The contents of a cell |
Click in the cell. Under Table Tools, click the Layout tab. In the Table group, click Select, and then click Select Cell. |
|
The contents of a row |
Click in the row. Under Table Tools, click the Layout tab. In the Table group, click Select, and then click Select Row. |
|
The contents of a column |
Click in the column. Under Table Tools, click the Layout tab. In the Table group, click Select, and then click Select Column. |
|
The contents of multiple cells, rows, or columns |
Click in a cell, a row, or a column and then hold the left mouse button down while you drag across all of the cells, rows, or columns that contain the content that you want to select. To select the contents of cells, rows, or columns that are not next to each other, click in the first cell, row, or column, press CTRL, and then click the additional cells, rows, or columns that contain the content that you want to select. |
|
The contents of an entire table |
Click in the table. Under Table Tools, click the Layout tab. In the Table group, click Select, and then click Select Table. |
Select text in different places
You can select text or items in a table that are not next to each other. For example, you can select a paragraph on one page and a sentence on a different page.
-
Select some text or an item in a table.
-
Hold down CTRL while you select any additional text or item in a table that you want.
Select text in Outline view
To view your document in Outline view, click the View tab, and then click Outline in the Document Views group.
|
To select |
Move the pointer to |
|---|---|
|
A heading |
The left of the heading until it changes to a right-pointing arrow, and then click. |
|
A heading, its subheading, and body text |
The left of the heading until it changes to a right-pointing arrow, and then double-click. |
|
A paragraph of body text |
The left of the paragraph until it changes to a right-pointing arrow, and then click. |
|
Multiple headings or paragraphs of body text |
The left of the text until it changes to a right-pointing arrow, and then drag up or down. |
Notes:
-
In Outline view, clicking once to the left of a paragraph selects the entire paragraph instead of a single line.
-
If you select a heading that includes collapsed subordinate text, the collapsed text is also selected (even though it’s not visible). Any changes that you make to the heading — such as moving, copying, or deleting it — also affect the collapsed text.
Select text by using the keyboard
Select text in the body of a document
Note: To select an entire document, press CTRL+A.
|
To select |
Do this |
|---|---|
|
One character to the right |
Press SHIFT+RIGHT ARROW. |
|
One character to the left |
Press SHIFT+LEFT ARROW. |
|
A word from its beginning to its end |
Place the insertion point at the beginning of the word, and then press CTRL+SHIFT+RIGHT ARROW. |
|
A word from its end to its beginning |
Move the pointer to the end of the word, and then press CTRL+SHIFT+LEFT ARROW. |
|
A line from its beginning to its end |
Press HOME, and then press SHIFT+END. |
|
A line from its end to its beginning |
Press END, and then press SHIFT+HOME. |
|
One line down |
Press END, and then press SHIFT+DOWN ARROW. |
|
One line up |
Press HOME, and then press SHIFT+UP ARROW. |
|
A paragraph from its beginning to its end |
Move the pointer to the beginning of the paragraph, and then press CTRL+SHIFT+DOWN ARROW. |
|
A paragraph from its end to its beginning |
Move the pointer to the end of the paragraph, and then press CTRL+SHIFT+UP ARROW. |
|
A document from its end to its beginning |
Move the pointer to the end of the document, and then press CTRL+SHIFT+HOME. |
|
A document from its beginning to its end |
Move the pointer to the beginning of the document, and then press CTRL+SHIFT+END. |
|
From the beginning of a window to its end |
Move the pointer to the beginning of the window, and then press ALT+CTRL+SHIFT+PAGE DOWN. |
|
The entire document |
Press CTRL+A. |
|
A vertical block of text |
Press CTRL+SHIFT+F8, and then use the arrow keys. Press ESC to turn off the selection mode. |
|
The nearest character |
Press F8 to turn on selection mode, and then press LEFT ARROW or RIGHT ARROW; press ESC to turn off the selection mode. |
|
A word, a sentence, a paragraph, or a document |
Press F8 to turn on selection mode, and then press F8 once to select a word, twice to select a sentence, three times to select a paragraph, or four times to select the document. Press ESC to turn off the selection mode. |
Select items in a table
|
To select |
Do this |
|---|---|
|
The contents of the cell to the right |
Press TAB. |
|
The contents of the cell to the left |
Press SHIFT+TAB. |
|
The contents of adjacent cells |
Hold down SHIFT while you press the appropriate arrow key repeatedly until you have selected the contents of all of the cells that you want. |
|
The contents of a column |
Click in the column’s top or bottom cell. Hold down SHIFT while you press the UP ARROW or DOWN ARROW key repeatedly until you have selected the contents of the column. |
|
The contents of an entire table |
Click in the table, and then press ALT+5 on the numeric keypad (with NUM LOCK off). |
Stop selecting the entire word
-
Click the Microsoft Office Button
, and then click Word Options. -
Click Advanced.
-
Under Editing options, clear the check box next to When selecting, automatically select entire word.
 , and then click Word Options.
In this post you’ll discover lots of different ways to navigate through your document, select text and edit text quickly in Word using both the mouse and keyboard shortcuts.
As a beginner you will probably use your mouse 90% of the time, but if you learn just one or two new techniques on the keyboard you won’t have to keep switching between the keyboard and the mouse which will speed things up and it will stand you in good stead moving forwards.
It also means that you can use your laptop while you are on a crammed train!
Clickable Table of Contents
1. Selecting text using the mouse
You can select different part of your document. Here is a small selection to get you started.
#1 Select a word using click-and-drag
1. Left-click anywhere in the middle of a word and keep your finger on the button.
2. Drag to the right. As soon as you go past the end of the current word, the whole word is selected.
3. Release the button.
#2 Select a phrase using click-and-drag
1. Left-click at the beginning of your selection and keep your finger on the button.
2. Drag to the end of your selection.
3. Release the button.
#3 Select a word
Double-left-click a word to select it.
#4 Select a sentence
Press and hold Shift and left-click anywhere in the sentence.Select a paragraph Triple-left-click anywhere in a paragraph to select it.
#5 Select a paragraph
Triple-left-click anywhere in a paragraph to select it.
#6 Select a line
1. Move the mouse pointer to the left margin next to the line you want to select.
2. Left-click to select the line.
#7 Select the whole document
1. Move the mouse pointer to the left margin.
2. Press and hold the Ctrl key.
3. Left-click to select the whole document.
2. Selecting text with keyboard shortcuts
#1 Select a letter
1. Position the cursor.
2. Press and hold the Shift key.
3. Press the → key (right-cursor).
#2 Select a word
1. Place the cursor at the beginning of the word or phrase.
2. Press and hold the Shift and Ctrl keys.
3. Press the → key (right cursor). The word is selected. Continue to press the cursor key to extend the selection.
#3 Select a phrase
1. Place the cursor at the beginning of the phrase.
2. Press and hold the Shift key.
3. Left-click at the end of the phrase.
#4 Select the whole document
Press Ctrl + A.
3. Navigating your document
You can use the scroll bars or your mouse wheel to move through a document, but there are other techniques you can use to navigate a document.
#1 Page through a document
Press the Page Up and Page Down buttons to move through the document one screenat a time.
#2 Go to a specific page
1. Press Ctrl + G to display the Go To dialog box.
2. Type in a page number.
3. Click Go To
4. Click Close
#3 Go to the beginning of the line
Press Home
#4 Go to the end of the line
Press End
#5 Go to the top of the document
Press Ctrl + Home
#6 Go to the bottom of the document
Press Ctrl + End
#7 Go to the next or previous word
1. Position the cursor.
2. Press and hold the Ctrl key.
3. Press the → or ← key.
#8 Go to the next or previous paragraph
1. Position the cursor.
2. Press and hold the Ctrl key.
3. Press the ↓ or ↑ key.
4. Delete vs Backspace
- Forward Delete: The Delete key deletes a letter from the right of the cursor position
- Backward Delete: The Backspace key (normally located at the top-right corner of the keyboard) deletes a letter to the left of the cursor position
- Press Ctrl and Delete to delete an entire word to the right of the cursor
- Press Ctrl and Backspace to delete an entire word to the left of the cursor
5. Visual Separators
Type 3 dashes ( — ) to display a single line separator.
![]()
Type 3 equals signs ( === ) to display a double line separator
![]()
Type 3 hashes ( ### ) to display a triple line separator
![]()
Type 3 underscores ( ___ ) to display a thick separator
![]()
Type 3 asterisks ( *** ) to display a dotted line separator
![]()
Type 3 tildas ( ~~~ ) to display a wavy line separator. The tilda is found by pressing the Shift key and the key below the Esc key in the top-left corner of the keyboard.
![]()
6. All the key points again
- You can select a single character, word, phrase, sentence, line, paragraph or the entire document using the keyboard or your mouse.
- You can navigate around a document or go direct to any page using keyboard commands.
- You can backwards delete or forward delete letters or words.
- Press 3 of the following symbols followed by Enter to display a funky separator line in your document: dashes (—), underscores (___), equals signs (===), hashes (###), asterixes (***) or tildas (~~~).
7. What Next?
I hope you found plenty of value in this post. I’d love to hear your biggest takeaway in the comments below together with any questions you may have.
Have a fantastic day.


About the author
Jason Morrell
Jason loves to simplify the hard stuff, cut the fluff and share what actually works. Things that make a difference. Things that slash hours from your daily work tasks. He runs a software training business in Queensland, Australia, lives on the Gold Coast with his wife and 4 kids and often talks about himself in the third person!
SHARE
Control Buttons In Microsoft Word — List of common control key shortcuts ctrl+athese two keys will select all text or other objects.. Home, insert, page layout, references, mailing, review and view. This video looks at how to link buttons, text or images to sec. Now, if you want, you can use the arrange all command on the view tab to stack your open documents in the word window. The buttons contained in them are used to access commands more quickly than by opening the menus and the respective. In computing, a control key ctrl is a modifier key which, when pressed in conjunction with another key, performs a special operation (for example, ctrl + c);
The way to do that is to use activex option buttons that you can insert from the legacy controls folder in the controls section of the developer tab of the ribbon insert one button and then select it and click on the design mode and access the properties dialog and assign a group name to the button. Microsoft word toolbars, screentips and toolbar buttons. The steps are for word. See shortcuts for word heading styles. The window control buttons will display in the document.

Menu controls are primary building blocks of the ribbon ui and many custom ribbon.
First, you should create a command button, please click developer > legacy tools > command button (activex control), see screenshot: Click create option buttons to insert the defined group in your document. Click the advanced button and scroll down to the display group. One is alternate or alt key and the other is control or ctrl key. On the developer tab, in the controls group, click legacy tools, and in the activex controls section, click option button (the round button, fourth from the left on the top row). The ribbon is a user interface element which was introduced by microsoft in microsoft office 2007. On the word ribbon, under the tab developer, within the group controls, click the legacy tools icon. We have listed out more than 450 useful alt code shortcuts under the article alt key shortcuts for windows. The buttons contained in them are used to access commands more quickly than by opening the menus and the respective. Just position your cursor in the document where you want a check box, switch to the developer tab, and then click the check box content control button. This video looks at how to link buttons, text or images to sec. But those shortcuts don’t appear on the gallery tooltips unlike other buttons. The way to do that is to use activex option buttons that you can insert from the legacy controls folder in the controls section of the developer tab of the ribbon insert one button and then select it and click on the design mode and access the properties dialog and assign a group name to the button.
Uncheck show all windows in the taskbar. First, you should create a command button, please click developer > legacy tools > command button (activex control), see screenshot: Click the advanced button and scroll down to the display group. On microsoft word you press ctrl + + meaning control and the plus button, and a superscript is ctrl shift + what is the undo button on microsoft excel? The way to do that is to use activex option buttons that you can insert from the legacy controls folder in the controls section of the developer tab of the ribbon insert one button and then select it and click on the design mode and access the properties dialog and assign a group name to the button.
The way to do that is to use activex option buttons that you can insert from the legacy controls folder in the controls section of the developer tab of the ribbon insert one button and then select it and click on the design mode and access the properties dialog and assign a group name to the button.
The toolbar a toolbar is a bar containing buttons and options that you use to carry out commands. There is a slight difference between the hidden control buttons and the control buttons. First, you should create a command button, please click developer > legacy tools > command button (activex control), see screenshot: The buttons contained in them are used to access commands more quickly than by opening the menus and the respective. Menu controls are primary building blocks of the ribbon ui and many custom ribbon. In the word options dialog box, (1) click customize ribbon in left bar, (2) check the developer option in the right box, and (3) click the ok button. Click the advanced button and scroll down to the display group. The developer tab, which displays the content control buttons you will need to insert form fields, is not shown on the ribbon by default. Home, insert, page layout, references, mailing, review and view. Just position your cursor in the document where you want a check box, switch to the developer tab, and then click the check box content control button. In the list of tabs under customize the ribbon, select the developer box and then click ok. Individual content controls can contain content such as dates, lists, or paragraphs of formatted text. It is located below the quick access toolbar and the title bar.
First, you should create a command button, please click developer > legacy tools > command button (activex control), see screenshot: The hidden control buttons are contextual, that appears based upon the left or right click on the title bar. It is located below the quick access toolbar and the title bar. The ribbon is a user interface element which was introduced by microsoft in microsoft office 2007. We have listed out more than 450 useful alt code shortcuts under the article alt key shortcuts for windows.
The hidden control buttons are contextual, that appears based upon the left or right click on the title bar.
Unc path injection using windows media player activex control. Microsoft word has loads of great keyboard shortcuts, and its support for the function keys on your keyboard is no exception. The ribbon is a user interface element which was introduced by microsoft in microsoft office 2007. The way to do that is to use activex option buttons that you can insert from the legacy controls folder in the controls section of the developer tab of the ribbon insert one button and then select it and click on the design mode and access the properties dialog and assign a group name to the button. Click file > options to open the word options dialog box. Choose the commands tab select the name of the menu (i used insert) scroll in the right window to find the button click and drag the button to the space on the toolbar where you want the button The assign macro popup window appears. The window control buttons will display in the document. One is alternate or alt key and the other is control or ctrl key. Uncheck show all windows in the taskbar. Click create option buttons to insert the defined group in your document. To add a control, click in the document where you want to add it, and then click the control you want to add on the design tab. Click the advanced button and scroll down to the display group.
Word creates something like the following control buttons. Microsoft word toolbars, screentips and toolbar buttons.
Quickly Select Text in Word Documents Using a Mouse or Keyboard Shortcuts
by Avantix Learning Team | Updated May 17, 2021
Applies to: Microsoft® Word® 2010, 2013, 2016, 2019 or 365 (Windows)
You can use several keyboard or mouse shortcuts in Microsoft Word to select characters, words, lines, paragraphs and blocks of text in your documents.
Recommended article: 10 Microsoft Word Tips, Tricks and Shortcuts for Selecting in Tables
Do you want to learn more about Microsoft Word? Check out our virtual classroom or live classroom Word courses >
1. Select an entire document
Click in the document and then press Ctrl + A to select the entire document.
2. Select a word
To select a word, double-click the word.
3. Select a sentence
To select a sentence, Ctrl + click in the sentence.
4. Select a line using the invisible selection bar
To select a line using the invisible selection bar, move the pointer into the area to the left of the line and click (the pointer should turn into a right-pointing arrow).
5. Select a paragraph
To select a paragraph, triple-click in the paragraph.
6. Select a paragraph using the invisible selection bar
To select a paragraph using the invisible selection bar, move the pointer into the area to the left of the paragraph and double-click (the pointer should turn into a right-pointing arrow).
7. Select from the cursor to the end or beginning of the line
Press Shift + End to select from the cursor to the end of the line. If you press Shift + Home, Word will select from the cursor to the beginning of the line.
8. Select by word using arrow keys
To select by word, position the cursor where you want to start the selection and then press Ctrl + Shift + right arrow or Ctrl + Shift + left arrow.
9. Select by line using arrow keys
To select by line, position the cursor where you want to start the selection and then press Shift + down arrow or Shift + up arrow.
10. Select by paragraph using arrow keys
To select by paragraph, position the cursor where you want to start the selection and then press Ctrl + Shift + down arrow or Ctrl + Shift + up arrow.
11. Select by character using arrow keys
To select by character, position the cursor where you want to start the selection and then press Shift + right arrow or Shift + left arrow.
12. Select blocks of text by Shift-clicking
To select text blocks, position the cursor where you want to start the selection and then move or scroll to the location where you want to end the selection and Shift-click.
13. Select by screen
To select by screen, position the cursor where you want to start the selection and then press Ctrl + Shift + PgUp or Ctrl + Shift + PgDown.
14. Select vertically
To select vertically in a document, press Alt and drag up or down.
You can save lots of time in Word using shortcuts for selecting text.
Subscribe to get more articles like this one
Did you find this article helpful? If you would like to receive new articles, join our email list.
More resources
How to Clear Formatting in Word (with Shortcuts)
21 Microsoft Word Shortcuts for Faster Formatting
How to Create, Save, Use and Edit Templates in Microsoft Word
How to Extract All Pictures from a Microsoft Word Document (or One or Two)
10+ Great Microsoft Word Navigation Shortcuts for Moving Around Quickly in Your Documents
Related courses
Microsoft Word: Intermediate / Advanced
Microsoft Excel: Intermediate / Advanced
Microsoft PowerPoint: Intermediate / Advanced
Microsoft Word: Long Documents Master Class
Microsoft Word: Styles, Templates and Tables of Contents
Microsoft Word: Designing Dynamic Word Documents Using Fields
VIEW MORE COURSES >
Our instructor-led courses are delivered in virtual classroom format or at our downtown Toronto location at 18 King Street East, Suite 1400, Toronto, Ontario, Canada (some in-person classroom courses may also be delivered at an alternate downtown Toronto location). Contact us at info@avantixlearning.ca if you’d like to arrange custom instructor-led virtual classroom or onsite training on a date that’s convenient for you.
Copyright 2023 Avantix® Learning
Microsoft, the Microsoft logo, Microsoft Office and related Microsoft applications and logos are registered trademarks of Microsoft Corporation in Canada, US and other countries. All other trademarks are the property of the registered owners.
Avantix Learning |18 King Street East, Suite 1400, Toronto, Ontario, Canada M5C 1C4 | Contact us at info@avantixlearning.ca
Here’s some power selection tricks in Microsoft Word for text, tables, pictures and more. You might think that selecting text and other things in Word is simple. Like many things in Office, there’s a lot more available than the simple methods that we all learn.
There are quick ways to choose a word, paragraph, objects, text with similar formatting (sort of), the same style, separate non-continuous items, vertical selections, by finding or a heading and content.
- Selection shortcuts
-
Select Menu
- Select all Text with Similar Formatting – warning
- Select all in a style
- More than one part at once
- Vertical selection
- Find to Select
- Tables
- Images
-
Move
- Automatic Spacing of move/copy text
- Copy
- Selection Pane
- Navigation Pane
- Mini Toolbar
- Lost in Selection
Selection shortcuts
You can make a selection with your mouse, naturally, and also hold down the Shift key and use the arrow buttons.
Double click on a word to select the entire word.
Triple click to select the entire paragraph.
Ctrl + A will Select All. It’s one of the near-universal shortcuts that works in many programs. Ctrl + A works in Windows Explorer, Outlook, web browsers as well as Word, Excel, PowerPoint and many other programs.
There are also some selection options on the Home | Editing ribbon:
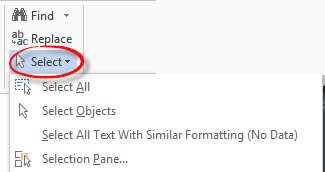
Select All – is there but, as we’ve mentioned, Ctrl + A is a lot faster.
Select Objects – lets you select multiple objects, even if they aren’t visible. Word Objects are non-text elements like images, drawings, SmartArt, Charts, Shapes etc. Choose this option (‘Click and Drag to select several objects’ appears in the status bar) then draw a rectangle with your mouse over the area where there’s objects (even if they are ‘behind’). Then use Tab and Shift+Tab to move between the objects.
Select all Text with Similar Formatting – warning
Select All Text with Similar Formatting – does NOT do exactly what the menu label says. It selects all text of the same style, ignoring other formatting.
Here’s an example with two lines of text that are obviously quite different. Yet both have been selected by ‘Select all text with similar formatting’.

That’s because the lines have the same style and they are selected even though some words have formatting applied ‘over’ the style.
Microsoft says this is ‘by design’ which is debatable. At the very least, it’s a poorly worded menu item. For most people it means using this option with care.
Select all in a style
Related to ‘Select All Text with Similar Formatting’ above is the ability to select everything that has a particular style linked to it.

Right-click on a Style Gallery or Style List entry and choose ‘Select all … instances’.
More than one part at once
Mostly, selections are of continuous blocks. Multiple words, paragraphs etc. that are all together.
You can make a selection of multiple areas from different parts of a document. In other words, a single selection with breaks of non-selected text between. We nerds call this a dis-contiguous selection.
Here’s an example of a single non-continuous selection. We’ve chosen all the mission commanders from the list of men who walked on the moon (the grey background lines).

Do this by holding down the Ctrl key while making the selections. If you Cut or Copy that selection and paste it into a new location, you’ll get a continuous selection.
Vertical selection
Hold down the Alt key (ignore the ribbon shortcuts) and use your mouse to select a vertical block of text or empty space.

Handy for reformatting text or fixing imported text.
Find to Select
The Advanced Find dialog will select the target word wherever it’s found in the document. Choose Find In | Current Selection or Main Document.

Click outside Advanced Find and you can cut, copy, reformat the non-continuous selection that Find has made for you.
Tables
Selecting an entire table seems easy if you click on the handle at top left.

But that doesn’t really select the whole table, instead it selects the contents of all the cells. Try selecting that handle then pressing delete, the table remains but the cells are all empty.
To delete a table, right-click on the top-left handle and choose Delete Table.

To select a row or rows, click to the left of the table.
To select a column, hover the mouse near the top of the column until a down arrow appears. Click to select the column.

To select a single cell, hover the mouse near the bottom left side of the cell until the angled arrow appears.

Selecting multiple cells by clicking in one cell and dragging to cover all the cells you want.
Hold down the Ctrl key to make a non-continuous selection of rows or cells.

The Table | Layout ribbon has a Select menu.

Images
Select an image by clicking on it, the Picture tab will appear automatically.
Move
To move a selection in Word there are various options:
- Cut and Paste – Select, press Ctrl + X to cut the selection to the clipboard, change the cursor to another location and press Ctrl + V to paste the selection there.
- Select and Drag – select then click on the selection and drag it to a new location. It’s very quick but lacking the Live Preview that’s available in other parts of Office.
- Move To – the lesser known option. Make a selection, press F2 (Move to where? will appear in the status bar) then click the mouse at another location and the selection will jump to that spot.
Automatic Spacing of move/copy text
One of the little noticed, but very useful features, in Word is automatic spacing when moving text.
Long time users of Word might remember when you would insert text then fiddle around add/delete spaces at the start or end. Some time ago Microsoft added a some ‘smarts’ to the paste command so there’s proper spacing before and after inserted text.
Copy
It’s much the same with Copying a selection in Word
- Copy and Paste Select, press Ctrl + C to copy the selection to the clipboard, change the cursor to another location and press Ctrl + V to paste the selection there.
- Select, Ctrl and Drag select then click on the selection and drag it to a new location, hold down the Ctrl key when clicking to paste at the new location. When you hold down the Ctrl key, the mouse cursor will show a +
- Copy to Make a selection, press Shift + F2 (Copy to where? will appear in the status bar) then click the mouse at another location and the selection will be copied to that spot.
Selection Pane
A right-hand pane that shows the objects on the current page. Click on an item to jump to that object. Click again to rename the object. The eye icon will show/hide that item. See See more with Selection Pane in Excel, PowerPoint and Word

The Selection Pane is mostly used for images and graphics on a page.
Navigation Pane
The Navigation Pane (View | Navigation Pane) has more features than just a quick way to navigate around a document. You can also rearrange sections of the document.
Right-click on a Navigation Pane heading to see various options. For this article we’re interested in ‘Select Heading and Content’.

Once selected you can do whatever you like with the selection.
There’s a faster way to rearrange parts of your document – just drag and drop. To move a heading and the content below it, click on a heading and drag it up/down the navigation pane and drop it into a new location.

Hold down the Ctrl key when dropping and the heading/content will be copied. The + symbol will appear on the mouse cursor.
When you make a selection, the mini toolbar will appear to make some quick formatting changes.

Some people feel the mini toolbar gets in the way, though it’s generally smart about disappearing as the cursor moves away from the selection. You can turn it off at Options | General | Show mini toolbar on selection.
Lost in Selection
If you can’t figure out what to select or how it’s positioned on the page – don’t forget our old friend, the Show All feature. See Understand the Show All markers in Word

Click on the pilcrow icon to see all the paragraph marks, tabs, spaces etc.
Understand the Show All markers in Word
See more with Selection Pane in Excel, PowerPoint and Word
Keyboard shortcuts for the Office Selection Pane
Emoji Panel is part of Windows 10 that totally sucks