
The easiest way to select and copy text with your keyboard or mouse
This wikiHow teaches you how to quickly select all of the items or text in a given window so you can perform an action on all of them at the same time.
-

1
Locate the items you wish to select. They can be in a document, web page, or even contained in a folder in your Mac’s Finder.
-
2
Click anywhere in the window. Position the cursor and click inside the window that contains the text, images, or files you wish to select.
-
3
Press ⌘ and A simultaneously. The ⌘ keys are on either side of the space bar. Everything in the active window should be highlighted. Now you can move, delete, copy, or cut the highlighted items all at the same time.
- Alternatively, click on Edit or View in the menu bar at the top of the screen, then click on Select All.[1]
- Alternatively, click on Edit or View in the menu bar at the top of the screen, then click on Select All.[1]


-
1
Select all files displayed as icons. Open a finder window and maximize it so that you can see everything inside a given folder.
- Place your cursor in the top-left corner of the folder. Be sure to hover over a blank space within the folder and not over an individual file.
- Click, then drag the cursor to the bottom-right corner. All the files, folders, and images in-between will be selected.
-
2
Select all files displayed in a list. Open a window or application with its contents displayed in list view.[2]
- Click on the first file or item in the list.
- Press and hold the shift key.
- Click on the last item in the list.
- The entire list between the first and last items should be highlighted and selected.
- Now you can perform an action (move, copy, cut, delete, etc.) on all of the files at the same time.


Add New Question
-
Question
How do I select a group of thumbnails on a Mac?

You should press Cmd A on a Mac keyboard; on any other keyboard, press Ctrl A to select all. To select a group, just click and drag with the mouse over the thumbnails you want to select and Cmd click to deselect any individual files.
-
Question
How do I delete a file on Mac?
Joseph Bill
Community Answer
Right click on «file,» then click «Move to Trash.» After that, go to the trash can at the bottom right of your screen. At the top right corner of the pop-up, you will see «Empty.» Click it, then you’re done.
Ask a Question
200 characters left
Include your email address to get a message when this question is answered.
Submit
References
About this article
Article SummaryX
With your cursor, click inside the window that contains the items or text you want to select, then press the command (⌘) and «A» keys at the same time.
Did this summary help you?
Thanks to all authors for creating a page that has been read 156,382 times.
Is this article up to date?
Contents
- 1 How do you select all text on a Macbook?
- 2 How do I select all text without dragging?
- 3 How do you select an entire page on a Mac?
- 4 Why can’t I select multiple files on Mac?
- 5 How do you select all on Mac word?
- 6 How do you open all files at once on a Mac?
- 7 How do you select multiple words in Word on a Mac?
- 8 Which keys do you use to copy and paste a text to another file?
- 9 What keys do you use to exit word?
- 10 How do you select all?
- 11 How do you switch between pages on a Mac?
- 12 How do you select all on a Macbook Air?
- 13 How do you multi select on a Mac?
- 14 What is the shortcut to select all on a Mac?
- 15 How do I move multiple files on a Mac?
- 16 How do you select all on Mac Mail?
- 17 How do you select on a Mac?
- 18 How do I select all in pages?
- 19 How do I select all files in a folder on a Mac?
- 20 How do I select all files in a folder?
How do you select all text on a Macbook?
Select a word: Double-click the word. Select a paragraph: Triple-click in the paragraph. Select a range of text: Click in front of the first character, then hold down the Shift key on your keyboard and click at the end of the text you want to select.
How do I select all text without dragging?
Click the “Select” drop-down menu in the Editing group on the ribbon and choose “Select All.” All of the body text on the pages will be highlighted. You can now format it, cut, copy, align the text and more. The keyboard shortcut “Ctrl-A” will accomplish the same result.
How do you select an entire page on a Mac?
You should press Cmd A on a Mac keyboard; on any other keyboard, press Ctrl A to select all.
Why can’t I select multiple files on Mac?
Shift (⇧) + Click
You can also use Shift+Click to select groups of contiguous files in the Finder. Select the first file, hold down the Shift key, then click the last file. All files between those two will be selected.
How do you select all on Mac word?
1. Select All (Ctrl + A) Selects everything within your document so that you can make all the formatting edits that you want at the same time. Clicking this command with your mouse is the same as hitting Ctrl + A on your keyboard (Cmd + A on a Mac).
How do you open all files at once on a Mac?
In the Preview app on your Mac, choose Preview > Preferences, then click Images. Select an option for “When opening files”: Open all files in one window: Uses one window for all files you open in Preview, no matter when you open them.
How do you select multiple words in Word on a Mac?
The quickest way to select multiple objects in Word for Mac is with your mouse. Click the first object you want to select, hold down the “Command” key and select each additional object.
Which keys do you use to copy and paste a text to another file?
Windows users:
- Copy: Ctrl+C.
- Cut: Ctrl+X.
- Paste: Ctrl+V.
What keys do you use to exit word?
Alt + F4 = Quit.
How do you select all?
Select all of the text in your document or on your screen by holding down the “Ctrl” key and pressing the letter “A”. 18 Tech Support Reps Are Online! Microsoft Answers Today: 65. Remember the “Select All” shortcut (“Ctrl+A”) by associating the letter “A” with the word “All”.
How do you switch between pages on a Mac?
Move to the next or previous page: Press the Page Up or Page Down key. If your keyboard doesn’t have these keys, press Fn-Up Arrow or Fn-Down Arrow. Move to a specific page: Press Control-Command-G, type the page number, then press Return or click Go to Page.
How do you select all on a Macbook Air?
You can use Command+A to select all, or a Shift+Click to select a large group of files, then use Command+Click to deselect the ones you don’t want included in the group.
How do you multi select on a Mac?
Select multiple items: Press and hold the Command key, then click the items (they don’t need to be next to each other). Select multiple items that are adjacent: Click the first item, then press the Shift key and click the last item. All items in between are included in the selection.
What is the shortcut to select all on a Mac?
Command-A: Select All items. Command-F: Find items in a document or open a Find window. Command-G: Find Again: Find the next occurrence of the item previously found. To find the previous occurrence, press Shift-Command-G.
How do I move multiple files on a Mac?
How to move multiple files in OSX
- Click somewhere in the directory.
- Press cmd-A to select all files.
- Press and hold cmd.
- Click somewhere in the selection and hold the mouse button.
- Drag the files to the destination.
How do you select all on Mac Mail?
Hold Cmd ⌘ and click the other emails you want to select or press Cmd ⌘ + A to select all emails in the current folder.
How do you select on a Mac?
Select items on your Mac screen
- Select an item: Click the item.
- Select multiple items: Press and hold the Command key, then click the items (they don’t need to be next to each other).
- Select multiple items that are adjacent: Click the first item, then press the Shift key and click the last item.
How do I select all in pages?
Select words or paragraphs
- Select a word: Double-tap it.
- Select a paragraph: Triple-tap in the paragraph.
- Select a range of text: Double-tap a word, then move the drag points to include more or less text. Drag beyond the end of the paragraph to include any formatting marks (called invisibles).
How do I select all files in a folder on a Mac?
To select a specific number of files, you can hold the Command key, and then click on each file you wish selected, no matter how they are ordered in a particular folder. To choose a group of files that are stacked one atop the other in a list, click the first file, then hold Shift and click the last.
How do I select all files in a folder?
To select everything in the current folder, press Ctrl-A. To select a contiguous block of files, click the first file in the block. Then hold down the Shift key as you click the last file in the block. This will select not only those two files, but everything in between.
Excel for Microsoft 365 for Mac PowerPoint for Microsoft 365 for Mac Excel 2021 for Mac PowerPoint 2021 for Mac Excel 2019 for Mac PowerPoint 2019 for Mac Excel 2016 for Mac PowerPoint 2016 for Mac Excel for Mac 2011 Outlook for Mac 2011 PowerPoint for Mac 2011 More…Less
This topic lists all keyboard shortcuts for the Microsoft 365 for Mac products. Keyboard shortcuts allow you to quickly complete commands and functions without using a mouse. The shortcuts in this topic refer to the US keyboard layout. Keys for other layouts might not correspond exactly to the keys on a US keyboard.
Many of the shortcuts that use the Ctrl key on a Windows keyboard also work with the Control key in Office 2016 for Mac. However, not all do.
Note: If a shortcut requires pressing two or more keys at the same time, this topic separates the keys with a plus sign (+). If you have to press one key immediately after another, the keys are separated by a comma (,).
In this topic
-
Work with files, applications, and tools
-
Edit and format content
-
Use dialogs
Work with files, applications, and tools
|
To do this |
Press |
|---|---|
|
Create a new file or item (context dependent) |
Command + N |
|
Create a new file from a template or theme |
Shift + Command + P |
|
Expand or minimize the ribbon |
Command + Option + R |
|
Save or sync |
Command + S |
|
|
Command + P |
|
Open a file or item |
Command + O |
|
Close a file or item |
Command + W |
|
Quit the current application |
Command + Q |
|
Hide the current application |
Command + H |
|
Hide other applications |
Option + Command + H |
|
Minimize the window |
Command + M |
Edit and format content
|
To do this |
Press |
|---|---|
|
Undo the last change |
Command + Z |
|
Redo or repeat the last action |
Command + Y |
|
Cut the selection (and copy to the clipboard) |
Command + X |
|
Copy the selection to the clipboard |
Command + C |
|
Copy the formatting from the selection |
Command + Shift + C |
|
Copy the selection to Scrapbook |
Control + Option + C |
|
Paste |
Command + V |
|
Paste Special (doesn’t apply to all products) |
Command + Control + V |
|
Paste the formatting to the selection |
Command + Shift + V |
|
Select All |
Command + A |
|
Find |
Command + F |
|
Insert hyperlink |
Command + K |
Use dialogs
|
To do this |
Press |
|---|---|
|
*Move to the next box, option, control, or command in a dialog |
Tab |
|
*Move to the previous box, option, control, or command in a dialog |
Shift + Tab |
|
Exit a dialog or cancel an action |
Esc |
*May require full keyboard access. To learn how to enable full keyboard access in a Mac, see Set up your device to work with accessibility in Microsoft 365.
More information
Set up your device to work with accessibility in Microsoft 365
Keyboard shortcuts in Word
Keyboard shortcuts in Excel
Use keyboard shortcuts to create PowerPoint presentations
Use keyboard shortcuts to deliver PowerPoint presentations
Keyboard shortcuts for Outlook
Keyboard shortcuts in OneNote
Need more help?
PDNob Users Worldwide
2,582,819
by Rachel Jones|2023-01-29 |
3 min read


When using Microsoft word and creating different reports and files, you may need to select all the words on a document to copy or delete it, but it may be challenging for the people who are new to Microsoft word. If you are one of them, then here is a quick guide for you that will help you select all on word whether you are using Windows or Mac computer.
So, let’s get started.
-
1. Select All Word Shortcut
- How to Select All on Windows
- How to Select All on Mac
- 2. How to Select with Mouse
- 3. How to Select with Select Tool
1. Select All Word Shortcut
Selecting all words or an entire document using Microsoft Word is easy if you know the right way. There are some shortcut keys that you can use to do that, depending on your computer’s operating system. Besides that, there are also some other ways which can help you select all on MS Word.
Let’s get to know each method.
How to Select All on Windows
If you are a windows user and using Microsoft Word to create or edit documents, then selecting all would be so much easy for you. Because Windows have already given a select all shortcut which is Ctrl + A. You can use this shortcut key, which will select all words on the file in a matter of seconds.
But, if you don’t want to use this shortcut key or it is not convenient for you, then there is also another way which could be helpful for you. You can use PDNob Shortcut to create a custom button and select everything on a document.
Let’s learn how to select all using the PDNob Shortcut tool.
-
Download and Install PDNob Shortcut
-
Press the middle mouse button to open the panel. Click on the empty space and select Stimulate Keystrokes. Save Ctrl + A as the stimulated keys. This will successfully create the shortcut button to select all or everything on Microsoft Word.
-
Open the MS Word file. Hit the middle mouse button to open the panel and click on the created shortcut key. This will automatically select everything on the document, making it easier to select all without touching the keyboard with just a single click.
How to Select All on Mac
If you are using a MacBook or running MacOS on your computer, the method mentioned above will not work for you. The reason is: that MacOS is way different from how to select all on Windows, which is why Mac has its own shortcut to select all in MS Word document.
Besides, you also can’t use PDNob Software on Mac because it is only available for Windows Computers.
So, the question is how to select all on Mac or what is the select all shortcut for MacOS?
You will have to press the Command + A button together. It will select everything on your MS Word document, making it easier for you to Copy, Delete, or Replace anything on the file.
2. How to Select with Mouse
Select with mouse is also great if you don’t want to use any of the above methods. All you have to do is click and hold on the start of the Word Document and then drag your cursor to the downside to the end of the document.
This will select everything on the file.
3. How to Select with Select Tool
There is another way to select everything on MS Word. Microsoft Word comes with a built-in tool named Select. You can use that tool in order to select all on the file.
For this, look at the top right corner of the Word document; here, you will find an option Select. You will have to click on it and then click on the Select All button that appears below.
It will immediately select everything on the document, making it convenient for you to modify the document.

Conclusion
So, this is how to select all in the MS Word document. You can use any of the above-given methods according to your computer’s operating system. But, the recommended one is select all using PDNob Shortcut. By following this method, you can easily select everything on the document without even touching the keyboard.
You can also create other shortcuts using PDNob, making your user experience better.
PDNob Windows Shortcuts
Discover how PDNob can improve your productivity.
In this article you’ll learn all of the different Select All shortcuts in Word, Excel and PowerPoint, and how to use Select All to quickly grab things like:
- Objects (PowerPoint)
- Text with similar formatting (Word)
- Formulas (Excel)
- Constants (Excel)
- Comments (Excel)
- And more!
This allows you to quickly grab EXACTLY what you need in each of the programs when you need it. This saves you from otherwise having to manually selecting everything yourself, one-by-one.
Select All shortcut (A Must Know)
The universal Select All shortcut for most program (Mac or PC) is:

Select All shortcut (PC Users): Ctrl + A
Select All shortcut (Mac Users) Cmd + A
That said there are a variety of different ways you can use the shortcut in Word, Excel and PowerPoint to finish your tasks faster and get you to Happy Hour (all discussed below).
How to best use the Select All command?
In short, this command is best used to quickly grab all the text, numbers, objects, formulas etc. that you want to quickly format or work with.
This allows you to quickly make changes to everything at once. For example:
- Change the font style of all the text in a Word document
- Grab all the formulas or constants in an Excel spreadsheet to change their font color
- Grab all your PowerPoint objects on a slide to change their shape fill
Which makes sense, right?
Why bother doing things manually (one-by-one) when you can select all your objects at once.
And it’s this kind of know-how why one person leaves the office at a decent hour, while another wastes away at the office all night.
How to Select All in Word

You have 4 different types of selection options in Microsoft Word.
And if you are on a PC, you can additionally shortcut all of these using your Ribbon Guides (details below).

1. Select All (Ctrl + A)
Selects everything within your document so that you can make all the formatting edits that you want at the same time.
Clicking this command with your mouse is the same as hitting Ctrl + A on your keyboard (Cmd + A on a Mac).
2. Select Objects
Changes your mouse cursor into an arrow symbol that allows you to select an element (chart, picture, SmartArt graphic, etc.) as an object.
This is different than when you click things with your mouse. When you click with your mouse, you normally click into the object as if you are going to edit it.
The Select Objects command ensures that you select the object itself. That way you can cut and paste it, or move it around within your document.
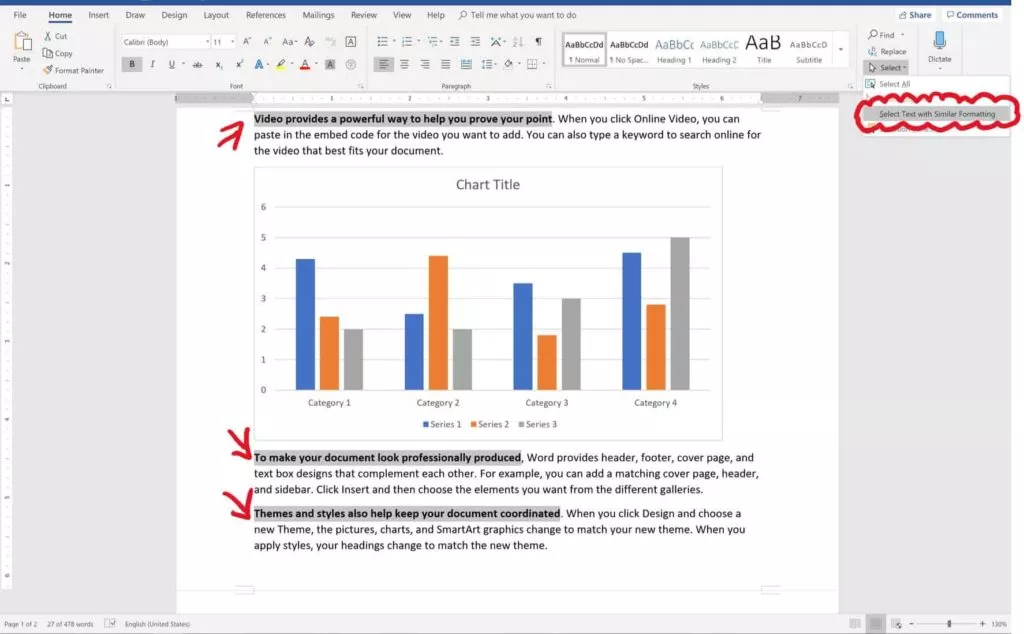
3. Select Text with Similar Formatting
Selects all of the text within a Word document that matches the formatting of the text that you have already selected.
This is one of the coolest features in Microsoft Word that hardly anyone knows about. This command grabs all of the same formatted text within a document, so you can change it’s formatting all at once.
Ahem… amazing!
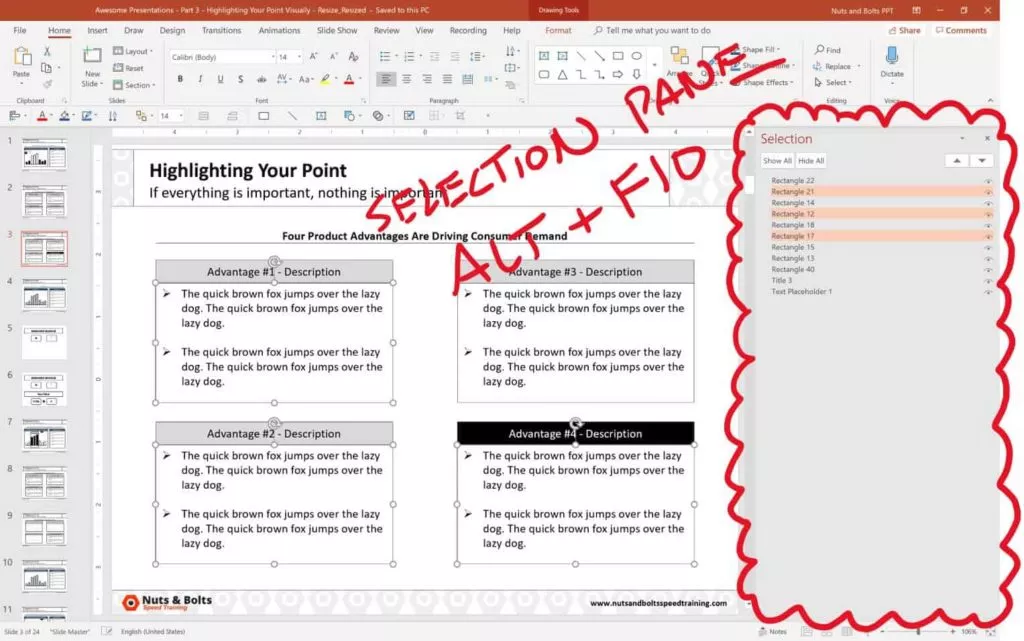
4. The Selection Pane in Word (Alt + F10)
Opens or closes the Selection Pane in Microsoft Word.
Inside the Selection Pane you can see (and quickly manipulate) all the objects in a Word document.
Similar to the Selection Pane in PowerPoint, it only only shows you the objects on the current page you are currently working on.
That means that if you have 100 charts in your Word document but only 1 chart on your current page, you will only see 1 chart in the Selection Pane.
Select All Shortcuts in Word (Ribbon Guides)
Instead of using your mouse to access the selection commands, on a PC you can use your Ribbon Guides.
To use these shortcuts, simply hit the Alt key on your keyboard. Hitting the Alt key, you will see alphabetical sequences to the commands across your Ribbon.

On a PC, your select all Ribbon Guide shortcuts are:
- Select All: Alt, H, SL, A
- Select Objects: Alt, H, SL, O
- Select Text with Similar Formatting: Alt, H, SL, S
- Selection Pane: Alt, H, SL, P
Note: When using your Ribbon Guide shortcuts in Word, you do not need to hold them down. Instead, simply hit and let go of them one at a time (following the letters forward).
To learn more about the Microsoft Office ribbon, see this guide by Microsoft here.
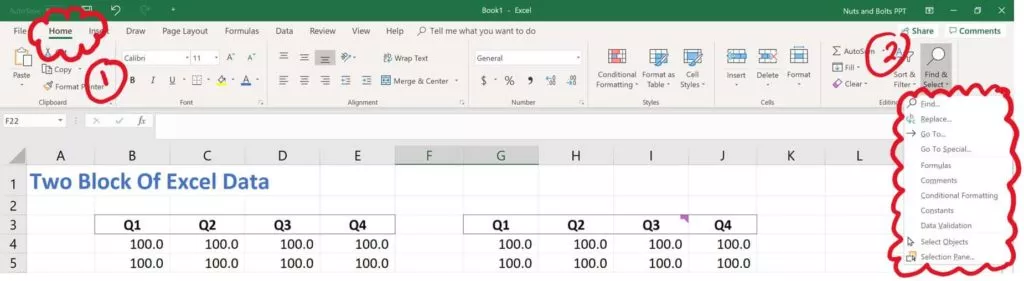
Select All in Excel
Because there are so many more inputs that can go into an Excel spreadsheet, there are 7 different selection commands in Excel (all covered below)
1. Select All (Ctrl + A)
Hitting Ctrl + A triggers the Select All command (which is otherwise not up in your Excel ribbon.
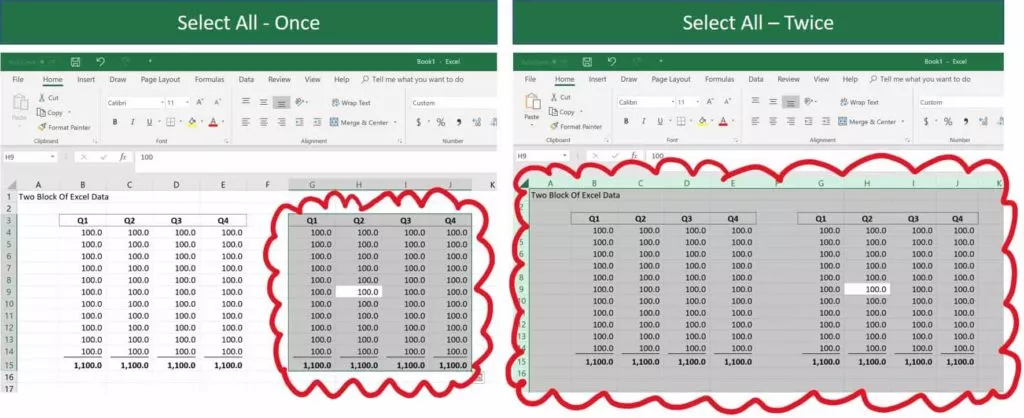
It’s also important to note that the Select All command works a little bit differently in Excel.
Using the command once, first selects the block of cells that you are currently active in.
Using the command a second time, then selects everything within your spreadsheet.
See images above for hitting it once, then twice.
2. Select Formulas
Clicking Formulas will grab all the formulas in your current spreadsheet (pictured below).
This is a fast way and easy way to quickly identify and change the formatting of any formulas in your spreadsheet.

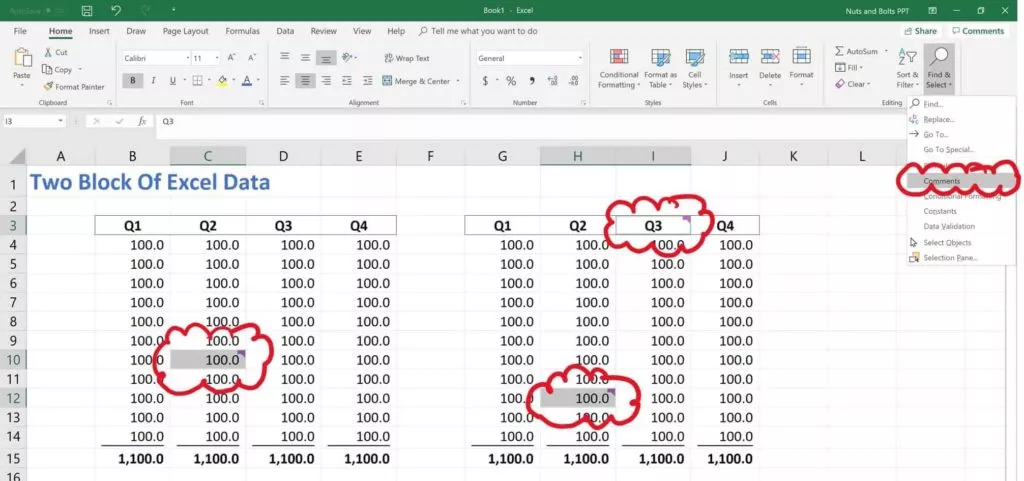
3. Select Comments
Clicking Comments automatically selects all of the comments in your spreadsheet (pictured below).
Comments show up in your spreadsheet as little markers in the upper-right hand corner of your cells. If you don’t want to waste time searching for them, simply use these command.
This allows you to quickly grab all the comments in your spreadsheet and format the cells.
4. Select Conditional Formatting
Clicking Conditional Formatting selects any cells within your spreadsheet that have conditional formatting in them.
This allows you to spot check or change the conditional formatting rules for those specific cells.
To learn more about conditional formatting rules, and how to use them, see this article by Microsoft here.
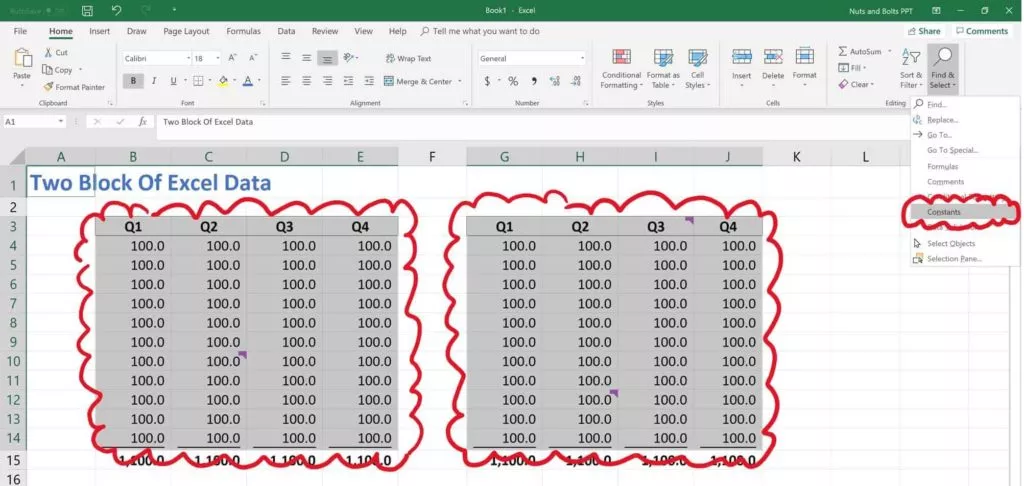
5. Select Constants
Selects all the constant values in your spreadsheet (i.e. values that are not formula-driven).
This is a fast and easy way to find all of the inputs that someone is using in their financial model or spreadsheet so that you can double-check their assumptions (pictured below).
6. Select Objects
Turns your cursor into an arrow that allows you to select objects that are within your spreadsheet (charts, pictures, SmartArt graphics etc.).
This is useful when you have a large spreadsheet or dashboard and you want to just select a single graphic without accidentally selecting the cells around it.
7. The Selection Pane in Excel (Alt + F10)
Opens the Selection Pane in Excel, showing you all of the charts, pictures, SmartArt graphics, etc., that are currently within your active spreadsheet.
Just keep in mind that the Selection Pane will only show you objects that are within the current sheet you are on. It will not show you objects that are on other sheets within your Excel file.
Select All Shortcuts in Excel (Ribbon Guides):
On top of using your mouse to activate the different Select commands in Excel, if you are on a PC, you can also use your Ribbon Guides to shortcut these commands (see key combinations below).
If you use any of these selection commands A LOT when working in Excel and are on a PC, I highly recommend learning these key combinations to save you time.

On a PC, your Ribbon Guide Shortcuts to these different commands are:
- Formulas: Alt, H, FD, U
- Comments: Alt, H, FD, M
- Conditional Formatting: Alt, H, FD, C
- Constants: Alt, H, FD, N
- Data Validation: Alt, H, FD, V
- Select Objects: Alt, H, FD, O
- Selection Pane: Alt, H, FD, P
Note: When using your Ribbon Guide shortcuts, you do not need to hold down the keys to make them work. Instead, simply hit and let go of them one at a time.
Select All in PowerPoint

You have 3 different types of selection options in PowerPoint (all of which you can shortcut on a PC using your Ribbon Guide shortcuts as discussed further below).

1. Select All (Ctrl + A)
Selects all of the objects that are currently on your slide.
This shortcut works in all of the different PowerPoint views including:
- The Normal View
- The Slide Master View
- The Handout Master View
- The Notes Master View, etc.
To learn more about setting up these different views in PowerPoint, see our guide on custom PowerPoint templates here.
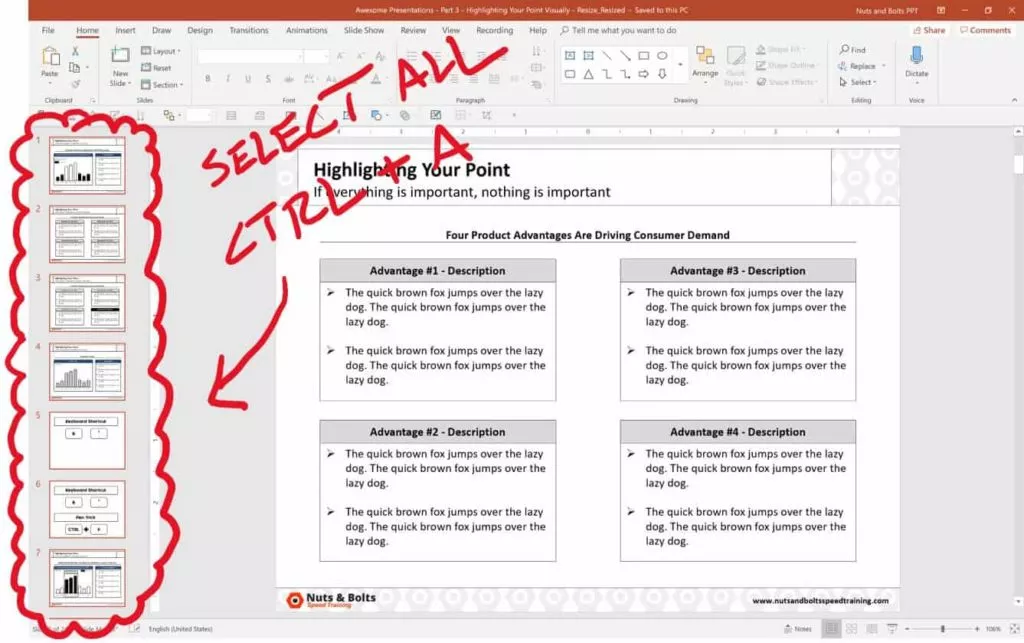
On top of that, if you first click into the thumbnail view (pictured below) you can use the command to grab all of your slides. This allows you to copy and paste those slides, apply a new layout, reset the slides, etc.
2. Select Objects
This is the default selection option in PowerPoint, allowing you to select objects (shapes, text boxes, charts, SmartArt graphics, etc.) which is what all of your slides are made of.
3. Selection Pane in PowerPoint (Alt + F10)
Opens the Selection Pane in PowerPoint, giving you a bird’s eye view of everything that is on your slide (even if it is buried beneath something else).
To learn other useful PowerPoint shortcuts like this to save you time in the program, see our guide here.
Selection Pane Shortcuts in PowerPoint
To learn more about how to use the Selection Pane shortcuts in PowerPoint, watch the short video below.
Inverse selected objects in PowerPoint
Another way to cleverly use the Select All command in PowerPoint is to ‘inverse-select’ your objects.
For example, let’s say you want to select EVERYTHING on your slide except for the title.
To do so, follow these steps:
- Hit Ctrl + A to select everything on your slide
- While holding the Shift key or the Ctrl key, select your Title to un-select it
Doing so leaves you with everything on your slide selected except for your slide title (or whatever else you unselected by holding the Shift or Ctrl key).
Select All shortcuts in PowerPoint (Ribbon Guides)
Besides navigating these selection commands using your mouse, you can also use your Ribbon Guide shortcuts to access them if you are on a PC.
To use your Ribbon Guide shortcuts, simply hit and let go of the Alt key, and then follow the alphabetical or numerical queues to find your command (all shortcut combinations are listed below).

On a PC, your Select All Ribbon Shortcuts are:
- Select All: Alt, H, SL, A
- Select Objects: Alt, H, SL, O
- Selection Pane: Alt, H, SL, P
Note: When using your Ribbon Guide shortcuts, you do not need to hold down the keys to make them work. Instead, simply hit and let go of them one at a time.
Conclusion
So those all the different ways you can Select All in Word, Excel and PowerPoint, and the different Select All shortcuts available to you if you are on a PC version of Microsoft Office.
Knowing how to properly use these, allows you to quickly grab exactly what you’re looking for so you can format it. This saves you time and gets you once step closer to Happy Hour.
If you are interested in taking your PowerPoint skills to the next level, you can learn more about our online courses and training here.