
Select objects, shapes, pictures or text boxes, to change or move them. Sizing handles indicate that a shape or object has been selected.
Click or tap the object to select it. If that doesn’t select it, go to Home > Select and do one of the following:
-
To select all of the text in the document, choose Select All.
-
To select objects that are hidden, stacked, or behind text, choose Select Objects. To select an object, click or tap when your pointer becomes a selection arrow
 as it moves over an object. To select multiple objects, press and hold Ctrl while you click or tap the objects that you want.
 -
To select text with similar formatting, choose Select All Text with Similar Formatting.
-
To open the task pane where you can select, multi-select, show, hide, or change the order of objects, choose Selection Pane, and then select the options that you want.
 as it moves over an object. To select multiple objects, press and hold Ctrl while you click or tap the objects that you want.

Tips for selecting shapes and objects
|
To do this |
Do the following |
|---|---|
|
Select multiple objects. |
Press and hold Shift or Ctrl while you select the objects. |
|
Select an object that is under other objects and cycle forward through the stack of objects. |
Select the top object, and then press Tab. |
|
Select an object that is under other objects and cycle backward through the stack of objects. |
Select the top object, and then press Shift+Tab. |
|
Select objects that are part of a group. |
Select the group, and then do one of the following:
|
|
Cancel the selection of one object at a time. |
Press and hold Shift or Ctrl while you click or tap each object. |
See Also
Group or ungroup shapes, pictures, or other objects
Select objects, shapes, pictures or text boxes, to change or move them. Sizing handles indicate that a shape or object has been selected.
Using the Selection Pane
If you can’t select an object or there many objects to select, use the Selection pane.
-
Select one of the objects you want to manage.
-
Go to Shape Format or Picture Format> Arrange
> Selection Pane.
-
The Selection Pane opens with all your objects listed, and you can do any of the following:
-
Drag an item up or down in the list to change the order. If you have objects that cover each other, this will bring an object to the front, or put it behind another object.
-
Choose to show or hide objects from the Selection Pane. To hide an object, select the eye icon in the Selection Pane indicating that the object is Showing
. The icon changes to a simple icon indicating that the object is Hidden from view. To show the object once again, select the Hidden icon , and the object reappears. -
Group or ungroup objects listed in the Selection Pane. If you select multiple objects by using Command + Click, you can then group them or ungroup them by selecting Format Shape or Format Picture > Arrange
> Group Objects.
-
 > Selection Pane.
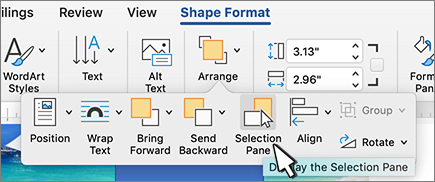
 . The icon changes to a simple icon indicating that the object is Hidden
  from view. To show the object once again, select the Hidden icon
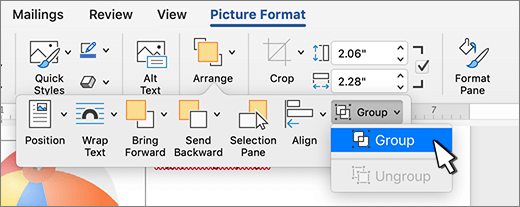
In the following text, there are 4 effective ways which enable you to quickly select and group multiple objects in your Word document.
It’s not unusual for some of you to create a Word document with plenty of shapes, text boxes, and pictures, etc. And there are also occasions when you have to select them to group so you can move them together instead of operating one by one. Doubtlessly, the question lies at how to select numerous objects. So we will take the example of selecting several flowchart shapes to demonstrate you the 4 methods.
Method 1: Group Objects by Selecting them One by One
Obviously, you can select number of objects one by one.
- Firstly, suppose we have an example as below:


Press either “Ctrl” or “Shift”.
- Then left click shapes to be group one by one.
- Next right click.
- Click “Group” option on the list-menu.
- And again click “Group” on the extend list-menu.


Now you have succeeded in grouping these objects, and you can move them together as a whole.
Method 2: Group Objects by Selecting them on “Selection Pane”
- This time click “Page Layout” tab first.
- Then click “Selection Pane” in “Arrange” group.

- Next on the right side of the document, there will open the “Selection Pane” where you can see all the shapes on a certain page. Press “Ctrl” and hold on.
- And click the shape name on the pane one by one. You can see the shapes on the document page have been selected.

- Then repeat from step 3 to step 5 in method 1.


Method 3: Group Objects by Using “Select Objects” Option in Word 2010
Here is what you need to know that you are unable to use “Select Objects” option in Word 2010 directly but to insert a “New Drawing Canvas” into Word document first before you insert all the shapes.
- To begin with, click “Insert” tab.
- Then choose “Shapes” in “Illustrations” group.
- Next click “New Drawing Canvas”.

- Then insert shapes you need on the drawing canvas.
- Next, click “Home” tab.
- And go to click “Select” option in “Editing” group.
- Choose “Select Objects” on the list-menu.

- Now you can see the indication on the left-down corner of the document page, such as below:


Just follow the lead, and click and drag to draw an area including all objects on the canvas so as to select them.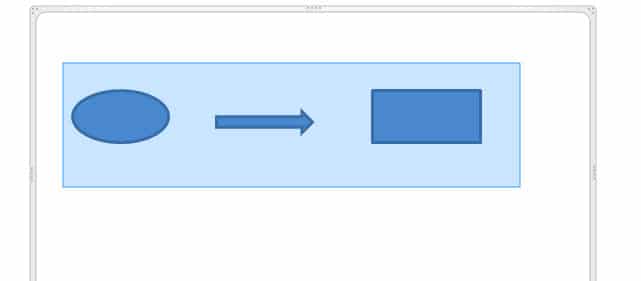

- Again repeat from step 3 to step 5 in method 1.
Method 4: Group Objects by Using “Select Objects” Option in Other Word Versions
Actually, in all Word versions except Word 2010, you can use “Select Objects” option directly to select and group objects without inserting a canvas first. What you need to do is follow from step 5 to step 9 in method 3.
Also you can save the .docxs file as .doc file so you can select objects on document directly.
And if you try to group pictures, then you have to change the pictures’ “Text Wrapping” style into any one but “In line with text”.
Comparison
| Methods | Advantages | Disadvantages |
| Method 1: Group Objects by Selecting them One by One | 1. It’s an easy and simple way.
2. You can apply this method no matter what Word version you’re using. |
1. You have to select objects one by one.
2. You could miss some small objects since there are too many. |
| Method 2: Group Objects by Selecting them on “Selection Pane” | 1. It’s an easy and simple way.
2. You won’t miss objects since they are listed on the pane. 3. You can apply this method no matter what Word version you’re using. |
You have to select objects one by one. |
| Method 3: Group Objects by Using “Select Objects” Option in Word 2010
& Method 4: Group Objects by Using “Select Objects” Option in Other Word Versions |
1. You can select multiple objects at one time.
2. You’re less likely to miss some objects. 3. If you are not using Word 2010, then you can select multiple objects directly by drawing an area to include them. |
1. For Word 2010 users, you have to insert a drawing canvas before inserting shapes into documents so as to select them multiply.
2. For Word 2010 users, you may need to save the .docx file as .doc file so as to select objects directly. |
Keep Handy a High Efficiency Recover Tool
Basically, in modern business practices, time is money. So there is not so much time for you to think about what to do once you get files corrupted. Therefore, the best way is to keep a well-functioned Word file repair tool in place so you can address the corruption issues efficiently.
Author Introduction:
Vera Chen is a data recovery expert in DataNumen, Inc., which is the world leader in data recovery technologies, including corrupted Excel file repair and pdf repair software products. For more information visit www.datanumen.com
It is fairly straightforward to quickly select all the text in MS Word documents. We will go over 3 ways to do it.

- Select All using a ShortCut Key
- Select All using Mouse
- Select all using the Select tool
Method 1: Select All Using a Shortcut Key
Step 1: Open an MS Word Document.

Step 2: Hit the keyboard shortcut keys.
- Click on any part of the page.
- Then, press the Ctrl + A keys on your keyboard.
- Right after that, you’ll notice that all of the text, including any object in your document, has been selected.

Method 2: Select All by Clicking and Dragging
Step 1: Open an MS Word Document.

Step 2: Highlight your content.
- Once your document is ready, move your mouse pointer to the very beginning of your file.
- Then, click and hold the left mouse button and drag it to the bottom of your window.
- This will allow MS Word to automatically scroll down the pages of your document. Hence, highlighting every line of the content.

Method 3: Select All Using the Select Tool
Step 1: Open an MS Word Document.

Step 2: Click the Select button.
- Go to the Home Tab and click the Select button.
- This will open a drop-down menu.
- Click on Select All.
- This will select all the text in the document.

Conclusion
You’ve finally arrived at the end of this article.
We hope you’ve found this article helpful!
Если вам нужно выделить все встроенные объекты в Word, как вы это сделаете? Теперь это руководство познакомит вас со следующими методами выбора всех встроенных объектов во всем документе или выделения документа.
Выберите все встроенные объекты с помощью VBA
Выберите все встроенные объекты с помощью Kutool for Word
 Выберите все встроенные объекты с помощью VBA
Удивительный! Используйте эффективные вкладки в Word (Office), например Chrome, Firefox и New Internet Explorer!

Подробнее Скачать бесплатно
Вместо того, чтобы выбирать внедренные объекты по одному, VBA — более простой способ выбрать все внедренные объекты.
Код VBA может выбрать все встроенные объекты, сделайте следующее:
Шаг 1: нажмите Alt + F11 открыть окно VBA;
Шаг 2: нажмите Модули от Вставить вкладка, поместите код в Модули окно;
Шаг 3: нажмите Run![]() или нажмите F5 применить VBA.
или нажмите F5 применить VBA.
Код VBA для выбора всех встроенных объектов:
Подложка SelectAllEmbedObjects ()
Dim tempTable как объект
Приложение.ScreenUpdating = False
ActiveDocument. DeleteAllEditableRanges wdEditorEveryone
Для каждой таблицы tempTable в ActiveDocument.InlineShapes
tempTable.Range.Paragraphs (1) .Range.Editors.Add wdEditorEveryone
Download
ActiveDocument.SelectAllEditableRanges wdEditorEveryone
ActiveDocument. DeleteAllEditableRanges wdEditorEveryone
Application.ScreenUpdating = True
End Sub
Выберите все встроенные объекты с помощью Kutool for Word
Если вы плохо разбираетесь в макросах, то выбирать все внедренные объекты один за другим сложно и отнимает много времени. Использовать VBA для выбора всех объектов так сложно. Теперь порекомендуйте более простой способ выбрать все внедренные объекты. Одним щелчком мыши вы можете выбрать все объекты во всем документе или в его части.
Kutools for Word, удобная надстройка, включает группы инструментов, облегчающих вашу работу и расширяющих ваши возможности обработки текстовых документов. Бесплатная пробная версия на 45 дней! Get It Now!
Нажмите Кутулс > нажмите Выбор абзаца in Пункт группа> щелкните Выбрать все внедренные объекты Word Абзац из раскрывающегося списка. Смотрите скриншот:

Примечание: Если вы хотите выбрать только все объекты из выделенного фрагмента документа, сначала выберите часть документа, а затем примените этот инструмент.
Для получения более подробной информации о Выберите внедрить абзацы объекта of Kutools for Word. пожалуйста, посетите: Выбор абзаца описание функции
Рекомендуемые инструменты для повышения производительности Word


Kutools For Word — Более 100 расширенных функций для Word, сэкономьте 50% времени
- Сложные и повторяющиеся операции можно производить разово за секунды.
- Вставляйте сразу несколько изображений из папок в документ Word.
- Объединяйте и объединяйте несколько файлов Word из папок в одну в желаемом порядке.
- Разделите текущий документ на отдельные документы в соответствии с заголовком, разрывом раздела или другими критериями.
- Преобразование файлов между Doc и Docx, Docx и PDF, набор инструментов для общих преобразований и выбора и т. Д.
Комментарии (2)
Оценок пока нет. Оцените первым!
Microsoft Word provides features to select multiple objects in Microsoft Word document. This article explains how to select multiple objects or shapes in the MS Word Document.
Microsoft Office 2010
Step (1). Open Microsoft Word 2010 document.
Step (2). Select multiple objects by holding Ctrl key down and mouse click on objects. This way we can select multiple objects.
If your document have so many overlapped objects, it is bit difficult to select them using mouse. Instead of this, you can select the multiple objects from Selection Pane. Following steps explain how to select multiple objects using Selection Pane.
Step (1). Click on Home tab and select Select item under Editing section. It will display a sub-menu.
Step (2). In sub-menu select Selection Pane… menu item. It will display Selection and Visibility window/pane. It will display the shapes on the current page.
Step (3). You can select multiple objects/shapes by holding Ctrl key down and mouse click on objects/shapes in the Selection and Visibility pane/window.
Another way of selecting multiple objects is by dragging the mouse over the objects with in the mouse dragged area. This is simple and easy to use feature. This feature was available in earlier versions of MS Word 2010. At the time of writing this article this feature is not available in MS Word 2010. Strange!
Following steps achieve this by converting the MS Word 2010 document to Word 97 – 2003 document type.
Step (1). Open Microsoft Word 2010 document.
Step (2). Save As the document to Word 97-20013 document type. The document may loose some of the features supported in Word 2010 document format. Be careful while converting the document to old format.
Step (3). Click on Home tab. It will display Home tab items.
Step (4). Select Select item under Editing section. It will display a sub-menu.
Step (5). In sub-menu select Select Objects menu item. This is a check menu item. Means if you click on Select Objects menu item on first time; Microsoft Word will enable you to select multiple objects. If you click on second time on Select Objects menu item; it will disable you to select multiple objects.
Step (6). Now drag your mouse pointer (by pressing left mouse button) over the objects you want to select.
Step (7). The objects which are there in the mouse dragged area will be selected and you can do operations on multiple selected objects or shapes.
by Code Steps