
Excel for Microsoft 365 Excel 2021 Excel 2019 Excel 2016 Excel 2013 Excel 2010 Excel 2007 More…Less
To select all cells on a worksheet, use one of the following methods:
-
Click the Select All button.

-
Press CTRL+A.
Note If the worksheet contains data, and the active cell is above or to the right of the data, pressing CTRL+A selects the current region. Pressing CTRL+A a second time selects the entire worksheet.

Tip If you want to select all cells in the active range, press CTRL+SHIFT+*.
Need more help?
Want more options?
Explore subscription benefits, browse training courses, learn how to secure your device, and more.
Communities help you ask and answer questions, give feedback, and hear from experts with rich knowledge.
At times, when we need to introduce a change in the dataset, formatting the cells, for instance, selecting only a few cells won’t be sufficient to apply these changes. The entire set of data is to be selected to apply the changes throughout. There might be a couple of ways to execute this & we would cover both in course of this article.
Here are the different ways of selecting all the cells,
- Using the Keyboard Shortcut
- Using the Navigation Keys
We would be trying to select the cells of the below dataset using each of the above-listed methods.

1. Using the Keyboard Shortcut
Now for the above dataset, there could be two situations in which:
- all the data would be in the format of a table
- or would be in the form of a plain range
Nevertheless, we shall see how to select everything in both cases using the keyboard shortcut method.
Let’s consider the first case in which the data involved is in a table format. One can confirm whether the data is in a table format or not, by clicking on any cells within the data and looking for the Table Tools tab. This tab shall appear at the very last position in the list of default tabs as shown below.

Here cell A1 is the active cell, but when the active cell moves outside the range of the table, the Table Tools tab would disappear from the list of tabs.
Upon confirming that the given dataset is a table, click on any cells within the range of that table and use the keyboard shortcut, CTRL + A to select all the cells of the table.
Focus on pressing the cells one after the other, as in first press the ‘CTRL’ key and without lifting the finger off that key, hit the letter key ‘A’. Once this is done, all the cells within the range of the table gets selected as shown in the below image,

But for any reason, our requirement is to select the entire sheet rather than only the contents of the table in this sheet, we can also do that by repeating the same step. Hit CTRL+A using the same sequence as stated above and the entire sheet gets selected.

In the above image, the entire sheet gets selected once you hit CTRL + A twice.
Now comes the other occasion where the dataset is not in the format of the table, but as a plain range of data. This can also be identified by clicking on any cell of the dataset & looking out for the Table Tools tabs.
If that ain’t visible, it ain’t a table!

But, here’s the catch with the plain range datasets, when CTRL+A is pressed only the entire sheet gets selected and not the cells with the data alone.
2. Using the Navigation Keys
Identify whether the dataset is in table format or not through the steps mentioned in the above method. If it’s a table, go to the top-left cell of that table using the CTRL and arrow keys. Press CTRL key & then the left arrow (←) key to move the active cell to the leftmost cell in the active row & then hit up arrow (↑) key without removing that finger off the CTRL-key.
CTRL + ←, followed by CTRL + ↑
Now the active cell would be the top-left cell of the table.

After this, press the SHIFT key followed by the down arrow (↓) key to select the entire active column of the table as shown below.
SHIFT + ↓

Then, without lifting the finger off the SHIFT key, hit the right arrow key (→) to select the entire table.
SHIFT + →

Press SHIFT + ↓, followed by SHIFT + → again if the entire sheet is to be selected instead of only the cells with the data.

If the data belongs to a plain range & not a table, the same steps mentioned above for the data in a table format can be repeated. But here, there won’t be a need to do SHIFT + ↓, followed by SHIFT + → twice, since the entire sheet will be selected the very first time they are used.
Conclusion
Now that we’ve covered 2 different ways to select all the cells in MS Excel, do watch out our space, QuickExcel to more such tips and tricks. Cheers!
In this article you’ll learn all of the different Select All shortcuts in Word, Excel and PowerPoint, and how to use Select All to quickly grab things like:
- Objects (PowerPoint)
- Text with similar formatting (Word)
- Formulas (Excel)
- Constants (Excel)
- Comments (Excel)
- And more!
This allows you to quickly grab EXACTLY what you need in each of the programs when you need it. This saves you from otherwise having to manually selecting everything yourself, one-by-one.
Select All shortcut (A Must Know)
The universal Select All shortcut for most program (Mac or PC) is:

Select All shortcut (PC Users): Ctrl + A
Select All shortcut (Mac Users) Cmd + A
That said there are a variety of different ways you can use the shortcut in Word, Excel and PowerPoint to finish your tasks faster and get you to Happy Hour (all discussed below).
How to best use the Select All command?
In short, this command is best used to quickly grab all the text, numbers, objects, formulas etc. that you want to quickly format or work with.
This allows you to quickly make changes to everything at once. For example:
- Change the font style of all the text in a Word document
- Grab all the formulas or constants in an Excel spreadsheet to change their font color
- Grab all your PowerPoint objects on a slide to change their shape fill
Which makes sense, right?
Why bother doing things manually (one-by-one) when you can select all your objects at once.
And it’s this kind of know-how why one person leaves the office at a decent hour, while another wastes away at the office all night.
How to Select All in Word

You have 4 different types of selection options in Microsoft Word.
And if you are on a PC, you can additionally shortcut all of these using your Ribbon Guides (details below).

1. Select All (Ctrl + A)
Selects everything within your document so that you can make all the formatting edits that you want at the same time.
Clicking this command with your mouse is the same as hitting Ctrl + A on your keyboard (Cmd + A on a Mac).
2. Select Objects
Changes your mouse cursor into an arrow symbol that allows you to select an element (chart, picture, SmartArt graphic, etc.) as an object.
This is different than when you click things with your mouse. When you click with your mouse, you normally click into the object as if you are going to edit it.
The Select Objects command ensures that you select the object itself. That way you can cut and paste it, or move it around within your document.
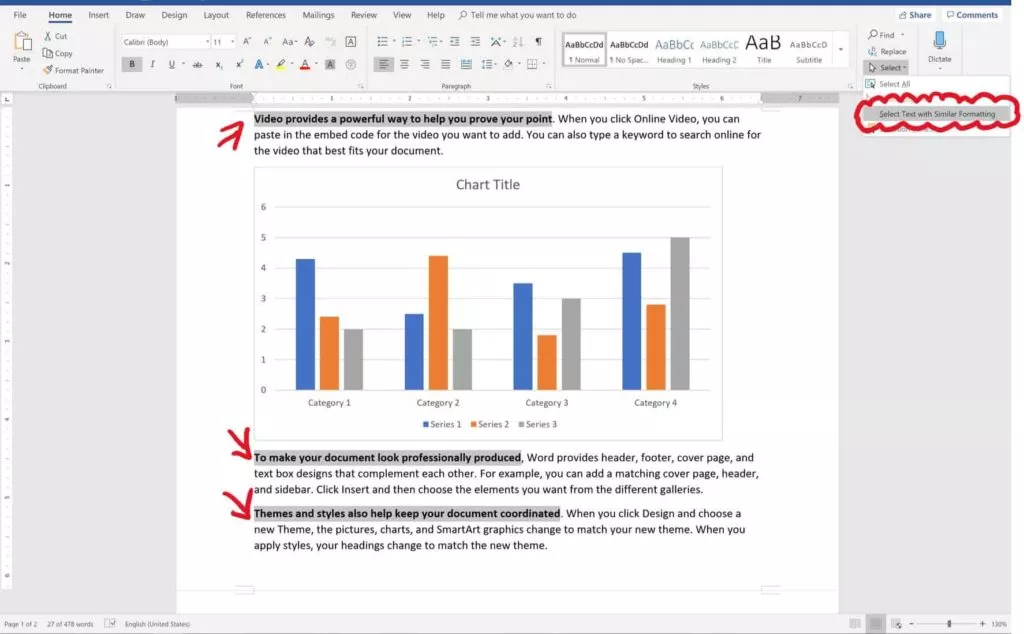
3. Select Text with Similar Formatting
Selects all of the text within a Word document that matches the formatting of the text that you have already selected.
This is one of the coolest features in Microsoft Word that hardly anyone knows about. This command grabs all of the same formatted text within a document, so you can change it’s formatting all at once.
Ahem… amazing!
4. The Selection Pane in Word (Alt + F10)
Opens or closes the Selection Pane in Microsoft Word.
Inside the Selection Pane you can see (and quickly manipulate) all the objects in a Word document.
Similar to the Selection Pane in PowerPoint, it only only shows you the objects on the current page you are currently working on.
That means that if you have 100 charts in your Word document but only 1 chart on your current page, you will only see 1 chart in the Selection Pane.
Select All Shortcuts in Word (Ribbon Guides)
Instead of using your mouse to access the selection commands, on a PC you can use your Ribbon Guides.
To use these shortcuts, simply hit the Alt key on your keyboard. Hitting the Alt key, you will see alphabetical sequences to the commands across your Ribbon.

On a PC, your select all Ribbon Guide shortcuts are:
- Select All: Alt, H, SL, A
- Select Objects: Alt, H, SL, O
- Select Text with Similar Formatting: Alt, H, SL, S
- Selection Pane: Alt, H, SL, P
Note: When using your Ribbon Guide shortcuts in Word, you do not need to hold them down. Instead, simply hit and let go of them one at a time (following the letters forward).
To learn more about the Microsoft Office ribbon, see this guide by Microsoft here.
Select All in Excel
Because there are so many more inputs that can go into an Excel spreadsheet, there are 7 different selection commands in Excel (all covered below)
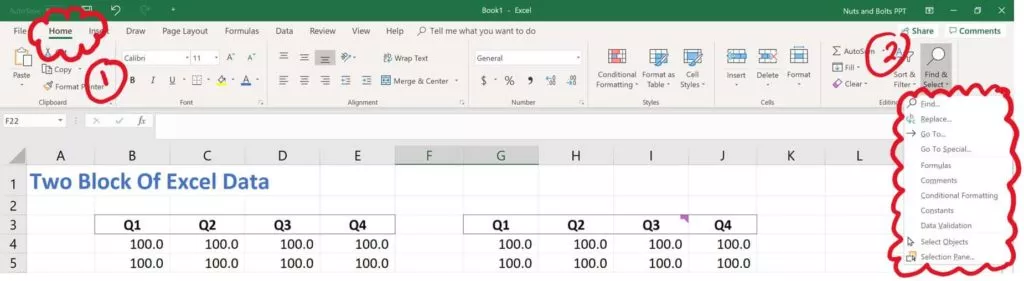
1. Select All (Ctrl + A)
Hitting Ctrl + A triggers the Select All command (which is otherwise not up in your Excel ribbon.
It’s also important to note that the Select All command works a little bit differently in Excel.
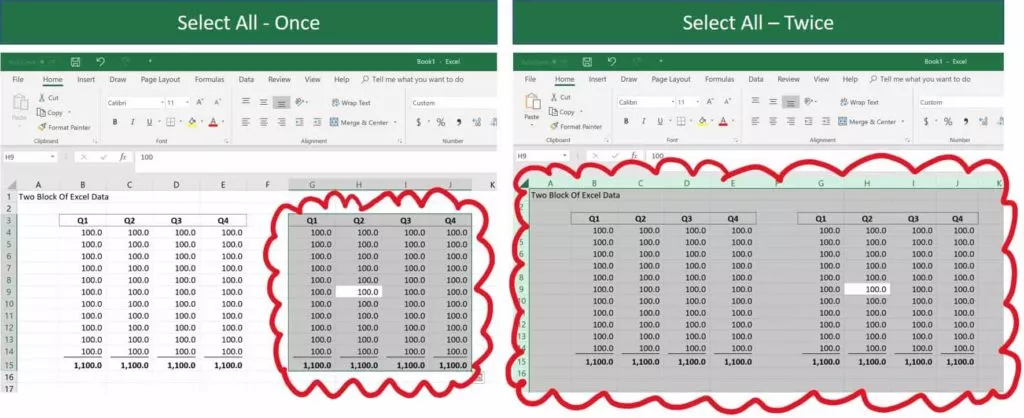
Using the command once, first selects the block of cells that you are currently active in.
Using the command a second time, then selects everything within your spreadsheet.
See images above for hitting it once, then twice.
2. Select Formulas
Clicking Formulas will grab all the formulas in your current spreadsheet (pictured below).
This is a fast way and easy way to quickly identify and change the formatting of any formulas in your spreadsheet.

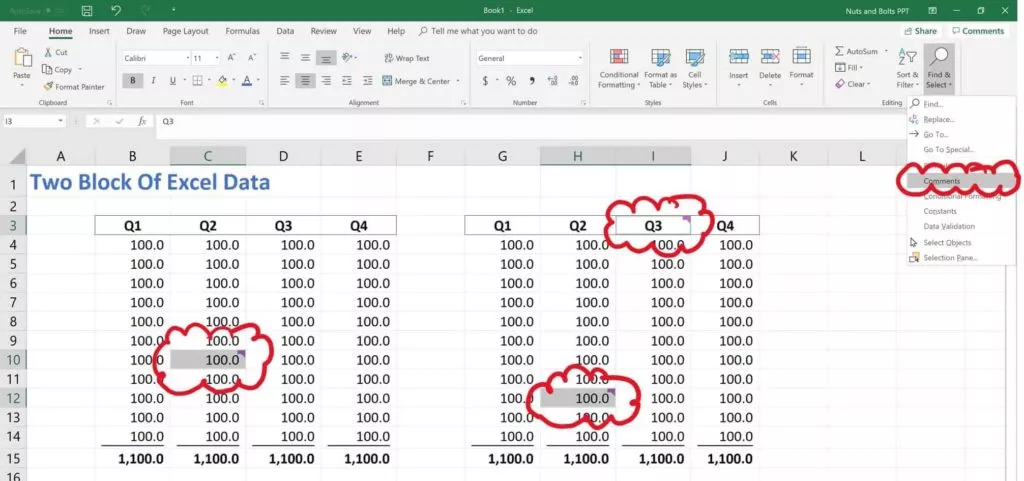
3. Select Comments
Clicking Comments automatically selects all of the comments in your spreadsheet (pictured below).
Comments show up in your spreadsheet as little markers in the upper-right hand corner of your cells. If you don’t want to waste time searching for them, simply use these command.
This allows you to quickly grab all the comments in your spreadsheet and format the cells.
4. Select Conditional Formatting
Clicking Conditional Formatting selects any cells within your spreadsheet that have conditional formatting in them.
This allows you to spot check or change the conditional formatting rules for those specific cells.
To learn more about conditional formatting rules, and how to use them, see this article by Microsoft here.
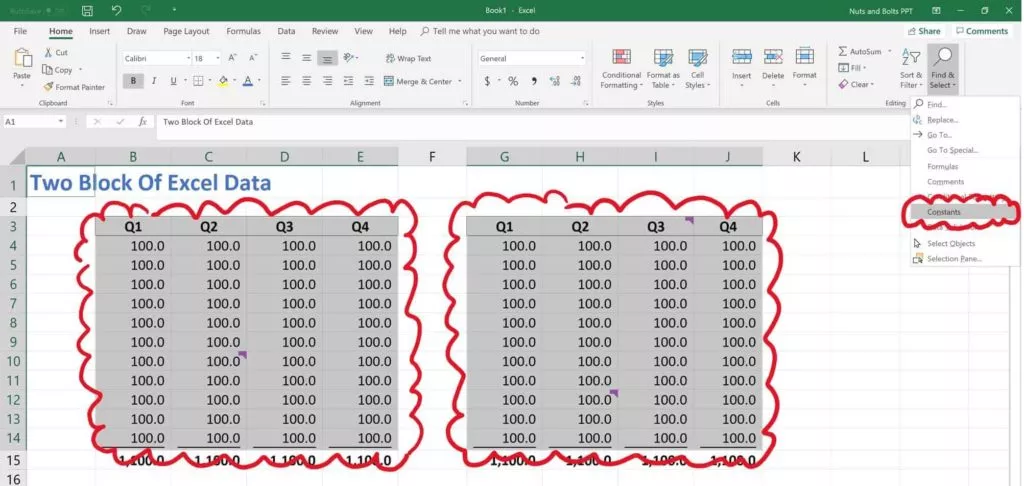
5. Select Constants
Selects all the constant values in your spreadsheet (i.e. values that are not formula-driven).
This is a fast and easy way to find all of the inputs that someone is using in their financial model or spreadsheet so that you can double-check their assumptions (pictured below).
6. Select Objects
Turns your cursor into an arrow that allows you to select objects that are within your spreadsheet (charts, pictures, SmartArt graphics etc.).
This is useful when you have a large spreadsheet or dashboard and you want to just select a single graphic without accidentally selecting the cells around it.
7. The Selection Pane in Excel (Alt + F10)
Opens the Selection Pane in Excel, showing you all of the charts, pictures, SmartArt graphics, etc., that are currently within your active spreadsheet.
Just keep in mind that the Selection Pane will only show you objects that are within the current sheet you are on. It will not show you objects that are on other sheets within your Excel file.
Select All Shortcuts in Excel (Ribbon Guides):
On top of using your mouse to activate the different Select commands in Excel, if you are on a PC, you can also use your Ribbon Guides to shortcut these commands (see key combinations below).
If you use any of these selection commands A LOT when working in Excel and are on a PC, I highly recommend learning these key combinations to save you time.

On a PC, your Ribbon Guide Shortcuts to these different commands are:
- Formulas: Alt, H, FD, U
- Comments: Alt, H, FD, M
- Conditional Formatting: Alt, H, FD, C
- Constants: Alt, H, FD, N
- Data Validation: Alt, H, FD, V
- Select Objects: Alt, H, FD, O
- Selection Pane: Alt, H, FD, P
Note: When using your Ribbon Guide shortcuts, you do not need to hold down the keys to make them work. Instead, simply hit and let go of them one at a time.
Select All in PowerPoint

You have 3 different types of selection options in PowerPoint (all of which you can shortcut on a PC using your Ribbon Guide shortcuts as discussed further below).

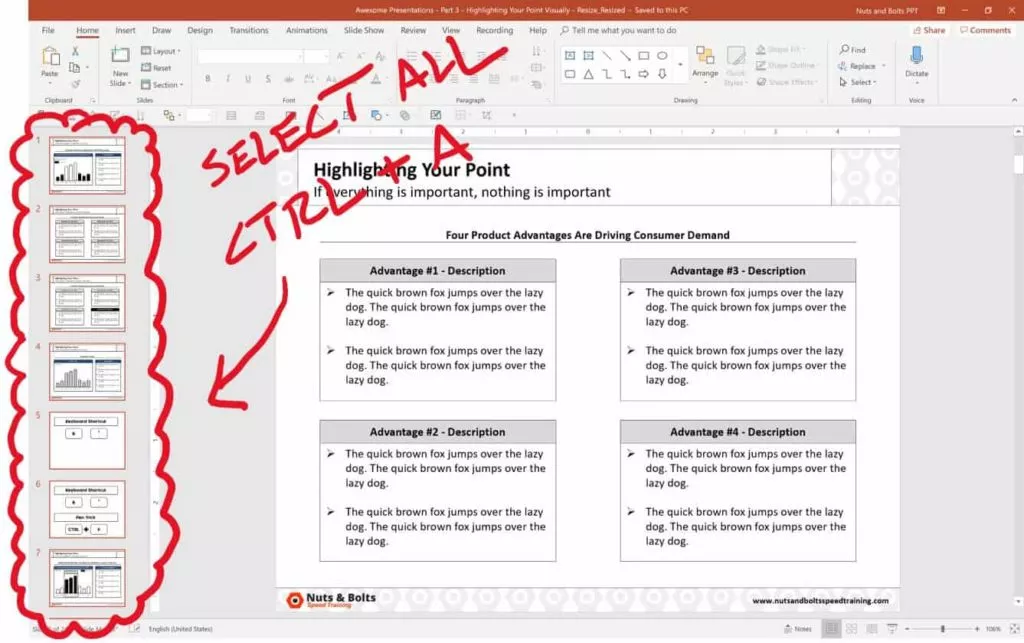
1. Select All (Ctrl + A)
Selects all of the objects that are currently on your slide.
This shortcut works in all of the different PowerPoint views including:
- The Normal View
- The Slide Master View
- The Handout Master View
- The Notes Master View, etc.
To learn more about setting up these different views in PowerPoint, see our guide on custom PowerPoint templates here.
On top of that, if you first click into the thumbnail view (pictured below) you can use the command to grab all of your slides. This allows you to copy and paste those slides, apply a new layout, reset the slides, etc.
2. Select Objects
This is the default selection option in PowerPoint, allowing you to select objects (shapes, text boxes, charts, SmartArt graphics, etc.) which is what all of your slides are made of.
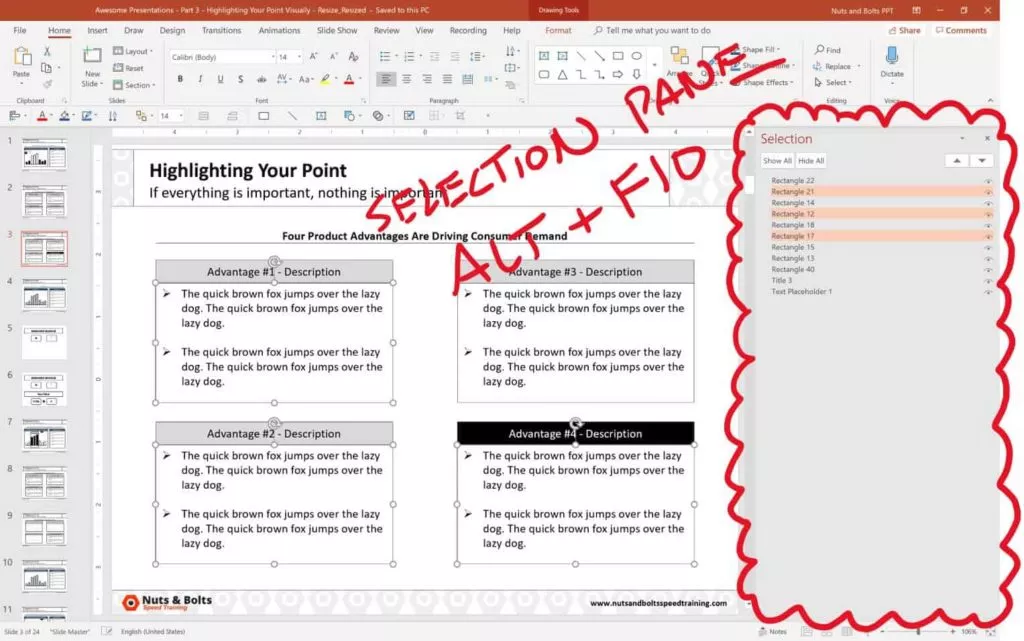
3. Selection Pane in PowerPoint (Alt + F10)
Opens the Selection Pane in PowerPoint, giving you a bird’s eye view of everything that is on your slide (even if it is buried beneath something else).
To learn other useful PowerPoint shortcuts like this to save you time in the program, see our guide here.
Selection Pane Shortcuts in PowerPoint
To learn more about how to use the Selection Pane shortcuts in PowerPoint, watch the short video below.
Inverse selected objects in PowerPoint
Another way to cleverly use the Select All command in PowerPoint is to ‘inverse-select’ your objects.
For example, let’s say you want to select EVERYTHING on your slide except for the title.
To do so, follow these steps:
- Hit Ctrl + A to select everything on your slide
- While holding the Shift key or the Ctrl key, select your Title to un-select it
Doing so leaves you with everything on your slide selected except for your slide title (or whatever else you unselected by holding the Shift or Ctrl key).
Select All shortcuts in PowerPoint (Ribbon Guides)
Besides navigating these selection commands using your mouse, you can also use your Ribbon Guide shortcuts to access them if you are on a PC.
To use your Ribbon Guide shortcuts, simply hit and let go of the Alt key, and then follow the alphabetical or numerical queues to find your command (all shortcut combinations are listed below).

On a PC, your Select All Ribbon Shortcuts are:
- Select All: Alt, H, SL, A
- Select Objects: Alt, H, SL, O
- Selection Pane: Alt, H, SL, P
Note: When using your Ribbon Guide shortcuts, you do not need to hold down the keys to make them work. Instead, simply hit and let go of them one at a time.
Conclusion
So those all the different ways you can Select All in Word, Excel and PowerPoint, and the different Select All shortcuts available to you if you are on a PC version of Microsoft Office.
Knowing how to properly use these, allows you to quickly grab exactly what you’re looking for so you can format it. This saves you time and gets you once step closer to Happy Hour.
If you are interested in taking your PowerPoint skills to the next level, you can learn more about our online courses and training here.
What’s next?
How to select all objects (pictures and charts) easily in Excel?
How do you select all objects, such as all pictures, and all charts? This article is going to introduce tricky ways to select all objects, to select all pictures, and to select all charts easily in active worksheet in Excel.
Select all objects in active worksheet
Select all pictures in active worksheet
Select all charts in active worksheet
Delete all objects/ pictures/ charts/ shapes in active/selected/all worksheets
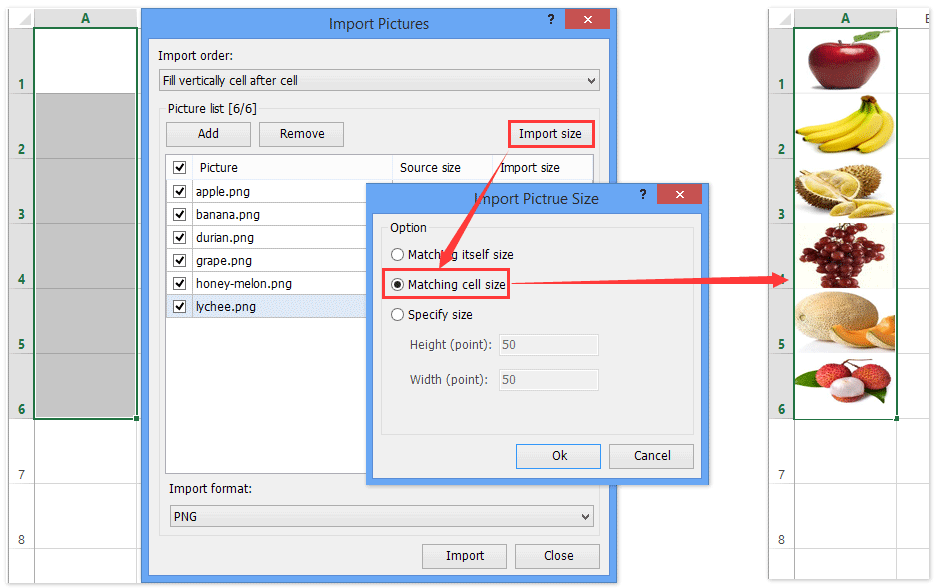
Easily insert multiple pictures/images into cells in Excel
Normally pictures are inserted above cells in Excel. But Kutools for Excel’s Import Pictures utility can help Excel users batch insert each picture/image into a single cell as below screenshot shown:
Go to Download Free Trial 60 daysPurchasePayPal / MyCommerce
Recommended Productivity Software
Office Tab: Use tabbed interface in Office as the use of web browser Chrome, Firefox and Internet Explorer.Kutools for Excel: Adds 120 powerful new features to Excel. Increase your productivity in 5 minutes. Save two hours every day!Classic Menu for Office: Brings back your familiar menus to Office 2007, 2010, 2013 and 2016 (includes Office 365).
 Select all objects in active worksheet


Amazing! Using Tabs in Excel like Firefox, Chrome, Internet Explore 10!
How to be more efficient and save time when using Excel?
You can apply the Go To command to select all objects easily. You can do it with following steps:
Step 1: Press the F5 key to open the Go To dialog box.
Step 2: Click the Special button at the bottom to open the Go To Special dialog box.
Step 3: In the Go To Special dialog box, check the Objects option.
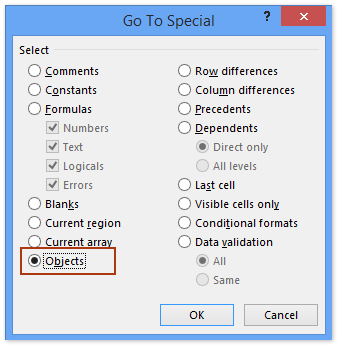
Step 4: Click OK. Then it selects all kinds of objects in active worksheet, including all pictures, all charts, all shapes, and so on.
Select all pictures in active worksheet
It seems no easy way to select all pictures except manually selecting each one. Actually, VB macro can help you to select all pictures in active worksheet quickly.
Step 1: Hold down the ALT + F11 keys, and it opens the Microsoft Visual Basic for Applications window.
Step 2: Click Insert > Module, and paste the following macro in the Module Window.
VBA: Select all pictures in active worksheet
1
2
3
Public Sub SelectAllPics()
ActiveSheet.Pictures.Select
End Sub
Step 3: Press the F5 key to run this macro. Then it selects all pictures in active worksheet immediately.
Select all charts in active worksheet
VB macro can also help you to select all charts in active worksheet too.
Step 1: Hold down the ALT + F11 keys, and it opens the Microsoft Visual Basic for Applications window.
Step 2: Click Insert > Module, and paste the following macro in the Module Window.
VBA: Select all charts in active worksheet
1
2
3
Public Sub SelectAllCharts()
ActiveSheet.ChartObjects.Select
End Sub
Step 3: Press the F5 key to run this macro. This macro will select all kinds of charts in active worksheet in a blink of eyes.
 Quickly delete all objects/ pictures/ charts/ shapes in active/selected/all worksheets
Sometimes, you may need to delete all pictures, charts, or shapes from current worksheet, current workbook or specified worksheets. You can apply Kutools for Excel’s Delete Illustrations & Objects utility to archive it easily.
Kutools for Excel — Combines More Than 120 Advanced Functions and Tools for Microsoft Excel
Go to DownloadFree Trial 60 daysPurchasePayPal / MyCommerce
1. Click Kutools > Delete > Delete Illustrations & Objects.
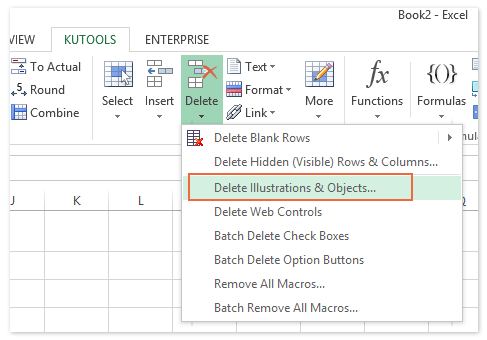
2. In the opening dialog box, you need to:
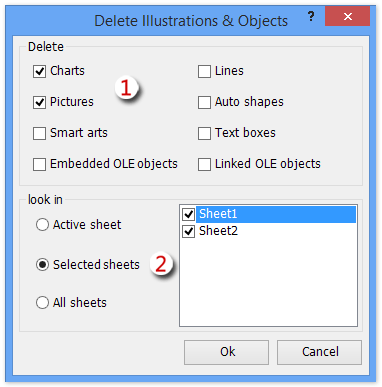
(1) In the Delete section, please specify the types of objects you want to delete.
In our case, we want to remove charts and pictures, therefore we check the Charts option and Pictures option.
(2) In the Look in section, specify the deleting scope.
In our case, we want to remove charts and pictures from several specified sheets, therefore we check the Selected Sheets option, and then check the specified worksheet in the right box. See left screenshot:
Free Download Kutools for Excel Now
3. Click the Ok button.
Then all charts and pictures are removed from the specified worksheets.
Related Articles
Delete all Pictures easily
Delete all charts Workbooks
Delete all Auto Shapes quickly
Delete all Text Boxes quickly
Is your problem solved?
Yes, I want to be more efficiency and save time when using Excel No, the problem persists and I need further support
Recommended Productivity Tools
The following tools will greatly save your time and effort, which one do you prefer?Office Tab: Using handy tabs in your Office, as the way of Chrome, Firefox and New Internet Explorer.Kutools for Excel: 120 powerful new functions for Excel, Increase your productivity in 5 minutes. Save two hours every day!Classic Menu for Office: Bring back familiar menus to Office 2007, 2010, 2013 and 365, as if it were Office 2000 and 2003.
Kutools for Excel
 Amazing! Increase your productivity in 5 minutes. Don’t need any special skills, save two hours every day!
More than 120 powerful advanced functions which designed for Excel:
- Merge Cell/Rows/Columns without Losing Data.
- Combine and Consolidate Multiple Sheets and Workbooks.
- Compare Ranges, Copy Multiple Ranges, Convert Text to Date, Unit and Currency Conversion.
- Count by Colors, Paging Subtotals, Advanced Sort and Super Filter,
- More Select/Insert/Delete/Text/Format/Link/Comment/Workbooks/Worksheets Tools…

![]()
![]()
![]()
Aug 11 2017
Top 29 Microsoft Excel Keyboard Shortcuts – #1 Select All
If you use Microsoft Excel on a regular basis, using keyboard shortcuts can increase your efficiency and keep your hands off of the mouse. Perhaps you already know a few, perhaps you know none. Either way we have an easy to reference chart to teach you the 29 most used Microsoft Excel keyboard shortcuts. You can get your copy today, for free.
#1 – Microsoft Excel Keyboard Shortcut, Select All.
- “Ctrl + A” for Windows
- “Command + A” for Apple
If you Google “Select all cells in Microsoft Excel” you may get the graphic below.

This Excel keyboard shortcut is a huge time saver. Manually selecting all and not missing anything can take 10 or more seconds, while the keyboard shortcut would take a mere fraction of a second.
Typically if you are selecting all there is a very good chance your next action will be to copy what you have selected. Doing that is just as easy, another Excel keyboard shortcut, “Ctrl + C“, which is mostly likely shortly followed by another MS Excel keyboard shortcut, “Ctrl + V“, to paste what you copied. So doing this manually could take you a handful of seconds if you are fast when you work in Excel, or minute if you are slow. But if you used the three keyboard shortcuts, you could do this in a second or less.
Would you like to see a long list of Excel keyboard shortcuts? If so visit our sister site, ExcelConsultant.Net, Free Excel help article on Microsoft Excel keyboard shortcuts.

If you would like to get a free copy of the 29 Microsoft Excel Keyboard Shortcuts chart please send us an email and we will get that right out to you, provided by SiegeMedia.com.
What are your favorite and most used Microsoft Excel keyboard shortcuts? If you would like to see a post on them, send us an email and let us know what they are.
If you are a data scientist or visualization expert chances are you know all of the primary Excel keyboard shortcuts and that you really do not use the mouse that much. Just like people who used to work in Lotus 123, using keyboard shortcuts is a sign of a master. I know when I was an Excel consultant I was extremely fast in Excel, and much of that speed came via keyboard shortcuts. But anyone using Excel can master these, and while you work on memorizing them, use the free cheat sheet being offered here.
Stay tuned for more Microsoft Excel keyboard shortcuts.
- Previous Post
- Next Post