
Word for Microsoft 365 Word for Microsoft 365 for Mac Word 2021 Word 2021 for Mac Word 2019 Word 2019 for Mac Word 2016 Word 2016 for Mac Word 2013 Word 2010 Word for Mac 2011 More…Less
Before you share your document, remove any markup by accepting or rejecting tracked changes and deleting comments.
Important: To remove tracked changes, you must accept or reject them. To remove comments, you must delete them. Choosing the No Markup view only temporarily hides changes and comments. They will be visible again the next time someone opens the document.
Accept or reject changes one at a time
-
Click or tap at the beginning of the document.
-
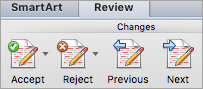
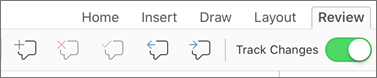
On the Review tab, go to Changes.
-
Select Accept or Reject. As you accept or reject changes, Word will move to the next change.

-
Repeat until you’ve reviewed all changes in your document.

Tip: To review changes in the document without accepting or rejecting them, select Next or Previous.
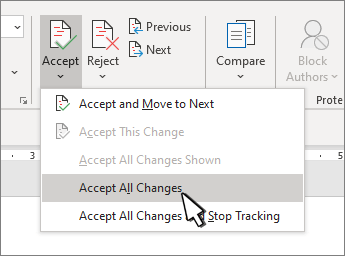
Accept or reject all changes
-
On the Review tab, go to Changes.
-
Do one of the following:
-
In the Accept drop-down list, select Accept All Changes.
-
In the Reject drop-down list, select Reject All Changes.
-
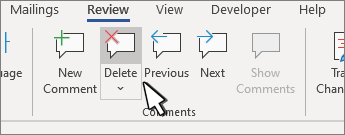
Delete Comments one at a time
-
Select a comment.
-
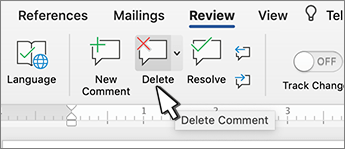
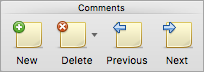
On the Review tab, go to Comments and select Delete.
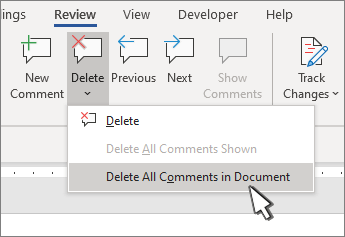
Delete all comments
-
Select a comment.
-
On the Review tab, go to Comments.
-
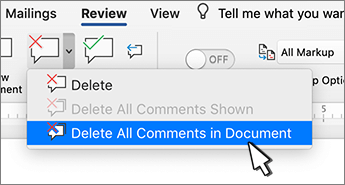
In the Delete drop-down list, select Delete All Comments in Document.
Tips:
-
To do a final check, run Document Inspector. This tool checks for tracked changes and comments, hidden text, personal names in properties, and other information.
-
To run Document Inspector, go to File > Info > Check for Issues and select Inspect Document.
Accept or reject changes one by one
-
Click or tap at the beginning of the document
-
On the Review tab, select Accept or Reject. As you accept or reject changes, Word will move to the next change.
-
Repeat until you’ve reviewed all of the changes in your document.
Tip: To move through changes in the document without accepting or rejecting them, select Next or Previous.
Accept or reject all changes
-
Go to the Review tab.
-
Do one of the following: Changes and do one of the following:
-
In the Accept drop-down list, select Accept All Changes.
-
In the Reject drop-down list, select Reject all Changes.
-
Delete comments one by one
-
Select a comment.
-
On the Review tab, select Delete.
Delete all comments
-
Go to the Review tab.
-
In the Delete drop-down list, select Delete All Comments in Document.
Remove tracked changes
-
Click at the beginning of the document.
-
On the Review tab, go to Changes.
-
Select Accept or Reject. As you accept or reject changes, Word will move to the next change.
-
Repeat until you’ve removed all changes in the document.
Tip: To review changes in the document without accepting or rejecting them, select Next or Previous.
Accept or reject a single change
When you accept or reject a single change, Word will not move to the next change in the document.
-
Right-click the change and select the option to accept or reject it.
Remove comments
You need to remove comments separately from tracked changes.
-
Select a comment.
-
On the Review tab, go to Comments.
-
Select Delete.
Remove all comments at once
-
Go to the Review tab
-
In the Delete drop-down list, select Delete All Comments in Document.
Resolve conflicting changes
When multiple authors are collaborating on a document, they might make changes that conflict with one another. Conflicts can occur when one person works offline and then saves the document to the server, or when two people work on the same part of a document and save to the server before refreshing the document with updates made by other authors.
When edits conflict, you must resolve them before you can save the document to the server. All changes in the document are saved on your computer in the Microsoft Upload Center, even when the document contains conflicts. However, the changes aren’t saved to the server until the conflicts are resolved. When conflicts exist, Word notifies you by displaying a message bar at the top of the document window and a notification in the status bar.
-
In the message bar, click Resolve Conflicts.
Word displays the Your conflicting changes pane that lists the conflicts, and the Conflicts tab appears on the ribbon.
-
In the Your conflicting changes pane, click a conflicting change to highlight the conflicting part of the document.
Word uses pink highlighting to mark the conflicting changes that you made and green highlighting to mark changes made by other authors. Any other tracked changes that are in the document are temporarily hidden.
-
Do one of the following:
To
Do this
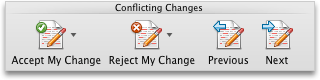
Keep your change
On the Conflicts tab, under Conflicting Changes, click Accept My Change.
Remove your change
On the Conflicts tab, under Conflicting Changes, click Reject My Change.
Accept or reject changes
You can review each change in sequence and decide whether to accept or reject the change.
-
Click or tap at the beginning of the document.
-
On the Review tab, go to Tracking.
-
Select Accept or Reject. As you accept or reject changes, Word will move to the next change.
Tip: To review changes in the document without accepting or rejecting them, select Next or Previous.
-
Repeat until you’ve reviewed all of the changes in your document.

Accept or reject a single change
Rather than move through changes in sequence, you can accept or reject a single change. When you accept or reject the change, Word will not move to the next change in the document.
-
Right-click the change and select the option to accept or reject it.
Accept changes
-
Tap twice on a change in the document to select it.
-
On the Review tab, tap the Accept icon.
-
Do one of the following:
-
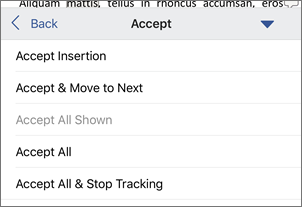
Tap Accept & Move to Next to accept the change and move to the next change in the document.
-
Tap Accept Deletion, Accept Insertion, or Accept Change to accept the selected change, identified contextually by type, and not move to the next change in the document.
-
Tap Accept All Shown to accept all changes that are visible, but not changes that are hidden. For example, if you’re viewing only changes made by a specific reviewer, tapping Accept All Shown accepts only the changes made by that reviewer.
-
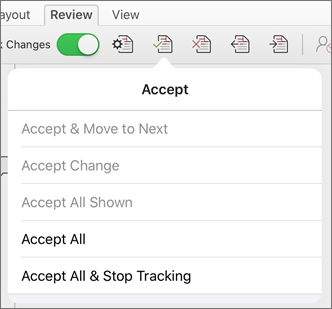
Tap Accept All to accept all changes in the document.
-
Tap Accept All & Stop Tracking to accept all changes in the document and turn off Track Changes.
-
-
To move to another change without accepting or rejecting it, tap the Previous or Next icon.
Reject changes
-
Tap twice on a change in the document to select it.
-
On the Review tab, tap the Reject icon.
-
Do one of the following:
-
Tap Reject & Move to Next to reject the change and move to the next change in the document.
-
Tap Reject Deletion, Reject Insertion, or Reject Change to reject the selected change, identified contextually by type, and not move to the next change in the document.
-
Tap Reject All Shown to reject all changes that are visible, but not changes that are hidden. For example, if you’re viewing only changes made by a specific reviewer, tapping Reject All Shown rejects only the changes made by that reviewer.
-
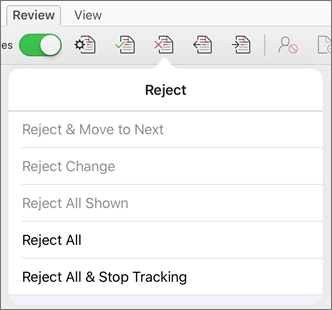
Tap Reject All to reject all changes in the document.
-
Tap Reject All & Stop Tracking to reject all changes in the document and turn off Track Changes.
-
-
To move to another change without accepting or rejecting it, tap the Previous or Next icon.
Delete comments
-
Tap twice on a comment in the document to select it.
-
Tap the Review tab.
-
Tap the Delete icon to delete the comment or press and hold the Delete icon until the Delete list appears, and then do one of the following:
-
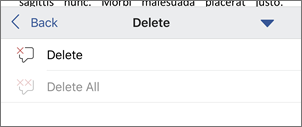
Tap Delete to delete only the selected comment.
-
Tap Delete All to delete all comments in the document.
-
-
To move to another comment without deleting it, tap the Previous or Next icon.
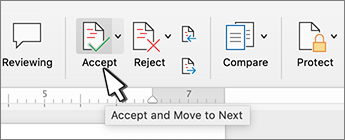
Accept changes
-
Tap twice on a change in the document to select it.
-
On the Review tab, tap Accept.
-
Do one of the following:
-
Tap Accept & Move to Next to accept the change and move to the next change in the document.
-
Tap Accept Deletion, Accept Insertion, or Accept Change to accept the selected change, identified contextually by type, and not move to the next change in the document.
-
Tap Accept All Shown to accept all changes that are visible, but not changes that are hidden. For example, if you’re viewing only changes made by a specific reviewer, tapping Accept All Shown accepts only the changes made by that reviewer.
-
Tap Accept All to accept all changes in the document.
-
Tap Accept All & Stop Tracking to accept all changes in the document and turn off Track Changes.
-
Reject changes
-
Tap twice on a change in the document to select it.
-
On the Review tab, tap Reject.
-
Do one of the following:
-
Tap Reject & Move to Next to reject the change and move to the next change in the document.
-
Tap Reject Deletion, Reject Insertion, or Reject Change to reject the selected change, identified contextually by type, and not move to the next change in the document.
-
Tap Reject All Shown to reject all changes that are visible, but not changes that are hidden. For example, if you’re viewing only changes made by a specific reviewer, tapping Reject All Shown rejects only the changes made by that reviewer.
-
Tap Reject All to reject all changes in the document.
-
Tap Reject All & Stop Tracking to reject all changes in the document and turn off Track Changes.
-

Delete comments
-
Tap twice on a comment in the document to select it.
-
One the Review tab, tap Delete, and then do one of the following:
-
Tap Delete to delete only the selected comment.
-
Tap Delete All to delete all comments in the document.
-
To move to another comment without deleting it, tap the Previous or Next icon.
-
Need more help?
 Please Note:
This article is written for users of the following Microsoft Word versions: 2007, 2010, 2013, 2016, 2019, and Word in Microsoft 365. If you are using an earlier version (Word 2003 or earlier), this tip may not work for you. For a version of this tip written specifically for earlier versions of Word, click here: Accepting All Formatting Changes.
![]()
Written by Allen Wyatt (last updated June 19, 2021)
This tip applies to Word 2007, 2010, 2013, 2016, 2019, and Word in Microsoft 365
Graciela has a huge document with many changes that were made with Track Changes turned on. Some of these changes are formatting changes and some of them are of other types, such as textual edits. Graciela would like to accept all the formatting changes but not the other types of changes. She is curious if there is an «accept all» command that will accept only the formatting changes.
It is relatively easy to accomplish this task. Just follow these steps:
- Make sure the Review tab of the ribbon is displayed.
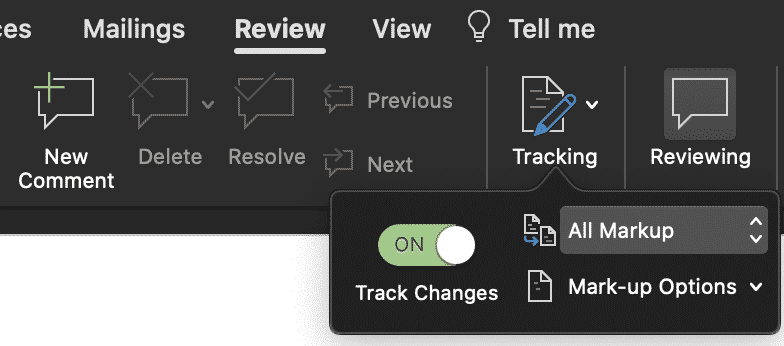
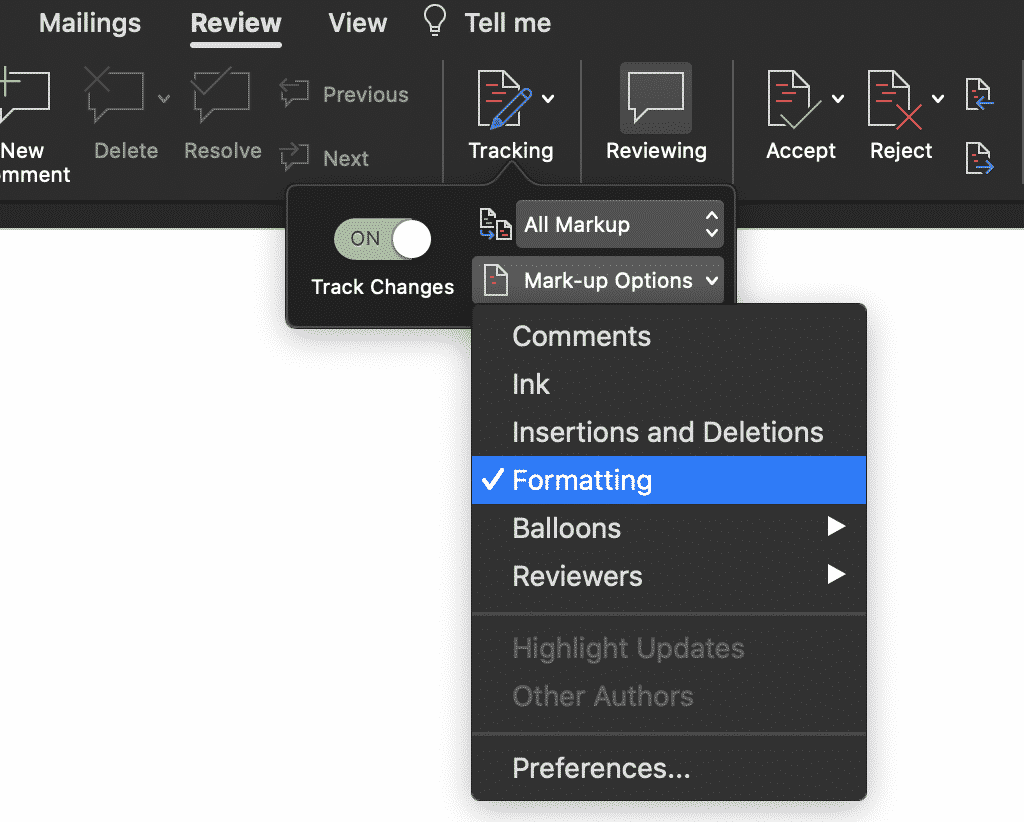
- Click the Show Markup tool (in the Tracking group). Word displays some options that control what changes are shown.
- Clear all the checkmarks, except the Formatting checkmark. (You will need to repeat step 2 for each checkmark you need to remove.)
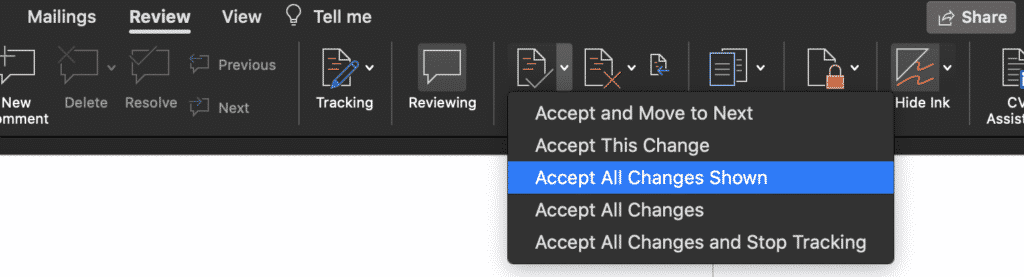
- Click the down-arrow under the Accept tool (in the Changes group). Word displays some different ways you can accept changes.
- Choose Accept All Changes Shown. All the formatting changes (which is all that are shown) are accepted. (Don’t select Accept All Changes in Document; that would accept all the changes whether they are shown or not.)
- Use the Show Markup tool to select which changes you want Word to show.
If you find yourself getting rid of the formatting changes quite a bit, you can instruct Word to not track formatting changes at all. Follow these steps if you are using Word 2007 or Word 2010:
- Make sure the Review tab of the ribbon is displayed.
- Click the down-arrow under the Track Changes tool (in the Tracking group) and then click Change Tracking Options. Word displays the Track Changes Options dialog box. (See Figure 1.)
- Clear the Track Formatting check box.
- Click OK.
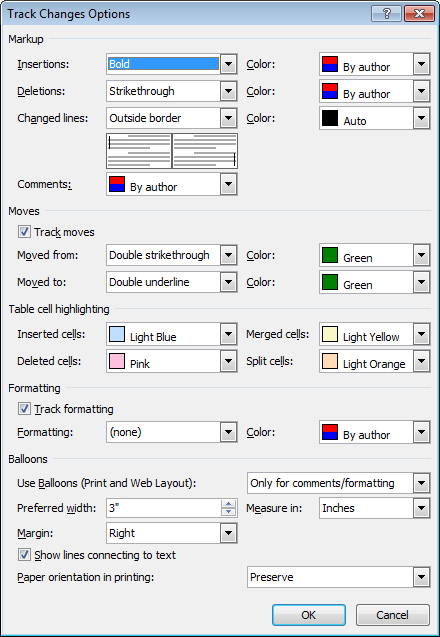
Figure 1. The Track Changes Options dialog box.
If you are using Word 2013 or a later version, follow these steps instead:
- Make sure the Review tab of the ribbon is displayed.
- Click the small icon at the lower-right corner of the Tracking group. Word displays the Track Changes Options dialog box.
- Click the Advanced Options button. Word displays the Advanced Track Changes Options dialog box. (See Figure 2.)
- Clear the Track Formatting check box.
- Click OK to close the Advanced Track Changes Options dialog box.
- Click OK to close the Track Changes Options dialog box.
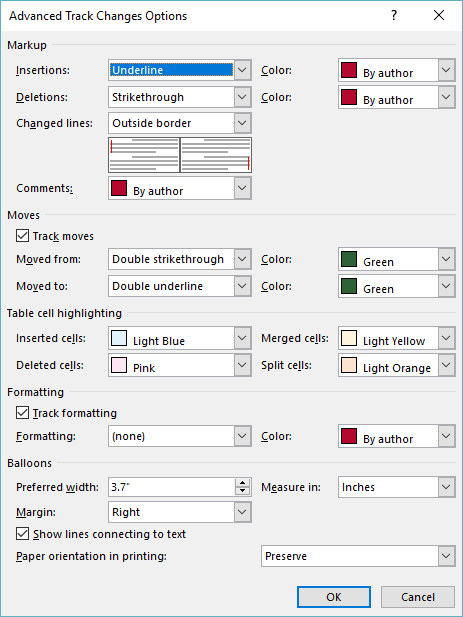
Figure 2. The Advanced Track Changes Options dialog box.
Now Word won’t track any of the formatting changes you make in the document. If you find that the setting is not persistent from one Word session to another, you can create a small macro to run whenever a document is opened. Simply add this single line to the macro:
ActiveDocument.TrackFormatting = False
WordTips is your source for cost-effective Microsoft Word training.
(Microsoft Word is the most popular word processing software in the world.)
This tip (8834) applies to Microsoft Word 2007, 2010, 2013, 2016, 2019, and Word in Microsoft 365. You can find a version of this tip for the older menu interface of Word here: Accepting All Formatting Changes.
Author Bio
With more than 50 non-fiction books and numerous magazine articles to his credit, Allen Wyatt is an internationally recognized author. He is president of Sharon Parq Associates, a computer and publishing services company. Learn more about Allen…
MORE FROM ALLEN
Continually Saving Normal.dot
If your Normal.dot file is continually saved when you exit Word, even when you haven’t made any changes to it, the …
Discover More
Specifying Print Quantity in a Cell
When you print a worksheet, you can specify in the Print dialog box how many copies you want printed. If you want the …
Discover More
Automatic Selection of Portrait or Landscape
Should you print in portrait or in landscape? The decision can greatly affect the way your printout looks. Wouldn’t it be …
Discover More
More WordTips (ribbon)
Consolidating Changes under a Single User
When using Track Changes, you may want to have your edits appear to be those of a different user. Here’s how to fool Word …
Discover More
Changing Revision Bar Thickness
Ever wonder how to customize the way the Track Changes feature displays revision bars at the side of changed material? …
Discover More
Producing Cleaner Markup
Sometimes it seems that Word is overly aggressive in what it shows in its markup when you have Track Changes turned on. …
Discover More
This tutorial shows how to use Track Changes in Microsoft Word. Track Changes helps us edit documents by tracking insertions, deletions, replacements, and format changes. Word calls these edits markups.
This tutorial also includes an overview of Word’s new Modern comment tool.
We will cover twelve topics:
- How to Turn Track Changes On and Off
- How to Show and Hide Track Changes
- How to Delete Text with Track Changes
- How to Insert Text with Track Changes
- How to Replace Text with Track Changes
- How to Change Formatting with Track Changes
- How to Accept or Reject Track Changes
- How to Insert Comments
- How to Reply to Comments
- How to Resolve Comments
- How to Delete Comments
- How to Open and Close the Reviewing Pane
Watch all the steps shown here in real time!
Explore more than 200 writing-related software tutorials on my YouTube channel.
Let’s dive in…
How to Turn Track Changes On and Off
- Select the Review tab in the ribbon.

- Select the Track Changes button in the Tracking group. The button will appear darker than the rest of the ribbon when Track Changes is turned on.

- Select the Track Changes button (see figure 2) again to turn off tracking.
How to Show and Hide Track Changes
You can control how comments and edits appear by using the Display for Review and Show Markup menus in the Tracking group in the ribbon.
- Select the Display for Review drop-down menu to choose how edits and comments are displayed. The options are (A) Simple Markup, (B) All Markup, (C) No Markup, and (D) Original.

(A) Simple Markup displays the edited version of the document without visible in-line edits. However, edits are indicated by a vertical line in the left margin.
For example, if you delete a sentence, that sentence won’t appear on screen. Instead, a vertical line will appear in the left margin showing that a change was made in that location.
If you want to see the edit, select the vertical line to switch to All Markup.

Comments will be visible on the right side of the screen when in Simple Markup.
(B) All Markup displays all edits and comments.
A vertical line, like the one shown in Simple Markup (see figure 4), will appear on the left side of the screen indicating that a change was made in that location.
Select that line to switch to Simple Markup.
(C) No Markup displays the edited version of the document without any visible edits or comments.
(D) Original displays the original version of the document without any edits or comments.
- Select the Show Markup drop-down menu to choose what features Track Changes displays. (Note that this menu is called Markup Options in Word for Mac.)
I recommend showing markups for Insertions and Deletions and Formatting as well as choosing Show Only Formatting in Balloons so that your insertions and deletions will appear in the text and formatting changes will appear next to the text.

Be default, comments will appear in balloons on the right side of the text.
Important note: The remaining sections show Track Changes in the All Markup view.
How to Delete Text with Track Changes
- Select the text you want to delete.
- Select the Delete key on your keyboard. The deleted text will appear with a strikethrough in the All Markup view.

How to Insert Text with Track Changes
- Place your cursor where you want to insert new text.
- Type the new text. The insertion will appear with an underline in the All Markup view.

How to Replace Text with Track Changes
- Select the text you want to replace.
- Type the replacement text. The original text will appear with a strikethrough, and the replacement text will appear with an underline in the All Markup view.

How to Change Formatting with Track Changes
Formatting includes the font style, font size, font color, italics, bold font, underlining, superscripting and subscripting, indentations, alignment, and margins.
- Select the text you want to reformat.
- Change the format. Track Changes will automatically display the change with your other markup if you have selected formatting in the Show Markup section of the Tracking group.

How to Accept or Reject Track Changes
Edits created with Track Changes must be accepted before they become part of your document. You can accept or reject edits individually or all at once.
Accept or Reject Edits Individually
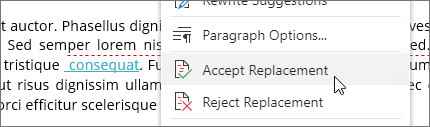
- Click on or select the insertion, deletion, or replacement text.
- Select the Accept or Reject button in the Changes group.

Pro Tip: Use the Previous and Next buttons to navigate through all the edits in the document.

Accept or Reject All Edits
Unless you are very confident in your reviewers’ expertise, I strongly caution against accepting or rejecting all edits without first checking the accuracy of each one.
- Select the Accept or Reject menu arrow in the Changes group.
- Select your preferred option: Accept/Reject All Changes or Accept/Reject All Changes and Stop Tracking.

This section covers the basics of using comments in Word. For a more in-depth look, please see my previous tutorial “How to Use Comments in Microsoft Word (Modern Comments).”
You can use the Comment tool with Track Changes turned on or turned off.
- Place your cursor near the text you want to comment on or select the text.
- Select the Review tab in the ribbon (see figure 1).
- Select the New Comment button in the Comments group.

- Type your comment into the comment text box on the right side of the screen.
If you are part of an organization, you may be able to @ mention other users in your comments.
- Select the Post button or type the keyboard shortcut Ctrl + Enter (PC) or Command + Return (Mac) to post the comment.

- If you need to edit your comment, select the Edit button (PC users see figure 15; Mac users see figure 16).


- Type your reply into the Reply text box in the other person’s comment.
- Select the Post button or type the keyboard shortcut Ctrl + Enter (PC) or Command + Return (Mac) to post the reply.

You can mark a comment as “Resolved” to tell other people (or remind yourself) that an issue has been taken care of. However, you can also reopen a resolved comment, thereby turning it back to a regular comment.
- Select the three-dot menu in the comment.
- Select Resolve thread from the drop-down menu.

The comment will no longer be visible in the contextual view on the right side of the screen.
How to Reopen Resolved Comments
- Select the Review tab (see figure 1).
- Select the Show Comments menu arrow.
- Select List from the drop-down menu.

- Select the Reopen button in the comment.

Here are two ways to delete comments.
Method 1: Select the three-dot menu in the comment and then select Delete thread from the drop-down menu.

Method 2: Place your cursor in the comment or the text connected to the comment and then select the Delete menu arrow in the Review tab.
From there, choose Delete to delete the current comment, or Delete All Comments Shown, Delete All Comments in Document, or Delete All Resolved Comments (PC only).

How to Open and Close the Reviewing Pane
The Reviewing Pane (labeled Revisions) shows all the comments and edits selected in the Show Markup drop-down menu in the Tracking group in the ribbon, along with the total number of those comments and markups in the document.
The Reviewing Pane isn’t necessary for using Track Changes, but it can be helpful when you need to find a specific edit or want to see how many edits or comments are in the document.
- Select the Review tab (see figure 1).
- Select the Reviewing Pane button in the Tracking group.
The Reviewing Pane will appear, normally on the left side of your screen.

- Reselect the Reviewing Pane button to close the Reviewing Pane.
Related Resources
How to Copy and Paste Text with Comments and Track Changes in Word
How to Remove User Names from Existing Track Changes in Microsoft Word
How to Change Your User Name for Track Changes in Microsoft Word
How to Stop Microsoft Word from Calling You “Author” in Track Changes
How to Change the Color of Track Changes in Microsoft Word
Updated January 16, 2023
it is a variation of question
MS Word: How do I format all change tracked text at once?
I am finding difficulty in working with the colors given in MS Word (I am at 2016) for track change. The colors are so few, and are so dim or otherwise obscure that track changed deleted/ added text doesn’t pop out at screen to catch my attention. Often small sized characters (like . , ; a) are so small that there addition/ deletion goes unnoticed as they are not visible so well and I end up leaving them unattended. underline _ or dash — or separation char – are further problem, because they are used as the style of deletion/ addition in trackchange and if that very character was there and is deleted, or was not there and is added, it is just impossible to figure out because that char then have two meanings.
I have given different colors to addition (red) and to deletion (blue) so it is slightly better, but these are so dull colors that they still fail to catch attention.
I want to select all deleted text in one go and highlight it with (say) yellow,
I want to select all added text in one go and highlight it with (say) green,
I think then it just can’t go unnoticed.
I have explored STYLES but couldn’t figure out any category for track changed text.
How to select ALL DELETED text and then ALL ADDED text (track change) in one go in MS Word 2016 (w8) to do the above?
Thanks.
added
On This page, you will find several macros, that go to each track-changed text/ phrase one by one. These macros are extracting track changed text to excel or word files or just displaying on screen.
http://answers.microsoft.com/en-us/office/forum/office_2007-word/possible-to-export-word-track-changes-information/e0dee9dc-aedb-41d3-92bf-8dc609cc75af?db=5&auth=1
I don’t know so much vba, can someone take any macro from there and modify so that it goes only to all added and/ or all deleted track-change text one by one, and then just change the color or highlight or whatever.
Thanks.
When you turn on Tracked Changes in Microsoft Word, Word will automatically track all text, formatting and ink changes for you.
Tracking all changes is a handy way to show your colleagues what you have updated in the document, leaving the document owner to manage these changes, accepting and rejecting them before they are saved into the documents text body.

Formatting refers to the way in which the document is laid out, an example of a formatting change would be indenting a paragraph or inserting a page break.
Often formatting changes can be reviewed at a glance.
Quickly accepting all formatting changes before you begin reviewing all other changes one-by-one is an easy way to de-clutter your document and leave you to review the changes the remaining changes individually.
In this blog, we will show you how to accept all formatting changes at once, while leaving all other tracked changes to be reviewed separately.
How to accept all formatting changes at once in Word?
- Open Word
- Click the Review Tab

- Find and Press Tracking
- Under Tracking, Press Mark-up Options
- In the Mark-up Options options, clear all checkmarks, except for the formatting line. Leave the tick next to formatting
- Note here, you may need to repeat steps 2-3 and clear the checkmarks individually depending on the version of Word you are working in
- Once all checkmarks are cleared, find and click Accept
- Press Accept All Changes Shown (aka, just your formatting changes)
After you have accepted all changes shown, you can review the remaining comment, ink and insertion/deletion mark-ups by re-ticking them as you did back in step 5 above.
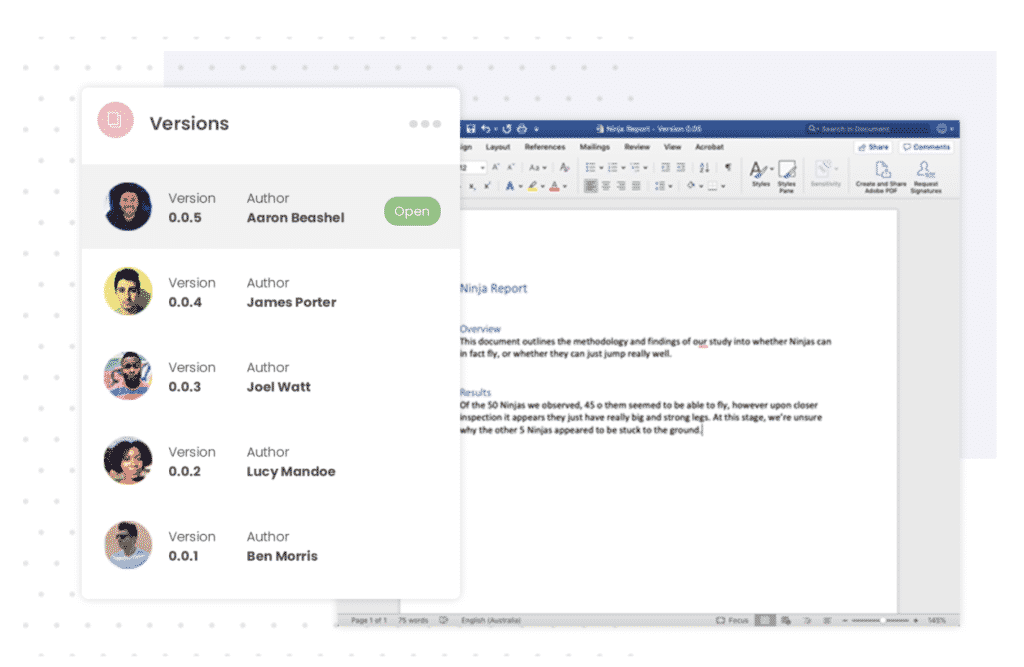
Looking for a better way to manage version control?
When you are collaborating with more than one other person on a Microsoft Word document keeping track of every version is often harder than it needs to be.
There are a number of commonly used methods to manage version control, such as; adding version numbers or dates to the end of the document name. Inserting your initials, or your initials and the date at the end of the document.
These methods do work, if your team are all following the same version control system and no two people are working on the document simultaneously, leaving you with two different versions of report_v18.
Too often, these methods just don’t work.
Your file name ends up being so long that you can’t read it without expanding the size of your documents window, or someone places the word _final at the end of your document prematurely leaving you with something along the lines of document_v18.2_final_v4 and so on.
The only way to find the latest version now is to look at the most recently updated file, cross your fingers and hope you have just opened the correct version.

With so many of us facing the same frustrations when collaborating in Microsoft Word, it’s no surprise that there are now some amazing purpose-built tools on the market that are here to make version control easy.
Tools such as Simul Docs.
Numerical file names is the best way to manage version control, you’ve been using some form of this method for a while now. But Simul takes it to a whole new level.
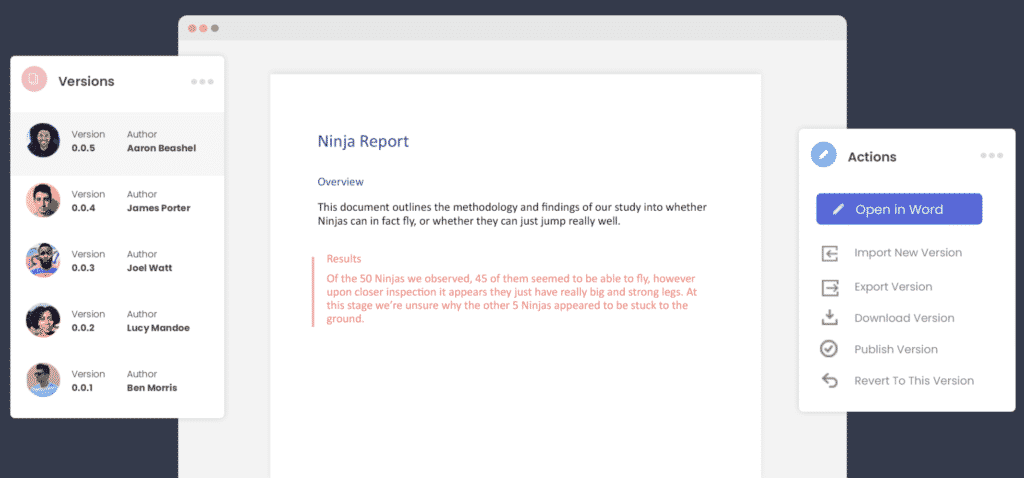
Removing the variable of individual decisions or file name preferences, Simul will automatically save a document under a new name when a change is made.
Simul makes version control easy and fool proof, like it should be.
When working in Simul you own the first draft, Simul would call this version 0.0.1.
Someone else opens version 0.0.1 and makes a few minor changes and without this author having to think about pressing save, or coming up with a new file name, Simul has automatically saved the document for them and called it version 0.0.2.
Then you jump back in and add a few extra pieces of information, this version is automatically saved as version 0.0.3.
Its version control done right. The way you’ve always dreamt it would be done.
With Simul managing version control for you, you will never have to search through a long list of documents and crazy file names again to find the latest version. You also won’t accidentally save over an old version without realising.
So you’ve finished collaborating and you now have a final version. Congratulations!
You can easily export or share your document directly from Simul Docs. Use the export button to take the file out in either Word or PDF formate, or use the share button to share the file using a direct link, email or any cloud sharing system such as Dropbox, GoogleDrive, OneDrive and Sharepoint.
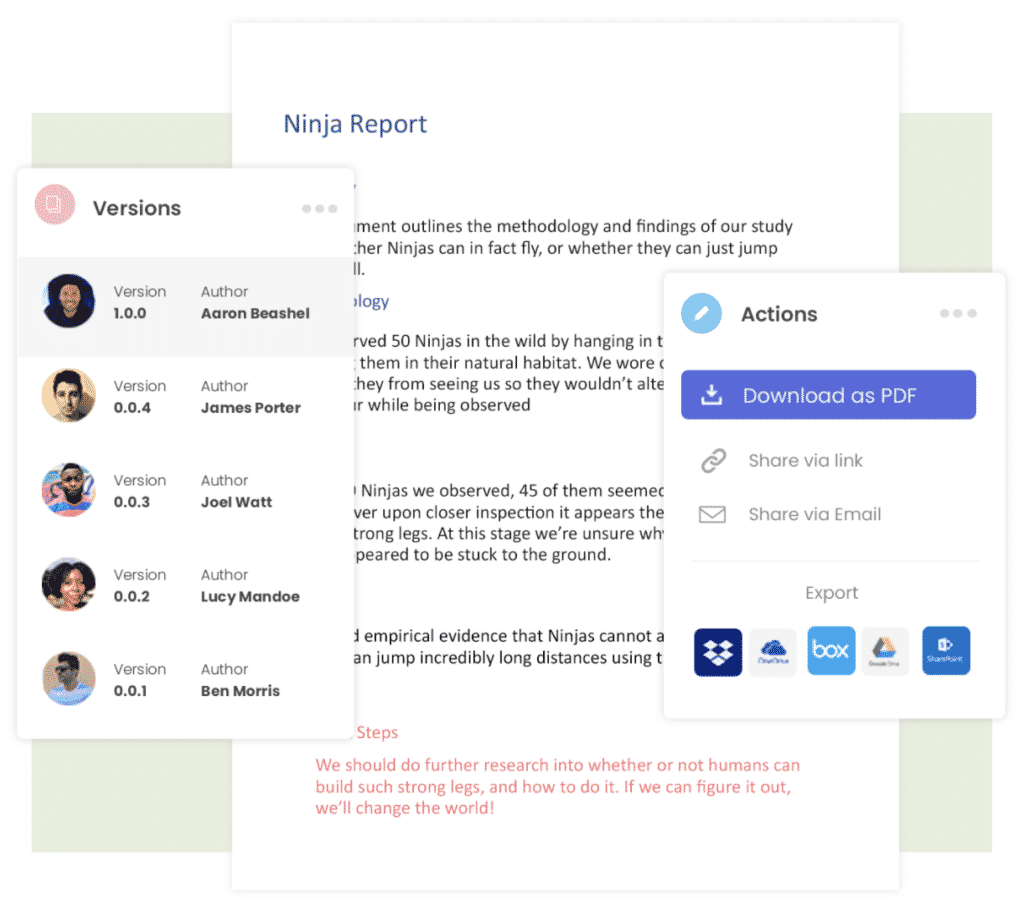
If you share the working file with someone outside of your organisation and they would like to track a few last updates for you or make a comment on the document, that’s ok. Simul is happy for you to share the document with anyone and allow them to collaborate with you using all of the amazing Simul Docs features.
Leaving you to collaborate, share and work on your document without any of the painful bits, the bits we all wish weren’t a part of collaborating in Word.
Simul Docs is the answer to collaboration done right.