
Реализация простого секундомера в ячейке рабочего листа с помощью кода VBA Excel. Примеры с использованием метода Application.OnTime.
Точность работы секундомера, реализованного средствами VBA Excel, оставляет желать лучшего, но для простых задач и в целях изучения вполне подойдет.
Внешний вид простого секундомера в ячейке рабочего листа в состоянии «включен»:

Для включения и выключения секундомера используется одна кнопка из коллекции «Элементы ActiveX», у которой в зависимости от состояния таймера меняется название (Caption).
Код секундомера располагается в модуле листа (в примерах – «Лист4»), результат выводится в ячейку «B2».
Код секундомера 1
На рабочий лист «Лист4» добавлена кнопка CommandButton1 из коллекции «Элементы ActiveX». Ее видимое наименование (Caption) вручную изменено на «Старт». При первом клике наименование кнопки программным способом изменяется на «Стоп», ячейке «B2» присваивается пустая строка и запускается секундомер. При повторном клике секундомер останавливается, а наименование кнопки меняется на «Старт».
|
1 2 3 4 5 6 7 8 9 10 11 12 13 14 15 16 17 18 19 20 21 22 23 24 25 26 27 28 29 30 31 32 33 34 35 36 37 38 39 40 41 42 |
Option Explicit ‘Объявление общей переменной для всех процедур Dim start As Boolean Private Sub CommandButton1_Click() If CommandButton1.Caption = «Старт» Then start = True ‘Форматирование ячейки «B2» и присвоение ей пустой строки ‘Форматирование можно сделать вручную, а оставить только ‘присвоение пустой строки: Range («B2») = «» With Range(«B2») .NumberFormat = «h:mm:ss;@» .Borders.LineStyle = True .HorizontalAlignment = xlCenter .VerticalAlignment = xlCenter .Value = «» End With ‘Запуск процедуры секундомера Call Stopwatch ‘Меняется наименование кнопки CommandButton1.Caption = «Стоп» Else start = False ‘Меняется наименование кнопки CommandButton1.Caption = «Старт» End If End Sub Private Sub Stopwatch() If start = True Then ‘Это условие необходимо, чтобы начать отсчет с нуля If Range(«B2») <> «» Then Range(«B2») = Range(«B2») + TimeValue(«00:00:01») Else Range(«B2») = 0 End If ‘Процедура приостанавливается на 1 секунду и запускает саму себя Application.OnTime Now + TimeValue(«00:00:01»), «Лист4.Stopwatch» Else Exit Sub End If End Sub |
Код секундомера 2
В этом примере используются две процедуры VBA Excel с методом Application.OnTime, которые по очереди запускают друг друга. Этот код приведен исключительно для ознакомления, что так тоже можно.
|
1 2 3 4 5 6 7 8 9 10 11 12 13 14 15 16 17 18 19 20 21 22 23 24 25 26 27 28 29 30 31 32 33 34 35 36 37 38 39 40 41 42 43 44 |
Option Explicit Dim start As Boolean Private Sub CommandButton1_Click() If CommandButton1.Caption = «Старт» Then start = True With Range(«B2») .NumberFormat = «h:mm:ss;@» .Borders.LineStyle = True .HorizontalAlignment = xlCenter .VerticalAlignment = xlCenter .Value = «» End With Call Stopwatch1 CommandButton1.Caption = «Стоп» Else start = False CommandButton1.Caption = «Старт» End If End Sub Private Sub Stopwatch1() If start = True Then If Range(«B2») <> «» Then Range(«B2») = Range(«B2») + TimeValue(«00:00:01») Else Range(«B2») = 0 End If ‘Процедура приостанавливается на 1 секунду и запускает процедуру Stopwatch2 Application.OnTime Now + TimeValue(«00:00:01»), «Лист4.Stopwatch2» Else Exit Sub End If End Sub Private Sub Stopwatch2() If start = True Then Range(«B2») = Range(«B2») + TimeValue(«00:00:01») ‘Процедура приостанавливается на 1 секунду и запускает процедуру Stopwatch1 Application.OnTime Now + TimeValue(«00:00:01»), «Лист4.Stopwatch1» Else Exit Sub End If End Sub |
Перейдем теперь к следующей, уже более сложной разработке. Итак, на рабочем листе необходимо создать интерфейс, показанный на рис. 1.37. Здесь обозначения Часы, Минуты и Секунды представляют элементы управления «Надпись» и являются просто поясняющими надписями рядом с соответствующими текстовыми окнами, в которые выводится информация о времени. Вывод этих сведений инициирует щелчок на кнопке Отобразить время. Фактически таким образом мы реализуем на рабочем листе вариант электронных часов. Фрагмент Секундомер (это слово набрано просто в ячейке на листе) позволяет в тех же окнах реализовать функции секундомера. Работа секундомера запускается по нажатию кнопки Старт. В этом случае текстовое окно для отображения текущего часа очищается, а информация в окнах, отводимых для минут и секунд, начинает обновляться.
Если пользователю требуется остановить отсчет времени, то он должен щелкнуть на кнопке Стоп, после чего обновление времени останавливается. В табл. 1.1 указаны имена и тины объектов, расположенных на рис. 1.37.
Таблица 1.1. Имена объектов на рис.1.37
| Свойство Name | Тип объекта | Комментарий |
|---|---|---|
| Th | Текстовое окно | Для вывода текущего часа |
| Tm | Текстовое окно | Для вывода минут |
| Ts | Текстовое окно | Для вывода секунд |
| Vrema | Кнопка | Caption — Отобразить время |
| Start | Кнопка | Caption — Старт |
| StopSec | Кнопка | Caption — Стоп |
В качестве первого шага введем переменную Flag, которая нам понадобится для остановки обновления времени. Эта переменная должна быть известна как процедуре обработки щелчка на кнопке Старт, так и процедуре обработки щелчка на кнопке Стоп.

Рис. 1.37. Реализация часов и секундомера
В редакторе Visual Basic существует общая область, где можно описывать переменные (рис. 1.38), которые должны быть известны внутри нескольких процедур. Строка программы в окне, представленном на рис. 1.38, означает следующее:
- Dim определить (это ключевое слово Visual Basic);
- Flag имя переменной;
- As Integer определение данной переменной как целого числа (значениями переменной могут быть только целые числа).
Таким образом, мы определили переменную, которая должна быть известна всем процедурам на данном рабочем листе Excel. И если одна из процедур поменяет значение переменной Flag, то в другой процедуре это изменение можно увидеть. В дальнейшем мы этим воспользуемся для остановки обновления времени по щелчку на кнопке.

Рис. 1.38. Определение переменной в общей области
После такого вступительного комментария можно привести процедуру обработки щелчка на кнопке Отобразить время (листинг 1.18).
1 2 3 4 5 6 7 8 9 10 |
' Листинг 1.18. Процедура, выполняемая по щелчку на кнопке Отобразить время Private Sub Vrema_Click() Flag = 0 While Flag = 0 Th.Text = Format(Now(), "hh") Tm.Text = Format(Now(), "nn") Ts.Text = Format(Now(), "ss") DoEvents Wend End Sub |
Теперь разберем строки этой процедуры. Во-первых, здесь используется оператор цикла, который начинается со строки While Flag = 0 и заканчивается строкой Wend. После ключевого слова While располагается условие, и если оно выполняется, то выполняются все строки программы вплоть до Wend. Затем управление опять передается на строку While, и если условие вновь выполняется, то все повторяется. Если же условие не выполняется, то управление передается на первую строку после Wend.
В строке Th.Text = Format(Now(), "hh") используются несколько внутренних функций Visual Basic. Так, функция Now() не требует входных параметров и просто выдаст текущую дату и время. В свою очередь, другая внутренняя функция, Format, позволяет задать определенный формат для выводимой информации. Если нам необходимо выделить только текущий час, то в качестве второго аргумента функции Format мы должны задать «hh». Соответственно в следующих двух строках из текущего времени выделяются минуты и секунды.
Далее по тексту располагается внутренняя процедура Visual Basic DoEvents, которая позволяет переключаться из выполняемого программного кода на обработку других событий. В данном случае нам необходимо по щелчку на кнопке Стоп установить значение переменной Flag в 1, что реализуется в процедуре, приведенной в листинге 1.19.
1 2 3 4 |
' Листинг 1.19. Процедура обработки щелчка на кнопке Стоп Private Sub StopSec_Click() Flag = 1 End Sub |
Таким образом, мы обеспечили вывод текущего времени и его остановку. Что касается остановки, то она скорее требуется для секундомера. И теперь наша задача заключается в реализации его функциональности. В листинге 1.20 приведена процедура, которая выполняется по щелчку на кнопке Старт, что позволяет включить секундомер.
1 2 3 4 5 6 7 8 9 10 11 12 13 14 15 16 17 18 19 20 21 22 23 24 25 26 |
' Листинг 1.20. Обработка щелчка на кнопке Старт Private Sub Start_Click() Th.Text = "" Tm.Text = 0 Ts.Text = 0 Flag В = 0 ' Получение значения секунд Sec = Format(Now(), "ss") ' В переменной Shet организуем счетчик Shet = 0 While Flag = 0 Sec2 = Format(Now(), "ss") If Sec <> Sec2 Then ' При изменении секунд Shet = Shet + 1 Sec = Sec2 ' Получение минут ChetMins = Shet 60 ' Выделение секунд ChetSecs = Shet - ChetMins * 60 Tm.Text = ChetMins Ts.Text = ChetSecs End If DoEvents Wend End Sub |
Здесь мы использовали операцию целочисленного деления () для получения числа прошедших минут. Программа для работы секундомера готова, и на рис. 1.39 показан результат ее работы.

Рис. 1.39. Пример работы секундомера
Познакомимся на практике в рамках данного примера со свойством, которое определяет доступ к элементам управления. Как мы уже знаем, у элементов управления имеется свойство Enabled. Когда для этого свойства установлено значение True, доступ к данному элементу разрешен, а в противном случае (при значении False) доступ запрещен.
Изменим предыдущую разработку следующим образом. В окне свойств для кнопок Старт и Отобразить время значение свойства Enabled установим True, а для кнопки Стоп в качестве значения этого свойства выберем False. В результате в начале работы для действий пользователя доступна кнопка, позволяющая отобразить время, и кнопка секундомера, а кнопка Стоп недоступна. Теперь при щелчке на кнопке Старт доступ к кнопке Стоп должен разрешаться, кнопка Старт должна стать недоступной. В листинге 1.21 показана модифицированная процедура обработки щелчка па кнопке Стоп, которая затрагивает свойства двух кнопок, относящихся к секундомеру.
1 2 3 4 5 6 7 |
' Листинг 1.21. Модифицированная процедура, ' выполняемая по щелчку на кнопке Стоп Private Sub StopSec_Click() Flag = 1 StopSec.Enabled = False Start.Enabled = True End Sub |
Также требуются небольшие изменения в процедуре обработки щелчка на кнопке Старт. Ее текст представлен в листинге 1.22.
1 2 3 4 5 6 7 8 9 10 11 12 13 14 15 16 17 18 19 20 21 22 23 24 |
' Листинг 1.22. Измененная процедура, ' выполняемая по щелчку на кнопке Старт Private Sub Start_Click() Th.Text = "" Tm.Text = 0 Ts.Text = 0 Flag = 0 Sec = Format(Now(), "ss") Shet = 0 StopSec.Enabled = True Start.Enabled = False While Flag = 0 Sec2 = Format(Now(), "ss") If Sec <> Sec2 Then Shet = Shet + 1 Sec = Sec2 ChetMins = Shet 60 ChetSecs = Shet - ChetMins * 60 Tm.Text = ChetMins Ts.Text = ChetSecs End If DoEvents Wend End Sub |
После выполненных изменений доступ к кнопкам в программе реализуется попеременно. Заметим, что по мере рассмотрения дальнейших разработок в наших статьях будет наблюдается общая тенденция на усложнение, поэтому рекомендуется каждый рассматриваемый пример прорабатывать детально. Необходимые сведения по VBA будут приводиться здесь и в последующих статьях в процессе рассмотрения разработок, поэтому явной необходимости в использовании дополнительной справочной информации нет. С другой стороны, было бы очень хорошо, если бы читатель познакомился с известными книгами по рассматриваемой теме.
Если на вашем листе есть секундомер, вы будете знать, когда закончить работу. Как создать секундомер на листе с кнопками «Пуск», «Стоп» и «Сброс», как показано на следующем снимке экрана? Если вы нажмете кнопку «Пуск», это будет время начала, если вы нажмете кнопку «Стоп», время остановится, а кнопка «Сброс» поможет вам сбросить время. В этой статье я расскажу о том, как создать простой и удобный секундомер в Excel.

Создайте секундомер с тремя кнопками с помощью кода VBA
Создайте секундомер с тремя кнопками с помощью кода VBA
Чтобы создать секундомер с тремя кнопками: «Пуск», «Стоп» и «Сброс», выполните следующие шаги один за другим.
Во-первых, вставьте три командные кнопки.
1. Нажмите Застройщик > Вставить > Кнопка управления, см. снимок экрана:

2. Затем перетащите мышь, чтобы нарисовать кнопку, после вставки кнопки вы можете изменить заголовок кнопки, нажмите Застройщик > Предложения, В Предложения диалоговом окне введите новый заголовок «Start»Для этой кнопки в текстовом поле рядом с Подпись, смотрите скриншоты:
3. Повторите два вышеупомянутых шага, чтобы вставить две другие кнопки и подписать их как «Stop(Основной ключ) и Сброс”, См. Снимок экрана:

4. После вставки кнопок вы должны выйти из режима дизайна, нажав Застройщик > Режим проектирования.
Во-вторых, создайте код VBA.
5. Затем щелкните правой кнопкой мыши вкладку текущего рабочего листа и выберите Просмотреть код, в выскочившем Microsoft Visual Basic для приложений окно, скопируйте и вставьте следующий код в Код листа:
Код VBA: Создать секундомер:
Public StopIt As Boolean
Public ResetIt As Boolean
Public LastTime
Private Sub CommandButton1_Click()
Dim StartTime, FinishTime, TotalTime, PauseTime
StopIt = False
ResetIt = False
If Range("C2") = 0 Then
  StartTime = Timer
  PauseTime = 0
  LastTime = 0
Else
  StartTime = 0
  PauseTime = Timer
End If
StartIt:
  DoEvents
  If StopIt = True Then
    LastTime = TotalTime
    Exit Sub
  Else
    FinishTime = Timer
    TotalTime = FinishTime - StartTime + LastTime - PauseTime
    TTime = TotalTime * 100
    HM = TTime Mod 100
    TTime = TTime  100
    hh = TTime  3600
    TTime = TTime Mod 3600
    MM = TTime  60
    SS = TTime Mod 60
    Range("C2").Value = Format(hh, "00") & ":" & Format(MM, "00") & ":" & Format(SS, "00") & "." & Format(HM, "00")
    If ResetIt = True Then
      Range("C2") = Format(0, "00") & ":" & Format(0, "00") & ":" & Format(0, "00") & "." & Format(0, "00")
      LastTime = 0
      PauseTime = 0
      End
    End If
    GoTo StartIt
  End If
End Sub
Private Sub CommandButton2_MouseDown(ByVal Button As Integer, ByVal Shift As Integer, ByVal X As Single, ByVal Y As Single)
  StopIt = True
End Sub
Private Sub CommandButton3_Click()
  Range("C2").Value = Format(0, "00") & ":" & Format(0, "00") & ":" & Format(0, "00") & "." & Format(0, "00")
  LastTime = 0
  ResetIt = True
End Sub

Внимание: В приведенном выше коде C2 это ячейка, в которую будет вставлено время секундомера, а CommandButton1, CommandButton2, CommandButton3 являются названиями кнопок, вы можете просмотреть точное название кнопки в Имя Box, см. снимок экрана:

В-третьих, отформатируйте ячейку времени секундомера.
6. Затем вы должны отформатировать ячейку времени как Текст формат, и вы можете изменить размер ячейки, шрифт, цвет шрифта, фон и т. д., как вам нужно, см. снимок экрана:

7. После завершения вышеуказанных шагов, с этого момента, когда вы нажимаете Start кнопку, время начнется сейчас, и нажмите Stop кнопка, это остановит время, Сброс кнопка сбросит время, см. снимок экрана:

Демонстрация: создание секундомера с тремя кнопками с помощью кода VBA
Лучшие инструменты для работы в офисе
Kutools for Excel Решит большинство ваших проблем и повысит вашу производительность на 80%
- Снова использовать: Быстро вставить сложные формулы, диаграммы и все, что вы использовали раньше; Зашифровать ячейки с паролем; Создать список рассылки и отправлять электронные письма …
- Бар Супер Формулы (легко редактировать несколько строк текста и формул); Макет для чтения (легко читать и редактировать большое количество ячеек); Вставить в отфильтрованный диапазон…
- Объединить ячейки / строки / столбцы без потери данных; Разделить содержимое ячеек; Объединить повторяющиеся строки / столбцы… Предотвращение дублирования ячеек; Сравнить диапазоны…
- Выберите Дубликат или Уникальный Ряды; Выбрать пустые строки (все ячейки пустые); Супер находка и нечеткая находка во многих рабочих тетрадях; Случайный выбор …
- Точная копия Несколько ячеек без изменения ссылки на формулу; Автоматическое создание ссылок на несколько листов; Вставить пули, Флажки и многое другое …
- Извлечь текст, Добавить текст, Удалить по позиции, Удалить пробел; Создание и печать промежуточных итогов по страницам; Преобразование содержимого ячеек в комментарии…
- Суперфильтр (сохранять и применять схемы фильтров к другим листам); Расширенная сортировка по месяцам / неделям / дням, периодичности и др .; Специальный фильтр жирным, курсивом …
- Комбинируйте книги и рабочие листы; Объединить таблицы на основе ключевых столбцов; Разделить данные на несколько листов; Пакетное преобразование xls, xlsx и PDF…
- Более 300 мощных функций. Поддерживает Office/Excel 2007-2021 и 365. Поддерживает все языки. Простое развертывание на вашем предприятии или в организации. Полнофункциональная 30-дневная бесплатная пробная версия. 60-дневная гарантия возврата денег.
")
Вкладка Office: интерфейс с вкладками в Office и упрощение работы
- Включение редактирования и чтения с вкладками в Word, Excel, PowerPoint, Издатель, доступ, Visio и проект.
- Открывайте и создавайте несколько документов на новых вкладках одного окна, а не в новых окнах.
- Повышает вашу продуктивность на 50% и сокращает количество щелчков мышью на сотни каждый день!
")
While working at IBM, I was a part of a ToastMasters International club. It’s a place where you can improve your communication and leadership skills.
An interesting section in the weekly meetings was impromptu speaking. In this part of the meeting, a person was given a topic and he/she had to speak on it for 2 minutes. There was a designated person who used to time the speech and shows a green card at 1 minute, a yellow card at 1:30 minutes, and a red card after 2 minutes.
Usually, a smartphone or a watch is used to time the speech, and the time taken is recorded manually on a paper.
It often happens that the person forgets to show the colored cards or sometimes forgets to record the timing for the speakers (happened with me all the time). With these things in mind, I have created a stopwatch in Excel that would help time and record the speeches.
Let’s first learn how to create a basic stopwatch in Excel.
How to Create a Stopwatch in Excel (Basic)
By a simple/basic stopwatch in Excel, I mean something that would start when we press the start button and stop when we press the stop button.
Something as shown below:
Download this Basic Stopwatch in Excel
To create this stopwatch in Excel, you need to know about the Application.Ontime method in VBA.
Application.OnTime Method in VBA
Application.OnTime method can be used when you want to run a specified code in the future. For example, you may use it to show a message box to remind you to get up and stretch your legs after 1 hour or have medicines after 3 hours.
Syntax of Application.OnTime Method:
Application.OnTime(EarliestTime, Procedure, LatestTime, Schedule)
- EarliestTime: The time when you want to run the procedure.
- Procedure: The name of the procedure that should be run.
- LatestTime (Optional): In case another code is running and your specified code can’t be run at the specified time, you can specify the LatestTime for which it should wait. For example, it could be EarliestTime + 45 (which means it will wait for 45 seconds for the other procedure to get completed). If even after 45 seconds the procedure it not able to run, it gets abandoned. If you don’t specify this, Excel would wait until the code can be run, and then run it.
- Schedule (Optional): If set to True, it schedules new time procedure. If False, then it cancels the previously set procedure. By default, this is True.
An Example of Application.OnTime Method
Sub test()
Application.OnTime Now + TimeValue("00:00:05"), "ShowMessage"
End Sub

Sub ShowMessage()
MsgBox ("HELLO")
End Sub
The first part of the macro uses the Application.OnTime method and runs the procedure ShowMessage (in double quotes) after five seconds. The ShowMessage procedure simply shows the message box with the prompt HELLO.
You can use this format to run any procedure after a specified time from the current time.
Now using this concept, let’s look at the code for creating a simple stopwatch in Excel.
Dim NextTick As Date, t As Date
Sub StartStopWatch()
t = Time
Call StartTimer
End Sub

Sub StartTimer()
NextTick = Time + TimeValue("00:00:01")
Range("A1").Value = Format(NextTick - t - TimeValue("00:00:01"), "hh:mm:ss")
Application.OnTime NextTick, "StartTimer"
End Sub

Sub StopTimer()
On Error Resume Next
Application.OnTime EarliestTime:=NextTick, Procedure:="StartTimer", Schedule:=False
End Sub
This code has 3 parts:
- The first part initializes the current time to the variable t. Then it calls another procedure StartTimer.
- StartTimer procedure uses a variable NextTick which gets incremented by 1 with every passing second. In the worksheet, cell A1 has the running timer as we have specified NextTick – t -TimeValue(“00:00:01”), “hh:mm:ss”) to be the value in that cell. It then runs the StartTimer code again after every second.
- StopTimer cancels the Application.Ontime procedure by making the schedule value False. This stops the timer.
Here is what you’ll get with the above code (I have assigned the macros to the start/stop buttons):
This is a basic stopwatch in Excel.
I call it basic as you can not stop in middle and restart where you left. It will always restart from 1 when you press the start button.
Now that you have learned the basics of Application.OnTime method, you can easily tweak this to create whatever kind of stopwatch you want in Excel.
Also read: Make VBA Code Pause or Delay (Using Sleep / Wait Commands)
Stopwatch in Excel (For ToastMasters)
I have used the concept discussed above and created a Stopwatch in Excel that can be used in the Toastmasters meeting (which I mentioned at the beginning of this tutorial).
Here are the things that can be done using this stopwatch:
- You can stop the timer and then restart again from the same time (recorded till then).
- You can reset the timer. This sets the timer value to 0. As soon as you do that it automatically records the total time elapsed.
- It changes the color of the timer box, depending on stopwatch value (this could be a good reminder to show the green/yellow/red cards).
Here is how it looks:
In this above demo, I have set the color change every five seconds. You can easily specify when you want the color to change (the green card at 1 min, yellow card at 1.5 minutes, and a red card at 2 minutes) by changing the values in the Calculation sheet.
As soon as you hit the reset button, the color of the timer would go back to white, the value of the timer would become 0, and it will record the time in column G.
Download the ToastMasters Style Stopwatch in Excel
Note: Since these files contain macro, you will have to enable macros before using it. When you open the workbook, you’ll see a yellow button – Enable Content. Click on it to enable macros.
![]()
If you create something cool using a timer, do share it with me.
You May Also Like the Following Excel Tutorials:
- Matrix Falling Numbers Effect in Excel using VBA.
- How to Automatically Insert Date and Time Stamp in Excel.
- Using Loops in Excel VBA.
- Free Excel Templates.
- Creating a Dashboard in Excel.
You can easily create a stopwatch in excel with the help of VBA and simple excel functionalities.
In this blog, you will learn about creating a countdown timers or a stopwatch inside a excel worksheet
Lets dive right in
How to Stopwatch in Excel… Very Useful
Creating a Timer/Stop watch in Excel
Professionals who are used to organizing their lives in Excel at some point wish Excel could include a timer to help keep track of common tasks. This article shows how to create a macro that enables a Timer/Stop watch, suitable for time management within a worksheet.

You can download the Finished File with the code by clicking on the button

Preparing for Creating the Timer
In a New Worksheet, select columns A to F and adjust the columns width to 60 pixels by dragging. (alternatively go to Home ► Format ►Column Width)
Select range C6:E7 ► on the Home Tab in the Alignment group click on “Merge and Center”
Add a thick border to the merged cells.
Hit the shortcut CTRL + 1 ► Click on the Border Tab
Select a Thick Border ► Select a Blue Color ►Click on Outline ► OK

Set the Font to Impact, 28 pt, black color
Apply Time Format from the Number Tab of the Format cell dialog box

Type 0:00:00 in cell C6 (keep an eye on the Formula Bar).

Now we need to bring 3 pictures 9or Shapes) that will be used as buttons for triggering, pausing and stopping the timer. Position them on top of cell C6. Resize and align them.

Rename the worksheet “Timer” but since it’s the first sheet to the left, I can refer to it as Sheets(1). #1 is the index number.
Before we start writing a simple code, we need to understand 2 terms:
DoEvents is an Excel VBA command that temporarily pauses the execution of the macro to refresh the screen and execute any pending events in Excel. It can allow the user to interact with the Excel spreadsheet while the macro is running on the very same workbook!
DATEADD is a date and time function in VBA and this function has an output value as a date, this function takes input as a format of date and adds it to return a new date, the syntax for this function takes three arguments Interval, Number and the Date.
DateAdd (interval, number, date)
Parameters or Arguments
Interval
The time/date interval that you wish to add. It can be one of the following values:
| Value | Explanation | Value | Explanation | |
| yyyy | Year | w | Weekday | |
| q | Quarter | ww | Week | |
| m | Month | h | Hour | |
| y | Day of the year | n | Minute | |
| d | Day | s | Second |
Number
The number of intervals that you wish to add.
Date
The date to which the interval should be added.
Returns
The DATEADD function returns a date value.
Now we are ready to switch to VBA and write the code.
To switch to the Visual Basic Editor, we hit ALT+F11
In the Visual Basic Editor, create a module by clicking on the Insert menu and select Module. Alternatively, you can use the shortcut ALT+I+M
We start by declaring a variable that will be used in multiple subroutines, so we write it at the top of the module. We use the keyword “Dim”, we name it “a” and we set the data type to Boolean (True/False)
Dim a as Boolean
When this variable is set to TRUE, we want the counter to run, while if it is set to FALSE, we want to Stop or Reset the timer.
The First code to start the Timer is the following:
(If you copy and paste customize the Sheet and Cell reference)
Sub StartTimer()
a = True
Do While a
Application.Wait (Now + #12:00:01 AM#)
DoEvents
Sheets(1).Cells(6, “C”) = Format(DateAdd(“s”, 1, Sheets(1).Cells(6, “C”)), “hh:mm:ss”)
Loop
End Sub
What does this code mean?
- I set the variable “a” to TRUE = Run the Timer
- I use the statement Do While… Loop to loop over instructions so long as “a” is TRUE
- I set a wait time of one second before moving to the next line
- DoEvents ► enables me to see the Timer update in the worksheet and work in Excel while the code is running.
- Then I am adding one second to the existing value in cell C6 using the DateAdd VBA function and we format it as “hh:mm:ss”
- Then we repeat: wait a second and Add a second
To Stop the Timer, we create another subroutine that changes the variable to false
Sub PauseTimer()
a = False
End Sub
To Reset the Timer to zero we create a third subroutine that changes the variable to false and sets the value of C6 to 00:00:00 (If you copy and paste customize the Sheet and Cell reference)
Sub ResetTimer()
a = False
Sheets(1).Cells(6, “C”) = “00:00:00”
End Sub

After writing the 3 subroutines, we switch back to Excel ALT +F11
We’ll attach each subroutine to one of the shapes by Right Clicking and from the right click menu select Assign Macro then pick up the corresponding Macro

Now test by clicking on each shape: Start – Stop – Reset.
You can download the Finished File with the code by clicking on the button

Creating a Countdown timer in Excel
On its own, Excel doesn’t have a function to include a countdown timer. However, with Visual Basic for Applications, it’s possible to write a simple code to perform the countdown functionality. This article shows how to create a macro that enables a timer to count down, suitable for time management within a worksheet.

We can create a new sheet and name it CD (Countdown)
Create a setup identical to the one we created for the Timer.
In Cell C6 the number will be 00:15:00 which means will be counting from 15 minutes down. You can adjust the number as needed.
In the visual basic editor, copy the previous codes and create a new module and paste the codes: we’ll make simple modifications to the code as follows:
- Name the Variable “b”
- Change the sheet name
- Change the subroutine names (you can’t use the same exact names)
- Change the number in the DateAdd function to negative 1 (to decrease the time)
- Change the Value in the Reset code to “00:15:00”
The 3 codes will read:
Dim b As Boolean
Sub StartCountDown()
b = True
Do While b
Application.Wait (Now + #12:00:01 AM#)
DoEvents
Sheets(“CD”).Cells(6, “C”) = Format(DateAdd(“s”, -1, Sheets(“CD”).Cells(6, “C”)), “hh:mm:ss”)
Loop
End Sub
Sub PauseCountDown()
b = False
End Sub
Sub ResetCountDown()
b = False
Sheets(“CD”).Cells(6, “C”) = “00:15:00”
End Sub

Close the Visual Basic editor and back to Excel, repeat the process of assigning macros to shapes.

Test your 3 countdown macros
Save the file as a macro enabled Excel file .xlsm
Enjoy the functionality of the Timer/ Stop watch and the Countdown timer.

Our friends at extend office also have a great article regarding the same topic how to make a stopwatch in excel. You can visit their article to also learn more about it
With a little bit more doing, you can convert this timer to a creative digital clock, resize it and keep it to the side of your Excel window. Learn how to do that by Watching the tutorial on my YouTube Channel. Make sure you subscribe to my channel to be notified when new tutorials are released.

We had a post on the forum recently asking how to create a timer in Excel, to record how long things took to happen on a model railroad. You can use the same code to time anything of course, like how long your code is taking to execute.
A follow up request asked for code to count down to a date and/or time. So in this post I’m going to provide code that does both.
Update
Following a few requests, I modified the code so that the elapsed time does not reset to 0 when the timer is stopped then restarted.
This new code allows time to accumulate over multiple Start/Stop clicks. Download the code below
Enter your email address below to download the Excel workbook with the timer code.
By submitting your email address you agree that we can email you our Excel newsletter.
Timing Algorithm
For the countdown I’m going to use the Timer function which gives us the number of seconds elapsed since midnight.
Knowing that we’re basing our time calculation on the number of seconds since midnight, we don’t want to go past midnight whilst we’re timing something or our calculations will be wrong.
If you want to start timing something before midnight, and finish timing it after midnight, you could use NOW to work out time elapsed.
The algorithm for our code is:
    Save StartTime

    While Stop button hasn't been pressed:
        Check elapsed time
        Display elapsed time on sheet (CurrentTime - StartTime)
        Display elapsed time on status bar

    When Stop button is pressed:
        Exit code
We can implement this as two subs. The first does the timing and display to the screen, the second sets a flag to indicate the Stop button has been pressed and the code should end.
These subs will be assigned to shapes so the shapes act as start and stop buttons.
The Stop button just sets a value in a cell. The timing sub monitors this cell until it sees the value that indicates it’s time to stop.
Here’s what the code looks like
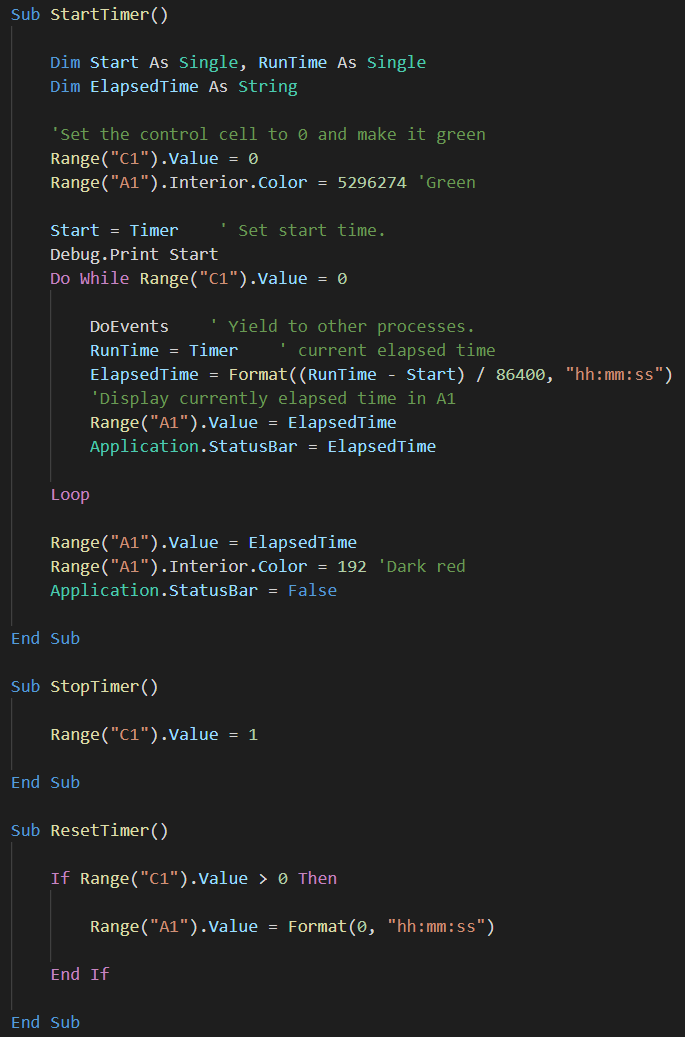
You’ll notice I’ve actually written a third sub called ResetTimer which just resets cell A1 to 0:00:00. This isn’t really needed so you can remove it if you want.
Here’s what it looks like in action
I’ve included code that displays the elapsed time in the status bar as the timer is running
Application.StatusBar = ElapsedTime
When the timer is stopped the elapsed time is removed from the status bar
Application.StatusBar = False
If you don’t want to see the time on the status bar just remove these lines.
DoEvents
One thing we must do with code like this is use DoEvents.
When we call DoEvents it allows Excel to do other things, like check if the Stop button has been pressed.
If we just kept looping around displaying the elapsed time, Excel would hang.
Displaying the Elapsed Time
I’m using the format function to display the time as hh:mm:ss.
There are many formats you can use to display numbers, dates, times, serial numbers and strings, so read up on what the function can do.
NOTE: We have an in-depth guide if you want to learn about custom number formats.
Countdown
For the countdown code we need to (obviously) know the date/time we are counting down to. So I’ll read that in from a cell on the sheet and call it ZeroHour.
To work out the numbers of days, hours, minutes and seconds until then, just call the NOW() function and subtract one from the other:
ZeroHour = Range("A5").Value
TimeDifference = ZeroHour - Now
By doing this we’ll end up with a time serial number stored in TimeDifference. If you aren’t sure what a time serial number is, read up on calculating time in Excel.
To display the time left we write it to a cell on the sheet, but we have to format it correctly first. As the value in TimeDifference is a time/date serial number it will look like 123.456.
If I just try to write that out to a cell, Excel will try to display the integer part (123) as the number of days since Jan 1st 1900. Of course we want to show the number of days from now until our target date.
To do this I use the INT() function to get rid of the decimal part of the serial number, which is the time, leaving me with just a number of days. I can then stitch all of this together like so:
Range("A6").Value = Int(TimeDifference) & "d " & Format((TimeDifference), "hh:mm:ss")
Times and Dates in the Past
If you try to use a time or date in the past, the VBA will catch this, display an error message and then exit.
Here’s what it looks like in action:

Download the Workbook
Click here to go back to the top of the page and get a copy of the code.
In this post we will explore the various ways we can set a Timer in Excel VBA as well as how to build your own VBA Stopwatch. Setting timers can be extremly useful if you want to run code as specific time intervals. On the otherhand a practical example can be a VBA Stopwatch which can be useful to measure time elapsed directly in a Excel spreadsheet.
The most simple example of a VBA Timer can be made using the VBA Timer function:
Dim startTime as Single

startTime = Timer 'Get current time in seconds
'... Some code here ...
Debug.Print Timer - startTime
'Result for about 1-2 seconds e.g. 1,90625
VBA Timer with Hours, Minutes and Seconds
The above is very useful if you want to measure time elapsed in Seconds, if you want to calculate time elapsed in Hours, Minutes and Seconds you can simply use the VBA Now function with text formatting using VBA Format instead:
Dim currTime as Date

currTime = Now()
'... Some code here ...
Debug.Print Format(currTime  - Now(), "HH:MM:SS")
'Result for 10 minutes and 1 second: 00:10:01
VBA Wait
In case you don’t want to measure time elapsed and instead set an interval or delay between code execution you either use the VBA Sleep or VBA Wait procedures like below. Remember that the VBA Sleep function is not a native VBA function and needs to be declared.
'Sleep for 1 second
Call Sleep(1000)

'Wait for 1 second
Call Application.Wait( DateAdd("s", 1, Now) )
VBA Alarms and Scheduling
Another VBA Timer scenario is scheduling procedures to run at a specific time or after a specific time interval like an alarm clock. To do this we use the Excel VBA OnTime procedure:
Sub SetAlarm()
    Dim timeout As Date
    timeout = TimeValue("21:50:00") 'Set alarm for 21:50 PM
    Application.OnTime timeout, "WhatHour"
End Sub

Sub WhatHour()
    Call MsgBox("The time is " & Format(Now(), "HH:MM"))
End Sub
You can use the VBA OnTime function also to schedule code execution after a specific duration of time. The below will save the current file after every 5 min.
Sub ScheduleAfter()
    Dim timeout As Date
    timeout = Now() + TimeValue("00:05:00")
    Application.OnTime timeout, "SaveBackup"
End Sub

Sub SaveBackup()
    ActiveWorkbook.Save 'Save workbook
    'Reschedule next Save event
    Dim timeout As Date
    timeout = Now() + TimeValue("00:05:00")
    Application.OnTime timeout, "SaveBackup"
End Sub
VBA Stopwatch
Using the VBA OnTime function we can also create a simple Excel VBA Stopwatch:
As you can see in the example above I created a button that launches a Start / Stop sequence. When the stopwatch is running it increments the TIMESTAMP cell (a named cell). You can use the code below to achieve this. Remember to select your named range as well as to connect your button to the StartStop procedure.
Dim timerOn As Boolean
Dim timeElapsed As Single
Sub StartStop()
    If timerOn Then
        Application.OnTime Now() + TimeValue("00:00:01"), "AddSecond", Schedule:=False
        timerOn = False
    Else
        timeElapsed = 0
        timerOn = True
        Application.OnTime Now() + TimeValue("00:00:01"), "AddSecond"
    End If
End Sub
Sub AddSecond()
    If timerOn Then
        timeElapsed = timeElapsed + 1
        Dim s As Long, h As Long, m As Long
        h = timeElapsed / 3600
        s = timeElapsed - h * 3600
        m = s / 60
        s = s - m * 60

        [TIMESTAMP] = Format(TimeSerial(h, m, s), "HH:MM:SS")
        Application.OnTime Now() + TimeValue("00:00:01"), "AddSecond"
    End If
End Sub
What happens above? When you hit the button the AddSecond procedure will be set to run within a second and then automatically sets itself to run in the next second after updating the timestamp. The next hit of the button will turn of the schedule. This approach may see some slight delays over a longer duration of time (as we are running code before the schedule), however, it should be good enough.
If you need any accuracy, Excel is probably not the place to do this. But if close enough is close enough, then here’s how I would do it.
In a standard module:
Public gbStop As Boolean
Public gdtStart As Date

Sub UpdateTime()

    Sheet1.Range("rngTimer").Value = Now - gdtStart
    DoEvents

    If Not gbStop Then
        Application.OnTime Now + TimeSerial(0, 0, 1), "UpdateTime"
    End If

End Sub
In Sheet1’s class module
Private Sub CommandButton1_Click()

    gbStop = False
    gdtStart = Now
    Application.OnTime Now + TimeSerial(0, 0, 1), "UpdateTime"

End Sub

Private Sub CommandButton2_Click()

    gbStop = True

End Sub
When you click Button1, gbStop is set to false, the start time is recorded in a public variable, and the UpdateTime procedure is scheduled to run 1 second later.
One second later, UpdateTime runs and the value of the cell named rngTimer is changed to show the elapsed time between Now and the start recorded in Button1_Click. If gbStop is still False, UpdateTime schedules itself to run again in another second.
Eventually, you press Button2 which sets the public variable gbStop to True. The next time Updatetime runs, it doesn’t schedule itself to run again.