In the article below, we will introduce you how to find, change and delete hyperlinks in your Word document.
Hyperlinks in a Word document are very convenient. We can click it to quickly jump to the corresponding web page. Moreover, Word provides a feature which can convert the text into hyperlink automatically. However, sometimes it is not desirable. In one of our article “3 Ways to Prevent Word from Auto Creating Hyperlink“, we show you how to prevent Word from auto convert text into hyperlink. Actually, there is one more way to do that task.
Use “Paste Special” Option
- When you finish copying a text, click “Paste” in “Clipboard” group. For example, we here copy a sample text as below:
- Then choose “Paste Special”.
- In “Paste Special” dialog box, choose “Unformatted Text”.
- And click “OK”.
Now you can see all formats disappear including hyperlinks.
Now let’s see another situation. If you get a long document with thousands of hyperlinks from your colleague, you may want to change or delete some of them.
Below we will first introduce the basic two parts of a hyperlink, and then propose a method to quickly find or locate multiple hyperlinks. And finally, we will give out several methods to modify or remove the hyperlinks in your document.
Two Parts of a Hyperlink
Actually, hyperlink in Word document is a special text, which contains the following two parts:
- Anchored Text: this is the visible and clickable text in a hyperlink. In the example below, the blue words “DataNumen Word Repair” is the “Anchored Text”:
- Link: this refers to the Internet address to which the anchored text links. You cannot see it directly.
Usually, it is the “Anchored Text” that is shown on your document. To view the “Link” part, you can press “Alt + F9”. Below is an example:
Simply press “Alt + F9” again, and you can switch back to “Anchored Text”.
Find All Hyperlinks in a Document
- First, press keyboard shortcuts “Alt+ F9”. You can see all hyperlinks turn into their “Link” parts now.
- Press “Ctrl + H” to open the “Find and Replace” dialog box.
- Click “Find”.
- Then type “^d HYPERLINK” in “Find what” text box.
- Next click “Reading Highlight”.
- Choose “Highlight All”.
Now you can achieve the effect as below:
- Then all the hyperlinks will be highlighted.
- You can also click “Find Next” button to locate each hyperlink one by one.
Change Multiple Hyperlinks in Batch
Let’s say, if you want to migrate your website from http to its secure version, i.e., https. Then you need to change the following link:
https://www.datanumen.com
to its https version:
https://www.datanumen.com
It is obviously not convenient to change all links one by one manually, especially when a file contains thousands of them. Following is the solution:
Since there are two parts in a hyperlink, you need to change both of them.
To change the “Anchored Text” part of the hyperlink:
- Press “Ctrl + H” to open the “Find and Replace” dialog box.
- Type “http://” in “Find what” text box.
- Then type “https://” in “Replace with” text box.
- Click “Replace All”. Now you shall finishing replacing the “Anchored text” part.
To change the “Link” part of the hyperlink:
- Press “Alt + F9” to switch to the “Link” part.
- And press “Ctrl + H” to open the “Find and Replace” dialog box.
- Type “https://www.datanumen.com” in “Find what” text box.
- Type “https://www.datanumen.com” in “Replace with” text box.
- Click “Replace” or “Replace All” button.
Now you have replaced both parts of the hyperlink.
Other than finding or changing hyperlinks, sometimes you may also want to remove them. Following are four methods you can use:
Remove Hyperlinks – Method 1: Right Click
- First thing, select a hyperlink in your Word document.
- Then right click.
- Choose “Remove Hyperlink” option on the menu.
Now you can see the Hyperlink no more. Generally speaking, this is perhaps the most common way to carry out the performance. It’s simple. However, it’s probably not the quickest way to do so when there are thousands of hyperlinks in a document.
Method 2: Use “Format Painter”
In case you have no patience to delete hyperlinks one by one manually, you can check out the following steps.
- First, repeat steps in method 1.
- Next, select the row where the disabled hyperlink lies.
- Now, double click the “Format Painter” icon in “Clipboard” group.
- Then drag your cursor to select the content which contains the rest hyperlinks.
Check the video below:
When you finish the steps above, all hyperlinks shall be gone. Comparing with method 1, this one can be a real time saver. Meanwhile, it’s not that complicated.
Method 3: Use “Replace” Feature
- To use this way, you have to finish all steps in “Steps to Find All Hyperlinks in a Document” first. Make sure you have pressed “Alt + F9” to change to the “Link” view.
- Then in “Find and Replace” dialog box, click “Replace”.
- Type “^d HYPERLINK” in “Find what” text box.
- Finally click “Replace All”.
Method 4: Use Macro in Word
You can also realize deleting hyperlinks in batch by using macro in Word.
- To begin with, press “Alt+ F11” to open “Microsoft Visual Basic for Applications” window.
- Next, double click “This Document” on the left tree view.
- Copy the following code and paste them on the right editing area:
Sub RemoveLinks()
‘ Enumerate all the hyperlinks and remove them in the document
While ThisDocument.Hyperlinks.Count > 0
ThisDocument.Hyperlinks(1).Delete
Wend
End Sub
- Then click the green “Run Sub” button. Or you can simply press “F5”. Both operations can start running the macro.
Comparison of 4 Removal Methods
| Methods | Advantages | Disadvantages |
|
Right Click |
Simple |
You can only remove one hyperlink at a time, which can waste you much time. |
|
Use “Format Painter” |
1. Simple
2. It’s able to remove multiple hyperlinks in batch, but you need to manually select the related contents. |
You have to click and hold on to scroll down so as to select the whole document which can cost time. |
|
Use “Replace” Feature |
It’s able to remove multiple hyperlinks in batch. |
You have to remember the codes “^d HYPERLINK”. |
|
Use Macro in Word |
It’s able to remove multiple hyperlinks in batch. |
You have to use VBA codes which is a bit complex for beginners. |
Deal with Crashed Files
Frequent switching between webpages and documents can result in Word file corruption. To recover word and bring back your files, you need to use the built-in recovery function in Word. Certainly, for better recovery experience, you can take a third-party tool to do it.
Author Introduction:
Vera Chen is a data recovery expert in DataNumen, Inc., which is the world leader in data recovery technologies, including excel recovery and pdf repair software products. For more information visit www.datanumen.com
Word for Microsoft 365 Outlook for Microsoft 365 Project Online Desktop Client Word 2021 Outlook 2021 Project Professional 2021 Project Standard 2021 Word 2019 Outlook 2019 Project Professional 2019 Project Standard 2019 Word 2016 Outlook 2016 Project Professional 2016 Project Standard 2016 Office 2016 Word 2013 Outlook 2013 Project Professional 2013 Project Standard 2013 Office 2013 Word 2010 Outlook 2010 Office 2010 Word 2007 Outlook 2007 Office 2007 InfoPath 2013 InfoPath Edit Mode 2010 InfoPath Filler 2013 Word Starter 2010 More…Less
The fastest way to create a basic hyperlink in a Microsoft 365 document is to press ENTER or the SPACEBAR after you type the address of an existing webpage, such as http://www.contoso.com. Microsoft 365 automatically converts the address into a link.
In addition to webpages, you can create links to existing or new files on your computer, to email addresses, and to specific locations in a document. You can also edit the address, display text, and font style or color of a hyperlink.
Notes:
-
If you want to remove links or stop Microsoft 365 from automatically adding hyperlinks, see Remove or turn off hyperlinks.
-
This article applies to desktop versions of Word, Excel, Outlook, and PowerPoint. A simplified set of hyperlink features is offered on Microsoft 365 Online. If you have a desktop version of Microsoft 365, you can edit your document there for more advanced hyperlink features, or you can try or buy the latest version of Microsoft 365.
-
Select the text or picture that you want to display as a hyperlink.
-
On ribbon, on the Insert tab, select Link.
You can also right-click the text or picture and click Link on the shortcut menu.
-
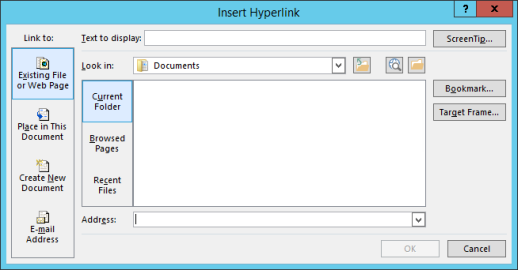
In the Insert Hyperlink box, type or paste your link in the Address box.
Note: If you don’t see the Address box, make sure Existing File or Web Page is selected under Link to.
Optionally, type different display text for your link in the Text to display box.
Note: If you don’t know the address for your hyperlink, click Browse the Web
to locate the URL on the Internet and copy it.
Optional: To customize the ScreenTip that appears when you rest the pointer over the hyperlink, click ScreenTip in the top-right corner of the Insert Hyperlink dialog box and enter the text you want.
You can add a hyperlink to a file on your computer, or to a new file that you want to create on your computer.
-
Select the text or picture that you want to display as a hyperlink.
-
Press Ctrl+K.
-
Under Link to, do one of the following:
-
To link to an existing file, click Existing File or Web Page under Link to, and then find the file in the Look in list or the Current Folder list.
-
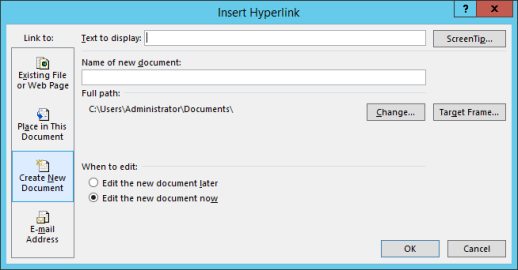
To create a new, blank file and link to it, click Create New Document under Link to, type a name for the new file, and either use the location shown under Full path or browse to a different save location by clicking Change. You can also choose whether to Edit the new document later or open and Edit the new document now.
-
Optional: To customize the ScreenTip that appears when you rest the pointer over the hyperlink, click ScreenTip in the top-right corner of the Insert Hyperlink dialog box and enter the text you want.
-
Select the text or picture that you want to display as a hyperlink.
-
Press Ctrl+K.
You can also right-click the text or picture and click Link on the shortcut menu.
-
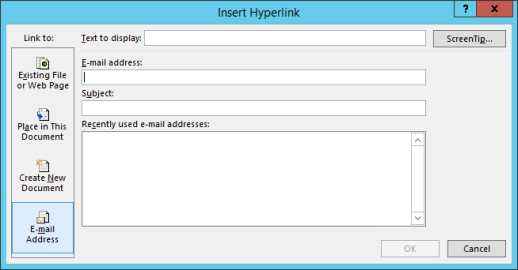
Under Link to, click E-mail Address.
-
Either type the email address that you want in the E-mail address box, or select an address in the Recently used e-mail addresses list.
-
In the Subject box, type the subject of the message.
Note: Some web browsers and email programs might not recognize the subject line.
Optional: To customize the ScreenTip that appears when you rest the pointer over the hyperlink, click ScreenTip in the top-right corner of the Insert Hyperlink dialog box and enter the text you want.
You can also create a hyperlink to a blank email message by simply typing the address in the document. For example, type someone@example.com, and Microsoft 365 creates the hyperlink for you (unless you turned off automatic formatting of hyperlinks).
You can create hyperlinks that link to a Word document or Outlook email message that includes heading styles or bookmarks. You can also link to slides or custom shows in PowerPoint presentations and specific cells and sheets in Excel spreadsheets.
Tips:
-
Learn about adding bookmarks.
-
To add a heading style, select your heading text, click the Home tab in Word or the Format Text tab in Outlook, and select a style in the Styles group.
Create a hyperlink to a location in the current document
-
Select the text or picture that you want to display as a hyperlink.
-
Press Ctrl+K.
You can also right-click the text or picture and click Link on the shortcut menu.
-
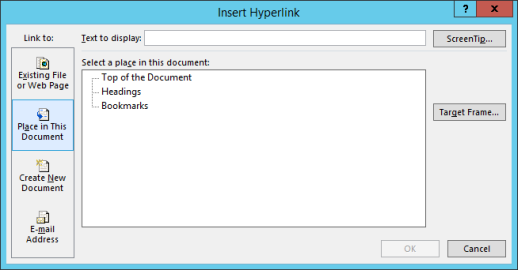
Under Link to, click Place in This Document.
-
In the list, select the heading (current document only), bookmark, slide, custom show, or cell reference that you want to link to.
Optional: To customize the ScreenTip that appears when you rest the pointer over the hyperlink, click ScreenTip in the top-right corner of the Insert Hyperlink dialog box and enter the text you want.
Create a hyperlink to a location in another document
-
Select the text or picture that you want to display as a hyperlink.
-
Press Ctrl+K.
You can also right-click the text or picture and click Link on the shortcut menu.
-
Under Link to, click Existing File or Web Page.
-
In the Look in box, click the down arrow, and find and select the file that you want to link to.
-
Click Bookmark, select the heading, bookmark, slide, custom show, or cell reference that you want, and then click OK.
Optional: To customize the ScreenTip that appears when you rest the pointer over the hyperlink, click ScreenTip in the top-right corner of the Insert Hyperlink dialog box and enter the text you want.
-
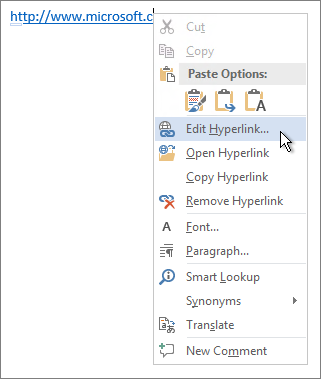
To change the address or display text of a hyperlink you added, right-click the link and click Edit Hyperlink.
-
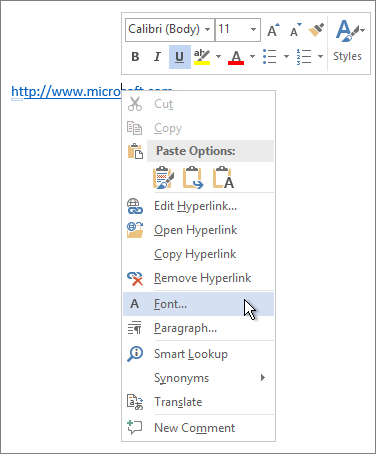
To change the appearance of a hyperlink, such as font style, size, or color, right-click the link and click Font on the shortcut menu, or click a style option on the mini toolbar that appears.
-
To customize the ScreenTip that appears when you rest the pointer over the hyperlink, right-click the link, click Edit Hyperlink, click ScreenTip in the top-right corner of the dialog box, and enter the text you want.
See also
Remove or turn off hyperlinks
Create a hyperlink in Publisher
Create a hyperlink in OneNote
Hyperlinks in Word for the web
Need more help?
Want more options?
Explore subscription benefits, browse training courses, learn how to secure your device, and more.
Communities help you ask and answer questions, give feedback, and hear from experts with rich knowledge.
How to Add and Edit Links in Word Documents
Insert hyperlinks quickly
Updated on February 11, 2021
What to Know
- Highlight text you want to hyperlink. Right-click it and choose Link. Alternatively, select Insert > Links > Link.
- Then, enter the URL in the Address field.
- Remove a link: Right-click the hyperlink text and choose Remove Hyperlink.
Microsoft Word is primarily used to create word processing documents, but you can also work with hyperlinks and HTML code used in websites. Learn how to insert, remove, or edit hyperlinks using Word for Microsoft 365, Word 2019, Word 2016, Word 2013, and Word 2010.
Insert Links
To link to other documents or web pages from a Word document, insert a hyperlink.
-
Select the text that you want to apply the hyperlink to. This can be the text of a URL, a single word, a phrase, a sentence, or a paragraph.
-
Right-click the text and select Link or Hyperlink to open the Insert Hyperlink dialog box. Or, go to the Insert tab and select Links > Link.
-
In the Address field, enter the URL address of the document or website you want to link to. For online assets, the URL must include the protocol (for example, http, https, or ftp).
The Text to display text box defaults to the text you selected in step 1. You can change this text here if you like.
-
Select OK.
-
The selected text appears as a hyperlink that can be clicked to open the linked document or website.
To make changes to the link, right-click the hyperlink and select Edit Hyperlink.
Remove Hyperlinks
When you type a URL into Word, it automatically inserts a hyperlink that connects to the website. This feature is handy if you distribute documents electronically, but it can be a nuisance when printing documents.
To remove a hyperlink, right-click the link and select Remove Hyperlink.
In Word for Mac, right-click then select Hyperlink. In the slide-out menu, select Edit Hyperlink, then choose Remove Link.
More About Editing Hyperlinks
When you work in the Insert Hyperlink dialog box and the Edit Hyperlink dialog box, several other features are available on the left side of the dialog box.
Existing File or Web Page
This tab is selected by default in the Insert Hyperlink and the Edit Hyperlink dialog boxes. This tab displays the text for the hyperlink and the URL of that hyperlink
In the middle of the window, there are three tabs:
- Current Folder displays files that are located in the same folder location as the current document. If you want the selected link to link to a document located in this folder, locate the file and choose it. The Address field changes to reflect the document location on your computer. The Text to display field also changes to the file address, so you may want to edit this field to change the text that displays in the Word document.
- Browsed Pages shows a list of recent documents and web pages you have accessed. Select one of these as the new link destination.
- Recent Files displays a list of recent files you’ve worked on in Word. This is handy if you’re working on a series of separate documents and want to create links to these files quickly.
Place in This Document
This tab displays sections and bookmarks contained in the current document. Use it to link to specific locations within the current document.
Create New Document
Go to this tab to create a new document to which the link will connect. This feature is useful if you’re creating a series of documents but haven’t created the document you want to link to. Define the name of the new document in the labeled field.
If you don’t want to edit the new document you create from here, select Edit the new document later.
Email Address
This section creates a link that will generate a new email when someone clicks it and populates several of the new email fields with the defaults you define. Enter the email address where you want the new email to be sent, and add the subject that will appear in the new email by filling in the appropriate fields.
If you have used this feature recently for other links, any email addresses you used in those will appear in the Recently used e-mail addresses list.
Thanks for letting us know!
Get the Latest Tech News Delivered Every Day
Subscribe
Skip to content
How to Find and Check Hyperlinks in a Word Document
How to Find and Check Hyperlinks in a Word Document
There are a lot of reasons why you might want to locate hyperlinks in a Word document.
You might be working with an old file and you want to be sure all the links are valid before you share it. When I upload ebooks to various online seller platforms, I have to make sure that the file doesn’t include a link to a competitor’s site. Apple, for example, won’t accept an ebook that contains a link to Amazon.
If you need to find and check hyperlinks in a Word document, here’s how to do it:
- Press Alt + F9 to display the link in all your hyperlinks.
- Press Ctrl + F to open the search dialog box.
- Type “HYPERLINK” in the search box.
Word will highlight all the links in your document.
There’s no function in Word to automatically check the links. You’ll have to check them manually by copying them into a browser or purchase a Word add-in that will do it for you.
If you want to specifically look for links to a certain site, you can search on that site’s name while the links are displayed.
When you’re finished, press Alt + F9 to toggle back to the link text.
Note that this will not reveal links that may be attached to images in your Word document. You’ll need to check each image individually.
- About
- Latest Posts
Jacquelyn’s latest book is Seven Day Anger Free Challenge: Be the Peace. She is the author of the novel Choices (A Joyful Cup Story) as well as the nonfiction books The Simple Facts About Self-Publishing, Words to Work By: 31 devotions for the workplace based on the Book of Proverbs and Finding Joy in the Morning: You can make it through the night. With her husband, she is the co-creator of several coloring books for adults.
Related Posts
Page load link
Go to Top
Today a lot of Word documents contain hyperlinks or URLs to some websites, Internet resources or
e-mail addresses. When you type a link in your document, it can appear as a field. You can easily
change the view of hyperlinks.
For example, when you type an e-mail
[email protected]
and press space, you will see:
![]()
To change a representation of hyperlinks in a document, do the following:
1. On the File tab, click the
Options button:

2. In the Word Options dialog box, on the
Advanced tab, under Show document content, uncheck the
Show field codes instead of their values checkbox:
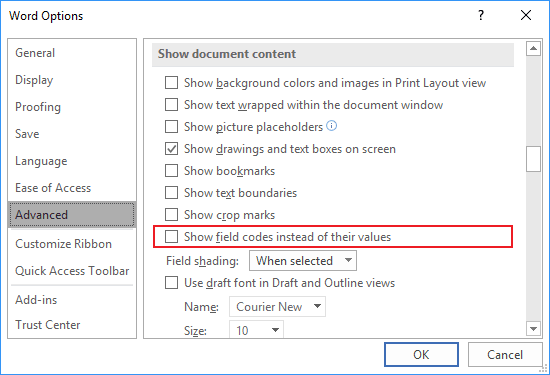
After clicking OK, all hyperlinks in the document will be shown as usual, as blue
hyperlinks:
See
How to turn on or turn off highlighting off fields in a Word document.
See also this tip in French:
Comment afficher les liens bleu au lieu de { HYPERLINK lien } dans Word.
Please, disable AdBlock and reload the page to continue
Today, 30% of our visitors use Ad-Block to block ads.We understand your pain with ads, but without ads, we won’t be able to provide you with free content soon. If you need our content for work or study, please support our efforts and disable AdBlock for our site. As you will see, we have a lot of helpful information to share.


 to locate the URL on the Internet and copy it.