Word for Microsoft 365 Word 2021 Word 2019 Word 2016 Word 2013 Word 2010 Word 2007 More…Less
Word can automatically count the lines in a document and display the appropriate number beside each line of text. This is useful when you need to refer to specific lines in a document, such as a script or a legal contract.

By default, Word numbers every line in a document (except those in tables, footnotes, endnotes, text boxes, and headers and footers). However, you can choose which line numbers to display. For example, you can display line numbers in all or part of the document. Or you can display line numbers at intervals, such as every tenth line (10, 20, 30, and so on).
What do you want to do?
-
Add line numbers
-
Remove line numbers
Add line numbers
You can add line numbers to all or part of a document. To view line numbers, you must be in Print Layout view (click the View tab to check).
Notes:
-
A table is counted as one line.
-
A figure is counted as one line.
-
A text box is counted as one line if it is positioned inline with the text on the page. If text on the page wraps around the text box, the lines of text on the page are counted. Lines of text inside a text box are not counted.
Add line numbers to an entire document
-
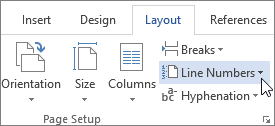
On the Layout tab, in the Page Setup group, click Line Numbers.
Note: If your document is divided into sections and you want to add line numbers to the entire document, you first need to select the document. Click Select in the Editing group on the Home tab, and then click Select All. Or press CTRL+A.
-
Do one of the following:
-
To number consecutively throughout the document, click Continuous.
-
To start with number 1 on each page, click Restart Each Page.
-
To start with number 1 after each section break, click Restart Each Section.
-
For more advanced line numbering options, such as numbering at different intervals, click Line Numbering Options, and then click Line Numbers on the Layout tab.
-
Add line numbers to a section or to multiple sections
-
Click in a section or select multiple sections.
-
On the Layout tab, in the Page Setup group, click Line Numbers.
-
Click Line Numbering Options, and then click the Layout tab.
-
In the Apply to list, click Selected sections.
-
Click Line Numbers.
-
Select the Add line numbering check box, and then select the options that you want.
Top of Page
Remove line numbers
You can remove line numbers from the entire document, from a section, or from a paragraph.
-
Click in the document, or click in the section or paragraph from which you want to remove line numbers. If you want to remove line numbers from multiple sections, select the sections.
-
On the Layout tab, in the Page Setup group, click Line Numbers.
-
Do one of the following:
-
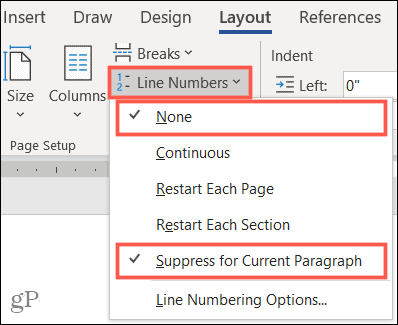
To remove line numbers from the entire document or section, click None.
-
To remove line numbers from a single paragraph, click Suppress for Current Paragraph.
-
Top of Page
What do you want to do?
-
Add line numbers
-
Remove line numbers
Add line numbers
You can add line numbers to all or part of a document. To view line numbers, you must be in Print Layout view (click the View tab to check).
Notes:
-
A table is counted as one line.
-
A figure is counted as one line.
-
A text box is counted as one line if it is positioned inline with the text on the page. If text on the page wraps around the text box, the lines of text on the page are counted. Lines of text inside a text box are not counted.
Add line numbers to an entire document
-
On the Page Layout tab, in the Page Setup group, click Line Numbers.
Note: If your document is divided into sections and you want to add line numbers to the entire document, you first need to select the document. Click Select in the Editing group on the Home tab, and then click Select All. Or press CTRL+A.
-
Do one of the following:
-
To number consecutively throughout the document, click Continuous.
-
To start with number 1 on each page, click Restart Each Page.
-
To start with number 1 after each section break, click Restart Each Section.
-
For more advanced line numbering options, such as numbering at different intervals, click Line Numbering Options, and then click Line Numbers on the Layout tab.
-
Add line numbers to a section or to multiple sections
-
Click in a section or select multiple sections.
-
On the Page Layout tab, in the Page Setup group, click Line Numbers.
-
Click Line Numbering Options, and then click the Layout tab.
-
In the Apply to list, click Selected sections.
-
Click Line Numbers.
-
Select the Add line numbering check box, and then select the options that you want.
Top of Page
Remove line numbers
You can remove line numbers from the entire document, from a section, or from a paragraph.
-
Click in the document, or click in the section or paragraph from which you want to remove line numbers. If you want to remove line numbers from multiple sections, select the sections.
-
On the Page Layout tab, in the Page Setup group, click Line Numbers.
-
Do one of the following:
-
To remove line numbers from the entire document or section, click None.
-
To remove line numbers from a single paragraph, click Suppress for Current Paragraph.
-
Top of Page
Need more help?
Add line numbers to a section or to multiple sections
- Click in a section or select multiple sections.
- On the Layout tab, in the Page Setup group, click Line Numbers.
- Click Line Numbering Options, and then click the Layout tab.
- In the Apply to list, click Selected sections.
- Click Line Numbers.
Contents
- 1 How do I add line numbers in Word for Mac?
- 2 How do I number every 5th line in Word?
- 3 How do you get line numbers on every 5 lines?
- 4 How do we show line numbers next to the code?
- 5 How many lines are in a Word document page?
- 6 How do I change line number in Word?
- 7 How do you display line numbers in VS?
- 8 How do I find line numbers?
- 9 How do I count the number of rows in word?
- 10 Does Word Count Count Lines?
- 11 How do you insert a line across the page in word?
- 12 Why can’t I see line numbers in Word?
- 13 How do I move line numbers to the right?
- 14 How do I change line number font?
- 15 How do I show line numbers in IntelliJ?
- 16 How do I show line numbers in vim?
- 17 How do you number lines in a text file?
- 18 How do I show line numbers in less command?
- 19 How do I show line numbers in nano?
- 20 How do I copy line numbers in Word?
How do I add line numbers in Word for Mac?
In your Word document, click the “Layout” tab in the ribbon bar and then click on the “Line Numbers” button. Select “Restart Each Section” from the drop-down menu. If you want to add a new section break, click the “Breaks” button. This is just above the “Line Numbers” button in the “Layout” tab.
How do I number every 5th line in Word?
How to number every nth line in Word 2013
- On Page Layout tab, click on Line Numbers and click Line Numbering Options…
- Page Setup opens.
- Line Numbers windows opens.
- You can start numbering at a specific number (Start at), control number position (From text) and number every nth line (Count by).
How do you get line numbers on every 5 lines?
Add line numbers to a section or to multiple sections
- Click in a section or select multiple sections.
- On the Page Layout tab, in the Page Setup group, click Line Numbers.
- Click Line Numbering Options, and then click the Layout tab.
- In the Apply to list, click Selected sections.
- Click Line Numbers.
How do we show line numbers next to the code?
Display line numbers in code
- On the menu bar, choose Tools > Options. Expand the Text Editor node, and then select either the language you’re using or All Languages to turn on line numbers in all languages.
- Select the Line numbers checkbox.
How many lines are in a Word document page?
The standard number of lines per page tends to be 46.
How do I change line number in Word?
Simply follow these steps:
- Display the Home tab of the ribbon.
- Click the small icon at the bottom-right of the Styles group.
- Hover the mouse pointer over the Line Number style.
- Click on the drop-down arrow and choose the Modify option from the resulting menu.
How do you display line numbers in VS?
1 Answer. On the menu bar, choose Tools, Options. Expand the Text Editor node, and then select either the node for the language you are using, or All Languages to turn on line numbers in all languages.
How do I find line numbers?
You can find out the phone number for your local phone company by looking at your monthly bill or dialing “411” from your phone line. Verify your identity.
How do I count the number of rows in word?
Right-click on the selected table and select Table Properties from the shortcut menu. Click on the Row tab — the number of rows selected is listed at the top of the dialog box.
Does Word Count Count Lines?
Word counts the number of words in a document while you type. Word also counts pages, paragraphs, lines, and characters.
How do you insert a line across the page in word?
Press Ctrl+A to select all the text in your document. Click Home > Shrink Font one or more times. As you click Shrink Font, Word decreases the size of every font in your document.
Why can’t I see line numbers in Word?
To use line numbers in Word, you must be in Print Layout view. Go to the View tab and click Print Layout in the Views section of the ribbon. Next, insert the numbers by heading to the Layout tab. Click the Line Numbers button in the Page Setup section of the ribbon.
How do I move line numbers to the right?
Remember though, it is not section alignment alone. For line numbers to appear in the right margin you must set the section alignment to right to left “and” have a right to left script language enabled.
How do I change line number font?
Process
- Go to the Home tab of the Ribbon after enabling line numbering.
- Under Styles, click the Dialog Box Launcher arrow to open the Styles pane.
- In the Styles pane, click Options.
- Under “Select styles to show” in the Options window, select “All styles”.
- Click OK to exit out of the Options window.
How do I show line numbers in IntelliJ?
IntelliJ IDEA 15
- File > Settings… > Editor > General > Appearance > Show line numbers.
- Hit Shift twice > write “line numbers” > Show Line Numbers (that one that has the toggle) > change the toggle to ON.
How do I show line numbers in vim?
How to display line number in vim
- Press the ESC key.
- At the : prompt type the following command to run on line numbers: set number.
- To turn off line numbering, type the following command at the : prompt again: set nonumber.
- One can set relative line numbers by typing: :set relativenumber.
How do you number lines in a text file?
4 Answers. In notepad , you can type Ctrl + g to view current line number. It also at bottom-right corner of status-bar.
How do I show line numbers in less command?
All you have to do is pass either -N or –LINE-NUMBERS option to the less command. This option forces less to show a line number at the beginning of each line in the screen.
How do I show line numbers in nano?
You can ask nano to temporarily turn on line numbers by pressing Alt-C (meaning “Hold down the Alt key and the C key simultaneously”). This will show line and column numbers near the bottom of nano’s window.
How do I copy line numbers in Word?
Assuming there is a consistent amount of space between the margin and the first desired word on each line, what you could do after pasting is to use a block cut (Shift-Alt and drag the cursor over the desired area, followed by Ctrl-X), then select all the lines, delete what’s left, then paste again – voila! the numbers
When reviewing documents with others or creating a contract, you can enable line numbers in Word for handy reference points.
Using line numbers, you have handy reference points within your document. For things like contracts and scripts, or documents that you are reviewing with others, you can easily insert line numbers in Microsoft Word. And like many Office features, you have flexibility. You can decide how and where your line numbers appear.
To prepare you for using line numbers, we’ll show you how to insert them, your numbering options, and how to remove them if needed.
To use line numbers in Word, you must be in Print Layout view. Go to the View tab and click Print Layout in the Views section of the ribbon.
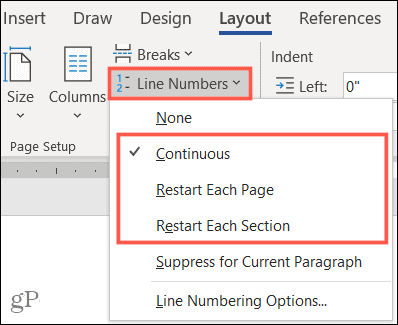
Next, insert the numbers by heading to the Layout tab. Click the Line Numbers button in the Page Setup section of the ribbon. Then, select the line numbering option you’d like to use from the following:
- Continuous: Numbers lines consecutively throughout the document.
- Restart Each Page: Begins with number 1 on each page.
- Restart Each Section: Begins with number 1 after each section break.
After making your selection, you’ll see the page numbers along the left side of your document.
Notes for Line Numbers
Here are a few notes for using line numbers in Word to keep in mind.
- A table counts as one line.
- A figure counts as one line.
- A text box counts as one line. If lines of text wrap around the box, those lines of text are counted. Lines of text inside the text box are not counted.
Customize Your Line Numbers
You have a few settings that you can adjust for your line numbers, such as spacing from text and the starting number.
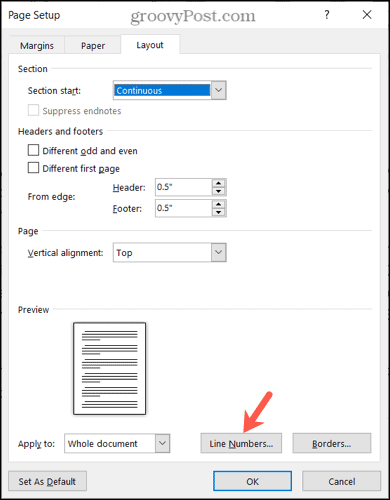
To access these settings, click Line Numbers on the Layout tab and select Line Number Options. Click the Line Numbers button on the Layout tab of the pop-up window.
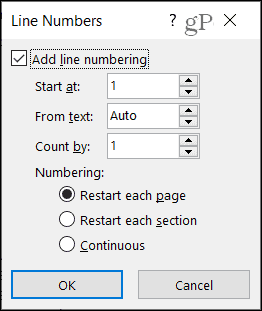
When the tiny Line Numbers window displays, start by checking the box at the top for Add line numbering. You cannot adjust the other options in the window if the box is unchecked.
Start at: Select a number if you want something other than number 1.
From text: The default setting is Auto, but you can use the arrows to select a specific spacing for the line numbers in relation to your text.
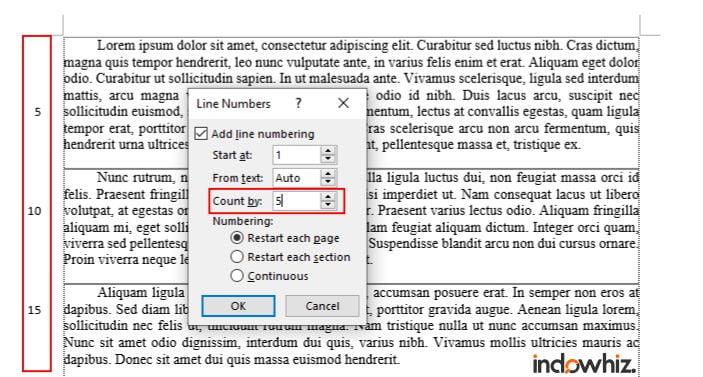
Count by: Rather than numbering each and every line, you can set a Count By number. For example, if you select 2, your line numbers will count by two, as in the screenshot below.
Numbering: Like the options in the Line Numbers drop-down box on the Layout tab, you can select Restart each page, Restart each section, or Continuous here as well.
After making your adjustments, click OK and then OK once more to apply them.
Remove Line Numbers in Word
If you want to turn off the line numbers, you can do this for the entire document or your current paragraph.
Click Line Numbers on the Layout tab. Then do one of the following:
- Select None to remove the line numbers from the entire document.
- Select Suppress for Current Paragraph to remove the numbering for a particular paragraph (where your cursor is located).
Get on the Same Page With Line Numbers in Word
Make sure everyone is on the same page, line, or paragraph with line numbers in Word. Whether you use them for a short time or keep them on the document forever, they come in handy!
For related how-tos, take a look at how to add page numbers to your documents and how to work with page and section breaks in Word.
Be sure to keep up with what’s new on groovyPost, follow us on Twitter!
There are many cases where collaboration is needed to complete or review a word document. Then, sometimes referring to content in specific lines in a document could be troublesome and time-consuming. For example, we could say “please refer to the explanation of X on page 10 starting at line 18!“. Without line numbers, we need to count the line from the beginning of the page to a certain line, as well as people who read it.
Fortunately, Microsoft Word has a feature to display the line numbers in the document [1]. Using this feature, we can display line numbers throughout the document or in some parts of it. However, the line number can’t be displayed in tables, footnotes, endnotes, text boxes, and headers and footers.
Adding line numbers
As in Fig 1, the steps to adding line numbers are as follows:
- Go to the
Layoutmenu; - Then in the
Page Setupgroup, clickLine Numbers; - Click one of the following options:
Continuous: To display line numbers consecutively throughout the document.Restart Each Page: If we want to display line numbers starting with number 1 on each page.Restart Each Section: To display line numbers starting with number 1 after each section break.Line Numbering Options...: For more advanced options, such as margin and intervals. See more detailed explanation in section Formatting line numbers.
Removing line numbers
As in Fig 1, the following steps are used to remove line numbers:
- Click the document, or select sections or paragraphs from which we want to remove line numbers;
- Go to the
Layoutmenu; - Then in the
Page Setupgroup, clickLine Numbers; - Click one of the following options:
None: To remove line numbers throughout the document or section.Suppress for Current Paragraph: To remove line numbers from the selected paragraphs.
Formatting line numbers
Advanced options
The advanced options could be found in the following steps:
- Go to the
Layoutmenu; - Then in the
Page Setupgroup, clickLine Numbers; - Click
Line Numbering Options...; - In the
Layouttab of Page Setup, clickLine Numbers..., as seen in Fig 2 point 1; - Then in Fig 2 point 2, adjust the setting as you need;
- Click
OK.
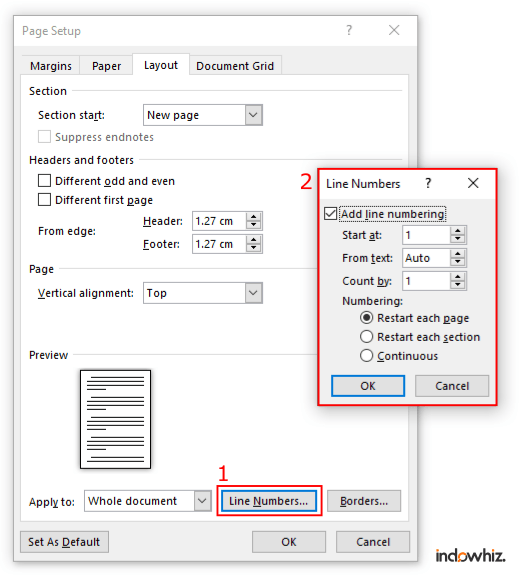
The explanation of advanced options in Fig 2 point 2 are as follows:
Start at: The starting number. By default,1is the starting line number.From text: The distance between the line number and the line text (defaultAuto).Count by: Display line numbers at specified interval (default1). For example, if we setCount by = 5, it will display line numbers in every fifth line, as seen in Fig 3.Numbering: The way to display line numbers, as explained in the section Adding line numbers.
Style formatting
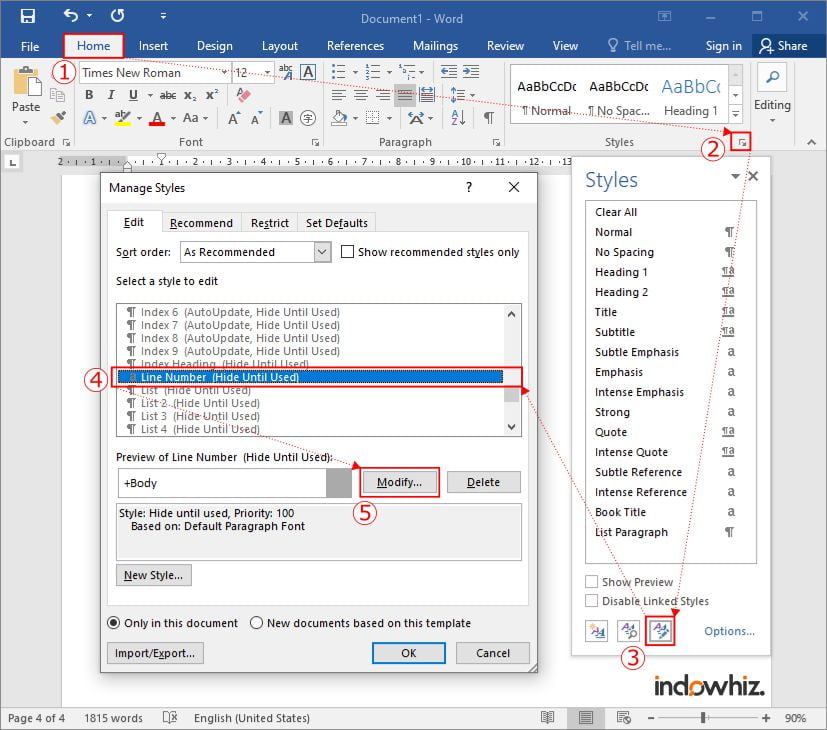
We could also change the style of the line number, such as change its color and font [2]. As in Fig 4, the steps are as follows:
- Go to
Homemenu; - Then in the
Stylesgroup, click theDialog Box Launcherbutton. It is a small button in the lower-right corner of theStylesgroup; - Click
Manage Stylesbutton; - In the
Manage Stylesdialog box, find and selectLine Numberin the style list; - Click
Modify...; - Adjust the style as you need, then click
OK.
References
If you are looking for quick help to show or insert line numbers in Word:
- Go to the Page Layout Tab
- In the Page Setup category, click on the Line Numbering Button.
- A list of line numbering option will appear
- Select the Continuous option to number all lines consecutively
- Select the Restart Each Page option to restart line numbering on every new page.
These are the steps you may use to insert line numbers in
Word.
However, if you want more details, keep sliding down this page to learn everything about line numbering in MS Word.
This term can be a bit confusing for many.
A great number of MS Word users don’t even think that it is interesting to them, let alone relevant.
The case is different for others: attorneys to be specific. People
working with legal documents do in fact need to know the answer to “What
is the Line Number?”. I’m not an attorney though, but I do know that legal
documents do require line numbers running down the pages.
What are Line Numbers in Word?
Line numbers (not to be mistaken with numbered list) are numbers that count the number of lines in a Word document while showing the appropriate number beside each line of text.

By default, Word automatically counts and number every line in a document (except those in endnotes, footnotes, text boxes, tables, headers, and footers. However, you may not see these numbers because they are hidden. And until you take some steps to display it, you’ll never see it.
NOTE: Line numbers are different from a numbered list.
How to insert line numbers in word
Word automatically performs line numbering in your Word document; however, it doesn’t show the numbers. This means that if you want to see your document numbered line after line, then you need to take some action to display it.
Without further ado, below are the steps on how to insert
line numbers in Word:
- Click on the Layout tab.

- In the Page Setup category, click the Line
Numbering button
The Line numbering shortcut menu appears from which you can
select the numbering options. By default, the None option is selected in
all MS Word documents, which means “don’t show line numbers”.

- Choose the line numbering option you want.

- Continuous option will number all lines in the document consecutively from the first page to the last page.
- Restart Each Page option will restart the line numbering on every new page in the document.
- Restart Each Section (for multi-section document) will restart the line numbering on every new section in the document. If the document has only one section, then the Restart Each Section option will work just like the Continuous option.
PRO TIP: If you need only a portion of the document
numbered, use section breaks to set those portion or pages into their own
sections and apply the line numbering to that section only by using the Restart
Each Section option.
- Suppress for Current Paragraph can be used if you’ve inserted the line numbers already, but would like the current paragraph unnumbered.
How to remove line numbers in Word
To remove line numbering in Word:
- Go to the Page Layout Tab
- In the Page Setup category, click on the Line
Numbering Button. - A list of line numbering option appears
- Select None to remove the numbering completely
- Or select Suppress for Current Paragraph
to remove line numbers for the current paragraph only.
How to format line number in Word
If you desire to format line numbering in Word, you first need to display the line numbers dialog and then set some options, like how far away from the text the numbers should appear.
To format line numbers, obey the following steps:
- Click on the Layout tab

- In the Page Setup group, click the Line
Numbering button.

- A shortcut menu appears, click on the Line
Numbering Options.

The Page Setup dialog will appear.

- On the Page Setup dialog box, click on the
Layout Tab - Now click on the Line numbers… button.
The Line Numbers dialog appears.

Almost all the options on this dialog box are already in the Line Numbers shortcut menu. The only item that isn’t there, however, is the From Text option which can be used to adjust the distance between the text and the line numbers.
Basically, this is all about line numbers in Word you should
know.
If you have any questions, you can post them in the comment section below this article.

