
Word for Microsoft 365 Word for Microsoft 365 for Mac Word for the web Word 2021 Word 2021 for Mac Word 2019 Word 2019 for Mac Word 2016 Word 2016 for Mac Word 2013 Word 2010 Word 2007 Word Starter 2010 More…Less
Use sections breaks to divide and format documents of all sizes. For example, you can break down sections into chapters, and add formatting such as columns, headers and footers, page borders, to each.
Add a section break
-
Select where you want a new section to begin.
-
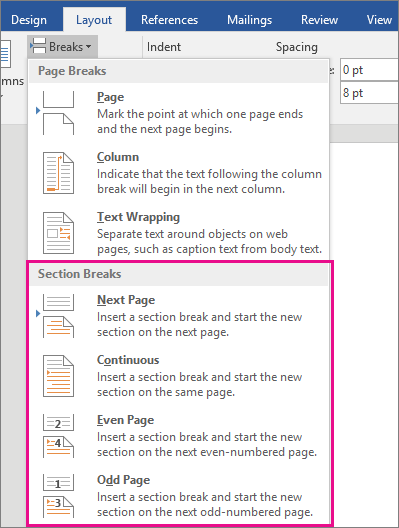
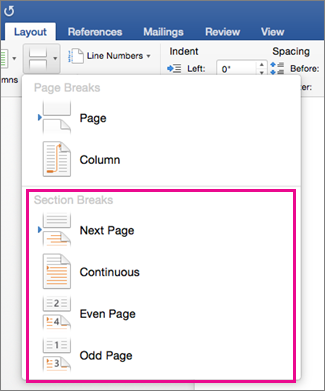
Go to Layout > Breaks.

-
Choose the type of section break you want:
-
Next Page Section break starts the new section on the following page.
-
Continuous Section break starts the new section on the same page. This type of section break is often used to change the number of columns without starting a new page.
-
Even Page Section break starts a new section on the next even-numbered page.
-
Odd Page Section break starts a new section on the next odd-numbered page.
-


Important:
Office 2010 is no longer supported. Upgrade to Microsoft 365 to work anywhere from any device and continue to receive support.
Upgrade now
Insert a section break
-
Select where you want a new section to begin.
-
Go to Page Layout > Breaks.
-
Section break that you want to add:
-
A Next Page section break starts the new section on the next page
-
A Continuous section break starts the new section on the same page.
Tip: You can use Continuous section breaks to create pages with different number of columns.
-
An Even Page or an Odd Page section break starts the new section on the next even-numbered or odd-numbered page.
-

Insert a section break
-
Select where you want a new section to begin.
-
Go to Layout > Breaks, and then choose the type of section break you want.
-
Next Page Starts the new section on the following page.
-
Continuous Starts the new section on the same page. This section break is particularly useful for documents that have columns. You can use it to change the number of columns without starting a new page.
-
Even Page Starts the new section on the next even-numbered page. For example, if you insert an Even Page Break at the end of page 3, the next section will start on page 4.
-
Odd Page Starts the new section on the next odd-numbered page. For example, if you insert an Odd Page Section Break at the end of page 3, the next section will start on page 5.
-
You can add page breaks, but Word for the web can’t add section breaks yet.
If you have the Word desktop application, use the Open in Word command to open the document and add section breaks there. When you’re done and you save the document, it will continue to be stored where you opened it in Word for the web.
See also
Use section breaks to change the layout or formatting in a section of your document
Insert a page break
Need more help?
Want more options?
Explore subscription benefits, browse training courses, learn how to secure your device, and more.
Communities help you ask and answer questions, give feedback, and hear from experts with rich knowledge.
On the View tab, click Arrange, and then click Split. If the window is wide enough, Word displays Split directly on the View tab. To adjust the relative sizes of the panes, move the mouse pointer to the dividing line, and when you see the split pointer, click and drag the dividing line to a new position.
Contents
- 1 How do I divide a page into sections?
- 2 How do I split a page in Word 2020?
- 3 How do I divide my Word document into 4 sections?
- 4 How do I split a Word document into 3 sections?
- 5 How do I make 2 pages into 1 page in Word?
- 6 How do I make 4 page invites in Word?
- 7 How do I split a Word document into 8 sections?
- 8 How do I make 4 columns in Word?
- 9 What are the 4 types of section breaks?
- 10 How do I split a Word document into two?
- 11 Is there a fit to page option in Word?
- 12 How do I fit to one page in Word?
- 13 How do I make 1/4 size in Word?
- 14 How do you Print quarter page flyers?
- 15 How do I Print 4 flyers on one page PDF?
- 16 How do I split a page into 6 sections in Word?
- 17 How do I fix columns in Word?
- 18 How do I type in different columns in Word?
- 19 How do I edit sections in Word?
- 20 What’s a section break on word?
How do I divide a page into sections?
Insert a section break
- Select where you want a new section to begin.
- Go to Page Layout > Breaks.
- Section break that you want to add: A Next Page section break starts the new section on the next page. A Continuous section break starts the new section on the same page.
How do I split a page in Word 2020?
Go to Layout > Breaks > Page.
- Click or tap in the document where you want a page break.
- Go to Insert > Page Break.
How do I divide my Word document into 4 sections?
To split a page to 4 parts, you can insert a table to deal with the job.
- Place the cursor at left-top of the page, then click Insert > Table, select 2×2 Table.
- The table has been inserted, then drag right-corner of the table to resize it as you need.
- Insert texts into the columns and rows separately.
How do I split a Word document into 3 sections?
Follow the steps outlined in this tutorial.
- Highlight the text you wish to split into columns.
- Select the “Page Layout” tab.
- Choose “Columns” then select the type of columns you wish to apply. One. Two. Three. Left. Right.
How do I make 2 pages into 1 page in Word?
Click the “1 Page Per Sheet” button to open a drop-down menu with more options. Click “2 Pages Per Sheet.”
How do I make 4 page invites in Word?
the following may answer your question: if you have a Word document with more than 4 pages, click File > Print and then in the lower right corner of the print dialog, under “Zoom,” select 4 pages per sheet.
How do I split a Word document into 8 sections?
Divide a Document into Sections
- Place the insertion point where you want the section break.
- Choose the Page Layout tab.
- Click the down-arrow next to the Breaks button. A menu appears.
- Click the type of section break you want. Word inserts the section break.
How do I make 4 columns in Word?
On the Layout tab, click Columns, then click the layout you want.
- To apply columns to only part of your document, with your cursor, select the text that you want to format.
- On the Layout tab, click Columns, then click More Columns.
- Click Selected text from the Apply to box.
What are the 4 types of section breaks?
The different kinds of section breaks include next page, continuous, even page, and odd page breaks.
How do I split a Word document into two?
How to Split a Word Document Into Two Columns
- Open a Word document that you want to format into columns. Video of the Day.
- Click the “Page Layout” tab.
- Select “Two.”
- Click “Columns” again, then “More Columns” to customize the columns further.
- Click the “Microsoft Office Button” or “File” tab.
Is there a fit to page option in Word?
“Shrink to Fit” changes the font size and margins to make the document fit on one page. In Microsoft Word 2007 and 2010, go to “Print,” “Print Preview” and then “Shrink to Fit” under the “Preview” option.
How do I fit to one page in Word?
How to Make a Word Document Fit on One Page
- Click the top, left “Office” button, point to “Print” and select “Print Preview.”
- Click “Shrink One Page” in the Preview group.
- Click the “Close Print Preview” button in the Preview group to exit print preview and retain your changes.
How do I make 1/4 size in Word?
Firstly open up a new Word document, go into Mailings on the ribbon and click on Labels in the Create section… This opens up a new dialogue box – click on Options… Select Microsoft as the Label vendor, and scroll down to 1/4 Letter, then click OK.
How do you Print quarter page flyers?
Click the “Properties” button when the Print dialog box pops up on your screen. Select “4 pages” from the “Pages per Sheet” drop-down box. Click the “OK” button. The printer produces a sheet with four copies of your party flyer.
How do I Print 4 flyers on one page PDF?
Choose File > Print. From the Page Scaling pop-up menu, select Multiple Pages Per Sheet. From the Pages Per Sheet pop-up menu, select a value. Click OK or Print.
How do I split a page into 6 sections in Word?
Follow these general steps:
- Open a new document and set the paper orientation and margins the way you want.
- Insert a three-column, single-row table in your document.
- Remove the borders around the table, if desired.
- Format the second (center) column to be rather narrow.
- Adjust the width of the other columns as desired.
How do I fix columns in Word?
To fit the columns to the text (or page margins if cells are empty), click [AutoFit] > select “AutoFit Contents.” To fit the table to the text, click [AutoFit] > select “AutoFit Window.” To keep Word from automatically adjusting your column size, click [AutoFit] > select “Fixed Column Width.”
How do I type in different columns in Word?
To add columns to a document:
- Select the text you want to format.
- Click the Page Layout tab.
- Click the Columns command. A drop-down menu will appear. Adding columns.
- Select the number of columns you want to insert. The text will then format into columns.
How do I edit sections in Word?
Change a section break
- Click or tap in the section break you want to change.
- Go to Layout and select the Page Setup launcher button .
- Select the Layout tab.
- Select a new section type from the Section Start drop down list.
- Select OK.
What’s a section break on word?
Section breaks are used to divide the document into sections. Once section breaks are inserted, you can format each section separately. For example, format a section as a single column for the introduction of a report, and then format the next section as two columns for the report’s body text.
When you’re working on a long document, separating it into different parts makes it much easier to navigate. Microsoft Word eases your workflow by letting you insert document breaks, namely section and page breaks.


As you’ll see in this article by defining section and page breaks you can apply specific formatting elements in different parts of your document. You’ll also have better control over pagination.
Read on to learn how to use section and page breaks in Word to make your document more visually appealing and easier for readers to make their way around. Finally, we’ll show you some great sources for professionally designed Word templates.
How to Add Breaks in MS Word (Quick Start Video)
Are you ready to learn how how to insert breaks in MS Word? The short video below will give you a head start on inserting, viewing, and deleting MS Word section and page breaks:
To learn even more about breaks in Word (including the difference betwen section breaks and page breaks), study the written tutorial below.
Understanding Section and Page Breaks
Section and page breaks are types of breaks or partitions in a Word document. In this section, you’ll learn some basics:
1. Microsoft Word Section Break vs Page Break
A page break is a partition in the text of the document. At a page break, the succeeding text is automatically placed on top of a new page.


But, with a section break for Word the text is partitioned — along with the formatting associated with it:
- page numbers
- margins
- headers and footers
- paper size and/or orientation
Also, a Microsoft Word section break may or may not begin on a new page (more on that below).
2. Why Use Microsoft Section and Page Breaks?
Section and page breaks are useful for partitioning different parts of a document, especially a long one.
In a book, you’d use section breaks to divide it into chapters as well as delineate the front matter from the back matter. The title page, copyright page, table of contents, individual chapters, index, etc., would be separate sections.
For example, you usually want a new chapter of a book (or similar) document to begin on a new page. This is when a page break is most useful.
A section break for MS Word is useful for visually distinguishing parts of a document. An example of where you might use a section break is in a proposal where you want the summary to have a different layout. In this case, the summary section could have its own header, footer, and margins that are different from the rest of the document.
By using section breaks, each chapter can have a different running header, including the chapter title.


Microsoft Word Section breaks also let you use lower case numbers for page numbers on the introduction of the book and Arabic numerals on the rest of the pages.
Similarly, a section break in Microsoft Word lets you use a two-column format in the index section and a single column everywhere else.
You’ll also want to use section and page breaks when you want to control the pagination of your document. For example, the first page of your document may be a cover page. But you don’t want the cover page to be page 1 of your document. By inserting a section break after the cover page, you can make the next page be page 1.
You accomplish these results by inserting different types of section and page breaks in Word.
3. Types of Microsoft Word Section Breaks
There are four types of section breaks in MS Word:
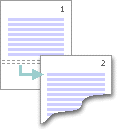
- Next Page. This type of section break forces the text to the right of the cursor to a new section on the following page. All the formatting associated with the text is carried through to the new section as well.
- Continuous. A continuous section break creates a new section but keeps the text on the same page. This means two different sections can have their own formatting yet remain on the same page.
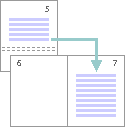
- Odd Page. This kind of section break moves the text to the right of the cursor to the top of the next odd-numbered page. If you’re on page 3, for example, and you insert an Odd Page Section Break, the next section will start on top of page 5 (page 4 will be blank). Book chapters usually begin on the next odd page of the book.
- Even Page. An Even Page section break moves the text to the right of the cursor to the top of the next even-numbered page. So, if you’re on page 6 and you insert an Even Page Section Break, the new section will begin on page 8 (leaving page 7 blank).
4. Types of Page Breaks
As for Microsoft Word page breaks, there are two kinds:


- Simple Page Breaks. A simple page break moves text to the right of the cursor to the top of the next page.
- Column Breaks. If your document is broken up into columns, a column break moves text to the right of the cursor to the top of the next column.
How to View Existing Breaks in an MS Word Doc
By default, section and page breaks are invisible in Word. You can only see their effects. You’ll see changes in formatting and pagination for each section. That’s because these breaks don’t appear when the document is printed.
As you’re editing and formatting your document, you may need to see page and section breaks. To view existing page and section breaks in Word, on the Home tab, then click on the Paragraph button.


How to Insert Section Breaks in Your Word Docs
To insert a page or section break, place the cursor where you want one section/page to end and the next section/page to begin.
Go to Insert > Break, then choose the specific type of page break or section break you want to insert.


Or, click on the Layout tab. Then click on the Breaks button on the ribbon and select the type of page or section break you wish to insert.


How to Remove/Delete Section and Page Breaks in Word
To remove a section or page break in Word, first display all the breaks.
Select the section or page break you want to remove by highlighting it. Click on either the Delete or Backspace key on your keyboard.


When you delete a section break, the text in the section adopts the formatting of the next section.
Tips for Using Section and Page Breaks in MS Word
Are you just getting comfortable with using Microsoft Word section and page breaks? Here are some extra tips to help you use them effectively:
1. Keep Your Section Breaks to a Minimum
Insert a section break in Word only when you have to (see above for when it’s a good idea to do so). Having more sections than necessary makes it more difficult to make global changes to your document, because you’d have to manually make those changes in each section.
2. Pay Attention to Which Section You’re In
If you’ve divided your document into sections, always be aware of what section you’re in when you make formatting changes. That’s because these changes will apply only to the section you’re currently in — that’s the section where your cursor is. If you want to make a formatting change to apply to the whole document, select the entire document first before making your changes.
3. Microsoft Word May Change a Continuous Section Break to the Other Section Break Types
You may be surprised that your continuous section break has been converted into a different type of section break. This happens when you’ve got a continuous section break. Then, in the next section, you try to apply a different header/footer, pagination, margins, or page size and orientation. Those formatting changes require a page break. And so, Word will automatically change the section break type to one that results in a page break.
Streamline Your Microsoft Word Workflow With Templates


There are other ways to streamline your MS Word workflow. One of them is using premium Word templates, like the ones you’ll find at Envato. Premium templates for Microsoft Word are created by professional designers to provide impressive layouts. These templates are customizable with your content, images, and branding. You can also adjust the design and layout as you please.
Envato Elements gives you unlimited downloads of Word templates as well as other inputs you need to complete your projects — fonts, graphics, stock photos, and more — all for one flat monthly subscription fee.


Or, go to GraphicRiver for Microsoft Word templates and other creative elements on a pay-per-use basis. It’s a terrific source for one-off projects.
Make Your Document Easier to Read and Navigate
Now you know how to use section and page breaks in Microsoft Word to better organize your document. Section breaks also let you have more granular control over the formatting of specific parts of your document. These make your document look better as well as easier to read and navigate through.
Use the steps you learned in this article to properly use section and page breaks. Also, use Word templates to make it much easier and faster to create impressive documents. Envato Elements provides unlimited downloads of templates for Word for one monthly subscription. For occasional projects, GraphicRiver is an excellent source of Word templates where you pay for each use.
Editorial Note: This tutorial has been updated to add a video by Andrew Childress.
Содержание
- Создание раздела
- Вставка разрыва страницы
- Форматирование и настройка раздела
- Очевидная польза разбивки документа на разделы
- Вопросы и ответы
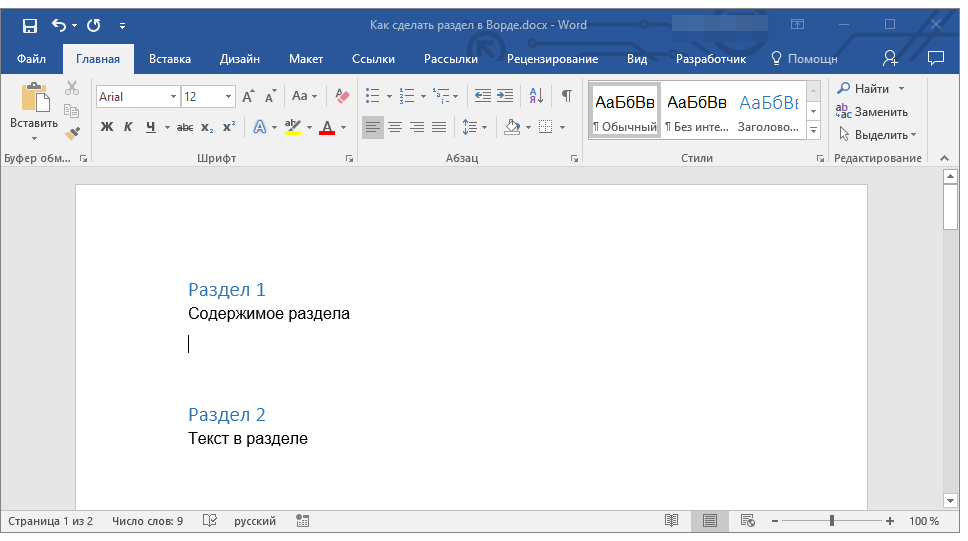
Большинство команд форматирования в Microsoft Word применяются ко всему содержимому документа или к области, которая была предварительно выделена пользователем. В числе таких команд установка полей, ориентация страницы, ее размер, колонтитулы и т.д. Все бы хорошо, вот только в некоторых случаях требуется по-разному отформатировать разные части документа, а для этого следует разбить документ на разделы.
Урок: Как убрать форматирование в Ворде
Примечание: Несмотря на то, что создавать разделы в Microsoft Word очень просто, ознакомиться с теорией по части данной функции лишним уж точно не будет. Именно с этого мы и начнем.
Раздел — это как документ внутри документа, точнее, независимая его часть. Именно благодаря такому разбиению можно изменить размеры полей, колонтитулы, ориентацию и ряд других параметров для отдельной страницы или определенного их количества. Форматирование страниц одного раздела документа будет происходить независимо от остальных разделов этого же документа.
Урок: Как убрать колонтитулы в Ворде
Примечание: Разделы, о которых идет речь в данной статье, это не часть научной работы, а элемент форматирования. Отличие вторых от первых заключается в том, что при просмотре распечатанного документа (как и его электронной копии) никто не догадается о разбиении на разделы. Такой документ выглядит и воспринимается как целостный файл.
Простой пример одного раздела — титульная страница. К этой части документа всегда применяются особые стили форматирования, который не должен распространяться на остальную часть документа. Именно поэтому без выделения титульной страницы в отдельный раздел попросту не обойтись. Также, можно выделить в раздел таблицы или любые другие фрагменты документа.
Урок: Как сделать титульную страницу в Word
Создание раздела
Как было сказано в начале статьи, создать раздел в документе не сложно. Для этого нужно добавить разрыв страницы, а затем выполнить еще несколько простых манипуляций.
Вставка разрыва страницы
Добавить разрыв страницы в документ можно двумя способами — с помощью инструментов на панели быстрого доступа (вкладка «Вставка») и с помощью горячих клавиш.
1. Установите указатель курсора в том месте документа, где должен заканчиваться один раздел и начинаться другой, то есть, между будущими разделами.
2. Перейдите во вкладку «Вставка» и в группе «Страницы» нажмите кнопку «Разрыв страницы».
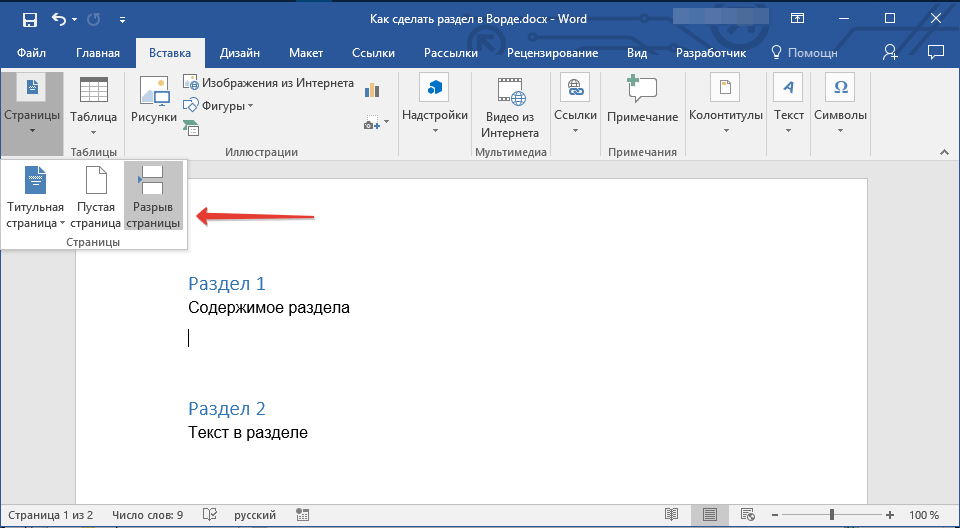

3. Документ будет разделен на два раздела с помощью принудительного разрыва страницы.
Для вставки разрыва с помощью клавиш просто нажмите «CTRL+ENTER» на клавиатуре.
Урок: Как в Ворд сделать разрыв страницы
Форматирование и настройка раздела
Разделив документ на разделы, которых, как вы понимаете, вполне может быть и больше двух, можно смело переходить к форматированию текста. Большинство средства форматирования располагаются во вкладке «Главная» программы Word. Правильно отформатировать раздел документа вам поможет наша инструкция.

Урок: Форматирование текста в Ворде
Если в разделе документа, с которым вы работаете, содержатся таблицы, рекомендуем ознакомиться с детальной инструкцией по их форматированию.
Урок: Форматирование таблиц Word
Помимо использования определенного стиля форматирования для раздела, возможно, вы пожелаете сделать отдельную нумерацию страниц для разделов. Наша статья вам в этом поможет.
Урок: Нумерация страниц в Ворде
Наряду с нумерацией страниц, которая, как известно, располагается в верхних или нижних колонтитулах страниц, при работе с разделами также может возникнуть необходимость изменения этих самых колонтитулов. О том, как их изменить и настроить вы можете прочесть в нашей статье.
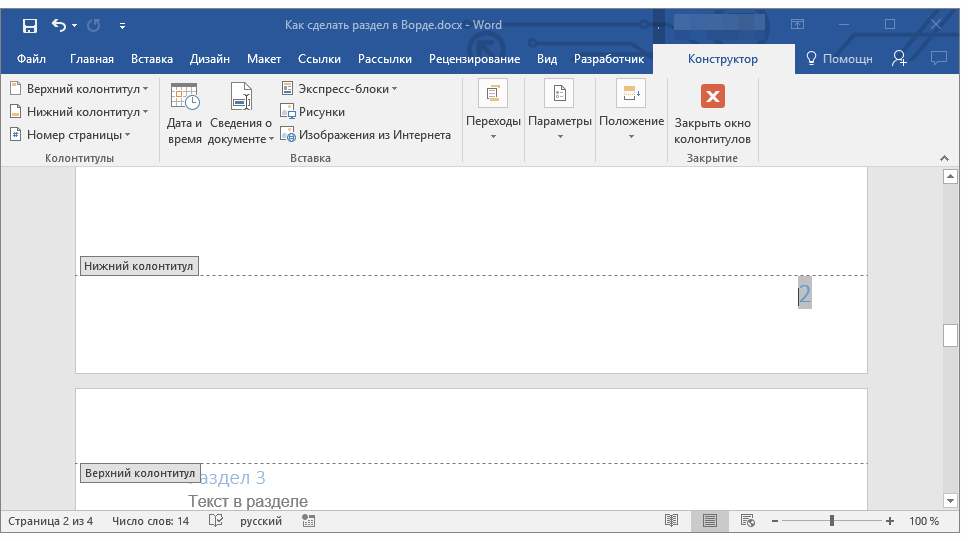
Урок: Настройка и изменение колонтитулов в Word
Очевидная польза разбивки документа на разделы
Помимо возможности выполнения независимого форматирования текста и прочего содержимого части документа, разбивка на разделы имеет еще одно явное преимущество. Если в документ, с которым вы работаете, состоит из большого количества частей, каждую из них лучше всего вывести в независимый раздел.
Например, титульный лист — это первый раздел, введение — второй, глава — третий, приложение — четвертый, и т.д. Все зависит лишь от количества и типа текстовых элементов, входящих в состав документа, с которым вы работаете.
Обеспечить удобство и высокую скорость работы с документом, состоящим из большого количества разделов, поможет область навигации.
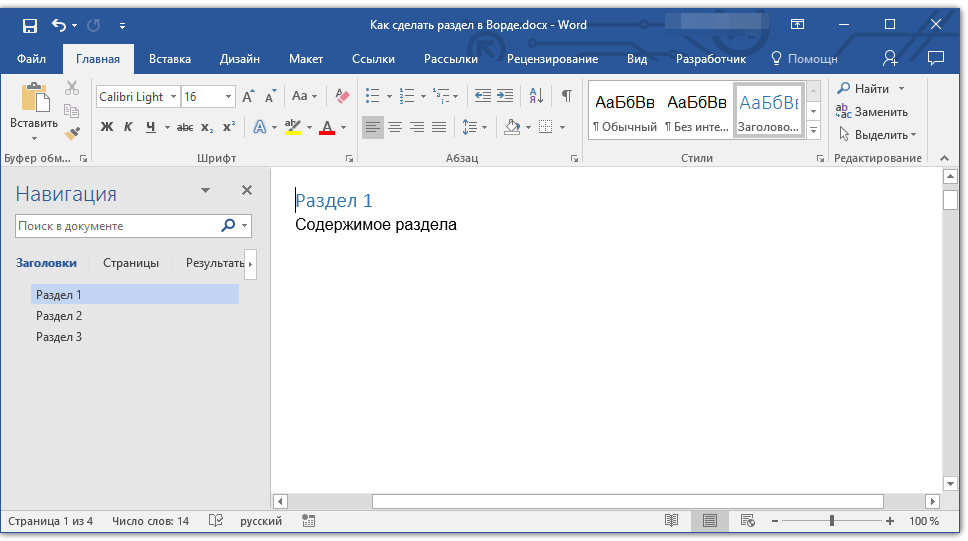
Урок: Функция навигации в Ворде
Вот, собственно, и все, из этой статьи вы узнали, как создавать разделы в документе Word, узнали об очевидной пользе этой функции в целом, а заодно и о ряде других возможностей этой программы.
Download PC Repair Tool to quickly find & fix Windows errors automatically
As important as the quality of your content may be, it is also essential to be visualized and represented neatly and easily. For example, if your Word document is riddled with words from top to bottom, splitting its content into four quarters can make it easy for the reader to comprehend. Today’s tutorial will look at a few ways to easily partition your Word document in four different quarters.
You can split and create four quarters or sections from a page in Microsoft Word in two ways.
- Using the Labels option
- By creating a 2×2 table
Check out each of these methods.
1] Split a Word page in 4 quarters using Labels

The proper, official way to complete the job is to split the A4 Word sheet into ¼ columns using the Labels option. Here’s what you need to do:
- Open a new Word document, and from the options ribbon at the top, click on Mailings
- In the Create section, you’ll see the Labels option. Click on it to open the Envelopes and Labels dialog box
- Here, click on options, and from the list of choices under Product Number, select ¼ Letter
- Click on Ok, and you’ll then be taken back to the Envelopes & Labels dialogue box
- Click on New document, and a new file will open that will be partitioned into 4 equal-sized boxes stretching from corner to corner of the page.
Selective information can go in the appropriate corner. Your page is now divided into four portions; you can write text on each separately.
2] Split a Word page in 4 quarters by creating a 2×2 table
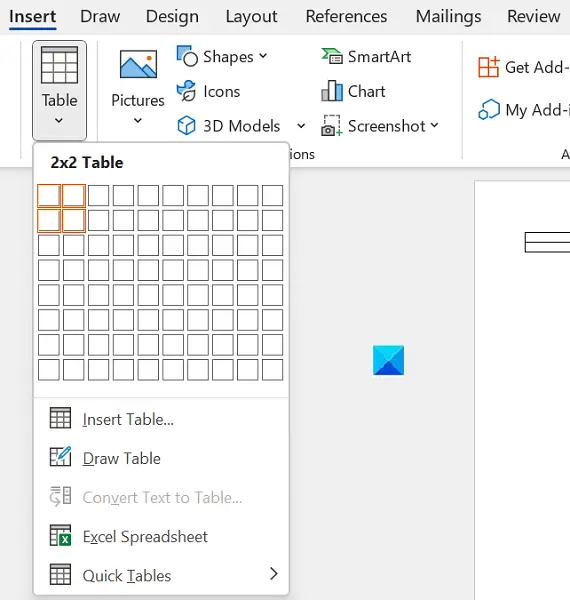
Another way you can split the page of a Word document into 4 divisions, equal or unequal, the way you want is by inserting a 2×2 table and subsequently removing the borders from it, so it appears to be divided into 4 quarters.
- Open a new Word document and from the Insert tab, click on Table and select enter a 2×2 table.
- To make the table span across the page and look like four quarters, drag the right and the bottom corner of the table accordingly
- Insert texts in the rows and columns, considering them different quarters.
- If you find the border lines too thick, you can modify them by clicking on the Design ribbon and selecting Page Borders.
This is also an easy way to make your page look like it has been divided into 4 quarters on MS Word.
How do I split a Word page into 3 columns?
Like a four-way partition, you can split a page into two or three halves in Microsoft Word. To lay out three columns on a single page of MS Word, click on the Layout tab. Open the Columns drop-down and select Three. You can go on to have more than three columns using the More columns option.
What is a section break in Word?
Using Section formatting, you can apply page layouts to different sections within the document. A section break is used to divide a page into different sections. Using them, each section can be formatted independently. For example, one section may be composed of a single column, while another may have two or more.
We hope that you will now be able to divide your Word page according to your needs.

An undergraduate student of Business Economics at Delhi University, Divyansh loves Cricket, Formula 1, Television and dabbles his interest in Tech on the side. Writing about the Windows ecosystem is what excites him.