
В этой статье мы рассмотрим коллекцию Sections и ее объекты Section, которые предоставляют разделы документа Word. Существует тонкая грань между разделами и страницами документа, так, в созданном документе существует только один раздел, при желании можно добавить еще несколько, однако количество страниц может быть или равным количеству разделов, или больше. Добавление разделов документа Word актуально в том случае, если мы хотим оформить рамку для каждой страницы в индивидуальном стиле.
Возьмем такой пример: в документе 20 страниц и один раздел, которому они принадлежат, приложение Word позволяет применить заданную рамку ко всему разделу, к первой странице раздела или ко всем страницам кроме первой. Но, что если мы хотим, что бы каждая страница была оформлена индивидуальной рамкой (свет, стиль, толщина линии)? В таком случае, нам придется добавить 20 отдельных разделов в документ Word, и уже для каждого применить индивидуальное оформление.
Sections – разделы документа Word
Коллекция Sections содержит объекты Section для заданного документа, выделения или выбора. Отсюда следует, что мы можем получить доступ к данной коллекции тремя способами с помощью свойства Sections, которое есть у таких объектов:
Word Document – В данном случаем мы обрабатываем разделы для конкретного документа Word.
Word Selection – Тут мы можем получить те разделы документа Word, которое принадлежат заданному выделению.
Word Range – Тут мы можем получить те разделы документа Word, которое принадлежат заданному выбору.
Свойства
Count – Возвращает количество разделов (объектов Section) в коллекции.
First — Возвращает объект Section, представляющий первый элемент в коллекции Sections.
Last — Возвращает объект Section, представляющий последний элемент в коллекции Sections.
PageSetup — Возвращает объект PageSetup.
Методы
Add(Range, Start) — Возвращает объект Section, представляющий новый раздел, добавленный в документ Word. Оба параметра являются дополнительными.
Range — Диапазон перед которым нужно вставить раздел. Если этот аргумент опущен, раздел документа Word вставляется в конец.
Start — Тип раздела документа Word, который вы хотите добавить. Если параметр отсутствует, то раздел добавляется после следующей страницы. Значение константы WdSectionStart.
- wdSectionContinuous — 0 – Сплошной раздел.
- wdSectionEvenPage — 3 — Четные страницы.
- wdSectionNewColumn — 1 – Колонка.
- wdSectionNewPage — 2 — Страница.
- wdSectionOddPage — 4 — Нечетные страницы.
Item(index) – Доступ к заданному разделу по его номеру в коллекции.

Section – разделы документа Word
Свойства
Application — Возвращает объект Word Application.
Borders — Возвращает коллекцию Borders.
Footers и Headers — Свойства возвращают коллекцию HeadersFooters для нижнего или верхнего колонтитула.
Range — Возвращает объект Range.
PageSetup— Возвращает объект PageSetup.
Index — Возвращает позицию объекта Section в коллекции.
Теперь рассмотрим два программных кода на языке VBScript и JScript:
' ----------------------------------------------------------------------------
' Коллекция Sections и объект Section
' Добавление разделов в документ Word
' Sections.vbs
' ----------------------------------------------------------------------------
Option Explicit

dim oWord, oDoc, oSel, i, MyText

Set oWord = CreateObject("Word.Application")
Set oDoc = oWord.Documents
oDoc.Add()
oWord.Visible = True
Set oSel = oWord.Selection

MyText = "Разделы документа Word. "

For i=0 to 40
    oSel.TypeText MyText & MyText & MyText & MyText & MyText & MyText & MyText
    oSel.TypeParagraph
Next

MsgBox "Количество разделов в документе Word - " & oDoc(1).Sections.Count

oDoc(1).Sections.Add
oDoc(1).Sections.Add
oDoc(1).Sections.Add

MsgBox "Количество разделов в документе Word - " & oDoc(1).Sections.Count
<
// ----------------------------------------------------------------------------
// Коллекция Sections и объект Section
// Добавление разделов в документ Word
// Sections.js
// ----------------------------------------------------------------------------
var oWord, oDoc, oSel, i, MyText;

oWord = WScript.CreateObject("Word.Application");
oDoc = oWord.Documents;
oDoc.Add();
oWord.Visible = true
oSel = oWord.Selection;

MyText = "Разделы документа Word. ";

for(i=0; i<=40; i++){
    oSel.TypeText(MyText + MyText + MyText + MyText + MyText + MyText + MyText);
    oSel.TypeParagraph();
}

WScript.Echo("Количество разделов в документе Word - " + oDoc(1).Sections.Count);

oDoc(1).Sections.Add();
oDoc(1).Sections.Add();
oDoc(1).Sections.Add();

WScript.Echo("Количество разделов в документе Word - " + oDoc(1).Sections.Count);
В данных примерах все довольно просто. В самом начале мы создаем ссылку на объект Word Application, далее происходит создание нового документа и вставка в него заданного текста. Приложение Word автоматически создает один раздел для всего документа, плюс, данный раздел будет содержать в себе все страницы.
Далее в сценарии происходит вывод количества разделов документа Word, естественно, их значение равно 1. После, мы добавляем три новых раздела с помощью метода Add и снова выводим общее количество разделов.
Instructions for Word on a PC
- Click on the “Insert” tab at the top of the screen, so that the Insert ribbon appears.
- Click on the “Symbol” button all the way to the right.
- Select the “More Symbols” tab.
- Select the “Special Character” tab.
- Select the Section symbol.
- Click on the “Insert” button.
Contents
- 1 How do I make a section symbol in Word?
- 2 How do you type the section symbol?
- 3 How do you make a section symbol on a Mac?
- 4 How do you insert a section symbol in pages?
- 5 How do you make a section symbol in latex?
- 6 How do you type special characters on a keyboard?
- 7 How do you make a section symbol in Word on a Mac?
- 8 What is Section * in LaTeX?
- 9 How do you write a section without the number in LaTeX?
- 10 How do you put a dot over a letter in LaTeX?
- 11 How do I get symbols on my keyboard Windows 10?
- 12 How do you make symbols on a laptop?
- 13 How do I make emoticon symbols?
- 14 What is the dot key on Mac?
- 15 How do you write a chapter in a book in LaTeX?
- 16 What is blind text in LaTeX?
- 17 How do I start a single section in LaTeX?
- 18 How do I change the chapter number in LaTeX?
- 19 How do I change the section numbering style in LaTeX?
- 20 How do you make an O in LaTeX?
How do I make a section symbol in Word?
Creating the “Section” Symbol (§) in Word Documents
Click on the menu option Insert. On the drop-down menu, click on the menu option Symbol. On the Symbol screen that displays, click on the Special Characters tab. Click on the “section” symbol (§) in the list of symbols that displays, then click on Insert and Close.
How do you type the section symbol?
For the section symbol on a Windows computer, you would press and hold the Alt key. Next, type the numbers, “0167,” and then release the Alt key. This would create the section symbol (§) in your text.
How do you make a section symbol on a Mac?
In Mac OSX section symbol is inserted by holding down option key and pressing 6. Best. In Mac OSX section symbol is inserted by holding down option key and pressing 6.
How do you insert a section symbol in pages?
Q. How do I enter the section symbol § (a pair of overlapping S characters) in a document?
- There are multiple sequences of keystrokes to try in web pages, HTML, and Microsoft Word.
- (1) Hold down the [Alt] key and on the numeric keypad press the digits “0”, “1”, “6” and “7” in that order, then release the [Alt] key.
How do you make a section symbol in latex?
The § symbol is obtained with S . You can also format multiple references; here’s a starting point. I used the detexify website to search the sign you are asking. The usage is simple, just assign a reference tag to the chapter you want, and then add that reference tag besides to this sign in your text.
How do you type special characters on a keyboard?
- Ensure that the Num Lock key has been pressed, to activate the numeric key section of the keyboard.
- Press the Alt key, and hold it down.
- While the Alt key is pressed, type the sequence of numbers (on the numeric keypad) from the Alt code in the above table.
- Release the Alt key, and the character will appear.
How do you make a section symbol in Word on a Mac?
Instructions for Word on a Mac
- Click on the “Insert” tab at the top of the screen, so that the Insert ribbon appears.
- Click on the “Advanced Symbol” button all the way to the right.
- Select the “Special Character” tab.
- Select the Section symbol.
- Click on the “Insert” button.
What is Section * in LaTeX?
The brief answer is, section inserts a new entry into the table of contents at the appropriate tree-level and also inserts a new entry into the navigation bars. But section* only adds an entry in the navigation bars, not in the table of contents.
How do you write a section without the number in LaTeX?
If you’d prefer your sections, subsection, and so forth to be displayed without numbers on the left side of the title, you simply add a * symbol to the command. (Note that section headings created this way will not be listed in the table of contents tableofcontents.)
How do you put a dot over a letter in LaTeX?
Mathematically, one or more dot symbols are used on a letter to denote a dot derivative. The default commands for this are dot and ddot and in which differential variables must be passed as arguments.
How do I get symbols on my keyboard Windows 10?
To insert symbols or kaomoji on Windows 10, use these steps:
- Open a text file, document, or email.
- Use the Windows key + (period) or Windows key + (semicolon) keyboard shortcut to open the emoji panel.
- Click the Omega button to access the symbols.
- Select the symbols you want to insert.
How do you make symbols on a laptop?
Release the ALT key and the symbol will appear. Create a symbol with a number pad. If your keyboard has a number pad on it, this is a much simpler process. Ensure Num Lock is enabled, then just hold alt, enter the code on the number pad, and receive your symbol.
How do I make emoticon symbols?
To find and insert emoji in any text area, use these steps:
- Open any app (such as Notepad, Word, or Microsoft Edge).
- In the text area, open the emoji panel using the Windows key + ; (semicolon) or Windows key +.
- Click on the Smiley face (emoji) tab.
- Start typing to search an emoji.
- Select the emoji to insert.
What is the dot key on Mac?
Other Punctuation
| SYMBOL | NAME | CODE |
|---|---|---|
| ¶ | Paragraph Symbol | Option+7 |
| • | Dot | Option+8 |
| § | Section Symbol | Option+6 |
| – | en-dash. Option, then minus sign | Option+- |
How do you write a chapter in a book in LaTeX?
Time for action – writing a book with chapters
- Create a new document with the following code: documentclass[a4paper,12pt]{book} usepackage[english]{babel} usepackage{blindtext} begin{document} chapter{Exploring the page layout} In this chapter we will study the layout of pages.
- Save the document and Typeset it.
What is blind text in LaTeX?
blindtext is a LaTeX package to create dummy text (and mathematics) in sample documents. It provides such text in a number of languages and a number of dummy document structures.
How do I start a single section in LaTeX?
- Use section*{Preface} addcontentsline{toc}{section}{Preface} .
- If you really want a 0 section, add this to the preamble: setcounter{section}{ -1} ; otherwise, do as Harish has suggested.
How do I change the chapter number in LaTeX?
So, a specific chapter or section number can be specified by manipulating the value inside this counter. The value in these counters can be set by using the setcounter command. The same technique can be used with section and subsection numbering to set specific numbers.
How do I change the section numbering style in LaTeX?
LaTeX lets you change the appearance of the sectional units. As a simple example, you can change the section numbering to upper-case letters with renewcommandthesection{Alph{section}} in the preamble (see alph Alph arabic roman Roman fnsymbol : Printing counters).
How do you make an O in LaTeX?
The following accents may be placed on letters. Although “o” letter is used in most of the examples, the accents may be placed on any letter.
Escaped codes.
| LaTeX command | Sample | Description |
|---|---|---|
| ‘{o} | ó | acute accent |
| ^{o} | ô | circumflex |
| “{o} | ö | umlaut, trema or dieresis |
| H{o} | ő | long Hungarian umlaut (double acute) |
“
![]()
Download Article
![]()
Download Article
- Adding a Table of Contents
- Updating the Table of Contents
- Stylizing the Table of Contents
- Video
|
|
|
This wikiHow teaches you how to customize and update the table of contents in your Word document. When you create a table of contents in Word, page numbers are added automatically based on the headings you’ve added to each section. Word makes it easy to customize the way the page numbers and section titles appear on the table. If you make changes to your document that affects your section headers or page numbers, you’ll need to choose the Update Table option so the table of contents remains correct.
-

1
Format the headings of each section of your document. Word’s table of contents builder automatically generates a table of contents based on the headings in your document.[1]
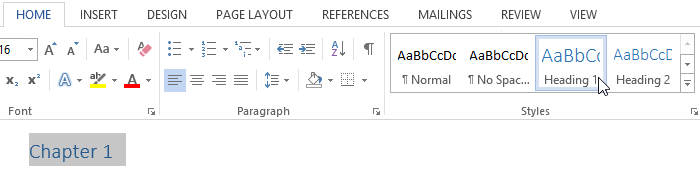
This means each section that you want represented in your table of contents must have a properly-formatted heading.- If a section should appear as a primary section in the table of contents, select its heading, click the Home tab, and then select Heading 1 on the «Styles» panel.
- To add a sub-section to the primary section in the table of contents, give that section a Heading 2 header: Select its heading and choose Heading 2 from the Styles section.
- You can can also use Heading 3, Heading 4, etc., to add even more pages to your table of contents.
- Make sure any page you want to include in the table of contents has a heading.
-
2
Click the location where you want to insert the table of contents. Typically this will be at the beginning of your document.
Advertisement
-
3
Click the References tab. It’s at the top of Word.
-
4
Click Table of Contents on the toolbar. It’s at the upper-left corner of Word. A list of Table of Contents styles will expand.
-
5
Select an automatic style template. Several style options appear for your table of contents—choose one of the suggested styles to get started. Once selected, this will add a table of contents that lists the page numbers for each of your formatted sections.


Advertisement
-
1
Click the References tab. It’s at the top of Word.[2]
- Use this method if you’ve made a change (changing a heading, adding/removing pages) to your document and need to update the table of contents to reflect that change.
- The only way to change the name of a section on the table of contents is to change the name of the corresponding header in the document.
-
2
Click Update Table on the «Table of Contents» panel. It’s in the upper-left corner. Two options will appear.
-
3
Select an update option.
- Select Update page numbers only if you want to refresh the page numbers without applying any changes you’ve made to the headings.
- Select Update entire table to apply all heading and page number changes.
-
4
Click OK. The table of contents is now up-to-date.


Advertisement
-
1
Click the References tab. It’s at the top of Word.
-
2
Click Table of Contents on the toolbar. It’s at the upper-left corner of Word. A list of Table of Contents styles will expand.
-
3
Click Custom table of contents on the menu. This opens the Table of Contents dialog box.
-
4
Adjust your general preferences. The «Print Preview» box at the upper-left corner shows you how the printed table of contents will appear, while the «Web preview» box displays how it will look on the web.[3]
- Use the checkbox next to «Show page numbers» to show or hide page numbers. If you just want to hide page numbers on the web version of the table of contents, check the box next to «Use hyperlinks instead of page numbers.»
- Use the checkbox next to «Right align pages numbers» top adjust the alignment.
- To change the style of the line or pattern that separates the heading title and the page number, make your selection from the «Tab leader» menu.
- To choose another theme, select something from the «Format» menu.
- To adjust how many heading levels are displayed in the table, select an option from the «Show levels» menu (the default is 3).
-
5
Click the Modify button. It’s in the lower-right corner of the window. This is where you can change the properties of the text on the table of contents page.
- If you don’t see this button, click the «Formats» menu and select From template. It should appear then.
-
6
Select a style and click Modify. The styles you can change appear in the «Styles» box on the left side of the window. When you click a style (e.g., TOC 1), you’ll see the font size, spacing, and other details—clicking Modify allows you to change these details.
-
7
Make your changes and click OK. You can choose different fonts, alignments, colors, and numerous other details for each selected style. Alternatively, you can keep the defaults, which come from the table of contents template you selected.
-
8
Click OK. The style changes you’ve made will apply to your table of contents immediately.


Advertisement
Ask a Question
200 characters left
Include your email address to get a message when this question is answered.
Submit
Advertisement
Video
Thanks for submitting a tip for review!
About This Article
Article SummaryX
1. Click the References tab.
2. Click Update Table.
3. Select an update option.
4. Click OK.
Did this summary help you?
Thanks to all authors for creating a page that has been read 59,876 times.
Is this article up to date?
 When I first wrote this blog post, Word 2003 was still the predominant version of the program, more commonly used than Word 2007. (And Word 2010 was just a gleam in some Microsoft programmer’s eye…) So I basically wrote the post for users of 2003 and then just posted a brief explanation where to find the same functions in 2007, which was the first version to use ribbons instead of dropdown menus. Over the years, this has been one of the most popular T4L posts but now that 2007 and 2010 are more widely used, I’ve decided to spell out the steps for those versions in full. You can still find the instructions for Word 2003 and earlier versions later in the post.
NOTE: I’ve never had Office 2013, so I can’t say if there are any differences for that version, but I now have Office 2016 and the process is exactly the same, so it’s a good bet that it is for 2013 as well. (If you have Word 2013 and there is any difference, please post a comment below and I’ll add that info here.)
Both sets of instructions are for creating different sections in an MS-Word document so you can change the header for each section. For example, you might want to have different headers with each chapter name to help readers find the section they’re looking for more quickly.
Note: The same techniques work for creating separate footers, which you might want to do to start Page 1 after a Table of Contents, for example.
Section Break vs. Page Break
You may already know that you can force a page break by placing your cursor in front of the text you want to start on the next page and pressing Ctrl + Enter on your keyboard. (And if you don’t know that, consider this a bonus tip!) 🙂
However, that won’t work for our purpose. We don’t want to just move the text to the next page; we want to start a new section so we can create a new header.
Instructions for Word 2007, 2010, 2013, and 2016
Put your cursor at the start of the text you want to start a new section.
On the Page Layout ribbon, click the down arrow beside the Breaks button. (In Word 2016, the ribbon is just called Layout. I don’t know which one it is in 2013.)

Select Section Breaks > Next Page.
Now the text is at the top of the next page.
Move your cursor near the top of the page and double-click to display the Header area.

NOTE: Some readers have reported that if they create a Header section using the Insert > Header command and choose anything other than the Blank option, the instructions don’t work. I’m not sure why this is as it works for me, but if you are still having problems after following these steps, try changing the Header format to Blank.
The Header and Footer Tools Design ribbon has opened at the top of the page. You can see that the Link to Previous button is depressed, meaning the two sections will have the same header. (You can also see a Same to Previous tab on the bottom border of the header section.)

Click the Link to Previous button.

The Same as Previous tab is now gone from the header section.
Type “Section 2 Header” in the header area.
Double-click in the main text area of the page.
This will close the header section and remove the toolbar. The new header appears at the top of the page.

Now, if you scroll back up to the first page, you can see that the header is still blank, because the two headers are no longer linked. You could also enter text into the header area and it wouldn’t change the header on the next page.
![]()
Simply repeat these steps for each new section and you can have as many different headers as you want.
Instructions for Word 2003 and Earlier Versions
Note: The screenshots below show a document I used when I wrote the original post. I no longer have it and I no longer have Word 2003, so I can’t update the document. But the dialog boxes should look the same.
Put your cursor at the start of the text you want to start a new section.
From the Insert menu, select Break.
In the dialog box that comes up, select the “Next page” radio button from the “Section break types” area.

Now the text is at the top of the next page. You can tell it’s also the beginning of a new section by looking at the status line at the bottom left of the Word window.

From the View menu, click Header and Footer.
The header section of the page will display and the Header and Footer toolbar also appears.

You’ll notice, above the header box, it says “Same as previous.” This is the default option for when you create a header, and that’s what we need to change.
Click the Same as Previous button on the toolbar.
You can mouse over the buttons to see the names of them. You want to click it so it doesn’t look like it’s depressed.

The “Same as previous” text is now gone from the header box at the top of the page.

Type “Section 2 Header” in the header area.
Double-click in the main text area of the page.
This will close the header section and remove the toolbar.

Now, if you scroll back up to the first page, you can see the header is still blank, because the two headers are no longer linked.
![]()
Simply repeat these steps for each new section and you can have as many different headers as you want.
You may also be interested in:
Save Text Snippets to Easily Reuse in Microsoft Word
Four Formatting Tips for Excel
Microsoft Products: News, Views, & How-Tos
Filed Under: Formatting, How To, MS-Word, Popular, Top Ten, Updates
If you found this post helpful, maybe your friends will too (hint, hint)!
To receive future blog posts in your Inbox, please fill out the form below.
Lesson 15: How to Create a Table of Contents in Word
/en/word-tips/modifying-page-numbers-in-word/content/
How to create a table of contents in Word
Imagine you’re working with a really long document in Microsoft Word, like an academic paper or a big report. Depending on the project, it might be dozens or even hundreds of pages long! When a document is this large, it can be difficult to remember which page has what information. Fortunately, Word allows you to insert a table of contents, making it easy to organize and navigate your document.
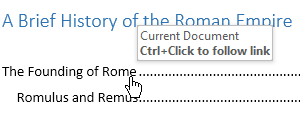
A table of contents is just like the list of chapters at the beginning of a book. It lists each section in the document and the page number where that section begins. A really basic table of contents might look like this:
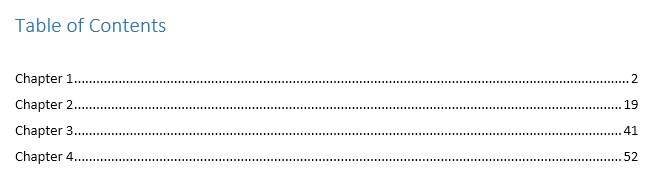
You could create a table of contents manually—typing the section names and page numbers—but it would take a lot of work. And if you ever decide to rearrange your sections or add more information, you’ll have to update everything all over again. However, with the right formatting, Word can create and update a table of contents automatically.
Step 1: Apply heading styles
If you’ve already read our Applying and Modifying Styles lesson, you know they’re an easy way to add professional text formatting to different parts of your document. Styles also serve another important purpose: adding a hidden layer of organization and structure to your document.
If you apply a heading style, you’re telling Word that you’ve started a new part of your document. When you insert the table of contents, it will create a section for each heading. In the table of contents above, each chapter uses a heading style, so there are four sections.
To apply a heading style, select the text you want to format, then choose the desired heading in the Styles group on the Home tab.
Step 2: Insert the table of contents
Now for the easy part! Once you’ve applied heading styles, you can insert your table of contents in just a few clicks. Navigate to the References tab on the Ribbon, then click the Table of Contents command. Select a built-in table from the menu that appears, and the table of contents will appear in your document.
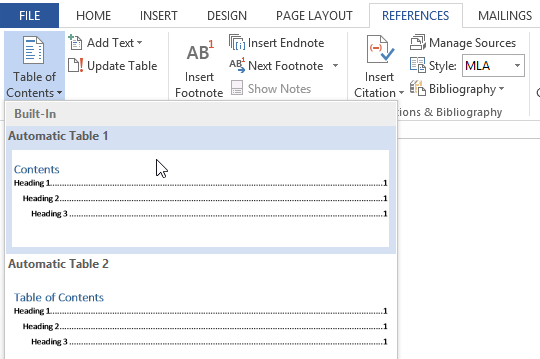
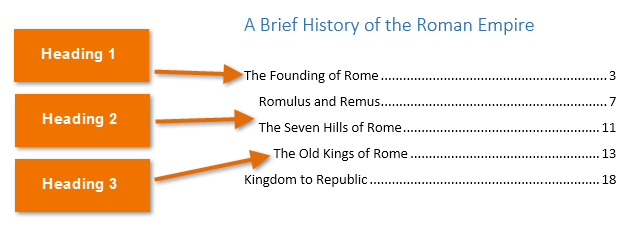
As you can see in the image below, the table of contents uses the heading styles in your document to determine where each section begins. Sections that begin with a Heading 2 or Heading 3 style will be nested within a Heading 1 style, much like a multilevel list.
A table of contents also creates links for each section, allowing you to navigate to different parts of your document. Just hold the Ctrl key on your keyboard and click to go to any section.
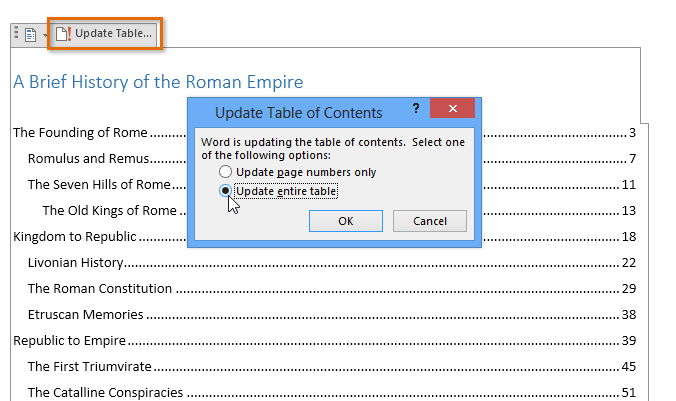
Step 3: Update as needed
If you edit or add to your document, it’s easy to update the table of contents. Just select the table of contents, click Update Table, and choose Update Entire Table in the dialog box that appears. The table of contents will then update to reflect any changes.
No matter how large your document may be, you can see there’s nothing complicated about creating a table of contents. If you want even more control over how your table of contents appears, check out this tutorial from Microsoft on Taking a Table of Contents to the Next Level.
/en/word-tips/how-to-create-a-bibliography-or-works-cited-page-in-word/content/