
Word proposes a very simple way to add horizontal lines to a document, but if you would like to remove these
lines, this wouldn’t be so obvious.
Enter three or more special characters on a new line and then press Enter, Word automatically
expands these characters to a line. A style of this line depends on the characters:

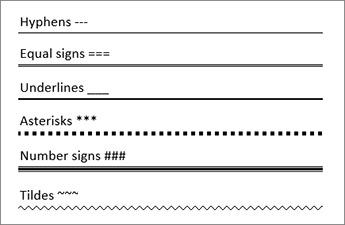
- Three or more «*» — dotted line
- Three or more «=» — double line
- Three or more «~» — wavy line
- Three or more «#» — thick decorative line
- Three or more «-» or «_» — thick single line
These lines often used in Word documents, but you can simply remove them if you understand: this is not
a line — this is a paragraph border (for more details see
How to use paragraph borders and shading).
And you can turn on/off AutoReplace of these symbols to lines. Do one of the following:
- Then Word makes an AutoReplace, it shows the AutoCorrect Options button. You can click
in it and choose Stop Automatically Creating Border Lines:
- Do the following:

1. On the File tab, click the Options button:

2. In the Word Options dialog box, on the Proofing tab,
under AutoCorrect options, click the AutoCorrect Options… button:

3. In the AutoCorrect dialog box, on the AutoFormat As You
Type tab, in the Apply as you type group, check or uncheck Border lines to turn on
or off this option:

See also this tip in French:
Comment ajouter et supprimer des lignes horizontales entre des sections du document.
Please, disable AdBlock and reload the page to continue
Today, 30% of our visitors use Ad-Block to block ads.We understand your pain with ads, but without ads, we won’t be able to provide you with free content soon. If you need our content for work or study, please support our efforts and disable AdBlock for our site. As you will see, we have a lot of helpful information to share.
Word for Microsoft 365 Outlook for Microsoft 365 Word 2021 Outlook 2021 Word 2019 Outlook 2019 Word 2016 Outlook 2016 Word 2013 Outlook 2013 Word 2010 Outlook 2010 Word 2007 Outlook 2007 More…Less
You can add horizontal lines, sometimes called horizontal rules, to a document or email message to help separate sections of text and add visual appeal.
By default, Word and Outlook have a three-character shortcuts that inserts a full-width horizontal rule in your document or message. The appearance of that rule—thinner, thicker, double-line, dotted, wavy—depends on which shortcut you use, as illustrated in the image below.
If this automatic line feature doesn’t suit you, you can turn off this feature in Word or turn it off in Outlook.
If you want to draw a line for illustration purposes, see Draw a line in Word or Outlook instead.
Insert a horizontal line by typing a few characters
The fastest way to add a horizontal line or rule is to use the AutoFormat feature. When you type certain characters three times in their own paragraph and then press Enter, those characters instantly become a full-width horizontal line.
-
Place the cursor where you want to insert the horizontal line.
-
Type three of the characters illustrated below, and then press Enter.

The line is inserted for the full width of the page. When inserted into a column, the line is inserted to match the width of the column. To add text above the line, put your cursor where you want the text and begin typing.
Format the horizontal line after you create it
The shortcut described above creates an empty paragraph with a bottom border. You can change the look of that border line by using the Borders options:
-
In Word, on the Home tab of the ribbon, select the down arrow next to
Borders.In Outlook, on the Format Text tab of the ribbon, select the down arrow next to
Borders. -
At the bottom of the menu, select Borders and Shading.
-
In the dialog, you can change the line’s style (solid, dotted, wavy, double, and so on), color, or width as you see fit.
-
When you’re done formatting the line, select OK. Then, on the ribbon, select the
Borders button to apply your changes.
 Borders.
 Borders button to apply your changes.
 Word: Turn off the automatic line feature
To prevent Word or Outlook from automatically inserting a horizontal line when you type the three shortcut characters, do the following:
-
On the ribbon, select File > Options.
-
In the dialog box, select Proofing > AutoCorrect Options > AutoFormat As You Type.
-
Clear the Border Lines option.
-
Select OK.
Outlook: Turn off the automatic line feature
-
On the ribbon, select File > Options.
-
In the dialog box, select the Mail tab, then select Editor Options.
-
On the Proofing tab, select AutoCorrect Options > AutoFormat As You Type.
-
Under Apply as you type, clear the Border Lines option.
-
Select OK.
Want to draw a line?
See Draw a line in Word or Outlook.
See Also
Add a border to some text
Draw shapes
Need more help?
Want more options?
Explore subscription benefits, browse training courses, learn how to secure your device, and more.
Communities help you ask and answer questions, give feedback, and hear from experts with rich knowledge.
465
465 people found this article helpful
Use these three methods to quickly insert a line in your document
Updated on December 4, 2020
What to Know
- AutoFormat: Type the three characters for the desired line style > Enter.
- Horizontal Line tool: In Home tab, select Borders drop-down menu > Horizontal Line.
- Shapes menu: Go to Insert > Shapes. In Lines group, select and drag a line shape across the page.
This article covers three ways to insert horizontal lines in Word for Microsoft 365, Word 2019, Word 2016, Word 2013, and Word 2010.
Use AutoFormat to Insert a Line in Word
You can quickly insert a line into a Word document with the AutoFormat feature. To create a line, place the cursor in the location that you’d like to insert it, type the three characters for the desired line style, then press Enter.
To create the different types of lines, press the associated keys on the keyboard:
- Plain single line: Three hyphens (—)
- Plain double line: Three equal signs (===)
- Broken or dotted line: Three asterisks (***)
- Bold single line: Three underline symbols (___)
- Wavy line: Three tildes (~~~)
- Triple line with a thick center: Three number signs (###)
Here’s what each of these line types looks like in Word:
Use the Horizontal Line Tool to Insert a Line in Word
To insert a line into a Word document using the built-in Horizontal Line tool:
-
Place the cursor where you want to insert a line.
-
Go to the Home tab.
By default, the Home tab is selected when you open a new or existing Word document.
-
In the Paragraph group, select the Borders drop-down arrow and choose Horizontal Line.
-
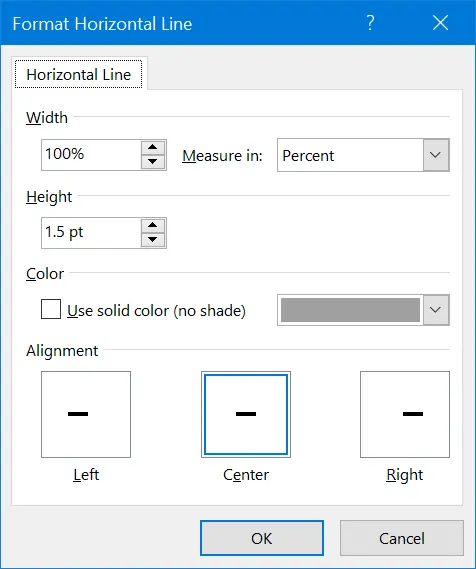
To change the look of the line, double-click the line in the document.
-
In the Format Horizontal Line dialog box, modify the width, height, color, and alignment of the line.
Use the Shapes Menu to Insert a Line in Word
A third way to add a line to a Word document is to draw it on the page. The Shapes menu contains several line options, including lines with arrow points on one or both ends. After you draw the line, customize the color and appearance.
-
Place the cursor in the spot where you want to insert a line.
-
Go to the Insert tab.
-
In the Illustrations group, select the Shapes drop-down arrow.
-
In the Lines group, choose a line shape.
-
In the Word document, drag across the location where you want the line to appear.
-
To change the look of the line, select the line to enable the Shape Format tab. (Some versions of Word call this Format.)
-
Go to the Shape Format tab and change the color, use a different line style, or apply effects.
FAQ
-
How do I change line spacing in Word?
To fix spacing in Word, highlight the text whose spacing you want to change and select the Home tab. Next to Paragraph, select the down arrow to expand the options. In the Spacing section, set the amount of space before and after line breaks or choose a preset line-spacing option.
-
How do I add a signature line in Word?
To insert a signature line in Word, go to the Insert tab and select Signature Line. Selecting few or no options leaves a blank line, and a signature line will appear in the document.
-
How do I add line numbers in Word?
To add line numbers in Word, go to Layout > Page Setup > Line Numbers and choose Continuous, Restart Each Page or Restart Each Section > Line Numbering Options.
Thanks for letting us know!
Get the Latest Tech News Delivered Every Day
Subscribe
There are many word processing tools available but once worked in the comfort of Microsoft Word, you may not like any other software. It is pretty sure no one exactly knows the complete features Word offers. Adding dividers is one such hidden features and you can do this with shortcuts. In this article we will show how to add dividers in Microsoft Word documents quickly.
Related: How to fix slow Microsoft Word and speed up you productivity?
You can add dividers with different methods.
- Use hyphen and underscore
- Using other symbol shortcuts
- Insert image as divider
- Insert from the menu
1. Using Hyphens and Underscores
The simplest and most easy method is to use continuous hyphens and underscores. You can continuously press hyphen or underscore to insert the divider line between paragraphs. The advantage is that you can define the length and alignment of the divider as per your need.
- Divider using hyphens: —————–
- Divider using underscore: ____________
2. Quick Way to Add Dividers with Shortcuts
When you want to insert a full width divider between two sections or elements, you can use the following shortcuts.
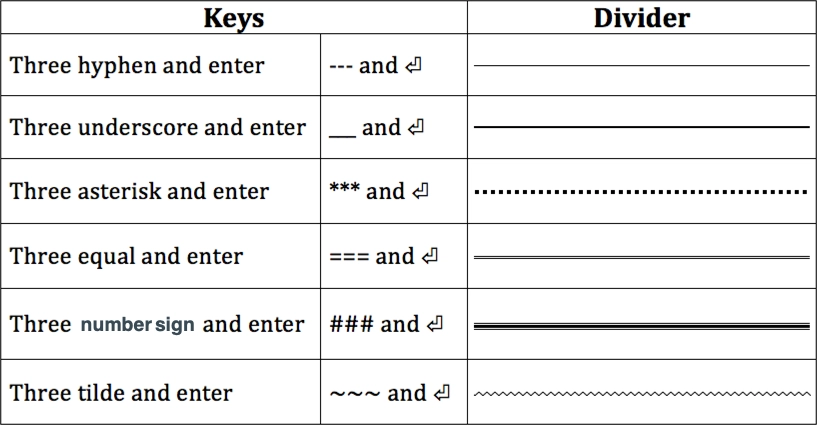
- Press hyphens for three or more times and press the enter key (— and ⏎). This will create a full width divider as a thin continuous line.
- Press three asterisks and enter (*** and ⏎) to if you want a dotted line.
- Use three equal signs and enter (=== and ⏎) to add a double line.
- Use three underscores and enter (___ and ⏎) to make a divider with medium thickness.
- Type three number signs and enter key (### and ⏎) to create a thicker line with borders.
- And finally with three tildes and enter (~~~ and ⏎) to create a wavy divider line.
Below picture explains the shortcut keys and the display of the divider in Word document.
Deleting Dividers Inserted with Shortcuts
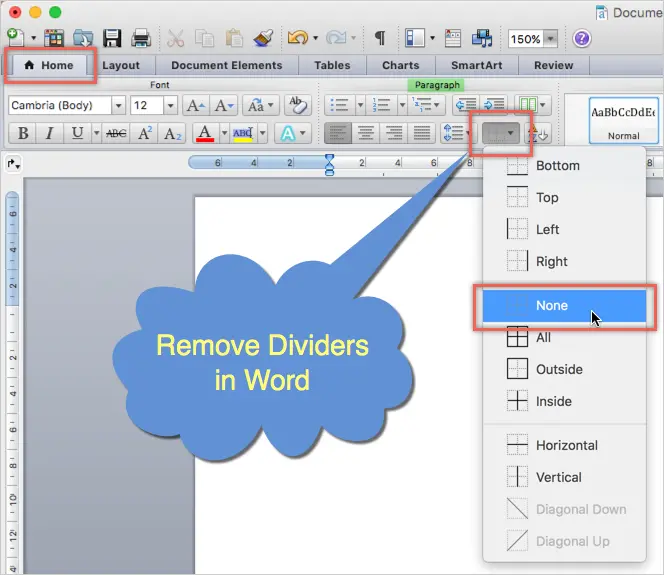
Well, you have created the dividers using the above shortcuts and now is the time to see how to delete them. You may find it difficult to delete since those dividers are not actually lines – they are bottom borders act like an underline. In fact, you can simply click on the “Borders” icon to insert divider in Word. Since “Borders” option by default uses “Bottom Border” clicking on it will insert a line similar to the above shortcuts. Follow the below instructions in order to delete the dividers.
- Position your cursor on the previous line of the divider. If you have an element like paragraph before the divider then select the paragraph.
- Click on the “Home” tab and then click the small arrow next to “Border” button in the “Paragraph” group.
- Select “No Border” or “None” option from the list.
This works on all Word versions like 2019, Microsoft 365, etc. on all platforms like Windows 10 / 11. This also works on Microsoft Word for Mac.
3. Using Images for Dividers
Using image is another option to insert divider image on your Word document. You can create suitable images and insert between elements as an object. Remember, not to copy image from website and paste on your document. Word will take long time to extract the image and also link the image to the webpage from where you are copying. The best option is to right click and save the image to your computer. After that, you can either copy paste from local computer or insert the image from menu.
4. Using Horizontal Line as Divider
The last option to insert divider in Word documents is using horizontal line menu option available. You can access this option under “Paragraph” group in “Home” tab. However, this option varies in Word 2016 onwards and earlier versions.
Word 2010 or Earlier
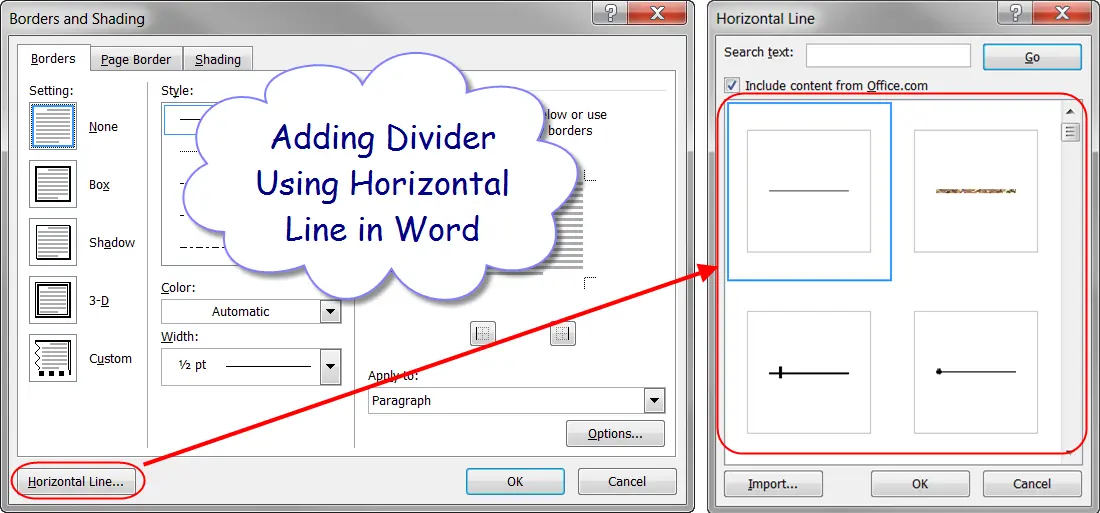
- Click on the “Borders and Shading” button and click on the “Horizontal Line” option to insert a divider on your document.
- If you want to insert a fancy divider, choose the menu option click on the “Horizontal Line…” button. On the popup box, select the divider style you want to insert.
Word 2016 or Later
- If you use Word 2016 or later versions like Microsoft 365, click on the small arrow next to “Border” icon. This is available in “Paragraph” group under “Home” menu.
- Choose “Horizontal Line” option to insert a grey color divider line.
- Double click on the divider to open the “Format Horizontal Line” pop-up.
- Choose the color, alignment, width and height for your divider.
- Unlike dividers inserted with shortcuts, you can move the horizontal lines by dragging it to required place in your document.
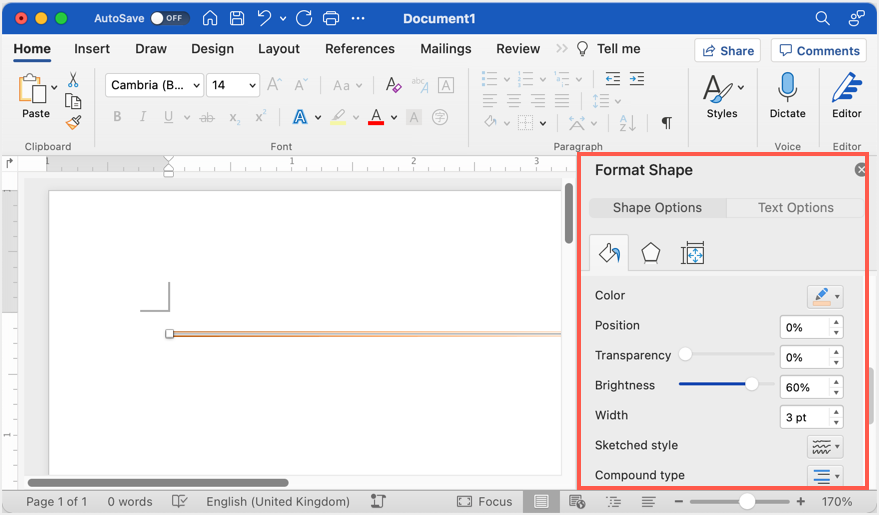
Horizontal line is a perfect option for inserting dividers in Word and it will also work on Word Microsoft 365 subscription in Mac also. However, double clicking on horizontal line in Mac Word will open “Format Shape” options in the sidebar. You can go to “Shape Options” tab and start customizing the color, thickness and other styles of the line.
Microsoft Word
A great way to make your Word document easier to read and more visually appealing is to separate sections in the document by inserting a graphical horizontal line. Word provides a number of attractive graphical horizontal lines from which you can choose.
Follow these steps to insert a horizontal line in your
document:
- Put
your cursor in the document where you want to insert the horizontal line. - Go to
Format | Borders And Shading. - On the
Borders tab, click the Horizontal Line button. - Scroll
through the options and select the desired line. - Click
OK.
You can also insert your own custom horizontal lines. To insert
a custom line, follow these steps:
- Go to
Format | Borders And Shading. - Click the
Horizontal Line button. - Click
the Import button. - Navigate
to the file that contains the line you want to add and click the Add
button to add the line to the Horizontal Line Gallery. - Click
OK to add the line to the current document.
Horizontal lines are treated as any other graphic image;
they can be copied, moved, resized, and colored like any other picture object.
To format the line, right-click it and select Format Horizontal line to change
the line’s properties such as color, size, and alignment.
Microsoft Excel
Use conditional formatting to view formula cells in Excel
If you need to find and check the formulas in a Microsoft
Excel worksheet that contains hundreds of cells, you could press [Ctrl][~] to display them all at once. However, you would have to
press the shortcut keys again to see if the resulting value for the formula was
correct. You could also use the Special command under Edit | Go To: to
highlight all of the formula cells in a worksheet, but once you click on one
cell to see the underlying formula in the formula bar, the rest of the cells
are no longer selected. The method that I recommend is to use conditional
formatting to highlight the cells that have formulas. With conditional
formatting, the cells stay highlighted even after you click on one cell to view
the underlying formula.
To use conditional formatting, create a Visual Basic
function that automatically checks for formulas in cells. Follow these steps:
- Open
the Excel file containing the formulas to be checked. - Press
[ALT][F11] - Go
to Insert | Module. - Enter the following code at the
prompt.
Function IsFormula(Check_Cell As Range)
IsFormula
= Check_Cell.Hasformula
End Function - Press [ALT][Q].
- Select
the cells to be examined for formulas (e.g., select A5:H1000 with A5 as the
active cell). - Go
to Format | Conditional Formatting. - Select
Formula Is from the Cell Value Is drop-down list. - Enter
=IsFormula(A5) - Click
the Format button. - Choose
Yellow in the Color drop-down list. - Click
OK twice.
All formulas in the current workbook are highlighted in
yellow and will remain so when you reopen the workbook, as long as macros are
enabled.
Microsoft Access
Divide Word documents into sections using horizontal lines
A great way to make your Word document easier to read and
more visually appealing is to separate sections in the document by inserting a
graphical horizontal line. Word provides a number of attractive graphical
horizontal lines from which you can choose.
Follow these steps to insert a horizontal line in your
document:
- Put
your cursor in the document where you want to insert the horizontal line. - Go to
Format | Borders And Shading. - On the
Borders tab, click the Horizontal Line button. - Scroll
through the options and select the desired line. - Click
OK.
You can also insert your own custom horizontal lines. To insert
a custom line, follow these steps:
- Go to
Format | Borders And Shading. - Click the
Horizontal Line button. - Click
the Import button. - Navigate
to the file that contains the line you want to add and click the Add
button to add the line to the Horizontal Line Gallery. - Click
OK to add the line to the current document.
Horizontal lines are treated as any other graphic image;
they can be copied, moved, resized, and colored like any other picture object.
To format the line, right-click it and select Format Horizontal line to change
the line’s properties such as color, size, and alignment.
Editorial standards