
Word for Microsoft 365 Word for Microsoft 365 for Mac Word for the web Word 2021 Word 2021 for Mac Word 2019 Word 2019 for Mac Word 2016 Word 2016 for Mac Word 2013 Word 2010 Word 2007 Word Starter 2010 More…Less
Use sections breaks to divide and format documents of all sizes. For example, you can break down sections into chapters, and add formatting such as columns, headers and footers, page borders, to each.
Add a section break
-
Select where you want a new section to begin.
-
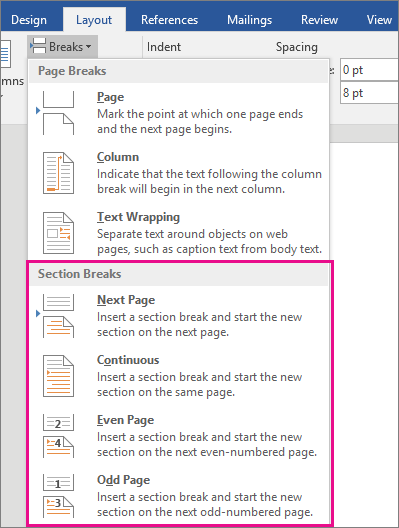
Go to Layout > Breaks.

-
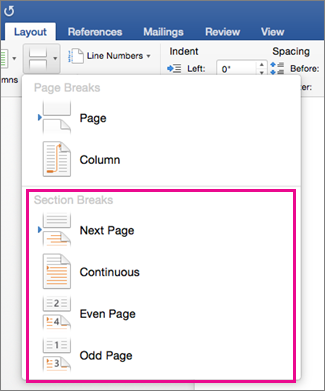
Choose the type of section break you want:
-
Next Page Section break starts the new section on the following page.
-
Continuous Section break starts the new section on the same page. This type of section break is often used to change the number of columns without starting a new page.
-
Even Page Section break starts a new section on the next even-numbered page.
-
Odd Page Section break starts a new section on the next odd-numbered page.
-


Important:
Office 2010 is no longer supported. Upgrade to Microsoft 365 to work anywhere from any device and continue to receive support.
Upgrade now
Insert a section break
-
Select where you want a new section to begin.
-
Go to Page Layout > Breaks.
-
Section break that you want to add:
-
A Next Page section break starts the new section on the next page
-
A Continuous section break starts the new section on the same page.
Tip: You can use Continuous section breaks to create pages with different number of columns.
-
An Even Page or an Odd Page section break starts the new section on the next even-numbered or odd-numbered page.
-

Insert a section break
-
Select where you want a new section to begin.
-
Go to Layout > Breaks, and then choose the type of section break you want.
-
Next Page Starts the new section on the following page.
-
Continuous Starts the new section on the same page. This section break is particularly useful for documents that have columns. You can use it to change the number of columns without starting a new page.
-
Even Page Starts the new section on the next even-numbered page. For example, if you insert an Even Page Break at the end of page 3, the next section will start on page 4.
-
Odd Page Starts the new section on the next odd-numbered page. For example, if you insert an Odd Page Section Break at the end of page 3, the next section will start on page 5.
-
You can add page breaks, but Word for the web can’t add section breaks yet.
If you have the Word desktop application, use the Open in Word command to open the document and add section breaks there. When you’re done and you save the document, it will continue to be stored where you opened it in Word for the web.
See also
Use section breaks to change the layout or formatting in a section of your document
Insert a page break
Need more help?
Вынуждена констатировать, что операция «Разрыв раздела»
очень редко используется правильно.
По окончании урока вы сможете:
- Дать
определение разрыву раздела - Установить
разрыв раздела со следующей страницы - Сделать
альбомную ориентацию страницы двумя способами
1. Понятие «Разрыв раздела»
Какие свойства имеет документ? Это:
- Границы печатного поля
- Колонтитул (это мы выяснили на уроке 38)
- Ориентация страницы (книжная или альбомная)
- Набор стилей текста
Я не упоминаю такие свойства, как автор документа, количество знаков, страниц и так далее.
По ходу создания документа мы можем создавать новые стили
текста (разумеется, не увлекаясь), но вот границы печатного поля, ориентация
страницы и колонтитулы задаются на ВЕСЬ
документ.
А как быть, если необходима страница в альбомном варианте, например,
в документе есть большая таблица, которая отлично будет читаться именно в
альбомном варианте:
Для этого есть возможность создания в документе несколько
разделов.
Образно можно представить, что мы разрезаем документ на несколько частей и каждой части задаем свои параметры разметки страницы, ориентации страницы, колонтитулы с меняющейся информацией.
Команда «Разрыв раздела» находится на ленте Разметка страницы → группа команд Параметры страницы → команда Разрывы → выпадающее меню → второй раздел выпадающего меню Разрывы разделов → 4 вида разделов:

- Следующая страница
- Текущая страница
- Четная страница
- Нечетная страница
Рассмотрим подробнее виды разрывов разделов:
2. Разрыв раздела со следующей
страницы
Шаг 1. Устанавливаем курсор в месте
создания нового раздела
Шаг 2. Устанавливаем разрыв раздела со
следующей страницы (Разметка страницы → группа команд Параметры страницы →
команда Разрывы → выпадающее меню → второй раздел выпадающего меню
Разрывы разделов → команда Следующая страница)
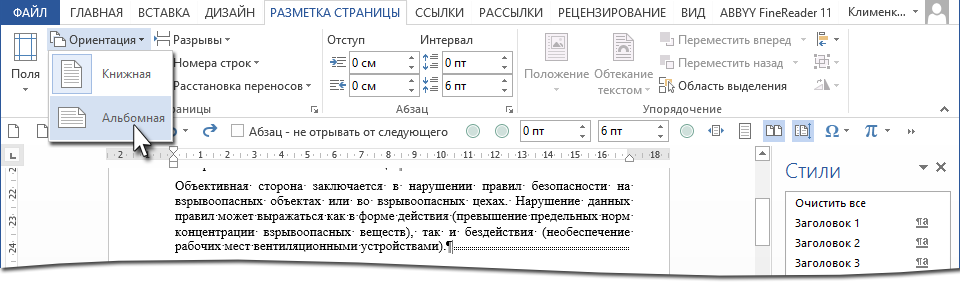
Шаг 3. Задаем альбомную ориентацию страницы
(лента Разметка страницы → группа команд Параметры страницы →
команда Ориентация → команда Альбомная из выпадающего
меню):
Получили такую
картину:

- Текст на странице книжной ориентации
- Непечатаемый символ «Разрыв страницы (со следующей страницы)»
- Текст на странице альбомной ориентации
| Внимание! |
В этом случае ВСЕ страницы после вставки разрыва раздела будут иметь альбомную ориентацию. |
А если нам нужно показать
в альбомной ориентации несколько страниц и эти страницы находятся в середине
документа?
3. Альбомная ориентация для
части страниц (1 способ)
Скачайте документ тут. Это знакомый вам из предыдущих уроков документ. Я только убрала режимы «Абзац с новой страницы» и Абзац не отрывать от следующего». Откройте документ. Текст, который будет располагаться на страницах альбомной ориентации, я покрасила красным цветом.
Шаг 1. Выделяем весь текст красного цвета (Урок 2).
Шаг 2. Открываем диалоговое окно «Параметры страницы» (лента Разметка страницы → группа команд Параметры страницы → команда Настраиваемые поля из выпадающего меню):

Шаг 3. Задаем в диалоговом окне «Параметры
страницы» альбомную ориентацию для выделенного текста:

- Щелкаем курсором по иконке «альбомная»
- Выбираем из выпадающего меню опцию «к выделенному тексту»
- ОК
Шаг 4. Масштабируем документ, чтобы
наглядно убедится в том, что для части текста выбрана альбомная ориентация (Лента
Вид → группа команд Масштаб → диалоговое окно Масштаб → радиокнопка «несколько
страниц» → выпадающее меню → количество страниц):

Я выбрала по 4 странице в каждой полосе:

Вы увидели, что получилось два разрыва страницы, а между
ними страницы в альбомной ориентации?
Убедились? Верните масштаб «По ширине странице» (кнопка «По ширине страницы» на панели быстрого доступа. Если вам не лень, то можете сделать то же самое через ленту, но через панель быстрого доступа быстрее. Но это в том случае, если панель быстрого доступа у вас настроена (Урок 18 и Урок 19):

4. Альбомная ориентация для
части страниц (2 способ)
Шаг 1. Находим в документе текст синего цвета и устанавливаем курсор перед последним перед этим текстом символом конца абзаца:

Шаг 2. Задаем разрыв раздела (лента
Разметка страницы → группа команд Параметры страницы →
команда Разрывы → выпадающее меню → второй раздел выпадающего меню
Разрывы разделов → Следующая страница). Смотрите самую
первую картинку этого урока. Но еще лучше и быстрее воспользуемся панелью
быстрого доступа:

Но это в том случае, если вы установили панель быстрого доступа (Урок 19). Давайте прикинем: 6 действий в первом случае против одного действия во втором случае. Я убедила вас работать с панелью быстрого доступа?
Шаг 3. Устанавливаем курсор перед последним
символом конца абзаца синего текста и задаем разрыв раздела:

А теперь внимательнее.
Я уменьшила масштаб документа, чтобы окинуть взглядом плоды трудов наших:

Мы сделали четыре разрыва, в результате которых получили 5 разделов:
- Первый раздел состоит из одной страницы книжной ориентации
- Второй раздел состоит из трех страниц альбомной ориентации
- Третий раздел состоит из одной страницы книжной ориентации
- Четвертый раздел состоит из одной страницы пока ещё книжной ориентации
- Пятый раздел состоит из оставшихся страниц книжной ориентации
Так как мы сделали
четвертый разрыв раздела, то наш курсор перескочил на пятый раздел.
Следовательно, если мы начнем менять параметры страницы, то изменения будут
именно в пятом разделе. Чтобы понять, что мы находимся на пятом разделе,
давайте посмотрим на темную полосу внизу документа. Эта полоса называется «Строка состояния» и содержит важную
информацию:

- Номер раздела
- Номер страницы (на которой в данный момент находится курсор) из общего числа страниц в документе
- Число слов
- Язык проверки правописания (стоит «Русский», но мы можем задать другой язык проверки правописания)
| Понять и запомнить! |
|
Шаг 4. Щелкаем в любом месте четвертого
раздела и задаем альбомную ориентацию (лента Разметка страницы → группа команд
Параметры страницы → команда Ориентация → команда Альбомная из выпадающего
меню):

А теперь я
промасштабировала документ:

А теперь давайте
подумаем, какой способ создания альбомной ориентации наиболее удобен? Полагаю,
вы скажете: первый способ! Для меня без разницы, потому что я работаю с панелью
быстрого доступа: все нужные мне команды в шаговой доступности.
Теперь вы сможете:
- Дать определение разрыву раздела
- Установить разрыв раздела со следующей страницы
- Сделать альбомную ориентацию страницы двумя способами
- заодно познакомились со Строкой состояния
Продолжение следует…
How to Remove a Section Break in a Word Document
Microsoft Word provides many tools that allow you to format the text that you have added to a document. But it also includes some formatting options for the document itself. This can range from things like columns, to other features like section breaks.
A section break in a Word document lets you split up your document into separate parts, which you can then format without affecting the rest of the document. A common use for this is to change the orientation for a single page of your document, while leaving the rest of the document in the current orientation.
But if you have previously created a section break that you no longer need, or if you are editing someone else’s document and wish to remove one of the section breaks they’ve added, then our guide below will show you how.
How to Delete a Section Break in Microsoft Word
The steps in this article were performed in the Microsoft Word for Office 365 version of the application, but will also work in most other recent versions of Word. The first section of this article provides a quick overview of how to remove a Word section break, but you can continue scrolling to see the full guide with pictures, or you can click here to jump to that section.
How to Delete a Section Break in Word

Learn how to locate a section break in a Word document and delete that break if you no longer wish to include it in your document.
Как убрать разрыв страницы в Ворде
Удобной функцией форматирования документа Microsoft Word является «разрыв страницы» — переброс курсора на новый лист с любого места на предыдущем листе. Он часто появляется при копировании текста из интернета, других документов или случайном нажатии клавиш Ctrl+Enter. Рассмотрим разные способы, как убрать разрыв страницы в Ворде в документах любой величины.
Способ 1: удаление разрыва страницы
Разрыв страницы дает пустое пространство на листе, куда не устанавливается курсор. Поэтому и возникает сложность с удалением свободного места.
Чтобы убрать разрыв страницы, проделайте следующее:
- Зайдите на вкладку «Главная» документа.
- В третьем блоке слева «Абзац» активируйте кнопку «Отобразить все знаки».

На листе появятся знаки абзацев, пробелы и другие символы, включая пунктирную линию перед пустым блоком со словами «Разрыв страницы».

Текст со следующего листа автоматически заполнит пустое пространство. Если перед предыдущим абзацем и следующим образовались пустые строчки, удалите их нажатием Delete.
Способ 2: удаление разрывов страницы во всем документе
Если в файле 2-5 страниц, убрать разрывы стандартным методом будет несложно. Но если документ содержит свыше 20 страниц, их просмотр и редактирование займет массу времени. Чтобы облегчить процедуру, можно воспользоваться опцией «Найти и Заменить». Ее можно вызвать одновременным нажатием клавиш Ctrl+H с клавиатуры или через меню блока «Редактирование» во вкладке «Главная».

Удалите страничные разрывы, проделав следующее:
- Вызовите окно «Найти и Заменить».
- Кликните по кнопке «Больше …».

Установите курсор в поле «Найти» и кликните по кнопке «Специальный».

Выберите из перечня опцию «Разрыв страницы».

Кликните по кнопки «Заменить все».

При работе с окном «Найти и Заменить» поле «Заменить на» необходимо оставить пустым. Функция редактирования в автоматическом режиме отыщет все разрывы во всем документе, удалит их ничем не заменяя. Если после операции окажется, что между абзацами подтянутого на лист текста образовались пустые строчки, их нужно удалить.
Способ 3: работа с интервалами в меню «Абзац»
Причиной большого отступа между абзацами, который нельзя удалить нажатием Delete, может быть отредактированный интервал. В этом случае при активации кнопки «Отобразить все знаки» на листе не появится пунктирная линия со словами «Разрыв страницы». Расстояние между абзацами не будет заполнено даже знаками абзаца.
Для того, чтобы убрать разрыв страницы в Ворде, сделанный интервалом, проделайте следующее:
- Выделите пустой промежуток между абзацами, захватив и сами абзацы.
- По выделенному фрагменту кликните правой клавишей мыши.
- Укажите в списке «Абзац».


Разорванные абзацы текста автоматически подтянутся друг к другу. Свободное поле удалится.
Способ 4: удаление разрывов таблицы
Разрывы используют и для редактирования таблиц на листе. Если свободное место после использования Ctrl+Enter никак не задействовано, его лучше удалить. Особенно если в дальнейшем таблица пойдет на печать.
Действуем так:
- Включите в документе «Отобразить все знаки».
- Найдите на странице признак разрыва с пунктирной линией.
- Установите курсор перед пунктиром.
- Нажмите клавишу Delete с клавиатуры.

Удаление автоматически склеит две части таблицы в одну. Текст будет выглядеть цельным. Если в документе несколько таких разорванных таблиц, используйте опцию «Найти и Заменить». Так не придется все операции удаления выполнять вручную. Это займет много времени.
Удаление разрыва страницы очень простая процедура, которая не влияет на читабельность текста. Но после нажатия кнопки Delete восприятие документа может измениться в худшую сторону. Если так случилось, нажмите с клавиатуры Ctrl+Z для отмены действия. Также при работе с «Найти и Заменить» перепроверяйте установку команд из «Специальные». Если она была выбрана неправильно, используйте Ctrl+Z.
Перед применением инструкции, сохраните документ в текущем виде, это поможет избежать потери данных.

Ворд объединил в себе много удобных функций и инструментов, с помощью которых можно создавать тексты с любым форматированием и стилизацией. Это мощный редактор, но чтобы использовать всю его силу, необходимо знать, как пользоваться его инструментарием.
Довольно часто пользователи, толком не разобравшись во всем, форматируют документ наугад и в итоге сталкиваются со множеством проблем, среди которых особое место занимают лишние разрывы разделов. Давайте попробуем разобраться, что это такое и как можно его убрать.
Удаление разрыва раздела в Word
Разрывы разделов в текстовом редакторе Ворд используются для изменения форматирования в документе. Соответственно, удаление разрывов разделов приводит к тому, что документ приобретает один стиль и одно форматирование. Если вам необходимо это сделать, воспользуйтесь одним из этих способов.
Способ 1: Клавиша «Delete»
В данном случае все очень просто – необходимо разместить курсор мыши непосредственно перед символом разрыва раздела и нажать на клавиатуре «Delete». Стоит заметить, что после этой операции следующий после удаленного разрыва раздел будет иметь то же форматирование, что и предыдущий.

Важно! Если вы не видите в документе знаков разрыва и других непечатных символов, нужно на вкладке «Главная» кликнуть по кнопке «Отобразить все знаки» (группа «Абзац»).

Способ 2: Окно «Найти и заменить»
Удалить разрыв раздела в документе также можно с использованием диалогового окна «Найти и заменить». Достоинство этого метода в том, что с его помощью можно удалить как один элемент, так и несколько сразу.
- В окне текстового редактора Ворд нужно перейти на начало документа и нажать сочетание клавиш «Ctrl+H». Затем перейдите на вкладку «Заменить» в диалоговом окне.
- Наберите символы «^b» в поле «Найти».
- Оставьте пустым поле «Заменить на».

Вот такими простыми способами можно удалить разрыв раздела в Ворде. Пользуйтесь этими знаниями для форматирования документа.
When you’re working on a long document, separating it into different parts makes it much easier to navigate. Microsoft Word eases your workflow by letting you insert document breaks, namely section and page breaks.


As you’ll see in this article by defining section and page breaks you can apply specific formatting elements in different parts of your document. You’ll also have better control over pagination.
Read on to learn how to use section and page breaks in Word to make your document more visually appealing and easier for readers to make their way around. Finally, we’ll show you some great sources for professionally designed Word templates.
How to Add Breaks in MS Word (Quick Start Video)
Are you ready to learn how how to insert breaks in MS Word? The short video below will give you a head start on inserting, viewing, and deleting MS Word section and page breaks:
To learn even more about breaks in Word (including the difference betwen section breaks and page breaks), study the written tutorial below.
Understanding Section and Page Breaks
Section and page breaks are types of breaks or partitions in a Word document. In this section, you’ll learn some basics:
1. Microsoft Word Section Break vs Page Break
A page break is a partition in the text of the document. At a page break, the succeeding text is automatically placed on top of a new page.


But, with a section break for Word the text is partitioned — along with the formatting associated with it:
- page numbers
- margins
- headers and footers
- paper size and/or orientation
Also, a Microsoft Word section break may or may not begin on a new page (more on that below).
2. Why Use Microsoft Section and Page Breaks?
Section and page breaks are useful for partitioning different parts of a document, especially a long one.
In a book, you’d use section breaks to divide it into chapters as well as delineate the front matter from the back matter. The title page, copyright page, table of contents, individual chapters, index, etc., would be separate sections.
For example, you usually want a new chapter of a book (or similar) document to begin on a new page. This is when a page break is most useful.
A section break for MS Word is useful for visually distinguishing parts of a document. An example of where you might use a section break is in a proposal where you want the summary to have a different layout. In this case, the summary section could have its own header, footer, and margins that are different from the rest of the document.
By using section breaks, each chapter can have a different running header, including the chapter title.


Microsoft Word Section breaks also let you use lower case numbers for page numbers on the introduction of the book and Arabic numerals on the rest of the pages.
Similarly, a section break in Microsoft Word lets you use a two-column format in the index section and a single column everywhere else.
You’ll also want to use section and page breaks when you want to control the pagination of your document. For example, the first page of your document may be a cover page. But you don’t want the cover page to be page 1 of your document. By inserting a section break after the cover page, you can make the next page be page 1.
You accomplish these results by inserting different types of section and page breaks in Word.
3. Types of Microsoft Word Section Breaks
There are four types of section breaks in MS Word:
- Next Page. This type of section break forces the text to the right of the cursor to a new section on the following page. All the formatting associated with the text is carried through to the new section as well.
- Continuous. A continuous section break creates a new section but keeps the text on the same page. This means two different sections can have their own formatting yet remain on the same page.
- Odd Page. This kind of section break moves the text to the right of the cursor to the top of the next odd-numbered page. If you’re on page 3, for example, and you insert an Odd Page Section Break, the next section will start on top of page 5 (page 4 will be blank). Book chapters usually begin on the next odd page of the book.
- Even Page. An Even Page section break moves the text to the right of the cursor to the top of the next even-numbered page. So, if you’re on page 6 and you insert an Even Page Section Break, the new section will begin on page 8 (leaving page 7 blank).
4. Types of Page Breaks
As for Microsoft Word page breaks, there are two kinds:


- Simple Page Breaks. A simple page break moves text to the right of the cursor to the top of the next page.
- Column Breaks. If your document is broken up into columns, a column break moves text to the right of the cursor to the top of the next column.
How to View Existing Breaks in an MS Word Doc
By default, section and page breaks are invisible in Word. You can only see their effects. You’ll see changes in formatting and pagination for each section. That’s because these breaks don’t appear when the document is printed.
As you’re editing and formatting your document, you may need to see page and section breaks. To view existing page and section breaks in Word, on the Home tab, then click on the Paragraph button.


How to Insert Section Breaks in Your Word Docs
To insert a page or section break, place the cursor where you want one section/page to end and the next section/page to begin.
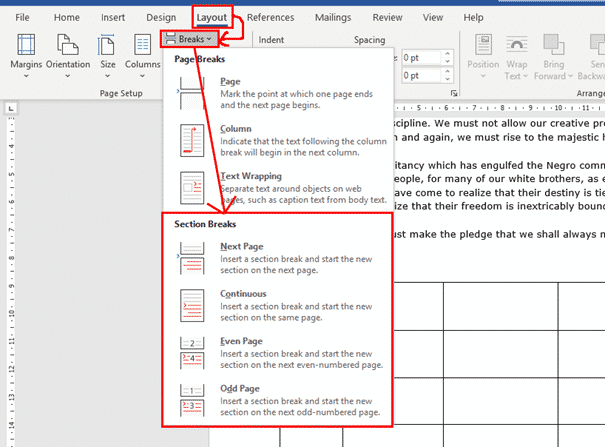
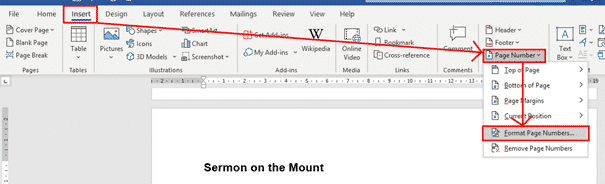
Go to Insert > Break, then choose the specific type of page break or section break you want to insert.


Or, click on the Layout tab. Then click on the Breaks button on the ribbon and select the type of page or section break you wish to insert.


How to Remove/Delete Section and Page Breaks in Word
To remove a section or page break in Word, first display all the breaks.
Select the section or page break you want to remove by highlighting it. Click on either the Delete or Backspace key on your keyboard.


When you delete a section break, the text in the section adopts the formatting of the next section.
Tips for Using Section and Page Breaks in MS Word
Are you just getting comfortable with using Microsoft Word section and page breaks? Here are some extra tips to help you use them effectively:
1. Keep Your Section Breaks to a Minimum
Insert a section break in Word only when you have to (see above for when it’s a good idea to do so). Having more sections than necessary makes it more difficult to make global changes to your document, because you’d have to manually make those changes in each section.
2. Pay Attention to Which Section You’re In
If you’ve divided your document into sections, always be aware of what section you’re in when you make formatting changes. That’s because these changes will apply only to the section you’re currently in — that’s the section where your cursor is. If you want to make a formatting change to apply to the whole document, select the entire document first before making your changes.
3. Microsoft Word May Change a Continuous Section Break to the Other Section Break Types
You may be surprised that your continuous section break has been converted into a different type of section break. This happens when you’ve got a continuous section break. Then, in the next section, you try to apply a different header/footer, pagination, margins, or page size and orientation. Those formatting changes require a page break. And so, Word will automatically change the section break type to one that results in a page break.
Streamline Your Microsoft Word Workflow With Templates


There are other ways to streamline your MS Word workflow. One of them is using premium Word templates, like the ones you’ll find at Envato. Premium templates for Microsoft Word are created by professional designers to provide impressive layouts. These templates are customizable with your content, images, and branding. You can also adjust the design and layout as you please.
Envato Elements gives you unlimited downloads of Word templates as well as other inputs you need to complete your projects — fonts, graphics, stock photos, and more — all for one flat monthly subscription fee.


Or, go to GraphicRiver for Microsoft Word templates and other creative elements on a pay-per-use basis. It’s a terrific source for one-off projects.
Make Your Document Easier to Read and Navigate
Now you know how to use section and page breaks in Microsoft Word to better organize your document. Section breaks also let you have more granular control over the formatting of specific parts of your document. These make your document look better as well as easier to read and navigate through.
Use the steps you learned in this article to properly use section and page breaks. Also, use Word templates to make it much easier and faster to create impressive documents. Envato Elements provides unlimited downloads of templates for Word for one monthly subscription. For occasional projects, GraphicRiver is an excellent source of Word templates where you pay for each use.
Editorial Note: This tutorial has been updated to add a video by Andrew Childress.
Section breaks are probably one of the most useful features in Word when you are formatting complicated documents. They allow you to change formatting aspects that would otherwise be the same throughout a document, such as page orientation, margins, columns, headers and footers.
Column changes (2, 3 or more columns) need Section Breaks before and after. A document in portrait orientation can have a Section Break to switch to landscape.
Inserting a Section Break
To insert a section break, click where you want the break to occur, and go to Layout | Page Setup |Breaks. You will see that there are four different types of break to choose from.
Continuous Section Break
Possibly the most common section break is the continuous or invisible section break.

A continuous break will start your new section on the same page. This allows you to do things like:
- Have different numbers of text columns on the one page. Word will normally add continuous section breaks automatically when setting columns.
- Have different margins on different sections of the same page.
In the example below, I have kept the regular page margins for the text part of the document, but added a continuous section break so I can reduce the margins on the lower part of the page to give my table a bit more room. (After the table, I would then need to add another continuous break to go back to the regular margins for the next part of the document.)

Continuous Section Breaks are useful to add invisible dividers within a document.
Next Page Break

The Next Page break does exactly what it says on the box – starts your next section on a new page. It’s very similar to a regular page break, except that it allows you to change other page layout and formatting options in the new section.
Even and Odd Page Section Breaks

These options allow you to format your text for printing in book format, and choose whether your section will start on the left or right page of the book. In a standard book format, odd numbers are usually on the right-hand side, so if you want your new section to start on the right-hand page, select an Odd Page section break.
Page Numbering and Section Breaks
When starting a new section on a new page, there are two options for how you want the page numbering to work:
- Start the page numbering again in the new section.
- Continue the page numbering from the previous section.
To set this, put your cursor somewhere after the section break, and go to Insert | Header & Footer | Page Number | Format Page Numbers.
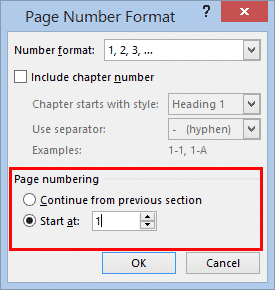
In the bottom part of the Page Number Format dialog, select whether you want to continue the numbering from the previous section or start the numbering again. The default for restarting the numbering is to start back at 1, but you can also choose to start your section page numbering at any number you wish by using the spinner or typing a number in.
Headers & Footers with Section Breaks
By default, when you set up a header or footer for your document, it will display the same on every page of the document. We don’t always want this though; we may want different information in each chapter, or we may want no header or footer on the title page or contents pages, for example.
When setting different headers and footers, the thing to remember is that you are setting what happens to this header/footer compared to the one in the previous section. So again, we need to put our cursor somewhere after a section break. Then double-click within the header or footer to select it, and you will see the Link to Previous button under Header & Footer | Navigation.

This button is usually selected, as the default is to have the same headers and footers throughout. If you want your new section to have a different header/footer, just click the Link to Previous button to deselect it. Then you can make any changes you want to the header/footer, and they will only apply from that point onwards. Any header or footer before the section break will not be affected by changes you make here.

Once you have unlinked each of your sections’ headers and footers from the previous section, you can then edit them independently in each section. If you already have a header/footer throughout your document and you want it removed from the title and contents pages at the beginning, you would:
- Put a section break at the beginning of the first page that you want to retain the header/footer.
- Unlink the header/footer from the previous section.
- Go back to the first section and delete the header and footer. As you have unlinked the sections, the deletion will only apply to the first section.
Deleting a Section Break
It’s easiest to delete a section break if you can see it, and to see it you need to turn on Show Hidden Characters under Home | Paragraph.

Now you can see the section break, just click at the beginning of the section break line and click Delete.

Two ways to make Word remember your preferred font
Merge or Split cells in Word tables
Paste tricks and tips for Microsoft Word
Flowing column text in Word with break-out or sidebar