
Элемент управления пользовательской формы ScrollBar, применяемый в VBA Excel для создания полосы прокрутки. Свойства UserForm.ScrollBar, примеры кода.
UserForm.ScrollBar – это элемент управления пользовательской формы, представляющий из себя полосу прокрутки с кнопками, реагирующий как на перемещение ползунка, так и на нажатие кнопок.

Элемент управления ScrollBar предназначен в VBA Excel для ввода пользователем числовых данных, которые ограничены минимальным и максимальным значениями. Увеличение или уменьшение значения полосы прокрутки осуществляется с указанным шагом при помощи ползунка или кнопок.
Визуально, элемент управления ScrollBar состоит из полосы прокрутки и двух кнопок, работающих аналогично кнопкам элемента управления SpinButton. Ориентация может быть горизонтальной или вертикальной в зависимости от настроек.
Полоса прокрутки в VBA Excel используется в паре с элементом управления TextBox или Label. Вспомогательный элемент необходим, чтобы отобразить текущее значение ScrollBar на пользовательской форме.
Свойства элемента ScrollBar
| Свойство | Описание |
|---|---|
| BackColor | Цветовое оформление элемента управления. |
| Delay* | Время между последовательными событиями при удержании кнопки. |
| ControlTipText | Текст всплывающей подсказки при наведении курсора на полосу прокрутки. |
| Enabled | Возможность взаимодействия пользователя с элементом управления. True – взаимодействие включено, False – отключено (цвет стрелок становится серым). |
| Height | Высота элемента управления. |
| Left | Расстояние от левого края внутренней границы пользовательской формы до левого края элемента управления. |
| Max | Максимальное значение свойства Value. |
| Min | Минимальное значение свойства Value. |
| Orientation** | Задает горизонтальную или вертикальную ориентацию элемента управления ScrollBar. |
| SmallChange | Шаг изменения значения свойства Value. |
| TabIndex | Определяет позицию элемента управления в очереди на получение фокуса при табуляции, вызываемой нажатием клавиш «Tab», «Enter». Отсчет начинается с 0. |
| Top | Расстояние от верхнего края внутренней границы пользовательской формы до верхнего края элемента управления. |
| Visible | Видимость элемента ScrollBar. True – элемент отображается на пользовательской форме, False – скрыт. |
| Width | Ширина элемента управления. |
* По умолчанию свойство Delay равно 50 миллисекундам. Это означает, что первое событие (SpinUp, SpinDown, Change) происходит через 250 миллисекунд после нажатия кнопки, а каждое последующее событие – через каждые 50 миллисекунд (и так до отпускания кнопки).
** По умолчанию включена автоматическая ориентация, которая зависит от соотношения между шириной и высотой элемента управления. Если ширина больше высоты – ориентация горизонтальная, если высота больше ширины – ориентация вертикальная.
В таблице перечислены только основные, часто используемые свойства полосы прокрутки. Все доступные свойства отображены в окне Properties элемента управления ScrollBar.
Примеры кода с полосой прокрутки
Пример 1
Условие примера 1
- На пользовательской форме VBA Excel расположены элементы управления ScrollBar1 и Label1.
- Необходимо задать для полосы прокрутки ScrollBar1 интервал значений от -100 до 100 единиц с шагом 5 и отображением текущего значения на элементе Label1.
- При открытии формы полоса прокрутки должна быть установлена на значении 0.
Решение примера 1
Первоначальные настройки при открытии пользовательской формы:
|
Private Sub UserForm_Initialize() Me.Caption = «Пример 1» With ScrollBar1 .Min = —100 .Max = 100 .SmallChange = 5 .Value = 0 End With Label1.Caption = «0» End Sub |

Обработка события Change объекта ScrollBar1:
|
Private Sub ScrollBar1_Change() Label1.Caption = ScrollBar1.Value End Sub |
Обе процедуры размещаются в модуле пользовательской формы VBA Excel.
Пример 2
Условие примера 2
- На пользовательской форме расположены элементы управления ScrollBar1 и TextBox1.
- Интервал значений для полосы прокрутки ScrollBar1 от 0 до 1000 единиц с шагом 10 и отображение текущего значения в поле элемента TextBox1.
- При открытии формы полоса прокрутки должна быть установлена в значение 0.
- Установка соответствующего значения полосы прокрутки при ручном изменении содержимого текстового поля.
- Предусмотреть сообщение о значении TextBox1, не входящем в интервал значений элемента управления ScrollBar1.
Решение примера 2
Первоначальные настройки при открытии пользовательской формы:
|
Private Sub UserForm_Initialize() Me.Caption = «Пример 2» With ScrollBar1 .Min = 0 .Max = 1000 .SmallChange = 10 .Value = 0 End With TextBox1.Text = «0» End Sub |

Обработка события Change объекта ScrollBar1:
|
Private Sub ScrollBar1_Change() TextBox1.Text = ScrollBar1.Value End Sub |
Обработка события Change объекта TextBox1:
|
Private Sub TextBox1_Change() On Error GoTo Instr ScrollBar1.Value = TextBox1.Text Exit Sub Instr: TextBox1.Text = «Недопустимое значение» End Sub |
Если содержимое элемента управления TextBox1 не соответствует интервалу значений полосы прокрутки, возникает ошибка (преобразование в число происходит автоматически). Чтобы ее избежать и вывести сообщение о недопустимости значения, используется обработчик ошибок.

Все три процедуры размещаются в модуле пользовательской формы.
How to make a scrollable UserForm. This allows you to put scroll bars onto a form so that it can hold information that is accesible when the user scrolls down or to the right.
Sections:
Make a Scrollable UserForm
Notes
Make a Scrollable UserForm
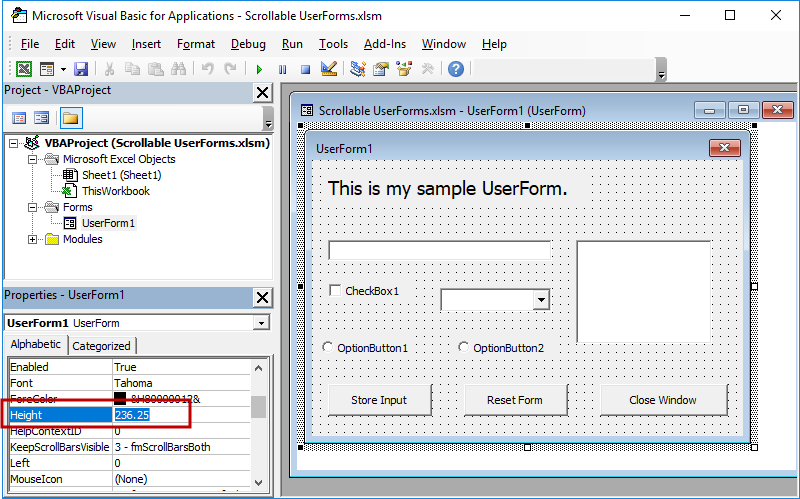
Make sure you are viewing the form. Alt+F11 to go to the VBA window > Double-click the UserForm from the Project window (Ctrl+R if you don’t see that window) and then make sure the form itself is selected and not a control within the form; do this by clicking the title bar at the top of the form.
Also, make sure the properties window is displayed, if it isn’t, hit F4 to display it.
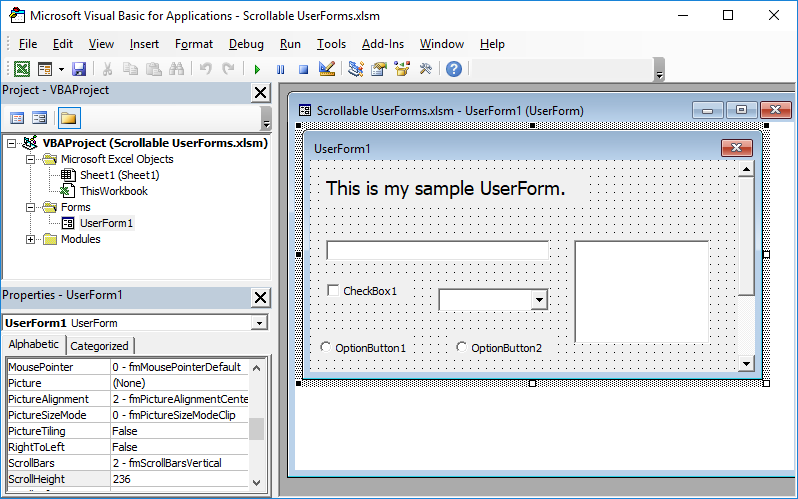
- For now, make the form large enough to display all of the contents on it; then, look to the properties window and take note of the number for the Height property:

The value of 236.25 is what is needed to display everything on the form and this number will be used later in the tutorial.
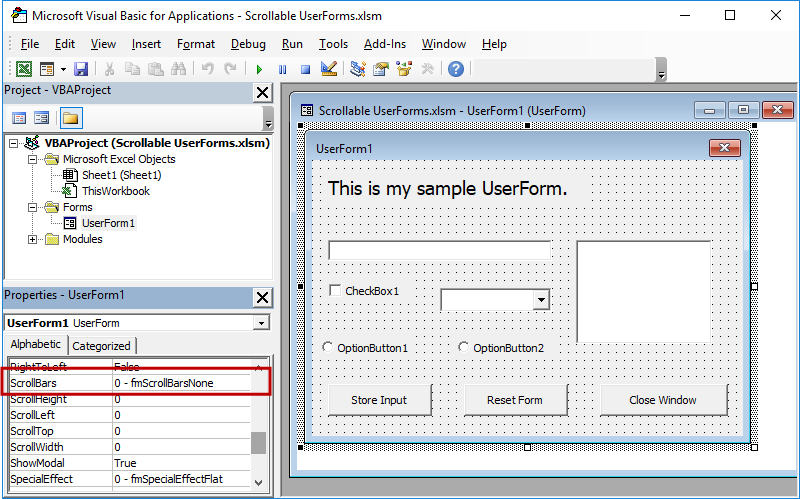
If your form is very wide and you need a scroll bar to go left-to-right, also look to the Width property and take note of that number when the form is large enough to display everything. - Go down to the ScrollBars option.
Click the option to the right so that a menu appears.
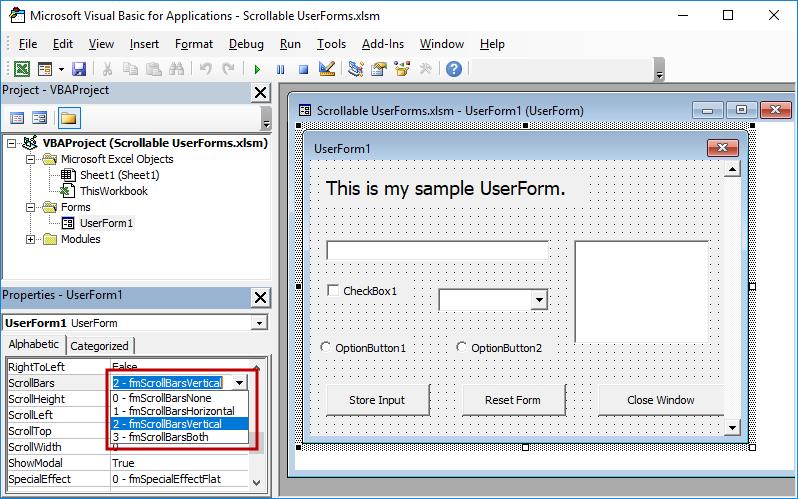
Choose the correct option:
fmScrollBarsHorizontal means that left-to-right scroll bars will appear.
fmScrollBarsVertical means that up-and-down scroll bars will appear — most common choice.
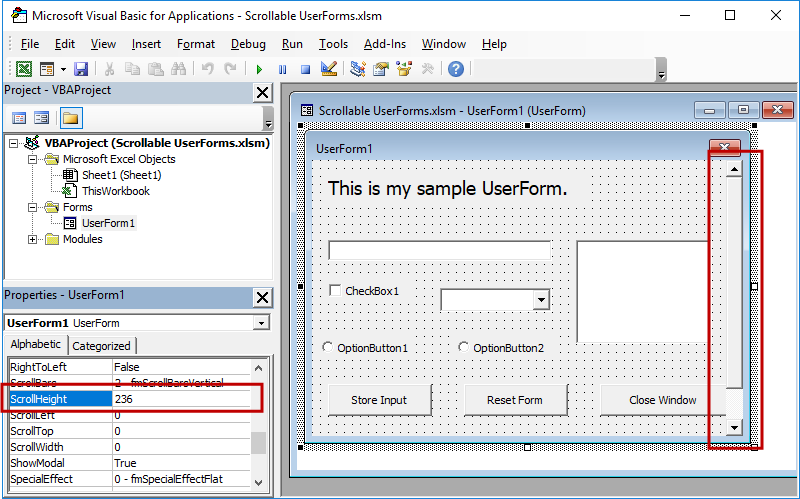
fmScrollBarsBoth means that both horizontal and vertical scroll bars will appear. - Take the number that you got from Step 1 and put that into the ScrollHeight property if you are using vertical scroll bars and/or if you are using horizontal scroll bars, put the value from the Width property in for the ScrollWidth property.
In this example we will only use vertical scroll bars.
You will also notice that once you enter the number for the ScrollHeight or ScrollWidth property, the scroll bar will appear on the form, as you can see in the image above. - Make sure that the values for ScrollLeft and ScrollTop are set to 0. These properties allow you to have a form that is part of the way scrolled by default; if that sounds confusing, just wait until you get the scroll bars working and test some values for this field, say 20, and then run the form and you will understand.
- Resize the form so that it is the size that you want it to be, which should be smaller than it was in step 1. Once you do this, you will see that some of the controls will no longer be visible.
You are now ready to test the form out!
Run the form to see the results:
If you notice too much empty space at the bottom of the form, just go back to the property window and adjust the value for the ScrollHeight property until it looks right to you — do the same for the width if you are using horizontal scroll bars.
Notes
Adding scroll bars to UserForms is not difficult, it’s just a little bit annoying since it doesn’t work as intuitively as it seems like it should.
Just remember, to adjust these properties:
- ScrollBars
- ScrollHeight and/or ScrollWidth
- ScrollLeft and/or ScrollTop
The ScrollLeft and ScrollTop properties are rarely used because, usually, forms start at the upper-left-most position.
Make sure to download the sample file for this tutorial so you can see this example in Excel.
![]()
Excel VBA Course — From Beginner to Expert
200+ Video Lessons
50+ Hours of Instruction
200+ Excel Guides
Become a master of VBA and Macros in Excel and learn how to automate all of your tasks in Excel with this online course. (No VBA experience required.)
View Course
Similar Content on TeachExcel
Make Perfect Scrollable Boxes in Worksheets in Excel — Great for a Dashboard
Tutorial:
Make a scrollable box in a worksheet in Excel that allows you to scroll through a table o…
Make a UserForm in Excel
Tutorial: Let’s create a working UserForm in Excel.
This is a step-by-step tutorial that shows you e…
UserForm Events
Tutorial: Explanation of UserForm Events in Excel. This includes what they are, how to use them, and…
UserForm Controls
Tutorial: This tutorial gives you an overview of what a UserForm Control is and how to add them to y…
Use Macros with UserForms
Tutorial: This tutorial explains how macros interact with UserForms.
This includes an explanation of…
Showing a UserForm
Tutorial: How to display a UserForm in Excel and some common things you might want to do when you di…
Subscribe for Weekly Tutorials
BONUS: subscribe now to download our Top Tutorials Ebook!
![]()
Excel VBA Course — From Beginner to Expert
200+ Video Lessons
50+ Hours of Video
200+ Excel Guides
Become a master of VBA and Macros in Excel and learn how to automate all of your tasks in Excel with this online course. (No VBA experience required.)
View Course
Содержание
- ScrollBar control
- Remarks
- See also
- Support and feedback
- Метод Scroll (Microsoft Forms)
- Синтаксис
- Settings
- Замечания
- См. также
- Поддержка и обратная связь
- Excel-VBA Solutions
- Pages
- How to Use Scroll Bar in Userform
- Premium Excel Course Now Available!
- Build Professional — Unbreakable — Forms in Excel
- 45 Tutorials — 5+ Hours — Downloadable Excel Files
- Scrollable UserForm
- Sections:
- Make a Scrollable UserForm
- Notes
- Свойство ScrollBars
- Синтаксис
- Settings
- Замечания
- См. также
- Поддержка и обратная связь
Returns or sets the value of another control based on the position of the scroll box.
A ScrollBar is a stand-alone control you can place on a form. It’s visually like the scroll bar you see in certain objects such as a ListBox or the drop-down portion of a ComboBox. However, unlike the scroll bars in these examples, the stand-alone ScrollBar is not an integral part of any other control.
To use the ScrollBar to set or read the value of another control, you must write code for the events and methods of the ScrollBar. For example, to use the ScrollBar to update the value of a TextBox, you can write code that reads the Value property of the ScrollBar and then sets the Value property of the TextBox.
The default property for a ScrollBar is the Value property. The default event for a ScrollBar is the Change event.
To create a horizontal or vertical ScrollBar, drag the sizing handles of the ScrollBar horizontally or vertically on the form.
See also
Support and feedback
Have questions or feedback about Office VBA or this documentation? Please see Office VBA support and feedback for guidance about the ways you can receive support and provide feedback.
Источник
Перемещает полосу прокрутки на объект.
Синтаксис
object. Scroll( [ ActionX [, ActionY ]] )
Синтаксис метода Scroll состоит из следующих частей:
| Part | Описание |
|---|---|
| object | Обязательно. Допустимое имя объекта. |
| ActionX | Необязательный параметр. Определяет действие для горизонтального направления. |
| ActionY | Необязательный параметр. Определяет действие для вертикального направления. |
Settings
Параметрами для ActionX и ActionY являются:
| Константа | Значение | Описание |
|---|---|---|
| fmScrollActionNoChange | 0 | Прокрутка в указанном направлении отсутствует. |
| fmScrollActionLineUp | 1 | Перемещение вверх по вертикальной полосе прокрутки или влево по горизонтальной полосе прокрутки. Перемещение эквивалентно нажатию клавиш стрелок вверх или влево для перемещения по полосе прокрутки. |
| fmScrollActionLineDown | 2 | Перемещение вниз по вертикальной полосе прокрутки или вправо по горизонтальной полосе прокрутки. Перемещение эквивалентно нажатию клавиш стрелок вправо или вниз для перемещения по полосе прокрутки. |
| fmScrollActionPageUp | 3 | Перемещение одной страницы вверх по вертикальной полосе прокрутки или одной страницы влево на горизонтальной полосе прокрутки. Перемещение эквивалентно нажатию на клавиатуре клавиши PAGE UP для перемещения по полосе прокрутки. |
| fmScrollActionPageDown | 4 | Перемещение одной страницы вниз по вертикальной полосе прокрутки или одной страницы вправо на горизонтальной полосе прокрутки. Перемещение эквивалентно нажатию на клавиатуре клавиши PAGE DOWN для перемещения по полосе прокрутки. |
| fmScrollActionBegin | 5 | Перемещение в верхний конец вертикальной полосы прокрутки или в левый конец горизонтальной полосы прокрутки. |
| fmScrollActionEnd | 6 | Перемещение в нижний конец вертикальной полосы прокрутки или в правый конец горизонтальной полосы прокрутки. |
Замечания
Метод Scroll применяет полосы прокрутки, отображаемые на форме, рамке или странице , которая больше, чем ее область отображения. Этот метод не применяется к автономной полосе ScrollBar или полосам прокрутки, отображаемым в TextBox.
См. также
Поддержка и обратная связь
Есть вопросы или отзывы, касающиеся Office VBA или этой статьи? Руководство по другим способам получения поддержки и отправки отзывов см. в статье Поддержка Office VBA и обратная связь.
Источник
Excel-VBA Solutions
Want to become an expert in VBA? So this is the right place for you. This blog mainly focus on teaching how to apply Visual Basic for Microsoft Excel. So improve the functionality of your excel workbooks with the aid of this blog. Also ask any questions you have regarding MS Excel and applying VBA. We are happy to assist you.
Pages
How to Use Scroll Bar in Userform
Some times we need to use very large userforms in our VBA projects. Size of the form depends on the number of fields and various objects we have in our form. And if we need to show them in one window, we need to create big userform to put them all. You can create a form of any size by giving appropriate values for Height and width in properties window. But if our userform is bigger than the screen we need to use scroll bars inside our form. It is easier to put a scroll bar to a userform. But I saw that many people have problems with setting scroll bars correctly. Lot of people say that their scroll bars not working at run time. So there are few important things you should know when using scroll bars.
I will explain these important facts using a simple example. I have created a large form which has height of 1200 and width of 420. And there are a lot of text fields inside my userform.
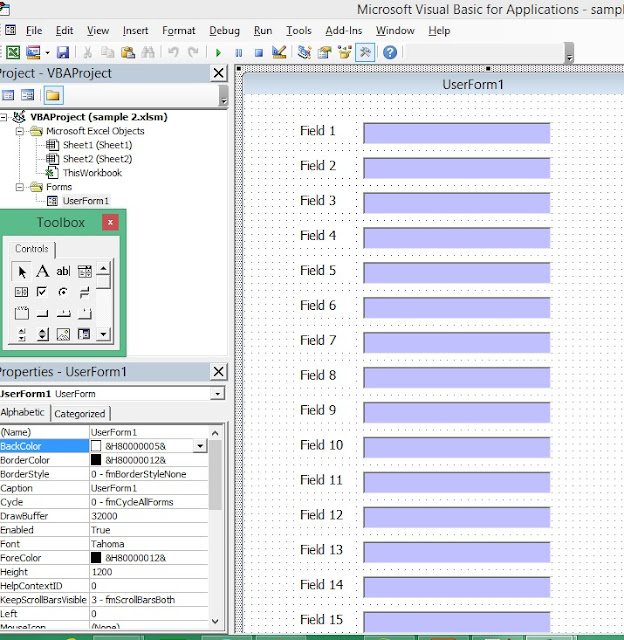
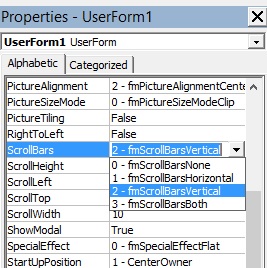
If you look at properties window, you will notice that ScrollBars value is set to 0-fmScrollBarsNone by default. So we need to change this property depending on our requirement. If you have a userform with larger width, then you need to set ScrollBars value to 1-fmScrollBarsHorizontal. If you have a userform which has higher height, then you need to set this value to 2-fmScrollBarsVertical. And if you need scroll bars in both directions you can set the value to 3-fmScrollBarsBoth. You need to set to this value only if both width and height of your form is bigger than the screen.
You should set ScrollTop value to the 0. So then it will always appear at top.

Finally you need to set the ScrollHeight. It is very important to set appropriate value to this. Othewise you may not able to scroll up to the bottom of the form. Also if you set higher value, then user will scroll after the end of the objects. So user will see like your form is extended more than needed. So you should set a optimum value for this property for correct functionality and nice appearance. For example if you have a form having a height of 1200, you should set ScrollHeight value around 1850.
Источник
Premium Excel Course Now Available!
Build Professional — Unbreakable — Forms in Excel
45 Tutorials — 5+ Hours — Downloadable Excel Files
BLACK FRIDAY SALE (65%-80% Off)
Excel Courses Online
Video Lessons Excel Guides
How to make a scrollable UserForm. This allows you to put scroll bars onto a form so that it can hold information that is accesible when the user scrolls down or to the right.
Sections:
Make sure you are viewing the form. Alt+F11 to go to the VBA window > Double-click the UserForm from the Project window (Ctrl+R if you don’t see that window) and then make sure the form itself is selected and not a control within the form; do this by clicking the title bar at the top of the form.
Also, make sure the properties window is displayed, if it isn’t, hit F4 to display it.
- For now, make the form large enough to display all of the contents on it; then, look to the properties window and take note of the number for the Height property:
The value of 236.25 is what is needed to display everything on the form and this number will be used later in the tutorial.
If your form is very wide and you need a scroll bar to go left-to-right, also look to the Width property and take note of that number when the form is large enough to display everything. - Go down to the ScrollBars option.
Click the option to the right so that a menu appears.
Choose the correct option:
fmScrollBarsHorizontal means that left-to-right scroll bars will appear.
fmScrollBarsVertical means that up-and-down scroll bars will appear — most common choice.
fmScrollBarsBoth means that both horizontal and vertical scroll bars will appear. - Take the number that you got from Step 1 and put that into the ScrollHeight property if you are using vertical scroll bars and/or if you are using horizontal scroll bars, put the value from the Width property in for the ScrollWidth property.
In this example we will only use vertical scroll bars.
You will also notice that once you enter the number for the ScrollHeight or ScrollWidth property, the scroll bar will appear on the form, as you can see in the image above. - Make sure that the values for ScrollLeft and ScrollTop are set to 0. These properties allow you to have a form that is part of the way scrolled by default; if that sounds confusing, just wait until you get the scroll bars working and test some values for this field, say 20, and then run the form and you will understand.
- Resize the form so that it is the size that you want it to be, which should be smaller than it was in step 1. Once you do this, you will see that some of the controls will no longer be visible.
You are now ready to test the form out!
Run the form to see the results:
If you notice too much empty space at the bottom of the form, just go back to the property window and adjust the value for the ScrollHeight property until it looks right to you — do the same for the width if you are using horizontal scroll bars.
Notes
Adding scroll bars to UserForms is not difficult, it’s just a little bit annoying since it doesn’t work as intuitively as it seems like it should.
Just remember, to adjust these properties:
- ScrollBars
- ScrollHeight and/or ScrollWidth
- ScrollLeft and/or ScrollTop
The ScrollLeft and ScrollTop properties are rarely used because, usually, forms start at the upper-left-most position.
Make sure to download the sample file for this tutorial so you can see this example in Excel.
Источник
Определяет, содержит ли элемент управления, форма или страница вертикальные полосы прокрутки, горизонтальные полосы прокрутки или оба вида полос.
Синтаксис
object. ScrollBars [= fmScrollBars ]
Синтаксис свойства ScrollBars состоит из следующих частей:
| Part | Описание |
|---|---|
| object | Обязательно. Допустимый объект. |
| fmScrollBars | Необязательный параметр. Место отображения полос прокрутки. |
Settings
fmScrollBars может принимать следующие значения:
| Константа | Значение | Описание |
|---|---|---|
| fmScrollBarsNone | 0 | Полосы прокрутки не отображаются (по умолчанию). |
| fmScrollBarsHorizontal | 1 | Отображается горизонтальная полоса прокрутки. |
| fmScrollBarsVertical | 2 | Отображается вертикальная полоса прокрутки. |
| fmScrollBarsBoth | 3 | Отображаются и горизонтальная, и вертикальная полосы прокрутки. |
Замечания
Если значение свойства KeepScrollBarsVisible равно True, любая полоса прокрутки всегда видна на форме или странице, независимо от того, попадает ли содержание объекта в границы объекта.
Если полоса прокрутки видна, ее поле прокрутки ограничивается видимой областью полосы прокрутки. При необходимости также изменяется положение прокрутки, чтобы вся полоса прокрутки оставалась видимой. Диапазон полосы прокрутки меняется при изменении значения свойства ScrollBars, меняется размер прокручиваемой или видимой области.
Если полоса прокрутки не видна, можно задать для нее любое значение. Допустимы как отрицательные значения, так и значения, превышающие размер прокрутки.
Для однострочного элемента управления можно отобразить горизонтальную полосу прокрутки, используя свойства ScrollBars и AutoSize. Полосы прокрутки скрываются или отображаются в соответствии со следующими правилами:
Если для свойства ScrollBars задано значение fmScrollBarsNone, полоса прокрутки не отображается.
Если для свойства ScrollBars задано значение fmScrollBarsHorizontal или fmScrollBarsBoth, для элемента управления отображается горизонтальная полоса прокрутки, если текст длиннее области редактирования и если элемент управления содержит достаточно места, чтобы разместить полосу прокрутки под его областью редактирования.
Если для свойства AutoSize задано значение True, элемент управления увеличивается, чтобы вместить добавленную полосу прокрутки, если размер элемента управления максимален или близок к максимальному.
Для многострочного элемента TextBox можно отобразить полосы прокрутки с помощью свойств ScrollBars, WordWrap и AutoSize . Полосы прокрутки скрываются или отображаются в соответствии со следующими правилами:
Если для свойства ScrollBars задано значение fmScrollBarsNone, полоса прокрутки не отображается.
Если для свойства ScrollBars задано значение fmScrollBarsVertical или fmScrollBarsBoth, для элемента управления отображается вертикальная полоса прокрутки, если текст длиннее области редактирования и если элемент управления содержит достаточно места, чтобы разместить полосу прокрутки вдоль правого края его области редактирования.
Если для свойства WordWrap задано значение True, горизонтальная полоса прокрутки для многострочного элемента управления не показывается. Большинство многостроковых элементов управления не используют горизонтальную полосу прокрутки.
Горизонтальная полоса прокрутки может отображаться в многострочном элементе управления в случае одновременного выполнения следующих условий:
- Область редактирования содержит слово, оказывающееся длиннее ширины области редактирования.
- Для элемента управление включено использование горизонтальных полос прокрутки.
- В элементе управления достаточно места для размещения полосы прокрутки под областью редактирования.
- Для свойства WordWrap задано значение False.
См. также
Поддержка и обратная связь
Есть вопросы или отзывы, касающиеся Office VBA или этой статьи? Руководство по другим способам получения поддержки и отправки отзывов см. в статье Поддержка Office VBA и обратная связь.
Источник
UserForm Controls — ScrollBar and SpinButton
UserForm acts as a container in which you add multiple ActiveX controls, each of which has a specific use and associated properties. By itself, a UserForm will not be of much use unless ActiveX controls are added to it which are the actual user-interactive objects. Using ActiveX Controls on a Worksheet have been illustrated in detail, in the separate section of «Excel VBA: ActiveX Controls, Form Controls & AutoShapes on a Worksheet».
Also refer «2. UserForm and Controls — Properties» for properties common to the UserForm and most Controls
Note: In below given examples, vba codes are required to be entered in the Code Module of the UserForm, unless specified otherwise.
——————————————-
Contents:
ScrollBar Control
SpinButton Control
——————————————-
ScrollBar Control
A ScrollBar control enables to change (increment or decrement) the value displayed by other UserForm controls (viz. TextBox, Label, …) or the value in a worksheet range. It scrolls through a range of values when a user: (i) clicks on the scroll arrows; (ii) drags the scroll box; or (iii) clicks in an area between a scroll arrow and the scroll box. ScrollBar & SpinButton controls — the difference between the two is that the ScrollBar box can be dragged to change the control’s value over larger increments (while keeping the increment low for clicks) which advantages a ScrollBar to make a selection from across a large number of values and cover an extremely wide range.
SmallChange Property specifies the incremental change, as an integer value (Long variable), that occurs when a user clicks the scroll arrow. The LargeChange Property specifies the incremental change when the user clicks between a scroll arrow and the scroll box. The default value is 1 for both the properties.
Min and Max Properties are integer values (Long variable) which specify the minimum and maximum acceptable values of the ScrollBar control (for the Value property setting). In a vertical ScrollBar clicking down the scroll arrow increases the value and the lowest position displays the maximum value (will be reverse when you click up the scroll arrow). In a horizontal ScrollBar clicking the right scroll arrow increases the value and the rightmost position displays the maximum value (will be reverse when you click the left scroll arrow).
Orientation Property determines a vertical ScrollBar or a horizontal ScrollBar. It has 3 settings: (i) fmOrientationAuto (Value -1) — this is the default value wherein the ScrollBar dimensions automatically determine whether the ScrollBar is Vertical or Horizontal. Where width is more than height, ScrollBar is Horizontal and where height is more than width, ScrollBar is Vertical; (ii) FmOrientationVertical (Value 0) — vertical ScrollBar; and (iii) FmOrientationHorizontal (Value 1) — horizontal ScrollBar.
Example 1: Creating a Mortgage Calculator, using ScrollBar controls. Refer Image 29. See vba codes below:

Private Sub UserForm_Initialize()
‘Set properties of Controls on initialization of UserForm.
‘set properties for controls in re of Loan Amount:
TextBox1.BackColor = RGB(255, 255, 0)
TextBox1.TextAlign = fmTextAlignCenter
TextBox1.Font.Bold = True
TextBox1.Enabled = False
Label1.Caption = «Loan Amount ($):»
Label1.TextAlign = fmTextAlignLeft
ScrollBar1.Min = 0
ScrollBar1.Max = 10000
ScrollBar1.Orientation = fmOrientationHorizontal
ScrollBar1.SmallChange = 5
ScrollBar1.LargeChange = 100
ScrollBar1.Value = 0
‘set properties for controls in re of Annual Interest Rate:
TextBox2.BackColor = RGB(255, 255, 0)
TextBox2.TextAlign = fmTextAlignCenter
TextBox2.Font.Bold = True
TextBox2.Enabled = False
Label2.Caption = «Annual Int Rate (%):»
Label2.TextAlign = fmTextAlignLeft
ScrollBar2.Min = 0
ScrollBar2.Max = 1000
ScrollBar2.Orientation = fmOrientationHorizontal
ScrollBar2.SmallChange = 1
ScrollBar2.LargeChange = 10
ScrollBar2.Value = 0
‘set properties for controls in re of Loan Tenure:
TextBox3.BackColor = RGB(255, 255, 0)
TextBox3.TextAlign = fmTextAlignCenter
TextBox3.Font.Bold = True
TextBox3.Enabled = False
Label3.Caption = «Loan Tenure (Yrs)»
Label3.TextAlign = fmTextAlignLeft
ScrollBar3.Min = 0
ScrollBar3.Max = 50
ScrollBar3.Orientation = fmOrientationHorizontal
ScrollBar3.SmallChange = 1
ScrollBar3.LargeChange = 4
ScrollBar3.Value = 0
‘set properties for Label which displays Monthly Instalment:
Label4.Caption = «Monthly Instalment: $»
Label4.TextAlign = fmTextAlignCenter
Label4.BackColor = RGB(0, 255, 0)
Label4.Font.Bold = True
End Sub
Private Sub ScrollBar1_Change()
‘in re of Loan Amount, clicking the scroll arrow will increment amount by $5,000 and clicking between a scroll arrow and the scroll box will increment amount by $100,000:
TextBox1.Value = ScrollBar1.Value * 1000
TextBox1.Value = «$» & Format(TextBox1.Value, «#,##0»)
End Sub
Private Sub ScrollBar2_Change()
‘in re of Annual Interest Rate, clicking the scroll arrow will increment rate by 0.1% and clicking between a scroll arrow and the scroll box will increment rate by 1%:
TextBox2.Value = ScrollBar2.Value / 10
End Sub
Private Sub ScrollBar3_Change()
‘in re of Loan Tenure, clicking the scroll arrow will increment year by 0.5 and clicking between a scroll arrow and the scroll box will increment year by 2:
TextBox3.Value = ScrollBar3.Value / 2
End Sub
Private Sub CommandButton1_Click()
‘calculates the Monthly Instalment using the excel PMT function:
Dim mi As Currency
If Not TextBox1.Value > 0 Then
MsgBox «Please Enter Loan Amount!»
Exit Sub
ElseIf Not TextBox2.Value > 0 Then
MsgBox «Please Enter Annual Interest Rate!»
Exit Sub
ElseIf Not TextBox3.Value > 0 Then
MsgBox «Please Enter Loan Tenure!»
Exit Sub
Else
mi = Pmt((TextBox2.Value / 100) / 12, TextBox3.Value * 12, TextBox1.Value)
‘Label displays the monthly instalment, rounded off to 2 decimal points:
Label4.Caption = «Monthly Instalment: $» & Round(mi, 2) * -1
End If
End Sub
Private Sub CommandButton2_Click()
‘close button unloads the UserForm
Unload Me
End Sub
————————————————————————————————————-
SpinButton Control
A SpinButton control, similar to a ScrollBar control, is used to increment or decrement the value (viz. a number, date, time, etc.) displayed by other UserForm controls (viz. TextBox, Label, …) or the value in a worksheet range. A SpinButton control (also referred to as a Spinner control) functions like a ScrollBar control, with similar properties (viz. SmallChange, Min, Max, Orientation, …). SmallChange Property specifies the incremental change, as an integer value (Long variable), that occurs when a user clicks the scroll arrow. A SpinButton control does not have a LargeChange property, like in a ScrollBar. In a vertical ScrollBar clicking up the scroll arrow decreases the value whereas clicking up the scroll arrow on a vertical Spinner increases the value.
ScrollBar & SpinButton controls — the difference between the two is that the ScrollBar box can be dragged to change the control’s value over larger increments (while keeping the increment low for clicks) which advantages a ScrollBar to make a selection from across a large number of values and cover an extremely wide range.
Example 2: Using a SpinButton control to change dates in TextBox, within a specified range:
Private Sub UserForm_Initialize()
‘populate a date in the TextBox
Dim dt As Date
‘disallow manual input in TextBox
TextBox1.Enabled = False
dt = «09/15/2011»
TextBox1.Text = dt
End Sub
Private Sub SpinButton1_SpinUp()
‘increase date by one day at a time, within the same month:
Dim dtUpper As Date
dtUpper = «09/30/2011»
If DateValue(TextBox1.Text) < dtUpper Then
TextBox1.Text = DateValue(TextBox1.Text) + 1
End If
End Sub
Private Sub SpinButton1_SpinDown()
‘decrease date by one day at a time, within the same month:
Dim dtLower As Date
If DateValue(TextBox1.Text) > dtLower Then
TextBox1.Text = DateValue(TextBox1.Text) — 1
End If
End Sub
Example 3: Move ListBox Items Up/Down in the list order and in the worksheet range, using the SpinButton control (by clicking Up or Down the scroll arrow). Refer Image 30. See below vba codes:

Private Sub loadListBox()
‘load ListBox from worksheet range:
Dim n As Integer
Dim cell As Range
Dim rng As Range
Set rng = Sheet7.Range(«A1:A6»)
For n = 1 To ListBox1.ListCount
ListBox1.RemoveItem ListBox1.ListCount — 1
Next n
For Each cell In rng.Cells
Me.ListBox1.AddItem cell.Value
Next cell
End Sub
Private Sub UserForm_Initialize()
‘loads ListBox on initializing of UserForm
loadListBox
End Sub
Private Sub SpinButton1_SpinUp()
‘clicking up the scroll arrow moves the selected ListBox item one up both in the list order and also in the linked worksheet range:
Dim n As Long
n = ListBox1.ListIndex
If n > 0 Then
Sheet7.Range(«A» & n + 1).Value = Sheet7.Range(«A» & n).Value
Sheet7.Range(«A» & n).Value = ListBox1.Value
loadListBox
ListBox1.Selected(n — 1) = True
ElseIf ListBox1.ListIndex = 0 Then
MsgBox «First Item cannot be moved Up!»
Else
MsgBox «Please select item!»
End If
End Sub
Private Sub SpinButton1_SpinDown()
‘clicking down the scroll arrow moves the selected ListBox item one down both in the list order and also in the linked worksheet range:
Dim n As Long
n = ListBox1.ListIndex
If n >= 0 And n < ListBox1.ListCount — 1 Then
Sheet7.Range(«A» & n + 1).Value = Sheet7.Range(«A» & n + 2).Value
Sheet7.Range(«A» & n + 2).Value = ListBox1.Value
loadListBox
ListBox1.Selected(n + 1) = True
ElseIf ListBox1.ListIndex = ListBox1.ListCount — 1 Then
MsgBox «Last Item cannot be moved Down!»
Else
MsgBox «Please select item!»
End If
End Sub
Private Sub CommandButton1_Click()
‘clicking the Close button unloads the UserForm
Unload Me
End Sub
Some times we need to use very large userforms in our VBA projects. Size of the form depends on the number of fields and various objects we have in our form. And if we need to show them in one window, we need to create big userform to put them all. You can create a form of any size by giving appropriate values for Height and width in properties window. But if our userform is bigger than the screen we need to use scroll bars inside our form. It is easier to put a scroll bar to a userform. But I saw that many people have problems with setting scroll bars correctly. Lot of people say that their scroll bars not working at run time. So there are few important things you should know when using scroll bars.
I will explain these important facts using a simple example. I have created a large form which has height of 1200 and width of 420. And there are a lot of text fields inside my userform.
If you look at properties window, you will notice that ScrollBars value is set to 0-fmScrollBarsNone by default. So we need to change this property depending on our requirement. If you have a userform with larger width, then you need to set ScrollBars value to 1-fmScrollBarsHorizontal. If you have a userform which has higher height, then you need to set this value to 2-fmScrollBarsVertical. And if you need scroll bars in both directions you can set the value to 3-fmScrollBarsBoth. You need to set to this value only if both width and height of your form is bigger than the screen.
You should set ScrollTop value to the 0. So then it will always appear at top.
Finally you need to set the ScrollHeight. It is very important to set appropriate value to this. Othewise you may not able to scroll up to the bottom of the form. Also if you set higher value, then user will scroll after the end of the objects. So user will see like your form is extended more than needed. So you should set a optimum value for this property for correct functionality and nice appearance. For example if you have a form having a height of 1200, you should set ScrollHeight value around 1850.
