
VBA Screen Updating is a property used to avoid or prevent distraction flashes while running the code and make it fast by turning off screen updating. We can turn off the screen updating by setting this property as “False.”
We often feel the Excel screen going crazy while the Macro is running. We almost get frustrated by that. But, how do we deal with these situations and make the code run faster than the usual slow thing?
Screen Updating is something we can notice while the excel macroA macro in excel is a series of instructions in the form of code that helps automate manual tasks, thereby saving time. Excel executes those instructions in a step-by-step manner on the given data. For example, it can be used to automate repetitive tasks such as summation, cell formatting, information copying, etc. thereby rapidly replacing repetitious operations with a few clicks.
read more is running. When the task is executing, we notice our screen updating the values until the Macro finishes its assigned task. As our screen flickers or refreshes, it leads to the slowdown of the Excel program and takes a longer time than usual to complete the task.
In VBA, we have a property called “ScreenUpdating,” we set this property to FALSE to eliminate the screen updating process while the code runs.
This article will say goodbye to watching on-screen action drama while the code is running. Instead, today you will make your code run faster and quicker than your usual time.
Table of contents
- Excel VBA Screen Updating
- When to use Screen Updating Feature?
- How to use Screen Updating Feature in VBA Code?
- Example #1 – Turn Off Screen Updating
- Example #2 –
- Recommended Articles

You are free to use this image on your website, templates, etc, Please provide us with an attribution linkArticle Link to be Hyperlinked
For eg:
Source: VBA Screen Updating Property (wallstreetmojo.com)
When to use Screen Updating Feature?
Suppose you have any doubt about when to use this technique. Then, look into the below points.
- Looping through a large number of cells.
- Sending emails from Excel VBAWe can use VBA to automate our mailing feature in Excel to send emails to multiple users at once. To use Outlook features, we must first enable outlook scripting in VBA, and then use the application method.read more.
- Switching between Excel workbooks.
- Opening new workbooks.
How to use the Screen Updating Feature in VBA Code?
You can download this VBA ScreenUpdating Excel Template here – VBA ScreenUpdating Excel Template
Example #1 – Turn Off Screen Updating
Look at the below code.
Code:
Sub Screen_Updating()

 Dim RowCount As Long
 Dim ColumnCount As Long
 Dim MyNumber As Long

 MyNumber = 0

 For RowCount = 1 To 50

 For ColumnCount = 1 To 50
   MyNumber = MyNumber + 1
   Cells(RowCount, ColumnCount).Select
   Cells(RowCount, ColumnCount).Value = MyNumber
 Next ColumnCount

 Next RowCount

End Sub
The above has a nested VBA loopA VBA loop in excel is an instruction to run a code or repeat an action multiple times.read more to insert serial numbers from the first column to the 50th column and again to insert serial numbers starting from 51 from the second row to the 50th column.

Like this, it will insert until it reaches the 50th row.
While this code is running, you can notice your screen flickering. You cannot do anything apart from watching this crazy moment.
To avoid all of these, we can add Screen Updating to FALSE.
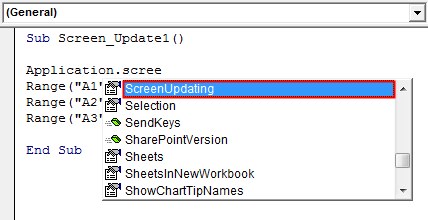
To access the Screen Updating feature, first, we need to access the Application object.
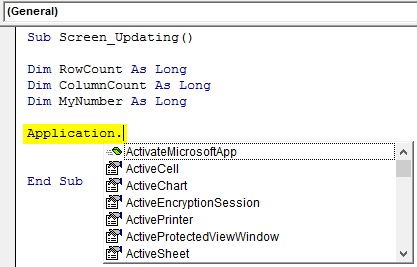
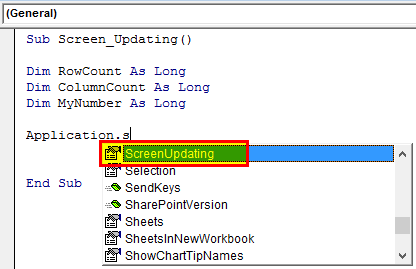
As we can see with the Application object, we have many properties and methods. So, select “Screen Updating” from the IntelliSense list.
Note: You must apply the Screen Updating feature immediately after declaring the variables.
After selecting the Screen Updating property, put an equal sign (=).
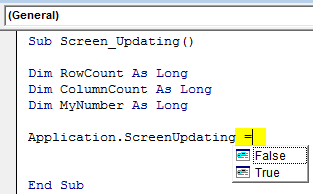
As we can see, there are two Boolean values: FALSE and TRUE.
To stop screen updating, set the status to FALSE.

As the Macro starts running first, it will update the screen, updating the status to FALSE, and proceed to the next line.
Since Macro executed Screen Updating to FALSE, it will not allow the screen to update while the code is executing its task.
Example #2 –
Always Set Screen Updating to TRUE at the End
We have seen many people set the Screen Updating to FALSE but forgot to set it back to TRUE at the end of the Macro.
Always set the Screen Updating back to TRUE at the end of the Macro.
Code:
Sub Screen_Updating()

 Dim RowCount As Long
 Dim ColumnCount As Long
 Dim MyNumber As Long

 Application.ScreenUpdating = False
 MyNumber = 0

 For RowCount = 1 To 50

 For ColumnCount = 1 To 50
   MyNumber = MyNumber + 1
   Cells(RowCount, ColumnCount).Select
   Cells(RowCount, ColumnCount).Value = MyNumber
 Next ColumnCount

 Next RowCount
 Application.ScreenUpdating = True

End Sub
Recommended Articles
This article has been a guide to VBA Screen Updating. Here, we discuss how to use the Application.ScreenUpdating feature to make code run faster and quicker than your usual time, along with examples and a downloadable Excel template. Below are some useful Excel articles related to VBA: –
- Solver Function in VBA
- Use VBA Debug Print
- Break For Loop in VBA
- ThisWorkbook Property in VBA
- VBA FreeFile
Home / VBA / VBA ScreenUpdating | How to Turn it ON and OFF
What is VBA Screen Updating?
ScreenUpdating is a property in VBA that you can use to turn “ON” and “OFF” the screen updating while running the code. You can turn it off before running a code that makes your code run faster and then turn it on once the execution of the code completes. You can read and write this property.

By default, screen updating is “ON” in Excel. When you normally run a code it takes a lot of flickering if that code takes time, but if you turn OFF the screen updating it will take less time than normal to run.
Turn OFF Screen Updating in VBA
- First, type the keyword “Application”.
- After that, press a dot “.” to open the properties and methods list.
- Now, select “ScreenUpdating”.
- In the end, specify “False” to it.

Once you turn off screen updating, VBA will not turn it ON once the code is executed. So it’s always better to turn it off from your end. The code would be like something below.

Points to Consider
- Make sure to have the screen updating “ON” when you are using a user form.
- If you are debugging code, it is better to have a screen updating “ON” so that you can see all the activities as they are.
There’s More
VBA With Statement | VBA Wait and Sleep Commands | VBA Status Bar | VBA Random Number | Line Break in a VBA Code | VBA Immediate Window (Debug.Print) | VBA Concatenate | VBA Module | VBA Random Number
Excel VBA ScreenUpdating
When we run any VBA macro with a huge set of code, the code completes but in the background we get processing data in the form of running or waiting for the pointer. And once it is done, we can only see the output. The regular way is not the proper way to see how the values are updating by running code. For example, let’s say we have written the code to generate some numbers in 100 cells. Now that code could simply generate the output without showing how the numbers are getting printed. To resolve this, we have VBA ScreenUpdating. ScreenUpdating in VBA helps us the see how the code is generating the output. This could be numbers, text, alphabets or combination. Once we run the code loop, by VBA ScreenUpdating we could able to see the numbers getting generated.
How to Use ScreenUpdating Application in Excel VBA?
We will learn how to use the ScreenUpdating application in Excel by using the VBA Code.
You can download this VBA ScreenUpdating Excel Template here – VBA ScreenUpdating Excel Template
VBA ScreenUpdating can be noticed while we run the code or macro. While the code is running, we will be able to see how our screen is getting updated by the values generated by written code in VBA. Instead of seeing the older waiting sign, by the help of VBA ScreenUpdating we can see how the screen is updating the values of output by VBA ScreenUpdating. Now by that, we can also see the name of the article itself defines it work, VBA ScreenUpdating.
VBA ScreenUpdating – Example #1
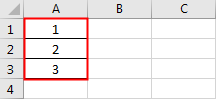
In this example, we will see a simple code for updating the screen. For this, we need some cells with numbers, as shown below. For this, follow the below steps:
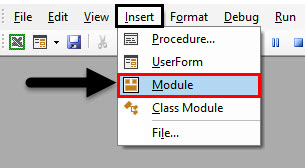
Step 1: Open a Module from the Insert menu tab as shown below.
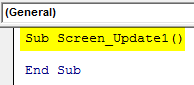
Step 2: Now write the subprocedure in the name of VBA ScreenUpdating as shown below.
Code:
Sub Screen_Update1()

End Sub
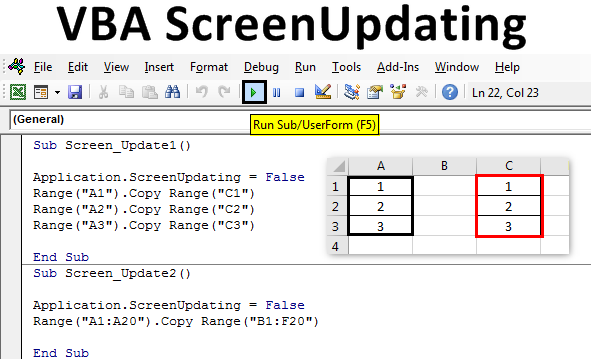
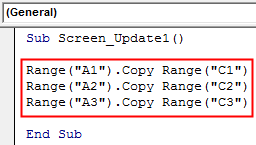
Step 3: We will now copy the numbers from cell A1: A3 to any other cells. Let’s say that cell be C1: C3 with the help of the below code.
Code:
Sub Screen_Update1()

Range("A1").Copy Range("C1")
Range("A2").Copy Range("C2")
Range("A3").Copy Range("C3")

End Sub
Step 4: Now if we run this code, we could only get the output which is copied values from column A to C. Now we will use ScreenUpdating application as shown below.
Code:
Sub Screen_Update1()

Application.ScreenUpdating
Range("A1").Copy Range("C1")
Range("A2").Copy Range("C2")
Range("A3").Copy Range("C3")

End Sub
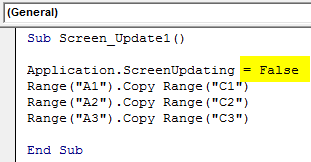
Step 5: We put an equal sign to select the Boolean values which are TRUE or FALSE. We will select FALSE to stop the screenupdating.
Code:
Sub Screen_Update1()

Application.ScreenUpdating = False
Range("A1").Copy Range("C1")
Range("A2").Copy Range("C2")
Range("A3").Copy Range("C3")

End Sub
Step 6: Run the code by pressing the F5 key or by clicking on the Play Button located below the menu ribbon. We will see the values are copied from column A to C.

This could be seen more clearly if we have a huge set of numbers.
VBA ScreenUpdating – Example #2
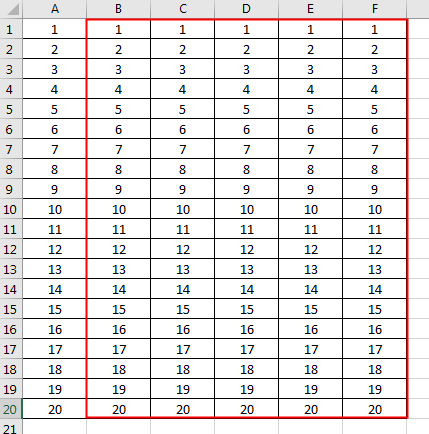
Let’s see another example for ScreenUpdating. This time let’s consider the number from 1 to 20 from cell A1 to A20 as shown below.

For using screenupdating application, follow the below steps:
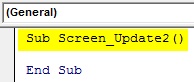
Step 1: Write the subprocedure of VBA Screenupdating as shown below.
Code:
Sub Screen_Update2()

End Sub
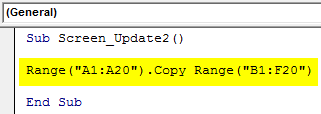
Step 2: Now write the code to select the range cell from A1 to A20 and copy them at B1 to F20 as shown below. In a similar fashion as we saw in example-1.
Code:
Sub Screen_Update2()

Range("A1:A20").Copy Range("B1:F20")

End Sub
Step 3: To apply the screenupdating application, we will again use a similar line of code which we have seen in example-1.
Code:
Sub Screen_Update2()

Application.ScreenUpdating = False
Range("A1:A20").Copy Range("B1:F20")

End Sub
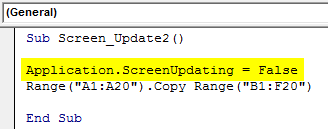
The above-used application ScreenUpdating as FALSE will allow us to see how the VBA code updates the screen. As we have more numbers so there are chances we can see screenupdating.
Step 4: Run the code by pressing the F5 key or by clicking on the Play Button. We could see the value getting updated.
VBA ScreenUpdating – Example #3
There is another way to see the screen getting updated. This could be done with the help of the For-Next Loop. In this example, we will print the numbers in a Row and Column combo matrix. For this, follow the below steps:
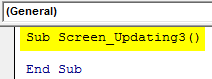
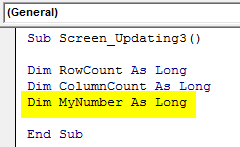
Step 1: Write the subprocedure of VBA ScreenUpdating.
Code:
Sub Screen_Updating3()

End Sub
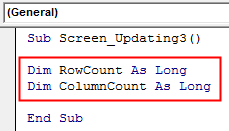
Step 2: Now declare the 2 variables for Row and Columns separately as data type Long.
Code:
Sub Screen_Updating3()

Dim RowCount As Long
Dim ColumnCount As Long

End Sub
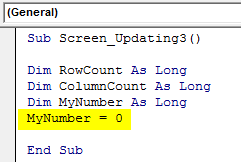
Step 3: Now declare another variable which we will use as a reference to start the numbers.
Code:
Sub Screen_Updating3()

Dim RowCount As Long
Dim ColumnCount As Long
Dim MyNumber As Long

End Sub
Step 4: Now give the reference number from which position we want to start the counting. Here we are giving it as 0.
Code:
Sub Screen_Updating3()

Dim RowCount As Long
Dim ColumnCount As Long
Dim MyNumber As Long
MyNumber = 0

End Sub
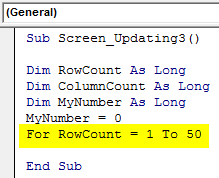
Step 5: Now open a For loop and give the count of the Columns and Rows which want to see updating. Let say from 1 to 50.
Code:
Sub Screen_Updating3()

Dim RowCount As Long
Dim ColumnCount As Long
Dim MyNumber As Long
MyNumber = 0
For RowCount = 1 To 50

End Sub
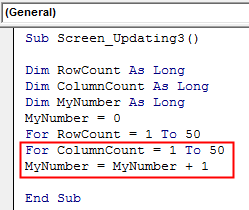
Step 6: To continue the loop give MyNumber variable +1.
Code:
Sub Screen_Updating3()

Dim RowCount As Long
Dim ColumnCount As Long
Dim MyNumber As Long
MyNumber = 0
For RowCount = 1 To 50
For ColumnCount = 1 To 50
MyNumber = MyNumber + 1

End Sub
Step 7: Now select the Row and Column variables in Cell function. And then select the values stored in them and assign them to MyNumber variable.
Code:
Sub Screen_Updating3()

Dim RowCount As Long
Dim ColumnCount As Long
Dim MyNumber As Long
MyNumber = 0
For RowCount = 1 To 50
For ColumnCount = 1 To 50
MyNumber = MyNumber + 1
Cells(RowCount, ColumnCount).Select
Cells(RowCount, ColumnCount).Value = MyNumber

End Sub
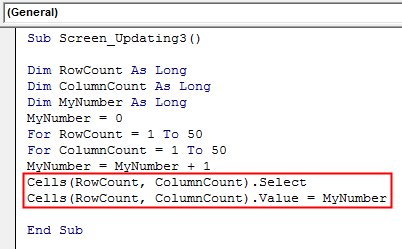
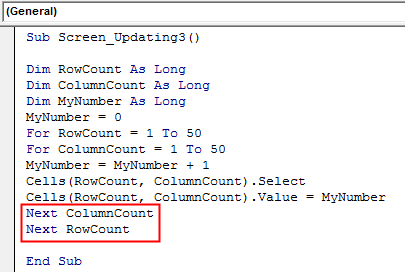
Step 8: Now close the Loop by Next. Include Row and Column variables which we defined and used in the For-Next loop.
Code:
Sub Screen_Updating3()

Dim RowCount As Long
Dim ColumnCount As Long
Dim MyNumber As Long
MyNumber = 0
For RowCount = 1 To 50
For ColumnCount = 1 To 50
MyNumber = MyNumber + 1
Cells(RowCount, ColumnCount).Select
Cells(RowCount, ColumnCount).Value = MyNumber
Next ColumnCount
Next RowCount

End Sub
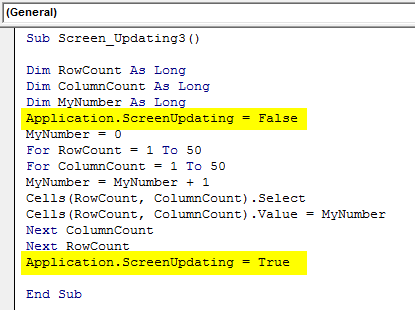
Step 9: Now we haven’t inserted the Screenupdating application yet. Now insert the Screenupdating application as FALSE before the start of the loop and as TRUE at the end of the loop as shown below.
Code:
Sub Screen_Updating3()

Dim RowCount As Long
Dim ColumnCount As Long
Dim MyNumber As Long
Application.ScreenUpdating = False
MyNumber = 0
For RowCount = 1 To 50
For ColumnCount = 1 To 50
MyNumber = MyNumber + 1
Cells(RowCount, ColumnCount).Select
Cells(RowCount, ColumnCount).Value = MyNumber
Next ColumnCount
Next RowCount
Application.ScreenUpdating = True

End Sub
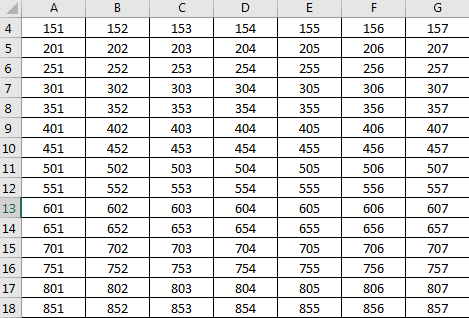
Now compile the complete code step by step by pressing the F8 function key and then run it if no error is found. We will see, how each cell of selected rows and columns is getting updated with the values stored in it.
Pros of Excel VBA ScreenUpdating
- It is quite helpful in seeing how the screen is getting updated with the value stored in the loop.
- We can use Screenupdating if we want to switch between worksheets and workbooks.
- We can use any range of numbers.
Things to Remember
- We use the insert For-Next loop as the frame or first, we can satisfy the condition of For loop and then close it by Next.
- VBA ScreenUpdating is quite useful and visible if we are using a huge set of numbers.
- Once done, do save the excel file as Macro enables excel format.
- VBA ScreenUpdating can also be used for creating a macro through which we can send emails.
Recommended Articles
This is a guide to VBA ScreenUpdating. Here we discuss how to use ScreenUpdating application in Excel VBA along with practical examples and downloadable excel template. You can also go through our other suggested articles –
- VBA IF Statements
- VBA Sort
- VBA While Loop
- VBA Environ
Определяет, обновляется ли экран (перерисовка) во время ряда действий. Для чтения и записи.
выражение. ScreenUpdating
выражение: переменная, представляющая объект Application.
Используйте свойство ScreenUpdating для повышения производительности во время ряда действий. Например, можно отключить обновление экрана при создании ряда фигур, чтобы экран не перерисовывался после появления каждой фигуры. Затем можно включить обновление экрана, чтобы обновить экран.
Если вы отправляете большое количество команд в экземпляр Microsoft Visio во время отключения обновления экрана, экземпляр Visio может иногда перезаписывать экран, чтобы очистить его буферы.
Если программа не включает обновление экрана после его выключения, экземпляр Visio снова включает обновление экрана, когда пользователь выполняет операцию.
Свойства ShowChanges и ScreenUpdating похожи тем, что оба они предназначены для повышения производительности во время ряда действий, но работают по-разному. Задание свойства ShowChanges также задает свойство ScreenUpdating , но задание свойства ScreenUpdating не задает свойство ShowChanges . Сравнение этих двух свойств см. в свойстве ShowChanges .
В этом фрагменте кода Microsoft Visual Basic показано, как использовать свойство ScreenUpdating .
Есть вопросы или отзывы, касающиеся Office VBA или этой статьи? Руководство по другим способам получения поддержки и отправки отзывов см. в статье Поддержка Office VBA и обратная связь.
Если во время кода все же нужно пересчитывать какие-то диапазоны, то можно пересчитывать только их:
если печать производится внутри кода, то эту строку желательно вставить сразу после строки, выводящей лист на печать(при условии, что печать не происходит в цикле. В этом случае — по завершению цикла печати).
Я советую всегда отключать разбиение на страницы, т.к. это может тормозить весьма значительно, т.к. заставляет при любом изменении на листах обращаться к принтеру и переопределять кол-во и размер печатных страниц. А это порой очень не быстро.
На всякий случай можно отключить отображение информации в строке статуса Excel (в каких случаях там вообще отображается информация и зачем можно узнать в статье: Отобразить процесс выполнения). Хоть это и не сильно поедает ресурсы — иногда может все же ускорить работу кода:
Главное, что следует помнить — все эти свойства необходимо включить обратно после работы кода . Иначе могут быть проблемы с работой внутри Excel. Например, если забыть включить автопересчет формул — большинство формул будут пересчитывать исключительно принудительным методом — после нажатия сочетания клавиш Shift + F9 . А если забыть отключить обновление экрана — то есть шанс заблокировать себе возможность работы на листах и книгах. Хотя по умолчанию свойство ScreenUpdating и должно возвращаться в True, если было отключено внутри процедуры — лучше не надеяться на это и привыкать возвращать все свойства на свои места принудительно. По сути все это сведется к нескольким строкам:
‘Возвращаем обновление экрана Application.ScreenUpdating = True ‘Возвращаем автопересчет формул Application.Calculation = xlCalculationAutomatic ‘Включаем отслеживание событий Application.EnableEvents = True
Как такой код выглядит на практике. Предположим, надо записать в цикле в 10 000 строк значения:
Sub TestOptimize() ‘отключаем обновление экрана Application.ScreenUpdating = False ‘Отключаем автопересчет формул Application.Calculation = xlCalculationManual ‘Отключаем отслеживание событий Application.EnableEvents = False ‘Отключаем разбиение на печатные страницы ActiveWorkbook.ActiveSheet.DisplayPageBreaks = False ‘Непосредственно код заполнения ячеек Dim lr As Long For lr = 1 To 10000 Cells(lr, 1).Value = lr ‘для примера просто пронумеруем строки Next ‘Возвращаем обновление экрана Application.ScreenUpdating = True ‘Возвращаем автопересчет формул Application.Calculation = xlCalculationAutomatic ‘Включаем отслеживание событий Application.EnableEvents = True End Sub
Разрывы печатных страниц можно не возвращать — они тормозят работу в любом случае.
Следует избегать циклов, вроде Do While для поиска последней ячейки . Часто такую ошибку совершают начинающие. Куда эффективнее и быстрее вычислять последнюю ячейку на всем листе или в конкретном столбце без этого тормозного цикла Do While. Я обычно использую
другие варианты определения последней ячейки я детально описывал в статье: Как определить последнюю ячейку на листе через VBA?
Для более опытных пользователей VBA я приведу несколько решений по оптимизации кодов в различных ситуациях:
Sub TestOptimize_Array() ‘Непосредственно код заполнения ячеек Dim arr, lr As Long ‘запоминаем в массив одним махом все значения 10000 строк первого столбца arr = Cells(1, 1).Resize(10000).Value ‘если нужно заполнение для двух и более столбцов ‘arr = Cells(1, 1).Resize(10000, 2).Value ‘или ‘arr = Range(Cells(1, 1),Cells(10000, 2)).Value ‘или автоматически вычисляем последнюю ячейку и заносим в массив данные, начиная с ячейки А3 ‘llastr = Cells(Rows.Count, 1).End(xlUp).Row ‘последняя ячейка столбца А ‘arr = Range(Cells(3, 1),Cells(llastr, 2)).Value For lr = 1 To 10000 arr(lr,1) = lr ‘заполняем массив порядковыми номерами Next ‘Выгружаем обработанный массив обратно на лист в те же ячейки Cells(1, 1).Resize(10000).Value = arr End Sub
Но здесь следует учитывать и тот момент, что большие массивы могут просто вызвать переполнение памяти. Наиболее актуально это для 32-битных систем, где на VBA и Excel выделяется памяти меньше, чем в 64-битных системах
Dim rRange as Object, wsSh as Object
будет медленнее работать, чем:
Dim rRange as Range, wsSh as Worksheet
Причина в том, что при объявлении As Object мы не даем VBA практически никакой информации о типе данных, кроме того, что это какой-то объект. И VBA приходится «на лету» внутри кода при каждом обращении к такой переменной определять её конкретный тип(Range, Worksheet, Workbook, Chart и т.д.). Что опять же занимает время.
Если работаете с массивами, то можно при объявлении указать это явно:
Такая инициализация происходит быстрее.
А еще лучше будет при этом еще и тип данных сразу присвоить:
Dim arr() as string, arr2() as long
но это только если есть уверенность в том, что в массив будут заноситься строго указанные типы данных
Конечно, это не все приемы и решения для оптимизации. Но на первых парах должно хватить. Плюс, всегда следует исходить из здравого смысла . Например, если код выполняется за 2 секунды, то вероятно нет смысла его дальше оптимизировать. Конечно, если этот код не из тех, которые просто изменяют значение одной-двух ячеек.
Статья помогла? Поделись ссылкой с друзьями!
Источник
VBA Screen Updating Property


Excel VBA Screen Updating
VBA Screen Updating is a property used to avoid or prevent distraction flashes while running the code and make it fast by turning off screen updating. We can turn off the screen updating by setting this property as “False.”
We often feel the Excel screen going crazy while the Macro is running. We almost get frustrated by that. But, how do we deal with these situations and make the code run faster than the usual slow thing?
Screen Updating is something we can notice while the excel macro Excel Macro A macro in excel is a series of instructions in the form of code that helps automate manual tasks, thereby saving time. Excel executes those instructions in a step-by-step manner on the given data. For example, it can be used to automate repetitive tasks such as summation, cell formatting, information copying, etc. thereby rapidly replacing repetitious operations with a few clicks. read more is running. When the task is executing, we notice our screen updating the values until the Macro finishes its assigned task. As our screen flickers or refreshes, it leads to the slowdown of the Excel program and takes a longer time than usual to complete the task.
In VBA, we have a property called “ScreenUpdating,” we set this property to FALSE to eliminate the screen updating process while the code runs.
This article will say goodbye to watching on-screen action drama while the code is running. Instead, today you will make your code run faster and quicker than your usual time.
Table of contents
You are free to use this image on your website, templates, etc., Please provide us with an attribution link How to Provide Attribution? Article Link to be Hyperlinked
For eg:
Source: VBA Screen Updating Property (wallstreetmojo.com)
When to use Screen Updating Feature?
Suppose you have any doubt about when to use this technique. Then, look into the below points.
How to use the Screen Updating Feature in VBA Code?
Example #1 – Turn Off Screen Updating
Look at the below code.
Code:
The above has a nested VBA loop VBA Loop A VBA loop in excel is an instruction to run a code or repeat an action multiple times. read more to insert serial numbers from the first column to the 50th column and again to insert serial numbers starting from 51 from the second row to the 50th column.
Like this, it will insert until it reaches the 50th row.
While this code is running, you can notice your screen flickering. You cannot do anything apart from watching this crazy moment.
To avoid all of these, we can add Screen Updating to FALSE.
To access the Screen Updating feature, first, we need to access the Application object.
As we can see with the Application object, we have many properties and methods. So, select “Screen Updating” from the IntelliSense list.
Note: You must apply the Screen Updating feature immediately after declaring the variables.
After selecting the Screen Updating property, put an equal sign (=).
As we can see, there are two Boolean values: FALSE and TRUE.
To stop screen updating, set the status to FALSE.
As the Macro starts running first, it will update the screen, updating the status to FALSE, and proceed to the next line.
Since Macro executed Screen Updating to FALSE, it will not allow the screen to update while the code is executing its task.
Example #2 –
Always Set Screen Updating to TRUE at the End
We have seen many people set the Screen Updating to FALSE but forgot to set it back to TRUE at the end of the Macro.
Always set the Screen Updating back to TRUE at the end of the Macro.
Источник
VBA ScreenUpdating — Использование приложения ScreenUpdating в Excel VBA

Excel VBA ScreenUpdating
Когда мы запускаем любой макрос VBA с огромным набором кода, код завершается, но в фоновом режиме мы получаем обработку данных в виде запуска или ожидания указателя. И как только это будет сделано, мы сможем увидеть только результат. Обычный способ не является правильным способом увидеть, как значения обновляются при запуске кода. Например, допустим, мы написали код для генерации нескольких чисел в 100 ячеек. Теперь этот код может просто генерировать вывод, не показывая, как печатаются числа. Чтобы решить эту проблему, у нас есть VBA ScreenUpdating . Обновление экрана в VBA помогает нам увидеть, как код генерирует вывод. Это могут быть цифры, текст, алфавиты или комбинации. Как только мы запустим цикл кода, с помощью VBA ScreenUpdating мы сможем увидеть генерируемые числа.
Как использовать приложение ScreenUpdating в Excel VBA?
Мы узнаем, как использовать приложение ScreenUpdating в Excel с помощью кода VBA.
Вы можете скачать этот шаблон VBA ScreenUpdating Excel здесь — VBA ScreenUpdating Шаблон Excel
VBA ScreenUpdating можно заметить, пока мы запускаем код или макрос. Пока код работает, мы сможем увидеть, как наш экран обновляется значениями, сгенерированными написанным кодом в VBA. Вместо того, чтобы видеть старый знак ожидания, с помощью VBA ScreenUpdating мы можем видеть, как экран обновляет значения вывода с помощью VBA ScreenUpdating. Теперь мы видим, что само название статьи определяет ее работу, VBA ScreenUpdating .
VBA ScreenUpdating — Пример № 1
В этом примере мы увидим простой код для обновления экрана. Для этого нам понадобятся несколько ячеек с номерами, как показано ниже. Для этого выполните следующие шаги:

Шаг 1. Откройте модуль на вкладке меню «Вставка», как показано ниже.

Шаг 2: Теперь напишите подпроцедуру под именем VBA ScreenUpdating, как показано ниже.
Код:

Шаг 3: Теперь мы скопируем числа из ячейки A1: A3 во все остальные ячейки. Предположим, что ячейка будет C1: C3 с помощью приведенного ниже кода.
Код:

Шаг 4: Теперь, если мы запустим этот код, мы сможем получить только выходные данные, скопированные значения из столбца A в C. Теперь мы будем использовать приложение ScreenUpdating, как показано ниже.
Код:

Шаг 5: Мы ставим знак равенства, чтобы выбрать логические значения ИСТИНА или ЛОЖЬ. Мы выберем ЛОЖЬ, чтобы остановить обновление экрана.
Код:

Шаг 6: Запустите код, нажав клавишу F5 или нажав кнопку воспроизведения, расположенную под лентой меню. Мы увидим, что значения копируются из столбца А в С.

Это можно было бы увидеть более четко, если бы у нас был огромный набор чисел.
VBA ScreenUpdating — пример № 2
Давайте посмотрим еще один пример для ScreenUpdating. На этот раз давайте рассмотрим число от 1 до 20 от ячейки A1 до A20, как показано ниже.

Для использования приложения обновления экрана, выполните следующие действия:
Шаг 1: Напишите подпроцедуру VBA Screenupdating, как показано ниже.
Код:

Шаг 2: Теперь напишите код, чтобы выбрать ячейку диапазона от A1 до A20, и скопируйте их с B1 до F20, как показано ниже. Подобным образом, как мы видели в примере-1.
Код:

Шаг 3: Чтобы применить приложение для обновления экрана, мы снова будем использовать аналогичную строку кода, которую мы видели в примере-1.
Код:

Вышеупомянутое приложение ScreenUpdating как FALSE позволит нам увидеть, как код VBA обновляет экран. Чем больше у нас чисел, тем больше шансов, что мы увидим обновление экрана.
Шаг 4: Запустите код, нажав клавишу F5 или нажав кнопку воспроизведения. Мы могли видеть, как значение обновляется.

VBA ScreenUpdating — Пример № 3
Существует еще один способ обновления экрана. Это можно сделать с помощью цикла For-Next. В этом примере мы будем печатать числа в комбинированной матрице строк и столбцов. Для этого выполните следующие шаги:
Шаг 1: Напишите подпроцедуру VBA ScreenUpdating.
Код:

Шаг 2: Теперь объявите 2 переменные для Row и Columns отдельно как тип данных Long.
Код:

Шаг 3: Теперь объявите другую переменную, которую мы будем использовать как ссылку для начала чисел.
Код:

Шаг 4: Теперь дайте ссылочный номер, с какой позиции мы хотим начать отсчет. Здесь мы даем это как 0.
Код:

Шаг 5: Теперь откройте цикл For и укажите количество столбцов и строк, которые хотят видеть обновления. Скажем, от 1 до 50.
Код:

Шаг 6: Чтобы продолжить цикл, присвойте переменной MyNumber +1.
Код:

Шаг 7: Теперь выберите переменные Row и Column в функции Cell. А затем выберите значения, хранящиеся в них, и назначьте их переменной MyNumber.
Код:

Шаг 8: Теперь закройте цикл по следующему. Включите переменные Row и Column, которые мы определили и использовали в цикле For-Next.
Код:

Шаг 9: Теперь мы еще не вставили приложение Screenupdating. Теперь вставьте приложение Screenupdating как FALSE перед началом цикла и как TRUE в конце цикла, как показано ниже.
Код:

Теперь скомпилируйте полный код шаг за шагом, нажав функциональную клавишу F8, а затем запустите его, если ошибок не обнаружено. Посмотрим, как обновляется каждая ячейка выбранных строк и столбцов с сохраненными в ней значениями.

Плюсы Excel VBA ScreenUpdating
- Это очень полезно, чтобы увидеть, как экран обновляется со значением, хранящимся в цикле.
- Мы можем использовать Screenupdating, если мы хотим переключаться между рабочими листами и рабочими книгами.
- Мы можем использовать любой диапазон номеров.
То, что нужно запомнить
- Мы используем цикл вставки For-Next в качестве фрейма или сначала, мы можем удовлетворить условие цикла For и затем закрыть его с помощью Next.
- VBA ScreenUpdating весьма полезен и виден, если мы используем огромный набор чисел.
- После этого сохраните файл Excel, так как макрос разрешает формат Excel.
- VBA ScreenUpdating также можно использовать для создания макроса, с помощью которого мы можем отправлять электронные письма.
Рекомендуемые статьи
Это руководство по VBA ScreenUpdating. Здесь мы обсудим, как использовать приложение ScreenUpdating в Excel VBA вместе с практическими примерами и загружаемым шаблоном Excel. Вы также можете просмотреть наши другие предлагаемые статьи —
- Коллекция VBA (Примеры)
- VBA IF Заявления | Шаблоны Excel
- Как использовать функцию сортировки Excel VBA?
- VBA While Loop (Примеры с шаблоном Excel)
- VBA Environ
Источник

Ok! This one is important.
Any good VBA procedure always has this line mentioned at the beginning.
Application.Screenupdating=FALSE
And before the end of the procedure you will see this line too.
Application.Screenupdating=TRUE
What is ScreenUpdating?
Screenupdating is the property of application objects in VBA. It can be set to TRUE or FALSE. It is like a switch, that can be turned On or Off.
And What Does it Do?
The first line speed ups the macro processing by stopping real time screen updating of Excel.
If you have a long macro that writes into different sheets, applies filters, removes filters, changes sheets, saves workbooks, etc. And if you haven’t turned off screen updates using the line Application.Screenupdating=FALSE, then you will see the flickering on screen. Each and every change done by macro in the workbook will be shown dynamically. This slows down the macro speed.
And If you have this line at the beginning of macro, excel will not reflect changes done by macro until screenupdating is turned on using the line Application.Screenupdating=TRUE.
If you want to speed up your macro, disable the screen update at the beginning of subroutine and enable the screen update before the end of subroutine.
Here’s one Example:
Sub Screencheck()
 Application.Screenupdating=FALSE 'Disabling the screen updating.
 Sheet1.Activate
 Range("A1").value ="Hi"
 Range("A2").value ="How are you?"
 Range("A3").value ="Exceltip is amazing, isn't it?"
 Sheet2.Activate
 Application.Screenupdating= TRUE 'Enabling the screen updating.
End Sub
When you run the above sub you will not see any screen flickering. You will see the final result of work done by this macro.
Important Notes:
Make sure that you enable the screen update before your procedure ends. If you don’t enable the screen update, you will not be able to see the work done by the macro.
Unable screen updating before every Exit Sub and End Sub command. It is common to forget enabling screen updates before Exit Sub. If you don’t do this, you may keep wondering why your code didn’t work. But in reality, it did. You just can’t see it.
That’s it. This is what Application.Screenupdating = False does in VBA. This one line of code changes a lot. It is the difference between mature programming and careless programming. If you want to speed up your macro, always use this line in your code.
I hope this was helpful to you. If you have any doubts regarding this article or have any other Excel/VBA related questions, feel free to ask in the comments section below. I’ll be happy to help.
Related Articles:
What is the difference Between ByRef and ByVal Arguments? :This is an important VBA Question. The ByVal and ByRef are used to pass arguments differently. One lets the change be made in the original variable while the other does not alter the original variable.
How To Loop Through Sheets In Excel Using VBA : While automating the usual boring tasks of excel in VBA, you’ll get the need to loop through each sheet. Let’s start with an example. VBA Code to Loop in all sheets in Activeworkbook and print sheet Name
Events in Excel VBA: Sometimes we want something to happen automatically when a certain event occurs. To do something when a specific event happens in Excel, we use Excel VBA event
Popular Articles:
50 Excel Shortcuts to Increase Your Productivity | Get faster at your task. These 50 shortcuts will make you work even faster on Excel.
The VLOOKUP Function in Excel | This is one of the most used and popular functions of excel that is used to lookup value from different ranges and sheets.
COUNTIF in Excel 2016 | Count values with conditions using this amazing function. You don’t need to filter your data to count specific values. Countif function is essential to prepare your dashboard.
How to Use SUMIF Function in Excel | This is another dashboard essential function. This helps you sum up values on specific conditions.