
If you are an absolute beginner with Microsoft Word, the screen can be very confusing.
In this post you’ll be given an express tour of the Word screen, shown the key components to look out for and introduced to the ‘lingo’ (terminology) that is used.
Clickable Table of Contents
1. What does Microsoft Word do?
Word is a powerful tool that allows you to create and manipulate business or personal documents. Whether you need a one-page letter, a 200-page report or want to create a fun flyer or newsletter, Word provides the tools you need.
You can format text by changing attributes like the style, the size and the colour. You can emphasise text by making it bold, italic (slanted) or by underlining it.
You may change the spacing and positioning of the text or add a header or footer which appears on every page.
Spelling mistakes can be easily identified, then rectified.
When you are comfortable with the basics, you can convert a solid page of text into several columns of text (like a newspaper), add pictures, diagrams or drawings, create tables of data, make cross-references to other parts of the document, add a table of contents or build a back-of-book index. Some of this is covered in this course. The more advanced features are not.
Because of its versatility, ease of use and functionality, Microsoft Word is the program of choice for individuals, small businesses and large companies across the world.
2. Key components of the Word screen
» Bird’s eye view
The annotated screenshot provides a birds eye view of the Word screen. Each of these components are broken down and explained in the next section.

» Quick Access Toolbar (QAT)
")
The Quick Access Toolbar sits in the top-left corner of the Word screen. It contains one-click access to features that YOU might use often and avoids the need to hunt down a tool amongst all the toolbars that are available.
The default icons are Autosave (on or off), Save, Undo and Redo, but you can add your own icons to suit the way you work.
» The command centre
At the top of the Microsoft Word screen is the command centre, a large array of tools that give you access to everything Microsoft Word has to offer.
The command centre comprises tabs, ribbons, command groups and commands (icons).
» Tabs and ribbons
Every Word tool is organised into TABS and RIBBONS. Each ribbon can be selected by clicking its TAB.
Each ribbon has groups of related tools that follow a particular theme or purpose.
The HOME RIBBON contains the most commonly used tools, whatever level you’re at. This is true of every program.

The next tab, INSERT contains commands for inserting different elements into the document, such as tables, pictures and other graphic objects.

Another tab, LAYOUT, contains commands for setting up the printed page, such as the paper size, margin sizes and page orientation.

You get the idea.
You’ll learn how to use some of these commands as you go through this course.
As a beginner, most of what you need is on the HOME TAB/RIBBON, so you shouldn’t have to venture too much further to find what you need.
» Command groups and commands (icons)
Commands (icons) are organised into groups. Group names appear at the bottom of the ribbon and are separated by vertical dividers.
Command groups contain a collection of related tools.
If you look at the HOME RIBBON, you’ll see command groups called Clipboard, Font, Paragraph, Styles, Editing and Add-Ins.
Faint vertical dividers are used to separate each command group.

On the HOME RIBBON, the FONT group contains options to change the font, font size and colour, set bold, italic and underline, and more.

» How screen size affects the commands you see
Icons can be different sizes and may or may not has a text description next to them.
For example, the PASTE icon (right) is large while the CUT, COPY and FORMAT PAINTER are small.

Microsoft Word uses smart technology to detect what size screen you are using and adapts the icons to best fit the size of your screen.
If you are using a big screen (e.g. a 27” or 32″ monitor), then there is adequate space to display icons at their full size.
However, if you are using a laptop or tablet device which has a small screen then the icons will be compacted to fit the space, and some may also lose their text descriptor.
» Screen tips
A screen tip is a floating box that appears when you hover over a command icon.
It tells you the function of the icon, i.e. what will happen when you click the icon.

» The printed page
The white page is laid out against a light-grey background, a bit like placing a blank page on a table top.
A large monitor often has the space to display the whole of an A4 vertical page on the screen. Sometimes you can display 2, 3 or more full-size pages side-by side on one screen.
On laptops or smaller screens, you will only see the top section of the page and you need to scroll down with your mouse to see the rest of the page.
A flashing vertical marker indicates where text will appear when you start typing

» Rulers, measurements and margin areas
A vertical ruler is displayed down the left side of the page and a horizontal ruler is displayed across the top of the page.
Measurements can be displayed using the metric system (cm) or the old imperial system (inches).
The grey section of the rulers show the margin area. These sections of the page cannot be typed into unless you are specifically editing the header or footer
To turn the ruler on or off:
1. Single-left-click the VIEW tab.
2. Tick the RULER tick box to show the ruler
3. Untick the RULER tick box to hide the ruler.

» Status bar
At the bottom of the Word window is the STATUS BAR.
![]()
The left side of the status bar can display all kinds of information about your document.
The example above shows the section number (chapter), page number, total number of pages, the word count, a spell check icon and the language used for the spell checker.
» 3 view icons
On the right side of the status bar, there are 3 view icons. The middle icon is the only one you’ll need as a beginner.
![]()
» Zoom / magnification
In the bottom-right corner of the Word window is the ZOOM control.
To change the magnification of your document
![]()
- Either single-left-click the – or + at each end of the slider …
- Or click-and-drag the slider left or right
Changing the zoom percentage DOES NOT change the size of the text when you print out your document. It simply allows you to get a closer look or pull out for a bird’s eye view.
» Sign in
In the top-right corner of your Word window is a SIGN IN button. This will sign you into your Office 365 account so you can change your settings, if needed.
 let's you sign in to your Microsoft Office account")
» Ribbon display options
Also, in the top-right-corner of your Word window are the RIBBON DISPLAY OPTIONS icon.
Single-left-click the icon to display 3 options.

The default option is option 3: SHOW TABS AND COMMANDS. You can see all the tabs and the currently selected ribbon

The second option, SHOW TABS, only hides the RIBBON while you are editing your document.
To display the ribbon again, single-left-click a TAB. But remember, when you click back on your document, the ribbon will be hidden again

The third option: AUTO-HIDE RIBBON hides the tab row and the ribbon as well as the title bar and the status bar at the bottom of the screen to give you the most possible screen space for your document content.
This is useful is you are working on a small screen

To redisplay the tabs and ribbons
1. Move the mouse pointer to the top edge of the screen until the blue Word title bar appears.
2. Single-left-click the blue bar.
3. Single-left-click either SHOW TABS or SHOW TABS AND COMMANDS.
3. All the key points again
- Word is a program (app) for creating everything from single-page documents to reports, flyers or full-length books.
- The Quick AccessToolbar (QAT) provides one click access to the tools that you use the most.
- At the top of the screen is the command centre. Commands (icons) are organised into command groups. Word will adapt the size of the commands and command groups to fit the screen space available.
- There are a number of ribbons that contain related groups of commands. Each ribbon has a specific purpose or theme. Each ribbon has a tab which you can click to select the ribbon.
- The RULER displays metric or imperial measurements. The grey section of the rulers indicates un-editable areas as defined by the margin sizes for the document.
- The STATUS BAR at the bottom of the Word window provides information about the document, 3 different view icons and the zoom/magnification slider.
- At the top-right of the Word window is the SIGN IN button (for Office 365) and the RIBBON DISPLAY OPTIONS icons which has 3 display settings – Hide Tabs and Commands, Show Tabs and Show Tabs and Commands. The last option is the default setting.
- Hover over any command icon to see a screen tip which tells you the function of the icon.
4. What Next?
I hope you found plenty of value in this post. I’d love to hear your biggest takeaway in the comments below together with any questions you may have.
Have a fantastic day.


About the author
Jason Morrell
Jason loves to simplify the hard stuff, cut the fluff and share what actually works. Things that make a difference. Things that slash hours from your daily work tasks. He runs a software training business in Queensland, Australia, lives on the Gold Coast with his wife and 4 kids and often talks about himself in the third person!
SHARE
Full screen mode used to exist in the really old versions of Microsoft Word. It allowed you to use up the entire screen of your computer to view your documents. However, in the newer versions of Word, the feature is missing and you won’t find the option to make Word full screen.
The question is, has the option really been removed and is there really no way to make Word go full screen on your computer?
Luckily, there’s still a way. Even though the option has been removed from the Word interface, the feature somehow still seems to exist and lets you use the old full-screen layout of Word. Since it’s hidden from the main options, you’re going to have to find a way to enable it and add it to a menu from where you can easily access it.
There are actually multiple ways to activate full-screen mode in newer versions of Microsoft Word.
Use a Keyboard Shortcut To View Word Full Screen
One of the quickest and easiest ways to make your latest version of Word go full screen is to use a keyboard shortcut. Although the option has been removed from the interface, the keyboard shortcut for it continues to work and does the exact task it’s supposed to do.
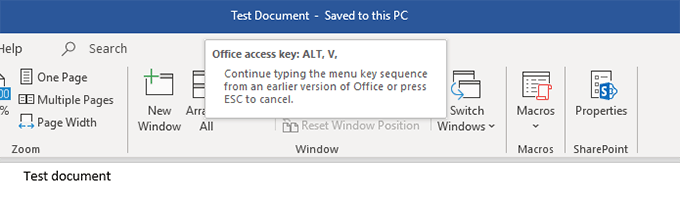
While you’re viewing a document in the normal mode and you want to make it full-screen, simply press the Alt + V keys at the same time on your keyboard. Then immediately press the U button on your keyboard and your document takes up your entire screen.
When you want to return to the normal mode, press the Esc key and you’ll be back to where you were.
Enable Word Full Screen From The Quick Access Toolbar
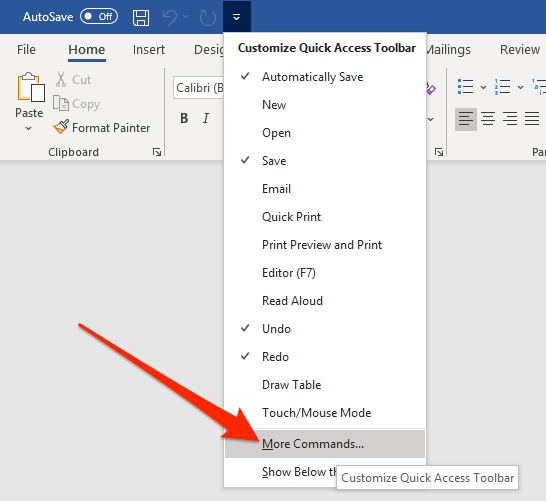
You may have noticed that there’s a small toolbar at the very top of your Word screen. It’s called the Quick Access toolbar, and as the name suggests, it lets you quickly access some of Word’s features on your machine.
You can actually use the toolbar to make Word full screen. There’s a command that you can add to the toolbar which then when clicked, opens your document in full-screen mode.
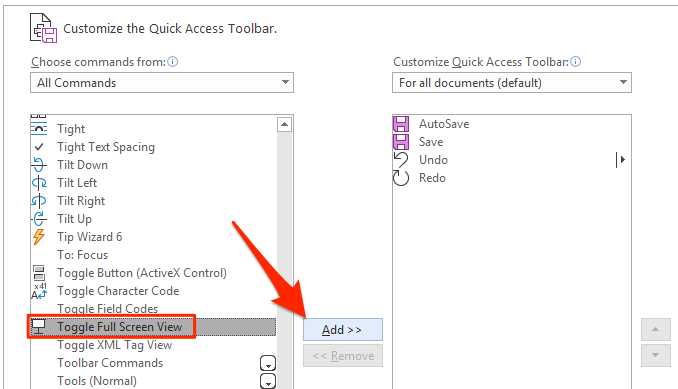
- Click on the small down-arrow icon in the Quick Access toolbar and a menu will open on your screen. Select the option that says More Commands from this newly opened menu.
- The following screen lists the commands you can add to the toolbar but it doesn’t show all the commands by default. To make it show all available commands, select All Commands from the Choose commands from the dropdown menu.
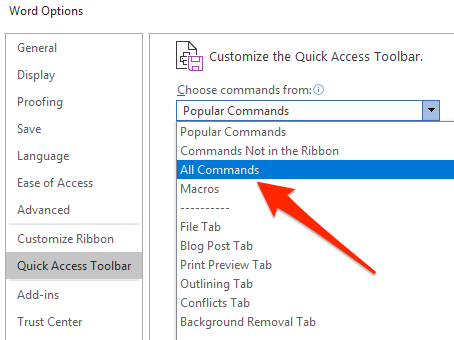
- When all the commands are shown on your screen, look for the command that says Toggle Full Screen View. Click on it to select it and then click on the Add button to add the command to your toolbar.
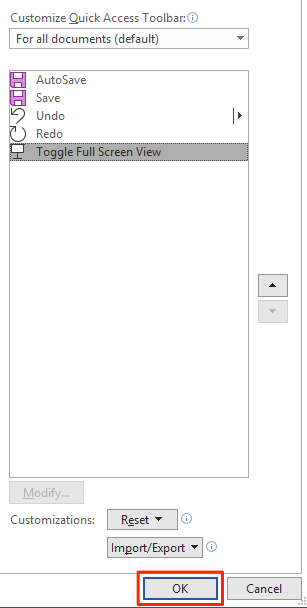
- When it’s added to your toolbar, you’ll see it in the right-hand side commands list. Click on the OK button at the bottom to save your changes.
- You’ll now find a new icon appearing in your Quick Access toolbar. Click on the icon and it’ll open your current document in full-screen mode.
- When you want to exit full-screen, just press Esc on your keyboard.
The icon for full-screen mode will continue to be there in your toolbar for all of your documents. If you ever want to remove it, you can do so by opening the pane you used to add the command, selecting the command in the right-hand side pane, and clicking Remove.
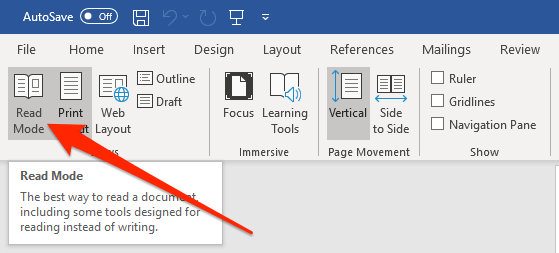
Make Word Full Screen Using The Read Mode
The Word full screen reading view may not be exactly a full-screen solution for your documents but it does the job to some extent. It hides many of your formatting toolbars and other items from your screen letting you focus on the document on your screen.
You are going to see some of the options at the top, though, which can’t be removed in this mode.
To access the read mode in MS Word, click on the View menu while your document is open and select the Read Mode option.
To switch back to the normal mode, press the Esc key on your keyboard. You’ll be back to the normal editing screen with all the toolbars on it.
Create a Customizable Keyboard Shortcut For Word Full Screen Mode
If you don’t want to use the default keyboard shortcut for Word full screen mode and you’d rather create your own, you can do so by using Macro in Word.
A Macro is a set of actions that are performed when you trigger the macro. You don’t really need to know much about it to be able to create a full-screen shortcut for Word, though.
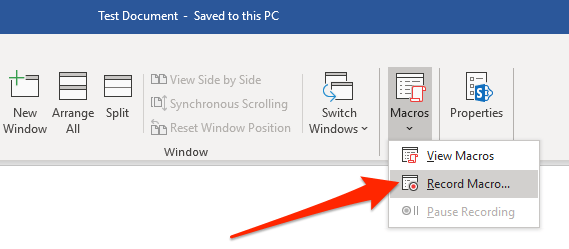
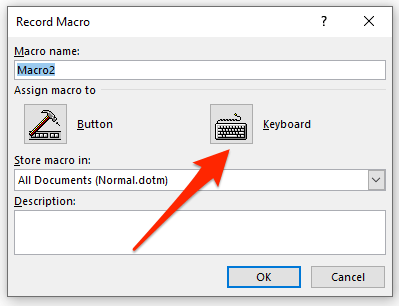
- Open your document in MS Word, click on the View tab at the top, click on the down-arrow icon under Macros, and select Record Macro.
- Enter any value in the Macro name field. Then click on Keyboard in the Assign macro to section so you can assign a keyboard shortcut to your macro.
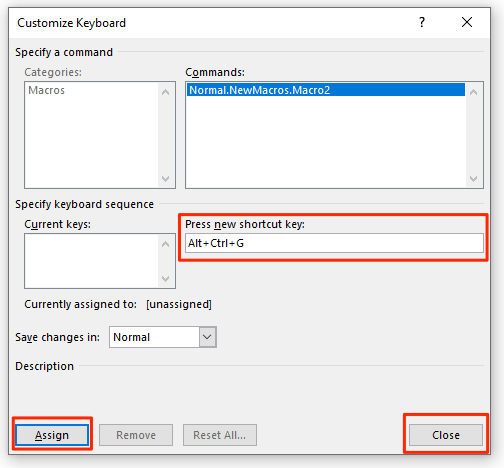
- Once you click on Keyboard, you’ll see a new dialog box on your screen. Put your cursor in the Press new shortcut key field and press the keyboard shortcut that you want to assign to the full-screen mode. Click on Assign followed by Close to save your changes.
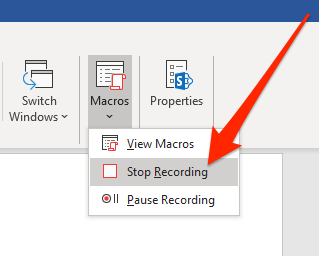
- Press Alt + V on your keyboard. Then click on the down-arrow icon in the Macros option in your toolbar and select Stop Recording.
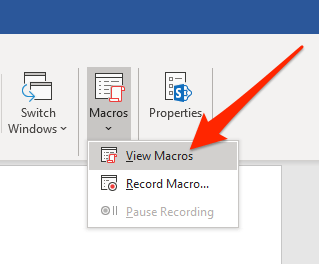
- Click on the Macros down-arrow again and select View Macros.
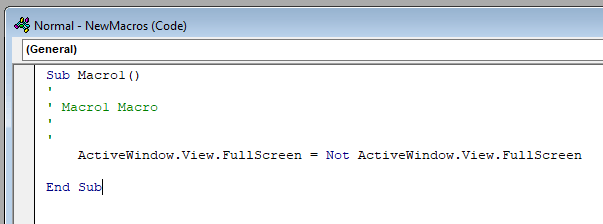
- Choose your macro in the list and click the Edit button.
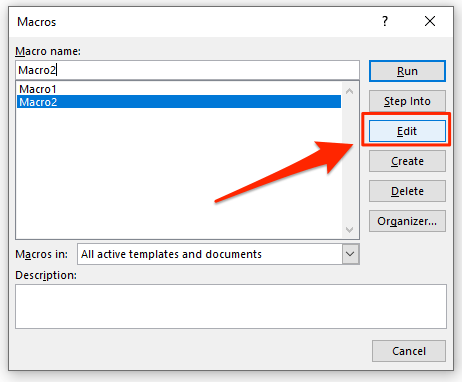
- Make sure your macro only contains the following code. You can copy and paste the following code in your macro if you want. Hit Ctrl + S to save changes.
Sub Macro1()
'
' Macro1 Macro
'
'
    ActiveWindow.View.FullScreen = Not ActiveWindow.View.FullScreen
End Sub
From now on, whenever you press your custom keyboard shortcut in Word, it’ll launch your document in full-screen mode.
Word for Microsoft 365 Word 2021 Word 2019 Word 2016 Word 2013 Word 2010 More…Less
This article presents basic concepts in Microsoft Word to help new users get started in creating sophisticated, professional-looking documents.
-
Click the Start button
 or press the Windows key on your keyboard to display the Start menu.
 -
In the list of applications, find Word and click it. The startup screen appears and Word starts.
Tip: The first time you start Word, the Microsoft Software License Agreement might appear.
 or press the Windows key on your keyboard to display the Start menu.
To quit Word, click the x button  in the upper-right corner of your screen.
If you made any changes since you last saved the document, a message box appears asking if you want to save changes. To save the changes, click Yes. To quit without saving the changes, click No. If you clicked the x button by mistake, click Cancel.
Top of Page
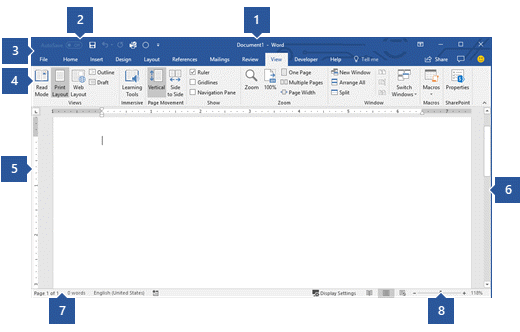
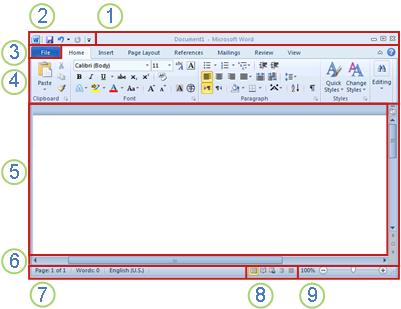
1 Title Bar: Displays the file name of the document that is being edited and the name of the software you are using. It also includes the standard Minimize, Restore, and Close buttons.
2 Quick Access Toolbar: Commands that are frequently used, such as Save, Undo, and Redo are located here. At the end of the Quick Access Toolbar is a pull-down menu where you can add other commonly used or commonly needed commands.
3 File Tab: Click this button to find commands that act on the document itself rather than the content of the document, such as New, Open, Save as, Print, and Close.
4 Ribbon: Commands needed for your work are located here. The appearance of the Ribbon will change depending on the size of your monitor. Word will compress the ribbon by changing the arrangement of the controls to accommodate smaller monitors.
5 Edit Window: Shows the contents of the document you are editing.
6 Scroll Bar: Lets you change the display position of the document you are editing.
7 Status Bar: Displays information about the document you are editing.
8 Zoom slide control: Lets you change the zoom settings of the document you are editing.
Top of Page
In Word, you must save your document so you can quit the program without losing your work. When you save the document, it is stored as a file on your computer or in a network location. Later, you can open the file, change it, and print it.
To save a document, do the following:
-
Click the Save button in the Quick Access toolbar. The Save As window appears.
-
Choose a location where you want to save the document and enter a file name in the File name box. To change the file name, type in a new file name.
-
Click Save.
You can open a Word document to resume your work. To open a document, do the following:
-
Open File Explorer, and click Documents. A list of documents appears.
-
If the document you want to work on is on the list, click the file name to open the document. If the document isn’t on the list, navigate to the location where you stored your file, and double-click the file. The Word startup screen appears, and then the document is displayed.
Tip: You can also open a document from within Word by clicking the File tab and then clicking Open. To open a document you saved recently, click Recent.
Top of Page
Before you edit or format text, you must first select the text. Follow the steps below to select text.
-
Place the curser at the beginning of the text you’d like to edit or format and then press the left mouse button.
-
While holding down the left mouse button, move it to the right (called “dragging”) to select the text. A background color is added in the location of the selected text to indicate the selection range.
You can find most text formatting tools by clicking the Home tab and then choosing from the Font group.
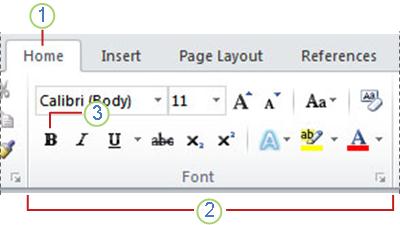
1 This is the Home tab.
2 This is the Font group on the Home tab.
3 This is the Bold button. See the table below for the names and functions of all the buttons in the Font group.
|
Button |
Name |
Function |
|---|---|---|
|
|
Font |
Changes the font. |
|
|
Font Size |
Changes the size of the text. |
|
|
Grow Font |
Increases the text size. |
|
|
Shrink Font |
Decreases the text size. |
|
|
Change Case |
Change all the selected text to uppercase, lowercase, or other common capitalizations. |
|
|
Clear Formatting |
Clears all formatting for the selected text, leaving only the plain text. |
|
|
Bold |
Makes the selected text bold. |
|
|
Italic |
Italicizes the selected text. |
|
|
Underline |
Draws a line under the selected text. Click the dropdown arrow to select the type of underline. |
|
|
Strikethrough |
Draws a line through the middle of selected text. |
|
|
Subscript |
Creates subscript characters. |
|
|
Superscript |
Creates superscript characters. |
|
|
Text Effects |
Apply a visual effect to selected text, such as shadow, glow, or reflection. |
|
|
Text Highlight Color |
Makes text look like it was marked with a highlighter pen. |
|
|
Font Color |
Changes the text color. |


Top of Page
Styles allow you to quickly format major elements in your document, such as headings, titles, and subtitles. Follow the steps below to apply styles to the text in your document.
-
Highlight the text you want to change.
-
On the Home tab in the Styles group, pause the pointer over any style to see a live preview directly in your document. To see the complete list of styles, click the More arrow to open the Styles pane.
-
To apply the style that’s most appropriate for your text, just click it.
When you’re done applying styles to the individual elements, Word lets you use a style set to change the look of your whole document all at once.
-
On the Design tab, in the Document Formatting group, choose one of the predefined style sets, such as Basic or Casual. Pause the pointer over any style set to see a live preview directly in your document. To see more predefined style sets, click the down arrow on the right side of the Document Formatting group.
-
To apply the style set that’s most appropriate for your text, just click it.
Top of Page
With Word, you can easily change the spacing between lines and paragraphs in your document.
-
On the Design tab, click Paragraph Spacing to see a drop-down list of paragraph spacing options. Pause the pointer over any paragraph spacing style to see a live preview directly in your document.
-
When you find the look you want, click it.
Tip: To define your own paragraph spacing, choose Custom Paragraph Spacing.
Top of Page
It’s easy to preview what the layout of your document will look like when printed without actually printing.
-
Click the File tab.
-
Click Print to see a preview of your document.
-
Review the Settings for any properties you might want to change.
-
When the properties for your printer and document appear the way that you want them to, click Print.

Top of Page
To use Word, look for the Word icon in the Start menu and click it.
-
Click the Start button
to display the Start menu. -
Point to All Programs, Microsoft Office, and then clickMicrosoft Word 2010.
-
The startup screen appears, and Word starts.
 to display the Start menu.
Tip: The first time you start Word, the Microsoft Software License Agreement might appear.
To quit, choose the Exit command on the File tab.
-
Click the File tab.
-
Choose Exit.
If you made any changes since you last saved the document, a message box appears asking if you want to save changes. To save the changes, click Yes. To quit without saving the changes, click No. If you clicked the Exit button by mistake, click Cancel.
Top of Page
1 Title Bar: Displays the file name of the document that is being edited and the name of the software you are using. It also includes the standard Minimize, Restore, and Close buttons.
2 Quick Access Toolbar: Commands that are frequently used, such as Save, Undo, and Redo are located here. At the end of the Quick Access Toolbar is a pull-down menu where you can add other commonly used or commonly needed commands.
3 File Tab: Click this button to find commands that act on the document itself rather than the content of the document, such as New, Open, Save as, Print, and Close.
4 Ribbon: Commands needed for your work are located here. The appearance of the Ribbon will change depending on the size of your monitor. Word will compress the ribbon by changing the arrangement of the controls to accommodate smaller monitors.
5 Edit Window: Shows the contents of the document you are editing.
6 Scroll Bar: Lets you change the display position of the document you are editing.
7 Status Bar: Displays information about the document you are editing.
8 View Buttons: Lets you change the display mode of the document you are editing to fit your needs.
9 Zoom slide control: Lets you change the zoom settings of the document you are editing.
Top of Page
In Word, you must save your document so you can quit the program without losing your work. When you save the document, it is stored as a file on your computer. Later, you can open the file, change it, and print it.
To save a document, do the following:
-
Click the Save button in the Quick Access toolbar.
-
Specify the location where you want to save the document in the Save in box. The first time you save your document, the first line of text in the document is pre-filled in as the file name in the File name box. To change the file name, type in a new file name.
-
Click Save.
-
The document is saved as a file. The file name in the Title Bar changes to reflect the saved file name.
You can open a Word document to resume your work. To open a document, do the following:
-
Click the Start button, and then click Documents.
-
Navigate to the location where you stored your file, and double-click the file. The Word startup screen appears, and then the document is displayed.
Tip: You can also open a document from within Word by clicking the File tab and then clicking Open. To open a document you saved recently, click on Recent
.
Top of Page
Before you edit or format text, you must first select the text. Follow the steps below to select text.
-
Place the curser at the beginning of the text you’d like to edit or format and then press the left mouse button.
-
While holding down the left mouse button, move it to the right (called “dragging”) to select the text. A background color is added in the location of the selected text to indicate the selection range.
Most text formatting tools are found by clicking the Home tab and then choosing from the Font group.
1 This is the Home tab.
2 This is the Font group on the Home tab.
3 This is the Bold button. See the table below for the names and functions of all the buttons in the Font group.
|
Button |
Name |
Function |
|---|---|---|
|
|
Font |
Changes the font. |
|
|
Font Size |
Changes the size of the text. |
|
|
Grow Font |
Increases the text size. |
|
|
Shrink Font |
Decreases the text size. |
|
|
Change Case |
Change all the selected text to uppercase, lowercase, or other common capitalizations. |
|
|
Clear Formatting |
Clears all formatting for the selected text, leaving only the plain text. |
|
|
Bold |
Makes the selected text bold. |
|
|
Italic |
Italicizes the selected text. |
|
|
Underline |
Draws a line under the selected text. Click the dropdown arrow to select the type of underline. |
|
|
Strikethrough |
Draws a line through the middle of selected text. |
|
|
Subscript |
Creates subscript characters. |
|
|
Superscript |
Creates superscript characters. |
|
|
Text Effects |
Apply a visual effect to selected text, such as shadow, glow, or reflection. |
|
|
Text Highlight Color |
Makes text look like it was marked with a highlighter pen. |
|
|
Font Color |
Changes the text color. |
Top of Page
Styles allow you to quickly format major elements in your document, such as headings, titles, and subtitles. Follow the steps below to apply styles to the text in your document.
-
Highlight the text you want to change.
-
On the Home tab in the Styles group, pause the pointer over any style to see a live preview directly in your document.
-
To apply the style that’s most appropriate for your text, just click it.
When you’re done applying styles to the individual elements, Word 2010 lets you change the look of your whole document all at once.
-
On the Home tab, in the Styles group, click Change Styles.
-
Point to Style Set to find predefined style sets. Pause the pointer over any style set to see a live preview directly in your document.
-
When you find the look you want, click it.
Top of Page
With Word 2010, you can easily change the spacing between lines and paragraphs in your document.
-
On the Home tab, in the Styles group, click Change Styles.
-
Point to Paragraph Spacing to find a selection of built-in paragraph spacing styles. Pause the pointer over any paragraph spacing style to see a live preview directly in your document.
-
When you find the look you want, click it.
Tip: To define your own paragraph spacing, choose Custom Paragraph Spacing.
Top of Page
It’s easy to preview what the layout of your document will look like when printed without actually printing.
-
Click the File tab.
-
Click Print to see a preview of your document.
-
Review the Settings for any properties you might want to change.
-
When the properties for your printer and document appear the way that you want them to, click Print.
Top of Page
Need more help?
Want more options?
Explore subscription benefits, browse training courses, learn how to secure your device, and more.
Communities help you ask and answer questions, give feedback, and hear from experts with rich knowledge.

1. Office Button – Click the Office
Button to find a drop down menu containing options, such as: open, save, and
print. Also shows previously opened
files, which you may choose to “pin” them to make them “permanent”
choices.
2. Ribbon – The Ribbon is the
strip of buttons and icons located above the work area in Word 2007. The Ribbon
replaces the menus and toolbars found
in earlier versions of Word. Each ribbon contains groups of command
buttons with common purpose. Each
ribbon contains 7 tabs.
3. Tab Selector
button –
You can easily set tab stops by clicking on the desired position on the ruler.
This button
allows you to determine which type of
tab will be set left aligned , right aligned , center aligned or
decimal tab . Clicking on this button
will allow you to change the tab style.
4. Rulers – Gives you an idea
of where you are on the page
5. Document – This is what you
are typing/what will print out
6. Status Bar – This row can be
customized by right-clicking and selecting desired options. Desired options may
include page number/number of total
page, word count, insert/overtype mode, caps lock, and zoom slide.
7. Task Bar – Shows open
programs.
8. View Shortcuts – These four buttons
allow you to change the way you view your document on the screen. From
left to right they are: print layout,
full screen reading, web layout and draft. These can be added/removed by right
clicking anywhere on the status bar
and checking/unchecking View shortcuts.
9. Zoom Slide – Allows you to
increase/decrease the amount of the document you see on the screen.
10. View Ruler Button
–
Allows you to view/hide the rulers.
11. Screen Split
Button –
At the top of the vertical scroll bar is a new button. Just below the double
arrow is a tiny
button that looks like a minus sign
that lets you split your screen in two when double-clicked. Double-clicking it
a
second time will unsplit your screen.
12. Scroll Bars – Allows you to view
entire workbook by moving it up, down (vertical scroll bar), left or right
(horizontal
scroll bar).
13. Right Indent – Slide this triangle
to the left of the margin to limit the right side of a paragraph to that point.
Move
the triangle to the right of the
margin to allow the right side of the paragraph to extend beyond the margin.
The
triangle at the margin will keep the
right side of the paragraph with the margin.
14. Group – Command buttons
with a common purpose are clustered together. Each ribbon contains several
groups.
Some groups, but not all, contain a
quick launch bar (dialogue box launcher) in the bottom right hand corner.
15. Quick Launch
Bar/Dialogue Box Launcher – It
is the arrow in the bottom right hand corner of some
groups. When clicked, it will bring up
a dialog box where additional options/changes can be entered.
16. Title Bar – Shows name of
program and open document. Also contains minimize, maximize and close buttons.
17. Quick Access
Toolbar –
This customizable toolbar allows you to add frequently used commands. Click on
the
down arrow at the end of the toolbar
to add/remove command buttons – or — right-click on any command button
and choose Add to Quick Access
Toolbar.
18. Tab – The ribbon is
broken down into 7 tabs. Each tab has a common purpose and consists of several
groups. To
select a tab, simply click on it and
the appropriate groups will be displayed.
19. First Line Indent
–
This triangle controls where the first line of a paragraph begins. Moved to the
left of the
margin, will allow the first paragraph
to be in the left margin. Can be moved to the right of the margin to indent
your paragraph. THIS IS NOT SETTING
TABS!
20. Hanging Indent – The opposite of a
first line indent. It is often moved to the right of the first line indent,
which
allows the remaining lines of a paragraph to be indented
according to placement of the triangle.
In this article, you will learn the different parts of Microsoft Word Windows 2019. This is a lesson – 03 of Microsoft Word. You may also read previous lessons to learn the complete Microsoft Word.
Microsoft Word is application software for writing texts, and different types of documents can be easily developed in a practical way.
In other words, it is a word processor that allows you to create and edit text. As long as you know what the parts of Microsoft Word are and what they are used for. With this software, the user will be able to write and design texts where they will be able to use different fonts, colors, and sizes, with the different commands of Word.
In this section, we will make references to the basic parts of Microsoft Word Windows 2019. This program is a part of the Microsoft Office package developed by Microsoft. Along with other programs, there is a number of visual appearances and program window layout that can make the work easier. Let’s understand the basic parts of Microsoft Word Windows 2019.
In the below screenshot, you can see and learn about the various important parts of Microsoft Word Windows. If you learn the name of these parts then you will be used easily MS word application.

Quick Access Toolbar:
This bar is one of the most important parts of Microsoft Word Windows 2019. It is also located at the top of the screen, in the left corner just above the File Tab. It is the place for the most frequently used commands. You can customize this Toolbar by clicking the little arrow that displays some more commands such as “New” which refers to opening a new document, “Open” which implies displaying a document that we have saved on our computer, “Undo” reverse the previous action or “Redo” do the action again, and “Save” to save the current document.
Title bar:
The title bar is also one of the parts of the Microsoft Word window. It is located at the center and top of the document window and shows the name of the program or document. There, when we open a Microsoft Word document, we can read the title as Document1 – Word. It refers to a general name displayed by the program software. When we save our document, we can replace that name with a personalized one related to our file.
In this bar, on the right side, there are three more buttons known as window controls. It allows to perform of three commands i.e., minimize, maximize, and close the document or file.
The 1st is the “X” icon that is used to close the window of the Microsoft Word document we are working on. And the 02nd component is a double box icon which is located in the center of the previous ones and used to maximize or enlarge the document. The 03rd icon is a dash “_” used to minimize the document we are working on.
File Tab:
In Microsoft Word 2019, the File tab replaces the Microsoft Office button from Word 2007. Microsoft Office button is the circular button that is located in some operating systems at the bottom and in others at the top, on the left side. You can click it to see the backstage view. In this tab, where you can see the previously opened or saved files, create a new document, print a document, and do other operations.
Ribbon of Microsoft Word:
The Ribbon is one of the basic parts of Microsoft Word widow and contains organized commands in three layers.
- Tabs or Menu: These are the horizontal menu that appears at the top of the Ribbon and contain groups of related commands, i.e., File, Home, Insert, Design, Layout, References, Mailings, Review, View, and Help are examples of ribbon tabs.
- Groups: These are the organized related commands displayed below each tab or menu. The name of each group appears below the group on the Ribbon. For example, a group of commands related to a paragraph or a group of commands related to the font, etc.
- Commands: Commands appear within each group as mentioned above. For example, when we press the “File” tab, some commands or functions such as “New”, “Open” “Save”, “Save as” etc. are displayed.
Rulers:
Microsoft Word has two rulers – one is a horizontal ruler and the second is a vertical ruler. The horizontal ruler seems just under the Ribbon. It is used to set the size of the margins and tab stop position of the document. The vertical ruler appears on the left side of the document window and is used to measure the vertical position of elements on the page.
Scrollbar:
It is one of the parts of MS Word widow, which is characterized by being a long bar that is generally located on the right side of the document. It consists of an open bar containing an arrow that allows the user to scroll up and down more quickly.
Help icon:
The Help Icon can be used to find online-related queries. This provides helpful tutorials on various functions and commands related to MS word.
Zoom Control Buttons:
The zoom slider allows you to resize the document to view it according to the user’s requirements. It allows you to zoom in or zoom out from 0% to 500% wide range. The zoom controls consist of a slider that you can slide left (zoom in) or right (zoom out); you can also click the plus or minus sign buttons to increase or minus decrease the zoom factor.
View Buttons:
It is a group of buttons located to the left of the Zoom control, and near the bottom of the screen. It lets you switch the various Word document views.
- Print Layout view− This view displays pages exactly as they will show in print.
- Read Mode− This displays a full-screen view of the document.
- Web Layout − This displays a document view that appears on a Web browser, such as Internet Explorer.
- Outline view− This lets you display your document in outline form. For this view, we will first create using Word’s standard heading styles.
- Draft view− This displays only the text of your document as it appears on the printed page. No headers and footers are shown in this view.
Document or Work Area:
If we open MS Word on the computer then we can see different parts of the MS Word window on the screen. The document or work area is the area where we can type documents, letters, memos, or simply communication will be developed. The vertical flashing bar is called Cursor and the insertion point represents the location where text can write. It is generally white and can see when we open the MS Word application. These allow giving width and flexibility to the document.
Status Bar:
It is located at the bottom of the document and displays the information related to the word document. From left to right, it shows the total number of pages, word count, language, translator, error notifications, and sections among other information.
In this bar, we can visualize the document we are working on in five ways, e.g. print layout, full-screen reading, web layout, and outline view.
Dialog Box Launcher:
We can see a small arrow in the lower-right corner of many groups on the Ribbon that display some commands. By clicking this arrow, the downward window will open that provides more options about the group.