
Excel for Microsoft 365 Excel 2021 Excel 2019 Excel 2016 Excel 2013 More…Less
When you have multiple worksheets in an Excel workbook, you might want to save only one worksheet as its own workbook. Use the Move or Copy function to save one worksheet in Excel 2013 or Excel 2016.
Save a single worksheet
-
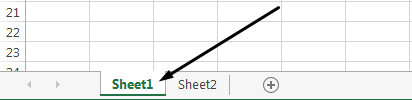
Right-click the worksheet name tab.

-
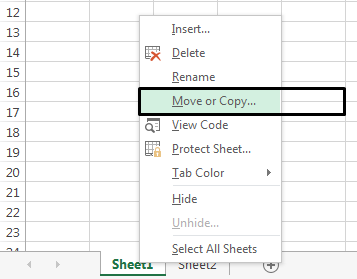
Click select Move or Copy.
-
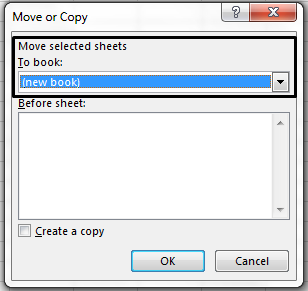
Click on the Move selected sheets to Book drop-down menu. Select (new book).
-
Click OK. Your new workbook opens with your moved worksheet.
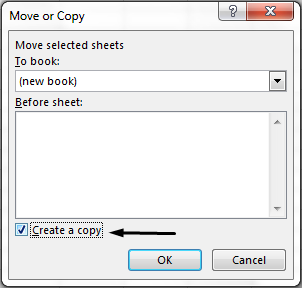
Note: This process moves your worksheet from the original workbook. If you want to keep your worksheet in both workbooks, in the Move or Copy dialog box, select the check box for Create a copy.
-
Click File > Save in your new workbook.
Tip: You can also save your Excel workbook with the keyboard shortcut, Ctrl + S.
Need more help?
Save a single worksheet
- Right-click the worksheet name tab.
- Click select Move or Copy.
- Click on the Move selected sheets to Book drop-down menu. Select (new book).
- Click OK. Your new workbook opens with your moved worksheet.
- Click File > Save in your new workbook.
Contents
- 1 How do I save separate Excel sheets as separate files?
- 2 How do I save one sheet in Excel as a PDF?
- 3 How do you save individual worksheets?
- 4 How do I save just the first page of an Excel workbook?
- 5 How do I save one sheet in Excel as a CSV?
- 6 How do I share just one sheet in Excel?
- 7 What’s the best format to save Excel files?
- 8 How do I save multiple Excel sheets as one PDF?
- 9 How do I separate sheets in Excel Online?
- 10 How do I save just one page of numbers?
- 11 What is an ODS file?
- 12 How do I save or export each sheet to separate CSV files in Excel?
- 13 How do I grant access to an Excel spreadsheet?
- 14 Should I save as XLS or XLSX?
- 15 How do you save Excel in XLS format?
- 16 How do I save all sheets in Excel?
- 17 How do I separate sections in Excel?
- 18 How do I separate text in Excel?
- 19 What is slicer in Excel?
- 20 How do I export pages?
How do I save separate Excel sheets as separate files?
Split a workbook to separate Excel Files with Move or Copy feature
- Select the sheets in the Sheet tab bar, right click, and select Move or Copy from the context menu.
- In the Move or Copy dialog, select (new book) from the To book drop down list, check the Create a copy option, and click the OK button.
How do I save one sheet in Excel as a PDF?
Save Excel Worksheets as PDF Files.
- Come to the worksheet that you need to save as PDF.
- Click the tab “File” in the ribbon.
- And then click the option “Save As”.
- Next in the “Save As” window, choose the path where you need to save.
- And then edit the name for the new file.
- Now choose the “PDF” in the “Save as type” part.
How do you save individual worksheets?
Step 1: Select the worksheet names in tab bar. You can select multiple with holding down Ctrl key or shift key. Step 2: Right click the worksheet name, and click the Move or Copy from context menu. Step 3: In Move or Copy dialog box, select the (new book) item from the drop down list of Move selected sheets to book.
How do I save just the first page of an Excel workbook?
You can do as follows.
- Right click on the sheet tab (the worksheet you need to save as new file) in the sheet tab bar, then click Move or Copy.
- In the Move or Copy dialog box, select (new book) from the To book drop-down list, check the Create a copy box, and then click the OK button.
How do I save one sheet in Excel as a CSV?
Save a workbook to text format (. txt or . csv)
- Open the workbook you want to save.
- Click File > Save As.
- Pick the place where you want to save the workbook.
- In the Save As dialog box, navigate to the location you want.
- Click the arrow in the Save as type box and pick the type of text or CSV file format you want.
Here are the steps:
- Right-click on the sheet that you want to send and select Move or Copy.
- In the Move or Copy dialogue box, select (new book) under the To book drop down.
- Click OK.
- With the newly created workbook activated, click on Send to Mail Recipient icon from the Quick Access Toolbar.
What’s the best format to save Excel files?
Most of the time you use the XLSX format: It’s save (can’t store malicious code), has the maximum number of rows and columns and is best known. XLSX is available since Excel 2007 and replaces the old XLS file type. It uses the open XML standard so which is documented well.
How do I save multiple Excel sheets as one PDF?
If you have multiple worksheets and want to save all of them in the same PDF file, click Options in the Save As dialog box. The Options dialog box will appear. Select Entire workbook, then click OK.
How do I separate sheets in Excel Online?
How to split Excel
- Open your browser in Excel free application web site and go to Splitter tool app.
- Click inside the file drop area to upload a Excel file or drag & drop a Excel file.
- Click on “SPLIT” button, file will be automatically uploaded to split.
How do I save just one page of numbers?
Within Numbers, select File from the Menu Bar. Select Export To and then select Excel from the menu. On the Export Your Spreadsheet screen, select to save Excel Worksheets either as One per sheet or One per table. Select Next.
What is an ODS file?
Files with . ods extension stand for OpenDocument Spreadsheet Document format that are editable by user. Data is stored inside ODF file into rows and columns.ODS files can also be converted into other spreadsheet formats as well like XLS, XLSX and others by different applications.
How do I save or export each sheet to separate CSV files in Excel?
Save, export or convert multiple/all sheets to csv or text file with Kutools for Excel
- Click Kutools Plus > Workbook > Split Workbook. See screenshot:
- In the Split Workbook dialog box: 1).
- In the Browse For Folder dialog box, specify a folder to save the exported files, and then click the OK button.
How do I grant access to an Excel spreadsheet?
First open the Excel file by double-clicking the file. Then go to the Review tab in the Excel ribbon and click the Share workbook button. When the user do this for the first time, the user can get this trust center message about privacy settings on the document.
Should I save as XLS or XLSX?
The underlying file format is what makes the main difference between the XLS and XLSX files.Data is arranged in an XLS file as binary streams in the form of a compound file as described in [MS-XLS]. In contrast, an XLSX file is based on Office Open XML format that stores data in compressed XML files in ZIP format.
How do you save Excel in XLS format?
Click File > Export > Change File Type. Under Workbook File Types, double-click Excel 97-2003 Workbook (*. xls). In the Save As popup window, choose a folder location for the workbook.
How do I save all sheets in Excel?
(1) Holding the Ctrl key, you can select multiple nonadjacent worksheets in the Sheet Tab bar by selecting them one by one. (2) Holding the Shift key, you can select multiple adjacent worksheets in the Sheet Tab bar by selecting the first one and the last one. 2. Click the File (or Office button) > Save As.
How do I separate sections in Excel?
To split a worksheet:
- Select the cell where you want to split the worksheet.
- Click the View tab on the Ribbon, then select the Split command.
- The workbook will be split into different panes.
- After creating a split, you can click and drag the vertical and horizontal dividers to change the size of each section.
How do I separate text in Excel?
Try it!
- Select the cell or column that contains the text you want to split.
- Select Data > Text to Columns.
- In the Convert Text to Columns Wizard, select Delimited > Next.
- Select the Delimiters for your data.
- Select Next.
- Select the Destination in your worksheet which is where you want the split data to appear.
What is slicer in Excel?
Slicers provide buttons that you can click to filter tables, or PivotTables. In addition to quick filtering, slicers also indicate the current filtering state, which makes it easy to understand what exactly is currently displayed. WindowsmacOSWeb. You can use a slicer to filter data in a table or PivotTable with ease.
How do I export pages?
Pages for Mac: Export a Pages document to PDF or another file format*
- Open the document, then choose File > Export To > [file format] (from the File menu at the top of your screen).
- Specify export settings, which differ depending on the file type:
- Click Next, then type a name for the document.
See all How-To Articles
This tutorial demonstrates how to save just one sheet in Excel and Google Sheets.
Save a Single Sheet
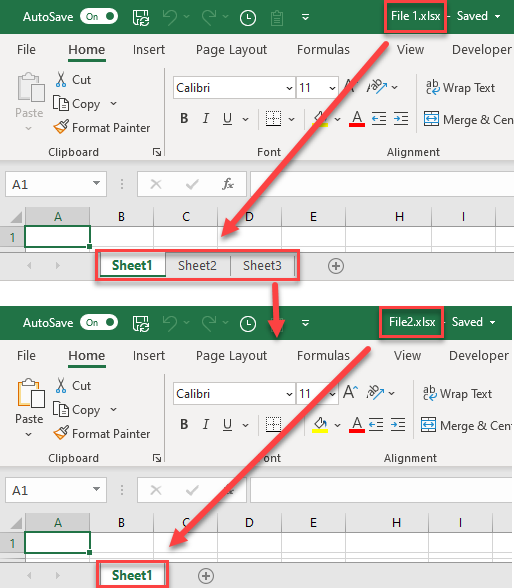
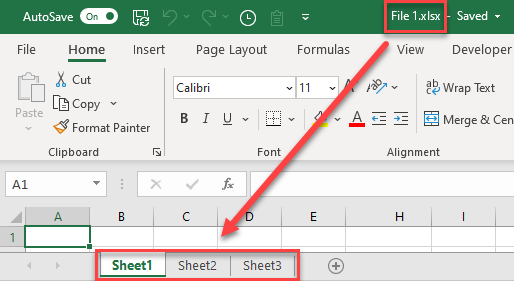
In case when you have a workbook with multiple sheets, you may need to save only one sheet in a separate Excel file. Say you have a file (File 1.xlsx) with three worksheets.
To save just one sheet (Sheet1) in the separate workbook, follow these steps:
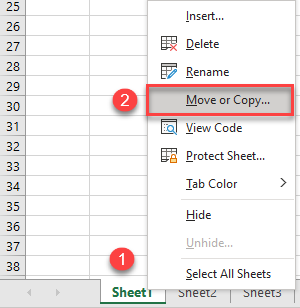
- First, copy the sheet to a new workbook. Right-click the sheet tab (Sheet1, in this example), and choose Move or Copy…
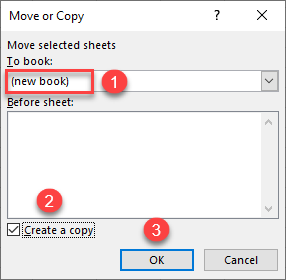
- In the Move or Copy window, choose (new book) from the To book drop-down, check Create a copy, and click OK.
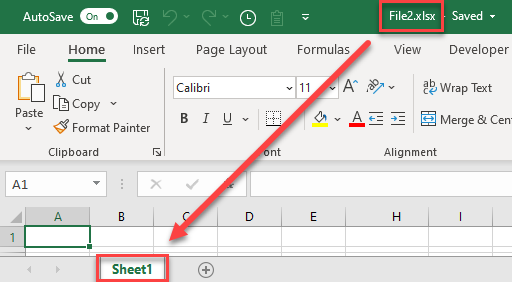
A new workbook opens with the default name Book1, containing only the sheet that you copied – Sheet1.

- Now, save the workbook. To do that, in the Ribbon, press the Save icon (or use the keyboard shortcut CTRL + S).
![]()
- Browse a folder, give your file a name (e.g., File2.xlsx), and click Save.
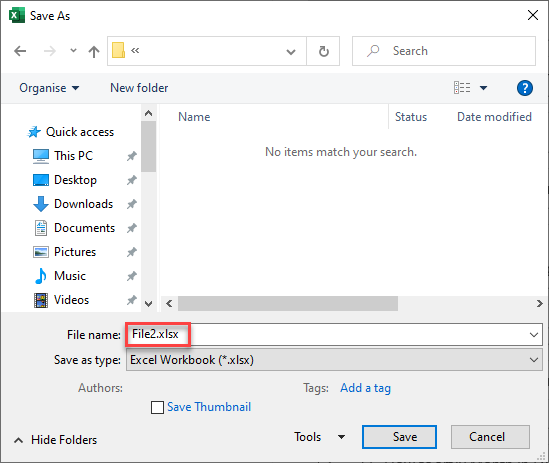
Finally, a single sheet from the first file is saved in the second file.
See also…
- VBA Copy Worksheet to New Workbook
- Copy Multiple Sheets to New Workbook
- How to Split Sheets
Save One Sheet in Google Sheets
As in Excel, you can also save just one sheet in Google Sheets.
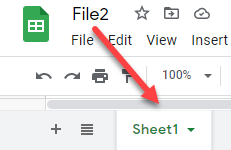
- In your initial Google Sheets file with multiple sheets (File1), click on the arrow on the sheet tab that you want to save (Sheet1), then choose Copy to > New spreadsheet.

- You’ll get a message that the sheet was copied; click Open spreadsheet to open it.

Name the new Google Sheets file (File2). The new file has only one sheet that you copied.
Содержание
- How to Save Just One Sheet in Excel & Google Sheets
- Save a Single Sheet
- See also…
- Save One Sheet in Google Sheets
- How to copy and move sheets in Excel
- How to copy a sheet in Excel
- Method 1. Copy Excel sheet by dragging
- Method 2. Duplicate a sheet by right-clicking
- Method 3. Copy a tab in Excel using the ribbon
- How to copy Excel sheet to another workbook
- How to copy a sheet to another workbook by dragging
- How to copy multiple sheets in Excel
- How to copy Excel sheet with formulas
- Copy information from one Excel sheet to another using formula
- How to duplicate an Excel sheet using VBA
- How to move sheets in Excel
- Move a sheet by dragging it
- Move a sheet via Move or Copy dialog
- Workbook Manager — quick way to move and copy sheets in Excel
- Move or copy sheet in Excel not working
- 1. Excel table
- 2. Protected workbook
- 3. Excel names
How to Save Just One Sheet in Excel & Google Sheets
This tutorial demonstrates how to save just one sheet in Excel and Google Sheets.
Save a Single Sheet
In case when you have a workbook with multiple sheets, you may need to save only one sheet in a separate Excel file. Say you have a file (File 1.xlsx) with three worksheets.
To save just one sheet (Sheet1) in the separate workbook, follow these steps:
- First, copy the sheet to a new workbook. Right-click the sheet tab (Sheet1, in this example), and choose Move or Copy…
- In the Move or Copy window, choose (new book) from the To book drop-down, check Create a copy, and click OK.
A new workbook opens with the default name Book1, containing only the sheet that you copied – Sheet1.
- Now, save the workbook. To do that, in the Ribbon, press the Save icon (or use the keyboard shortcut CTRL + S).

- Browse a folder, give your file a name (e.g., File2.xlsx), and click Save.
Finally, a single sheet from the first file is saved in the second file.
See also…
Save One Sheet in Google Sheets
As in Excel, you can also save just one sheet in Google Sheets.
- In your initial Google Sheets file with multiple sheets (File1), click on the arrow on the sheet tab that you want to save (Sheet1), then choose Copy to > New spreadsheet.
- You’ll get a message that the sheet was copied; click Open spreadsheet to open it.
Name the new Google Sheets file (File2). The new file has only one sheet that you copied.
Источник
How to copy and move sheets in Excel
 by Svetlana Cheusheva, updated on March 16, 2023
The tutorial shares a few helpful secrets about copying and moving sheets in Excel.
There may be many situations when you need to create a new spreadsheet based on an existing one or move a tab from one Excel file to another. For example, you may want to back up an important worksheet or create several copies of the same sheet for testing purposes. Luckily, there exist a few easy and quick ways to duplicate sheets in Excel.
How to copy a sheet in Excel
Excel has three inbuilt routes to duplicate worksheets. Depending on your preferred working technique, you can use the ribbon, mouse or keyboard.
Method 1. Copy Excel sheet by dragging
Usually, you drag-and-drop to move something from one place to another. But this method also works for copying tabs and is, in truth, the fastest way to copy a sheet in Excel.
Simply, click on the sheet tab that you want to copy, hold the Ctrl key and drag the tab where you want it: 
Method 2. Duplicate a sheet by right-clicking
Here’s another way to duplicate a sheet in Excel that is just as easy:
- Right click on the tab and select Move or Copy from the context menu. This will open the Move or Copy dialog box.
- Under Before sheet, choose where you want to place the copy.
- Put a tick in the Create a copy box.
- Click OK.
For instance, that’s how you can make a copy of Sheet1 and place it before Sheet3: 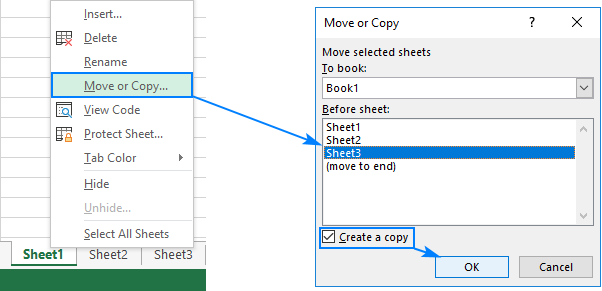
Method 3. Copy a tab in Excel using the ribbon
The ribbon contains all the features available in Excel, you just need to know where to look 🙂
To copy a sheet, go to the Home tab > Cells group, click Format, and then click Move or Copy Sheet: 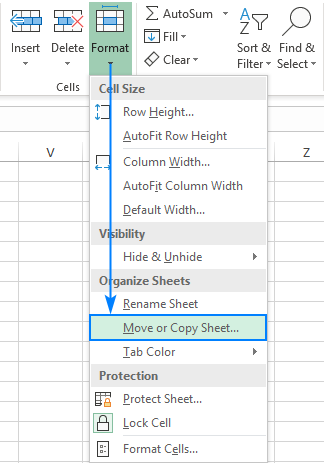
The Move or Copy dialog box appears, and you follow the same steps as described above.
How to copy Excel sheet to another workbook
The common way to copy a sheet to another workbook is this:
- Right click on the tab that you want to copy, and then click Move or Copy…
- In the Move or Copy dialog box, do the following:
- Under To book, choose the target file. To place a copy into a new workbook, select (new book).
- Under Before sheet, specify where to put the copy.
- Select the Create a copy box.
- Click OK.

Note. Excel displays only the open workbooks in the To book drop-down list, so be sure to open the destination file before copying.
Apart from this traditional route, there is one more way to do the same thing. Guess what, simply by dragging a sheet from one Excel file to another!
How to copy a sheet to another workbook by dragging
If Excel allows duplicating a sheet within the same workbook by dragging it, why not try to use this method for copying a sheet to a different workbook? We just need to view both files at the same time. Here’s how:
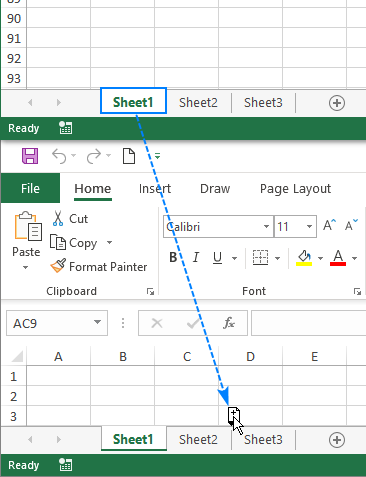
- Open the source and target workbooks.
- On the View tab, in the Windows group, click View Side by Side. This will arrange the two workbooks horizontally.
- In the source workbook, click the sheet tab you’d like to copy, hold down the Ctrl key and drag the sheet to the target workbook.
Awesome, isn’t it? The next time you need to copy information from one Excel file to another, forget about copy/pasting and drag the sheet.
How to copy multiple sheets in Excel
All the techniques that work for duplicating a single sheet can be used to copy multiple sheets. The key thing is to have several worksheets selected. Here’s how you can do this:
- To select adjacent sheets, click on the first sheet tab, press Shift , and click on the last tab.
- To select non-adjacent sheets, click on the first sheet tab, press Ctrl , and click the other tabs one by one.
With multiple worksheets selected, do one of the following to copy them:
- Click on any of the selected tabs, press Ctrl and drag the tabs to the desired position.
- Right-click any of the selected sheets and click Copy or Move. Then, carry out these steps.
- On the Home tab, click Format >Move or Copy Sheet. More details can be found here.
To copy multiple sheets to another workbook, select them as described above, and then follow one of these ways.
How to copy Excel sheet with formulas
Generally, you copy a sheet containing formulas like any other sheet. The formula references adjust automatically in a way that works just fine in most cases.
If a sheet with formulas is copied within the same workbook, the formulas will refer to copied sheet unless you use external cell references that point to another sheet or workbook. For example: 
If you copy a sheet with formulas to another workbook, the formula references behave in this way:
- References within the same worksheet, either relative or absolute, will point to the copied sheet in the destination workbook.
- References to other sheets in the original workbook will still point to the worksheets in the original workbook. In the screenshot below, please notice that the original file name [Book1] appears before the sheet name the third formula in the copied sheet:

For the copied formulas to refer to the sheet with the same name in the destination workbook, you can simply remove the original workbook name by using the Replace All feature of Excel. Here’s what you need to do:
- On the copied sheet, select all the formulas you want to change.
- Press Ctrl + H to open the Replace tab of the Find and Replace dialog.
- In the Find what box type the name of the original workbook exactly as it appears in your formulas. In our case, we’d type [Book1].
- Leave the Replace with box blank.
- Click Replace All.

As the result, the formula in the copied sheet will change from
Copy information from one Excel sheet to another using formula
In case you don’t want to copy the entire sheet, but only some part of it, select the range of interest and press Ctrl + C to copy it. Then switch to another sheet, select the upper-left cell of the destination range and press Ctrl + V to paste the copied range.
For the copied data to update automatically as soon as the original data changes, you can copy information from one Excel sheet to another by using formulas.
For example, to copy data from cell A1 in Sheet1 to cell B1 in Sheet2, enter this formula in B1:
To copy information from another Excel file, include the workbook name in square brackets:
If needed, drag the formula down or to the right to pull data from other cells.
Tip. To get a reference to another workbook right, type the equality sign (=), then switch to another workbook, click the desired cell, and press Enter. Excel will insert the reference for you automatically.
To copy data from several sheets into one, please see How to merge multiple sheets in Excel.
How to duplicate an Excel sheet using VBA
If you often need to copy information from one Excel sheet to another, macros can save you a lot of time. Here are just a few examples of tasks that can be performed automatically:
How to move sheets in Excel
Moving sheets in Excel is even easier than copying and can be done with the already familiar techniques.
Move a sheet by dragging it
To move a sheet(s) in Excel, you simply select one or more tabs and drag them to a new location.
For example, here’s how you can move Sheet1 and Sheet3 to the end of the workbook: 
To move a sheet to another workbook, place the workbooks side-by-side (View tab > View Side by Side) and then drag the sheet from one file to another.
Move a sheet via Move or Copy dialog
Open the Move or Copy dialog box either by right-clicking the sheet tab and selecting Move or Copy from the context menu or by clicking Home tab > Format > Move or Copy Sheet. Then, do one of the following:
- To move a sheet within the same workbook, choose before which sheet to place it and click OK.
- To move a sheet from one Excel file to another, select the workbook name from the To Book list, choose the «Before sheet» and click OK.

Note. If the destination file already contains a worksheet with the same name, Excel will add a number in brackets to the end of the moved sheet’s name. For example, Sheet 1 will become Sheet 1 (2).
Workbook Manager — quick way to move and copy sheets in Excel
If you often copy or move sheets from one Excel file to another, our Workbook Manager can make your life a lot easier.
Run the tool by clicking the Workbook Manager button on the Ablebits Data tab in the Manage group: 
Now, you have a tree-view of all open workbooks and can easily drag sheets between different files:
- To move a sheet or several selected sheets, drag them in the Workbook Manager window.
- To copy one or more sheets, drag them while holding the Ctrl key.
As you do this, the sheets in your workbooks are rearranged accordingly without you having to switch back and forth from one file to another. 
You are welcome to download a trial version of our Ultimate Suite to try this and 70+ more awesome tools for Excel.
Move or copy sheet in Excel not working
Usually Microsoft Excel copies and moves sheets without a hitch. If a certain worksheet refuses to be copied or moved, this may be because of the following reasons.
1. Excel table
You won’t be able to move or copy a group of sheets if one of those sheets contains an Excel table (vs. a range). Each such worksheet should be dealt with individually.
2. Protected workbook
Moving and copying sheets are not allowed in protected workbooks. To check if the workbook is protected, go to the Review tab > Protect group and have a look at the Protect Workbook button. If the button is highlighted, it means the workbook is protected. Click that button to unlock the workbook, and then move sheets.
3. Excel names
When copying or moving a sheet from one Excel file to another, you can get an error message that a certain name already exists, meaning the source and target workbooks contain a table or range with the same name. If it is just a single error, click Yes to use the existing version of the name, or No to rename it. In case of multiple errors, it makes sense to review all the names before moving or copying sheets. For this, press Ctrl + F3 to open the list of names in the active workbook — you will be able to edit or delete the names from there. For more information, please see How to define and use names in Excel.
That’s how you can move or copy a sheet in Excel. I thank you for reading and hope to see you on our blog next week.
Источник
Сохранение листов книги как отдельных файлов
Про сборку листов из нескольких книг в одну текущую я уже писал здесь. Теперь разберем решение обратной задачи: есть одна книга Excel, которую нужно «разобрать», т.е. сохранить каждый лист как отдельный файл для дальнейшего использования.

Примеров подобного из реальной жизни можно привести массу. Например, файл-отчет с листами-филиалами нужно разделить на отдельные книги по листам, чтобы передать затем данные в каждый филиал и т.д.
Если делать эту процедуру вручную, то придется для каждого листа выполнить немаленькую цепочку действий (выбрать лист, правой кнопкой по ярлычку листа, выбрать Копировать, указать отдельный предварительно созданный пустой файл и т.д.) Гораздо проще использовать короткий макрос, автоматизирующий эти действия.
Способ 1. Простое разделение
Нажмите сочетание Alt+F11 или выберите в меню Сервис — Макрос — Редактор Visual Basic (Tools — Macro — Visual Basic Editor), вставьте новый модуль через меню Insert — Module и скопируйте туда текст этого макроса:
Sub SplitSheets1()
    Dim s As Worksheet
    For Each s In ActiveWorkbook.Worksheets    'проходим по всем листам в активной книге
        s.Copy       'копируем каждый лист в новый файл
    Next
End Sub
Если теперь выйти из редактора Visual Basic и вернуться в Excel, а затем запустить наш макрос (Alt+F8), то все листы из текущей книги будут разбиты по отдельным новым созданным книгам.
Способ 2. Разделение с сохранением
При необходимости, можно созданные книги сразу же сохранять под именами листов. Для этого макрос придется немного изменить, добавив команду сохранения в цикл:
Sub SplitSheets2()
    Dim s As Worksheet
    Dim wb as Workbook
    Set wb = ActiveWorkbook
    For Each s In wb.Worksheets                                 'проходим во всем листам активной книги
        s.Copy                                                  'сохраняем лист как новый файл
        ActiveWorkbook.SaveAs wb.Path & "" & s.Name & ".xlsx"  'сохраняем файл
    Next
End Sub
Этот макрос сохраняет новые книги-листы в ту же папку, где лежал исходный файл. При необходимости сохранения в другое место, замените wb.Path на свой путь в кавычках, например «D:Отчеты2012» и т.п.
Если нужно сохранять файлы не в стандартном формате книги Excel (xlsx), а в других (xls, xlsm, xlsb, txt и т.д.), то кроме очевидного изменения расширения на нужное, потребуется добавить еще и уточнение формата файла — параметр FileFormat:
ActiveWorkbook.SaveAs wb.Path & "" & s.Name & ".xlsb", FileFormat:=50
Для основных типов файлов значения параметра FileFormat следующие:
- XLSX = 51
- XLSM = 52
- XLSB = 50
- XLS = 56
- TXT = 42
Полный список всех вариантов можно посмотреть в справке MSDN.
Способ 3. Сохранение в новые книги только выделенных листов
Если вы хотите раскидать по файлам не все листы в вашей книге, а только некоторые, то макрос придется немного изменить. Выделите нужные вам листы в книге, удерживая на клавиатуре клавишу Ctrl или Shift и запустите приведенный ниже макрос:
Sub SplitSheets3()
    Dim AW As Window
    Set AW = ActiveWindow
    For Each s In AW.SelectedSheets
        Set TempWindow = AW.NewWindow    'создаем отдельное временное окно
        s.Copy                           'копируем туда лист из выделенного диапазона
        TempWindow.Close                 'закрываем временное окно
    Next
End Sub
Создавать новое окно и копировать через него, а не напрямую, приходится потому, что Excel не умеет копировать группу листов, если среди них есть листы с умными таблицами. Копирование через новое окно позволяет такую проблему обойти.
Способ 4. Сохранение только выделенных листов в новый файл
Во всех описанных выше способах каждый лист сохранялся в свой отдельный файл. Если же вы хотите сохранить в отдельный новый файл сразу группу выделенных предварительно листов, то нам потребуется слегка видоизменить наш макрос:
Sub SplitSheets4()
    Dim CurW As Window
    Dim TempW As Window
    Set CurW = ActiveWindow
    Set TempW = ActiveWorkbook.NewWindow
    CurW.SelectedSheets.Copy
    TempW.Close
End Sub
Способ 5. Сохранение листов как отдельных PDF-файлов
Этот способ чем-то похож на второй, но листы сохраняются не как отдельные книги Excel, а в формате PDF, что часто требуется, если никто не должен менять документ и увидеть ваши формулы. Обратите внимание, что:
- для этого используется уже другой метод (ExportAsFixedFormat а не Copy)
- листы выводятся в PDF с параметрами печати, настроенными на вкладке Разметка страницы (Page Layout)
- книга должна быть сохранена на момент экспорта
Нужный нам код будет выглядеть следующим образом:
Sub SplitSheets5()
    Dim s As Worksheet

    For Each s In ActiveWorkbook.Worksheets
        s.ExportAsFixedFormat Filename:=ThisWorkbook.Path & "" & s.Name & ".pdf", Type:=xlTypePDF
    Next
End Sub
Способ 6. Готовый макрос из надстройки PLEX
Если лень или нет времени внедрять все вышеописанное, то можно воспользоваться готовым макросом из моей надстройки PLEX:

Ссылки по теме
- Сборка листов из нескольких книг в одну
- Что такое макросы, куда вставлять код на Visual Basic, как их использовать.
On 2002-02-21 09:08, RWinfield wrote:
Sub savesheet2()
Application.ScreenUpdating = False
ActiveSheet.Select
ActiveSheet.Copy
ThisFile = Range(«A1»).Value
ActiveSheet.SaveAs Filename:=»C:temp» & ThisFile & «.xls»
Application.ScreenUpdating = True
ActiveWorkbook.Close
End Sub
To use this open the workbook that you want to use this code in, then open the Visual Basic editor (press alt+F11). Once there click the INSERT menu item and choose MODULE from that menu. Copy the above code into the window. You need to make two changes to the above code.
ThisFile = Range(«A1»).Value…change A1 to an unused cell on your worksheet. This is the cell where you will enter the file name that you want the sheet saved as.
ActiveSheet.SaveAs Filename:=»C:temp» … change to the directory you want the file saved to.
Once you have done this close the VB editor and the macro will appear under TOOLSMACROS menu on the workbook. If you want the macro to be called something other than savesheet2 then edit the name prior to closing the VB editor.
Enter a file name in the cell you chose and run the macro. The macro will copy the active sheet to a new workbook with one sheet, then save the workbook as the filename you input, then will close the new workbook, which returns you to the original workbook with multiple sheets that you were working on.
Hope this make some sense
Rick
Coming to this question several years later, I have found a method that works much better for myself. This is because the worksheet(s) I’m trying to save are large and full of calculations, and they take an inconvenient amount of time to copy to a new sheet.
In order to speed up the process, it saves the current worksheet and then simply reopens it, closing the unwanted .csv window:
Sub SaveThisSheetInParticular()

Dim path As String
path = ThisWorkbook.FullName
Application.DisplayAlerts = False

Worksheets("<Sheet Name>").SaveAs Filename:=ThisWorkbook.path & "<File Name>", FileFormat:=xlCSV

Application.Workbooks.Open (path)
Application.DisplayAlerts = True
Workbooks("<File Name>.csv").Close

End Sub
Here the Sheet and csv filename are hardcoded, since nobody but the macro creator (me) should be messing with them. However, it could just as easily be changed to store and use the Active Sheet name in order to export the current sheet whenever the macro is called.
Note that you can do this with multiple sheets, you simply have to use the last filename in the close statement:
Worksheets("<Sheet 1>").SaveAs Filename:=ThisWorkbook.path & "<File 1>", FileFormat:=xlCSV
Worksheets("<Sheet 2>").SaveAs Filename:=ThisWorkbook.path & "<File 2>", FileFormat:=xlCSV

[...]

Workbooks("<File 2>.csv").Close
We have an Excel sheet with some formula and macros. We want to save the data as an another Excel sheet without formula and macros before we run macros on the current sheet.
It should just save the values. One way is copy the entire data and paste them as values in another Excel sheet and save it. But is there any other simple way to do this?
![]()
asked Apr 6, 2013 at 19:26
3
It’s a two step process
A. Loop through all sheets and copy the cells and then do a pastespecial values (No need to copy it to another sheet)
Sub Sample()
    Dim ws As Worksheet

    For Each ws In ThisWorkbook.Worksheets
        ws.Cells.Copy
        ws.Cells.PasteSpecial xlPasteValues
    Next

    Application.CutCopyMode = False
End Sub
IF you don’t want to go the VBA way then you will have to manually copy and do PasteSpecial. Once the above is done
B. You can get rid of the macros by saving the file as .xlsx. You will have to close and reopen the file. This way your original file will remain untouched.
answered Apr 6, 2013 at 20:29
![]()
2
Go to Data in the ribbon at the top of excel, click on edit links (in connections part of that toolbar near the middle, and then break link for every link seen.
answered Jun 29, 2016 at 12:37
![]()
1