
Excel for Microsoft 365 PowerPoint for Microsoft 365 Excel 2021 PowerPoint 2021 Excel 2019 PowerPoint 2019 Excel 2016 PowerPoint 2016 More…Less
If the AutoRecover option is turned on, you can automatically save versions of your file while you’re working on it. How you recover something depends on when you saved it.
If you’ve saved the file
-
Open the file you were working on.
-
Go to File > Info.
-
Under Manage Workbook or Manage Presentation, select the file labeled (when I closed without saving).
-
In the bar at the top of the file, select Restore to overwrite any previously saved versions.

Tip: In Word, you can also compare versions by clicking Compare instead of Restore.

If you haven’t saved the file
-
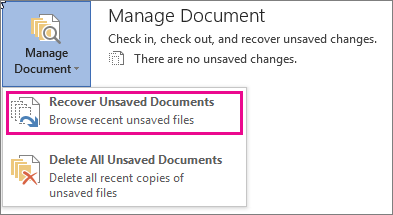
Go to File > Info > Manage Document > Recover Unsaved Workbooks in Excel, or Recover Unsaved Presentations in PowerPoint.
-
Select the file, and then select Open.
-
In the bar at the top of the file, select Save As to save the file.


See Also
View historical versions of Office files
What is AutoSave?
View the version history of an item or file in a SharePoint list or library
How does versioning work in a SharePoint list or library
Need more help?
Want more options?
Explore subscription benefits, browse training courses, learn how to secure your device, and more.
Communities help you ask and answer questions, give feedback, and hear from experts with rich knowledge.
Find solutions to common problems or get help from a support agent.
If you want to share a Word file with someone using an earlier version of Word, here’s how.
-
Go to File > Save As.
-
Choose where you want to save your file.
Tip: To go directly to the Save As dialog box, double-click a location (for example, double-click Computer).
-
In the Save As dialog box, under Save as type, select the file format you want. For example, you can save your document (.docx) as a Word 97-2003 document (.doc) so someone using an earlier version of Word can open it.
-
If you want to rename the file, type a new name in the File name box.
-
Select Save.
If you want to share a Word file with someone using an earlier version of Word, here’s how.
-
Go to File > Save As.
-
Choose where you want to save your file.
-
Under File Format, select the file format you want. For example, you can save your document (.docx) as a Word 97-2004 Document (.doc) so someone using an earlier version of Word can open it.
-
If you want to rename the file, type a new name in the Save As: box.
-
Select Save.
Word for the web can only save Word documents as a .docx, .pdf, or .ODT file. To save a format for an earlier version of Word, open the document in a desktop version of Word and save from there.
![]()
Microsoft Word has made it incredibly easy to track the changes made to any document and to restore previous versions. We’re going to show you how to view and restore previous versions of a Word document.
To use this method, you’re going to need an active Microsoft 365 subscription. This is a requirement because Microsoft Word enables version history only when files are saved to OneDrive. Fortunately, you get 1TB of OneDrive storage along with your Microsoft 365 subscription.
You’ll also need to save your document to OneDrive, which will ensure that it’s being saved automatically. Once this is done, you can continue to work on the document, and Microsoft Word will keep storing various versions of your document.
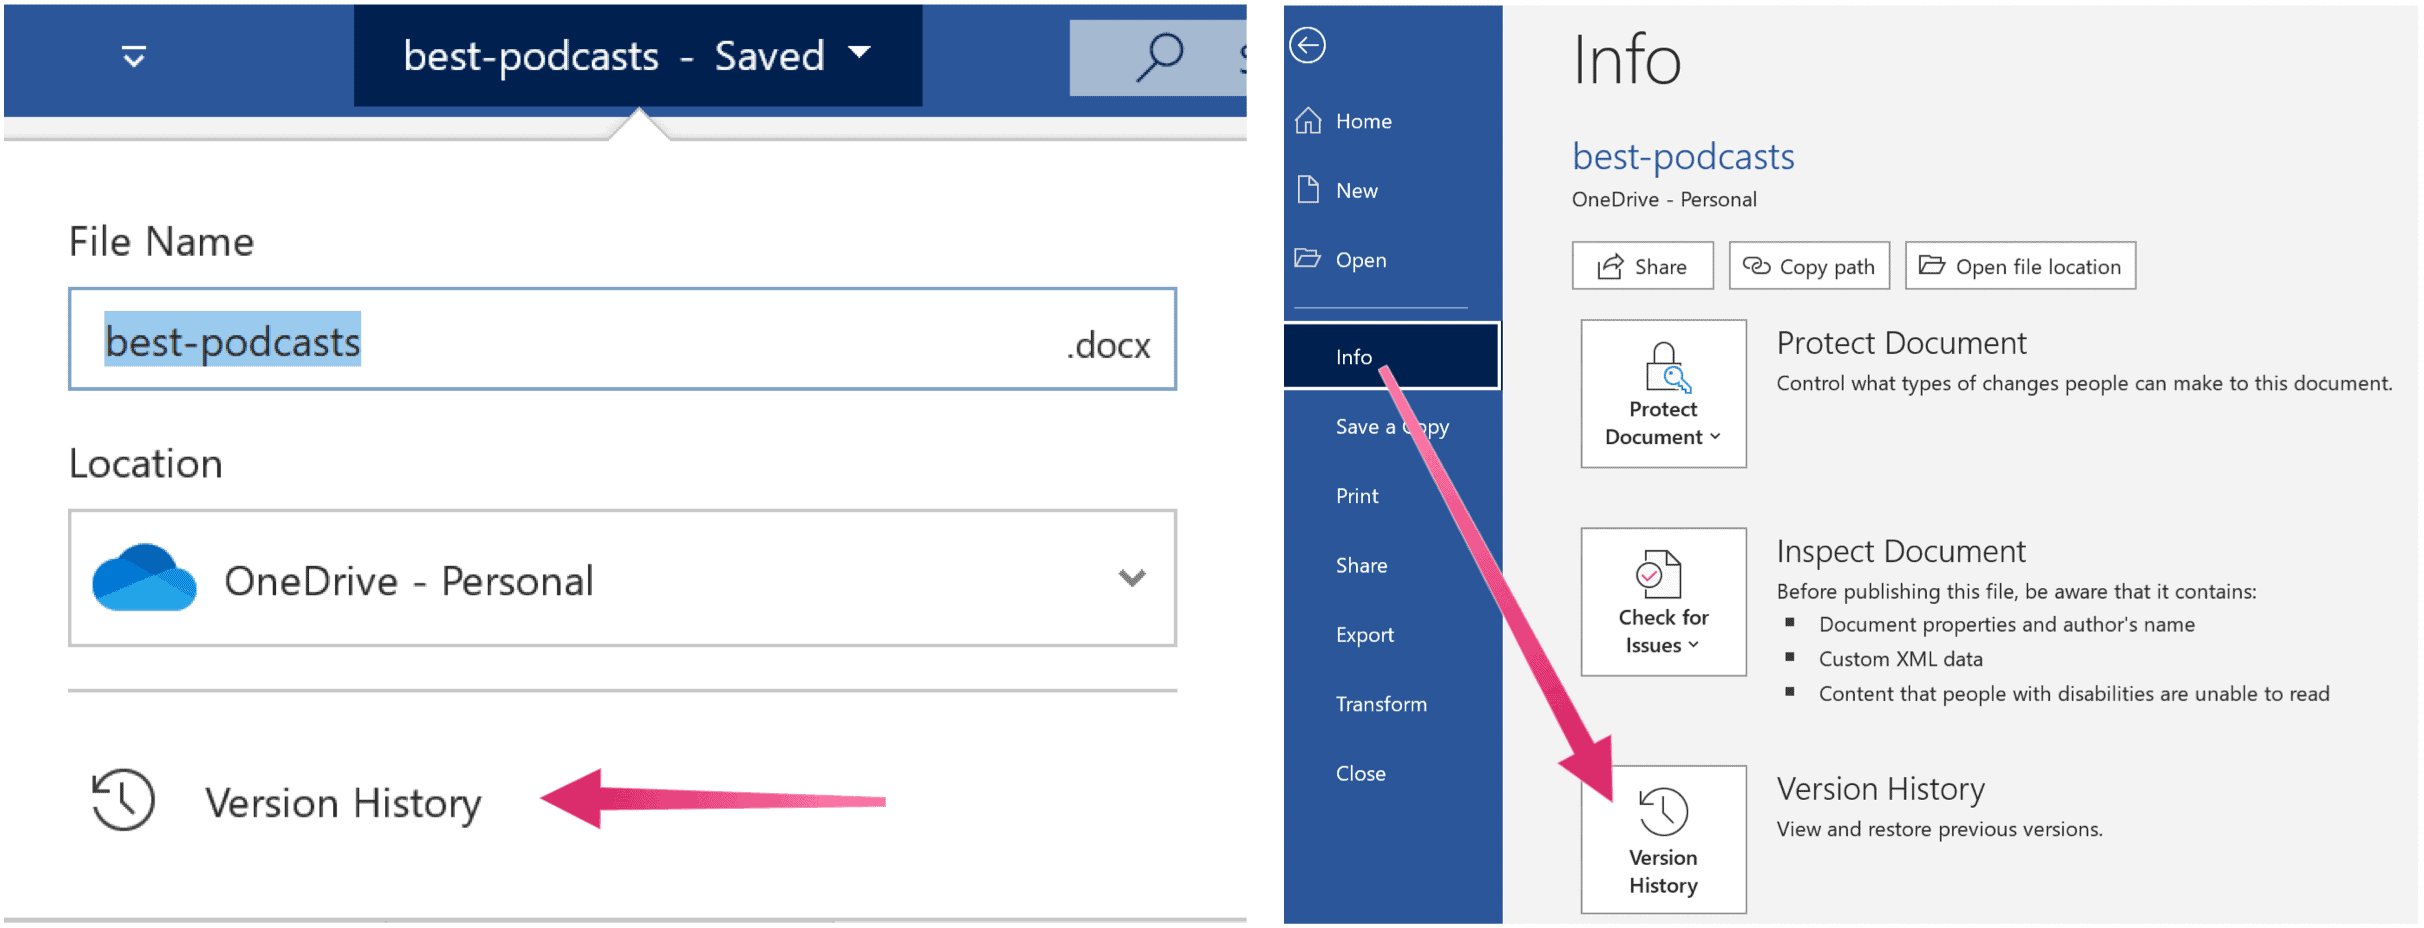
The first step is to view previous versions of Word documents. The fastest way to do this is by clicking the file name in the top bar in Microsoft Word.

Here, you’ll need to select “Version History.”
Alternatively, you can click the “File” button from the top menu bar.
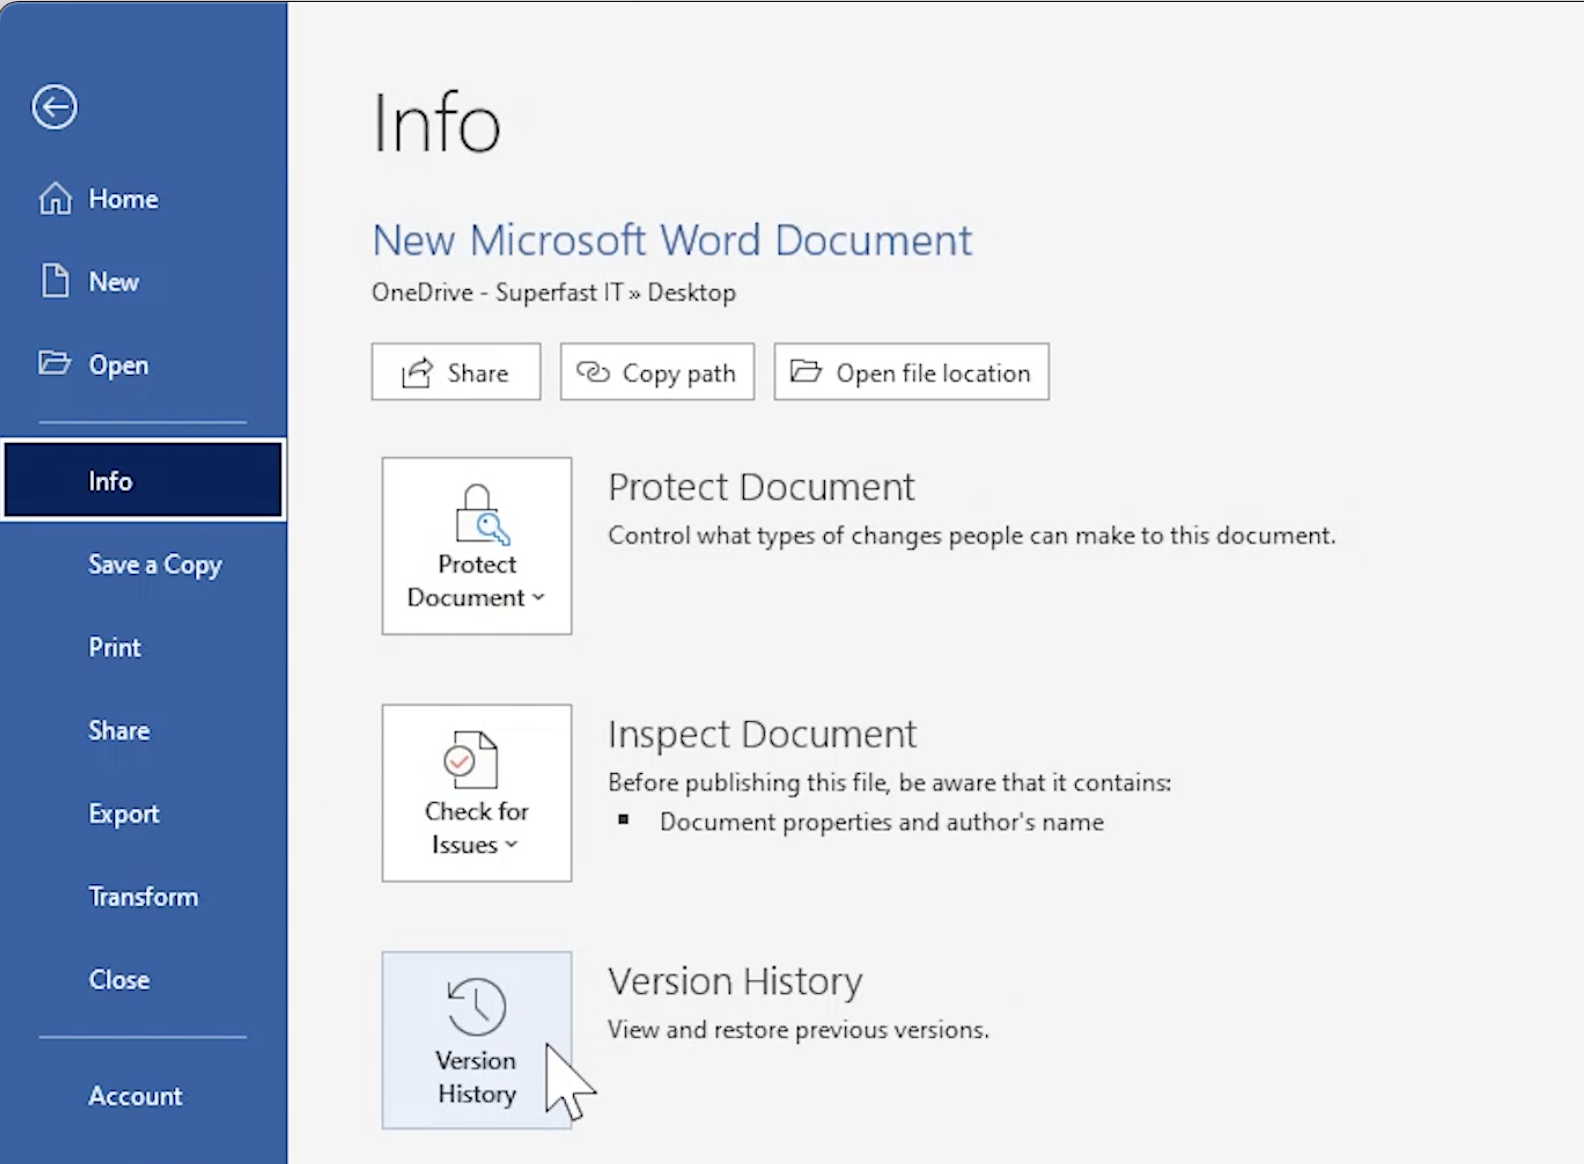
Now, select “Info.”
Click the “Version History” button.
This will open up the Version History pane on the right. The most recent version of your document will be listed at the top. Word also helpfully sorts your changes by date, which makes it a lot easier to track older versions of large documents.
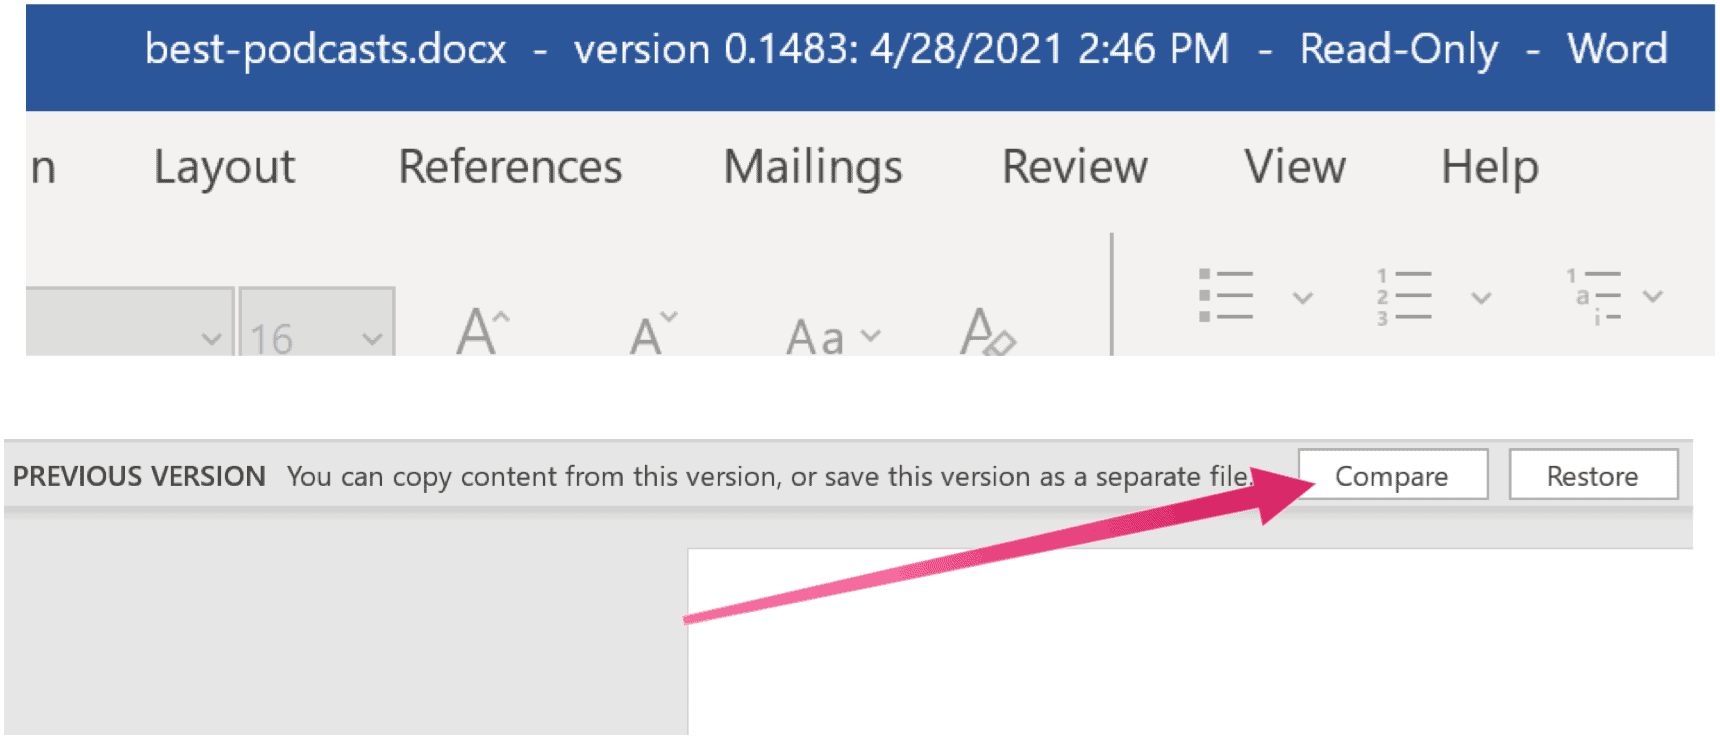
To view any version of a document, click “Open version.” This will open that version of the file. You can confirm that it’s an older version by checking for the Previous Version label above the document.
On the same line, you can select the “Compare” button to see what was changed. This will copy the old version of the file to a new document and highlight the changes made compared to previous versions of the document.
We’re going to show you how to find exactly what was changed here. First, click the up arrow icon below “Revisions.”
This will show you exactly what kinds of changes were made to the document and how many revisions in all were made in this version.
To check out the changes made in more detail, scroll down in the left pane. This highlights all the modifications.
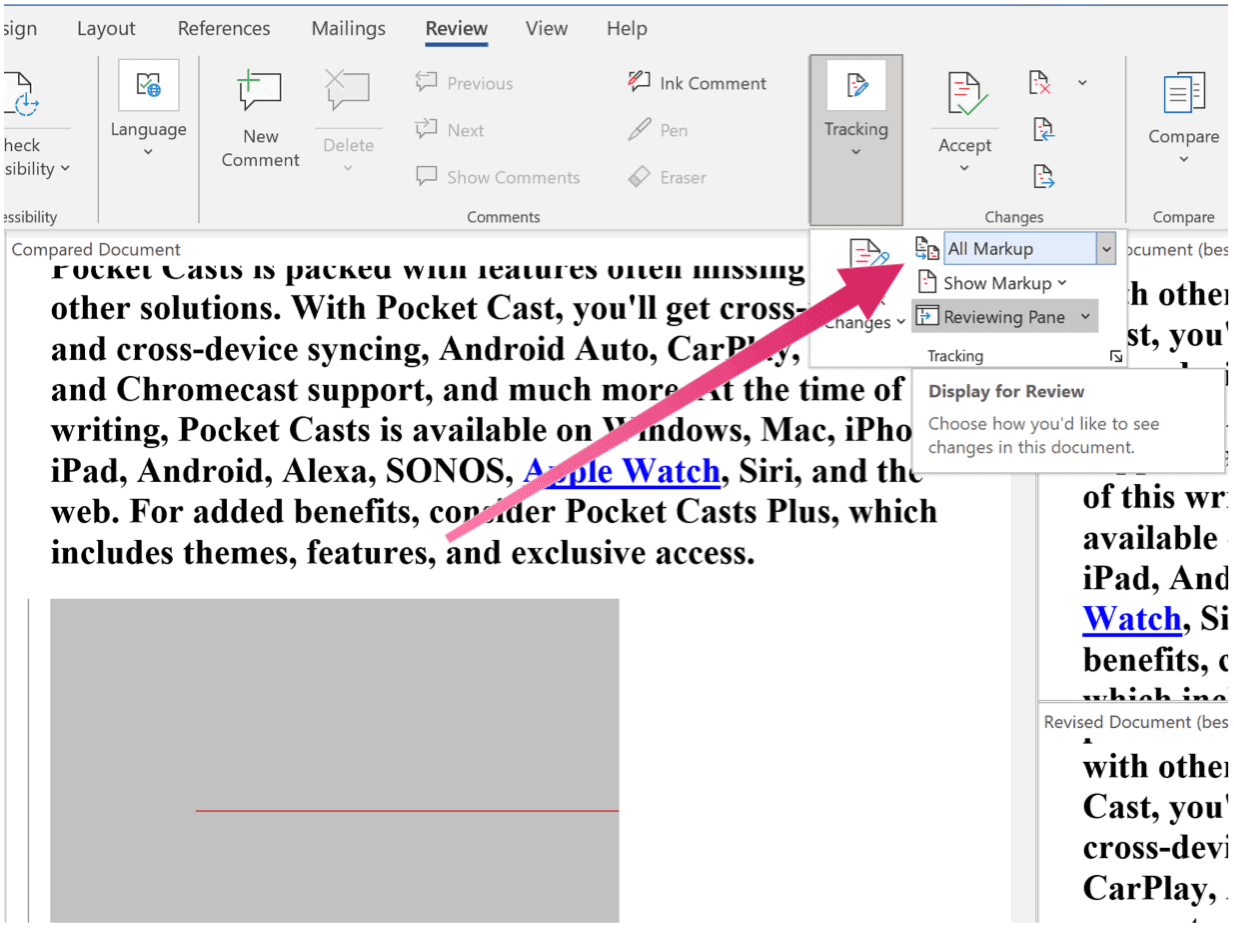
On the right side, you’ll see a vertical red line next to some paragraphs. This is just a simple way to show that changes were made here in this version of the document. There’s a way to see more detailed changes, too.
Go to the “Review” menu.
In the Tracking section, click the down arrow next to “Simple Markup.”
Now, select “All Markup.” This will reveal the details that we were after. Parts that were removed are highlighted with a red font and a strikethrough. Additions are colored red and also have an underline.
Once you’re done reviewing these changes, feel free to save the document if you need to.
Restore Previous Versions of Word Documents
We’ll now close this document and return to the previous one where we first saw the option to compare an older version. Here, you can click the “Restore” button to make this the most recent version of your Word document.
In case you didn’t want to do this, you can always go to the Version History pane and restore older versions using the same method.
READ NEXT
- › How to View and Restore Old Versions of PowerPoint Files
- › How to Prevent Accidentally Dragging and Dropping Text in Microsoft Word
- › Google Chrome Is Getting Faster
- › BLUETTI Slashed Hundreds off Its Best Power Stations for Easter Sale
- › This New Google TV Streaming Device Costs Just $20
- › How to Adjust and Change Discord Fonts
- › The New NVIDIA GeForce RTX 4070 Is Like an RTX 3080 for $599
- › HoloLens Now Has Windows 11 and Incredible 3D Ink Features
How-To Geek is where you turn when you want experts to explain technology. Since we launched in 2006, our articles have been read billions of times. Want to know more?
In this article, you will learn how to keep different versions of a Word document in the same file and extract them whenever necessary.
You can easily view and extract previous versions of a Word document when your files are stored to the cloud storage service OneDrive connected to your Office software. If you use OneDrive, the process is simple.
How to enable version history in Office 365?
To connect your Office software to OneDrive, follow these steps:
- Open Microsoft Word and create a new blank document.
- Click on the Sign in button in the upper-right corner of the document.
- Enter your Microsoft or Office 365 email address and password to log in.
Congratulations! Now you can automatically save multiple versions of your documents.
How to save different versions of a Word document?
To save multiple versions of a Word document, follow this procedure:
- Open Microsoft Word and create a document.
- To save this version, click on File > Save.
- Save the file in the OneDrive folder.

- You can save this document as many times as you want.
How to view a different version of your document?
- Open your Word document and click on the Version History button in the top-right corner.

- In the column on the right, you can choose the version you want to view or restore.
- To restore a version, click on Open version > Restore.
How to compare different versions of one document?
To compare different versions of a Word document, open it and click on Version History, open the desired version and click on the Compare button under the main menu to see the differences between the latest version and the selected one.

How to access version history online via OneDrive?
To open different versions of your Word document, you can also use OneDrive on the web.
- Go to the folder where you have stored your files, right-click on the selected document and scroll down to Version History.
- In the new tab, you will see a list of different versions of the document, which you can download or restore.
How to view version history in SharePoint?
- Open the list or library from the Quick Launch bar.
- Right click on the space between the item or document name and date, then scroll down to Version History. This way, you will see a list of versions of the file.
-
In the Version History window, choose the version you’d like to access and click the down arrow on the right side to see a list of options.
-
Finally, select View.
Do you need more help with Microsoft Word? Check out our forum!
![]()
Written by Allen Wyatt (last updated July 14, 2018)
This tip applies to Word 97, 2000, 2002, and 2003
Depending on your experience with developing complex documents, you may already be familiar with version control. Many companies maintain separate versions of a document at different benchmarks during the development process. For instance, one saved version may be at the first draft stage, another at the second draft stage, and still another at the public comment stage.
In the past, you may have needed to save different versions of your document in different files. Word supports saving multiple versions of your documents within a single file. This can be handy if you need to see a revision history of your document, and it may make your document management chores a bit easier.
To save a version of your document, follow these steps:
- Choose Versions from the file menu. Word displays the Versions dialog box. (See Figure 1.)
- Click on the Save Now button. Word displays the Save Version dialog box. (See Figure 2.)
- Enter any comments you want associated with this version. (A good idea is to indicate why you are saving the version.)
- Click on OK. Word saves the version.
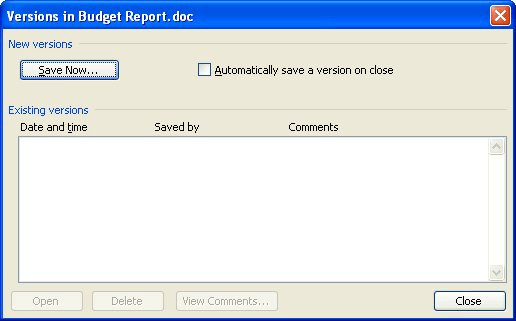
Figure 1. The Versions dialog box.
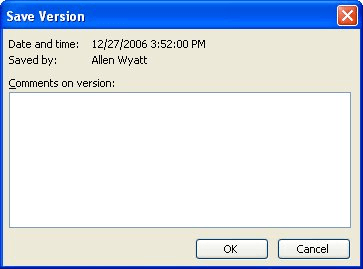
Figure 2. The Save Version dialog box.
The version saved by Word is essentially a snapshot of how your document looks when the version was saved. Edits you make to the document in the future do not interfere with the saved version.
WordTips is your source for cost-effective Microsoft Word training.
(Microsoft Word is the most popular word processing software in the world.)
This tip (1778) applies to Microsoft Word 97, 2000, 2002, and 2003.
Author Bio
With more than 50 non-fiction books and numerous magazine articles to his credit, Allen Wyatt is an internationally recognized author. He is president of Sharon Parq Associates, a computer and publishing services company. Learn more about Allen…
MORE FROM ALLEN
Inserting Fields
Fields are used for a variety of dynamic purposes in a document. There are a couple of ways you can easily insert fields, …
Discover More
Removing a Trendline Error Message
Excel allows you to add trendlines to your charted data. It is possible, though, that lately you’ve been seeing a …
Discover More
Displaying All the Files in a Folder using Explorer
Displaying all the files a folder contains is an easy task in Windows. One easy way to do it is by using the Windows …
Discover More
More WordTips (menu)
Rubbish In Your File
Do your files look garbled when you open them? Here’s one possible reason.
Discover More
Working with E-mailed Documents
Ding! You’ve got mail. That mail has a Word document attached to it. Before you rush off and open that document, take a …
Discover More
Document Shows as ‘In Use’ by Another User
Word tries to constantly track who is using various documents, in order to prevent two users from clashing in their edits …
Discover More
Microsoft Office programs automatically save a copy of open files every ten minutes by default. Whenever the user closes a file without saving it, the user can always return to the most recently save temporary version. This type of feature is available in Microsoft Word, PowerPoint, Excel, and Publisher.
In this tutorial, we will explain:
- How to change the Autosave frequency.
- How to display the previous save file.
- How to display an unsaved document.
- How to delete all files
- How to delete a saved document from the list.
Document versions are temporary copied versions of open files and files that are not saved.
1] How to change the Autosave frequency
Open Microsoft Word.
Click the File tab.

In the Backstage View, click Options.
A Word Options dialog box will open.
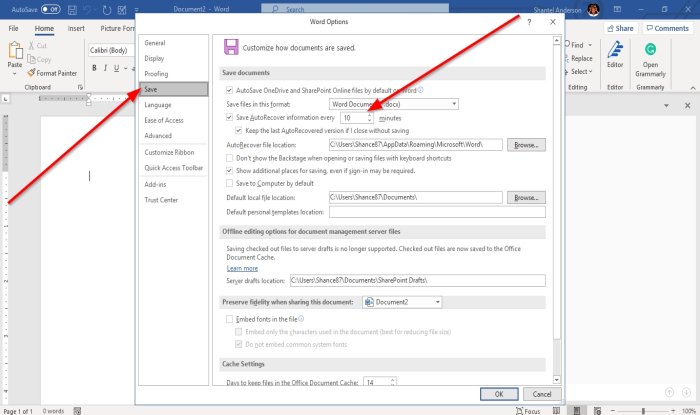
Inside the dialog box, click the Save tab.
On the Save page in the Save AutoRecover information every box, enter the number of minutes you want or use the up and down arrows to input the minutes.
Then, click OK.
2] How to display the previous save file
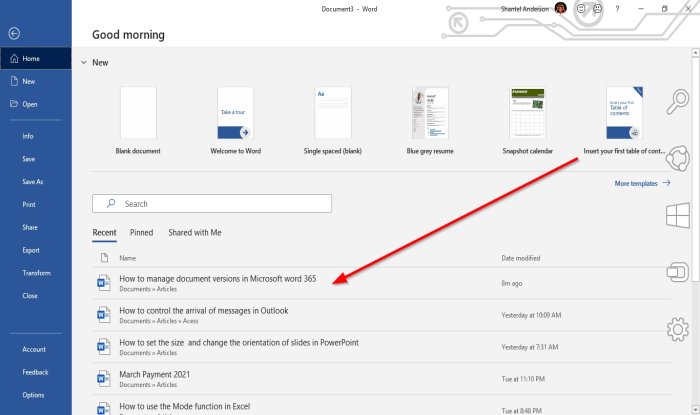
Click File.
In the Backstage View on the Home page under the Recent section, you will see previously saved files.
3] How to display an unsaved document
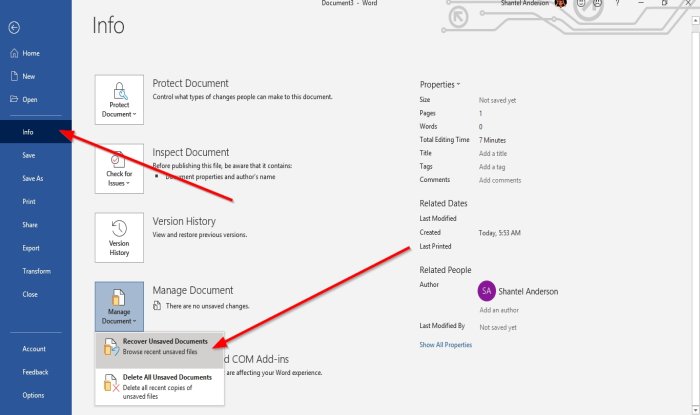
On the Backstage View, click Info.
On the Info page, click the Manage Document button.
In the Manage Document shortcut menu, select Recover Unsaved Documents.
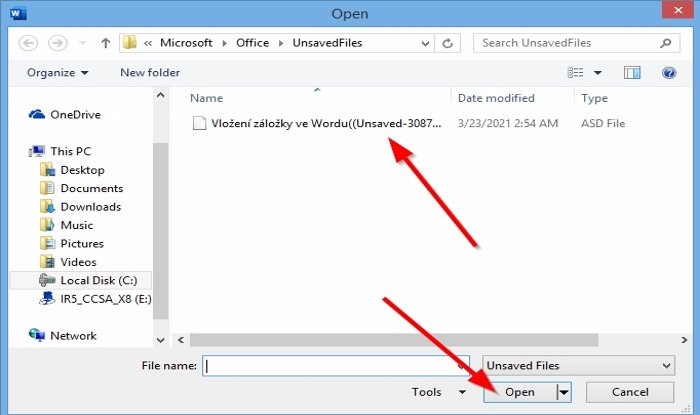
An Open dialog box will appear displaying the unsaved file.
Click the file, then click Open.
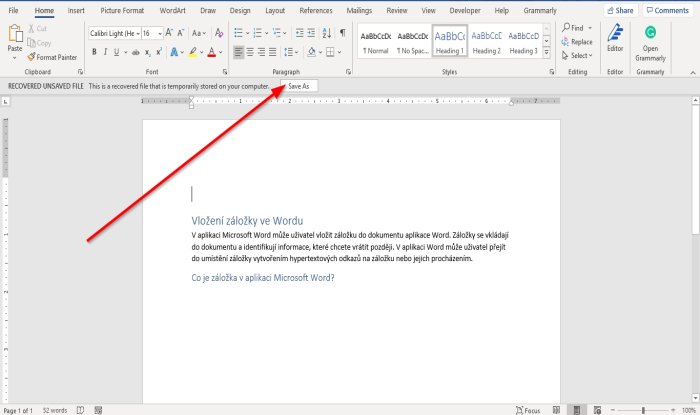
Your file is open; if you want to save the unsaved file, click the Save As banner on top of the document and save the file.
There is another method to recover an unsaved file.

On the Backstage View, on the Home page, on the bottom right, click More Documents.

On the Open page, click Recover Unsaved Documents.
An Open dialog box will open; click the file and click Open.
4] How to delete all Unsaved Documents
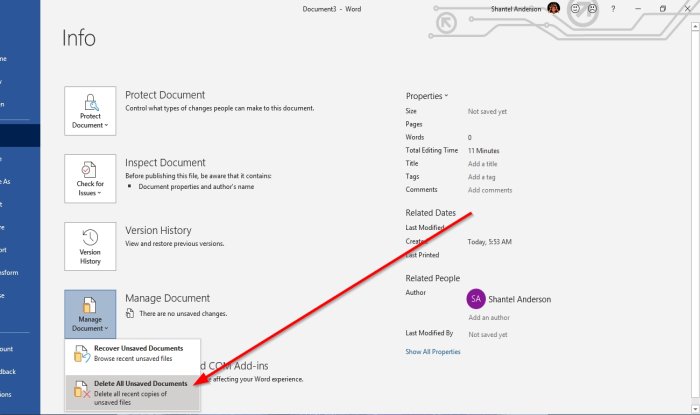
On the Backstage View, click Info.
On the Info page, click the Manage Document button.
In the Manage Document shortcut menu, select Delete all Unsaved Documents.
A message box will pop up; click Yes.
The Delete all Unsaved Documents feature will delete all copies of unsaved files.
5] How to delete a saved document from the list
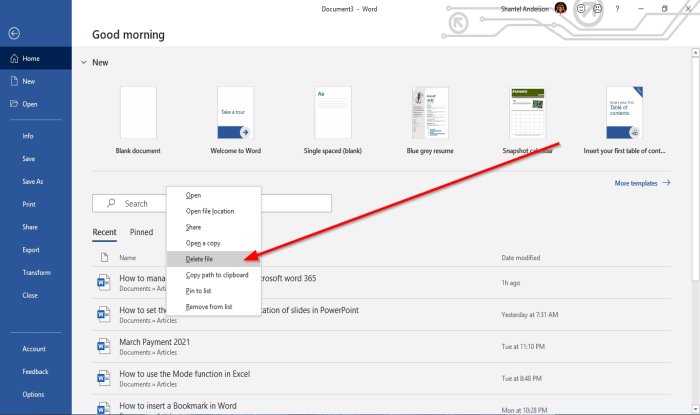
On the Backstage View on the Home page.
Under the Recent section, right-click one of the saved documents from the list.
In the shortcut menu, select Delete File.
A message box will pop up; click Yes.
It is deleted from the list.
Read: How to insert Random Text in Microsoft Word.
I hope this helps; if you have questions, please comment below.

If the requirements are met, you can restore previous versions of Microsoft Word documents. Here’s a look at how the process is performed.
It happens. You’re writing a report, research paper, or other Microsoft Word document, and you realize that an earlier version was better. Luckily, you can restore previous versions of Microsoft Word documents if you’re a Microsoft 365 subscriber. In this article, you’ll learn how to do it.
Saving Microsoft Word Documents Correctly
To utilize the restore feature in Microsoft Word, you must save your document on Microsoft OneDrive. As a Microsoft 365 subscriber, you’ll have plenty of room as each account comes with 1TB of online storage. Microsoft Word automatically saves your document as changes get made.
The key to using the restore tool is making sure you’re saving a Microsoft Word document properly. At the heart of this is the AutoSave feature, which saves your documents in real-time to Microsoft OneDrive.
Automatically Save Word Files to OneDrive
To set up AutoSave in Microsoft Word:
- Choose File > Options.
- Click Save.
- Check the box for AutoSave OneDrive and SharePoint Online files by default on Word.
- Choose OK to exit the window.
- Exit, then restart Word.
Open up the document you wish to restore. Follow the directions below.
- Click the file name at the top middle of your document that’s marked, “[File Name] saved.”
- Choose Version History.
Alternatively, you can:
- With the correct document open, choose File.
- Choose Info > Version History.
Regardless, you’ll now see a listing of restored versions of your document on the right side of Microsoft Word. Each item is organized by date, with the newer versions at the top of the list. Next, click to open a previous version. Further, older documents have a save date and time next to the document name above.
Comparing Versions
You can compare the current version of your document with the recently opened previous version. To do so, click the Compare button underneath the Ribbon in the older version.
At the top left, you’ll see a list of the revisions between the original and recovered version. Shown in separate sections are insertions, deletions, moves, formatting, and comments. Additionally, vertical lines next to paragraphs in the middle column denote changes. At the far right are two boxes. One shows the original document, the other the restored document.
Markup
To dig even further, click on the Tracking section of the Review tab—select Simple Markup, followed by All Markup. Removed items are highlighted with red font and a strikethrough. Meanwhile, additions are also colored in red and underlined. After reviewing these changes, you can save the restored file as a separate document. To do so, save just as you would any other Word document.
Restoring
To completely replace the original version of your document with the restored version:
- Bring up the restored version of your document.
- Click the Compare button underneath the Ribbon in the older version.
That’s it; a previous version of your document is now the current version. Further, you can always go back by following these instructions since versions are continuously saved thanks to Microsoft 365 and OneDrive.
There’s much you can do with Microsoft Word. The most recent articles covered how to combine document revisions, sort Word lists alphabetically and viewing multiple pages. Many more are also available online.
You can find Microsoft Word inside the Microsoft 365 suite. For home use, the Microsoft 365 suite is currently available in three varieties, including a Family, Personal, and Home & Student plan. Price-wise, the first is $100 per year (or $10/month) and includes Word, Excel, PowerPoint, OneNote, and Outlook for Mac. Membership covers up to six users. The Personal version is for one individual and is $70/year or $6.99 per month. Finally, the student plan is a one-time purchase of $150 and includes Word, Excel, and PowerPoint.
Business users can select from Basic, Standard, and Premium plans, starting at $5 per user/month.
![]()
There was a time when losing your work was a reality if you forgot to press save. However, today, using cloud-based Office 365 and OneDrive, ‘AutoSave‘ prevents you from losing work.
AutoSave has another helpful function, ‘Version History‘. Version history takes you back to a previously saved version in Word, Excel or even an image file.
Watch this handy step by step video explaining:
- What is AutoSave and how does it work?
- How to revert to a previously saved version in Word, using Version History
- How to restore a previously saved image, using Version History
What is AutoSave and how does it work?
If you are subscribed to Office 365, then your Word or Excel files will save using ‘AutoSave’ by default. This means that when you make changes to your document, it saves automatically — constantly saving to OneDrive in the cloud. Gone are the days of working on a file for an hour, forgetting to save, and losing that work if something goes wrong.
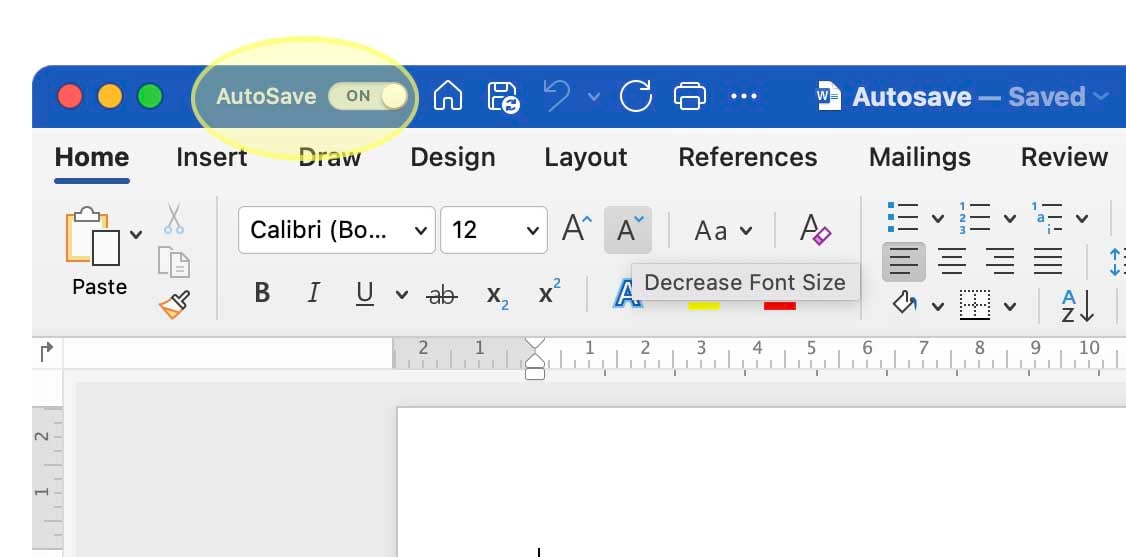
As long as AutoSave is switched on, you don’t need to press save. It means that you can make changes, close the document and those changes will have been automatically saved. You can see if AutoSave is switched on by looking at the top left hand-side of your file.
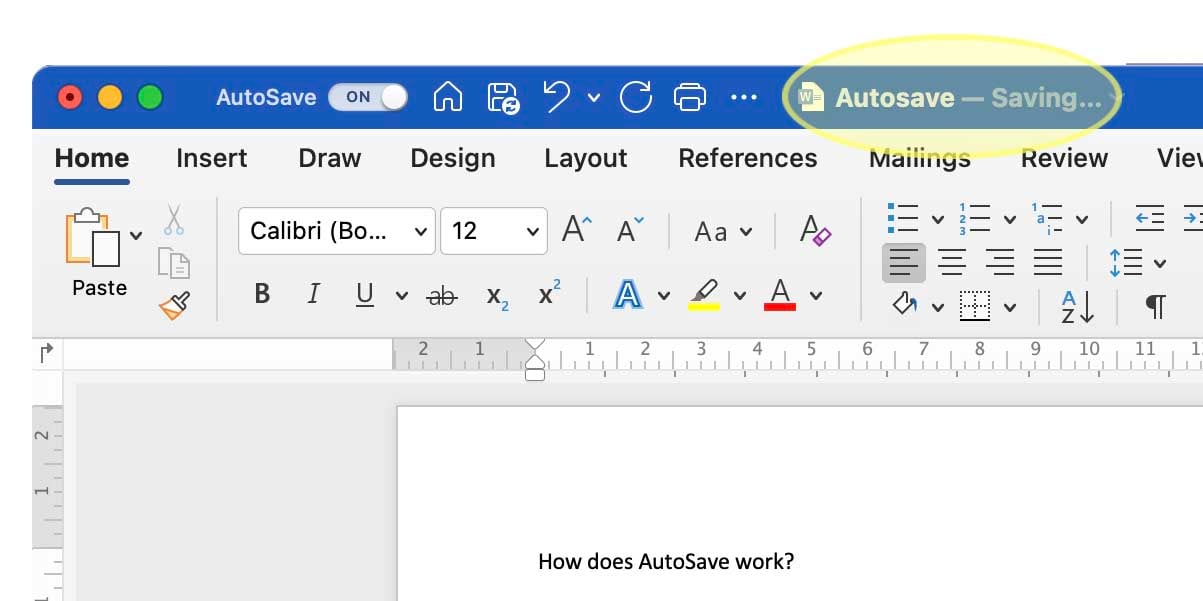
You can see that your document is constantly saving. While you type, it displays ‘saving’ at the top centre of the file, indicating that the file is saving as the changes are being made.
reverting back to a previously saved version in Word, using Version History
It is possible to see previously saved document versions for most file types while using Office 365. This is helpful if you accidentally delete sections of work, want to revert back to a previous version or see the history of a document for auditing purposes. First, here’s how to access version history:
How to access Version History on PCs
- Open the Word or Excel file
- Click ‘File‘
- Select ‘Info‘
- Click on ‘Version History‘
How to access Version History on Mac
- Open the Word or Excel file
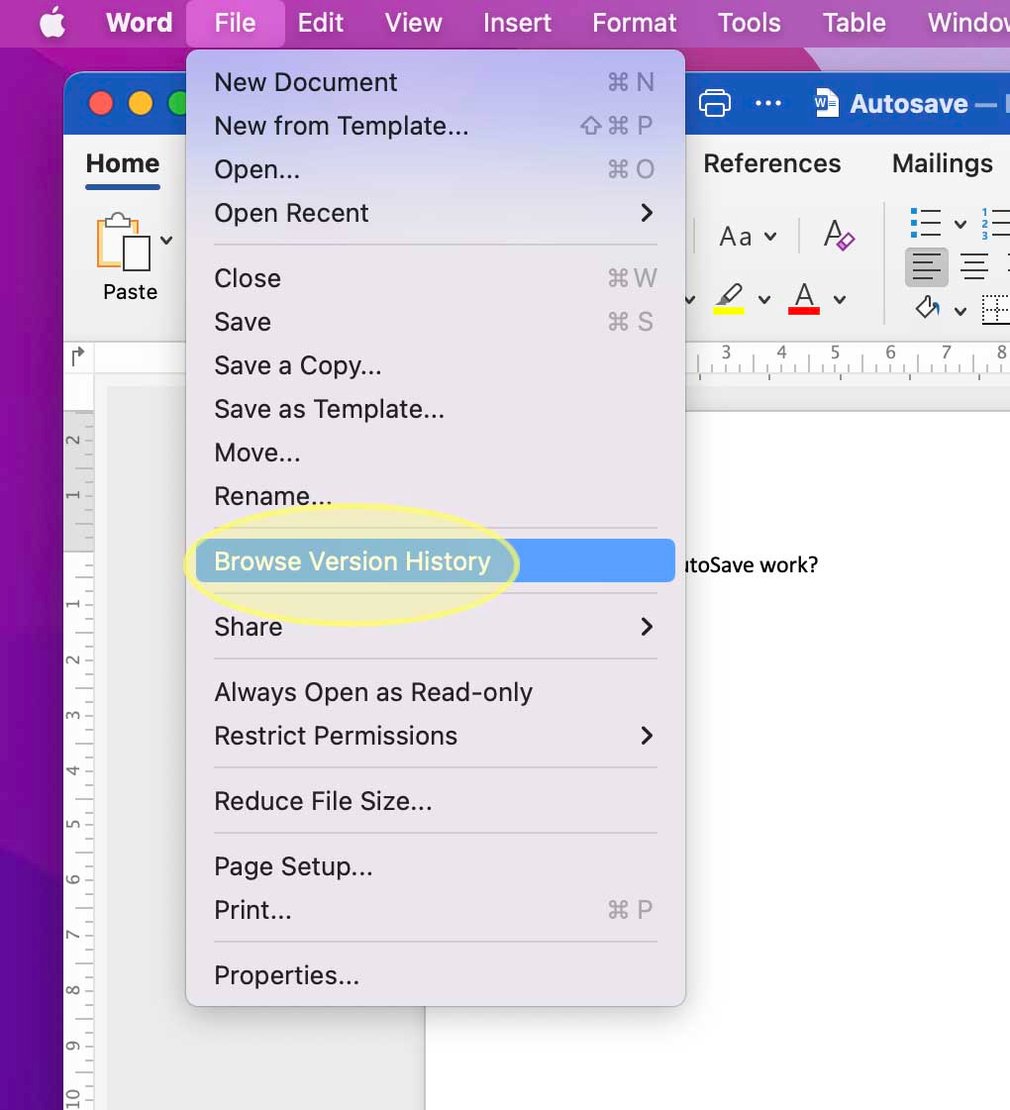
- Click ‘File‘
- Click ‘Browse Version History‘
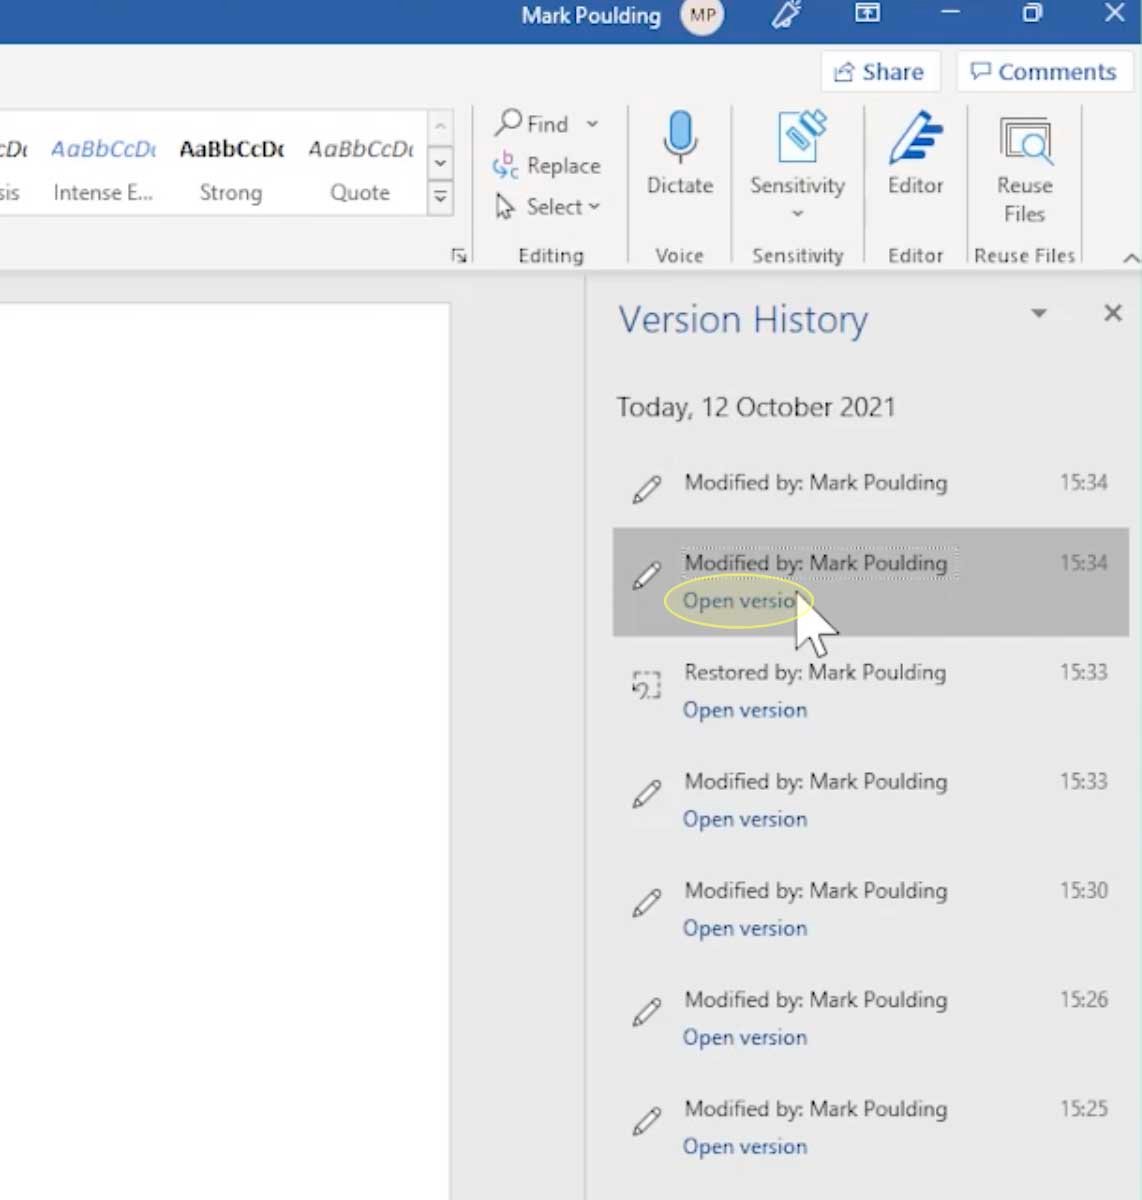
Next, you will see the version history panel open on the right-hand side of the document. All of the previous versions of the document will be listed.
By clicking ‘Open Version‘, you can restore a previous version of the document. It also details who made the change, as well as the date and time. If you are curious to know who had made changes to a document, this feature is useful for auditing:
Version History to restore a previously saved image
Version History also works for non-Word and Excel documents, such as images.
How to access image Version History
- Right-click on the file as it sits on your desktop.
- Click ‘Version History‘.
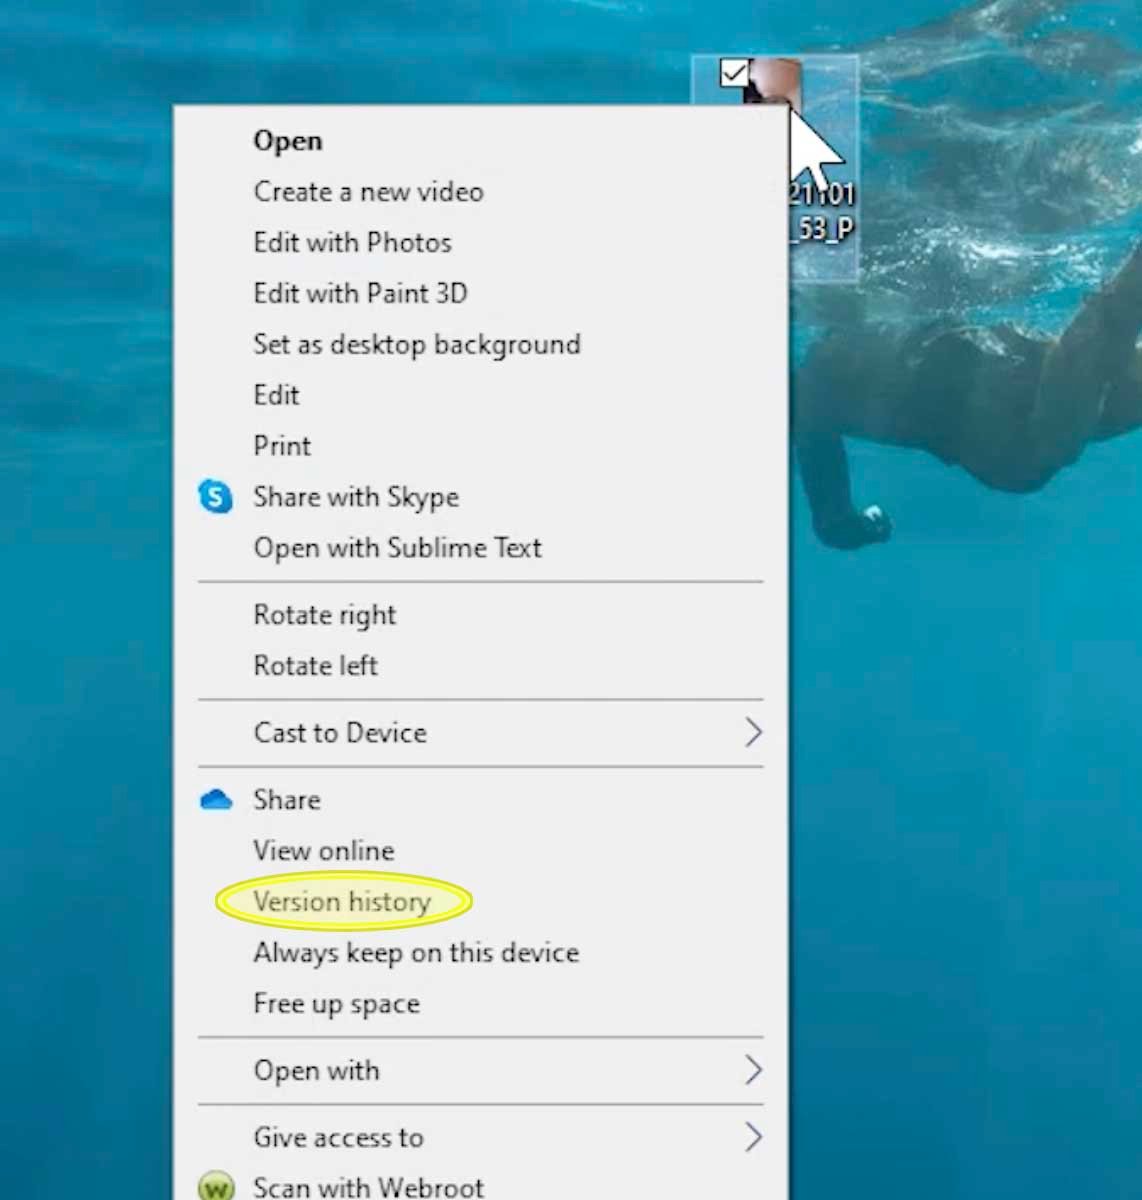
This opens a box with the history of the file. Just like in the Word file, you can revert back to any of the previously saved versions. Click on the three dots […] next to the version you wish to restore and then click ‘restore‘.
Restoring an image is not instantaneous, but after around 30 seconds the file will restore.
Looking to outsource IT?
I hope that this guide has been useful. If you are considering outsourcing your business’ IT, then take a look at our IT support packages and get in touch to find out more.
IT Support packages
contact us
Newsletter subscription
For more IT tips, subscribe to our monthly email newsletter
Subscribe
After toiling on a report for hours, you close Word and realize that you forgot to save the file. Perhaps you opened a document intended to be used as a template; you made a few changes and then saved the file, overwriting your template in the process. Before you spend time recreating a Word document from scratch, you can try to recover the previous version of the file.
Closed Without Saving
-
Start Microsoft Office and click on the «File» tab. Select «Recent» in the left pane.
-
Click «Recover Unsaved Documents» on the lower right side of the window. The Unsaved Files folder opens.
-
Select the file you want to restore and click «Open.» The document opens with a Recovered Unsaved File bar across the top.
-
Click the «Save As» button and save the file with a new name in a safe location, such as your desktop or Documents folder.
Other Versions of the File
-
Open the Word file that you saved and now want to restore to its previous condition.
-
Click on the «File» tab and and select «Info.»
-
Select the version you want to open in the Versions list. Click the «Restore» button when the file opens.
In Word 2010 there is a ‘version’ feature but it’s quite different from the feature of the same name in Word 97 to Word 2007.
In Word 2010 there is a ‘version’ feature but it’s quite different from the feature of the same name in Word 97 to Word 2007. Old hands at Word should carefully check out the Word 2010 incarnation before using it.
You can manage different auto saved versions of a particular document and open any of them for reference, comparison or even for restoring back earlier version. Different versions of the document you work on will be automatically saved with a timestamp and it can be opened as a separate document.

The crucial point is that Word 2010 only saves versions within an open document session. As soon as you close the document, the versions are removed. This greatly limits the usefulness of the Microsoft’s 2010 attempt at ‘versioning’.
Configure Auto-Save Settings
In Word 2010, Microsoft has again included the feature of auto-saving files which saves your documents automatically after specified intervals of time. You can configure auto-save or auto-recover settings and make required changes to the time interval. For this, click on File | Options.

In the “Word Options” window that pops open, under “Save documents” select “Save AutoRecover information” option and enter required time interval to save the document versions. The default is usually 10 minutes but you can change it to a longer or shorter time.
You also have option to save and recover the last unsaved version of the file you are working on in case you close the document accidently without saving it. For this select “Keep the last autosaved version if I close without saving” option. You can specify the file location from where you can fetch the last auto-saved file. After making changes click on OK button to close the window.
Manage Auto-Saved Versions
You can open any auto-saved version of the document you are working on. Click on File | Info | Versions and select required version based on the given time-stamp.

Selected auto-save version of the document will open in read-only mode.

The title of the document will give details about the auto-saved version like date and time. An alert message will appear at the top of the document asking if you want to compare the document with the latest version or restore the auto-saved version of the file.
Note: The auto-saved file version cannot be edited as it will be in read-only mode. If you want to make any changes and reuse the file later then you have to save the file with a new name.

Restore Version
Click on “Restore” button to replace the current version with the auto-saved version which you want to retain.

You will be prompted to confirm if you want to replace the file. If you click on OK button then you will lose the current file version as it will be replaced by the earlier version of the file. This feature is particularly useful when you want to undo any major change in the document.
Compare Versions
You can choose “Compare” to see difference between the two versions.

When you select this option the comparison result will be displayed in detail. There will be three sections in the results window. In the first column a summary of the result will be displayed. Changes based on different sections like Header, Text box, Footer will be given. Whatever content has been modified will be explained like content added or deleted. The second section displays the compared document. The changes between the two documents are highlighted. The third section displays both original and revised document. Using this feature you can easily track changes amongst different versions of the same document. After making the comparison you can save the compared document for future reference.
All auto-saved versions of a particular document will be available only when that document is open. Once you close the document you will lose all versions of the file unless you specifically saved any required version of the file. Again when you open the file for editing you will not find any earlier versions instead the auto-save process will start afresh when you begin working on the document.
Recover Unsaved Files
As already discussed above you need not worry about losing files in case of sudden system shutdown or any such problem, as your last unsaved version of the file will be auto-saved. To recover this file, click on File | Info | Versions | Manage Versions | Recover Unsaved Documents.

Here select required file from the “UnsavedFiles” folder and you can choose to open the file in desired mode. Click on the small down arrow next to “Tools” to select the required mode like Read-Only, Open and Repair, Open as Copy, etc. to open the file.