
Содержание
- Import or export text (.txt or .csv) files
- Import a text file by opening it in Excel
- Import a text file by connecting to it (Power Query)
- Export data to a text file by saving it
- Import a text file by connecting to it
- Export data to a text file by saving it
- Need more help?
- Save a workbook to text format (.txt or .csv)
- Available text file formats
- Export data to Excel
- In this article
- Exporting data to Excel: the basics
- Common scenarios for exporting data to Excel
- About exporting data to Excel
- Prepare for the export operation
Import or export text (.txt or .csv) files
There are two ways to import data from a text file with Excel: you can open it in Excel, or you can import it as an external data range. To export data from Excel to a text file, use the Save As command and change the file type from the drop-down menu.
There are two commonly used text file formats:
Delimited text files (.txt), in which the TAB character (ASCII character code 009) typically separates each field of text.
Comma separated values text files (.csv), in which the comma character (,) typically separates each field of text.
You can change the separator character that is used in both delimited and .csv text files. This may be necessary to make sure that the import or export operation works the way that you want it to.
Note: You can import or export up to 1,048,576 rows and 16,384 columns.
Import a text file by opening it in Excel
You can open a text file that you created in another program as an Excel workbook by using the Open command. Opening a text file in Excel does not change the format of the file — you can see this in the Excel title bar, where the name of the file retains the text file name extension (for example, .txt or .csv).
Go to File > Open and browse to the location that contains the text file.
Select Text Files in the file type dropdown list in the Open dialog box.
Locate and double-click the text file that you want to open.
If the file is a text file (.txt), Excel starts the Import Text Wizard. When you are done with the steps, click Finish to complete the import operation. See Text Import Wizard for more information about delimiters and advanced options.
If the file is a .csv file, Excel automatically opens the text file and displays the data in a new workbook.
Note: When Excel opens a .csv file, it uses the current default data format settings to interpret how to import each column of data. If you want more flexibility in converting columns to different data formats, you can use the Import Text Wizard. For example, the format of a data column in the .csv file may be MDY, but Excel’s default data format is YMD, or you want to convert a column of numbers that contains leading zeros to text so you can preserve the leading zeros. To force Excel to run the Import Text Wizard, you can change the file name extension from .csv to .txt before you open it, or you can import a text file by connecting to it (for more information, see the following section).
Import a text file by connecting to it (Power Query)
You can import data from a text file into an existing worksheet.
On the Data tab, in the Get & Transform Data group, click From Text/CSV.
In the Import Data dialog box, locate and double-click the text file that you want to import, and click Import.
In the preview dialog box, you have several options:
Select Load if you want to load the data directly to a new worksheet.
Alternatively, select Load to if you want to load the data to a table, PivotTable/PivotChart, an existing/new Excel worksheet, or simply create a connection. You also have the choice of adding your data to the Data Model.
Select Transform Data if you want to load the data to Power Query, and edit it before bringing it to Excel.
If Excel doesn’t convert a particular column of data to the format that you want, then you can convert the data after you import it. For more information, see Convert numbers stored as text to numbers and Convert dates stored as text to dates.
Export data to a text file by saving it
You can convert an Excel worksheet to a text file by using the Save As command.
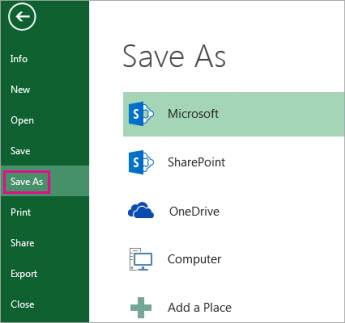
Go to File > Save As.
In the Save As dialog box, under Save as type box, choose the text file format for the worksheet; for example, click Text (Tab delimited) or CSV (Comma delimited).
Note: The different formats support different feature sets. For more information about the feature sets that are supported by the different text file formats, see File formats that are supported in Excel.
Browse to the location where you want to save the new text file, and then click Save.
A dialog box appears, reminding you that only the current worksheet will be saved to the new file. If you are certain that the current worksheet is the one that you want to save as a text file, click OK. You can save other worksheets as separate text files by repeating this procedure for each worksheet.
You may also see an alert below the ribbon that some features might be lost if you save the workbook in a CSV format.
For more information about saving files in other formats, see Save a workbook in another file format.
Import a text file by connecting to it
You can import data from a text file into an existing worksheet.
Click the cell where you want to put the data from the text file.
On the Data tab, in the Get External Data group, click From Text.
In the Import Data dialog box, locate and double-click the text file that you want to import, and click Import.
Follow the instructions in the Text Import Wizard. Click Help  on any page of the Text Import Wizard for more information about using the wizard. When you are done with the steps in the wizard, click Finish to complete the import operation.
In the Import Data dialog box, do the following:
Under Where do you want to put the data?, do one of the following:
To return the data to the location that you selected, click Existing worksheet.
To return the data to the upper-left corner of a new worksheet, click New worksheet.
Optionally, click Properties to set refresh, formatting, and layout options for the imported data.
Excel puts the external data range in the location that you specify.
If Excel does not convert a column of data to the format that you want, you can convert the data after you import it. For more information, see Convert numbers stored as text to numbers and Convert dates stored as text to dates.
Export data to a text file by saving it
You can convert an Excel worksheet to a text file by using the Save As command.
Go to File > Save As.
The Save As dialog box appears.
In the Save as type box, choose the text file format for the worksheet.
For example, click Text (Tab delimited) or CSV (Comma delimited).
Note: The different formats support different feature sets. For more information about the feature sets that are supported by the different text file formats, see File formats that are supported in Excel.
Browse to the location where you want to save the new text file, and then click Save.
A dialog box appears, reminding you that only the current worksheet will be saved to the new file. If you are certain that the current worksheet is the one that you want to save as a text file, click OK. You can save other worksheets as separate text files by repeating this procedure for each worksheet.
A second dialog box appears, reminding you that your worksheet may contain features that are not supported by text file formats. If you are interested only in saving the worksheet data into the new text file, click Yes. If you are unsure and would like to know more about which Excel features are not supported by text file formats, click Help for more information.
For more information about saving files in other formats, see Save a workbook in another file format.
The way you change the delimiter when importing is different depending on how you import the text.
If you use Get & Transform Data > From Text/CSV, after you choose the text file and click Import, choose a character to use from the list under Delimiter. You can see the effect of your new choice immediately in the data preview, so you can be sure you make the choice you want before you proceed.
If you use the Text Import Wizard to import a text file, you can change the delimiter that is used for the import operation in Step 2 of the Text Import Wizard. In this step, you can also change the way that consecutive delimiters, such as consecutive quotation marks, are handled.
See Text Import Wizard for more information about delimiters and advanced options.
If you want to use a semi-colon as the default list separator when you Save As .csv, but need to limit the change to Excel, consider changing the default decimal separator to a comma — this forces Excel to use a semi-colon for the list separator. Obviously, this will also change the way decimal numbers are displayed, so also consider changing the Thousands separator to limit any confusion.
Clear Excel Options > Advanced > Editing options > Use system separators.
Set Decimal separator to , (a comma).
Set Thousands separator to . (a period).
When you save a workbook as a .csv file, the default list separator (delimiter) is a comma. You can change this to another separator character using Windows Region settings.
Caution: Changing the Windows setting will cause a global change on your computer, affecting all applications. To only change the delimiter for Excel, see Change the default list separator for saving files as text (.csv) in Excel.
In Microsoft Windows 10, right-click the Start button, and then click Settings.
Click Time & Language, and then click Region in the left panel.
In the main panel, under Regional settings, click Additional date, time, and regional settings.
Under Region, click Change date, time, or number formats.
In the Region dialog, on the Format tab, click Additional settings.
In the Customize Format dialog, on the Numbers tab, type a character to use as the new separator in the List separator box.
In Microsoft Windows, click the Start button, and then click Control Panel.
Under Clock, Language, and Region, click Change date, time, or number formats.
In the Region dialog, on the Format tab, click Additional settings.
In the Customize Format dialog, on the Numbers tab, type a character to use as the new separator in the List separator box.
Note: After you change the list separator character for your computer, all programs use the new character as a list separator. You can change the character back to the default character by following the same procedure.
Need more help?
You can always ask an expert in the Excel Tech Community or get support in the Answers community.
Источник
Save a workbook to text format (.txt or .csv)
Sometimes, you might need to save a workbook in another file format, like a text (txt) or a comma-separated values format (csv). Just keep in mind that whenever you save a workbook in another file format, some of its formatting, data, and features might not be saved.
Caution: When you save a workbook in any of the text formats, all formatting will be removed.
Open the workbook you want to save.
Click File > Save As.
Pick the place where you want to save the workbook.

In the Save As dialog box, navigate to the location you want.
Click the arrow in the Save as type box and pick the type of text or CSV file format you want.
Note: The file formats you’ll see vary, depending on what type of sheet is active in your workbook (a worksheet, chart sheet, or other type of sheet).
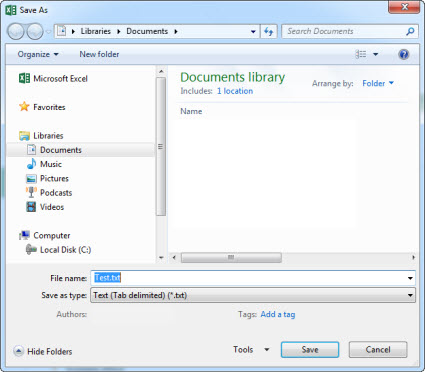
In the File name box, accept the suggested name or type a new name for the workbook.
Available text file formats
Formatted Text (Space-delimited)
Lotus space-delimited format. Saves only the active sheet.
Saves a workbook as a tab-delimited text file for use on another Microsoft Windows operating system, and ensures that tab characters, line breaks, and other characters are interpreted correctly. Saves only the active sheet.
Saves a workbook as a tab-delimited text file for use on the Macintosh operating system, and ensures that tab characters, line breaks, and other characters are interpreted correctly. Saves only the active sheet.
Saves a workbook as a tab-delimited text file for use on the MS-DOS operating system, and ensures that tab characters, line breaks, and other characters are interpreted correctly. Saves only the active sheet.
Saves a workbook as Unicode text, a character encoding standard that was developed by the Unicode Consortium.
CSV (comma delimited)
Saves a workbook as a comma-delimited text file for use on another Windows operating system, and ensures that tab characters, line breaks, and other characters are interpreted correctly. Saves only the active sheet.
Saves a workbook as a comma-delimited text file for use on the Macintosh operating system, and ensures that tab characters, line breaks, and other characters are interpreted correctly. Saves only the active sheet.
Saves a workbook as a comma-delimited text file for use on the MS-DOS operating system, and ensures that tab characters, line breaks, and other characters are interpreted correctly. Saves only the active sheet.
Data Interchange Format. Saves only the active sheet.
Symbolic Link Format. Saves only the active sheet.
Источник
Export data to Excel
Using the Export Wizard, you can export data from an Access database to in a file format that can be read by Excel. This article shows you how to prepare and export your data to Excel, and also gives you some troubleshooting tips for common problems that might occur.
In this article
Exporting data to Excel: the basics
When you export data to Excel, Access creates a copy of the selected data, and then stores the copied data in a file that can be opened in Excel. If you copy data from Access to Excel frequently, you can save the details of an export operation for future use, and even schedule the export operation to run automatically at set intervals.
Common scenarios for exporting data to Excel
Your department or workgroup uses both Access and Excel to work with data. You store the data in Access databases, but you use Excel to analyze the data and to distribute the results of your analysis. Your team currently exports data to Excel as and when they have to, but you want to make this process more efficient.
You are a long-time user of Access, but your manager prefers to work with data in Excel. At regular intervals, you do the work of copying the data into Excel, but you want to automate this process to save yourself time.
About exporting data to Excel
Access does not include a “Save As” command for the Excel format. To copy data to Excel, you must use the Export feature described in this article, or you can copy Access data to the clipboard and then paste it into an Excel spreadsheet.
You can export a table, query, form, or report. You can also export selected records in a multiple-record view, such as a datasheet.
Microsoft Excel includes a command to import data from an Access database. You can use that command instead of the export command in Access; however, the Excel import command only allows you to import tables or queries. For more information, see the Excel Help article Connect to (import) external data.
You cannot export macros or modules to Excel. When you export a form, report, or datasheet that contains subforms, subreports, or subdatasheets, only the main form, report, or datasheet is exported. You must repeat the export operation for each subform, subreport, and subdatasheet that you want to export to Excel.
You can only export one database object in a single export operation. However, you can merge multiple worksheets in Excel after you complete the individual export operations.
Prepare for the export operation
Before performing an export procedure, it is a good idea to review the data that you want to export to make sure that it does not contain any error indicators or error values. If there are any errors, try to resolve them before you export the data to Excel. Otherwise, problems can occur during the export operation, and null values might be inserted into cells in the Excel worksheet. For more information about problems that can occur when exporting to Excel, see the section Troubleshoot missing and incorrect values.
If the source object is a table or a query, decide whether you want to export the data with or without its formatting. This decision affects two aspects of the resulting workbook — the amount of data that is exported and the display format of the data. The following table describes the outcome of exporting formatted and unformatted data.
Источник
Import or export text (.txt or .csv) files
There are two ways to import data from a text file with Excel: you can open it in Excel, or you can import it as an external data range. To export data from Excel to a text file, use the Save As command and change the file type from the drop-down menu.
There are two commonly used text file formats:
-
Delimited text files (.txt), in which the TAB character (ASCII character code 009) typically separates each field of text.
-
Comma separated values text files (.csv), in which the comma character (,) typically separates each field of text.
You can change the separator character that is used in both delimited and .csv text files. This may be necessary to make sure that the import or export operation works the way that you want it to.
Note: You can import or export up to 1,048,576 rows and 16,384 columns.
Import a text file by opening it in Excel
You can open a text file that you created in another program as an Excel workbook by using the Open command. Opening a text file in Excel does not change the format of the file — you can see this in the Excel title bar, where the name of the file retains the text file name extension (for example, .txt or .csv).
-
Go to File > Open and browse to the location that contains the text file.
-
Select Text Files in the file type dropdown list in the Open dialog box.
-
Locate and double-click the text file that you want to open.
-
If the file is a text file (.txt), Excel starts the Import Text Wizard. When you are done with the steps, click Finish to complete the import operation. See Text Import Wizard for more information about delimiters and advanced options.
-
If the file is a .csv file, Excel automatically opens the text file and displays the data in a new workbook.
Note: When Excel opens a .csv file, it uses the current default data format settings to interpret how to import each column of data. If you want more flexibility in converting columns to different data formats, you can use the Import Text Wizard. For example, the format of a data column in the .csv file may be MDY, but Excel’s default data format is YMD, or you want to convert a column of numbers that contains leading zeros to text so you can preserve the leading zeros. To force Excel to run the Import Text Wizard, you can change the file name extension from .csv to .txt before you open it, or you can import a text file by connecting to it (for more information, see the following section).
-
Import a text file by connecting to it (Power Query)
You can import data from a text file into an existing worksheet.
-
On the Data tab, in the Get & Transform Data group, click From Text/CSV.
-
In the Import Data dialog box, locate and double-click the text file that you want to import, and click Import.
-
In the preview dialog box, you have several options:
-
Select Load if you want to load the data directly to a new worksheet.
-
Alternatively, select Load to if you want to load the data to a table, PivotTable/PivotChart, an existing/new Excel worksheet, or simply create a connection. You also have the choice of adding your data to the Data Model.
-
Select Transform Data if you want to load the data to Power Query, and edit it before bringing it to Excel.
-
If Excel doesn’t convert a particular column of data to the format that you want, then you can convert the data after you import it. For more information, see Convert numbers stored as text to numbers and Convert dates stored as text to dates.
Export data to a text file by saving it
You can convert an Excel worksheet to a text file by using the Save As command.
-
Go to File > Save As.
-
Click Browse.
-
In the Save As dialog box, under Save as type box, choose the text file format for the worksheet; for example, click Text (Tab delimited) or CSV (Comma delimited).
Note: The different formats support different feature sets. For more information about the feature sets that are supported by the different text file formats, see File formats that are supported in Excel.
-
Browse to the location where you want to save the new text file, and then click Save.
-
A dialog box appears, reminding you that only the current worksheet will be saved to the new file. If you are certain that the current worksheet is the one that you want to save as a text file, click OK. You can save other worksheets as separate text files by repeating this procedure for each worksheet.
You may also see an alert below the ribbon that some features might be lost if you save the workbook in a CSV format.
For more information about saving files in other formats, see Save a workbook in another file format.
Import a text file by connecting to it
You can import data from a text file into an existing worksheet.
-
Click the cell where you want to put the data from the text file.
-
On the Data tab, in the Get External Data group, click From Text.
-
In the Import Data dialog box, locate and double-click the text file that you want to import, and click Import.
Follow the instructions in the Text Import Wizard. Click Help
 on any page of the Text Import Wizard for more information about using the wizard. When you are done with the steps in the wizard, click Finish to complete the import operation.
 -
In the Import Data dialog box, do the following:
-
Under Where do you want to put the data?, do one of the following:
-
To return the data to the location that you selected, click Existing worksheet.
-
To return the data to the upper-left corner of a new worksheet, click New worksheet.
-
-
Optionally, click Properties to set refresh, formatting, and layout options for the imported data.
-
Click OK.
Excel puts the external data range in the location that you specify.
-
If Excel does not convert a column of data to the format that you want, you can convert the data after you import it. For more information, see Convert numbers stored as text to numbers and Convert dates stored as text to dates.
Export data to a text file by saving it
You can convert an Excel worksheet to a text file by using the Save As command.
-
Go to File > Save As.
-
The Save As dialog box appears.
-
In the Save as type box, choose the text file format for the worksheet.
-
For example, click Text (Tab delimited) or CSV (Comma delimited).
-
Note: The different formats support different feature sets. For more information about the feature sets that are supported by the different text file formats, see File formats that are supported in Excel.
-
-
Browse to the location where you want to save the new text file, and then click Save.
-
A dialog box appears, reminding you that only the current worksheet will be saved to the new file. If you are certain that the current worksheet is the one that you want to save as a text file, click OK. You can save other worksheets as separate text files by repeating this procedure for each worksheet.
-
A second dialog box appears, reminding you that your worksheet may contain features that are not supported by text file formats. If you are interested only in saving the worksheet data into the new text file, click Yes. If you are unsure and would like to know more about which Excel features are not supported by text file formats, click Help for more information.
For more information about saving files in other formats, see Save a workbook in another file format.
The way you change the delimiter when importing is different depending on how you import the text.
-
If you use Get & Transform Data > From Text/CSV, after you choose the text file and click Import, choose a character to use from the list under Delimiter. You can see the effect of your new choice immediately in the data preview, so you can be sure you make the choice you want before you proceed.
-
If you use the Text Import Wizard to import a text file, you can change the delimiter that is used for the import operation in Step 2 of the Text Import Wizard. In this step, you can also change the way that consecutive delimiters, such as consecutive quotation marks, are handled.
See Text Import Wizard for more information about delimiters and advanced options.
If you want to use a semi-colon as the default list separator when you Save As .csv, but need to limit the change to Excel, consider changing the default decimal separator to a comma — this forces Excel to use a semi-colon for the list separator. Obviously, this will also change the way decimal numbers are displayed, so also consider changing the Thousands separator to limit any confusion.
-
Clear Excel Options > Advanced > Editing options > Use system separators.
-
Set Decimal separator to , (a comma).
-
Set Thousands separator to . (a period).
When you save a workbook as a .csv file, the default list separator (delimiter) is a comma. You can change this to another separator character using Windows Region settings.
Caution: Changing the Windows setting will cause a global change on your computer, affecting all applications. To only change the delimiter for Excel, see Change the default list separator for saving files as text (.csv) in Excel.
-
In Microsoft Windows 10, right-click the Start button, and then click Settings.
-
Click Time & Language, and then click Region in the left panel.
-
In the main panel, under Regional settings, click Additional date, time, and regional settings.
-
Under Region, click Change date, time, or number formats.
-
In the Region dialog, on the Format tab, click Additional settings.
-
In the Customize Format dialog, on the Numbers tab, type a character to use as the new separator in the List separator box.
-
Click OK twice.
-
In Microsoft Windows, click the Start button, and then click Control Panel.
-
Under Clock, Language, and Region, click Change date, time, or number formats.
-
In the Region dialog, on the Format tab, click Additional settings.
-
In the Customize Format dialog, on the Numbers tab, type a character to use as the new separator in the List separator box.
-
Click OK twice.
Note: After you change the list separator character for your computer, all programs use the new character as a list separator. You can change the character back to the default character by following the same procedure.
Need more help?
You can always ask an expert in the Excel Tech Community or get support in the Answers community.
See Also
Import data from external data sources (Power Query)
Need more help?
How to remember or save previous cell value of a changed cell in Excel?
- Save previous cell value with VBA code in Excel.
- In the worksheet contains the value you will save when updating, right-click the sheet tab and select View Code from the right-clicking menu.
How do you generate random value based on assigned probability in Excel?
Generate random value with probability Select a blank cell which you will place the random value at, type this formula =INDEX(A$2:A$8,COUNTIF(C$2:C$8,”<=”&RAND())+1), press Enter key. And press F9 key to refresh the value as you need.
How do I keep a previous value in Excel?
If you want to KEEP the text/value that is shown in a cell for “all future”:
- Select the cell.
- Select COPY from the menus/ribbon or hold CTRL and hit C.
- Immediately select “Paste special” from the menus/ribbon,
- select “[v] Values” in the dialog that opened, then click OK.
How do I save a cell value in Excel?
Select all the cells with formulas that you want to convert. Press Ctrl + C or Ctrl + Ins to copy formulas and their results to clipboard. Press Shift + F10 and then V to paste only values back to Excel cells. Shift + F10 + V is the shortest way to use Excel “Paste special – values only” dialog.
How do you automatically update a cell value in Excel?
The detailed steps follow below.
- Select the range of cells where you want to replace text or numbers.
- Press the Ctrl + H shortcut to open the Replace tab of the Excel Find and Replace dialog.
- In the Find what box type the value to search for, and in the Replace with box type the value to replace with.
How do I save a name in Excel?
Assuming you are saving your workbooks in the My Documents folder, the steps for saving a workbook are straightforward:
- Open Excel’s File menu and choose Save.
- Click in the File Name text box.
- Type a descriptive and unique name for your workbook.
- Click the Save button.
How do I store a range in Excel?
How to Create Named Ranges in Excel
- Select the range for which you want to create a Named Range in Excel.
- Go to Formulas –> Define Name.
- In the New Name dialogue box, type the Name you wish to assign to the selected data range.
- Click OK.
What are the 4 major parts of Excel?
- Worksheet – rectangular grid of rows (numbers) and columns (letters)
- Cell – intersection of row and column.
- Cell reference – unique address, coordinates of the intersection of a column and row (B7)
- Gridlines – horizontal and vertical lines.
What is a Counta formula in Excel?
The COUNTA function counts cells containing any type of information, including error values and empty text (“”). For example, if the range contains a formula that returns an empty string, the COUNTA function counts that value. The COUNTA function does not count empty cells.
-
#2
FYI before you try anything BACKUP!! BACKUP!! and oh yea BACKUP!!
I just wanted to remind you before you try a macro, that looses all those valuable formulas and replaces them with VALUEs.
-
#3
Of course, I’ll keep a separate copy with the full formulas, etc. Thanks for the advice, though.
Now, any idea of how to go about actually saving the entire file as just values?
Any help is appreciated. Thanks.
-
#4
Here is what I used when I had to do the same thing every month, I hope it helps. I just copied it into a module use F8 to visually make sure it is working for your application. And if you can tell sometimes I failed to backup, Thank God for IT & Network Admin.
Sub thevalues()
CHECK = MsgBox(«Make a copy before this is ran!», vbOKCancel, «Just Checking»)
If CHECK = 1 Then
For Each ws In Worksheets
other = ws.Name
Worksheets(other).Activate
Range(«A1»).Select
Range(Selection, ActiveCell.SpecialCells(xlLastCell)).Select
Selection.Copy
Selection.PasteSpecial Paste:=xlPasteValues, Operation:=xlNone, _
SkipBlanks:=True, Transpose:=False
Application.CutCopyMode = False
Range(«A1»).Select
Next ws
Else: End If
End Sub
-
#5
Thanks for the solution! It uses macros, though. Does anyone have another solution without macros? (I’m VBA-challenged.)
-
#6
You could print it to a pdf and distribute that instead, pdf’s are quite economical on file size and you can set different levels of security to stop people from messing with it (according to your needs).
-
#7
You could try to just select all sheets (select the leftmost one, then shift-click on the last one), then select all cells (the small box left of column A and above row 1), then copy & paste as values.
-
#8
You could try to just select all sheets (select the leftmost one, then shift-click on the last one), then select all cells (the small box left of column A and above row 1), then copy & paste as values.
No, you really don’t want to do that. ANY complexity in the WB just leads to massive problems.
Having said that if your WB is simple enough then go for it (but at 35MB, I doubt it !)
-
#9
I was messing around with all the ways to select, copy and paste.
I got nothing.
I could group all sheet & select all like Jubjab suggested (I liked that), but I couldn’t copy all selections & paste value. It is probably why I made a macro for it. Of course after I saved the values I removed the macro before distribution.
-
#10
IT WORKED!!
Thanks Jubjab for your solution!! It worked just fine with my (now 43MB and growing) workbook.
Simple, elegant and effective. Beautiful.
The only thing you need to make sure is that the target workbook has enough empty worksheets on it, so that all tabs fit in. Other than that, it just works!
Thanks again.
This post will provide you with a step-by-step guide on how to save Excel workbook file with Cell value in Excel using VBA code in Excel 2013/2016/2019/365. Saving files based on specific criteria can be a tedious and time-consuming task, especially if you have to do it repeatedly. However, with VBA code, you can automate this process and save yourself a lot of time and effort.
1. Save File Based on Cell Value with VBA Code
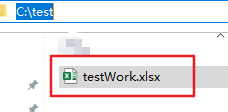
Assuming that you have a request that save the current workbook file I am working as the value in Cell A1. For example, the value of Cell A1 is testWork, and you want to save the workbook as the name of testWork.
To Save file with Cell Value in Excel, you need to write down an Excel VBA Macro to achieve the result. Just do the following steps:
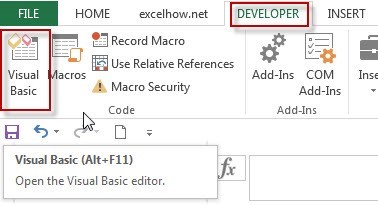
Step1: open your excel workbook and then click on “Visual Basic” command under DEVELOPER Tab, or just press “ALT+F11” shortcut.
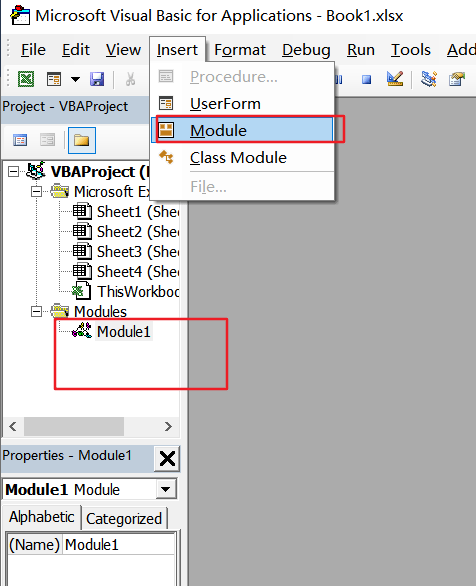
Step2: then the “Visual Basic Editor” window will appear.
Step3: click “Insert” ->”Module” to create a new module.
Step4: paste the below VBA code into the code window. Then clicking “Save” button.
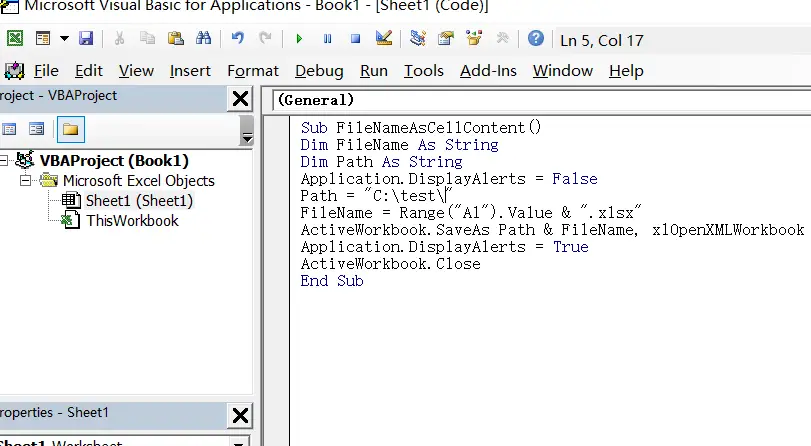
Sub FileNameAsCellContent()
    Dim FileName As String
    Dim Path As String
    Application.DisplayAlerts = False
    Path = "C:test"
    FileName = Range("A1").Value & ".xlsx"
    ActiveWorkbook.SaveAs Path & FileName, xlOpenXMLWorkbook
    Application.DisplayAlerts = True
    ActiveWorkbook.Close
End Sub
Step5: back to the current worksheet, then run the above excel macro. Click Run button.
Step6: Let’s see the result:
This video will demonstrate how to save a file based on a cell value in Excel using VBA code.
3. Conclusion
Now you should have a good understanding of how to use VBA code to save files based on cell values, and you’ll be able to apply this knowledge to your own Excel projects.
I’m going to assume that you want to save and close your file at or after 5 pm every day. If those assumptions are correct, modify the following code to suit the structure of your workbook:
Option Explicit
Private Sub Workbook_BeforeClose(Cancel As Boolean)
    Dim sht As Worksheet
    Dim celLive As Range
    Dim celSave As Range

    If Hour(Now()) >= 17 Then
    ' ### change the below values to match your workbook structure ###
        Set sht = Sheets("MySheet")
        Set celLive = sht.Range("A1")
        Set celSave = sht.Range("B1")

        celSave.Value = celLive.Value
        ActiveWorkbook.Save
    End If
End Sub
Alternatively, you may wish to review the results of the executed code before closing the workbook by using the following code instead:
Option Explicit
Private Sub Workbook_BeforeSave(ByVal SaveAsUI As Boolean, Cancel As Boolean)
    Dim sht As Worksheet
    Dim celLive As Range
    Dim celSave As Range

    If Hour(Now()) >= 17 Then
    ' ### change the below values to match your structure ###
        Set sht = Sheets("MySheet")
        Set celLive = sht.Range("A1")
        Set celSave = sht.Range("B1")

        celSave.Value = celLive.Value
        With Application
            .EnableEvents = False
            ActiveWorkbook.Save
            .EnableEvents = True
        End With
    End If
End Sub
Put the code for either method in the Workbook module or it will not execute.
Something that comes up time and time again in any kind of work is separating data out into separate workbooks based on the values of a field in the data.
Let’s say you have sales data for your company and you need to send each of the sales representatives in the company a copy of their sales.
You might not want to share the entire set of data with each rep but just their own sales due to privacy concerns around their commission based compensation.
To do this, you will need to take our original set of data and parse it out into many different workbooks (one for each sales rep) based on the sales rep column in the data.
Parsing and exporting data into different workbooks is a very common problem. Unfortunately, Excel does not have a built-in solution.
We would need to manually filter for each item in a column and then copy and paste the filtered data into a new file and save that. This can be very time-consuming if we have a lot of values to filter or if this is an activity we will be doing monthly, weekly, or even daily.
Fortunately, we can automate this with VBA!
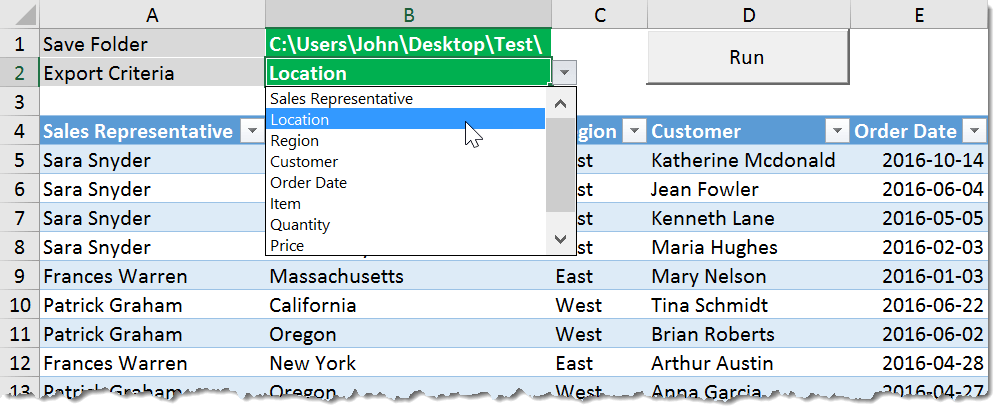
This template will allow you to separate out your data by selecting a column to separate it based on.
This workbook uses a table called Data to hold the aggregate data. You can adjust the size and column heading to suit your data. Delete or add columns as desired and rename the column headings to suit your own data.
The drop-down menu will automatically account for the new column headings. Set your save path accordingly, this is where the VBA will save all the new data files it creates.
When the template is all set up, press the Run button and your new data files will appear in the save path folder.
The VBA uses named range references so the template is flexible and you can cut and paste the sheet until you’re satisfied and you will not break the code. Here is the VBA code used in the template.
Option Explicit

Sub ExportData()

'Declare variables
Dim ArrayItem As Long
Dim ws As Worksheet
Dim ArrayOfUniqueValues As Variant
Dim SavePath As String
Dim ColumnHeadingInt As Long
Dim ColumnHeadingStr As String
Dim rng As Range

'Set the worksheet to
Set ws = Sheets("Data")

'Set the save path for the files created
SavePath = Range("FolderPath")

'Set variables for the column we want to separate data based on
ColumnHeadingInt = WorksheetFunction.Match(Range("ExportCriteria").Value, Range("Data[#Headers]"), 0)
ColumnHeadingStr = "Data[[#All],[" & Range("ExportCriteria").Value & "]]"

'Turn off screen updating to save runtime
Application.ScreenUpdating = False

'Create a temporary list of unique values from the column we want to
'separate our data based on
Range(ColumnHeadingStr & "").AdvancedFilter Action:=xlFilterCopy, _
    CopyToRange:=Range("UniqueValues"), Unique:=True

'Sort our temporary list of unique values
ws.Range("UniqueValues").EntireColumn.Sort Key1:=ws.Range("UniqueValues").Offset(1, 0), _
    Order1:=xlAscending, Header:=xlYes, OrderCustom:=1, MatchCase:=False, _
    Orientation:=xlTopToBottom, DataOption1:=xlSortNormal

'Add unique field values into an array
'ArrayOfUniqueValues = Application.WorksheetFunction.Transpose(ws.Range("IV2:IV" & Rows.Count).SpecialCells(xlCellTypeConstants))
ArrayOfUniqueValues = Application.WorksheetFunction.Transpose(ws.Range("UniqueValues").EntireColumn.SpecialCells(xlCellTypeConstants))

'Delete the temporary values
ws.Range("UniqueValues").EntireColumn.Clear

'Loop through our array of unique field values, copy paste into new workbooks and save
For ArrayItem = 1 To UBound(ArrayOfUniqueValues)
    ws.ListObjects("Data").Range.AutoFilter Field:=ColumnHeadingInt, Criteria1:=ArrayOfUniqueValues(ArrayItem)
    ws.Range("Data[#All]").SpecialCells(xlCellTypeVisible).Copy
    Workbooks.Add
    Range("A1").PasteSpecial xlPasteAll
    ActiveWorkbook.SaveAs SavePath & ArrayOfUniqueValues(ArrayItem) & Format(Now(), " YYYY-MM-DD hhmmss") & ".xlsx", 51
    ActiveWorkbook.Close False
    ws.ListObjects("Data").Range.AutoFilter Field:=ColumnHeadingInt
Next ArrayItem

ws.AutoFilterMode = False
MsgBox "Finished exporting!"
Application.ScreenUpdating = True

End SubNote: This was tested on Excel 2016 but I have not tested it on previous versions.
About the Author
John is a Microsoft MVP and qualified actuary with over 15 years of experience. He has worked in a variety of industries, including insurance, ad tech, and most recently Power Platform consulting. He is a keen problem solver and has a passion for using technology to make businesses more efficient.

Excel VBA Save As
If you are a frequent user of Microsoft Excel, you must have used Save As function under it, which allows you to save the currently opened workbook with a different name or different format (Excel Macro-enabled, CSV, PDF, etc.). You can also save the file in a different folder using this method. However, is it possible to use the same function under VBA? The answer is an absolute Yes! We are having Save As function under VBA as well which helps us to do all these above-mentioned tasks along with some additional benefits (obviously automating things is one of the benefits). In this article, we are going to have a look into different examples for VBA SAVE AS function.
Formula for Save As function in Excel VBA
Let us look below the formula for Save As function in VBA.

Where,
- FileName – Name of the workbook to be saved.
- FileFormat – File format in which the file needs to be saved (Ex. Pdf, CSV, etc.)
- Password – Password to protect the workbook (The workbook can’t be accessible without a password)
- WriteResPassword – Write reservation password for the workbook.
- ReadOnlyRecommended – Recognizes whether the workbook is saved in Read-Only format or not.
- CreateBackup – Determines whether a backup file for the workbook is created or not.
- AccessMode – Recognizes the access mode for the workbook.
- ConflictResolution – Recognizes the conflicts that pop-up when the workbook is shared and is used by more than one user.
- AddToMru – Checks if the workbook is added under recently used file or not.
- Local – Checks if the workbook is saved with the laws of Excel (local language) or with VBA laws (US – English).
Hush! Lots of arguments right? But what if I tell you, all these arguments are optional and can be skipped while using VBA SAVE AS function. However, it is true that these are the arguments that make VBA SaveAs more flexible function to use. “Expression” at the start of the syntax is nothing but an expression against which this function can be used. Like Workbook is the expression against which SaveAs can be used.
Examples to Save Excel File using VBA Save As Function
Below are the different examples to save excel file using VBA Save As function.
You can download this VBA Save As Excel Template here – VBA Save As Excel Template
Example #1 – How to Save a Copy of the Workbook with a Different Name?
Let’s see how we can save the current workbook with a different name.
Follow the below steps to use Save As Function in Excel VBA:
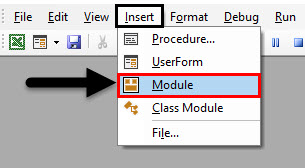
Step 1: Add a new module under Visual Basic Editor (VBE). Go to Insert and then select Module.
Step 2: Define a new sub-procedure which can store a macro.
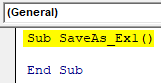
Code:
Sub SaveAs_Ex1()

End Sub
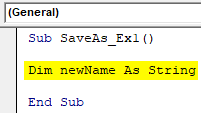
Step 3: Define a new variable which can hold the name by which the file to be saved as.
Code:
Sub SaveAs_Ex1()

Dim newName As String

End Sub
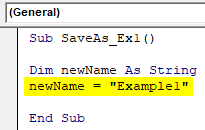
Step 4: Now use the assignment operator to assign a name to this variable using which current file can be saved as.
Code:
Sub SaveAs_Ex1()

Dim newName As String
newName = "Example1"

End Sub
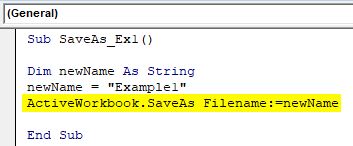
Step 5: Now, use SaveAs function with FileName argument in order to save the file as with name “Example1”.
Code:
Sub SaveAs_Ex1()

Dim newName As String
newName = "Example1"
ActiveWorkbook.SaveAs Filename:=newName

End Sub
Step 6: This is it, now run this code by hitting F5 or manually using the Run button and see the output.
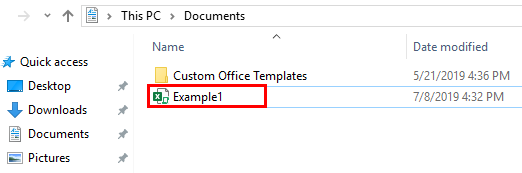
You can see that a file with the name “Example1” is being saved on Documents.
If you could have noted down, the file is being saved as Macro-Enabled File, because the original file which I have used SaveAs function on is a file with Macro-Enabled. It means that this function in VBA automatically checks the file format of the previous file and saves it in the same format. Also, by default, the file will be saved in Documents under This PC. This default location can be provided explicitly at the time of defining sheet name.
Example #2 – Saving Workbook with User Provided Name
Instead of defining name initially, is it possible to write a code which allows a user to save the worksheet by the name of his choice same as Excel Save As function?
Follow the below steps to use Save As Function in Excel VBA.
Step 1: Define a new sub-procedure under newly inserted module which can store the macro.
Code:
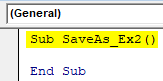
Sub SaveAs_Ex2()

End Sub
Step 2: Define a new variable which can hold the value of the user-defined name.
Code:
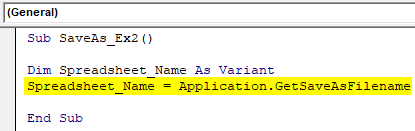
Sub SaveAs_Ex2()

Dim Spreadsheet_Name As Variant

End Sub

The reason for this variable being defined as Variant is, this data type makes Naming conventions versatile. For Example, a user may add some extra special character (which are allowed in naming conventions) or can add dates as well under the file name.
Step 3: Now, with the help of an assignment operator and function combination called application.GetSaveAsFilename, make a statement that allows the system to take a user-defined name. See how it has been achieved in the screenshot below.
Code:
Sub SaveAs_Ex2()

Dim Spreadsheet_Name As Variant
Spreadsheet_Name = Application.GetSaveAsFilename

End Sub
Step 4: Use conditional IF to make sure the name user enters is valid as per the naming conventions.
Code:
Sub SaveAs_Ex2()

Dim Spreadsheet_Name As Variant
Spreadsheet_Name = Application.GetSaveAsFilename
If Spreadsheet_Name <> False Then

End Sub
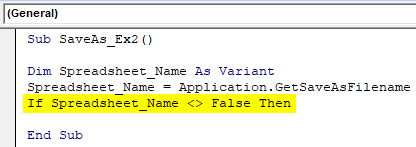
This condition checks if the name given by the user to save the worksheet is properly satisfying the naming conventions set for naming a file or not.
Step 5: Write down a statement which gets evaluated for the given IF condition.
Code:
Sub SaveAs_Ex2()

Dim Spreadsheet_Name As Variant
Spreadsheet_Name = Application.GetSaveAsFilename
If Spreadsheet_Name <> False Then
  ActiveWorkbook.SaveAs Filename:=Spreadsheet_Name

End Sub
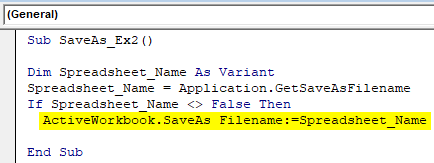
This piece of code gets evaluated once the IF condition is true. If so, the active workbook will get saved under the name define in variable Spreadsheet_Name (Which will be user-defined)
Step 6: End the IF-loop and run this code to see the output.
Code:
Sub SaveAs_Ex2()

Dim Spreadsheet_Name As Variant
Spreadsheet_Name = Application.GetSaveAsFilename
If Spreadsheet_Name <> False Then
  ActiveWorkbook.SaveAs Filename:=Spreadsheet_Name
End If

End Sub
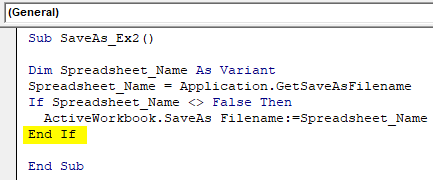
Step 7: As soon as you run this code, you’ll get Save As dialogue box which will allow you to type in the name of your choice and save the file.
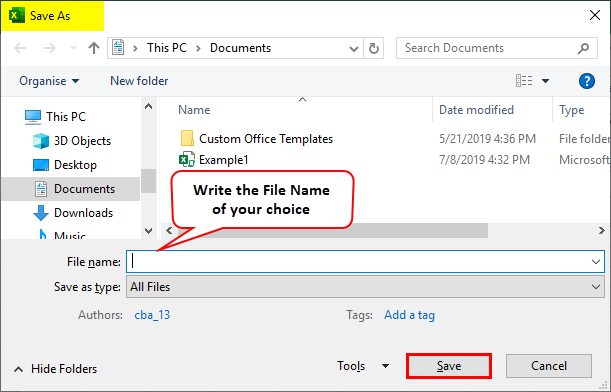
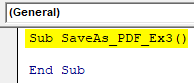
Example #3 – How to Save as a File into PDF using Excel VBA SaveAs function?
Suppose you have a data as given below in your excel sheet and you need to convert it into PDF.

Follow the below steps to convert this file into a PDF Using VBA Save As function:
Step 1: Define a new sub-procedure to store a macro.
Code:
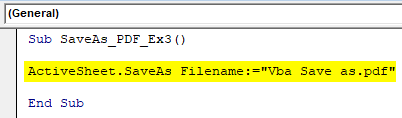
Sub SaveAs_PDF_Ex3()

End Sub
Step 2: Now, use the following code to save this file as a PDF file.
Code:
Sub SaveAs_PDF_Ex3()

ActiveSheet.SaveAs Filename:="Vba Save as.pdf"

End Sub
Step 3: Run this code and you’ll see a pdf file generated under This PC > Documents.
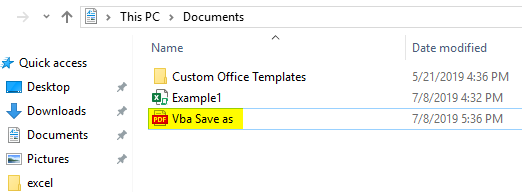
In this code, ActiveSheet.SaveAs allows the file to be saved with the same name. As we have added the extension as .pdf at the end of the file, it gets exported into PDF file. You can see the image above for your reference.
Things to Remember
- The by default save location for the file used under VBA SaveAs will be This PC > Documents. However, you can specify the directory manually at the time of defining file name.
- By default, the file saved using VBA SaveAs will be saved under the format same as that of the original file. However, it can also be defined as per user requirement at the time you define the variable.
Recommended Articles
This is a guide to VBA Save As. Here we discuss how to save the file using Excel VBA Save As function along with an example and downloadable excel template. Below are some useful excel articles related to VBA –
- VBA Exit Sub
- VBA Object
- VBA Object Required
- VBA Get Cell Value
In Microsoft Excel, users can export data to a .csv file. This is a simple file format that is used to store spreadsheets and databases, and which can be opened in a multitude of operating systems and programs. This simple file format separates values by commas (hence the name comma-separated values).
When creating a .csv on Microsoft Excel, a user might want to select only the data from specific columns. One superuser.com poster explained:
“I want to export specific number of columns from excel into .csv file. I have around 10 columns like lname, fname, phone, address, email and so on. What should I do to export only certain columns like lnam, email and so on?”
It is possible to select the only columns you intend to export and create a .csv file from them, using the following method.
Method 1: Create a New Workbook
The simplest method of creating your .csv file is to begin by selecting the first column that you intend to export. You can do this by pressing the letter that represents the column at the top of the page. So for instance, if a user is intending to export the F, G, and L columns, they should begin by clicking the F column at the top.
The user must then hold down the Ctrl key on the keyboard, and select G and L. This allows you to select multiple columns. You should see the highlighter appear around each full column of data. Then, press Ctrl and C and then press Ctrl and N.
The first keyboard command will copy all of the columns you have highlighted, and the second command will open a new workbook. Once a new workbook has opened. Press any cell inside the sheet and then press Ctrl and V, which will paste the data you copied from the first wookbook.
Then, press Ctrl and S on your keyboard and in the field at the bottom of the window that opens, choose a name for your file in the dialog box that is labelled File name. Underneath the name dialog box, there is a box labelled Save as type. Click this drop down menu and choose .csv. Then press Save.
Method 2: Use The CSV Exported VBA
- Click (here) and download the VBA
- And install it. Then load the form by simultaneously pressing CTRL + SHIFT + C
- Then highlight the range that you want to export
- Then select the folder where you want the export to be saved as CSV
- Name the file, format and specifiy the seperator.
- And Click Export.


Kevin Arrows
Kevin Arrows is a highly experienced and knowledgeable technology specialist with over a decade of industry experience. He holds a Microsoft Certified Technology Specialist (MCTS) certification and has a deep passion for staying up-to-date on the latest tech developments. Kevin has written extensively on a wide range of tech-related topics, showcasing his expertise and knowledge in areas such as software development, cybersecurity, and cloud computing. His contributions to the tech field have been widely recognized and respected by his peers, and he is highly regarded for his ability to explain complex technical concepts in a clear and concise manner.