
Word для Microsoft 365 Word 2021 Word 2019 Word 2016 Word 2013 Word 2010 Word 2007 Еще…Меньше
Примечание: Эта статья выполнила свою задачу, и в скором времени ее использование будет прекращено. Чтобы избежать появления ошибок «Страница не найдена», мы удаляем известные нам ссылки. Если вы создали ссылки на эту страницу, удалите их, и вместе мы обеспечим согласованность данных в Интернете.
-
Щелкните то место, куда вы хотите вставить дату или время.
-
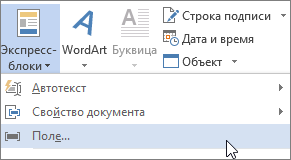
На вкладке Вставка в группе Текст нажмите кнопку Экспресс-блоки и выберите пункт Поле.

-
В поле Категории выберите пункт Дата и время.
-
В разделе Имена полей выберите CreateDate, PrintDate или SaveDate.
-
В поле Форматы даты выберите нужный формат даты и времени, например «12.02.2017 г. 21:45» или «12 февраля 2017 г.».
Дополнительные сведения
Вставка текущей даты в документ Word
Нужна дополнительная помощь?
Если вам нужно автоматически добавить текущую дату в имя файла при сохранении документа Word, как вы могли бы справиться с этой задачей в файле Word?
Сохраните документ Word с текущей датой в имени файла с кодом VBA
Сохраните документ Word с текущей датой в имени файла с кодом VBA
Чтобы автоматически добавлять текущую дату в имя файла при сохранении документа Word, выполните следующие действия:
1. Удерживайте ALT + F11 , чтобы открыть Microsoft Visual Basic для приложений окно.
2. А затем нажмите Вставить > Модули, скопируйте и вставьте приведенный ниже код в открытый пустой модуль:
Код VBA: сохранить документ Word с текущей датой в имени файла
Public Sub FileSave1()
    Dim xDlg As Dialog
    Dim xTitle As String
    On Error Resume Next
    xTitle = ActiveDocument.BuiltInDocumentProperties("Title").Value
    xTitle = xTitle & " " & Format((Year(Now() + 1) Mod 100), "20##") & "-" & _
        Format((Month(Now() + 1) Mod 100), "0#") & "-" & _
        Format((Day(Now()) Mod 100), "0#")
    Set xDlg = Dialogs(wdDialogFileSaveAs)
    xDlg.Name = xTitle
    xDlg.Show
End Sub
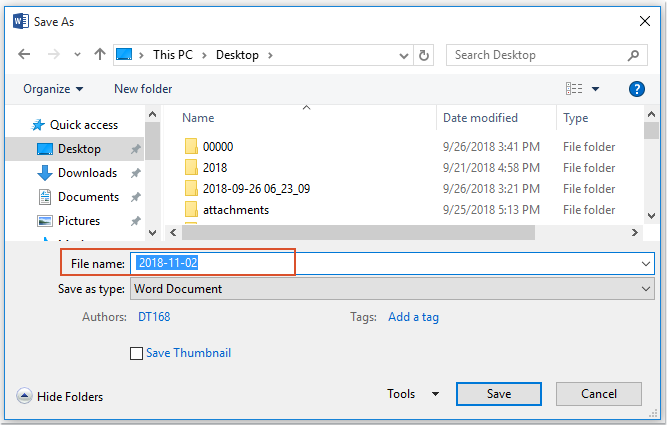
3. После вставки кода в модуль нажмите F5 ключ для запуска этого кода и Сохранить как окно отображается с текущей датой автоматически в Имя файла текстовое поле, см. снимок экрана:
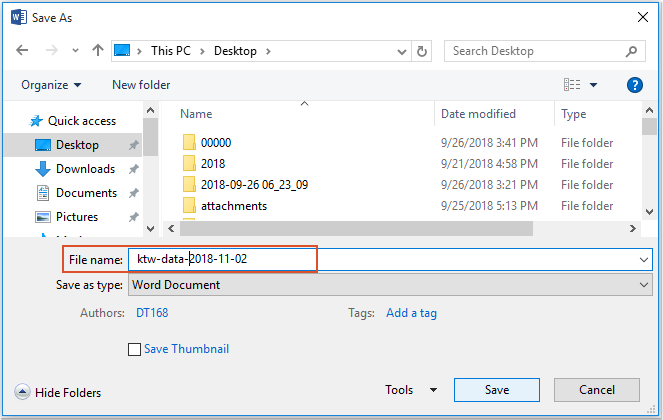
4. А затем вам просто нужно ввести собственное имя файла, как вам нужно, см. Снимок экрана:
Рекомендуемые инструменты для повышения производительности Word


Kutools For Word — Более 100 расширенных функций для Word, сэкономьте 50% времени
- Сложные и повторяющиеся операции можно производить разово за секунды.
- Вставляйте сразу несколько изображений из папок в документ Word.
- Объединяйте и объединяйте несколько файлов Word из папок в одну в желаемом порядке.
- Разделите текущий документ на отдельные документы в соответствии с заголовком, разрывом раздела или другими критериями.
- Преобразование файлов между Doc и Docx, Docx и PDF, набор инструментов для общих преобразований и выбора и т. Д.
Комментарии (0)
Оценок пока нет. Оцените первым!
Во время работы с документами офисной программы, часто необходимо отображать текущую дату и время в Ворде. Вставлять их вручную не очень удобно, потому что впоследствии может возникнуть необходимость в изменении этих параметров.
Как написать время в Ворде? В текстовом редакторе Microsoft Office Word имеются инструменты для вставки в документ текущих значений или автоматического обновления даты и времени, вставленных ранее, до текущих значений.
Содержание:
- Как вставить текущую дату и время в Ворде
- Как в Ворде вставить дату и время по умолчанию
- Вставка даты и времени для создания, сохранения и печати документа
- Вставка даты или времени с помощью горячих клавиш
- Изменение значений поля даты
- Удаление даты и времени из документа Word
- Выводы статьи
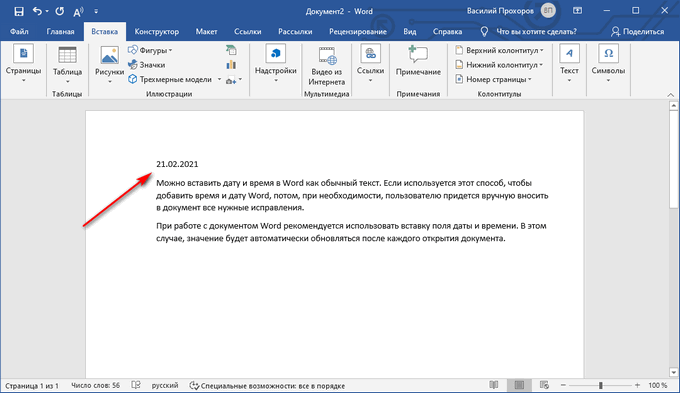
Можно вставить дату и время в Word как обычный текст. Если используется этот способ, чтобы добавить дату и время Word, потом, при необходимости, пользователю приходится вручную вносить в документ все нужные исправления.
При работе с документом Microsoft Word рекомендуется использовать вставку поля даты и времени. В этом случае, значение будет автоматически обновляться после каждого открытия документа.
В инструкциях этой статьи для вставки времени и даты в Ворде используется текстовый редактор Word 2019. В версиях Word 2016, Word 2013, Word 2010, Word 2007 выполняется похожий алгоритм действий.
Как вставить текущую дату и время в Ворде
Сначала разберем по шагам, как происходит вставка даты и времени Word.
Пройдите шаги:
- Откройте документ Word.
- Щелкните по месту в документе, подходящему для установки значений даты и времени.
- Войдите во вкладку «Вставка».
- В группе «Текст» нажмите на кнопку «Дата и время».
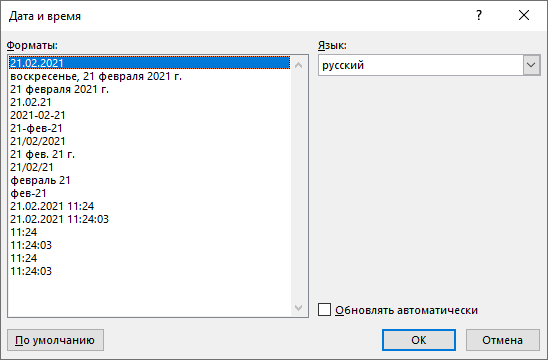
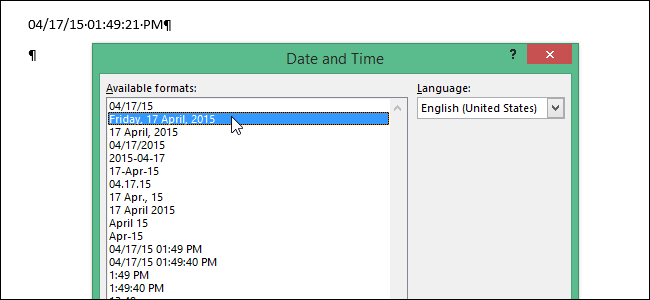
- Откроется новое окно, в котором нужно выбрать подходящие параметры для отображения формата дату или времени.
В поле «Форматы» представлены различные типы записей, подходящие для русского языка: несколько форматов даты, даты и времени, только времени. Доступны всевозможные варианты дат с использованием числа, месяца, года, дня недели, и времени в часах, минутах и секундах. Чаще всего используется самый распространенный формат: «ДД.ММ.ГГ» (дата, месяц, год).
В поле «Язык» по умолчанию выбран язык интерфейса текстового редактора. В нашем случае — русский.
Чтобы при каждом открытии документа, происходило обновление временных значений, поставьте флажок в пункте «Обновлять автоматически». Программа будет самостоятельно обновлять дату, соответствующую текущему значению, ориентируясь на календарь операционной системы Windows на компьютере.
Если галка отсутствует в поле «Обновлять автоматически», то введенные значения в документе не изменятся, потому что они вставлены обычным текстом, а не в специальном поле.
- Для сохранения изменений нажмите на кнопку «OK».
- В окне документа Word отобразятся текущие значения времени в выбранном формате.
Как в Ворде вставить дату и время по умолчанию
Очень часто необходимо вставлять одинаковые значения даты и времени в едином формате во всех документах Word, используемых на данном компьютере. В этом случае, нужно задать этот формат по умолчанию.
Выполните следующие действия:
- В открытом документе перейдите во вкладку «Вставка».
- Щелкните указателем мыши в том месте документа, где необходимо отображать значения текущего времени.
- Нажмите на кнопку «Дата и время», которая находится в группе «Текст».
- В окне «Дата и время» задайте подходящие параметры времени и даты.
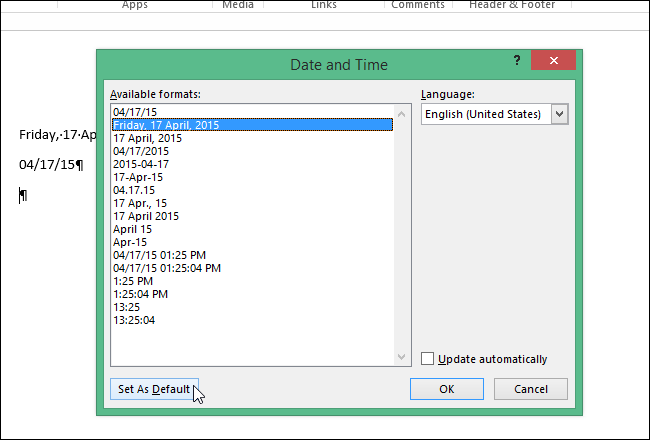
- Нажмите на кнопку «По умолчанию».

- В окне с предупреждением нажмите на кнопку «Да».

- Чтобы подтвердить выбор параметров, в окне «Дата и время» нажмите на кнопку «OK».
Вставка даты и времени для создания, сохранения и печати документа
Сейчас посмотрим на вставку полей с форматами даты при помощи функции экспресс-блоков.
Пройдите последовательные шаги:
- В открытом документе MS Word перейдите во вкладку «Вставка».
- В группе «Текст» нажмите на кнопку «Экспресс-блоки».

- В выпадающем меню нажмите на пункт «Поле…».
- В окне «Поле», в разделе «Выберите поле», в «Категории:» выберите «Дата и время».
- В поле «Поля:» нужно указать один из вариантов: «CreateData» (дата создания), «PrintDate» (дата печати), «SaveData» (дата сохранения).
- В разделе «Свойства поля», в поле «Форматы даты:» задайте подходящее значение.
- Нажмите на кнопку «OK».

Вставка даты или времени с помощью горячих клавиш
В Word существует способ вставки даты или времени при помощи «горячих» клавиш, не используя интерфейс параметров приложения.
Выполните следующее:
- Щелкните в том месте документа, куда нужно вставить дату или время.
- Нажмите на сочетания клавиш:
- «Alt» + «Shift» + «T» — вставка времени в заданном по умолчанию формате.
- «Alt» + «Shift» + «D» — вставка даты в формате по умолчанию.
При использовании этого способа, вставленные значения времени станут обновляться автоматически при каждом открытии документа.
Изменение значений поля даты
При использовании автоматического обновления значения даты, пользователю может понадобиться внести изменения. Чтобы задать новую дату необходимо сделать следующее:
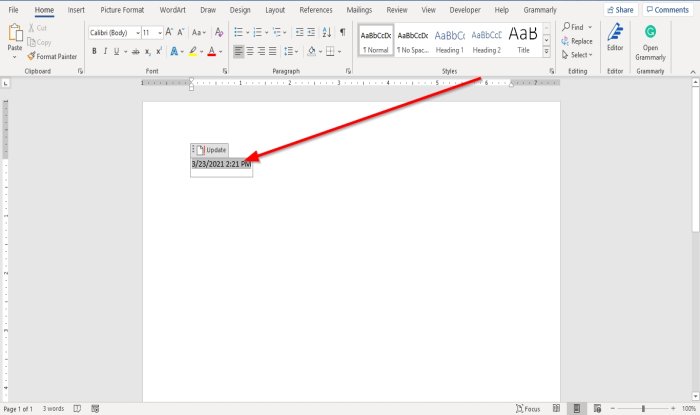
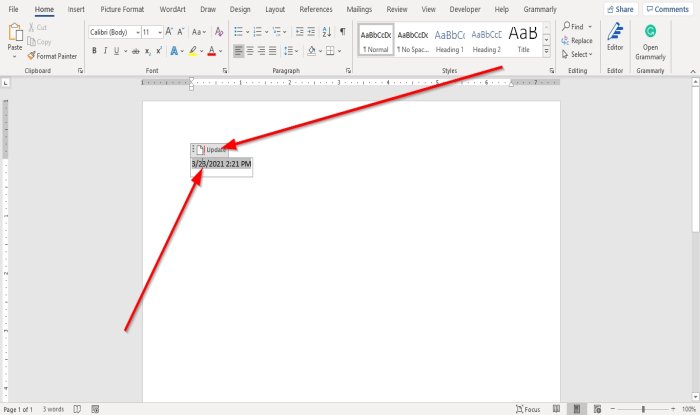
- В открытом документе подведите указатель мыши к дате, поле с датой окрасится в серый цвет.
- Щелкните по дате курсором мыши, вокруг поля даты появится прямоугольник.
- Выше этого поля откроется команда контекстного меню «Обновить».

- Введите новую дату, а затем щелкните мышью вне прямоугольника.
В данном документе Word появится новая дата.
Удаление даты и времени из документа Word
Если отображение значений даты и времени больше не понадобились, их можно удалить из документа. Сделать это очень просто:
- Выделите в документе Ворд поле или текст с датой.
- Затем нажмите на клавишу «Del» (Delete).
- Сохраните изменения перед закрытием документа Word.
Выводы статьи
В процессе работы в текстовом редакторе Microsoft Word пользователю может понадобиться добавить в документ дату и время. Сделать это можно обычным текстом, который не будет больше обновляться, пока его не изменят вручную, или использовать для вставки значения специальное поле. В этом случае, можно задать автоматическое обновление данного параметра при каждом открытии документа Word.
Похожие публикации:
- Как убрать пустую страницу в Ворде — 6 способов
- Конвертируем DOCX в DOC — 7 способов
- Как поставить длинное тире в Ворде — 6 способов
- Как сделать подпись в Word — 3 способа
- Как перевернуть страницу в Ворде
Aside from inserting the current date or time, Microsoft Word has some other useful choices for inserting dates automatically. The date/time the document was created, last saved or last printed.
In a Word document header or footer, the same Insert Date options and shortcuts apply as in the main document.
There’s an obvious Date & Time button on the Header/Footer ribbon.

That button opens the regular Insert Date and Time dialog box.
The Document Info button lets you insert various document details like Created Date, Saved Date and Printed date/time that we’ll now explain.
Document Properties
There are some document properties saved with every Office document (Word, Excel or PowerPoint)
Create Date – (aka CREATEDATE) the date the document was first made
Saved Date (aka LastSavedTime or SAVEDATE) – the last time the document was saved.
Print Date – (aka LastPrinted or PRINTDATE) last time the document was printed.
Any of these can appear in your document, in the header, footer or main document from Insert | Text | Quick Parts | Field …
Choose CreateDate, PrintDate or SaveDate from the Field list at left

There are some calendar options available: Hijiri/Lunar (Islamic), Saka Era (Indian) or Um-al-Qura (Saudi Arabia).
Date Formatting
There are date formatting options available in the field properties. If none of them are suitable, click the Field Codes button. You can enter your own ‘Date/Time Picture’
Choose one of the provided Date/Time formats and click Add to Field.

The Field Codes line can be changed. If you want a different date/time format, select the preset format closest to what you want, then edit it to what you need.
For example, here’s a date and time with extra text in single quotes eg ” 6 Jul 2018 which is a Friday at 12:20 PM “

Print Date
PRINTDATE is the last time the document was printed.
Field Code: {PRINTDATE} labelled Print Date
That includes ‘Print to PDF’ but not ‘Save As’ to a PDF.
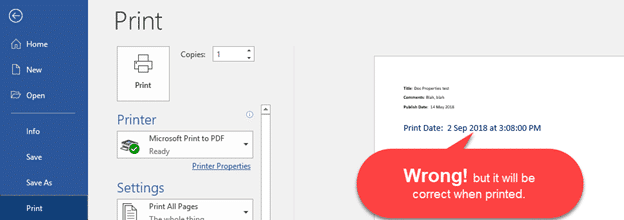
The Print Date is the date/time the Print action was started, usually when the Print button was clicked.
Possibly the most useful of the three date fields. Use it to identify exactly when the document was output. Here’s examples of Print Date in action without looking like a print date.

If the document has never been printed, PRINTDATE is ’empty’ and appears like this:
The PRINTDATE field is updated at print time. The printed document will show when it was printed.
Note: the Print Preview pane shows the wrong Print Date but that’s OK. It’s showing the last time the document was printed. No problem, the date/time you click the ‘Print’ button will be updated automatically before printing.
Creation Date
CREATEDATE is the date the document was first made.
Field Code: {CREATEDATE} labelled Create Date
All the same date formatting options apply as explained above.
Save Date
The date/time the document was last saved.
Field Code: {SAVEDATE} labelled SaveDate
For OneDrive and other cloud stored documents, that includes AutoSave.
All the same date formatting options apply as explained above.
Many ways to insert the current date and time in Word
Dates, time and duration, the truth behind them in Excel
Put current date or time into PowerPoint
Вставка автоматически обновляемых даты и времени в документ может быть весьма полезной. В диалоговом окне Дата и время (Date and Time) есть много форматов даты и времени, из которых можно выбрать подходящий. Кроме того, Вы можете настроить, как именно будут выглядеть доступные форматы.
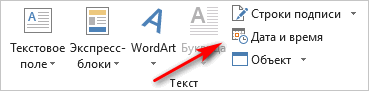
Чтобы открыть диалоговое окно Дата и время (Date and Time), нажмите на одноименную кнопку, которая находится на вкладке Вставка (Insert) в группе команд Текст (Text).
Вероятно, Вы обратили внимание на кнопку По умолчанию (Set As Default), когда вставляли дату и/или время при помощи диалогового окна Дата и время (Date and Time). Название кнопки вводит в заблуждение. Непонятно, что она делает на самом деле. Когда Вы выбираете формат из списка в диалоговом окне Дата и время (Date and Time) и нажимаете По умолчанию (Set As Default), выбранный формат применяется к значению поля Date, когда оно вставляется в документ нажатием клавиш Shift+Alt+D.
Поле Date также можно вставить с помощью Ленты меню. Для этого перейдите на вкладку Вставка (Insert) и в группе команд Текст (Text) нажмите Экспресс-блоки > Поле (Quick Parts > Field). Далее в списке Поля (Field names) выберите поле Date.
Кнопка По умолчанию (Set As Default) ничего не делает с форматами даты и времени, доступными в диалоговом окне Дата и время (Date and Time). Нажимая эту кнопку, Вы не определяете, какой параметр будет выбран в этом диалоговом окне по умолчанию. Word запомнит выбранный вариант лишь на время, пока приложение открыто. Когда в текущей сессии Вы вновь вызовете диалоговое окно Дата и время (Date and Time), в нём будет выбран тот же параметр, что и в прошлый раз. Если же Вы закроете Word, то при следующем запуске приложения снова будет выбран первый параметр из списка.
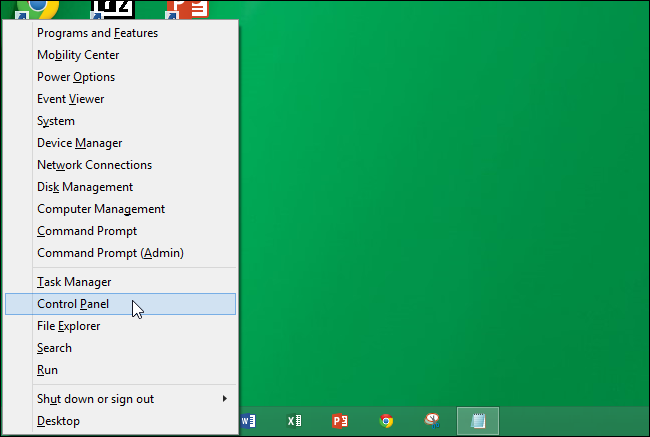
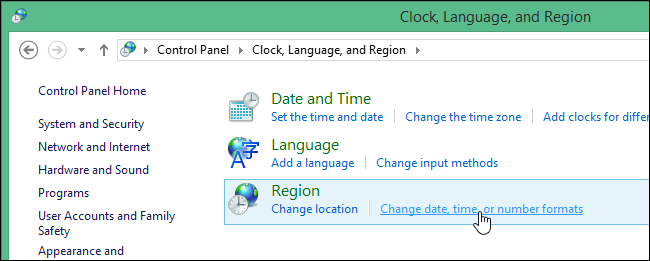
Верхний элемент в списке диалогового окна Дата и время (Date and Time) соответствует краткому формату даты, определённому в панели управления. Поэтому, если Вы хотите изменить формат даты, стоящий в списке на первом месте, нужно внести изменения в параметры региональных стандартов Windows. Чтобы настроить эти параметры, нажмите клавиши Windows+X и в появившемся меню выберите пункт Панель управления (Control Panel).
В открывшемся окне нажмите Часы, язык и регион (Clock, Language, and Region), если у Вас включен режим просмотра по категориям.
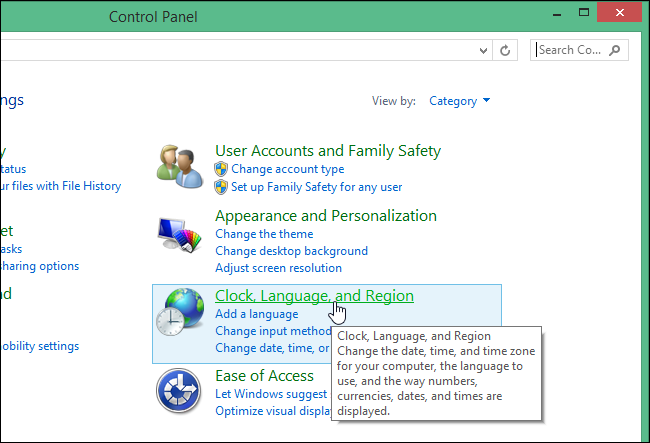
Кликните по Изменение форматов даты, времени и чисел (Change date, time, or number formats) в разделе Региональные стандарты (Region).
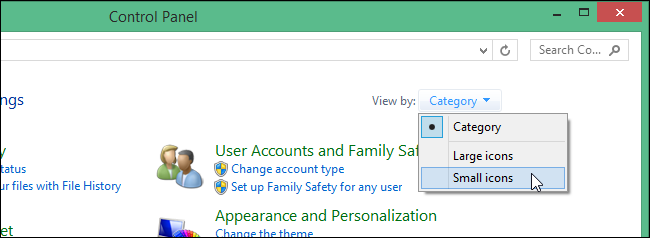
Если Панель управления (Control Panel) отображается в режиме просмотра Крупные значки (Large icons) или Мелкие значки (Small icons) …
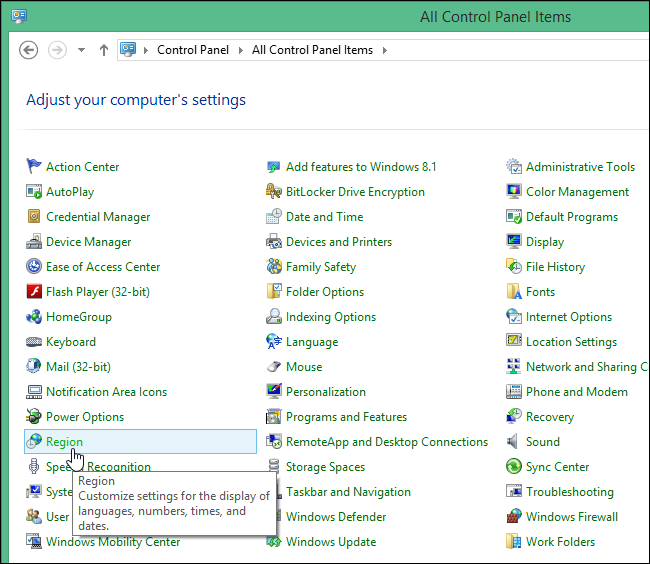
… нажмите Региональные стандарты (Region) в списке Все элементы панели управления (All Control Panel Items).
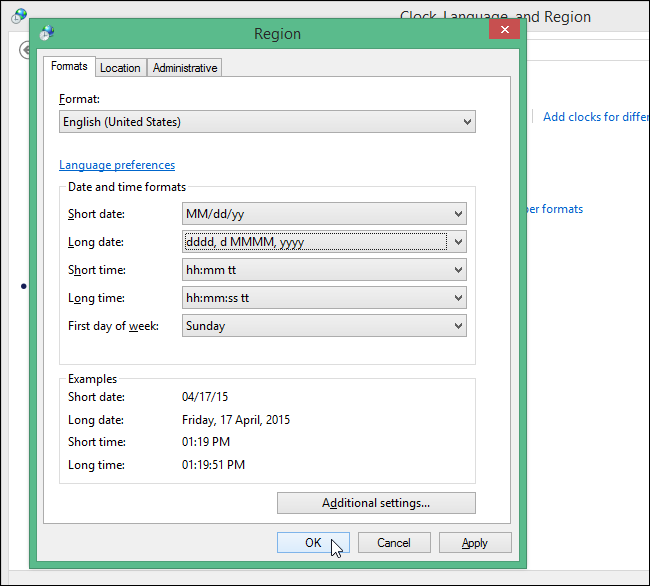
Откроется диалоговое окно Регион (Region). Выберите подходящий вариант из выпадающего списка Краткая дата (Short date) на вкладке Форматы (Formats). Именно этот формат появится на самом верху списка в диалоговом окне Дата и время (Date and Time).
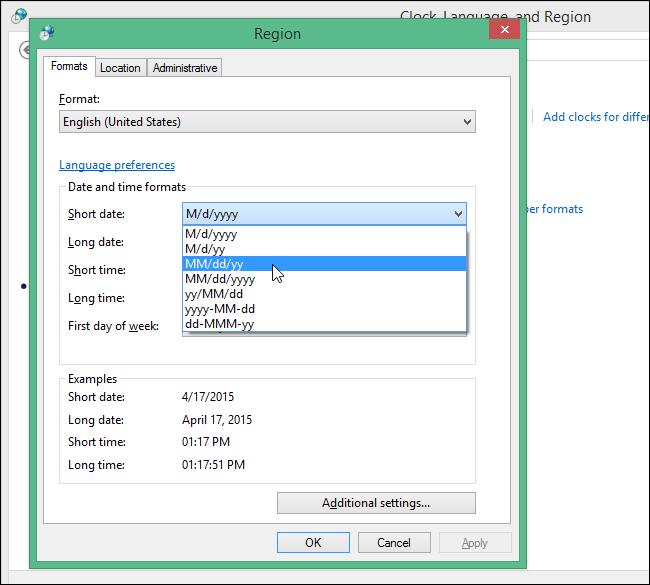
Чтобы изменить полный (длинный) формат даты, который будет показан вторым сверху в диалоговом окне Дата и время (Date and Time), выберите нужный вариант из выпадающего списка Полная дата (Long date).
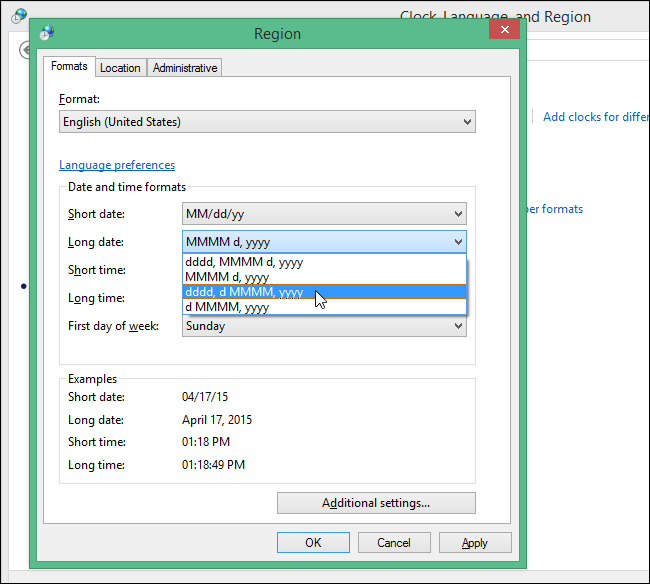
Точно также можно изменить краткий и полный форматы времени. Для этого необходимо выбрать подходящие варианты из выпадающих списков Краткое время (Short time) и Полное время (Long time) соответственно. Когда настройки будут завершены, нажмите ОК, чтобы сохранить изменения и закрыть диалоговое окно Регион (Region).
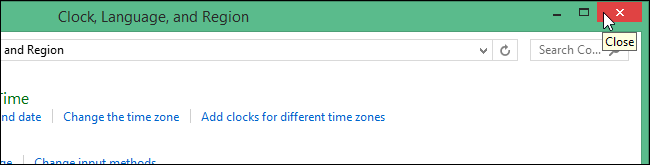
Чтобы закрыть Панель управления (Control Panel), нажмите кнопку Х в верхнем правом углу окна.
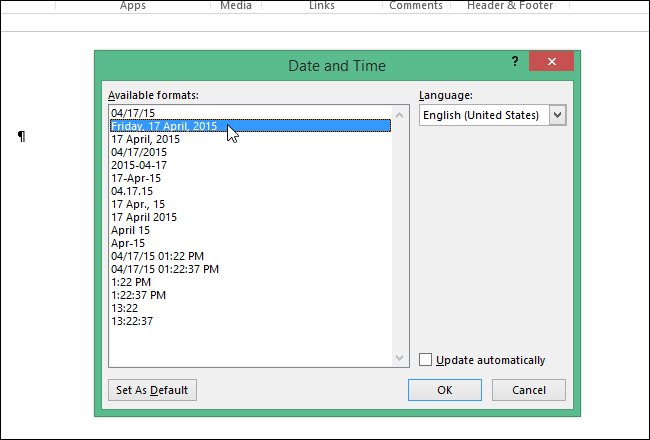
Теперь при вставке даты или времени в Word с помощью диалогового окна Дата и время (Date and Time), в списке Форматы (Available formats) Вы увидите настроенные Вами форматы. Если Вы изменяли полный и краткий формат времени, они появятся первыми в списке, где начинаются доступные форматы времени.
Примечание: Иллюстрации к этой статье сделаны в Word 2013.
Помните, что кнопка По умолчанию (Set As Default) в диалоговом окне Дата и время (Date and Time) устанавливает формат, который используется по умолчанию при вставке в документ поля Date нажатием клавиш Shift+Alt+D.
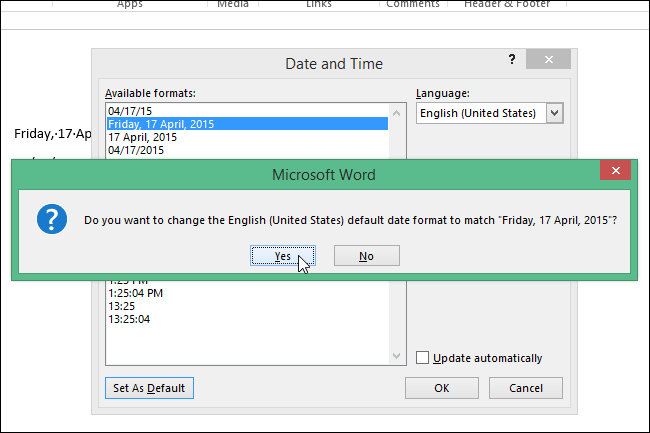
Когда Вы нажмёте кнопку По умолчанию (Set As Default) в диалоговом окне Дата и время (Date and Time), чтобы изменить формат, который используется по умолчанию для поля Date, появится окно с запросом подтверждения, в котором нужно нажать Да (Yes).
Теперь, когда Вы нажмёте Shift+Alt+D, чтобы быстро вставить поле Date, в документе появится дата в формате, который Вы установили по умолчанию в диалоговом окне Дата и время (Date and Time). Помните, что настройки, устанавливаемые нажатием кнопки По умолчанию (Set As Default), это не тоже самое, что полный и краткий формат даты и времени, которые Вы настроили в панели управления в Windows.
Примечание: Если Вы измените полный и краткий форматы даты и времени в региональных настройках Windows, то это изменит отображение дат не только в Word, но и в других приложениях.
Оцените качество статьи. Нам важно ваше мнение:
 Please Note:
This article is written for users of the following Microsoft Word versions: 2007, 2010, 2013, 2016, 2019, Word in Microsoft 365, and 2021. If you are using an earlier version (Word 2003 or earlier), this tip may not work for you. For a version of this tip written specifically for earlier versions of Word, click here: Inserting the Date Your Document was Last Saved.
![]()
Written by Allen Wyatt (last updated October 8, 2022)
This tip applies to Word 2007, 2010, 2013, 2016, 2019, Word in Microsoft 365, and 2021
Every time you save a document in Word, some of the document properties information is automatically updated. Part of the information is the date on which the document was last saved. You can insert this date into your documents and have it updated automatically, if you so desire. To insert the last date your document was saved in your document, follow these steps:
- Position the insertion point where you want the date to appear.
- Display the Insert tab of the ribbon.
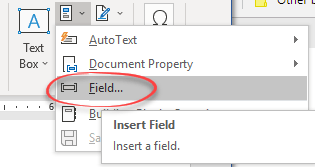
- Click Quick Parts (in the Text group) and then click Fields. Word displays the Field dialog box.
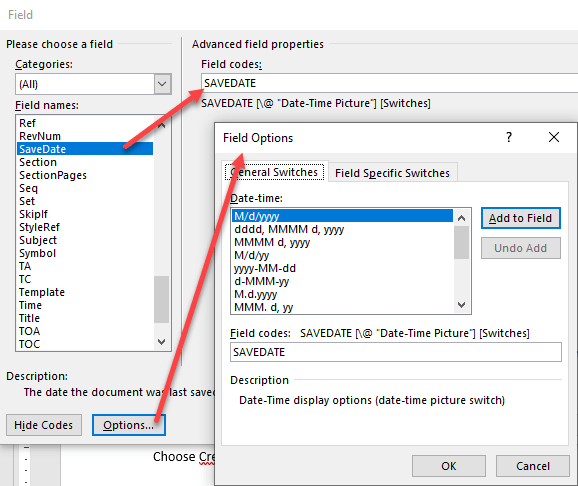
- Choose Date and Time from the Categories drop-down list at the left of the dialog box. (See Figure 1.)
- Select SaveDate from the field list at the left side of the dialog box.
- Choose a date format from the Field Properties column of the dialog box.
- Click on OK to insert the field.
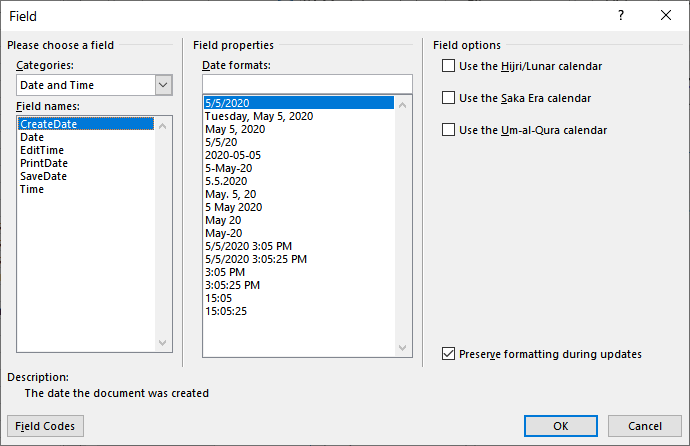
Figure 1. The Field dialog box.
There is an important caveat to remember when it comes to the last date field—it may not always appear to update. This is because Word doesn’t typically update fields—any fields—until it absolutely has to. When does that occur? Normally when you go to print the document. So, the SaveDate field will update when you print, and not before. The way around this is to force Word to update the field, which is done by right-clicking it and choosing Update Field from the resulting Context menu.
WordTips is your source for cost-effective Microsoft Word training.
(Microsoft Word is the most popular word processing software in the world.)
This tip (9719) applies to Microsoft Word 2007, 2010, 2013, 2016, 2019, Word in Microsoft 365, and 2021. You can find a version of this tip for the older menu interface of Word here: Inserting the Date Your Document was Last Saved.
Author Bio
With more than 50 non-fiction books and numerous magazine articles to his credit, Allen Wyatt is an internationally recognized author. He is president of Sharon Parq Associates, a computer and publishing services company. Learn more about Allen…
MORE FROM ALLEN
Moving Footnote Text into the Document
Need to move the contents of a footnote up into the main body of your document? You can use normal editing techniques to …
Discover More
Replacing a Dimmer Switch
Dimmer switches can be very helpful in creating a soothing atmosphere or an alert atmosphere, all at the twist of a knob. …
Discover More
Counting Words in Comments
Word makes it easy to calculate the number of words in a document. If you want to count words only in your comments, then …
Discover More
More WordTips (ribbon)
Inserting Custom Properties with Fields
If you define a group of custom properties for a document, you may want a way to display the contents of those properties …
Discover More
Quickly Inserting the Date Your Way
Tired of messing with inserting the date and then changing it to a format that is more to your liking? There’s a quick …
Discover More
Changing a Field Parameter
Fields are a powerful way to add dynamic content to your documents. Some fields rely on the use of parameters to control …
Discover More
Download PC Repair Tool to quickly find & fix Windows errors automatically
In Microsoft Word, the user can insert the current date or date and time as text or fields that can update automatically by using the date and time feature. In this tutorial, we will explain how to insert the current date, insert a date that updates automatically and how to edit or update a date field. This feature in Word instantly adds date and time to your document.

- On the Insert tab in the Text group, click the Insert Date and Time button.
- A Date and Time dialog box will open.
- Inside the dialog box, insert the date and time format you want.
- Then, click OK.
- The date and time format you chose will appear in the document.
How to insert a date in Word that updates automatically
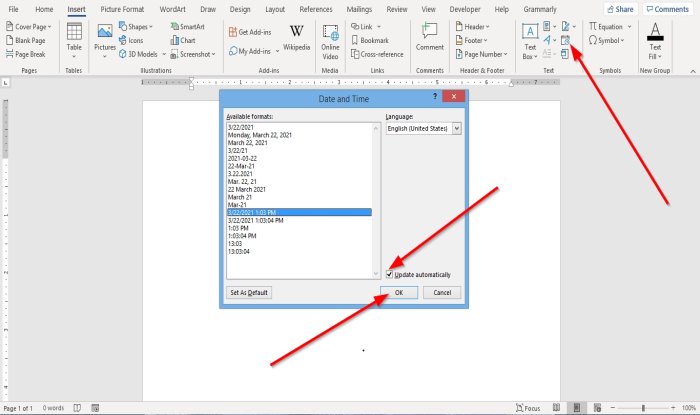
- On the Insert tab in the Text group, click the Insert Date and Time button.
- A Date and Time dialog box will open.
- Inside the dialog box, once you choose a date and time format.
- Select the Update Automatically check box.
- Then, click OK.
- The Date and Time are inserted as a field and can update automatically.
If you save the document with a Time and Date format, every time you open the document, the date and time will change automatically.
Read: How to Mark a Document as Final in Word.
How to edit or update a date field in Word
Once you choose to select Update Automatically in the Date and Time dialog box and click OK, you will notice that it will turn grey whenever you place the cursor on the date and time.
To edit the date and time, click on the grey box, change the date and time, and then click outside the box.
To change the date back to the current date, click the date field, then click Update.
It changes back to the current date.
I hope this helps; if you have questions, please comment below.

Shantel has studied Data Operations, Records Management, and Computer Information Systems. She is quite proficient in using Office software. Her goal is to become a Database Administrator or a System Administrator.
Contents
- 1 Can I change the date modified on a Word document?
- 2 How do I change the content created date?
- 3 Is there a timestamp on Word documents?
- 4 How can I change the date and time of a file?
- 5 How do I change the timestamp on a file in Windows?
- 6 How do I change the timestamp in Word for Mac?
- 7 How do I change the date modified on a file Windows 10?
- 8 How is editing time calculated in Word?
- 9 Where do you put the revision date on a document?
- 10 What is file modified date?
- 11 Which command can I use to modify the timestamp of a file?
- 12 How do you change the time stamp?
- 13 How do I change the last modified by?
- 14 How do I change the last date I opened my Mac?
- 15 How do you change the date added on a Mac?
- 16 How do I change the date and time in Windows 10?
- 17 Can you see how much time you’ve spent on a Word document?
- 18 How can I tell when a Word document was last edited Mac?
- 19 What does revision number mean in Word?
- 20 How do I add sequential date in Word?
Can I change the date modified on a Word document?
If you want to change the last modified date or change the file creation data, press to enable the Modify date and time stamps checkbox. This will enable you to change the created, modified, and accessed timestamps—change these using the options provided.
How do I change the content created date?
Go into Windows Explorer and right click on the file you are talking about. From the pop-up menu select “Properties Plus”. Make sure the *only* box checked is Created (not Modified, not Accessed, especially not Attributes). In the fields that show the drop-downs for dates, select or type in the date you want.
Is there a timestamp on Word documents?
To insert the current date or time within the body of a Word document, place the cursor where you want the stamp. From the Insert tab, click the calendar and clock icon in the Text section. In the pop-up, choose the format and then click OK to insert.
How can I change the date and time of a file?
Change System Date
Right-click the current time and select the option to “Adjust Date/Time.” Choose the option to “Change Date and Time…” and input the new information in the time and date fields. Press “OK” to save your changes and then open the file you want to change.
How do I change the timestamp on a file in Windows?
If you ever want to quickly update the Modified time stamp of a file to the current day and time, right-click that file, select Properties, select the TimeStamps tab, and then click the Touch button. That will instantly change the Last modified entry to the current day and time.
How do I change the timestamp in Word for Mac?
To change the Modified timestamp to the current date and time, type “touch -m” in Terminal, followed by one space. Then drag the file from Finder into Terminal and press “Enter.” Enter a space after the time and drag the file into the Terminal window. Press “Enter” to make the change.
How do I change the date modified on a file Windows 10?
Change ‘Created’ date for file
Click the Change Time/Attributes button (indicated below). A new window will open with details of what properties you can change. Enable the checkbox next to ‘Created’ and set the exact date and time that you want to set as the file’s creation date.
How is editing time calculated in Word?
Word doesn’t actually count the time you’re actively editing a document—just the time that document is open. So, if you open up a document and leave it open all day without working on it, that time counts.
Where do you put the revision date on a document?
Revised Date
- Go to the spot in your footer where you want this date.
- Type “Revised” and press space.
- On the Insert tab>Text section>Quick Parts drop down, select Field.
- In the Field Window, pull down the Categories menu to Date and Time.
- Select SaveDate (the last time the document was saved or revised).
What is file modified date?
A file’s last modified date refers to the date and time that a file is last written to. Typically, a file is modified or written to when a user opens and then saves a file, regardless of whether any data is changed or added to the file.This is done to make it easier to track the build or version of a set of files.
Which command can I use to modify the timestamp of a file?
The touch command is a standard command used in UNIX/Linux operating system which is used to create, change and modify timestamps of a file.
How do you change the time stamp?
Changing the date and time stamp
- In the main window, select the videos or photos you want to change.
- Select [Batch Date Change] in the [Edit] menu. The [Batch Date Change] window is displayed.
- Change the date and time stamp. You can change the date by either of the following two methods.
- Click [OK].
How do I change the last modified by?
How to Change “Last Saved By” in a Word Document
- Open the Windows “Start” Menu.
- Click on the “File” tab at the top of the screen, and then select “Options” from the left pane.
- Edit the information under the “Personalize your copy of Microsoft Office” category.
- Click on “OK” to confirm your new settings.
How do I change the last date I opened my Mac?
How to Change the Last Opened Date for a File on a Mac
- Open the “Go” menu and select “Utilities.” Click on “Terminal.”
- Type the following into the Terminal window: “touch -mt YYYYMMDDhhmm.” YYYY is the year, as in 2001.
- Select the file whose date you want to change and drag it over the Terminal window.
How do you change the date added on a Mac?
Set the date and time on your Mac
- On your Mac, choose Apple menu > System Preferences, then click Date & Time . Open Date & Time preferences for me.
- Click Date & Time, then set the date and time automatically or manually.
- Click Time Zone, then set the time zone automatically or manually.
How do I change the date and time in Windows 10?
Right-click on your folder then select Change attribute > File Properties. Check “Modify date and time stamps”
Can you see how much time you’ve spent on a Word document?
To access the editing time without opening Word, you can right-click a Word document in File Explorer and choose Properties. On the Details tab, you’ll see a Total editing time field. This can help you figure out how efficiently you’re working, or how much time you’re spending on office tasks.
How can I tell when a Word document was last edited Mac?
To view properties for an open document in Word, click the File tab and click on Info. On the right side of the window, the document properties are listed, including the Last Modified date, the date the document was Created, the Author, and the number of Words in the document.
What does revision number mean in Word?
The revision number is the number of times the document has been saved. That means it should correspond to the Date Modified field in the file manager, sometimes called Date Last Saved. (Note that using Save As resets the revision number to 1 in the new file.)
How do I add sequential date in Word?
Create a list of sequential dates
- Select the cell that contains the first date. Drag the fill handle across the adjacent cells that you want to fill with sequential dates.
- Select the fill handle. at the lower-right corner of the cell, hold down, and drag to fill the rest of the series.