
In the article below, we will look at the way to save and reuse style set in your Word document.
Occasionally, when you create a Word document with special style, you may find it time-consuming to change these default settings one by one. Actually, you can absolutely add your own special templates to the “Style Set” in Word. As a result, you can save a lot of time by just applying the newly created template to a new Word document.
Here we will go through the way of how to modify, add and apply styles in Word documents.
Modify the Default Styles in Word
In order to apply your own style to your Word files, you must modify certain default settings first. Following are detailed descriptions:
- First and foremost, click “Home” on the “Menu Bar”.
- Click the default style you want to change. For instance, we here use changing “Heading 1” as an example. If so, you need to click “Heading 1” in the “Styles” group.
- Next, right click “Heading 1”.
- On the drop-down menu, you should choose “Modify” option.

- Now in the “Modify Style” window, you can set the format according to your specific requirements. For example, you are able to change the font style as well as its size.
- Then, check the “Add to Quick Style list” box on the left-down side of the window.
- Next, go on to choose the “Only in this document” option which is just below the “Add to Quick Style list” box.
- Last but not the least, click “OK” to finish the job.

- Now, select your heading.
- Then click “Heading 1” in “Styles” group. You shall notice your modification works.
- Similarly, utilize this method to reset other default styles.


Save Special Styles to “Style Set” in Word
If you finish operating the whole document in the above way, it’s time to add this document style to the “Style Set” in Word. Details come in the following words:
- Select the whole document.
- Then click “Home”.
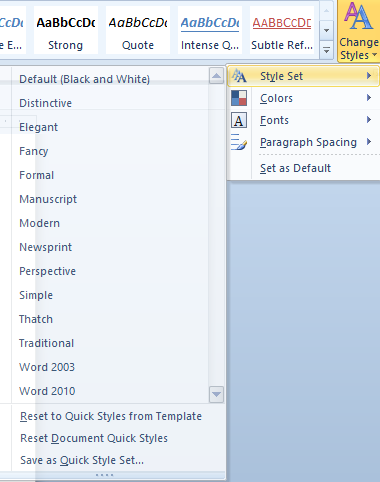
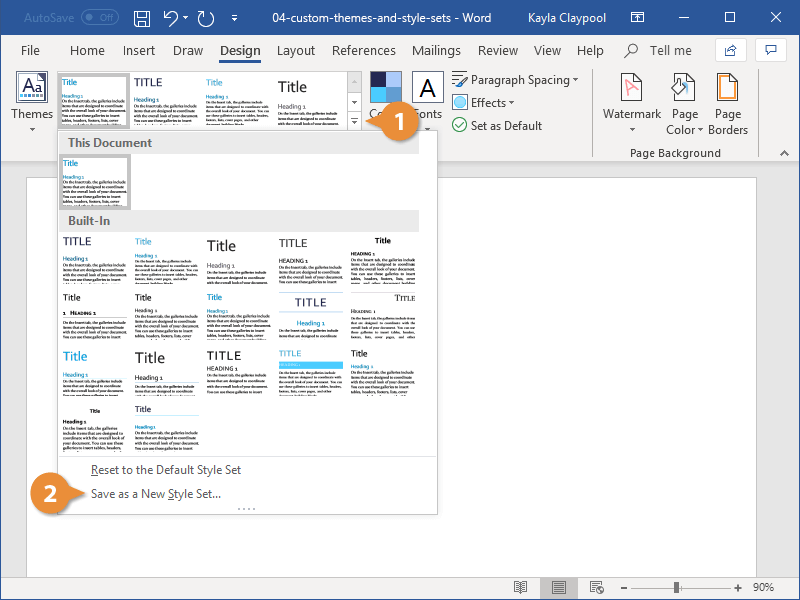
- Next, click “Change Styles”.
- On the drop-down menu, choose “Style Set” option.
- Click “Save as Quick Style Set”.

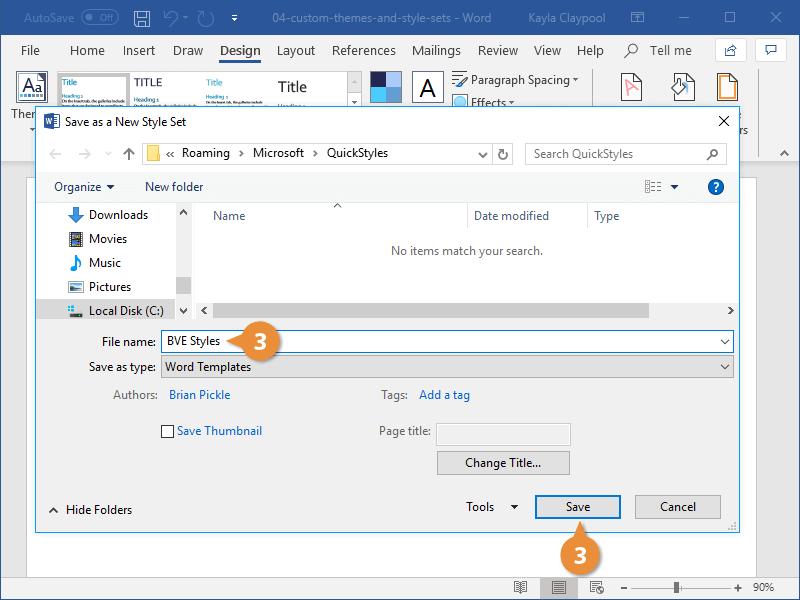
- Now, the “Save as Quick Style Set” window will pop up. Type the file name in text box.
- Click “Save”.


Apply Special Styles to Your Word Document
- Double click so as to open a Word document to which you want to apply a special style.
- Repeat from the aforementioned step 2 to step 4.
- Only this time, you can see the style with a name you just saved on the drop-down menu. Choose it. The new document shall take on the style you choose.
Never Underestimate Backups
Knowing how to add and apply styles to Word files can be a great help. However, like we always say, any wrong operation can result in file loss. Thus, just get into the habit of backing up your files on a regular basis. With a backup at hand, you can get through the doc repair.
Author Introduction:
Vera Chen is a data recovery expert in DataNumen, Inc., which is the world leader in data recovery technologies, including excel recovery and pdf repair software products. For more information visit www.datanumen.com
Word for Microsoft 365 Word 2021 Word 2019 Word 2016 Word 2013 Word 2010 Word 2007 More…Less
In Microsoft Office Word, styles are reusable sets of formatting options that you can apply to text. For example, suppose you want the headings in your document to appear in bold and in a particular color and font size. Although you can manually set each formatting option individually for each header, it is much easier to use a style that applies all of these options at once.
You can apply a specific style quickly and easily from the Styles gallery on the Home tab. You can also manage the contents of the gallery by adding new or other popular styles and deleting those that you don’t need.
Create a new style for the Styles gallery
The styles that you use frequently can be kept in the Styles gallery on the Home tab for ease of use. You can create a new style and add it to the gallery at any time.
-
Select the text that you want to format as a new style.
For example, perhaps you want text that contains certain information about your business to always appear as bold and red in your document.
-
On the mini toolbar that appears above your selection, specify the formatting that you want. For example, you can click Bold and Red .
-
With the formatted text selected, click the More
 arrow in the lower-right corner of the Styles gallery, and then click Create a Style.
The Create New Style from Formatting dialog box appears.
-
Give the style a name—for example, Business Fact—and then click OK. The style that you created appears in the Styles gallery with the name that you gave it, ready for you to apply whenever you want to text to appear bold and red.
 arrow in the lower-right corner of the Styles gallery, and then click Create a Style.
Move a style to the Styles gallery
You can move any existing style to the Styles gallery for easy access.
-
On the Home tab, click the Styles Dialog Box Launcher.
The Styles pane appears.
-
In the lower-right corner of the Styles pane, click Options.
-
Under Select styles to show, click All styles.
All styles are displayed in the Styles pane.
-
Select text in your document in the style that you want to move, and then click the style in the Styles task pane.
The style now appears in the Styles gallery.

Modify a style in the Styles gallery
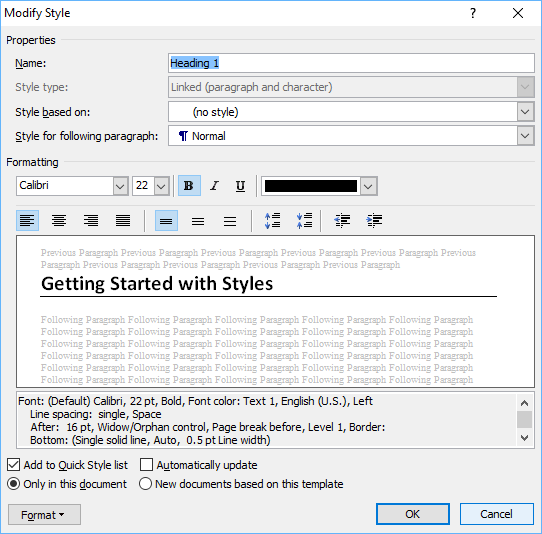
You can change the definition of styles that are available for your document. For example, suppose you want the Heading 1 style to stand out more. You could use a larger font size or a heavier font, or you could add more space above and below the heading.
-
On the Home tab, in the Styles group, right-click the style in the gallery that you want to change, and then select Modify.
-
In the Modify Style dialog box, change the style any way that you want, and then click OK.
For example, under Formatting, you can click the arrow next to the Color box, and then click a new font color. All instances of the style are updated automatically throughout the document.
Remove a style from the Styles gallery
-
On the Home tab, in the Styles group, right-click the style that you want to remove from the gallery.
-
Click Remove from Style gallery on the shortcut menu.
Note: Removing a style from the gallery does not remove the style from the entries that appear in the Styles task pane. The Styles task pane lists all of the styles in the document.
In addition to using the Quick Styles gallery on your Home tab to easily apply formatting to text, you can also choose an entire set of styles that work together to create document designed for a specific purpose. For example, you could have one set of Quick Styles to be used for reports. It might include styles for a title, an abstract, several heading levels, and body text. All of the style colors and formats in a single style set are designed to be used together to create a compelling and readable document.
Create a new style for the Quick Styles gallery
A Quick Style set contains the basic styles that you need to build a document. However, you may want to add a custom style.
-
Select the text that you want to format as a new style.
For example, perhaps you want text that contains certain information about your business to always appear as bold and red in your document.
-
On the mini toolbar that appears above your selection, specify the formatting that you want. For example, you can click Bold and Red .
-
Right-click the selection, point to Styles, and then click Save Selection as a New Quick Style.
-
Give the style a name—for example, Business Fact—and then click OK. The style that you created appears in the Quick Styles gallery with the name that you gave it, ready for you to apply whenever you want text to appear bold and red.
Move a style to the Quick Styles gallery
You can move any existing style to the Quick Styles gallery for easy access.
-
On the Home tab, click the Styles Dialog Box Launcher, and then click Options.
-
Under Select styles to show, click All styles.
All styles are displayed in the Styles task pane.
-
Select text in your document and then click the style in the Styles task pane.
The style now appears in the Quick Styles gallery.
Modify a style in a Quick Style set
You can change the definition of styles in the Quick Style set. For example, suppose you want the Heading 1 style to stand out more. You could use a larger font size or a heavier font, or you could add more space above and below the heading.
-
On the Home tab, in the Styles group, right-click the style in the Quick Styles gallery that you want to change, and then select Modify.
-
In the Modify Style dialog box, change the style any way that you want, and then click OK.
For example, under Formatting, you can click the arrow next to the Color box, and then click a new font color. All instances of the style are updated automatically throughout the document.
Save styles as a new Quick Style set
After you change a Quick Style set, you can save the new Quick Style set to the list of Style sets that you can choose from.
-
Create new styles or change the styles in a Quick Style set.
Note: You can also change the colors or fonts that are used in a Quick Style set by clicking Change Styles in the Styles group and then clicking Colors or Fonts.
-
On the Home tab, in the Styles group, click Change Styles, and then point to Style Set.
-
Click Save as Quick Style Set.
-
In the Save Quick Style Set dialog box, type a name for your new Quick Style set, and then click Save.
To view the new Quick Style set, click Change Styles in the Styles group, and then point to Style Set. The new Quick Style set appears in the list so that you can apply it to a document at any time.
Remove a style from the Quick Styles gallery
-
On the Home tab, in the Styles group, right-click the style that you want to remove from the gallery.
-
Click Remove from Quick Styles gallery on the shortcut menu.
Note: Removing a style from the Quick Styles gallery does not remove the style from the entries that appear in the Styles task pane. The Styles task pane lists all of the styles in the document.
Need more help?
Want more options?
Explore subscription benefits, browse training courses, learn how to secure your device, and more.
Communities help you ask and answer questions, give feedback, and hear from experts with rich knowledge.
How to Import or Copy Styles in Microsoft Word
by Avantix Learning Team | Updated April 6, 2021
Applies to: Microsoft® Word® 2010, 2016, 2019 and 365 (Windows)
In Microsoft Word, you can store a set of styles in your own custom Style Set (also called a Quick Style Set) and then apply the styles easily in other Word documents. A style is a predefined combination of formatting that can be applied to selected text. The most common styles are paragraph styles which include character and paragraph formatting. The default style is the Normal style.
Style Sets are designed to include heading styles (such as Heading 1, Heading 2 and Heading 3), the Normal style, and a few other built-in styles (but not all styles).
Style Sets are affected by the overall theme, font theme and color theme used in your document.
You can use Word’s built-in Style Sets or create your own.
Recommended article: How to Copy Styles Between Word Documents Using the Organizer
Applying styles
Before you can use Style Sets, you will need to apply styles in your document. Recommended styles that are used in Style Sets are Word’s built-in heading styles and the Normal style.
To apply a built-in style:
- Select the text you want to format.
- Click the Home tab in the Ribbon.
- In the Styles group, hover over each style in the Style gallery to see a live preview in the document. Click the More down arrow to see additional styles.
- Click the style you want to use. It’s best to apply heading styles to headings in your document. You can use the Normal style for standard paragraphs.
Below is the Style gallery on the Home tab in the Ribbon:

Applying a Style Set
Style Sets include a combination of title, heading and paragraph styles and allow you to format all of the elements in your document at once (after you have applied styles).
To apply a Style Set in 2010:
- Click the Home tab in the Ribbon.
- Click Change Styles in the Styles group. A drop-down menu will appear.
- From the drop-down menu, select Style Set.
- Select the Style Set you want to apply. The entire document will change (as long as you have applied styles in your document).
Below is the Style Set menu in Word 2010:
To apply a Style Set in 2013 and later versions:
- Click the Design tab in the Ribbon.
- In the Document Formatting group, click the More down arrow.
- Hover over the Style Sets to see a live preview.
- Click the Style Set you want to apply. The entire document will change (as long as you have applied styles in your document).
Below is the Style Set gallery in 2013 and later versions:
Modifying styles
If you modify styles, you can then save them in a new custom Style Set and apply them quickly in other documents.
To modify a built-in style:
- Click the Home tab in the Ribbon.
- In the Styles gallery, right-click the style you want to change and then select Modify from the drop-down menu. A dialog box appears.
- Make the desired changes.
- Click OK.
Below is the Modify Style dialog box:
Saving a new Style Set
If you have modified built-in styles, you can save them in a new Style Set and then apply it in other Word documents.
To save a new Style Set in Word 2010:
- Click the Home tab in the Ribbon.
- Click Change Styles in the Styles group. A drop-down menu will appear.
- From the drop-down menu, select Style Set.
- Click Save As Quick Style Set. A dialog box appears.
- Enter a name for the Style Set (be sure to save in the Quick Styles folder).
- Click Save. You will now be able to apply the Style Set in other documents using the same method described above.
To save a new Style Set in Word 2013 and later versions:
- Click the Design tab in the Ribbon.
- In the Document Formatting group, click the More down arrow.
- Click Save As a New Style Set. A dialog box appears.
- Enter a name for the Style Set (be sure to save in the Quick Styles folder).
- Click Save. You will now be able to apply the Style Set in other documents using the same method described above. Custom Style Sets will appear under Custom in the list of Style Sets.
If you apply a custom Style Set in another document, be sure that you have applied the same built-in styles and have used the same themes (overall theme, font theme and color theme). Themes appear on the Design tab in 2013 and later versions and in the Page Layout tab in 2010.
Subscribe to get more articles like this one
Did you find this article helpful? If you would like to receive new articles, join our email list.
More resources
How to Insert, Format and Update Cross-References in Word
How to Keep Text Together in Word (Paragraphs, Lines or Words)
How to Create a Table of Contents in Word (Insert, Format and Update a TOC)
How to Insert Reusable Text Snippets in Word with Quick Parts (Great Timesaver)
How to Convert a PDF to Word in Microsoft Word (for Free – No Third Party Programs Needed)
Related courses
Microsoft Word: Intermediate / Advanced
Microsoft Excel: Intermediate / Advanced
Microsoft PowerPoint: Intermediate / Advanced
Microsoft Word: Long Documents Master Class
Microsoft Word: Styles, Templates and Tables of Contents
Microsoft Word: Designing Dynamic Word Documents Using Fields
VIEW MORE COURSES >
Our instructor-led courses are delivered in virtual classroom format or at our downtown Toronto location at 18 King Street East, Suite 1400, Toronto, Ontario, Canada (some in-person classroom courses may also be delivered at an alternate downtown Toronto location). Contact us at info@avantixlearning.ca if you’d like to arrange custom instructor-led virtual classroom or onsite training on a date that’s convenient for you.
Copyright 2023 Avantix® Learning
Microsoft, the Microsoft logo, Microsoft Office and related Microsoft applications and logos are registered trademarks of Microsoft Corporation in Canada, US and other countries. All other trademarks are the property of the registered owners.
Avantix Learning |18 King Street East, Suite 1400, Toronto, Ontario, Canada M5C 1C4 | Contact us at info@avantixlearning.ca
Сохранение стиля текста
Автозамена стиля текста
При копировании текста в MS Word, из других источников, он, чаще всего, имеет другой формат, можно.
Копирование текста (таблиц) с сохранением стиля
Имеется текст с таблицами (файл «Источник»). При копировании в другой документ (файл «Прием»).
Свойства стиля текста для оглавления
Здравствуйте. Помогите пожалуйста разобраться с двумя вопросами. 1. В имеющемся документе есть.
Сохранение стиля
Есть кнопка, которая меняет стиль контента, как сделать так, что-бы при обновлении страницы, стиль.
Перенос стилей между документами
По умолчанию стили хранятся в файле документа. Для копирования стиля из одного документа в другой достаточно скопировать текст, форматированный данным стилем. После применения появившегося вместе с новым текстом стиля на любой другой текст, скопированный первоначально текст можно удалить. Однако если в новом документе уже имеется стиль с таким именем, вместо изменения стиля будет изменено форматирование вставляемого текста.
Нужные стили очень удобно скопировать в шаблон документа. Однако это может привести к определенным сложностям при переносе файлов с одного компьютера на другой. Дело в том, что стили из шаблона имеют приоритет над стилями из документа. И если на новом компьютере уже имеется шаблон с таким же именем (а большинство документов создается на основе встроенного шаблона Normal, который присутствует на любом компьютере с Microsoft Word), где хранятся стили с такими же именами – текст будет форматирован на основе «родных» стилей компьютера, на который принесен документ.
Для решения данной проблемы в Microsoft Word предусмотрен специальный инструмент – Организатор, позволяющий копировать стили и макросы (в пособии не рассматриваются) из одних файлов и шаблонов в другие. Для вызова Организатора следует нажать кнопку в нижней части области стилей, и в открывшемся окне нажать кнопку «Импорт / Экспорт…». Окно Организатора показано на рис. 4.13. В окне Организатора нас будет интересовать только вкладка «Стили».

Рис. 4.13 Окно Организатора для копирования стилей между документами
Принцип работы с окном Организатора прост: слева и справа окна располагаются списки стилей в двух файлах (обычно в документе и шаблоне), а сами файлы выбираются из выпадающих списков ниже. Любой из файлов можно закрыть одноименной кнопкой, а затем при помощи появившейся кнопки «Открыть файл…» открыть любой другой файл или шаблон. Затем в одном из списков следует выделить один или несколько стилей и кнопкой «Копировать» скопировать их в другой список. Можно копировать стили как слева направо, так и справа налево. Также можно переименовывать стили в списках и удалять их.
В Microsoft Word 2010 имеется возможность экспортировать набор стилей из ленты (но не из области задач) в файл шаблона. Для этого следует предварительно настроить стили в галерее ленты «под себя», затем нажать кнопку « Изменить стили» и в ее меню выбрать Набор стилей – Сохранить как набор экспресс-стилей…. В открывшемся окне вводится имя создаваемого шаблона.
Также в меню Набор стилей кнопки « Изменить стили» присутствуют команды Восстановить экспресс-стили документа / шаблона. Эти команды сбрасывают все изменения, внесенные пользователем во встроенные стили.
скопировать стили из документа Word 2010 Office в другой
Может кто-нибудь сказать мне, как скопировать стили из одного документа (2010) слово в другое? Казалось бы, очень очевидная вещь, но, очевидно, нет.
Кроме того, есть команда, скрипт, который я могу запустить для документа Word 2010 (источник), который имеет стили, которые я хочу скопировать в новый документ Word 2010 (пункт назначения), который не имеет этих стилей. Я хочу сделать эту копию из одного исходного документа в несколько целевых документов за один шаг.
Я обнаружил, что самый простой способ сделать это в Word — это открыть новый документ (в который вы хотите импортировать стиль).
Для этого сначала откройте окно стилей (Alt + Ctrl + Shift + S) и нажмите « Управление стилями» .
В нижней части окна Управление Стили Импорт / Экспорт . .
Затем вы можете выбрать другой файл, закрыв свой файл normal.dotm и используя « Открыть файл», чтобы выбрать файл со стилями, а затем скопировать необходимые стили.
Работает на 2013, 2010, 2007. В 2007 году Manage Styles — маленькая иконка в окне Styles.


Метод заключается в следующем:
Нажмите Шаблон документа.
Нажмите «Вложить», чтобы перейти к целевому документу или шаблону.
Вернувшись в диалоговое окно «Шаблоны и надстройки», нажмите, чтобы включить автоматическое обновление стилей документов.
Примечание. Если вкладка «Разработчик» отсутствует, выберите кнопку «Офис» — «Параметры Word» — вкладку «Популярные» и нажмите «Включить вкладку« Разработчик »на ленте».
Надеюсь это поможет.
Вы можете легко скопировать стили из одного документа Word 2010 в другой.
- Откройте документ, в который вы хотите скопировать стили.
- Используя вкладку « Разработчик », нажмите кнопку « Надстройки» .
- Нажмите на кнопку Организатор внизу слева.
- Щелкните правой кнопкой мыши на Закрыть файл .
- Затем он изменится на « Открыть файл» . Нажмите на это и выйдите и найдите, где находится файл, из которого вы хотите скопировать стили, и нажмите на него.
- Когда он войдет, в нем будут стили, из которых вы сможете выбирать.
- Выберите любой из них или несколько из них и нажмите на кнопку « Копировать» , но вы должны щелкнуть по ней 3 раза, чтобы она работала должным образом (я забываю, почему только сейчас, но именно так она работает. Это что-то делать с Родителем-> Ребенком-> Дедушкой, но я забыл только сейчас).
- Закончив, оставайтесь там, где вы есть, нажмите кнопку « Закрыть» и нажмите другую кнопку « Закрыть» , и все. Стили, которые вы хотите, теперь будут в вашем документе.
Я думаю, что есть другой простой способ сделать это, как я всегда делал. Если ваши стили находятся в документе A, откройте документ A и « сохранить как » под другим именем, таким как документ B. Теперь ваши стили будут доступны в документе B. Удалите «старое содержимое» в документе B и скопируйте новую рукопись в документ B и применить стили к вашему тексту. Я думаю, что все должно быть в порядке. 🙂
Для первой части вопроса, и если вы копируете только несколько стилей, проще всего просто скопировать любой текст с нужным вам стилем и вставить его в целевой документ. Стиль также будет скопирован и останется там, даже если вы удалите текст (не отменяйте вместо удаления!).
Метод заключается в следующем:
- Вкладка разработчика.
- Нажмите Шаблон документа.
- Нажмите «Вложить», чтобы перейти к целевому документу или шаблону.
- Вернувшись в диалоговое окно «Шаблоны и надстройки», нажмите, чтобы включить автоматическое обновление стилей документов.
- Нажмите ОК.
Microsoft 365, Microsoft Word, Office 2007, Office 2010, Office 2013, Office 2016, Office 2019, Office 2021 / Office LTSC, Office 365, Office for Mere Mortals /
8 March 2022
Styles can be saved in a Word document but are most effective when saved in a template.
Changing the style in a template will affect any document that uses the same template.
At the bottom of the Modify Style dialog are two choices for where to save the style. Microsoft has reworded the choices to make them more ‘friendly’. Sadly that somewhat obscures what’s happening.

Only in this document: the style is saved in the document only. No other documents will be affected by the style change.
New documents based on this template: the style is saved in the document template. The change in the style can affect other documents based on the same style. The wording is misleading because ‘New documents’ aren’t the only ones that the style change can affect. Existing documents based on the template are also affected.
The Modify Style dialog doesn’t show which template is being changed.
Style Organizer
To clearly see what styles are saved to which location, dig down to the Organizer. From the Manage Styles click on Import/Export to reach the Organizer:
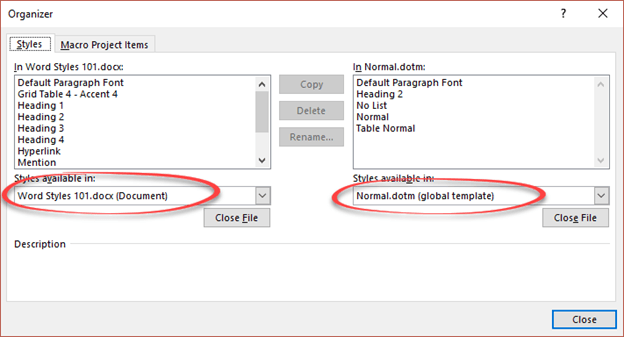
From the Organizer you can rename, copy, move or delete styles in either the document or a template.
Check out
What is a Style in Word, Excel or Outlook?
Word: get a list of styles in a document
Word Styles from the beginning
Word: where are all the Style controls?
Word Style inheritance made clear and simple
Styles in Excel
OneNote 2010 Heading styles
Style Separators in Word
In addition to using existing themes and style sets, you can make your own. You can create new themes and style sets from scratch or tweak existing ones. By using custom styles and themes, you can easily control exactly how your document looks.
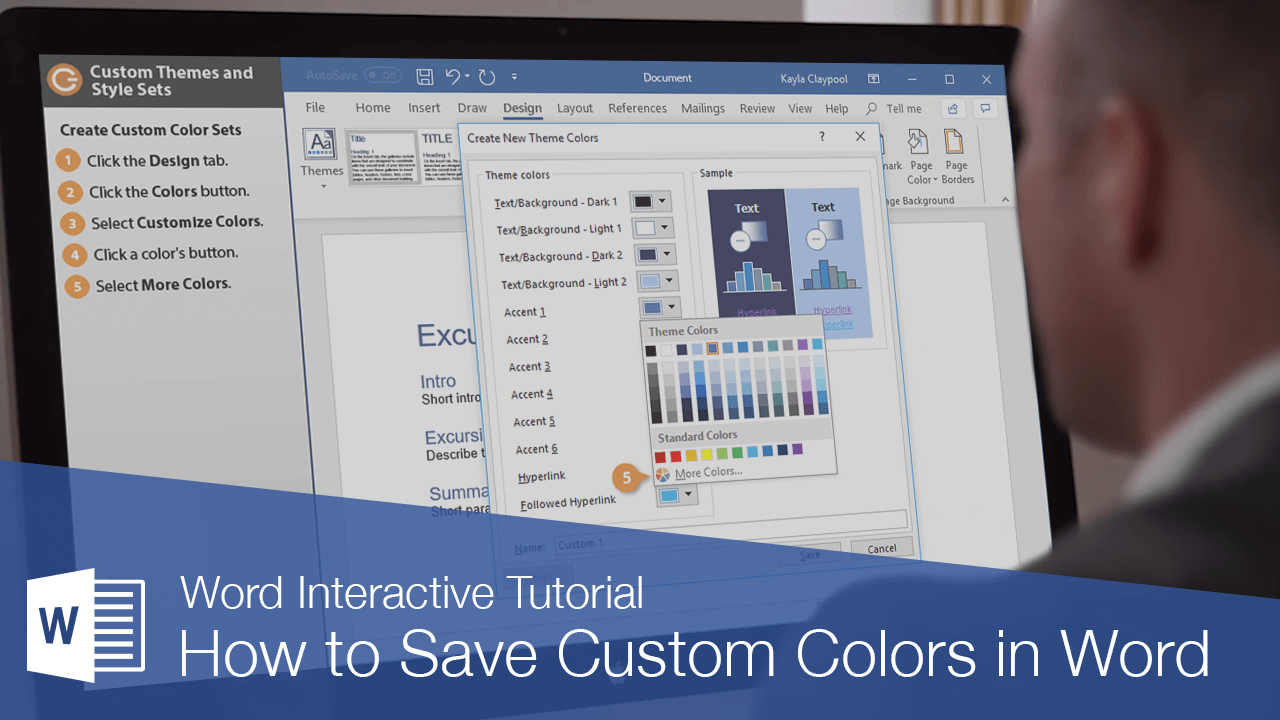
Create Custom Color Sets
You can create your own color set to give your document a fresh, unique look or comply with your organization’s brand standards.
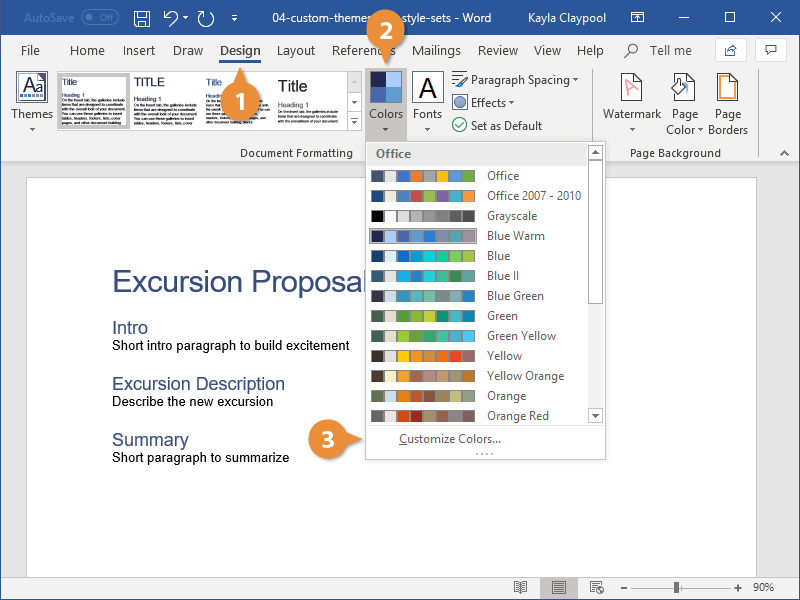
- Click the Design tab.
- Click the Colors button.
This menu shows previews of all the existing color sets, but you can also create your own.
- Select Customize Colors.

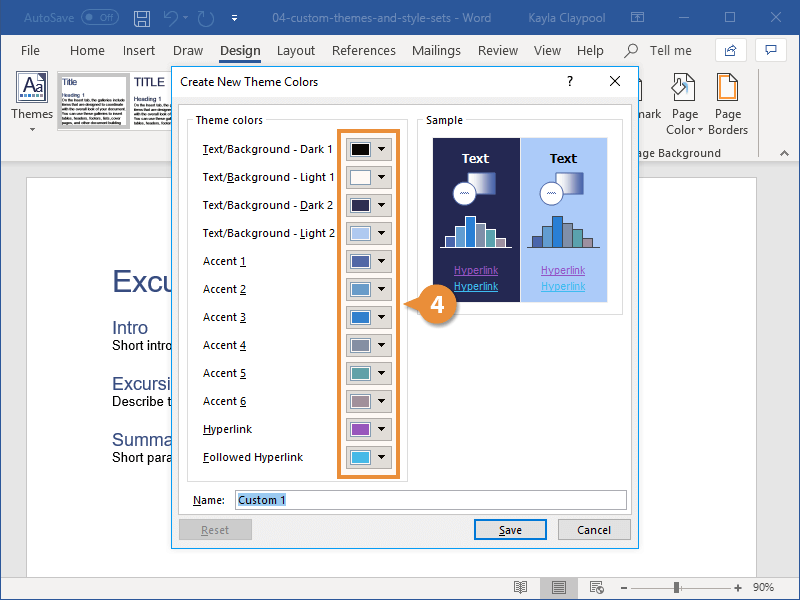
In this dialog box, you can set the text, background, and accent colors.
- Click a color’s button.
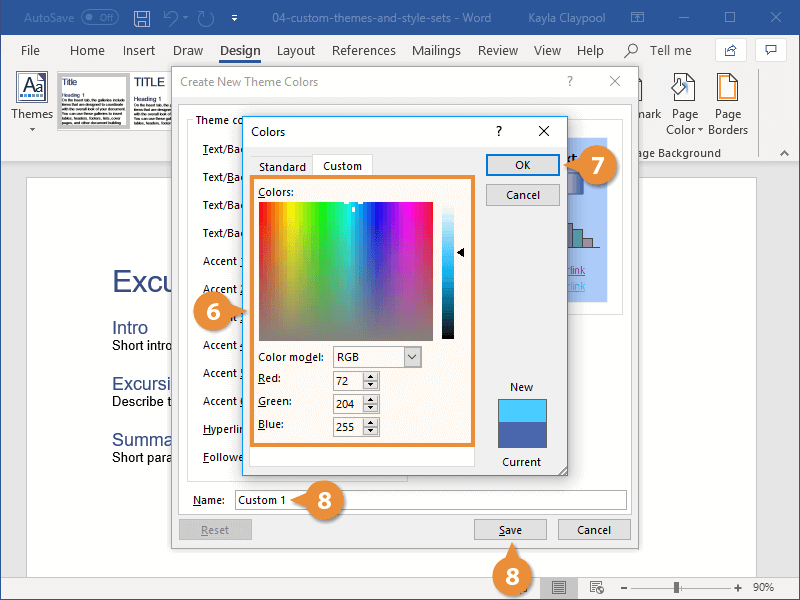
- Select More Colors.
Here, you can choose a color from the color picker or enter the exact color value in the text fields.
- Specify a color.
- Click OK.
The color is changed. Continue changing the other colors in the set the same way.
- When you’ve finished setting colors, give the color set a name and click Save.
You can switch the colors with another from the current theme or a variant of one of those colors.
If you’d prefer to create a new color set entirely, rather than shuffling existing theme colors around, you can.

The new color set is saved and automatically applied.
Create Custom Font Sets
You can also create custom font sets to use in custom themes.
- Click the Fonts button on the Design tab.
This menu lists all the font sets available, but you can also create your own.
- Select Customize Fonts.
In this dialog box, you can select new Heading and Body fonts. A preview, showing the two current fonts, also appears.
- Customize the Heading and Body fonts.
Once you’ve selected two fonts that look good in the preview, you’re ready to save the font set.
- Give the font set a name and click Save.
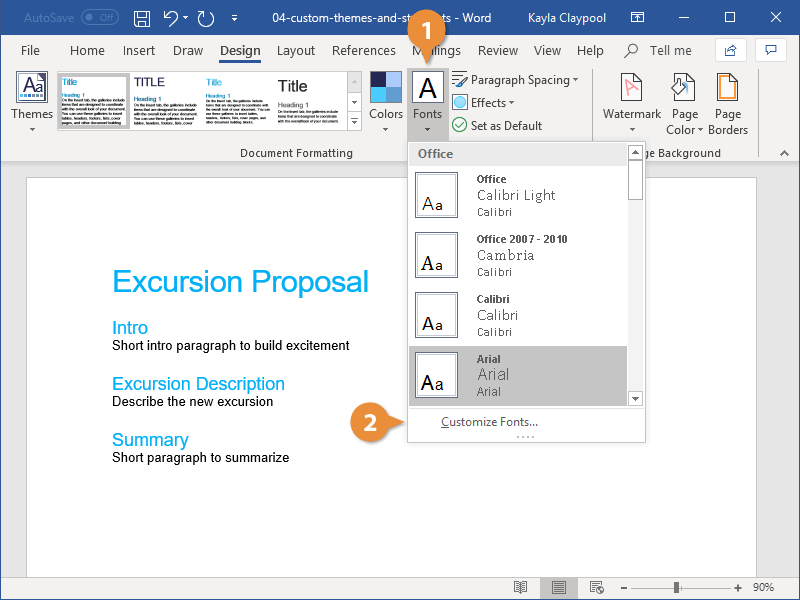
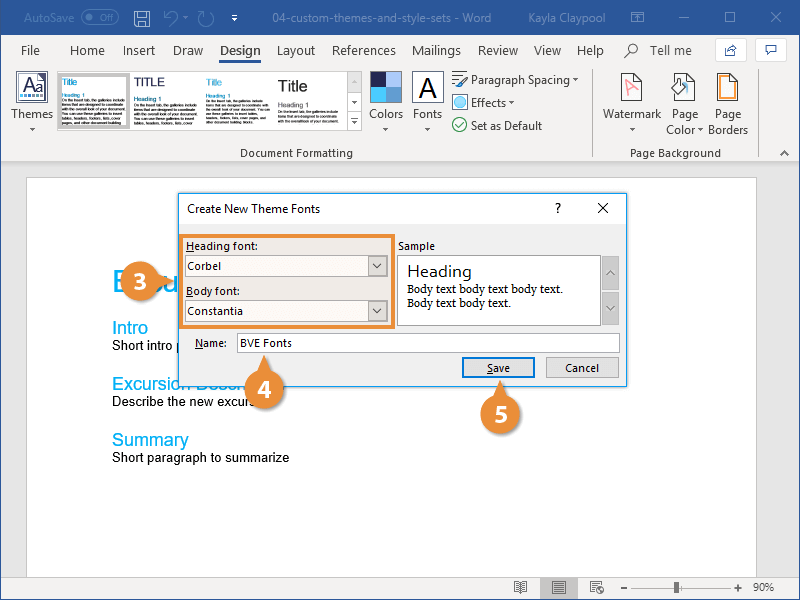
The font set is saved and automatically applied.
Create Custom Themes
When you have a color set and font set combination that you like, you can save it as a theme to use in other documents.
- Apply the theme colors, fonts, and effects you want to use in new documents, then click the Design tab.
- Click the Themes button.
- Select Save Current Theme button.
- Type a name for your theme and click Save.
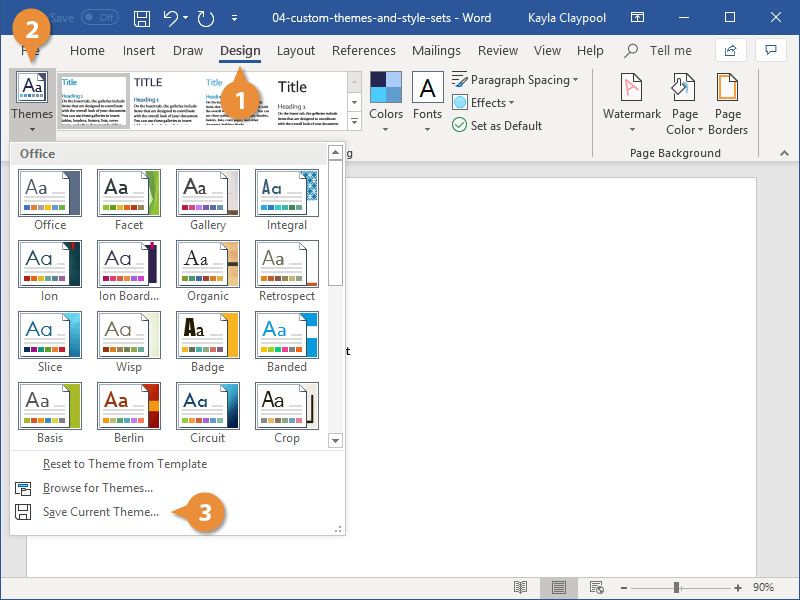
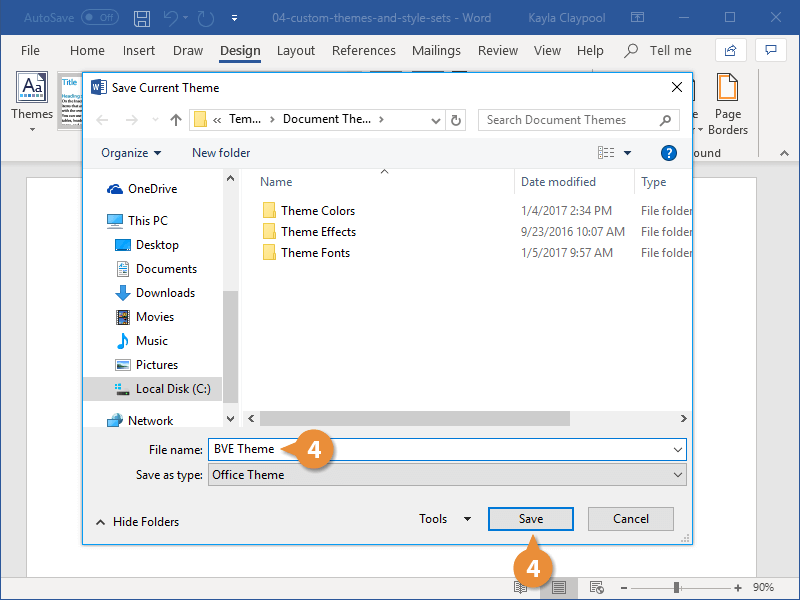
Your theme is saved and will be found in a special Custom group in the Themes menu.
Custom themes you’ve saved will be available for use in all your documents. You can even share the theme file with others so they can also use your new theme.
Create Custom Style Sets
If you’ve customized the basic styles in a document, you can create a custom style set.
- Click the Style Set gallery menu button on the Design tab.
You can select an existing style set here or save your custom style set currently in use.
- Select Save as a New Style Set.
- Give the style set a name and click Save.
The style set is saved. Just like with themes, a new Custom group will appear in the Styles gallery, above the built-in style sets.

FREE Quick Reference
Click to Download
Free to distribute with our compliments; we hope you will consider our paid training.

Ok, so you know how much I love Word’s styles feature.
It’s fabulous.
Not only does it allow you to change the look of a document on a whim, it can save you a whole heap of time.
And when you’re working on a large, bitty project it can save you a massive amount of time, especially if your client changes their mind at the last minute.
Styles come into their own, though, when you’re working for a client that works in a certain way, prefers a certain setup and they come back to you with more projects.
I’ve already touched upon how to work with styles in Word, but now I’m going to show you a little trick.
Those of you who know how this works can look away now, go make a cup of tea and do something more exciting instead.
For those of you who are thinking ‘what? there’s a trick?’ settle down and prepare to learn something that will change how you work with Word forever (or it might just give you an ‘ahaa’ moment).
Please remember, I work with Word 2007 (because I like it), so if you use a different version there may be slight differences. Overall you should be able to follow the tutorial OK.

First I’m going to create some styles.
Let’s say …
Heading 1 in Book Antiqua size 16, underlined and bold in a nice snazzy purple
Heading 2 in a nice Cooper Black size 14, bold in a nice 70s orange (I do like this one but never get to use it)
Title in Adobe Garamond Pro size 16, centred with a blue underline and written in a hideous moss green colour
And we’ll leave Normal, normal. Mine’s Calibri size 11 in black. Nice and easy to read with no bells and whistles.

Now you know how to create styles, because I showed you, and it’s very, very quick. But let’s say that you are working for a client who loves his snazzy purple and 1970s orange bubble writing.
You’ve created all your styles and he likes them. Even better, let’s say he told you what he wanted and you know you’ll probably lose the file that gives his preferences. Or you’ll write them down in your notebook of favourite things and promptly forget where you put it. I’m still looking for a notebook from a makeup masterclass last year – I know it’s in a stack of notebooks somewhere that’s not work related, but can I find it? …

Anyway.
The easiest thing is to save your style set in Word, so you can access it whenever you need. It can sit there, nestled in amongst all the other style sets until you need it.
Here’s what you do.
Note: in the Styles section of the ribbon you’ll see the styles you’ve created.

1. Create your styles
You’ve already done this, but just in case you forget – create the styles you want for your client’s document.
Once you open a new document, Word will revert to its ‘normal’ generic styles, or the styles you have made by modifying these standard ones.
These styles you have just created are for this document only.
But you want to save your new styles so you can use them, without creating them all over again …
2. Save your style set
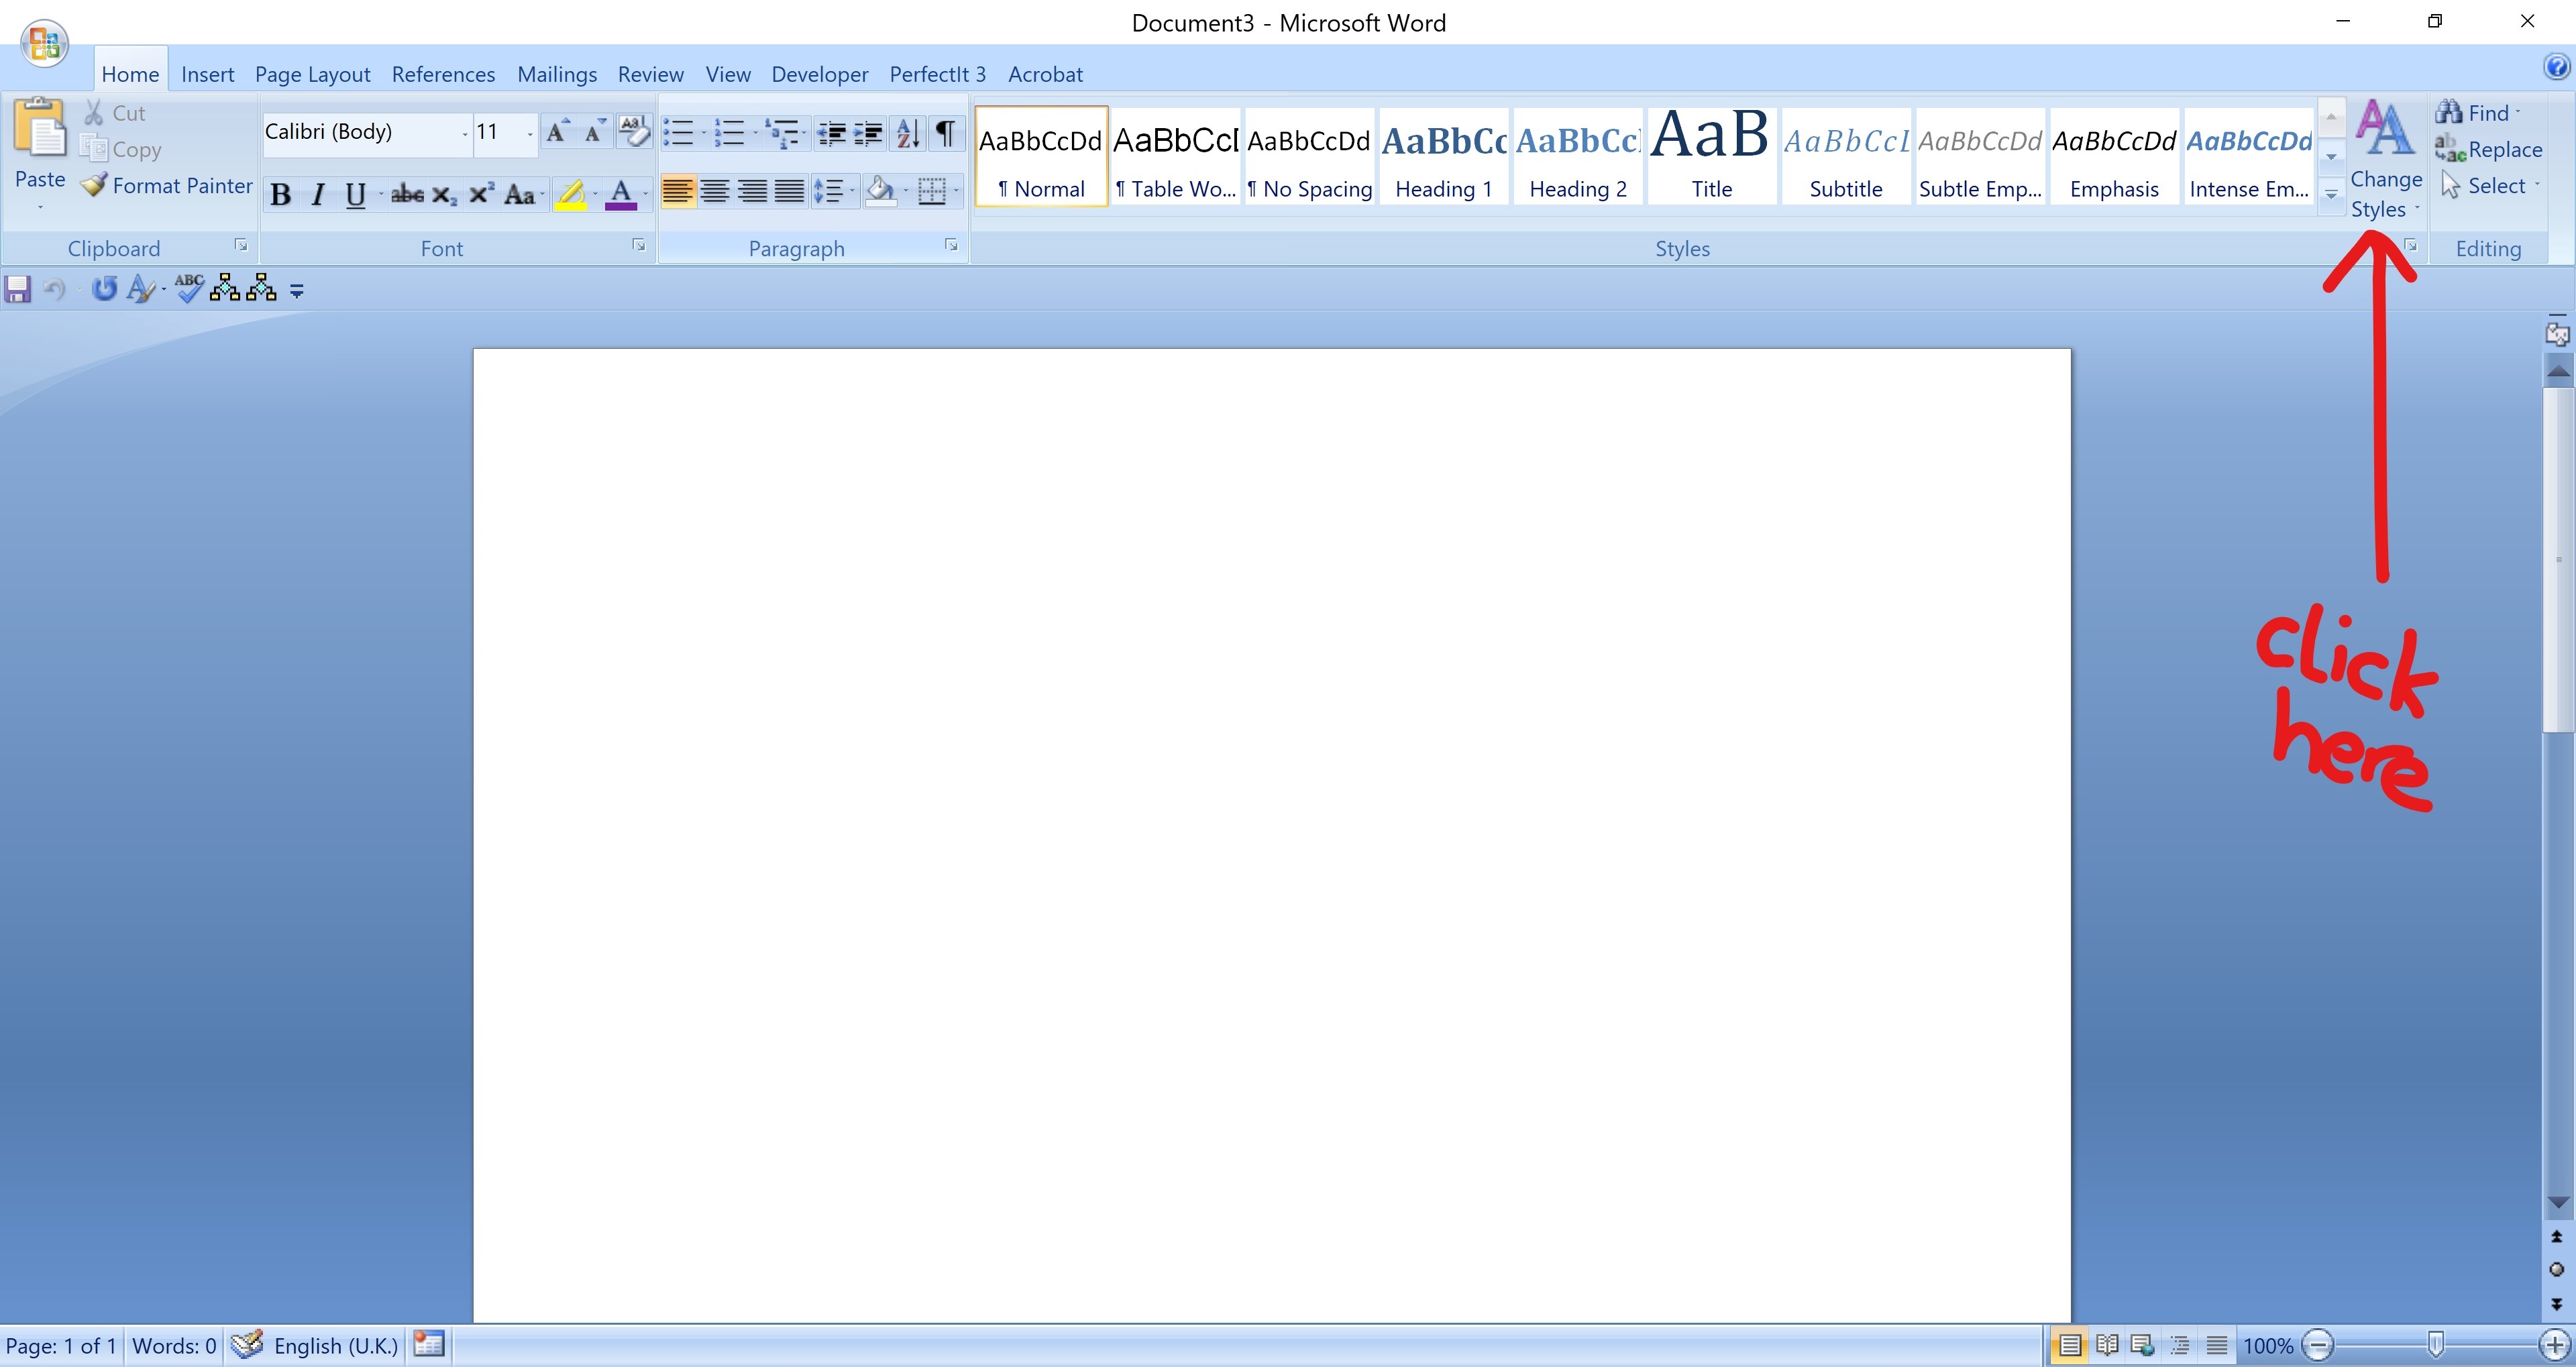
Go over to the Change Styles button and click on it (it’ll be highlighted when you hover your cursor over it).

NOT the little down arrow in the bottom right corner of the Styles ribbon section.

Now click on Style Set.

You’ll see a lot of options but head to the bottom and click on Save as Quick Style Set.

All you have to do now is give your style set a name that you will remember and that won’t have you scratching your head in a year’s time when the client comes back to you with volume 2 of their life’s work. Let’s just call this one 70s Dude Style. You’ll save it as a Word template so you don’t have to do anything else, just click Save.

3. Use your shiny new style
You’ve now saved your style. So let’s see if it works.
Open up a new document and you’ll notice that Word’s generic styles are peeking at you from the ribbon.

But we don’t want those, we want 70s Dude Style.
Click on Change Styles.
Then click on Style Set and look what’s there right at the top of the list! Don’t get too excited, it’s only on the top because it starts with a number, if you create other styles they’ll appear in alphabetical order.

Click on 70s Dude Style and you’ll see that in the Style ribbon there are now bright purple and orange headings.

So now you can add your own styles to Word and call on them whenever you need. It really does save time – and can also cut out the monotony of styling documents for each new job.
Note: Styles are fabulous, but when working with a client, publisher or typesetter, keep it simple. You can easily go overboard and make styles for everything, which can be helpful, but can be a headache if the client, publisher or typesetter use their own styles. Always ask if there is a preferred method of working, or a preferred style set – and if there is, ask the client to send a blank document, which uses their preferred style, then save that to your style sets instead.
Category: business, copy editing, freelance, Microsoft Word, Microsoft Word Styles, publishing, small business, trainingTags: advice, guides, tutorials, writing
Introduction
There are a number of built-in capabilities in Word that can help you add structure to your document. By using styles you can more easily navigate your document and move things around. For years you have been able to save Word documents as PDF, and in Word 2013 you can now also edit PDF documents. Let me show you.
How to apply styles to Word documents?
I’m going to write a new script for one of our videos. I’ll open up a blank document and start with the title, “Keep your contacts up to date”. To make it easier to format and navigate the document I’m going to apply styles. To apply a style to the title I’ll mark the title and click on the “Title” style.
I’m not thrilled about the formatting applied, but I’m going to leave it for now and change the look and feel of the entire document when I’ve finished writing all the text.
Next, I’ll write the outline for the script. The outline will also work as the headings for each paragraph. When I’ve written all the headings I’ll mark them and apply the “Heading 1” style. Now I’ll just write the text for each section and finally, I’ll add information about the video at the top. I’ll mark the informative text at the top and select to apply the “Subtle Emphasis” style.
How to manage paragraphs in Word?
By applying heading styles it is much easier to navigate and work with the document. In Word 2013 I can get a good overview of the contents by collapsing and expanding the paragraphs. To collapse a paragraph place your cursor on the heading, right-click and select Expand/Collapse – Collapse Heading.
This option will only be available if you have applied a heading style. Another, quicker way to collapse the paragraph is to click the little grey triangle to the left of the heading. If you want to collapse all paragraphs right-click any heading and select Expand/Collapse – “Collapse all headings”.
Now you can focus your attention better by only expanding a single paragraph. To go back to the original layout right-click and select Expand/Collapse – “Expand all headings” and the full document will show.
How to arrange paragraphs in Word?
To quickly re-arrange paragraphs in your document, click the “VIEW” tab and then mark the “Navigation Pane”.
Here you can see all the paragraphs in your document if you have applied styles. You can easily navigate your document by just marking a heading to go to that paragraph. To change the order of a paragraph just grab it by holding down the left mouse button and then drag and drop it, and the whole paragraph is moved. To go to the beginning of the document click the little arrow which takes you back to the first page.
How to change styles in Word?
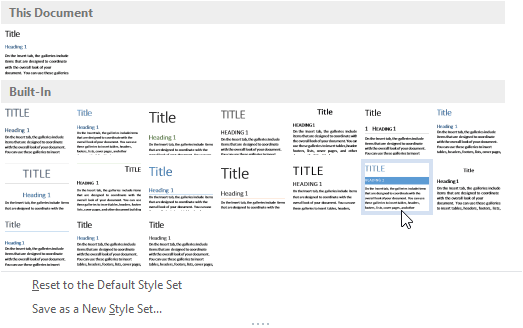
I’ll close down the “Navigation Pane”, and now I want to work on the look and feel of the document. To make it easier to change formatting, Word has a number of built-in style sets that you can use. To apply a style set to your document, click the “DESIGN” tab and select a style from the style set gallery.
A style set is a combination of fonts, colors, and layouts. You get a live preview of what your document will look like using different style sets. I’ll select this “Shaded” style set. This is a good start but I want to make some changes. To change the colors used in the style, click “Colors”, and see which color combination you prefer.
How to create numbered headings in Word?
I can continue to tweak the formatting until it’s exactly the way I want it. For example, I want to add some more space between the lines of the text. I’ll mark the first paragraph by double-clicking in the margin next to the paragraph. I’ll go to the “HOME” tab and click the Line and Paragraph Spacing” button and change the line spacing to 1.5.
To apply this change to the entire document, I’ll right-click the “Normal” style used for the text and select “Update Normal to Match Selection”.
There, now more space is added to the entire document. This looks fine, however, I want the video information at the top to be more compressed. Click the Show/Hide paragraph button on the “HOME” tab to see all paragraph ending marks.
I’ll remove the one at the very top by just pressing delete on my keyboard. To remove the space after the paragraphs and make the text more compressed mark the text, click on the “Line and Paragraph spacing” button and click “Remove Space After Paragraph”.
To make it even more compact I’ll click again and select “Remove Space Before Paragraph”. If I want it even tighter I can decrease the line spacing, but I prefer to have a bit more space so I’ll click undo twice. To save these changes to the style I’ll right-click the “Subtle emphasis” style and select to “Update Subtle Emphasis to Match Selection”.
To hide the paragraph marks again click the “Show/Hide” paragraph button.
How to create numbered headings in Word?
Next, I want to add heading numbers. To add numbers to your heading style, mark a heading and click “Numbering” in the Paragraph section of the “HOME” tab. Select a number format of your choice.
By default, Word indents numbered lists. To remove the indent click the “Decrease Indent” button. To apply this change to the heading style, right-click the “Heading 1” style and select “Update Heading 1 to Match Selection”.
As you can see all the headings are automatically numbered.
How to save a new style set in Word 2013?
Now that I’m happy with all the formatting I want to save this style for future video scripts so that I don’t have to make the changes all over again. To save a style set go to the “DESIGN” tab, open up the Style Set Gallery and click “Save as a New Style Set”.
Give it a name, I’ll name this “Video Script Design”. If you open up the Style Set Gallery, you will see the newly created Video Script Design style in the “Custom” section. By saving your style sets you don’t have to waste time formatting your documents over and over again.
How to create a template in Word?
In addition to the formatting, this video script follows a certain text pattern. It has the article number at the top followed by the video length, keywords a description and then the actual script starts off with an introduction. A Style Set only saves the design, not the contents of the document. If you want to keep some of the text in your document it’s better to save it as a document template. To make sure I don’t overwrite my script by mistake I’ll close down the document. I’ll open up Word again and in the “Recent document” section I’ll right-click and select “Open a copy”.
Now I’ll remove all the specific text and make it more generic. To save it as a template I’ll click “FILE”, “Save As” and then I’ll select “Word Template” in the file type drop down. I’ll give it a name, “Video Script Template”.
Next time I open up Word, my template is available under the “PERSONAL” section on the start page.
How to save Word documents as PDF
Let’s go back to my initial video script again. I’ll open it up from my “Recent documents”. When I’m done with the final script I want to save it as a PDF document. To save a document as a PDF click “FILE” and then “Export”, “Create PDF/XPS” and then click ”Publish”.
Your document is exported into a PDF document that you can easily share with others.
Edit PDF documents in Word 2013
Sometimes you need to make changes to PDF documents. Here I have some other scripts I have written that I would like to apply my newly created style too. The problem is I only have them as PDF documents. In Word 2013 you can open up and edit PDF documents. To open up a PDF document in Word, right-click the PDF document and select to “Open with” Word.
You’ll get a warning that the document might not look the same in Word as in Adobe. Click “OK” to open up the document. The PDF document opens up and as you can see in this case the formatting looks quite alright. So now I can continue to work on this script and apply my newly created style set in Word.
Closing
By knowing how to add structure to your documents using styles you’ll be able to save a lot of time when it comes to navigating and formatting documents.
Leave a Comment