
In this blog post, i try to give simple idea about how to create, write and save excel files using PowerShell. This will help you in many reporting automation process.
First of all we have to understand what is PowerShell. PowerShell is is a shell developed by Microsoft for purposes of task automation and configuration management . This powerful shell is based on the .NET framework and it includes a command-line shell and a scripting language.
Let’s start, what am try to do is, import 3 “txt” files with some data and write those details in to one excel file.
1.How to import .txt files ?
I have 3 txt files with some numeric data. import those files into our script using Get-Content cmdlet.
$Time = Get-Content 'C:InputFilesTIME.txt'
$Current = Get-Content 'C:InputFilesCUR.txt'
$volt = Get-Content 'C:InputFilesVOLT.txt'
2.How to Create Excel file ?
Create Excel file by creating powershell objects. Following Line create object using excel.
$excel = New-Object -ComObject excel.application
The next line hold visiblity of excel application. if you use $False it will run as hidden process and if you use $True it will show you the writing process as well. I use it as $False.
$excel.visible = $False
Now I add workbook to my excel.
$workbook = $excel.Workbooks.Add()
Then add worksheet to my workbook and rename it as “Data Set”. You can replace any name with it.
$diskSpacewksht= $workbook.Worksheets.Item(1)
$diskSpacewksht.Name = "Data Set"
Now add column names and the Header for our excel. we use (row number,col number) format.
$diskSpacewksht.Cells.Item(2,8) = 'Header - Data Set Excel'
$diskSpacewksht.Cells.Item(3,1) = 'Time'
$diskSpacewksht.Cells.Item(3,2) = 'Current'
$diskSpacewksht.Cells.Item(3,3) = 'Volt'
Then i try to use some styles for our excel, to get some attractive look. in this case change the font family, font size, font color and etc.
$diskSpacewksht.Cells.Item(2,8).Font.Size = 18
$diskSpacewksht.Cells.Item(2,8).Font.Bold=$True
$diskSpacewksht.Cells.Item(2,8).Font.Name = "Cambria"
$diskSpacewksht.Cells.Item(2,8).Font.ThemeFont = 1
$diskSpacewksht.Cells.Item(2,8).Font.ThemeColor = 4
$diskSpacewksht.Cells.Item(2,8).Font.ColorIndex = 55
$diskSpacewksht.Cells.Item(2,8).Font.Color = 8210719
3.How to Write Data to Excel file ?
Following code show you to how 3 txt files data write into a one excel file using powershell.
$col = 4
$col1 = 4
$col2 = 4

 foreach ($timeVal in $Time){
              $diskSpacewksht.Cells.Item($col,1) = $timeVal
              $col++
 }
 foreach ($currentVal in $Current){
              $diskSpacewksht.Cells.Item($col1,2) = $currentVal
              $col1++
 }
 foreach ($voltVal in $volt){
             $diskSpacewksht.Cells.Item($col2,3) = $voltVal
             $col2++
 }
4.How to Save Excel file ?
Finally we have to save our excel file. This whole process run as hidden. so we have to off Display alerts. Then file extension has to be .xlsx and we have to set the file path to save the file and quit from the excel.
$excel.DisplayAlerts = 'False'
$ext=".xlsx"
$path="C:CSVfilesDataSetE$ext"
$workbook.SaveAs($path)
$workbook.Close
$excel.DisplayAlerts = 'False'
$excel.Quit()
Following Source code shows the complete scenario.
$Time = Get-Content 'C:InputFilesTIME.txt'
$Current = Get-Content 'C:InputFilesCUR.txt'
$volt = Get-Content 'C:InputFilesVOLT.txt'

$excel = New-Object -ComObject excel.application
$excel.visible = $False
$workbook = $excel.Workbooks.Add()
$diskSpacewksht= $workbook.Worksheets.Item(1)

$diskSpacewksht.Name = "Data Set"
$diskSpacewksht.Cells.Item(2,8) = 'Header - Data Set Excel'
$diskSpacewksht.Cells.Item(3,1) = 'Time'
$diskSpacewksht.Cells.Item(3,2) = 'Current'
$diskSpacewksht.Cells.Item(3,3) = 'Volt'

$diskSpacewksht.Cells.Item(2,8).Font.Size = 18
$diskSpacewksht.Cells.Item(2,8).Font.Bold=$True
$diskSpacewksht.Cells.Item(2,8).Font.Name = "Cambria"
$diskSpacewksht.Cells.Item(2,8).Font.ThemeFont = 1
$diskSpacewksht.Cells.Item(2,8).Font.ThemeColor = 4
$diskSpacewksht.Cells.Item(2,8).Font.ColorIndex = 55
$diskSpacewksht.Cells.Item(2,8).Font.Color = 8210719

$col = 4
$col1 = 4
$col2 = 4
 foreach ($timeVal in $Time){
             $diskSpacewksht.Cells.Item($col,1) = $timeVal
             $col++
 }
 foreach ($currentVal in $Current){
           $diskSpacewksht.Cells.Item($col1,2) = $currentVal
           $col1++
 }
 foreach ($voltVal in $volt){
          $diskSpacewksht.Cells.Item($col2,3) = $voltVal
          $col2++
 }

$excel.DisplayAlerts = 'False'
$ext=".xlsx" $path="C:CSVfilesDataSetE$ext"
$workbook.SaveAs($path)
$workbook.Close$excel.DisplayAlerts = 'False'
$excel.Quit()
You have to copy this code and save as any name with “.ps1” file extension. Also change all file paths related to your file locations. I have attached my .txt files with this post, and you can test the script using those files.
Download TXT files :https://drive.google.com/open?id=0Bw-UUdtr10I8RW50X0NpZERPS1E
Author : Malith Oshan Lankarathne

Для работы с Excel в среде powershell нужно использовать COM объект.
#Создаем новый объект
$excel = New-Object -ComObject Excel.Application
При выполнении данного командлета произойдет запуск приложения Excel в скрытом состоянии, т.е. у нас будет висеть
процесс Excel, но при этом самого приложения как такового мы не увидем. Для того чтобы увидеть работу приложения
нужно обратиться к его свойству Visible и установить его в TRUE т.к. по умолчанию стоит FALSE
#Режим записи видимый
$excel.Visible = $true
Далее после того как приложение открылось нужно создать книгу воспользовавшись свойством Workbooks и методом Add().
#Создаем книгу Excel
$EWB = $excel.Workbooks.Add()
После создания книги нужно выбрать лист с которым будем работать в данной книге. Для этого воспользуемся
свойством Worksheet и методом Item()передав ему номер листа с которым будем работать.
#Выбираем первый лист книги
$EWS = $EWB.Worksheets.Item(1)
Зададим имя нашему листу для этого используем свойство Name и присвоим ему значение нового имени листа.
#Название листа книги
$EWS.Name = 'Service'
Так как Excel это таблица и мы работаем с ее ячейками то используем свойство Cells и метод Item() для
указания с какими ячейками данного листа мы будем работать. Отсчет начинается с 1.
#Первая строка ячеек
$EWS.Cells.Item(1,1) = 'Status'
$EWS.Cells.Item(1,2) = 'Name'
$EWS.Cells.Item(1,3) = 'DisplayName'
В данном примере мы устанавливаем названия наших колонок которые в дальнейшем будем заполнять. Первый аргумент
это номер строки с которой работаем, второй аргумент это ячейка в таблице. Перед тем как перебирать массив с
данными и записывать все в таблицу нам нужна вспомогательная переменная которая будет ссылаться на начальную
строку в таблице с дальнейшим увеличением в цикле для перехода на новую строку.
#Перебераем массив и вставляем в нужные ячейки листа
$j = 2
foreach($arr in $srv)
{
   #Если процесс запущен то зеленый иначе красный
   if($arr.Status -eq 4){
    $EWS.Cells.Item($j,1) = 'Запущен'
    $color = 10
   }else{
    $EWS.Cells.Item($j,1) = 'Остановлен'
    $color = 3
   }


   $EWS.Cells.Item($j,2) = $arr.Name
   $EWS.Cells.Item($j,3) = $arr.DisplayName

   $EWS.Cells.Item($j,1).Font.Bold = $true
   $EWS.Cells.Item($j,1).Font.ColorIndex = $color

   $j++
}
После того как книга заполнена нужными данными ее необходимо сохранить. Для этого используем метод Saveas() и
передаем ему путь и имя файла для сохранения.
#Сохраняем книгу
$EWB.Saveas('C:Excelservices.xlsx')
После этого закрываем саму книгу воспользовавшить методом Close().
#Закрываем книгу
$EWB.Close()
После того как закрыли книгу можно завершать работу приложения Excel использую метод Quit(). Тем самым освободив память в системе.
#Закрываем приложение Excel
$excel.Quit()
У данного способа есть существенный недостаток это очень медленная работа экспорта данных в таблицу Excel, но за то можно создавать красивые отформатированные таблицы для конечного пользователя. Здесь представлен полный скрипт, который получает список всех служб на вашем компьютере и записывает их в ячейки таблицы Excel.
#Получаем список всех процессов
$srv = Get-Service

#Создаем новый объект
$excel = New-Object -ComObject Excel.Application

#Режим записи видимый
$excel.Visible = $true

#Создаем книгу Excel
$EWB = $excel.Workbooks.Add()

#Выбираем первый лист книги
$EWS = $EWB.Worksheets.Item(1)

#Название листа книги
$EWS.Name = 'Service'

#Первая строка ячеек
$EWS.Cells.Item(1,1) = 'Status'
$EWS.Cells.Item(1,2) = 'Name'
$EWS.Cells.Item(1,3) = 'DisplayName'

#Перебераем массив и вставляем в нужные ячейки листа
$j = 2
foreach($arr in $srv)
{
   #Если процесс запущен то зеленый иначе красный
   if($arr.Status -eq 4){
    $EWS.Cells.Item($j,1) = 'Запущен'
    $color = 10
   }else{
    $EWS.Cells.Item($j,1) = 'Остановлен'
    $color = 3
   }


   $EWS.Cells.Item($j,2) = $arr.Name
   $EWS.Cells.Item($j,3) = $arr.DisplayName

   $EWS.Cells.Item($j,1).Font.Bold = $true
   $EWS.Cells.Item($j,1).Font.ColorIndex = $color

   $j++
}

#Сохраняем книгу
$EWB.Saveas('C:Excelservices.xlsx')

#Закрываем книгу
$EWB.Close()

#Закрываем приложение Excel
$excel.Quit()
First let me state, I’m a complete noobie at PS and am having some difficulties working thru this issue. Please excuse my coding if it appears a bit rudimentary. I have a script that opens a text file containing the following information:
pathfoldername, folder sizes, number of files, prepurge and post purge information. I can mport all information into Excel, However, it will not perform a SaveAs c:filename.xlsx.
I’m at a complete loss. Please Help
Below is my code.
Get-Content ‘\srv001itdocsAuditsWorldFolderAuditsWorldFolderSizes.txt’ | select-string -pattern » TOTAL: » | out-file c:foldersizeParsed.txt
$file = ‘c:foldersizeParsed.txt’
[Threading.Thread]::CurrentThread.CurrentCulture = ‘en-US’
$Excel = New-Object -comobject Excel.Application
$Excel.Visible = $true
################
$Excel.workbooks.OpenText($file,437,1,1,1,$True,$True,$False,$False,$True,$False)
#################
$Excel.Application.ActiveWindow.SplitRow = 1
$Excel.application.activewindow.freezepanes = $true
$Excel.Rows.Item(1).Font.Bold = $true # Bold heading text
$Excel.Rows.Item(1).VerticalAlignment = -4108 # Centre (vertically) heading
$Excel.Rows.Item(1).HorizontalAlignment = -4108 # Centre (horizontally) heading
$Excel.Columns.Item(1).columnWidth=10
$Excel.Columns.Item(2).columnWidth=15
$Excel.Columns.Item(3).columnWidth=15
$Excel.Columns.Item(4).columnWidth=0
$Excel.Columns.Item(5).columnWidth=20
$Excel.Columns.Item(6).columnWidth=15
$Excel.Cells.Item(1,1) = «Task»
$Excel.Cells.Item(1,2) = «Directory Size»
$Excel.Cells.Item(1,3) = «Qty Files»
$Excel.Cells.Item(1,5) = «Path»
$Excel.Cells.Item(1,6) = «Difference in MB»
$Excel.range(«F3:F3»).cells.formula = «=b2-b3»
$Excel.range(«F5:F5»).cells.formula = «=b4-b5»
$Excel.range(«F7:F7»).cells.formula = «=b6-b7»
$Excel.range(«F9:F9»).cells.formula = «=b8-b9»
$Excel.range(«F11:F11»).cells.formula = «=b10-b11»
$Excel.range(«F13:F13»).cells.formula = «=b12-b13»
$Excel.range(«F15:F15»).cells.formula = «=b14-b15»
$Excel.range(«F17:F17»).cells.formula = «=b16-b17»
$Excel.range(«F19:F19»).cells.formula = «=b18-b19»
$Excel.range(«F21:F21»).cells.formula = «=b20-b21»
$Excel.range(«F23:F23»).cells.formula = «=b22-b23»
$Excel.range(«F25:F25»).cells.formula = «=b24-b25»
$Excel.range(«F27:F27»).cells.formula = «=b26-b27»
$Excel.range(«F29:F29»).cells.formula = «=b28-b29»
$Excel.range(«F31:F31»).cells.formula = «=b30-b31»
$Excel.range(«F33:F33»).cells.formula = «=b32-b33»
$Excel.range(«F35:F35»).cells.formula = «=b34-b35»
$Excel.range(«F37:F37»).cells.formula = «=b36-b37»
$Excel.range(«F39:F39»).cells.formula = «=b38-b39»
$Excel.range(«F41:F41»).cells.formula = «=b40-b41»
$Excel.range(«F43:F43»).cells.formula = «=b42-b43»
$Excel.range(«F45:F45»).cells.formula = «=b44-b45»
$Excel.range(«F47:F47»).cells.formula = «=b46-b47»
$Excel.range(«F49:F49»).cells.formula = «=b48-b49»
$Excel.range(«F51:F51»).cells.formula = «=b50-b51»
$Excel.range(«F53:F53»).cells.formula = «=b52-b53»
$Excel.range(«F55:F55»).cells.formula = «=b54-b55»
$Excel.range(«F57:F57»).cells.formula = «=b56-b57»
$Excel.range(«F59:F59»).cells.formula = «=b58-b59»
$Excel.range(«F61:F61»).cells.formula = «=b60-b61»
$Excel.range(«F63:F63»).cells.formula = «=b62-b63»
$Excel.range(«F65:F65»).cells.formula = «=b64-b565»
$Excel.range(«F67:F67»).cells.formula = «=b66-b67»
$Excel.range(«F69:F69»).cells.formula = «=b68-b69»
$Excel.range(«F71:F71»).cells.formula = «=b70-b71»
$Excel.range(«F73:F73»).cells.formula = «=b72-b73»
$Excel.range(«F75:F75»).cells.formula = «=b74-b75»
$Excel.range(«F77:F77»).cells.formula = «=b76-b77»
$Excel.range(«F79:F79»).cells.formula = «=b78-b79»
$Excel.range(«F81:F81»).cells.formula = «=b80-b81»
$Excel.range(«F83:F83»).cells.formula = «=b82-b83»
$Excel.Cells.Item(2,1) = «PrePurge»
$Excel.Cells.Item(3,1) = «PostPurge»
$Excel.Cells.Item(4,1) = «PrePurge»
$Excel.Cells.Item(5,1) = «PostPurge»
$Excel.Cells.Item(6,1) = «PrePurge»
$Excel.Cells.Item(7,1) = «PostPurge»
$Excel.Cells.Item(8,1) = «PrePurge»
$Excel.Cells.Item(9,1) = «PostPurge»
$Excel.Cells.Item(10,1) = «PrePurge»
$Excel.Cells.Item(11,1) = «PostPurge»
$Excel.Cells.Item(12,1) = «PrePurge»
$Excel.Cells.Item(13,1) = «PostPurge»
$Excel.Cells.Item(14,1) = «PrePurge»
$Excel.Cells.Item(15,1) = «PostPurge»
$Excel.Cells.Item(16,1) = «PrePurge»
$Excel.Cells.Item(17,1) = «PostPurge»
$Excel.Cells.Item(18,1) = «PrePurge»
$Excel.Cells.Item(19,1) = «PostPurge»
$Excel.Cells.Item(20,1) = «PrePurge»
$Excel.Cells.Item(21,1) = «PostPurge»
$Excel.Cells.Item(22,1) = «PrePurge»
$Excel.Cells.Item(23,1) = «PostPurge»
$Excel.Cells.Item(24,1) = «PrePurge»
$Excel.Cells.Item(25,1) = «PostPurge»
$Excel.Cells.Item(26,1) = «PrePurge»
$Excel.Cells.Item(27,1) = «PostPurge»
$Excel.Cells.Item(28,1) = «PrePurge»
$Excel.Cells.Item(29,1) = «PostPurge»
$Excel.Cells.Item(30,1) = «PrePurge»
$Excel.Cells.Item(31,1) = «PostPurge»
$Excel.Cells.Item(32,1) = «PrePurge»
$Excel.Cells.Item(33,1) = «PostPurge»
$Excel.Cells.Item(34,1) = «PrePurge»
$Excel.Cells.Item(35,1) = «PostPurge»
$Excel.Cells.Item(36,1) = «PrePurge»
$Excel.Cells.Item(37,1) = «PostPurge»
$Excel.Cells.Item(38,1) = «PrePurge»
$Excel.Cells.Item(39,1) = «PostPurge»
$Excel.Cells.Item(40,1) = «PrePurge»
$Excel.Cells.Item(41,1) = «PostPurge»
$Excel.Cells.Item(42,1) = «PrePurge»
$Excel.Cells.Item(43,1) = «PostPurge»
$Excel.Cells.Item(44,1) = «PrePurge»
$Excel.Cells.Item(45,1) = «PostPurge»
$Excel.Cells.Item(46,1) = «PrePurge»
$Excel.Cells.Item(47,1) = «PostPurge»
$Excel.Cells.Item(48,1) = «PrePurge»
$Excel.Cells.Item(49,1) = «PostPurge»
$Excel.Cells.Item(50,1) = «PrePurge»
$Excel.Cells.Item(51,1) = «PostPurge»
$Excel.Cells.Item(52,1) = «PrePurge»
$Excel.Cells.Item(53,1) = «PostPurge»
$Excel.Cells.Item(54,1) = «PrePurge»
$Excel.Cells.Item(55,1) = «PostPurge»
$Excel.Cells.Item(56,1) = «PrePurge»
$Excel.Cells.Item(57,1) = «PostPurge»
$Excel.Cells.Item(58,1) = «PrePurge»
$Excel.Cells.Item(59,1) = «PostPurge»
$Excel.Cells.Item(60,1) = «PrePurge»
$Excel.Cells.Item(61,1) = «PostPurge»
$Excel.Cells.Item(62,1) = «PrePurge»
$Excel.Cells.Item(63,1) = «PostPurge»
$Excel.Cells.Item(64,1) = «PrePurge»
$Excel.Cells.Item(65,1) = «PostPurge»
$Excel.Cells.Item(66,1) = «PrePurge»
$Excel.Cells.Item(67,1) = «PostPurge»
$Excel.Cells.Item(68,1) = «PrePurge»
$Excel.Cells.Item(69,1) = «PostPurge»
$Excel.Cells.Item(70,1) = «PrePurge»
$Excel.Cells.Item(71,1) = «PostPurge»
$Excel.Cells.Item(72,1) = «PrePurge»
$Excel.Cells.Item(73,1) = «PostPurge»
$Excel.Cells.Item(74,1) = «PrePurge»
$Excel.Cells.Item(75,1) = «PostPurge»
$Excel.Cells.Item(76,1) = «PrePurge»
$Excel.Cells.Item(77,1) = «PostPurge»
$Excel.Cells.Item(78,1) = «PrePurge»
$Excel.Cells.Item(79,1) = «PostPurge»
$Excel.Cells.Item(80,1) = «PrePurge»
$Excel.Cells.Item(81,1) = «PostPurge»
$Excel.Cells.Item(82,1) = «PrePurge»
$Excel.Cells.Item(83,1) = «PostPurge»
#$Excel.UsedRange.EntireColumn.AutoFit()
SaveAs has been removed from code since it doesnt work anyway.
HELP!!! 
Содержание
- Чтение и запись данных в Excel файл из PowerShell
- Доступ к данным в Excel из консоли PowerShell
- Как получить данные из Active Directory и сохранить их в книге Excel?
- Powershell работа с Excel на примере служб windows
- Blog Of Maliya
- Know The Stuff
- How to Create,Write and Save Excel using PowerShell ?
- Read and Write Data to Excel File with PowerShell
- How to Read Data from an Excel Spreadsheet using PowerShell?
- Exporting Active Directory User Info to Excel Spreadsheet using PowerShell
Чтение и запись данных в Excel файл из PowerShell
В это статье мы покажем, как получить доступ к данным в файлах Excel напрямую из PowerShell. Возможности прямого обращения к данным Excel из PowerShell открывает широкие возможности по инвентаризации и построению различных отчетов по компьютерам, серверам, инфраструктуре, Active Directory и т.д.
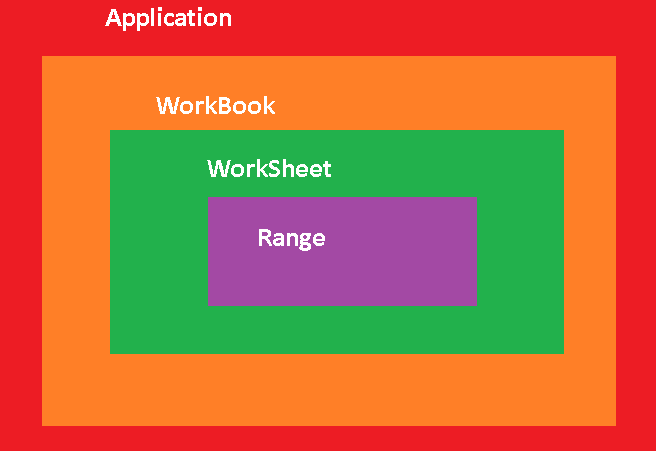
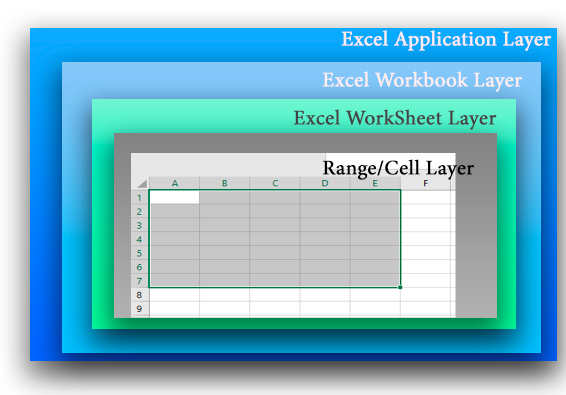
Прежде, чем показать, как обратиться к данным в ячейке файла Excel, необходимо рассмотреть архитектуру уровней представления в документе Excel. На следующем рисунке показаны 4 вложенных уровня в объектной модели Excel:
- Уровень приложения (Application Layer) – запущенное приложение Excel;
- Уровень книги (WorkBook Layer) – одновременно могут быть открыты несколько книг (документов Excel);
- Уровень листа (WorkSheet Layer) – в каждом xlsx файле может быть несколько листов;
- Ячейки (Range Layer) – здесь можно получить доступ к данным в конкретной ячейке или диапазонe ячеек.
Доступ к данным в Excel из консоли PowerShell
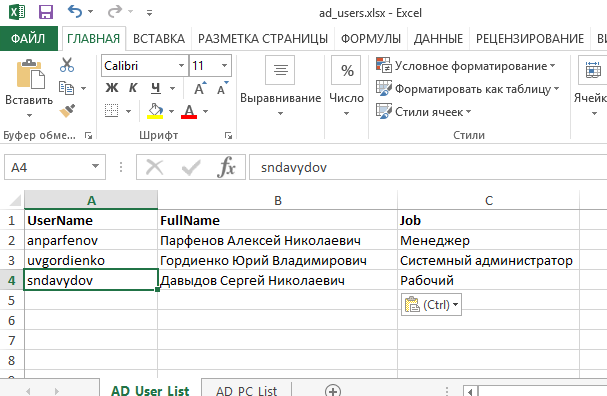
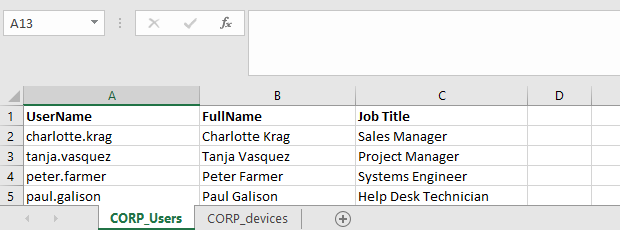
Рассмотрим на простом примере как получить доступ из PowerShell к данным в Excel файле со списком сотрудников.
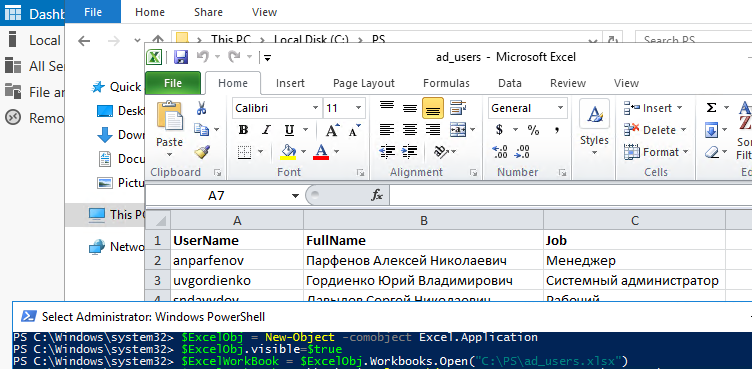
Сначала нужно запустить на компьютере приложение Excel (application layer) через COM объект:
$ExcelObj = New-Object -comobject Excel.Application
После выполнения этой команды на компьютере запускается в фоновом режиме приложение Excel. Чтобы сделать окно Excel видимым, нужно изменить свойство Visible COM объекта:
Теперь можно открыть файл (книгу, workbook) Excel:
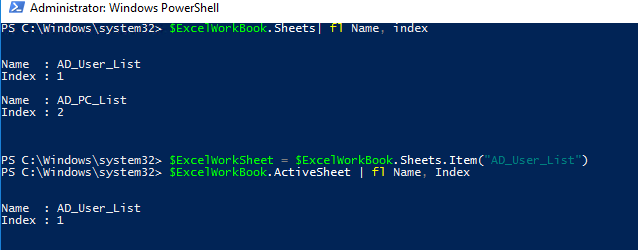
В каждом файле Excel может быть несколько листов (worksheets). Выведем список листов в текущей книге Excel:
$ExcelWorkBook.Sheets| fl Name, index
Теперь можно открыть конкретный лист (по имени или по индексу):
Текущий (активный) лист Excel можно узнать командой:
$ExcelWorkBook.ActiveSheet | fl Name, Index
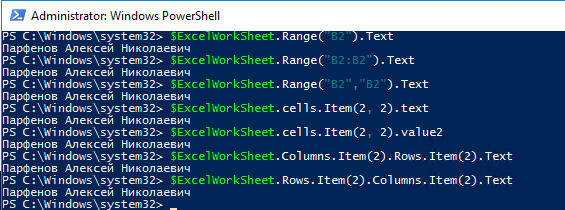
Теперь вы можете получить значения из ячеек документа Excel. Можно использовать различные способы адресации ячеек в книге Excel: через диапазон (Range), ячейку (Cell), столбец (Columns) или строку(Rows). Ниже я привел разные примеры получения данных из одной и той же ячейки:
$ExcelWorkSheet.Range(«B2»).Text
$ExcelWorkSheet.Range(«B2:B2»).Text
$ExcelWorkSheet.Range(«B2″,»B2»).Text
$ExcelWorkSheet.cells.Item(2, 2).text
$ExcelWorkSheet.cells.Item(2, 2).value2
$ExcelWorkSheet.Columns.Item(2).Rows.Item(2).Text
$ExcelWorkSheet.Rows.Item(2).Columns.Item(2).Text
Как получить данные из Active Directory и сохранить их в книге Excel?
Рассмотрим практический пример использования доступа к данным Excel из PowerShell. Например, нам нужно для каждого пользователя в Excel файле получить информацию из Active Directory. Например, его телефон (атрибут telephoneNumber), отдел (department) и email адрес (mail).
# Импорт модуля Active Directory в сессию PowerShell
import-module activedirectory
# Сначала откройте книгу Excel:
$ExcelObj = New-Object -comobject Excel.Application
$ExcelWorkBook = $ExcelObj.Workbooks.Open(«C:PSad_users.xlsx»)
$ExcelWorkSheet = $ExcelWorkBook.Sheets.Item(«AD_User_List»)
# Получаем количество заполненных строк в xlsx файле
$rowcount=$ExcelWorkSheet.UsedRange.Rows.Count
# Перебираем все строки в столбце 1, начиная со второй строки (в этих ячейках указано доменное имя пользователя)
for($i=2;$i -le $rowcount;$i++)<
$ADusername=$ExcelWorkSheet.Columns.Item(1).Rows.Item($i).Text
# Получаем значение атрибутов пользователя в AD
$ADuserProp = Get-ADUser $ADusername -properties telephoneNumber,department,mail|select-object name,telephoneNumber,department,mail
#Заполняем ячейки данными из AD
$ExcelWorkSheet.Columns.Item(4).Rows.Item($i) = $ADuserProp.telephoneNumber
В результате в Excel файле для каждого пользователя были добавлены столбцы с информацией из AD.

Рассмотрим еще один пример построения отчета с помощью PowerShell и Excel. Допустим, вам нужно построить Excel отчет о состоянии службы Print Spooler на всех серверах домена.
# Создать объект Excel
$ExcelObj = New-Object -comobject Excel.Application
$ExcelObj.Visible = $true
# Добавить рабочую книгу
$ExcelWorkBook = $ExcelObj.Workbooks.Add()
$ExcelWorkSheet = $ExcelWorkBook.Worksheets.Item(1)
# Переименовывать лист
$ExcelWorkSheet.Name = ‘Статус сервиса spooler’
# Заполняем шапку таблицы
$ExcelWorkSheet.Cells.Item(1,1) = ‘Имя сервера’
$ExcelWorkSheet.Cells.Item(1,2) = ‘Имя службы’
$ExcelWorkSheet.Cells.Item(1,3) = ‘Статус службы’
# Выделить шапку таблицы жирным. задать размер шрифта и ширину столбцов
$ExcelWorkSheet.Rows.Item(1).Font.Bold = $true
$ExcelWorkSheet.Rows.Item(1).Font.size=14
$ExcelWorkSheet.Columns.Item(1).ColumnWidth=25
$ExcelWorkSheet.Columns.Item(2).ColumnWidth=25
$ExcelWorkSheet.Columns.Item(3).ColumnWidth=25
# получим список всех Windows Server в домене
$computers = (Get-ADComputer -Filter ‘operatingsystem -like «*Windows server*» -and enabled -eq «true»‘).Name
$counter=2
# подключается к каждому компьютеру и получаем статус службы
foreach ($computer in $computers) <
$result = Invoke-Command -Computername $computer –ScriptBlock < Get-Service spooler | select Name, status >
#Заполняем ячейки Excel данными с сервера
$ExcelWorkSheet.Columns.Item(1).Rows.Item($counter) = $result.PSComputerName
$ExcelWorkSheet.Columns.Item(2).Rows.Item($counter) = $result.Name
$ExcelWorkSheet.Columns.Item(3).Rows.Item($counter) = $result.Status
$counter++
>
# сохраните полученный отчет и закройте Excel:
$ExcelWorkBook.SaveAs(‘C:psservice-report.xlsx’)
$ExcelWorkBook.close($true)
Область применения возможностей доступа из PowerShell в Excel очень широка. Начиная от простого построения отчетов, например, из Active Directory, и заканчивая возможностью создания PowerShell скриптов для актуализации данных в AD из Excel.
Источник
Powershell работа с Excel на примере служб windows
Для работы с Excel в среде powershell нужно использовать COM объект.
При выполнении данного командлета произойдет запуск приложения Excel в скрытом состоянии, т.е. у нас будет висеть процесс Excel, но при этом самого приложения как такового мы не увидем. Для того чтобы увидеть работу приложения нужно обратиться к его свойству Visible и установить его в TRUE т.к. по умолчанию стоит FALSE
Далее после того как приложение открылось нужно создать книгу воспользовавшись свойством Workbooks и методом Add().
После создания книги нужно выбрать лист с которым будем работать в данной книге. Для этого воспользуемся свойством Worksheet и методом Item()передав ему номер листа с которым будем работать.
Зададим имя нашему листу для этого используем свойство Name и присвоим ему значение нового имени листа.
Так как Excel это таблица и мы работаем с ее ячейками то используем свойство Cells и метод Item() для указания с какими ячейками данного листа мы будем работать. Отсчет начинается с 1.
В данном примере мы устанавливаем названия наших колонок которые в дальнейшем будем заполнять. Первый аргумент это номер строки с которой работаем, второй аргумент это ячейка в таблице. Перед тем как перебирать массив с данными и записывать все в таблицу нам нужна вспомогательная переменная которая будет ссылаться на начальную строку в таблице с дальнейшим увеличением в цикле для перехода на новую строку.
После того как книга заполнена нужными данными ее необходимо сохранить. Для этого используем метод Saveas() и передаем ему путь и имя файла для сохранения.
После этого закрываем саму книгу воспользовавшить методом Close().
После того как закрыли книгу можно завершать работу приложения Excel использую метод Quit(). Тем самым освободив память в системе.
У данного способа есть существенный недостаток это очень медленная работа экспорта данных в таблицу Excel, но за то можно создавать красивые отформатированные таблицы для конечного пользователя. Здесь представлен полный скрипт, который получает список всех служб на вашем компьютере и записывает их в ячейки таблицы Excel.
Источник
Blog Of Maliya
Know The Stuff
How to Create,Write and Save Excel using PowerShell ?
In this blog post, i try to give simple idea about how to create, write and save excel files using PowerShell. This will help you in many reporting automation process.
First of all we have to understand what is PowerShell. PowerShell is is a shell developed by Microsoft for purposes of task automation and configuration management . This powerful shell is based on the .NET framework and it includes a command-line shell and a scripting language.
Let’s start, what am try to do is, import 3 “txt” files with some data and write those details in to one excel file.
1.How to import .txt files ?
I have 3 txt files with some numeric data. import those files into our script using Get-Content cmdlet.
2.How to Create Excel file ?
Create Excel file by creating powershell objects. Following Line create object using excel.
The next line hold visiblity of excel application. if you use $False it will run as hidden process and if you use $True it will show you the writing process as well. I use it as $False.
Now I add workbook to my excel.
Then add worksheet to my workbook and rename it as “Data Set”. You can replace any name with it.
Now add column names and the Header for our excel. we use (row number,col number) format.
Then i try to use some styles for our excel, to get some attractive look. in this case change the font family, font size, font color and etc.
3.How to Write Data to Excel file ?
Following code show you to how 3 txt files data write into a one excel file using powershell.
4.How to Save Excel file ?
Finally we have to save our excel file. This whole process run as hidden. so we have to off Display alerts. Then file extension has to be .xlsx and we have to set the file path to save the file and quit from the excel.
Following Source code shows the complete scenario.
You have to copy this code and save as any name with “.ps1” file extension. Also change all file paths related to your file locations. I have attached my .txt files with this post, and you can test the script using those files.
Источник
Read and Write Data to Excel File with PowerShell
In this article we’ll show how to read and write data from Excel worksheets directly from PowerShell scripts. You can use Excel along with PowerShell to inventory and generate various reports on computers, servers, infrastructure, Active Directory, etc.
Before showing how to access data in an Excel cell, it is worth to understand the architecture of presentation layers in the Excel file. The figure below shows 4 nested presentation layers in the Excel object model:
- Application Layer – deals with the running Excel app;
- WorkBook Layer – multiple workbooks (Excel files) may be open at the same time;
- WorkSheet Layer – each XLSX file can contain several sheets;
- Range Layer – here you can access data in the specific cell or cell range.
How to Read Data from an Excel Spreadsheet using PowerShell?
Let’s take a look at a simple example of how to use PowerShell to access data in an Excel file containing a list of employees.
First, run the Excel app (application layer) on your computer using the COM object:
$ExcelObj = New-Object -comobject Excel.Application
After running the command, Excel will be launched on your computer in the background. To show the Excel window, change the Visible property of the COM object:
Then you can open an Excel file (a workbook):
Each Excel file can contain several worksheets. Let’s display the list of worksheets in the current Excel workbook:
$ExcelWorkBook.Sheets| fl Name, index

Then you can open a sheet you want (by its name or index):
You can get the name of the current (active) Excel worksheet using this command:
$ExcelWorkBook.ActiveSheet | fl Name, Index

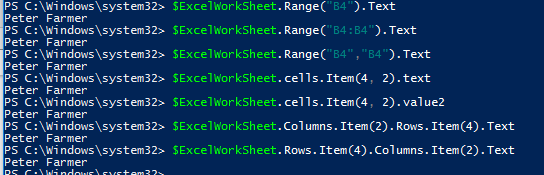
Then you can get values from cells in Excel worksheet. You can use different methods to get the cell values on the current Excel worksheet: using a range, a cell, a column or a row. See the examples of how to get data from the same cell below:
$ExcelWorkSheet.Range(«B4»).Text
$ExcelWorkSheet.Range(«B4:B4»).Text
$ExcelWorkSheet.Range(«B4″,»B4»).Text
$ExcelWorkSheet.cells.Item(4, 2).text
$ExcelWorkSheet.cells.Item(4, 2).value2
$ExcelWorkSheet.Columns.Item(2).Rows.Item(4).Text
$ExcelWorkSheet.Rows.Item(4).Columns.Item(2).Text
Exporting Active Directory User Info to Excel Spreadsheet using PowerShell
Let’s see a practical example of how to access Excel data from PowerShell. Suppose, we want to get some information from Active Directory for each user in an Excel file. For instance, their phone number (the telephoneNumber attribute), department and e-mail address .
# Importing Active Directory module into PowerShell session
import-module activedirectory
# Open an Excel workbook first:
$ExcelObj = New-Object -comobject Excel.Application
$ExcelWorkBook = $ExcelObj.Workbooks.Open(«C:PScorp_ad_users.xlsx»)
$ExcelWorkSheet = $ExcelWorkBook.Sheets.Item(«CORP_Users»)
# Get the number of filled in rows in the XLSX worksheet
$rowcount=$ExcelWorkSheet.UsedRange.Rows.Count
# Loop through all rows in Column 1 starting from Row 2 (these cells contain the domain usernames)
for($i=2;$i -le $rowcount;$i++) <
$ADusername=$ExcelWorkSheet.Columns.Item(1).Rows.Item($i).Text
# Get the values of user attributes in AD
$ADuserProp = Get-ADUser $ADusername -properties telephoneNumber,department,mail|select-object name,telephoneNumber,department,mail
# Fill in the cells with the data received from AD
$ExcelWorkSheet.Columns.Item(4).Rows.Item($i) = $ADuserProp.telephoneNumber
$ExcelWorkSheet.Columns.Item(5).Rows.Item($i) = $ADuserProp.department
$ExcelWorkSheet.Columns.Item(6).Rows.Item($i) = $ADuserProp.mail
>
# Save the XLS file and close Excel
$ExcelWorkBook.Save()
$ExcelWorkBook.close($true)
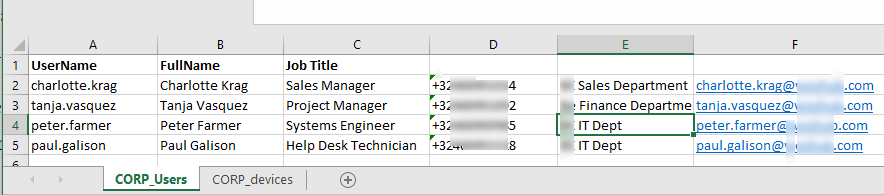
As a result, the columns containing AD information have been added for each user in the Excel file.
Let’s consider another example of making a report using PowerShell and Excel. Suppose, you want to make an Excel report about Print Spooler service state on all domain servers.
# Create an Excel object
$ExcelObj = New-Object -comobject Excel.Application
$ExcelObj.Visible = $true
# Add a workbook
$ExcelWorkBook = $ExcelObj.Workbooks.Add()
$ExcelWorkSheet = $ExcelWorkBook.Worksheets.Item(1)
# Rename a worksheet
$ExcelWorkSheet.Name = ‘Spooler Service Status’
# Fill in the head of the table
$ExcelWorkSheet.Cells.Item(1,1) = ‘Server Name’
$ExcelWorkSheet.Cells.Item(1,2) = ‘Service Name’
$ExcelWorkSheet.Cells.Item(1,3) = ‘Service Status’
# Make the table head bold, set the font size and the column width
$ExcelWorkSheet.Rows.Item(1).Font.Bold = $true
$ExcelWorkSheet.Rows.Item(1).Font.size=15
$ExcelWorkSheet.Columns.Item(1).ColumnWidth=28
$ExcelWorkSheet.Columns.Item(2).ColumnWidth=28
$ExcelWorkSheet.Columns.Item(3).ColumnWidth=28
# Get the list of all Windows Servers in the domain
$computers = (Get-ADComputer -Filter ‘operatingsystem -like «*Windows server*» -and enabled -eq «true»‘).Name
$counter=2
# Connect to each computer and get the service status
foreach ($computer in $computers) <
$result = Invoke-Command -Computername $computer –ScriptBlock < Get-Service spooler | select Name, status >
# Fill in Excel cells with the data obtained from the server
$ExcelWorkSheet.Columns.Item(1).Rows.Item($counter) = $result.PSComputerName
$ExcelWorkSheet.Columns.Item(2).Rows.Item($counter) = $result.Name
$ExcelWorkSheet.Columns.Item(3).Rows.Item($counter) = $result.Status
$counter++
>
# Save the report and close Excel:
$ExcelWorkBook.SaveAs(‘C:psServer_report.xlsx’)
$ExcelWorkBook.close($true)
You can use PowerShell to access Excel in a variety of scenarios. For example, you can create handy Active Directory reports or create PowerShell scripts to update AD data from Excel.
Источник
In this article we’ll show how to read and write data from Excel worksheets directly from PowerShell scripts. You can use Excel along with PowerShell to inventory and generate various reports on computers, servers, infrastructure, Active Directory, etc.
Contents:
- How to Read Data from an Excel Spreadsheet using PowerShell?
- Exporting Active Directory User Info to Excel Spreadsheet using PowerShell
You can access Excel sheets from PowerShell via a separate COM object (Component Object Model). This requires Excel to be installed on the computer.
Before showing how to access data in an Excel cell, it is worth to understand the architecture of presentation layers in the Excel file. The figure below shows 4 nested presentation layers in the Excel object model:
- Application Layer – deals with the running Excel app;
- WorkBook Layer – multiple workbooks (Excel files) may be open at the same time;
- WorkSheet Layer – each XLSX file can contain several sheets;
- Range Layer – here you can access data in the specific cell or cell range.
How to Read Data from an Excel Spreadsheet using PowerShell?
Let’s take a look at a simple example of how to use PowerShell to access data in an Excel file containing a list of employees.
First, run the Excel app (application layer) on your computer using the COM object:
$ExcelObj = New-Object -comobject Excel.Application
After running the command, Excel will be launched on your computer in the background. To show the Excel window, change the Visible property of the COM object:
$ExcelObj.visible=$true
You can display all Excel object properties as follows:
$ExcelObj| fl
Then you can open an Excel file (a workbook):
$ExcelWorkBook = $ExcelObj.Workbooks.Open("C:PScorp_ad_users.xlsx")
Each Excel file can contain several worksheets. Let’s display the list of worksheets in the current Excel workbook:
$ExcelWorkBook.Sheets| fl Name, index
Then you can open a sheet you want (by its name or index):
$ExcelWorkSheet = $ExcelWorkBook.Sheets.Item("CORP_users")
You can get the name of the current (active) Excel worksheet using this command:
$ExcelWorkBook.ActiveSheet | fl Name, Index
Then you can get values from cells in Excel worksheet. You can use different methods to get the cell values on the current Excel worksheet: using a range, a cell, a column or a row. See the examples of how to get data from the same cell below:
$ExcelWorkSheet.Range("B4").Text

$ExcelWorkSheet.Range("B4:B4").Text

$ExcelWorkSheet.Range("B4","B4").Text

$ExcelWorkSheet.cells.Item(4, 2).text

$ExcelWorkSheet.cells.Item(4, 2).value2

$ExcelWorkSheet.Columns.Item(2).Rows.Item(4).Text

$ExcelWorkSheet.Rows.Item(4).Columns.Item(2).Text
Exporting Active Directory User Info to Excel Spreadsheet using PowerShell
Let’s see a practical example of how to access Excel data from PowerShell. Suppose, we want to get some information from Active Directory for each user in an Excel file. For instance, their phone number (the telephoneNumber attribute), department and e-mail address .
# Importing Active Directory module into PowerShell session

import-module activedirectory

# Open an Excel workbook first:

$ExcelObj = New-Object -comobject Excel.Application

$ExcelWorkBook = $ExcelObj.Workbooks.Open("C:PScorp_ad_users.xlsx")

$ExcelWorkSheet = $ExcelWorkBook.Sheets.Item("CORP_Users")

# Get the number of filled in rows in the XLSX worksheet

$rowcount=$ExcelWorkSheet.UsedRange.Rows.Count

# Loop through all rows in Column 1 starting from Row 2 (these cells contain the domain usernames)

for($i=2;$i -le $rowcount;$i++){

$ADusername=$ExcelWorkSheet.Columns.Item(1).Rows.Item($i).Text

# Get the values of user attributes in AD

$ADuserProp = Get-ADUser $ADusername -properties telephoneNumber,department,mail|select-object name,telephoneNumber,department,mail

# Fill in the cells with the data received from AD

$ExcelWorkSheet.Columns.Item(4).Rows.Item($i) = $ADuserProp.telephoneNumber

$ExcelWorkSheet.Columns.Item(5).Rows.Item($i) = $ADuserProp.department

$ExcelWorkSheet.Columns.Item(6).Rows.Item($i) = $ADuserProp.mail

}

# Save the XLS file and close Excel

$ExcelWorkBook.Save()

$ExcelWorkBook.close($true)
As a result, the columns containing AD information have been added for each user in the Excel file.
Let’s consider another example of making a report using PowerShell and Excel. Suppose, you want to make an Excel report about Print Spooler service state on all domain servers.
# Create an Excel object

$ExcelObj = New-Object -comobject Excel.Application

$ExcelObj.Visible = $true

# Add a workbook

$ExcelWorkBook = $ExcelObj.Workbooks.Add()

$ExcelWorkSheet = $ExcelWorkBook.Worksheets.Item(1)

# Rename a worksheet

$ExcelWorkSheet.Name = 'Spooler Service Status'

# Fill in the head of the table

$ExcelWorkSheet.Cells.Item(1,1) = 'Server Name'

$ExcelWorkSheet.Cells.Item(1,2) = 'Service Name'

$ExcelWorkSheet.Cells.Item(1,3) = 'Service Status'

# Make the table head bold, set the font size and the column width

$ExcelWorkSheet.Rows.Item(1).Font.Bold = $true

$ExcelWorkSheet.Rows.Item(1).Font.size=15

$ExcelWorkSheet.Columns.Item(1).ColumnWidth=28

$ExcelWorkSheet.Columns.Item(2).ColumnWidth=28

$ExcelWorkSheet.Columns.Item(3).ColumnWidth=28

# Get the list of all Windows Servers in the domain

$computers = (Get-ADComputer -Filter 'operatingsystem -like "*Windows server*" -and enabled -eq "true"').Name

$counter=2

# Connect to each computer and get the service status

foreach ($computer in $computers) {

$result = Invoke-Command -Computername $computer –ScriptBlock { Get-Service spooler | select Name, status }

# Fill in Excel cells with the data obtained from the server

$ExcelWorkSheet.Columns.Item(1).Rows.Item($counter) = $result.PSComputerName

$ExcelWorkSheet.Columns.Item(2).Rows.Item($counter) = $result.Name

$ExcelWorkSheet.Columns.Item(3).Rows.Item($counter) = $result.Status

$counter++

}

# Save the report and close Excel:

$ExcelWorkBook.SaveAs('C:psServer_report.xlsx')

$ExcelWorkBook.close($true)
You can use PowerShell to access Excel in a variety of scenarios. For example, you can create handy Active Directory reports or create PowerShell scripts to update AD data from Excel.
For example, you can ask an employee of your HR department to keep the user register in Excel. Then using a PowerShell script and the Set-ADUser cmdlet, the employee can automatically update user info in AD (just delegate the employee the permissions to change AD user attributes and show how to run the PowerShell script). Thus you can keep an up-to-date address book with the relevant phone numbers, job titles and departments.