
В данной статье поработаем с документами docx при помощи C# и библиотеки DocX.
Для примеров я буду использовать обычное консольное приложение. Библиотеку DocX вы можете добавить при помощи NuGet.
Навигация для удобства:
Работа с текстом
Работа со ссылками
Работа с изображениями
Работа с таблицами
Работа с диаграммами
Защита документа
Работа с текстом:
Будет рассмотрена работа с текстом и его форматирование.
using System;
using System.Drawing;
using Xceed.Words.NET;

namespace Word
{
    class Program
    {
        static void Main(string[] args)
        {
            // путь к документу
            string pathDocument = AppDomain.CurrentDomain.BaseDirectory + "example.docx";

            // создаём документ
            DocX document = DocX.Create(pathDocument);

            // Вставляем параграф и указываем текст
            document.InsertParagraph("Тест");

            // вставляем параграф и передаём текст
            document.InsertParagraph("Тест").
                     // устанавливаем шрифт
                     Font("Calibri").
                     // устанавливаем размер шрифта
                     FontSize(36).
                     // устанавливаем цвет
                     Color(Color.Navy).
                     // делаем текст жирным
                     Bold().
                     // устанавливаем интервал между символами
                     Spacing(15).
                     // выравниваем текст по центру
                     Alignment = Alignment.center;

            // вставляем параграф и добавляем текст
            Paragraph paragraph = document.InsertParagraph();
            // выравниваем параграф по правой стороне
            paragraph.Alignment = Alignment.right;

            // добавляем отдельную строку со своим форматированием
            paragraph.AppendLine("Тест").
                     // устанавливаем размер шрифта
                     FontSize(20).
                     // добавляем курсив
                     Italic().
                     // устанавливаем точечное подчёркивание
                     UnderlineStyle(UnderlineStyle.dotted).
                     // устанавливаем цвет подчёркивания
                     UnderlineColor(Color.DarkOrange).
                     // добавляем выделение текста
                     Highlight(Highlight.yellow);
            // добавляем пустую строку
            paragraph.AppendLine();
            // добавляем ещё одну строку
            paragraph.AppendLine("Тест");

            // сохраняем документ
            document.Save();
        }
    }
}
Результат работы:

Работа со ссылками:
Будет рассмотрена работа со ссылкой и минимальное форматирование её отображения.
using System;
using System.Drawing;
using Xceed.Words.NET;

namespace Word
{
    class Program
    {
        static void Main(string[] args)
        {
            // путь к документу
            string pathDocument = AppDomain.CurrentDomain.BaseDirectory + "example.docx";

            // создаём документ
            DocX document = DocX.Create(pathDocument);

            // создаём ссылку
            Hyperlink hyperlinkBlog =
                    document.AddHyperlink("progtask.ru", new Uri("https://progtask.ru"));

            // создаём параграф
            Paragraph paragraph = document.InsertParagraph();
            // центрируем содержимое
            paragraph.Alignment = Alignment.center;
            // добавляем текст
            paragraph.InsertText("Blog - ");
            // добавляем ссылку
            paragraph.AppendHyperlink(hyperlinkBlog)
                     // меняем цвет
                     .Color(Color.BlueViolet).
                     // устанавливаем вид подчёркивания
                     UnderlineStyle(UnderlineStyle.singleLine).
                     // устанавливаем размер шрифта
                     FontSize(16);

            // сохраняем документ
            document.Save();
        }
    }
}
Результат работы:

Работа с изображениями:
Будет рассмотрена вставка изображения в документ.
using System;
using Xceed.Words.NET;

namespace Word
{
    class Program
    {
        static void Main(string[] args)
        {
            // путь к документу
            string pathDocument = AppDomain.CurrentDomain.BaseDirectory + "example.docx";
            string pathImage = AppDomain.CurrentDomain.BaseDirectory + "image.jpg";

            // создаём документ
            DocX document = DocX.Create(pathDocument);

            // загрузка изображения
            Image image = document.AddImage(pathImage);

            // создание параграфа
            Paragraph paragraph = document.InsertParagraph();
            // вставка изображения в параграф
            paragraph.AppendPicture(image.CreatePicture());
            // выравнивание параграфа по центру
            paragraph.Alignment = Alignment.center;

            // сохраняем документ
            document.Save();
        }
    }
}
Результат работы:

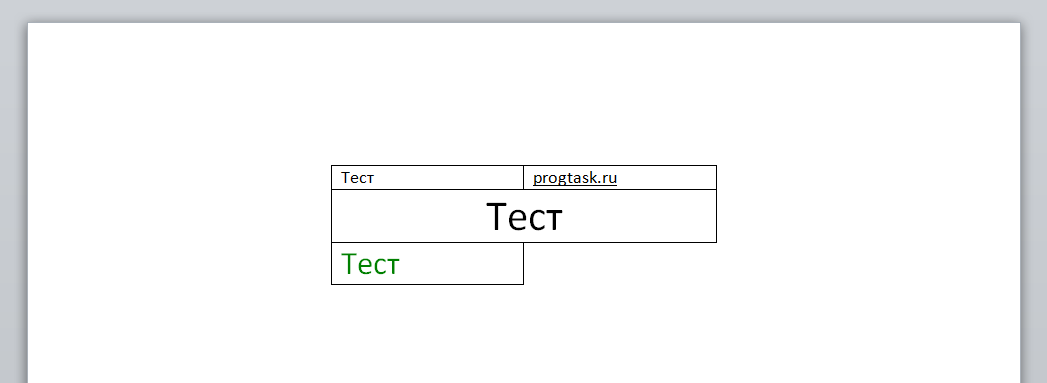
Работа с таблицами:
Будет рассмотрен простой пример таблицы.
using System;
using System.Drawing;
using Xceed.Words.NET;

namespace Word
{
    class Program
    {
        static void Main(string[] args)
        {
            // путь к документу
            string pathDocument = AppDomain.CurrentDomain.BaseDirectory + "example.docx";

            // создаём документ
            DocX document = DocX.Create(pathDocument);

            // создаём таблицу с 3 строками и 2 столбцами
            Table table = document.AddTable(3, 2);
            // располагаем таблицу по центру
            table.Alignment = Alignment.center;
            // меняем стандартный дизайн таблицы
            table.Design = TableDesign.TableGrid;

            // заполнение ячейки текстом
            table.Rows[0].Cells[0].Paragraphs[0].Append("Тест");
            // заполнение ячейки ссылкой
            Hyperlink hyperlinkBlog =
                    document.AddHyperlink("progtask.ru", new Uri("https://progtask.ru"));

            table.Rows[0].Cells[1].Paragraphs[0].AppendHyperlink(hyperlinkBlog).
                                                 UnderlineStyle(UnderlineStyle.singleLine);

            // объединяем 2 ячейки
            table.Rows[1].MergeCells(0, 1);
            // заполняем полученную ячейку
            table.Rows[1].Cells[0].Paragraphs[0].Append("Тест").
                                            // устанавливаем размер текста
                                            FontSize(26).
                                            // выравниваем текст по центру ячейки
                                            Alignment = Alignment.center;

            // заполняем ячейку, меняя цвет текста и его размер
            table.Rows[2].Cells[0].Paragraphs[0].Append("Тест").
                                                 Color(Color.Green).
                                                 FontSize(20);
            // удаляем ячейку
            table.DeleteAndShiftCellsLeft(2, 1);

            // создаём параграф и вставляем таблицу
            document.InsertParagraph().InsertTableAfterSelf(table);

            // сохраняем документ
            document.Save();
        }
    }
}
Результат работы:
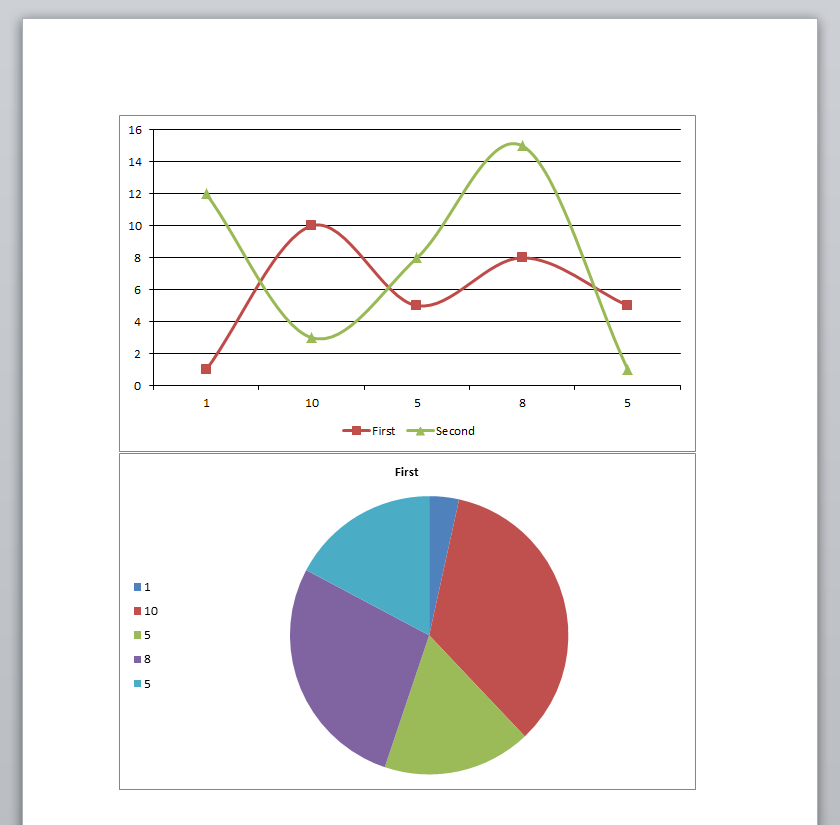
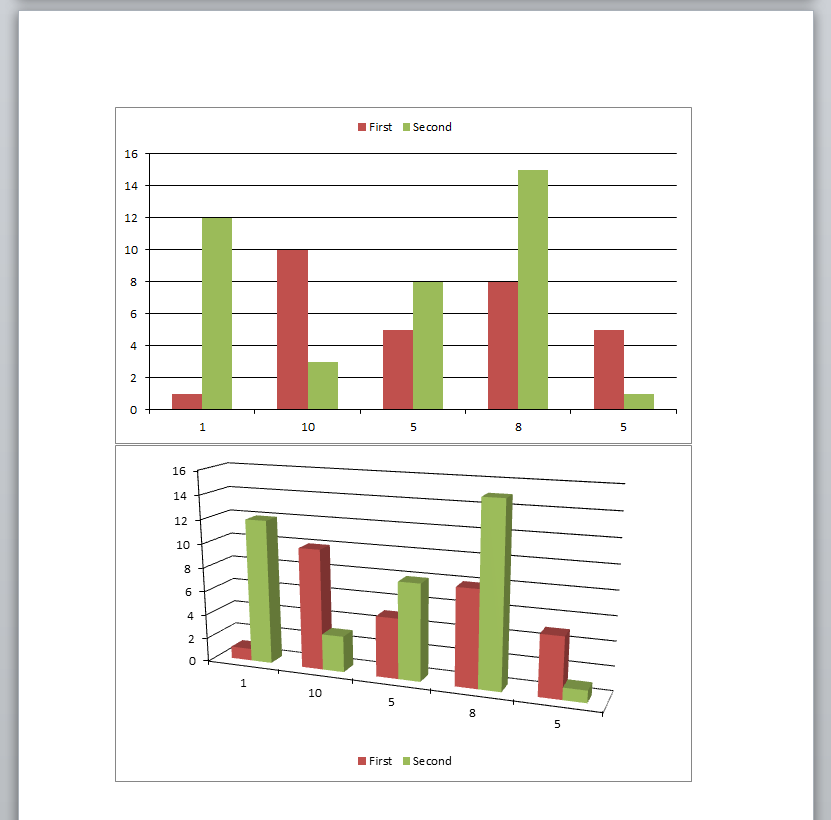
Работа с диаграммами:
Будут рассмотрены линейная, круговая и столбцовая диаграммы.
using System;
using System.Collections.Generic;
using Xceed.Words.NET;

namespace Word
{
    class Program
    {
        static void Main(string[] args)
        {
            // путь к документу
            string pathDocument = AppDomain.CurrentDomain.BaseDirectory + "example.docx";

            // создаём документ
            DocX document = DocX.Create(pathDocument);

            // добавляем линейную диаграмму
            document.InsertChart(CreateLineChart());
            // добавляем круговую диаграмму
            document.InsertChart(CreatePieChart());
            // добавляем столбцовую диаграмму
            document.InsertChart(CreateBarChart());
            // добавляем столбцовую диаграмму с 3d эффектом
            document.InsertChart(Create3DBarChart());

            // сохраняем документ
            document.Save();
        }

        private static Chart CreateLineChart()
        {
            // создаём линейную диаграмму
            LineChart lineChart = new LineChart();
            // добавляем легенду вниз диаграммы
            lineChart.AddLegend(ChartLegendPosition.Bottom, false);

            // создаём набор данных и добавляем на диаграмму
            lineChart.AddSeries(TestData.GetSeriesFirst());
            // добавляем ещё один набор
            lineChart.AddSeries(TestData.GetSeriesSecond());

            return lineChart;
        }

        private static Chart CreatePieChart()
        {
            // создаём круговую диаграмму
            PieChart pieChart = new PieChart();
            // добавляем легенду слева от диаграммы
            pieChart.AddLegend(ChartLegendPosition.Left, false);

            // создаём набор данных и добавляем на диаграмму
            pieChart.AddSeries(TestData.GetSeriesFirst());

            return pieChart;
        }

        private static Chart CreateBarChart()
        {
            // создаём столбцовую диаграмму
            BarChart barChart = new BarChart();
            // отображаем легенду сверху диаграммы
            barChart.AddLegend(ChartLegendPosition.Top, false);

            // создаём набор данных и добавляем в диаграмму
            barChart.AddSeries(TestData.GetSeriesFirst());
            // создаём набор данных и добавляем в диаграмму
            barChart.AddSeries(TestData.GetSeriesSecond());

            return barChart;
        }

        private static Chart Create3DBarChart()
        {
            // создаём столбцовую диаграмму
            BarChart barChart = new BarChart();
            // отображаем легенду снизу диаграммы
            barChart.AddLegend(ChartLegendPosition.Bottom, false);
            // добавление 3D эффекта
            barChart.View3D = true;

            // создаём набор данных и добавляем в диаграмму
            barChart.AddSeries(TestData.GetSeriesFirst());
            // создаём набор данных и добавляем в диаграмму
            barChart.AddSeries(TestData.GetSeriesSecond());

            return barChart;
        }
    }

    // класс с тестовыми данными
    class TestData
    {
        public string name { get; set; }
        public int value { get; set; }

        private static List<TestData> GetTestDataFirst()
        {
            List<TestData> testDataFirst = new List<TestData>();

            testDataFirst.Add(new TestData() { name = "1", value = 1 });
            testDataFirst.Add(new TestData() { name = "10", value = 10 });
            testDataFirst.Add(new TestData() { name = "5", value = 5 });
            testDataFirst.Add(new TestData() { name = "8", value = 8 });
            testDataFirst.Add(new TestData() { name = "5", value = 5 });

            return testDataFirst;
        }

        private static List<TestData> GetTestDataSecond()
        {
            List<TestData> testDataSecond = new List<TestData>();

            testDataSecond.Add(new TestData() { name = "12", value = 12 });
            testDataSecond.Add(new TestData() { name = "3", value = 3 });
            testDataSecond.Add(new TestData() { name = "8", value = 8 });
            testDataSecond.Add(new TestData() { name = "15", value = 15 });
            testDataSecond.Add(new TestData() { name = "1", value = 1 });

            return testDataSecond;
        }

        public static Series GetSeriesFirst()
        {
            // создаём набор данных
            Series seriesFirst = new Series("First");
            // заполняем данными
            seriesFirst.Bind(TestData.GetTestDataFirst(), "name", "value");
            return seriesFirst;
        }

        public static Series GetSeriesSecond()
        {
            // создаём набор данных
            Series seriesSecond = new Series("Second");
            // заполняем данными
            seriesSecond.Bind(TestData.GetTestDataSecond(), "name", "value");
            return seriesSecond;
        }
    }
}
Результат работы:
Защита документа:
Установим ограничение документу только для чтения. Для снятия его необходимо будет ввести пароль, который мы установим.
using System;
using System.Drawing;
using Xceed.Words.NET;

namespace Word
{
    class Program
    {
        static void Main(string[] args)
        {
            // путь к документу
            string pathDocument = AppDomain.CurrentDomain.BaseDirectory + "example.docx";
            const string password = "password";

            // создаём документ
            DocX document = DocX.Create(pathDocument);
            // делаем документ, который будет доступен только для чтения
            // для снятия защиты нужно будет ввести пароль
            // если нужно ограничить доступ без пароля, используйте метод AddProtection
            document.AddPasswordProtection(EditRestrictions.readOnly, password);

            // сохраняем документ
            document.Save();
        }
    }
}
![]() Загрузка…
Загрузка…
Задача: вывести данные в документ Word. На самом деле это очень большая и необъятная тема, примерно как сам Word, 90% возможностей которого не используются обычными пользователями. Сузим до более простой и чаще встречающейся на практике задачи, с которой в своей время пришлось столкнуться мне самому: надо вывести красивую справку, договор, отчет или иной документ Word с добавлением данных из кода C#. Само собой должны поддерживаться версии Word до 2007, так что о новых форматах файлов придется забыть.
Для начала вспомним, что в Word есть такая замечательная вещь как шаблоны. Соответственно большую часть сложного оформления можно вынести в них и из кода открывать шаблон и вставлять данные в нужные места. Для начала ограничимся простыми строками (типовая задача в крупных предприятиях — вставка дат, цифр, фио и тому подобных вещей, договор на сумму такую-то, от такой-то даты с фио таким-то с параметрами объекта такими-то).
Задача на текущую статью: открыть из кода C# шаблон Word и что-то в него вставить. Шаблон в формате .dot приготовим заранее, в том же самом ворде. Для связи с ним будем использовать механизм COM Interoperability (сокращенно Interop), то есть запускать отдельный exe-процесс самого Word и через специальный интерфейс управлять им. Интерфейсы слава богу есть и находятся они в специальных библиотеках, поставляемых вместе с Office, но документация по ним крайне невнятная, поведение местами очень странное и не логичное. В версиях Visual Studio 2010 и выше возможности программирования Office расширены, но текущее руководство действительно и для 2008 студии.
Нам надо
1. Подключить нужные библиотеки
2. Открыть шаблон Word
3. Найти в нем нужное место
4. Вставить в него строку с информацией
1. Проект в студии у нас уже должен быть. В разделе Ссылки/References кликаем правой кнопкой, идем в «Добавить ссылку» и ищем Microsoft.Office.Interop.Word. В параметрах добавленной библиотеки ставим true в Копировать локально/Copy local, так как библиотеку надо копировать вместе с исполняемыми файлами проекта.
В код добавляем соответствующие using
using Word = Microsoft.Office.Interop.Word;
using System.Reflection;
2. Теперь вам предстоит провести много времени с замечательным интерфейсом Word, который представляет сам текстовый редактор и его потроха в виде разнообразных обьектов. Сейчас важны два — Application и Document. Переменные для них по ряду не очевидных причин лучше объявлять через интерфейсы.
Word._Application application;
Word._Document document;
Так же почти все функции Word требуют объектных параметров, даже если внутри них сидят простые строки и логические значения, так что лучше заранее сделать несколько оберток
Object missingObj = System.Reflection.Missing.Value;
Object trueObj = true;
Object falseObj = false;
Чтобы запустить Word и открыть в нем шаблон с диска (путь известен), потребуется примерно такой код
//создаем обьект приложения word
application = new Word.Application();
// создаем путь к файлу
Object templatePathObj = "путь к файлу шаблона";;

// если вылетим не этом этапе, приложение останется открытым
try
{
    document = application.Documents.Add(ref  templatePathObj, ref missingObj, ref missingObj, ref missingObj);
}
catch (Exception error)
{
    document.Close(ref falseObj, ref  missingObj, ref missingObj);
    application.Quit(ref missingObj, ref  missingObj, ref missingObj);
    document = null;
    application = null;
    throw error;
}
_application.Visible = true;
Принципиально важны два момента
1. Мы создаем неуправляемый ресурс, который не соберет сборщик мусора — отдельный процесс в памяти с приложением Word, если мы его не закроем и не выведем на экран, он так и останется там висеть до выключения компьютера. Более того такие ворды могут накапливаться незаметно для пользователя, программист-то еще прибьет их вручную. Заботиться о высвобождения неуправляемого ресурса должен программист.
2. По умолчанию Word запускается невидимым, на экран его выводим мы.
Для начала рассмотрим самый простой и примитивный вариант — поиск и замена строки в документе Word. Некоторые программисты так и работают — ставят в шаблон текстовую метку вроде @@nowDate и заменяют ее на нужное значение.
Пришло время познакомится с фундаментом работы с Word — великим и ужасным объектом Range. Его суть сложно описать словами -это некоторый произвольный кусок документа, диапазон (range), который может включать в себя все что угодно — от пары символов, до таблиц, закладок и прочих интересных вещей. Не стоит путать его с Selection — куском документа, выделенным мышкой, который само собой можно конвертировать в Range. Соотвественно нам надо получить Range для всего документа, найти нужную строку внутри него, получить Range для этой строки и уже внутри этого последнего диапазона заменить текст на требуемый. И не стоит забывать, что документ может иметь сложную структуру с колонтитулами и прочей ересью, возможный универсальный метод для замены всех вхождений данной строки:
// обьектные строки для Word
object strToFindObj = strToFind;
object replaceStrObj = replaceStr;
// диапазон документа Word
Word.Range wordRange;
//тип поиска и замены
object replaceTypeObj;
replaceTypeObj = Word.WdReplace.wdReplaceAll;
// обходим все разделы документа
for (int i = 1; i <= _document.Sections.Count; i++)
{
    // берем всю секцию диапазоном
    wordRange = _document.Sections[i].Range;

    /*
    Обходим редкий глюк в Find, ПРИЗНАННЫЙ MICROSOFT, метод Execute на некоторых машинах вылетает с ошибкой "Заглушке переданы неправильные данные / Stub received bad data"  Подробности: http://support.microsoft.com/default.aspx?scid=kb;en-us;313104
    // выполняем метод поиска и  замены обьекта диапазона ворд
    wordRange.Find.Execute(ref strToFindObj, ref wordMissing, ref wordMissing, ref wordMissing, ref wordMissing, ref wordMissing, ref wordMissing, ref wordMissing, ref wordMissing, ref replaceStrObj, ref replaceTypeObj, ref wordMissing, ref wordMissing, ref wordMissing, ref wordMissing);
    */

    Word.Find wordFindObj = wordRange.Find;
    object[] wordFindParameters = new object[15] { strToFindObj, _missingObj, _missingObj, _missingObj, _missingObj, _missingObj, _missingObj, _missingObj, _missingObj, replaceStrObj, replaceTypeObj, _missingObj, _missingObj, _missingObj, _missingObj };

    wordFindObj.GetType().InvokeMember("Execute", BindingFlags.InvokeMethod, null, wordFindObj, wordFindParameters);
}
Редкий глюк подробно описан здесь.
На самом деле это не самый лучший метод для вставки информации в документ, так как могут возникнуть сложности с уникальными именами для текстовых меток (если текст одной входит в начало другой, данный метод найдет ее и заменит), их совпадением с произвольным текстом и так далее.
Даже если нам надо найти (и например отформатировать) именно строку с текстом внутри документа, лучше всего выдать наружу найденный Range и уже с ним производить разные злодеяния. Получим примерно такой метод:
object stringToFindObj = stringToFind;
Word.Range wordRange;
bool rangeFound;

//в цикле обходим все разделы документа, получаем Range, запускаем поиск
// если поиск вернул true, он долже ужать Range до найденное строки, выходим и возвращаем Range
// обходим все разделы документа
for (int i = 1; i <= _document.Sections.Count; i++)
{
    // берем всю секцию диапазоном
    wordRange = _document.Sections[i].Range;

    /*
    // Обходим редкий глюк в Find, ПРИЗНАННЫЙ MICROSOFT, метод Execute на некоторых машинах вылетает с ошибкой "Заглушке переданы неправильные данные / Stub received bad data"  Подробности: http://support.microsoft.com/default.aspx?scid=kb;en-us;313104
    // выполняем метод поиска и  замены обьекта диапазона ворд
    rangeFound = wordRange.Find.Execute(ref stringToFindObj, ref wordMissing, ref wordMissing, ref wordMissing, ref wordMissing, ref wordMissing, ref wordMissing, ref wordMissing, ref wordMissing, ref wordMissing, ref wordMissing, ref wordMissing, ref wordMissing, ref wordMissing, ref wordMissing);
    */

    Word.Find wordFindObj = wordRange.Find;

    object[] wordFindParameters = new object[15] { stringToFindObj, _missingObj, _missingObj, _missingObj, _missingObj, _missingObj, _missingObj, _missingObj, _missingObj, _missingObj, _missingObj, _missingObj, _missingObj, _missingObj, _missingObj };

    rangeFound = (bool)wordFindObj.GetType().InvokeMember("Execute", BindingFlags.InvokeMethod, null, wordFindObj, wordFindParameters);

    if (rangeFound) { return wordRange; }
}

// если ничего не нашли, возвращаем null
return null;
Простейшее решение проблемы уникальности текста (нужно нам найти Range слова Word, но внутри всего документа оно встречается десятки раз) — искать строку внутри строки, сначала найти уникальную строку, потом не уникальную внутри нее, неэстетично, но дешево, надежно и практично.
// оформляем обьектные параметры
object stringToFindObj = stringToFind;
bool rangeFound;

/*
Обходим редкий глюк в Find, ПРИЗНАННЫЙ MICROSOFT, метод Execute на некоторых машинах вылетает с ошибкой "Заглушке переданы неправильные данные / Stub received bad data"
http://support.microsoft.com/default.aspx?scid=kb;en-us;313104
rangeFound = containerRange.Find.Execute(ref stringToFindObj, ref wordMissing, ref wordMissing, ref wordMissing, ref wordMissing, ref wordMissing, ref wordMissing, ref wordMissing, ref wordMissing, ref wordMissing, ref wordMissing, ref wordMissing, ref wordMissing, ref wordMissing, ref wordMissing);
*/

Word.Find wordFindObj = containerRange.Find;

object[]  wordFindParameters = new object[15] { stringToFindObj, _missingObj, _missingObj, _missingObj, _missingObj, _missingObj, _missingObj, _missingObj, _missingObj, _missingObj, _missingObj, _missingObj, _missingObj, _missingObj, _missingObj };

rangeFound = (bool)wordFindObj.GetType().InvokeMember("Execute", BindingFlags.InvokeMethod, null, wordFindObj, wordFindParameters);

if (rangeFound) { return containerRange; }
else { return null; }
Если строку надо просто заменить, то сойдет простейшее
_range.Text = "Это текст заменит содержимое Range";
Но так как Range является универсальный контейнером для любого куска документа Word, то его возможности неизмеримо шире, часть их будет рассмотрена в дальнейших заметках.
Если нам надо просто встать в начало документа (и что-то вставить уже туда):
object start = 0;
object end = 0;
_currentRange = _document.Range(ref start, ref end);
Сохранить документ на диск можно следующим образом
Object pathToSaveObj = pathToSaveString;
_document.SaveAs(ref pathToSaveObj, Word.WdSaveFormat.wdFormatDocument, ref _missingObj, ref _missingObj, ref _missingObj, ref _missingObj, ref _missingObj, ref _missingObj, ref _missingObj, ref _missingObj, ref _missingObj, ref _missingObj, ref _missingObj, ref _missingObj, ref _missingObj, ref _missingObj);
- Работаем с MS Word из C#, часть 0, класс и тестовый проект-пример WinForms
- Работаем с MS Word из C#, часть 1. Открываем шаблон, ищем текст внутри документа
- Работаем с MS Word из C#, часть 2. Вставляем текст на закладку и форматируем
- Работаем с MS Word из C#, часть 3. Работа с таблицами
- Работаем с MS Word из C#, часть 4. Обьединяем несколько файлов в один, считаем количество страниц
- Microsoft.Office.Interop.Word Namespace
- Range Interface

In a recent post, I extolled the virtues of a wonderful OSS library I had found for working with Excel data programmatically, LinqToExcel. In that post, I also mentioned a fantastic library for working with Word docs as well, and promised to discuss it in my next post. This is that post.
The big pain point in working with MS Word documents programmatically is . . . the Office Interop. To get almost anything done with Word (including simply pulling the text out of the document, you pretty much need to use Interop, which also means you have to have Word installed on the local machine which is consuming your application. Additionally, my understanding is that there are issues with doing Word automation on the server side.
Image by Mohylek — Some Rights Reserved
Interop is essentially a giant wrapper around the ugliness that is COM, and the abstraction layer is thin indeed. If you need to automate MS Office applications, Interop (or going all the way down to the COM level) is pretty much the only way to do it, and obviously, you need to have Office installed on the client machine for it to work at all.
Often times though, we don’t so much need to automate the office application directly so much as get at the contents of Office file (such as Word or Excel files). Dealing with all that Interop nastiness makes this more painful than it needs to be.
Thankfully, the open source DocX by Cathal Coffey solves both problems nicely, and unlike Interop, presents an easy-to-use, highly discoverable API for performing myriad manipulations/extractions against the Word document format (the .docx format, introduced as of Word 2007). Best of all, DocX does not require that Word or any other Office dependencies be installed on the client machine! The full source is available from Coffey’s Codeplex repo, or you can add DocX to your project using Nuget.
10/2/2013 — NOTE: It has been noted by several commentors on Reddit and elsewhere that the MS official library OpenXml serves the same purpose as Docx, and after all, is the «official» library. I disagree — the OpenXml library «does more» but is inherently more complex to use. While it most certainly offers additional functionality not present in DocX, the DocX library creates a much simpler and more meaningful abstraction for what I find to be the most common use-cases working with Word documents programmatically. As always, the choice of libraries is a matter of preference, and to me, one of «Right tool for the job.»
1/23/2014 — NOTE: I mentioned in the opening paragraph the OSS project LinqToExcel, which is a fantastic library. However, LinqToExcel takes a dependency on the Access Database Engine, which can create issues when (for example) deploying to a remote server or other environment where administrative privileges may be limited. I discovered another OSS library with no such dependencies. You can read about it at Use Cross-Platform/OSS ExcelDataReader to Read Excel Files with No Dependencies on Office or ACE
In this post, we will look at a few of the basics for using this exceptionally useful library. Know that under the covers and with a little thought, there is a lot of functionality here beyond what we will look at in this article.
- Getting Started — Create a Word Document Using the DocX Library
- Use DocX to Add Formatted Paragraphs
- Find and Replace Text Using DocX -Merge Templating, Anyone?
- DocX Exposes Many of the Most Useful Parts of the Word Object Model
- C#: Query Excel and .CSV Files Using LinqToExcel
- Additional Resources/Items of Interest
Add DocX to your project using Nuget
NOTE: When adding Nuget packages to your project, consider keeping source control bloat down by using Nuget Package Restore so that packages are downloaded automatically on build rather than cluttering up your repo.
As with LinqToExcel, you can add the DocX library to your Visual Studio solution using the Nuget Package Manager Console by doing:
Install DocX using the Nuget Package Manager Console:
PM> Install-Package DocX
Alternatively, you can use the Solution Explorer. Right-click on the Solution, select «Manager Nuget Packages for Solution,» and type «DocX in the search box (make sure you have selected «Online» in the left-hand menu). When you have located the DocX package, click Install:
Install DocX using the Nuget Package Manager GUI in VS Solution Explorer:

Getting Started – Create a Word Document Using the DocX Library
Wanna Quickly create a Word-compatible, .docx format document on the fly from your code? Do this (I am assuming you have Word installed on your local machine):
(Note – change the file path to reflect your own machine)
A Really Simple Example:
using Novacode;
using System;
using System.Diagnostics;

namespace BlogSandbox
{
    public class DocX_Examples
    {
        public void CreateSampleDocument()
        {

            string fileName = @"D:UsersJohnDocumentsDocXExample.docx";


            var doc = DocX.Create(fileName);


            doc.InsertParagraph("This is my first paragraph");


            doc.Save();


            Process.Start("WINWORD.EXE", fileName);
        }
    }
}
Note in the above we need to add using Novacode; to our namespace imports at the top of the file. The DocX library is contained within this namespace. If you run the code above, a word document should open like this:
Output of Really Simple Example Code:

What we did in the above example was:
- Create an in-memory instance of a
DocXobject with a file name passed in as part of the constructor. - Insert a
DocX.Paragraphobject containing some text. - Save the result to disc as a properly formatted
.docxfile.
Until we execute the Save() method, we are working with the XML representation of our new document in memory. Once we save the file to disc, we find a standard Word-compatible file in our Documents/ directory.
Use DocX to Add Formatted Paragraphs – A More Useful Example
A slightly more useful example might be to create a document with some more complex formatted text:
Create Multiple Paragraphs with Basic Formatting:
public void CreateSampleDocument()
{
    string fileName = @"D:UsersJohnDocumentsDocXExample.docx";
    string headlineText = "Constitution of the United States";
    string paraOne = ""
        + "We the People of the United States, in Order to form a more perfect Union, "
        + "establish Justice, insure domestic Tranquility, provide for the common defence, "
        + "promote the general Welfare, and secure the Blessings of Liberty to ourselves "
        + "and our Posterity, do ordain and establish this Constitution for the United "
        + "States of America.";


    var headLineFormat = new Formatting();
    headLineFormat.FontFamily = new System.Drawing.FontFamily("Arial Black");
    headLineFormat.Size = 18D;
    headLineFormat.Position = 12;


    var paraFormat = new Formatting();
    paraFormat.FontFamily = new System.Drawing.FontFamily("Calibri");
    paraFormat.Size = 10D;


    var doc = DocX.Create(fileName);


    doc.InsertParagraph(headlineText, false, headLineFormat);
    doc.InsertParagraph(paraOne, false, paraFormat);


    doc.Save();


    Process.Start("WINWORD.EXE", fileName);
}
Here, we have created some Formatting objects in advance, and then passed them as parameters to the InsertParagraph method for each of the two paragraphs we create in our code. When the code executes, Word opens and we see this:
Output from Creating Multiple Formatted Paragraphs

In the above, the FontFamily and Size properties of the Formatting object are self-evident. The Position property determines the spacing between the current paragraph and the next.
We can also grab a reference to a paragraph object itself and adjust various properties. Instead of creating a Formatting object for our headline like we did in the previous example, we could grab a reference as the return from the InsertParagraph method and muck about:
Applying Formatting to a Paragraph Using the Property Accessors:
Paragraph headline = doc.InsertParagraph(headlineText);
headline.Color(System.Drawing.Color.Blue);
headline.Font(new System.Drawing.FontFamily("Comic Sans MS"));
headline.Bold();
headline.Position(12D);
headline.FontSize(18D);
This time, when the program executes, we see THIS:

OH NO YOU DID NOT!
Yes, yes I DID print that headline in Comic Sans. Just, you know, so you could see the difference in formatting.
There is a lot that can be done with text formatting in a DocX document. Headers/Footers, paragraphs, and individual words and characters. Importantly, most of the things you might go looking for are easily discoverable – in other words, the author has done a great job building out his API.
Find and Replace Text Using DocX — Merge Templating, Anyone?
Of course, one of the most common things we might want to do is scan a pre-existing document, and replace certain text. Think templating here. For example, performing a standard Word Merge is not very doable on your web server, but using DocX, we can accomplish the same thing. The following example is simple due to space constraints, but you can see the possibilities:
First, just for kicks, we will create an initial document programmatically in one method, then write another method to find and replace certain text in the document:
Create a Sample Document:
private DocX GetRejectionLetterTemplate()
{

    string fileName = @"D:UsersJohnDocumentsDocXExample.docx";


    string headerText = "Rejection Letter";
    string letterBodyText = DateTime.Now.ToShortDateString();
    string paraTwo = ""
        + "Dear %APPLICANT%" + Environment.NewLine + Environment.NewLine
        + "I am writing to thank you for your resume. Unfortunately, your skills and "
        + "experience do not match our needs at the present time. We will keep your "
        + "resume in our circular file for future reference. Don't call us, "
        + "we'll call you. "

        + Environment.NewLine + Environment.NewLine
        + "Sincerely, "
        + Environment.NewLine + Environment.NewLine
        + "Jim Smith, Corporate Hiring Manager";


    var titleFormat = new Formatting();
    titleFormat.FontFamily = new System.Drawing.FontFamily("Arial Black");
    titleFormat.Size = 18D;
    titleFormat.Position = 12;


    var paraFormat = new Formatting();
    paraFormat.FontFamily = new System.Drawing.FontFamily("Calibri");
    paraFormat.Size = 10D;
    titleFormat.Position = 12;


    var doc = DocX.Create(fileName);


    Paragraph title = doc.InsertParagraph(headerText, false, titleFormat);
    title.Alignment = Alignment.center;

    doc.InsertParagraph(Environment.NewLine);
    Paragraph letterBody = doc.InsertParagraph(letterBodyText, false, paraFormat);
    letterBody.Alignment = Alignment.both;

    doc.InsertParagraph(Environment.NewLine);
    doc.InsertParagraph(paraTwo, false, paraFormat);

    return doc;
}
See the %APPLICANT% placeholder? That is my replacement target (a poor-man’s merge field, if you will). Now that we have a private method to generate a document template of sorts, let’s add a public method to perform a replacement action:
Find and Replace Text in a Word Document Using DocX:
public void CreateRejectionLetter(string applicantField, string applicantName)
{

    string fileNameTemplate = @"D:UsersJohnDocumentsRejection-Letter-{0}-{1}.docx";


    string outputFileName =
    string.Format(fileNameTemplate, applicantName, DateTime.Now.ToString("MM-dd-yy"));


    DocX letter = this.GetRejectionLetterTemplate();


    letter.ReplaceText(applicantField, applicantName);


    letter.SaveAs(outputFileName);


    Process.Start("WINWORD.EXE", """ + outputFileName + """);
}
Now, when we run the code above, our output is thus:

Obviously, the preceding example was a little contrived and overly simple. But you can see the potential . . . If our letter contained additional «merge fields, we could just as easily pass in a Dictionary<string, string>, where the Dictionary contains one or more Key Value Pairs containing a replacement target and a replacement value. Then we could iterate, using the Dictionary Keys as the search string, and replace with the Dictionary values.
DocX Exposes Many of the Most Useful Parts of the Word Object Model
In this quick article, we have only scratched the surface. DocX exposes most of the stuff we commonly wish we could get to within a Word document (Tables, Pictures, Headers, Footers, Shapes, etc.) without forcing us to navigate the crusty Interop model. This also saves us from some of the COM de-referencing issues which often arise when automating Word within an application. Ever had a bunch of «orphaned» instances of Word (or Excel, etc.) running in the background, visible only in the Windows Task Manager? Yeah, I thought so . . .
If you need to generate or work with Word documents on a server, this is a great tool as well. No dependencies on MS Office, no need to have Word running. You can generate Word documents on the fly, and/or from templates, ready to be downloaded.
I strongly recommend you check out the project on Codeplex. Also, the project author, Cathal Coffey, discusses much of the DocX functionality on his own blog. If you dig DocX, drop by and let him know. He’s really done a fantastic job.
Additional Resources/Items of Interest
- Extending Identity Accounts and Implementing Role-Based Authentication in ASP.NET MVC 5
- C#: Query Excel and .CSV Files Using LinqToExcel
- Splitting and Merging Pdf Files in C# Using iTextSharp
- Working with PDF Files in C# Using PdfBox and IKVM
- Customizing Routes in ASP.NET MVC
- Routing Basics in ASP.NET MVC
- Building Out a Clean, REST-ful Web Api Service with a Minimal Web Api Project
- Creating a Clean, Minimal-Footprint ASP.NET WebAPI Project with VS 2012 and ASP.NET MVC 4
My name is John Atten, and my username on many of my online accounts is xivSolutions. I am Fascinated by all things technology and software development. I work mostly with C#, Javascript/Node.js, Various flavors of databases, and anything else I find interesting. I am always looking for new information, and value your feedback (especially where I got something wrong!)

Большинству операций, выполняемых программным способом, есть эквиваленты в пользовательском интерфейсе (UI), доступные как команды в меню и на панелях инструментов. Также существует нижележащая архитектура, обеспечивающая поддержку команд, выбираемых из UI. Всякий раз, когда вы создаете новый документ Word, он базируется на каком-либо шаблоне; расширение файлов шаблонов «.dot», а файлы документов – «.doc». Шаблон Word может содержать текст, код, стили, панели инструментов, элементы автотекста, комбинации клавиш для быстрого доступа к командам. Новый документ связывается с шаблоном и получает полный доступ к его элементам. Если вы не указываете конкретный шаблон, новый документ создается на основе стандартного шаблона «Normal.dot», который устанавливается при установке Word).
Шаблон Normal.dot является глобальным, он доступен любому документу, который вы создаете. Вы могли бы при желании поместить весь свой код в Normal.dot и создавать все документы в своей среде на основе собственного шаблона Normal (Обычный). Но тогда его файл мог бы стать чрезмерно большим, поэтому более эффективное решение для многих разработчиков — создание собственных шаблонов для конкретных приложений. В документах, создаваемых на основе вашего шаблона, код из стандартного шаблона Normal по-прежнему будет доступен. При необходимости можно связывать документ с несколькими шаблонами в дополнение к шаблону Normal.
Для работы с приложением Microsoft Word в .NET, используется объект Application, который является предком всех остальных объектов. Получив на него ссылку, вы можете работать с его методами и свойствами. Этот объект предоставляет большой набор методов и свойств, позволяющих программным путем управлять Microsoft Word. Код инициализации нового объекта Application, представлен ниже.
Microsoft.Office.Interop.Word.Application winword =
  new Microsoft.Office.Interop.Word.Application();
Чтобы открыть существующий документ или создать новый, необходимо создать новый объект Document.
object missing = System.Reflection.Missing.Value;
Microsoft.Office.Interop.Word.Document document =
     winword.Documents.Add(ref missing, ref missing, ref missing, ref missing);
Выполняя какую-либо операцию в пользовательском интерфейсе Word (например, добавляя верхний колонтитул), вы выделяете соответствующую секцию, используя объект «Selection», определяющий текущую позицию «невидимого» курсора и применяете к ней новый параметр форматирования с использованием объекта «Range». Данный объект представляет область в документе и может включать в себя все что угодно — от пары символов, до таблиц, закладок и много другого. Вы не ограничены одним объектом «Range» — в одном документе можно определить сразу несколько таких объектов.
//Добавление верхнего колонтитула
foreach (Microsoft.Office.Interop.Word.Section section in document.Sections)
{
    Microsoft.Office.Interop.Word.Range headerRange =
    section.Headers[Microsoft.Office.Interop.Word.WdHeaderFooterIndex.wdHeaderFooterPrimary].Range;
    headerRange.Fields.Add(headerRange, Microsoft.Office.Interop.Word.WdFieldType.wdFieldPage);
    headerRange.ParagraphFormat.Alignment =
    Microsoft.Office.Interop.Word.WdParagraphAlignment.wdAlignParagraphCenter;
    headerRange.Font.ColorIndex = Microsoft.Office.Interop.Word.WdColorIndex.wdBlue;
    headerRange.Font.Size = 10;
    headerRange.Text = "Верхний колонтитул" + Environment.NewLine + "www.CSharpCoderR.com";
}

//Добавление нижнего колонтитула
foreach (Microsoft.Office.Interop.Word.Section wordSection in document.Sections)
{
    Microsoft.Office.Interop.Word.Range footerRange =
   wordSection.Footers[Microsoft.Office.Interop.Word.WdHeaderFooterIndex.wdHeaderFooterPrimary].Range;

    footerRange.Font.ColorIndex = Microsoft.Office.Interop.Word.WdColorIndex.wdDarkRed;
    footerRange.Font.Size = 10;
    footerRange.ParagraphFormat.Alignment =
    Microsoft.Office.Interop.Word.WdParagraphAlignment.wdAlignParagraphCenter;
    footerRange.Text = "Нижний колонтитул" + Environment.NewLine + "www.CSharpCoderR.com";
}
Чтобы добавить текст в документ, необходимо указать позицию для вставки и сам текст.
//Добавление текста в документ
document.Content.SetRange(0, 0);
document.Content.Text = "www.CSharpCoderR.com" + Environment.NewLine;
Так же вы можете применить к тексту определенный стиль.
//Добавление текста со стилем Заголовок 1
Microsoft.Office.Interop.Word.Paragraph para1 = document.Content.Paragraphs.Add(ref missing);
object styleHeading1 = "Заголовок 1";
para1.Range.set_Style(styleHeading1);
para1.Range.Text = "Исходники по языку программирования CSharp";
para1.Range.InsertParagraphAfter();
В классе Microsoft.Office.Interop.Word.Document, присутствует коллекция «Tables», которая позволяет добавить таблицу в документ с использованием метода Add.
//Создание таблицы 5х5
Table firstTable = document.Tables.Add(para1.Range, 5, 5, ref missing, ref missing);

firstTable.Borders.Enable = 1;
foreach (Row row in firstTable.Rows)
{
    foreach (Cell cell in row.Cells)
    {
        //Заголовок таблицы
        if (cell.RowIndex == 1)
        {
            cell.Range.Text = "Колонка " + cell.ColumnIndex.ToString();
            cell.Range.Font.Bold = 1;
            //Задаем шрифт и размер текста
            cell.Range.Font.Name = "verdana";
            cell.Range.Font.Size = 10;
            cell.Shading.BackgroundPatternColor = WdColor.wdColorGray25;
            //Выравнивание текста в заголовках столбцов по центру
            cell.VerticalAlignment =
                 WdCellVerticalAlignment.wdCellAlignVerticalCenter;
            cell.Range.ParagraphFormat.Alignment =
                 WdParagraphAlignment.wdAlignParagraphCenter;
        }
        //Значения ячеек
        else
        {
            cell.Range.Text = (cell.RowIndex - 2 + cell.ColumnIndex).ToString();
        }
    }
}
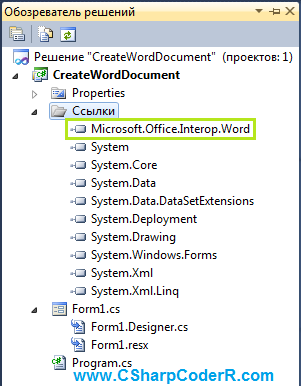
Для функционирования описанного выше кода, необходимо добавить к текущему проекту объектную библиотеку MS Word. Перейдите в меню «Проект» и выберете команду «Добавить ссылку» или в обозревателе решений, найдите пункт «Ссылки» и сделайте клик правой клавишей мыши по нему, из появившегося контекстного меню выберете соответствующий пункт.

В открывшемся окне «Добавить ссылку», перейдите на вкладку «COM» и выберете «Microsoft Word 14.0 Object Library» из предложенного списка библиотек.
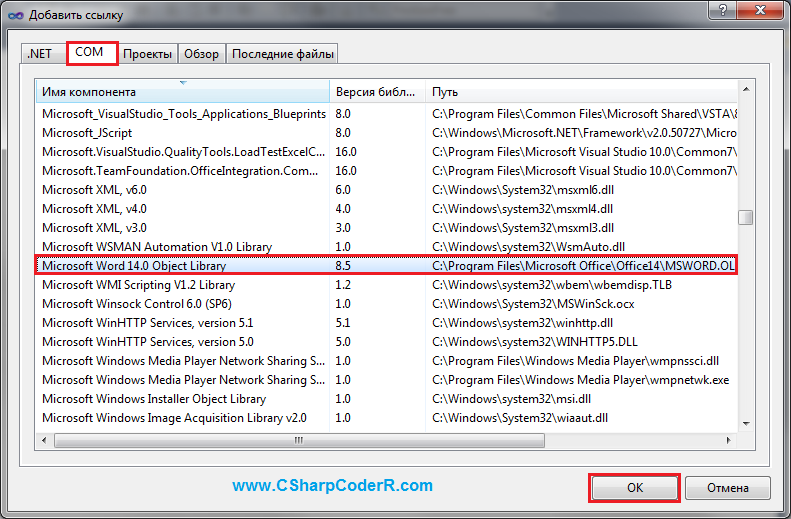
В обозревателе решений у вас появится ссылка на данную библиотеку.
Перейдите в конструктор главной формы и добавьте из панели элементов, командную кнопку «Button». Данный элемент необходим для запуска процесса создания документа и вызов MS Word для отображения.

Сделайте двойной клик левой клавишей мыши по элементу «Button» и вы перейдете в автоматически созданный метод события «button1_Click». Добавьте в него приведенный ниже код.
try
{
    Microsoft.Office.Interop.Word.Application winword =
        new Microsoft.Office.Interop.Word.Application();

    winword.Visible = false;

    //Заголовок документа
    winword.Documents.Application.Caption = "www.CSharpCoderR.com";

    object missing = System.Reflection.Missing.Value;

    //Создание нового документа
    Microsoft.Office.Interop.Word.Document document =
        winword.Documents.Add(ref missing, ref missing, ref missing, ref missing);

    //добавление новой страницы
    //winword.Selection.InsertNewPage();

    //Добавление верхнего колонтитула
    foreach (Microsoft.Office.Interop.Word.Section section in document.Sections)
    {
        Microsoft.Office.Interop.Word.Range headerRange = section.Headers[
        Microsoft.Office.Interop.Word.WdHeaderFooterIndex.wdHeaderFooterPrimary].Range;
        headerRange.Fields.Add(
       headerRange, Microsoft.Office.Interop.Word.WdFieldType.wdFieldPage);
        headerRange.ParagraphFormat.Alignment =
       Microsoft.Office.Interop.Word.WdParagraphAlignment.wdAlignParagraphCenter;
        headerRange.Font.ColorIndex =
       Microsoft.Office.Interop.Word.WdColorIndex.wdBlue;
        headerRange.Font.Size = 10;
        headerRange.Text = "Верхний колонтитул" + Environment.NewLine + "www.CSharpCoderR.com";
    }

    //Добавление нижнего колонтитула
    foreach (Microsoft.Office.Interop.Word.Section wordSection in document.Sections)
    {
        //
        Microsoft.Office.Interop.Word.Range footerRange =
wordSection.Footers[Microsoft.Office.Interop.Word.WdHeaderFooterIndex.wdHeaderFooterPrimary].Range;
        //Установка цвета текста
        footerRange.Font.ColorIndex = Microsoft.Office.Interop.Word.WdColorIndex.wdDarkRed;
        //Размер
        footerRange.Font.Size = 10;
        //Установка расположения по центру
        footerRange.ParagraphFormat.Alignment =
            Microsoft.Office.Interop.Word.WdParagraphAlignment.wdAlignParagraphCenter;
        //Установка текста для вывода в нижнем колонтитуле
        footerRange.Text = "Нижний колонтитул" + Environment.NewLine + "www.CSharpCoderR.com";
    }

    //Добавление текста в документ
    document.Content.SetRange(0, 0);
    document.Content.Text = "www.CSharpCoderR.com" + Environment.NewLine;

    //Добавление текста со стилем Заголовок 1
    Microsoft.Office.Interop.Word.Paragraph para1 = document.Content.Paragraphs.Add(ref missing);
    object styleHeading1 = "Заголовок 1";
    para1.Range.set_Style(styleHeading1);
    para1.Range.Text = "Исходники по языку программирования CSharp";
    para1.Range.InsertParagraphAfter();

    //Создание таблицы 5х5
    Table firstTable = document.Tables.Add(para1.Range, 5, 5, ref missing, ref missing);

    firstTable.Borders.Enable = 1;
    foreach (Row row in firstTable.Rows)
    {
        foreach (Cell cell in row.Cells)
        {
            //Заголовок таблицы
            if (cell.RowIndex == 1)
            {
                cell.Range.Text = "Колонка " + cell.ColumnIndex.ToString();
                cell.Range.Font.Bold = 1;
                //Задаем шрифт и размер текста
                cell.Range.Font.Name = "verdana";
                cell.Range.Font.Size = 10;
                cell.Shading.BackgroundPatternColor = WdColor.wdColorGray25;
                //Выравнивание текста в заголовках столбцов по центру
                cell.VerticalAlignment =
                WdCellVerticalAlignment.wdCellAlignVerticalCenter;
                cell.Range.ParagraphFormat.Alignment =
                WdParagraphAlignment.wdAlignParagraphCenter;
            }
            //Значения ячеек
            else
            {
                cell.Range.Text = (cell.RowIndex - 2 + cell.ColumnIndex).ToString();
            }
        }
    }
    winword.Visible = true;
}
catch (Exception ex)
{
    MessageBox.Show(ex.Message);
}
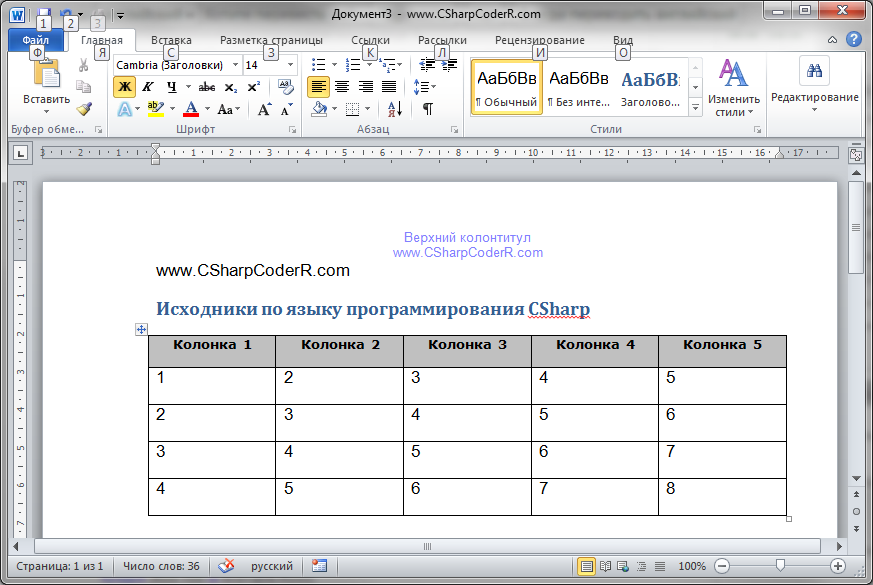
Запустите ваш проект, нажав на клавиатуре, клавишу «F5». Нажмите на единственную кнопку, расположенную на главной форме вашего проекта. У вас автоматически откроется документ Microsoft Word с заполненным верхним и нижним колонтитулом, обычным и с применением стиля текстом, а так же заполненной таблицей.
Для сохранения документа в определенной директории, добавьте приведенный ниже код, после строки «winword.Visible = true;».
//Сохранение документа
object filename = @"d:temp1.docx";
document.SaveAs(ref filename);
//Закрытие текущего документа
document.Close(ref missing, ref missing, ref missing);
document = null;
//Закрытие приложения Word
winword.Quit(ref missing, ref missing, ref missing);
winword = null;
При работе с приложением Word в памяти компьютера создается отдельный процесс, если его не закрыть или не вывести созданный документ на экран, то он будет работать до выключения компьютера. Так же при постоянной работе с такими документами, их процессы будут накапливаться незаметно для пользователя, что может привести к зависанию компьютера или другим последствиям.