
Excel 2007 stores the data in a bunch of files, most of them in XML, all crammed together into a zip file. If you want to look at the contents, you can rename your .xlsx to whatever.zip and then open it and look at the files inside.
Assuming your Excel file just contains raw data, and all you care about is reading it (i.e., you do not need/want to update its contents and get Excel to open it again), reading the data is actually pretty easy. Inside the zip file, you’re looking for the subdirectory xlworksheets, which will contain a number of .xml files, one for each worksheet from Excel (e.g., a default workbook will have three worksheets named sheet1.xml, sheet2.xml and sheet3.xml).
Inside of those, you’re looking for the <sheet data> tag. Inside of that, you’ll have <row> tags (one for each row of data), and inside of them <c> tags with an attribute r=RC where RC is replaced by the normal row/column notation (e.g., «A1»). The <c> tag will have nested <v> tag where you’ll find the value for that cell.
I do feel obliged to add a warning though: while reading really simple data can indeed be just this easy, life can get a lot more complex in a hurry if you decide to do much more than reading simple rows/columns of numbers. Trying to do anything even slightly more complex than that can get a lot more complex in a hurry.
All programmers need to learn how to read excel files. This is the information age, and many people store their data in excel files because they are user-friendly. Programmers must also know all about reading excel files in their respective programming language.
If you are a .Net Programmer and struggling with reading excel files, then don’t worry — you are in the right place. I will show you a step-by-step for reading excel files using C#.
You might be thinking that reading excel files would be difficult and require high-level expertise, but this is not the case. I will show you that it only takes 2-3 lines of code with IronXL to be able to read excel files.
We will be covering the following topics in this article:
- Introduction to IronXL
- Creating an Example Project for our Demonstration
-
Adding IronXL Nuget Package to our Project
a. Installing IronXL using the Package Manager Console
b. Installing IronXL using the Manage Package Manager
c. Directly download it and add a reference to the project -
Read the Excel file in C#
a. Designing the Form
b. Code to Read the data from Excel
c. Code to Read data within a specific range
d. Code to Read XLs and XLSX File
e. Code to Read CSV files -
Summary
Introduction to IronXL:
IronXL is a .Net Library development brought to you by Iron Software. This library provides excellent functions and APIs to help us read, create and update/edit our excel files and spreadsheets. IronXL does not require Excel to be installed on your server or Interop. Moreover, IronXL provides a faster and more intuitive API than Microsoft Office Interop Excel.
IronXL works on .Net Core 2, Framework 4.5, Azure, Mono and, Mobile and Xamarin.

Creating an Example Project for our Demonstration
I will be using Windows Form App as an example, but you can use one of your choice, such as Asp.Net Web App, .Net core MVC or .Net Core web api.
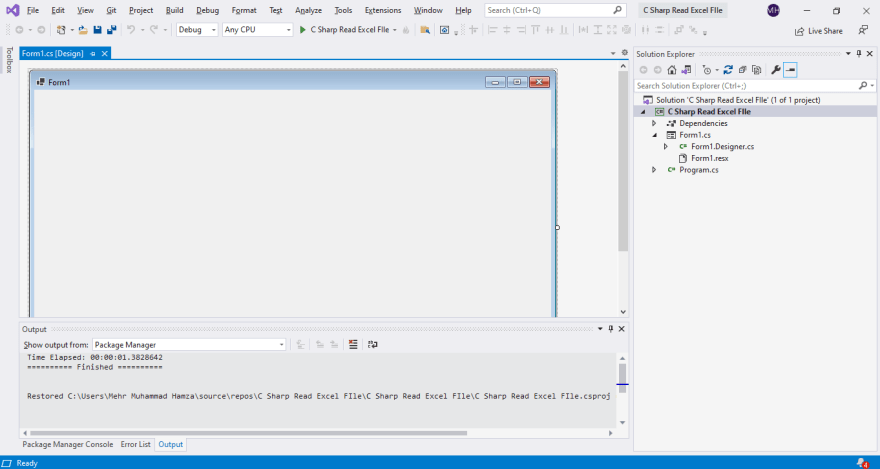
To create a new project, open Visual Studio, click on «Create New Project» => Select Template; I am using the Windows Form App, you can use any of your choosing. => Click on Next Button => Name Your Project; I have named mine as «C Sharp Read Excel File». => Click on Next = > Select your Target Framework; I am selecting .Net core 3.1, but again, you can choose your own. => Finally, click on «Create Project», and a project will be created and opened for you as shown below:
Our next task is to Install the Nuget Package for IronXL.
(adsbygoogle = window.adsbygoogle || []).push({});
Adding the IronXL Nuget Package
We can add the IronXL Package in one of any three ways, so you can choose the method that suits you best.
Installing IronXL using the Package Manager Console
Open the Package Manager console in your Project and use the following command:
Go to Tools => NuGet Package Manager => Package Manager Console.
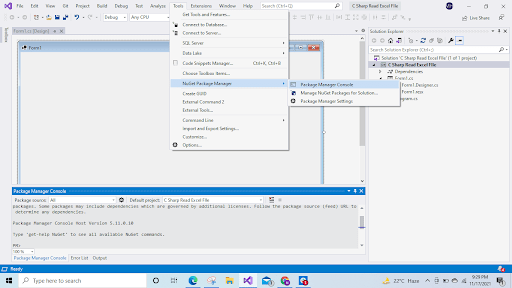
This will open the Package Manager console for you. Next, write the following command in the Package Manager console:
PM > Install-Package IronXL.Excel

Installing IronXL using the Nuget Package Manager
This is another way to install the Nuget Package Manager. If you have already completed installation using the previous method, than you won’t need to use this one.
Go to: Tools = > NuGet Package Manager => Manage NuGet Packages for Solution, and click on it.
This will open the Nuget-Solution for you; click on «Browse» and search for IronXL.Excel in the search bar:

Click on the «Install» button and it will install IronXL for you. After installing IronXL, go to your form and start designing it.
Downloading IronXL
Another way of using IronXL is to download it directly from this link. Once downloaded, just add the reference of the file in your project and start using it.
Design the Form
Now, we have to design the form to suit our requirements. I will use the minimum design for the demonstration. You can use any design depending on your needs.
Go to the ToolBox=> Select Label (for name our example app), and select the «Panel and Data» grid view. Put the «Data» grid view inside the panel. Our design will look like the following:

Our form has now been designed. Our next task is to actually write the code for reading an excel file or excel sheet in C#.
Write Code for Reading Excel Files in C
We want our app to read any given excel file at the click of a button, so for this, double-click on the «Read Excel File» button, and the following code will appear:
private void button1_Click(object sender, EventArgs e)
        {
        }
Enter fullscreen mode
Exit fullscreen mode
Next, add the following namespace in this file:
using System;
using System.Windows.Forms;
using IronXL;
using System.Data;
Enter fullscreen mode
Exit fullscreen mode
Using the IronXL namespace is necessary to access the IronXL functions. However, you can use other namespaces as per the requirements of your own projects.
WorkBook workbook = WorkBook.Load("Weather.xlsx");
            WorkSheet sheet = workbook.GetWorkSheet("Sheet1");
            DataTable dt = sheet.ToDataTable(true);
            dataGridView1.DataSource = dt;
Enter fullscreen mode
Exit fullscreen mode
The first statement will load the excel workbook «Weather.xlsx» for us. I have chosen the xlsx file format as an example. You can choose any file of your choice.
After loading the excel workbook, we need to select the excel worksheet we want to read. After that, we need to convert our worksheet into a data table so that we can further load it into our Data Grid View.
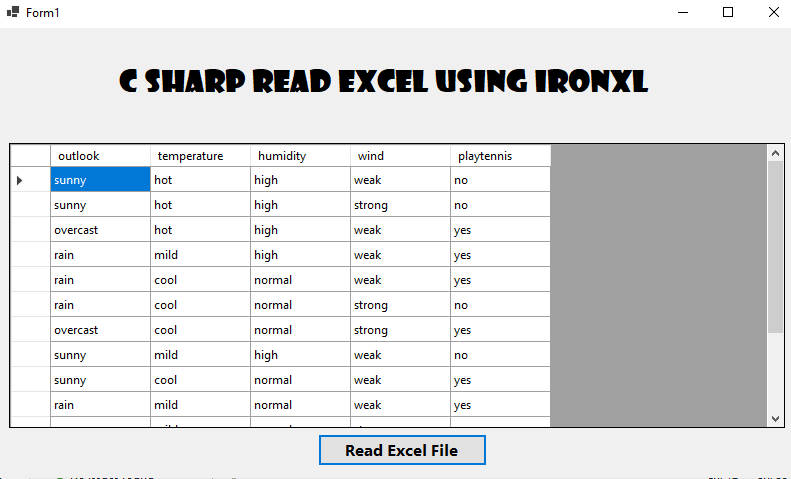
This will read the file for us and display all its data in the data grid view.
Output for Reading the Data from Excel File using C#:
Let’s open our «Weather.xlsx» file in Microsoft Excel and compare our output. xlsx file is the extension for a Microsoft Excel file.
Excel File:

Now that we can read excel files using C#, let’s explore some advanced options.
Let’s suppose that you want to read the data from an excel file for a specific cell range. Let’s look at how to do that.
Read Data from Excel within a Specific Cell Range:
To read the data in a specific cell range, write the following code behind the button:
WorkBook workbook = WorkBook.Load("Weather.xlsx");
            WorkSheet sheet = workbook.GetWorkSheet("Sheet1");
            var range = sheet["A1:C6"];
            DataTable dt = range.ToDataTable(true);
            dataGridView1.DataSource = dt;
Enter fullscreen mode
Exit fullscreen mode
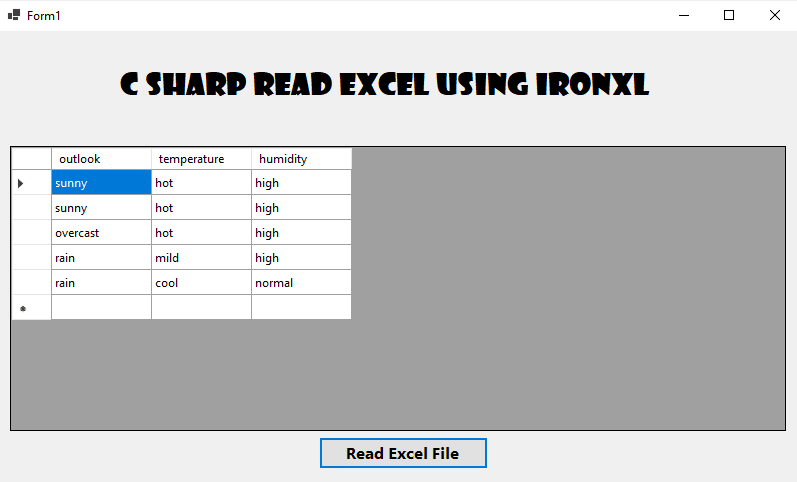
The first two lines are the same as those for loading the workbook and selecting the worksheet we want to read. On the third line, we have selected the cell range within which we want to read the data. I have selected the range A1:C6 which means that it will read the first three columns: Column A, Column B, and Column C, as well as the first six rows, as shown below.
Output for Read Data within a Specific Cell Range:
Read XLS or XLSX File:
We can read excel files no matter whether the file format is xls or xlsx. In the previous example, we looked at the example of reading the data from an Xslx file. Next, let’s look at saving the same file in .xls format and then reading it. The code will remain the same, we just have to change the file name to «Wather.xls» as shown below:
WorkBook workbook = WorkBook.Load("Weather.xls");
Output for Reading XLS File:

Read CSV File in C#:
If you have csv files instead of an excel file, you have to make slight changes to the code.
Let’s look at the following example.
I have the same Weather file saved as «Weather.csv», so I am using the same file for all the examples. Again, you can use any example according to your requirements.
WorkBook workbook = WorkBook.LoadCSV("Weather.csv", fileFormat: ExcelFileFormat.XLSX, ListDelimiter: ",");
            WorkSheet sheet = workbook.DefaultWorkSheet;
            DataTable dt = sheet.ToDataTable(true);
            dataGridView1.DataSource = dt;
Enter fullscreen mode
Exit fullscreen mode
On the first line will load the csv file for you and define the file format. The second line will select the worksheet, while the other two code lines are the same as those in the previous examples.
Output for Reading CSV File

Summary:
In this tutorial we have learned how to read data using excel in C# by selecting specific cells and ranges, or different file formats. This all was done with just a few lines of code.
If you want to learn more about Iron Software products, please click on this link. If you decide that you’d like to try it out for yourself, then go ahead and take advantage of the Iron Software 30-day Free-Trial . You may also want to take a look at the Iron Suite, this complete package includes five .Net Libraries, this special offer means you can get all five products for the price of only two. For more information, please click here.
I hope that you have found this guide helpful and easy to follow. If you need any further assistance, please feel free to post a comment.
Время на прочтение
7 мин
Количество просмотров 69K
В современном мире разработки приложений нередко встает необходимость работы с Excel документами. Чаще всего это разного рода отчеты, но иногда xls/x файлы используются в качестве хранилища данных. Например, если пользователь должен иметь возможность загрузить данные в приложение или выгрузить, в человеко-читаемом виде, Excel де-факто является стандартом. Относительно дружелюбный интерфейс, прозрачная структура, в купе с его распространенностью… трудно навскидку назвать решение лучше.

Однако, у многих Excel до сих пор ассоциируется с чем-то тяжелым, неповоротливым и сложным. Давайте посмотрим, как мы — обычные C# разработчики, можем легко сформировать простой Excel документ, на примере табличного отчета.
Историческая справка
Времена, когда доминировал проприетарный формат .xls(Excel Binary File Format) давно прошли и сейчас мы имеем только .xlsx(Excel Workbook), в рамках Office Open XML. Последний представляет собой обычный .zip архив с XML файлами. Не будем углубляться в его структуру, я искренне надеюсь что вам это никогда не понадобится.
На github, и не только, можно найти ряд библиотек, бесплатных и не только. Пожалуй самой популярной является EPPlus. До определенной степени, она довольно хорошо отражает концепцию Excel, именно по этому я всегда использую EPPlus. Версия 4 полностью бесплатна, начиная с 5‐й версии вам потребуется приобрести лицензию для коммерческого использования.
Задача
Итак, предположим, продукт-мэнеджеру ударила в голову идея того, что возможность выгружать некий отчет в формате Excel увеличит кол-во пользователей на 100500%. Проджет-менеджер решает выкатить эту киллер-фичу как хотфикс прямо сегодня — ведь работы всего на пару часов.

Сам по себе, отчет содержит краткое описание компании и историю изменения некоторых экономических показателей. Для простоты все свойства компании — строки. Экономические показатели — большие целые числа и числа с плавающей точкой, а также даты. Предположим, что где-то в недрах микросервисного backend-да есть сервис-генератор подобных отчетов, например по id компании. Однако, поскольку id нет смысла выводить пользователю, идентификатор отсутствует в самой модели отчета.
Аналитик, в свою очередь, выдает задачу с феноменально точным описанием — «Сгенерировать excel отчет на базе данных MarketReport». Что ж, для нашего примера, создадим заглушку — генератор фейковых данных:

Первый запуск
Подключим EPPlus версии 4.5.3.3 и создадим базовую обвязку для будущего генератора.

Сердцем генератора будет метод Generate. ExcelPackage это модель документа, через которую мы и будем осуществлять все взаимодействия с ним. Также имеется конструктор для передачи пути к файлу или потока.

В методе main создается генератор отчетов, а также генератор Excel файлов. Далее полученный файл просто записывается на диск.
При попытке запустить приложение, получаем exception:InvalidOperationException: The workbook must contain at least one worksheet
Все правильно, Excel документ не может существовать без страниц, должна быть хотя бы одна. Добавляем ее, все интуитивно понятно:
var sheet = package.Workbook.Worksheets
		.Add("Market Report");
Запускаем снова и… вот оно! Теперь наше приложение генерирует документ и, хотя там еще ничего нет, он уже весит 2,5KB — значит мы работаем с Excel правильно и все идет как надо.
Вывод данных
Давайте выведем основную информацию по компании в шапку. Для доступа к конкретной ячейки объект Cells на странице пакета снабжен удобным индексатором. При этом, до конкретной ячейки можно достучаться как через номер строки и столбца, так и по привычному всем буквенно-числовому коду:
sheet.Cells["B2"].Value = "Company:";
sheet.Cells[2, 3].Value = report.Company.Name;
Полный код вывода шапки.
sheet.Cells["B2"].Value = "Company:";
sheet.Cells[2, 3].Value = report.Company.Name;
sheet.Cells["B3"].Value = "Location:";
sheet.Cells["C3"].Value = $"{report.Company.Address}, " +
  												$"{report.Company.City}, " +
  												$"{report.Company.Country}";
sheet.Cells["B4"].Value = "Sector:";
sheet.Cells["C4"].Value = report.Company.Sector;
sheet.Cells["B5"].Value = report.Company.Description;
Для вывода исторических данных понадобится как минимум шапка таблицы и цикл по массиву History:
sheet.Cells[8, 2, 8, 4].LoadFromArrays(new object[][]{ new []{"Capitalization", "SharePrice", "Date"} });
var row = 9;
var column = 2;
foreach (var item in report.History)
{
  sheet.Cells[row, column].Value = item.Capitalization;
  sheet.Cells[row, column + 1].Value = item.SharePrice;
  sheet.Cells[row, column + 2].Value = item.Date;
  row++;
}
Предлагаю обратить внимание на метод LoadFromArrays, который заполняет диапазон ячеек рваным(зубчатым) массивом. Здесь мы можем видеть, что типизация теряется и передавая массив object мы ожидаем что EPPlus в конечном итоге использует ToString, чтобы записать переданное в ячейки.
Стилизация
Если вы прямо сейчас откроете документ, то вы возможно увидите не то, что хотелось бы отдать в продакшн в пятницу вечером.
Как это выглядит

Во-первых, шапка никак не выделяется, во-вторых таблица не имеет границ… выравнивание пляшет, даты отображаются магическими числами, а капитализация «уходит в какую-то математику» — как это прокомментировал аналитик.
Да, на все эти красивости у нас уйдет больше года кода, чем на сам вывод данных, и, в конечном тоге, получившаяся каша из логики вывода данных и разметки заставит некоторых усомниться в их компетентности… но, мы же backend разработчики, так давайте сверстаем Excel Sheet!
Размер ячеек
Из коробки у нас есть возможность сделать автофит а так же вручную выставить ширину в соответствии с нашей ситуацией. А ситуация у нас не самая хорошая — по задумке аналитика в шапке у ячеек должен быть автофит, а у ячеек таблицы — тоже автофит. Так в чем же подвох?
Если вы когда-нибудь до этого открывали Excel, то возможно знаете, что ширина ячеек не может отличаться в рамках столбца и автофит будет по самому широкому контенту ячейки. Однако, простые вещи бывает нетак то просто объяснить… Но если вы справитесь, то вот как это будет выглядеть в коде:
sheet.Cells[1, 1, row, column + 2].AutoFitColumns();
sheet.Column(2).Width = 14;
sheet.Column(3).Width = 12;
Формат данных
Как и большая часть стиля ячейки, он задается через одноименное свойство Style. Обратите внимание на вычисление 3-го аргумента индексатора. Это звоночек некачественного кода, но к этому мы вернемся в позже…
sheet.Cells[9, 4, 9 + report.History.Length, 4].Style.Numberformat.Format = "yyyy";
sheet.Cells[9, 2, 9 + report.History.Length, 2].Style.Numberformat.Format =  "### ### ### ##0";
Выравнивание
Его можно задать как на ячейке, так и на диапазоне. На самом деле, для EPPlus, это одна и та же сущность — некий ExcelRange, описывающий диапазон ячеек, в том числе и со всего 1 ячейкой.
sheet.Column(2).Style.HorizontalAlignment = ExcelHorizontalAlignment.Left;
sheet.Cells[8, 3, 8 + report.History.Length, 3].Style.HorizontalAlignment = ExcelHorizontalAlignment.Center;
Стиль текста
Также легко задается, используя Style.Font, кстати, здесь, на 2-й строчке, мы впервые указываем диапазон так, как привыкли его видеть пользователи Excel:
sheet.Cells[8, 2, 8, 4].Style.Font.Bold = true;
sheet.Cells["B2:C4"].Style.Font.Bold = true;
Границы
Задаем стиль линии, а также ее толщину. К этому моменту от кол-ва магических чисел-параметров индексатора уже рябит в глазах, но мы уже на финишной прямой… не так ли?
sheet.Cells[8, 2, 8 + report.History.Length, 4].Style.Border.BorderAround(ExcelBorderStyle.Double);
sheet.Cells[8, 2, 8, 4].Style.Border.Bottom.Style = ExcelBorderStyle.Thin;
График
«Ну что за отчет без графиков, верно, Карл?» — ловко подметит специалист по тестированию, и не важно, что этого не было в ТЗ а на часах уже половина 9-го…
Хотя график как сущность сам по себе сложнее таблиц и с графиками мы не работаем каждый день, EPPlus предоставляет довольно понятный API. Давайте добавим простейший график, отражающий рост капитализации:
var capitalizationChart = sheet.Drawings.AddChart("FindingsChart", OfficeOpenXml.Drawing.Chart.eChartType.Line);
capitalizationChart.Title.Text = "Capitalization";
capitalizationChart.SetPosition(7, 0, 5, 0);
capitalizationChart.SetSize(800, 400);
var capitalizationData = (ExcelChartSerie)(capitalizationChart.Series.Add(sheet.Cells["B9:B28"], sheet.Cells["D9:D28"]));
capitalizationData.Header = report.Company.Currency;
Еще, может понадобиться защитить страницу от редактирования:
sheet.Protection.IsProtected = true;На этом все, репозиторий с рабочим приложением находится здесь.
Заключение
О чем говорит финальная версия метода Generate?
public byte[] Generate(MarketReport report)
{
  var package = new ExcelPackage();

  var sheet = package.Workbook.Worksheets
    	.Add("Market Report");

  sheet.Cells["B2"].Value = "Company:";
  sheet.Cells[2, 3].Value = report.Company.Name;
  sheet.Cells["B3"].Value = "Location:";
  sheet.Cells["C3"].Value = $"{report.Company.Address}, " +
    												$"{report.Company.City}, " +
    												$"{report.Company.Country}";
  sheet.Cells["B4"].Value = "Sector:";
  sheet.Cells["C4"].Value = report.Company.Sector;
  sheet.Cells["B5"].Value = report.Company.Description;

  sheet.Cells[8, 2, 8, 4].LoadFromArrays(new object[][]{ new []{"Capitalization", "SharePrice", "Date"} });
  var row = 9;
  var column = 2;
  foreach (var item in report.History)
  {
    	sheet.Cells[row, column].Value = item.Capitalization;
   		sheet.Cells[row, column + 1].Value = item.SharePrice;
   		sheet.Cells[row, column + 2].Value = item.Date;
    	row++;
  }

  sheet.Cells[1, 1, row, column + 2].AutoFitColumns();
  sheet.Column(2).Width = 14;
  sheet.Column(3).Width = 12;

  sheet.Cells[9, 4, 9+ report.History.Length, 4].Style.Numberformat.Format = "yyyy";
  sheet.Cells[9, 2, 9+ report.History.Length, 2].Style.Numberformat.Format =  "### ### ### ##0";

  sheet.Column(2).Style.HorizontalAlignment = ExcelHorizontalAlignment.Left;
  sheet.Cells[8, 3, 8 + report.History.Length, 3].Style.HorizontalAlignment = ExcelHorizontalAlignment.Center;
  sheet.Column(4).Style.HorizontalAlignment = ExcelHorizontalAlignment.Right;

  sheet.Cells[8, 2, 8, 4].Style.Font.Bold = true;
  sheet.Cells["B2:C4"].Style.Font.Bold = true;

  sheet.Cells[8, 2, 8 + report.History.Length, 4].Style.Border.BorderAround(ExcelBorderStyle.Double);
  sheet.Cells[8, 2, 8, 4].Style.Border.Bottom.Style = ExcelBorderStyle.Thin;

  var capitalizationChart = sheet.Drawings.AddChart("FindingsChart", OfficeOpenXml.Drawing.Chart.eChartType.Line);
  capitalizationChart.Title.Text = "Capitalization";
  capitalizationChart.SetPosition(7, 0, 5, 0);
  capitalizationChart.SetSize(800, 400);
  var capitalizationData = (ExcelChartSerie)(capitalizationChart.Series.Add(sheet.Cells["B9:B28"], sheet.Cells["D9:D28"]));
  capitalizationData.Header = report.Company.Currency;

  sheet.Protection.IsProtected = true;

  return package.GetAsByteArray();
}
Во-первых, прежде всего, о том, что мы успешно справились с задачей, а именно, сгенерировали свой первый Excel отчет, поработали со стилями и даже решили пару попутных проблем.
Во-вторых, возможно имеет смысл искать новою работу, но, забегая вперед, я бы с этим не спешил… Если данная публикация наберет 1+ просмотров, то во второй части мы поговорим о том, как можно отделить стилизацию от логики заполнения данными, упростить манипуляции над ячейками и в целом сделаем код боле поддерживаемым.
Microsoft Excel is powerful spreadsheet tool with lots of features for data visualization, analysis and documentation. Excel formats data in the form of rows and columns and cells. As a developer, many times you are required to read or write data into an Excel file. There are multiple ways to read and write data in excel programmatically i.e. by using COM Components and using third party components/SDKs.
This tutorial shows you how to Read and Write Excel files in Microsoft C#. We are going to use Microsoft COM Objects i.e. Excel 16 object in our application. Use the following sample C# source code for Excel reading and writing. There are multiple examples discussed in this tutorial to read Excel files using C# and write data back to Excel file.
Table of Contents
- Write data to Excel file
- Read data from Excel file
- Steps to read and write data from Excel using C#
- Step 1: Create a new C# project in Visual Studio
- Step 2: Add COM Component Reference i.e. Excel 14 Object
- Step 3: Import the namespaces in C# code
- Step 4: Write Data to Excel File
- Step 5: Read Data from Excel File
- Step 6: Run the C# Program
Write data to Excel file
The following C# code uses the Excel interop library to create a new Excel instance, open a specified workbook and write text to the first cell of the worksheet. It also includes cleanup code to release resources and ensure that the Excel process is fully closed.
|
1 2 3 4 5 6 7 8 9 10 11 12 13 14 15 16 17 18 19 20 21 22 23 24 25 26 27 28 29 30 |
// Set cursor as hourglass Cursor.Current = Cursors.WaitCursor; Excel.Application xlApp = new Excel.Application(); Excel.Workbook xlWorkbook = xlApp.Workbooks.Open(FileName); Excel._Worksheet xlWorksheet = xlWorkbook.Sheets[1]; Excel.Range xlRange = xlWorksheet.UsedRange; xlWorksheet.Cells[1, 1] = txtWrite.Text; xlApp.Visible = false; xlApp.UserControl = false; xlWorkbook.Save(); //cleanup GC.Collect(); GC.WaitForPendingFinalizers(); //release com objects to fully kill excel process from running in the background Marshal.ReleaseComObject(xlRange); Marshal.ReleaseComObject(xlWorksheet); //close and release xlWorkbook.Close(); Marshal.ReleaseComObject(xlWorkbook); //quit and release xlApp.Quit(); Marshal.ReleaseComObject(xlApp); // Set cursor as default arrow Cursor.Current = Cursors.Default; |
Read data from Excel file
The following C# code also uses the same mechanism to read the data from an Excel sheet. First, it creates a new Excel instance, open a specified workbook and read value from the second cell of the worksheet. It also includes cleanup code to release resources and ensure that the Excel process is fully closed.
|
1 2 3 4 5 6 7 8 9 10 11 12 13 14 15 16 17 18 19 20 21 22 23 24 25 26 27 28 29 30 31 |
// Set cursor as hourglass Cursor.Current = Cursors.WaitCursor; Excel.Application xlApp = new Excel.Application(); Excel.Workbook xlWorkbook = xlApp.Workbooks.Open(FileName); Excel._Worksheet xlWorksheet = xlWorkbook.Sheets[1]; Excel.Range xlRange = xlWorksheet.UsedRange; if (xlRange.Cells[1, 2] != null && xlRange.Cells[1, 2].Value2 != null) { txtRead.Text = xlRange.Cells[1, 2].Value2.ToString(); } //cleanup GC.Collect(); GC.WaitForPendingFinalizers(); //release com objects to fully kill excel process from running in the background Marshal.ReleaseComObject(xlRange); Marshal.ReleaseComObject(xlWorksheet); //close and release xlWorkbook.Close(); Marshal.ReleaseComObject(xlWorkbook); //quit and release xlApp.Quit(); Marshal.ReleaseComObject(xlApp); // Set cursor as default arrow Cursor.Current = Cursors.Default; |
Steps to read and write data from Excel using C#
In this tutorial, we are going to use Microsoft Visual Studio 2017 Community Edition.
Step 1: Create a new C# project in Visual Studio
Open up Visual Studio and create a new Windows Desktop application using Visual C#. You can choose any .NET Framework available in your computer. We are going to use .NET Framework 4.6.1.

Step 2: Add COM Component Reference i.e. Excel 14 Object
Next step is to right click on ExcelReaderWriter C# Project under Solution Explorer and choose Add->Reference.

Then choose COM->Type Libraries and select the desired COM Component for Excel. In our case we used Microsoft Excel 16.0 Object Library.

Step 3: Import the namespaces in C# code
Add the following namespaces to import into the code.
|
using System.Runtime.InteropServices; //Microsoft Excel 16 object in references-> COM tab using Excel = Microsoft.Office.Interop.Excel; |
Also create a class variable to hold Excel File name i.e.
|
private string FileName = @«C:data.xlsx» |
Step 4: Write Data to Excel File
Add a Button and TextBox controls on the form. Then double click on the button to show up the code view and Visual Studio Automatically creates the button click event handler. Add the code to the handler so that it looks like below:
|
1 2 3 4 5 6 7 8 9 10 11 12 13 14 15 16 17 18 19 20 21 22 23 24 25 26 27 28 29 30 31 32 33 34 |
private void btnWrite_Click(object sender, EventArgs e) { // Set cursor as hourglass Cursor.Current = Cursors.WaitCursor; Excel.Application xlApp = new Excel.Application(); Excel.Workbook xlWorkbook = xlApp.Workbooks.Open(FileName); Excel._Worksheet xlWorksheet = xlWorkbook.Sheets[1]; Excel.Range xlRange = xlWorksheet.UsedRange; xlWorksheet.Cells[1, 1] = txtWrite.Text; xlApp.Visible = false; xlApp.UserControl = false; xlWorkbook.Save(); //cleanup GC.Collect(); GC.WaitForPendingFinalizers(); //release com objects to fully kill excel process from running in the background Marshal.ReleaseComObject(xlRange); Marshal.ReleaseComObject(xlWorksheet); //close and release xlWorkbook.Close(); Marshal.ReleaseComObject(xlWorkbook); //quit and release xlApp.Quit(); Marshal.ReleaseComObject(xlApp); // Set cursor as default arrow Cursor.Current = Cursors.Default; } |
Step 5: Read Data from Excel File
Create another Button and TextBox control to use for reading the data from Excel file. Add the following code to button click even handler.
|
1 2 3 4 5 6 7 8 9 10 11 12 13 14 15 16 17 18 19 20 21 22 23 24 25 26 27 28 29 30 31 32 33 34 35 |
private void btnRead_Click(object sender, EventArgs e) { // Set cursor as hourglass Cursor.Current = Cursors.WaitCursor; Excel.Application xlApp = new Excel.Application(); Excel.Workbook xlWorkbook = xlApp.Workbooks.Open(FileName); Excel._Worksheet xlWorksheet = xlWorkbook.Sheets[1]; Excel.Range xlRange = xlWorksheet.UsedRange; if (xlRange.Cells[1, 2] != null && xlRange.Cells[1, 2].Value2 != null) { txtRead.Text = xlRange.Cells[1, 2].Value2.ToString(); } //cleanup GC.Collect(); GC.WaitForPendingFinalizers(); //release com objects to fully kill excel process from running in the background Marshal.ReleaseComObject(xlRange); Marshal.ReleaseComObject(xlWorksheet); //close and release xlWorkbook.Close(); Marshal.ReleaseComObject(xlWorkbook); //quit and release xlApp.Quit(); Marshal.ReleaseComObject(xlApp); // Set cursor as default arrow Cursor.Current = Cursors.Default; } |
Step 6: Run the C# Program
Compile and run the program now. The output should be similar to the one showing below. Enter some data in first text box and click Write button. It will write data to already created Excel file C:data.xlsx. Similarly, you can click on Read button, which will read the data from same Excel file and show it in the second text file.

There are other third party libraries available, which you can use in your code to read and write Excel files. These libraries are available both under open source as well as commercially available. Few of them are:
- https://github.com/nissl-lab/npoi – Open Source, Apache 2.0 License
- https://github.com/EPPlusSoftware/EPPlus – Commercially Available
- https://github.com/JanKallman/EPPlus – Available under LGPL
- https://bytescout.com/products/developer/spreadsheetsdk/bytescoutspreadsheetsdk.html – Commercially Available
- Remove From My Forums
-
Question
-
Hi,
I want to write a program to access cells in an excel file?
How can I do that?
Thanks
Answers
-
Try this code!
Microsoft.Office.Interop.Excel.Application app = new Microsoft.Office.Interop.Excel.Application(); Microsoft.Office.Interop.Excel.Workbook wb = app.Workbooks.Open("your excel file path", Type.Missing, Type.Missing, Type.Missing, Type.Missing, Type.Missing, Type.Missing, Type.Missing, Type.Missing, Type.Missing, Type.Missing, Type.Missing, Type.Missing, Type.Missing, Type.Missing); Worksheet sheet = (Worksheet)wb.Sheets["Sheet name to read"]; Range excelRange = sheet.UsedRange; foreach (Microsoft.Office.Interop.Excel.Range row in excelRange.Rows) { int rowNumber = row.Row; string[] A4D4 = GetRange("A" + rowNumber + ":F" + rowNumber + "", sheet); } public string[] GetRange(string range, Worksheet excelWorksheet) { Microsoft.Office.Interop.Excel.Range workingRangeCells = excelWorksheet.get_Range(range, Type.Missing); //workingRangeCells.Select(); System.Array array = (System.Array)workingRangeCells.Cells.Value2; string[] arrayS = this.ConvertToStringArray(array); return arrayS; }
-
Edited by
Monday, September 5, 2011 6:40 AM
-
Marked as answer by
Martin_Xie
Monday, September 19, 2011 11:49 AM
-
Edited by
-
Hi DarkSeeker,
Try this:
static void Main(string[] args)
{
  IWorkbook workbook = Factory.GetWorkbook(@"C:tmpMyWorkbook.xls");
  IWorksheet worksheet = workbook.Worksheets[0];
  IRange a1 = worksheet.Cells["A1"];
  object rawValue = a1.Value;
  string formattedText = a1.Text;
  Console.WriteLine("rawValue={0} formattedText={1}", rawValue, formattedText);
}
Regards, http://shwetamannjain.blogspot.com
-
Marked as answer by
Martin_Xie
Monday, September 19, 2011 11:50 AM
-
Marked as answer by
-
“I
want to write a program to access cells in an excel file?”Thanks all for your great help and suggestions.
Hi DarkSeeker,
Welcome to MSDN Forum.
Usually, there are 2 approaches to access Office Excel files in .Net.
1.
COM Interop approach as the above said.FAQ: How do I use Excel Automation in .NET
http://social.msdn.microsoft.com/Forums/en-US/vbgeneral/thread/df02c6d2-e1b5-4731-bb04-2674aed789de
Add Reference to COM component “Microsoft Excel Object Library” into your project.
Code sample: Get/Set cell value in Excel Spreadsheet.
using Microsoft.Office.Interop.Excel;
object oExcel
= new Excel.Application;object oBook
= oExcel.Workbooks.Open(«C:\Book1.xls»);
object oSheet =
oBook.Worksheets(1);
// e.g. Read value in A2 cell
string cellValue
= oSheet.Range(«A2»).Value;
// e.g. Change value in A2 cell
oSheet.Range(«A2»).Value
= «»;
oBook.SaveAs(«C:\Book1.xls»,
true);
oExcel.Quit();2. OleDb Data Provider approach
Retrieve Excel Sheet data and bind into DataGridView control, and then access particular cells via DataGridView.
using System.Data;
using System.Data.OleDb;
OleDbConnection conn = new
OleDb.OleDbConnection((«provider=Microsoft.Jet.OLEDB.4.0; »
+ («data source=C:\myData.xls; »
+ «Extended Properties=Excel 8.0;»)));
// Select the data from Sheet1 of the workbook.
OleDbDataAdapter ada = new
OleDbDataAdapter(«select * from Sheet1$]», conn);
DataSet ds = new
DataSet();
ada.Fill(ds);
dataGridView1.DataSource
= ds.Tables[0].DefaultView;
conn.Close();// Access particular cells on DataGridView.
DataGridView1(RowIndex, ColumnIndex)
DataGridView1.Rows(RowIndex).Cells(ColumnIndex)
Martin Xie [MSFT]
MSDN Community Support | Feedback to us
Get or Request Code Sample from Microsoft
Please remember to mark the replies as answers if they help and unmark them if they provide no help.
-
Proposed as answer by
Carmelo La Monica
Tuesday, September 6, 2011 5:54 AM -
Marked as answer by
Martin_Xie
Monday, September 19, 2011 11:48 AM
-
Proposed as answer by
