
Так сложилось, что первая программа, которую пишет каждый программист, начиная изучать новый язык программирования — это программа, выводящая на экран текст «Hello World». В данной статье мы собрали пример такой программы на разных языках программирования.

Hello World на C
|
#include <stdio.h> int main() { printf(«Hello, World!n»); return 0; } |
Hello World на Java
|
class HelloWorld { public static void main(String[] args) { System.out.println(«Hello, World!»); } } |
Hello World на C++
|
#include <iostream> using namespace std; int main() { cout << «Hello, World!»; return 0; } |
Hello World на C#
|
using System; namespace HelloWorld { class Hello { static void Main() { Console.WriteLine(«Hello World!»); } } } |
Hello World на Python
Hello World на PHP
|
<?php echo «Hello, World!»; ?> |
Hello World на R
|
> myString <— «Hello, World!» > print ( myString) |
Hello World на JavaScript
|
<!DOCTYPE HTML> <html> <body> <script> alert( ‘Hello, world!’ ); </script> </body> </html> |
Hello World на Pascal (Паскаль)
|
program Hello; begin writeln (‘Hello, world!’) end. |
Hello World на Assembler
|
.MODEL SMALL .STACK 100h .DATA HelloMessage DB ‘Hello World’,13,10,‘$’ .CODE START: mov ax,@data mov ds,ax mov ah,9 mov dx,OFFSET HelloMessage int 21h mov ah,4ch int 21h END START |
Hello World на Scala
|
object HelloWorld { def main(args: Array[String]): Unit = { println(«Hello, World!») } } |
Hello World на Delphi
|
program Helloworld; {$APPTYPE CONSOLE} uses sysutils; begin writeln(‘Hello, World!’); sleep(3000); end. //конец программы |
Hello World на Kotlin
|
package demo fun main(args : Array<String>) { println(«Hello, world!») } |
Hello World на Ruby
Hello World на Swift
|
import Swift print(«Hello, World!») |
Hello World на Objective-C
|
#import <Foundation/Foundation.h> int main (int argc, const char * argv[]) { NSAutoreleasePool *pool = [[NSAutoreleasePool alloc] init]; NSLog (@»Hello, World!»); [pool drain]; return 0; } |
Hello World на Basic
Hello World на Visual Basic .NET
|
Module Module1 Sub Main() Console.WriteLine(«Hello, World!») End Sub End Module |
Hello World на Rust
|
fn main() { println!(«Hello, World!»); } |
Hello World на Ada
|
with Ada.Text_IO; procedure HelloWorld is begin Ada.Text_IO.Put_Line(«Hello, World!»); end HelloWorld; |
Hello World на Haskell
|
main = putStrLn «Hello, World!» |
Hello World на Go
|
package main import «fmt» func main() { fmt.Println(«Hello, World!») } |
Hello World на Lisp
|
(format t «Hello, World!~%») |
Hello World на MATLAB
Hello World на ABAP
|
REPORT first_programm. WRITE / ‘Hello, World!’. |
Hello World на Erlang
|
—module(prog). —export([main/0]). main() —> io:format(«Hello, World!~n»). |
Hello World на Arduino
|
const int rs = 12, en = 11, d4 = 5, d5 = 4, d6 = 3, d7 = 2; LiquidCrystal lcd(rs, en, d4, d5, d6, d7); void setup() { lcd.begin(16, 2); lcd.print(«Hello, World!»); } void loop() { lcd.setCursor(0, 1); lcd.print(millis() / 1000); } |
Hello World на AutoIt
|
#include <MsgBoxConstants.au3> MsgBox($MB_OK, «Tutorial», «Hello World!») |
Hello World на 1С
|
Сообщить(«Hello, World!»); |
Hello World на Actionscript
|
_root.createTextField(«mytext»,1,100,100,300,100); mytext.multiline = true; mytext.wordWrap = true; mytext.border = false; myformat = new TextFormat(); myformat.color = 0xff0000; myformat.bullet = false; myformat.underline = true; mytext.text = «Hello, World!»; mytext.setTextFormat(myformat); |
Hello World на AppleScript
|
display dialog «Hello, World!» |
Hello World на CoffeeScript
Hello World на Lua
Hello World на Perl
Hello World на PowerShell
|
$strString = «Hello, World!» write-host $strString |
Hello World на F#
Язык Си в примерах
- Компиляция программ
- Простейшая программа «Hello World»
- Учимся складывать
- Максимум
- Таблица умножения
- ASCII-коды символов
- Верхний регистр
- Скобочки
- Факториал
- Степень числа
- Треугольник Паскаля
- Корень уравнения
- Система счисления
- Сортировка
- Библиотека complex
- Сортировка на основе qsort
- RPN-калькулятор
- RPN-калькулятор на Bison
- Простая грамматика
- Задача «Расчёт сопротивления схемы»
- Простая реализация конечного автомата
- Использование аргументов командной строки
- Чтение и печать без использования stdio
- Декодирование звукозаписи в формате ADX
- Другие примеры
Вариант «простой»[править]
Первая программа, которую мы рассмотрим, — это «Hello World» — программа, которая выведет на экран строку текста «Hello, World!» («Здравствуй, мир!») и закончит своё выполнение.
#include <stdio.h>

int main (void)
{
  puts ("Hello, World!");
  return 0;
}
Посмотрим на неё внимательно. Первая строка — #include <stdio.h> —
означает «включи заголовок stdio.h». В этом заголовке объявляются функции, связанные с вводом и выводом данных.[1][2]
Аббревиатуру stdio можно перевести как стандартный ввод-вывод (англ. standard input/output). Буква «h» после точки означает заголовок (англ. header). В заголовках (которые как правило представлены отдельными заголовочными файлами) обычно объявляются предоставляемые соответствующими им библиотеками функции, типы данных, константы и определения препроцессора.[3]
Далее идёт определение функции main. Оно начинается с объявления:
что значит: «функция с именем main, которая возвращает целое число (число типа int от англ. integer) и у которой нет аргументов (void)»
В качестве варианта, стандарт допускает определение функции main как функции двух аргументов (int argc и char *argv[] — имена, разумеется, могут быть произвольными), что используется для получения доступа к аргументам командной строки из программы. В данном случае, эта возможность не требуется, поэтому функция определена как безаргументная (что также явно разрешено стандартом.)[4]
Английское слово void можно перевести как «пустота». Далее открываются фигурные скобки и идёт тело функции, в конце фигурные скобки закрываются. Функция main — главная функция программы, именно с нее начинается выполнение программы.
Тело функции, в свою очередь, определяет последовательность действий, выполняемых данной функцией — логику функции. Наша функция выполняет одно единственное действие:
Это действие, в свою очередь, есть вызов функции puts стандартной библиотеки.[5] В результате выполнения этого вызова, на стандартный вывод (которым, скорее всего, окажется экран или окно на экране) печатается строка Hello, world!.
Затем идёт команда return 0;, которая завершает выполнение функции с возвратом значения 0, определяемого стандартом (для функции main) как код успешного завершения.[6][7]
Вариант «классический»[править]
Этот вариант отличается использованием функций printf (вместо puts) и getchar.
#include <stdio.h>

int main (void)
{
  printf ("Hello, World!n");
  getchar ();
  return 0;
}
В отличие от функции puts, выводящей переданную в качестве аргумента символьную строку, первый и обязательный аргумент функции printf определяет формат вывода.[8]
В общем случае, формат состоит из произвольного текста (не включающего символ %) «перемешанного» с указателями преобразований (предваряемыми символом %). В данном случае, однако, эта возможность не используется и никаких преобразований не выполняется.
Обратите внимание на появившуюся в строковой константе комбинацию n — она включает в выводимую строку управляющий код (или управляющий символ) перевода (также разрыва или завершения) строки. В отличие от функции puts, всегда добавляющей этот код к выводимой строке, printf требует явного его указания.
Действующая редакция стандарта определяет семь таких комбинаций, причем все они записываются с помощью символа обратной косой черты (см. ASCII коды символов).[9]
Обратим внимание и на следующее новшество:
Окружение, в котором запускается программа, как правило можно настроить так, что вывод программы будет оставаться на экране после ее выполнения неограниченно долго. Проще всего это обеспечить вызывая программу из командного интерпретатора (который, в свою очередь, может быть запущен в окне эмулятора терминала) или (в зависимости от системы) окна Cmd.exe.
Однако, при запуске непосредственно из графического окружения, отведенное программе окно может закрыться сразу же после завершения программы. Функция getchar[10] ожидает ввод пользователя, тем самым «откладывая» завершение программы (return). Какие именно действия могут прервать это ожидание — зависит от системы, однако можно надеяться, что нажатие клавиши ⏎ Enter завершит эту функцию в любой системе.
В некоторых руководствах для этой же цели предлагается функция getch. Однако, эта функция (в отличие от getchar) не является стандартной и, к тому же, зависима от платформы. Так, в некоторых системах использование getch требует включения файла curses.h и предшествующего вызова функции initscr. В других системах, однако, getch может быть объявлена в conio.h, и выполнение initscr — не требуется.
Вариант «экзотический»[править]
Наконец, рассмотрим следующий, выходящий за рамки стандарта, вариант этой программы.
#include <windows.h>

int
main (void)
{
  MessageBox (0, "Hello, World!",
              "Message", MB_OK);
  return 0;
}
Использование заголовка windows.h может произвести впечатление приемлемости этого варианта кода в рамках только лишь одной конкретной системы. Однако, для использованного здесь интерфейса существует и независимая свободная реализация — Wine, — позволяющая собрать и выполнить данный вариант на таких системах, как, например, GNU/Linux, FreeBSD, Solaris и Mac OS X.
См. также[править]
- C11
- Wine
Примечания[править]
- ↑ В действительности,
#include <...>— это директива препроцессора, то есть команда, которая выполняется до начала компиляции файла. Смысл этой директивы очень прост и заключается в том, чтобы на место, где указана эта директива, вставить содержимое файла, имя которого указано в угловых скобках. Обычно заголовочные файлы содержат только прототипы функций, то есть просто список функций с указанием аргументов и типа возвращаемого значения. - ↑ 6.10.2 Source file inclusion(англ.) WG14 N1570 Committee Draft. ISO/IEC (2011-04-12). Проверено 2012-11-19 г.
- ↑ 7.21 Input/output
stdio.h(англ.) WG14 N1570 Committee Draft. ISO/IEC (2011-04-12). Проверено 2012-11-19 г. - ↑ 5.1.2.2.1 Program startup(англ.) WG14 N1570 Committee Draft. ISO/IEC (2011-04-12). Проверено 2012-11-19 г.
- ↑ 7.21.7.9 The puts function(англ.) WG14 N1570 Committee Draft. ISO/IEC (2011-04-12). Проверено 2012-11-19 г.
- ↑ 5.1.2.2.3 Program termination(англ.) WG14 N1570 Committee Draft. ISO/IEC (2011-04-12). Проверено 2012-11-19 г.
- ↑ 7.22.4.4 The exit function(англ.) WG14 N1570 Committee Draft. ISO/IEC (2011-04-12). Проверено 2012-11-19 г.
- ↑ 7.21.6.1 The fprintf function(англ.) WG14 N1570 Committee Draft. ISO/IEC (2011-04-12). Проверено 2012-11-19 г.
- ↑ 5.2.2 Character display semantics(англ.) WG14 N1570 Committee Draft. ISO/IEC (2011-04-12). Проверено 2012-11-19 г.
- ↑ 7.21.7.6 The getchar function(англ.) WG14 N1570 Committee Draft. ISO/IEC (2011-04-12). Проверено 2012-11-19 г.
Improve Article
Save Article
Like Article
Improve Article
Save Article
Like Article
To begin with, the “Hello World” program is the first step towards learning any programming language and also one of the simplest programs you will learn. All one needs to do is display the message “Hello World” on the screen. Let’s look at the program and try to understand the terminologies involved in it.
C program to print Hello World
#include <stdio.h>
int main()
{
printf("Hello World");
return 0;
}
Compiling the First C Program:
Before proceeding to write the first program, the user needs to set up a C program compiler, which would compile and execute the “Hello World” program. Here we have used Windows-based GCC compiler to compile and run the program. To know more on how to set up the local GCC compiler or running using online ide refer to Setting C Development Environment.
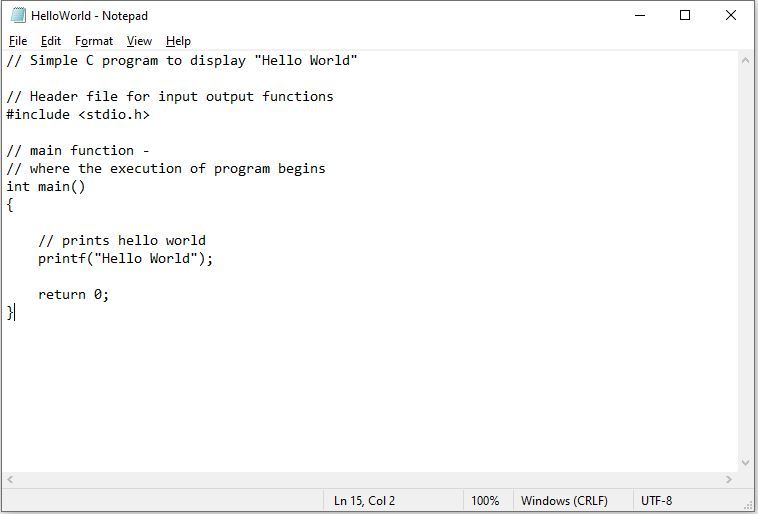
- Step 1: This requires writing the “Hello World” program, in a text editor and save the file with the extension .c, for example, we have stored the program in a C-type file HelloWorld.c.

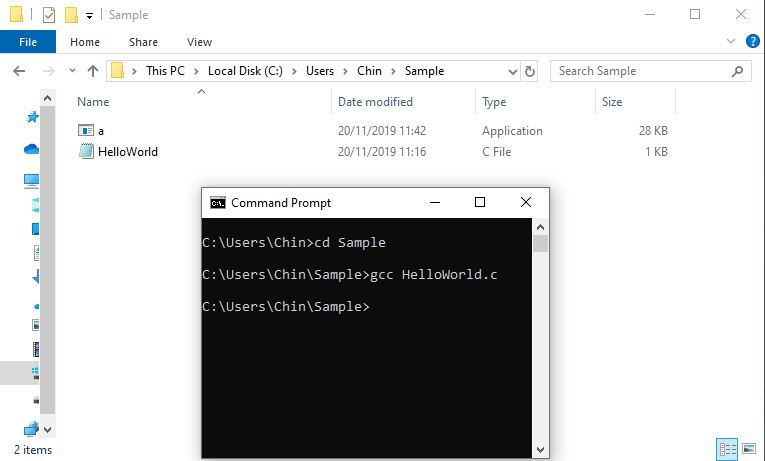
- Step 2: This includes opening CMD or command prompt line navigating to the directory where the file HelloWorld.c is present. Here it is present in C:UsersChinSample.
- Step 3: To compile the code execute the following command:
gcc HelloWorld.c
This would create a C-executable file with a random name given by the compiler itself. We got the executable filename as a.

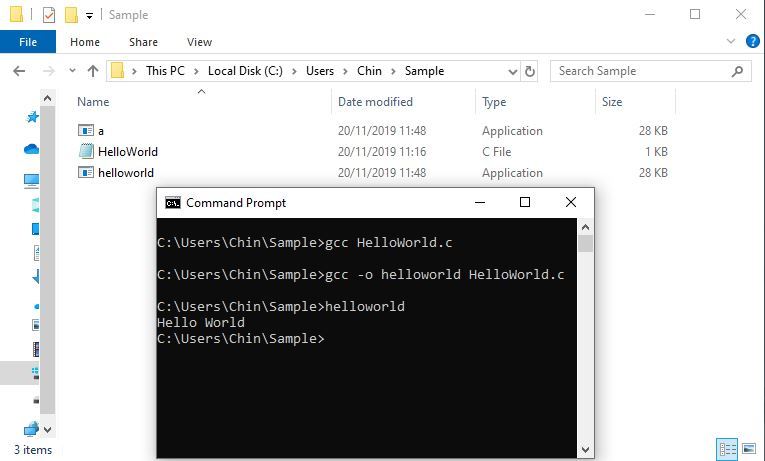
To give a user-oriented name, run the following command.gcc -o helloworld HelloWorld.c/pre> This would create a C-executable file by the name helloworld.

- Step 4: To run the executable file to get the result, just run the file.
helloworld

Explanation of the code:
Let us now understand the terminologies of the above program:
-
// Simple C program to display “Hello World”
This is a single comment line. A comment is used to display additional information about the program. A comment does not contain any programming logic as it is not read by the compiler. When a comment is encountered by a compiler, the compiler simply skips that line of code. Any line beginning with ‘//’ without quotes OR in between /*…*/ in C is a comment.
More on Comments in C -
#include
In C, all lines that start with pound (#) sign are called directives. These statements are processed by preprocessor program invoked by the compiler. The #include directive tells the compiler to include a file and #include<stdio.h> tells the compiler to include the header file for Standard Input Output file which contains declarations of all the standard input/output library functions.
More on Preprocessors in C. -
int main()
This line is used to declare a function named «main» which returns data of integer type. A function is a group of statements that are designed to perform a specific task. Execution of every C program begins with the main() function, no matter where the function is located in the program. So, every C program must have a main() function and this is the function where the execution of program begins.
More on main() function in C. - { and }: The opening braces ‘{‘ indicates the beginning of the main function and the closing braces ‘}’ indicates the ending of the main function. Everything between these two comprises the body of the main function and are called the blocks.
-
printf("Hello World");This line tells the compiler to display the message «Hello World» on the screen. This line is called a statement in C. Every statement is meant to perform some task. A semi-colon ‘;’ is used to end a statement. Semi-colon character at the end of the statement is used to indicate that the statement is ending there. The printf() function is used to print character stream of data on stdout console. Everything within » » is displayed to the output device.
More on Input/Output in C. -
return 0;
This is also a statement. This statement is used to return a value from a function and indicates the finishing of a function. This statement is basically used in functions to return the results of the operations performed by a function.
More on return in C. - Indentation: As you can see the printf and the return statement have been indented or moved to the right side. This is done to make the code more readable. In a program as Hello World, it does not seem to hold much relevance but as the program becomes more complex, it makes the code more readable and less error-prone. Therefore, one must always use indentations and comments to make the code more readable.
FAQ on the style of writing programs.
Like Article
Save Article
June 16th, 2017
Welcome to the C++ Tutorial.
In this first C++ tutorial, you will learn how to write (and run!) your first C++ program, “Hello, World!”. Along the way you will learn a little C++ history, see how to configure a C++ console application in Visual Studio 2017, walk through code structure, and see how code is built.
Acknowledgements
This tutorial series is a remix of C++: A General Purpose Language and Library Jump Start, an all-day course presented by Kate Gregory and James McNellis and hosted on Microsoft Virtual Academy and the evolution of that content as beginner and intermediate courses on EdX by Gerry O’Brien. Combined, these courses have been used by thousands of developers to learn more about C++.
The original content has been adapted for article format. Code has been migrated to Visual Studio 2017 and will take advantage of the good stuff for C++ developers in Visual Studio 2017. Screenshots and other behaviors will be from Visual Studio 2017. Code has been changed to reflect modern views on correctness, style, or usage where appropriate.
Prerequisites
There are plenty of resources for new and experienced C++ developers. We recommend the C++ Primer, 5th Edition by Lippman, Lajoie, and Moo. It uses modern constructs without revisiting older techniques that are better left in the past. Visit isocpp.org for a list of helpful resources, the latest C++ news, and pointers to interesting content across the internet.
You do not need experience with C or C++. If you are returning to C++ after a long break, welcome back.
This tutorial will be hands-on and coding oriented, so follow along! You can use Visual Studio Community, a fully-featured, extensible, free IDE for creating modern applications in C++ for Windows, Linux, and other platforms. You can also use use different compilers like GCC and Clang in Visual Studio.
Brief History of C++
Designed by Bjarne Stroustrup, C++ has been around for more than three decades. Born in 1979 as C with Classes, it retains backward compatibility with C with improvements in data abstraction and support for object oriented programming and generic programming.
C and C++ are popular because they are portable and can be compiled, without major changes, across different compilers or different computer hardware, operating systems, CPU architectures, or device form factors. Each platform or operating system may have different compilers available from different providers such as Microsoft, Intel, or the open source community.
C++ is continually evolving to keep pace with the needs of modern developers. C++ exists under the stewardship of a standards committee and became an international standard in 1998 with revisions in 2011, 2014, and 2017. It continues to be updated as a part of the standards committee work.
C++ is used in thousands of applications, dozens of which you have probably already used in one form or another today!
Creating an Empty Console Project
Most of the code you encounter while learning C++ can be run using simple text input with text output directly to a console window. These tutorials will use an empty project configured as a console application. You can add new source files and code and see the results on the command line.
Here is how you create an empty console project in Visual Studio 2017:
- Launch Visual Studio 2017.
- On the menu bar, choose File, New, Project.
- In the Visual C++ category, choose Empty Project and then name the project. Choose a name that gives some indication of contents – for example, “HelloWorld” for a tutorial or “GuessTheNumber” for a number guessing application.
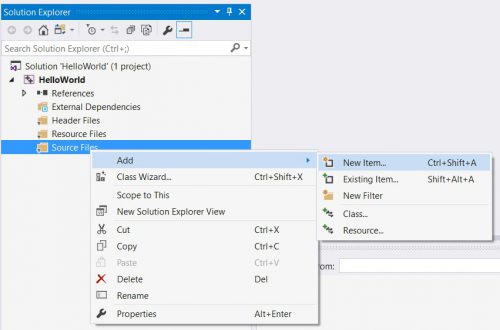
- In Solution Explorer, right-click Source Files then choose Add, New Item.

- In Add New Item, choose C++ File (.cpp) and then name the file. Again, the name should reflect the file contents. For example, “HelloWorld” for tutorial code or “WidgetClass” for the Widget implementation. Click Add.
- You now have an empty project ready for tutorial code or other C or C++ code. If you want basic template code that will build and is suitable for experimentation, copy the code below into the new C++ file, then press CTRL-F5 to build and run.
int main()

{

return 0;

}
This code is nothing more than an empty shell, ready for your exploration into C++.
There are other types of application you will no doubt explore as you become proficient in C++ and work on real C++ projects.
Hello World!
Time for the traditional first C++ demo, “Hello, World!”. History is a little unclear on the origin of this as the canonical sample for C++, but it might be traced back to Kernighan and Ritchie.
To create the Hello, World! application:
- Create an empty console project and name it “HelloWorld”; use that name for the cpp source file as well.
- In the empty “HelloWorld.cpp” file, enter the following code:
#include <iostream>
int main()
{
  std::cout << "Hello, World!" << std::endl;
  return 0;
}
- Press CTRL-F5 to run the program. When you are asked if you want to build it, click Yes. This is the first time you have run the program, so Visual Studio needs to build it.
- Do you see it run? If you are running inside an IDE like Visual Studio, the output window likely closed before you could see the greeting. You can do a couple of things to fix this.
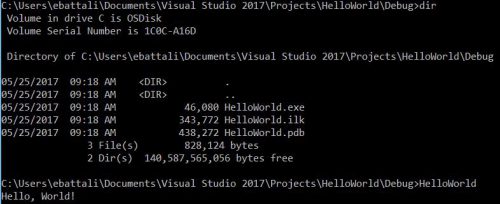
You can run the program from the command line. In Windows, launch an instance of the command prompt, move to the debug directory of your project, then type inhelloworld. This screenshot shows the files in the directory along with program output:
You can also add a statement that waits for you to press any key prior to exiting themainfunction Add the following statement before return 0:
std::cin.ignore();
Press CTRL-F5 to re-run the program. Hit a key to end the program.
Congratulations on your first C++ program. Let’s take a closer look. Line numbers have been added for reference and are not part of the program code.
1 #include <iostream>

2

3 int main()

4 {

5   std::cout << "Hello World!" << std::endl;

6   return 0;

7 }
Line 1: This is known as a preprocessor directive. It instructs the compiler to locate the file that contains code for a library known as iostream. This library contains code that allows for input and output to streams, such as the console window.
Line 3: Every C++ program must have a function known as main(). It is referred to as the entry point for the application when you start execution of the program on your computer. The int portion is the return type of the method. The empty parentheses () after the name indicate that this a function and that it takes no arguments, in other words, there are no parameters for passing in values. You will learn more about variable types, return value and arguments in the future.
Line 4: Function bodies in C++ start with an open curly brace.
Line 5: This code uses cout (pronounced “see out”) to send the text “Hello World!” and a newline/line flush (endl) to the console for output and display. The std:: prefix to these two commands is a way of indicating that they are part of a namespace known as std. The :: is used to indicate that cout and endl are part of the std namespace. [Trivia alert! cout looks like a method here, but there’s actually more happening behind the scenes. But it’s not something you have to worry about as a beginner.]
Also notice that the line ends with a semi-colon. C++ statements are terminated with semi-colons.
Line 6: The return statement is used to end a function when a value is expected to be sent back to a caller. In this case, the caller is the operating system and the value returned is an integer value of 0. If the program reaches this statement, returning a value of 0 is an indication to the operating system that the code executed successfully. Programmers return 0 to indicate successful execution and non-zero values to indicate that an error had occurred in the program somewhere.
Line 7: This line closes out the body of the function main() and is necessary so the compiler knows where the function or method ends, but is also used for other purposes that will be covered later in the course on variable scope and visibility.
There are more complicated applications, but the cool thing about C++ is that every scrap of syntax and library you learn to write a console application you can use to write any other kind of application at all.
How Code is Built
When you build C++ code, three major things happen: preprocessing, compiling and linking.
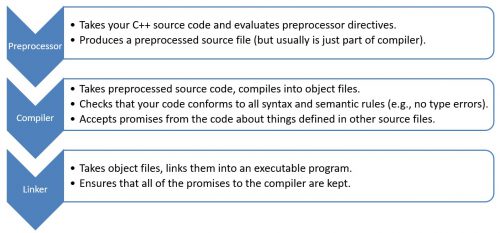
First, a tool called the preprocessor goes through your code and manipulates it a little bit. The output of the preprocessor goes to the compiler.
The compiler makes sure that you’ve used the syntax of supporting libraries and the C++ language itself correctly. Punctuation, variable definitions, and other syntactic elements all must adhere to standards. Real C++ applications can have lots of files, potentially even thousands, and each one must be compiled individually. The output of compilation is called an object file.
After every source file has been compiled, the linker links object files together into the application that is executed by the computer processor. The linker makes sure any promises you made in code are being kept. For example, in Hello, World, std::cout is defined elsewhere. The linker must resolve the call when it pulls in the iostream library.
These steps are critical to understand what happens when you get error messages. Error messages can point out small issues before they snowball into larger issues. Error messages can also help identify whether the mistake is a compiler or linker error — or some other problem. Reading error messages is vital to solving problems!
Review
In this C++ tutorial, you created a Visual Studio C++ console project and created your first C++ program, Hello World. Along the way, you learned how C++ code is built (preprocessor, compile, link), the basic structure of C++ applications, and a little bit of C++ history.
If you have any feedback or suggestions for us, please reach out. We can be reached via the comments below, via email (ebattali@microsoft.com or visualcpp@microsoft.com) and you can provide feedback via Help > Report A Problem in the product, or via Developer Community. You can also find us on Twitter (@VisualC) and Facebook (msftvisualcpp).
Thanks to Kate Gregory – Partner, Gregory Consulting Limited; and James McNellis – Microsoft Senior Software Development Engineer, for allowing us to utilize some of their video lectures, demonstrations, and content. Thanks also to Gerry O’Brien, Microsoft Learning Experience, for curriculum design and assistance.
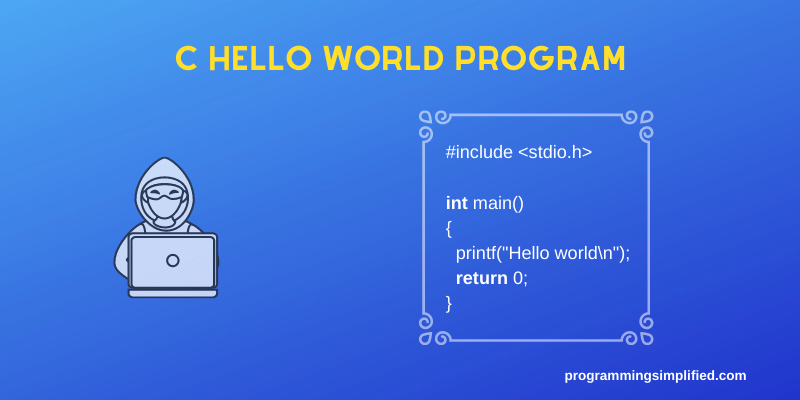
How to write a hello world program in C language? To learn a programming language, you must start writing programs in it, and this could be your first C program. Let’s have a look at the program first.
#include <stdio.h>
int main()
{
printf(«Hello worldn«);
return 0;
}
Library function printf is used to display text on the screen, ‘n’ places the cursor at the beginning of the next line, «stdio.h» header file contains the declaration of the function.
The program’s purpose is to get familiar with the syntax of the C programming language. In it, we have printed a particular set of words. To print whatever you want to, see C program to print a string.
Output: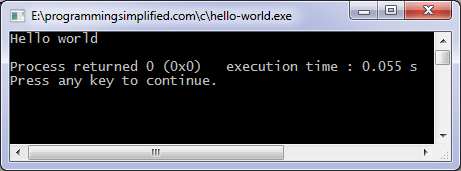
Download Hello world C program.
C hello world using character variables
#include <stdio.h>
int main()
{
char a = ‘H’, b = ‘e’, c = ‘l’, d = ‘o’;
char e = ‘w’, f = ‘r’, g = ‘d’;
printf(«%c%c%c%c%c %c%c%c%c%c», a, b, c, c, d, e, d, f, c, g);
return 0;
}
We have used seven-character variables, ‘%c’ is used to display a character variable. See other efficient ways below.
We may store «hello world» in a string (a character array).
#include <stdio.h>
int main()
{
char s1[] = «HELLO WORLD»;
char s2[] = {‘H’,‘e’,‘l’,‘l’,‘o’,‘ ‘,‘w’,‘o’,‘r’,‘l’,‘d’,‘‘};
printf(«%s %s», s1, s2);
return 0;
}
Output:
HELLO WORLD Hello world
If you didn’t understand this program, don’t worry as you may not be familiar with the strings yet.
C Hello world a number of times
Using a loop we can display it a number of times.
#include <stdio.h>
int main()
{
int c, n;
puts(«How many times?»);
scanf(«%d», &n);
for (c = 1; c <= n; c++)
puts(«Hello world!»);
return 0;
}
Hello world in C indefinitely
#include <stdio.h>
int main()
{
while (1) // This is always true, so the loop executes forever
puts(«Hello World»);
return 0;
}
To terminate the program press (Ctrl + C).